
brash-bird
10 posts
Taylor | 25 | She/Her I love making art related to my OCs! Here you'll find digital illustrations, crochet plushies and patterns, and other crafts! Thank you for checking out my blog!
Don't wanna be here? Send us removal request.
Statistics
We looked inside some of the posts by brash-bird and here's what we found interesting.
Average Info
Notes Per Post
53
Likes Per Post
40
Reblog Per Post
10
Reply Per Post
3
Time Between Posts
18 hours
Number of Posts By Type
Text
10
Last Seen Tumblr Blogs


Fun Fact
Tumblr has 411 employees.
Text

Remember that time?
1 note
·
View note
Text

Birdie ain't no country boy quitter!
0 notes
Text

Birdie x Evelyn 💕
#original character#oc art#illustration#sapphic#wlw#birdie is a#lesbian#and evelyn is#bisexual#birdie_rtt#evelyn_rtt
2 notes
·
View notes
Text

Vera's UFO abduction! 🛸👽
1 note
·
View note
Text

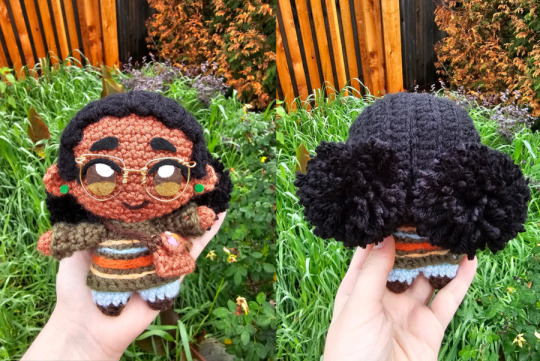
Here's the itabag I made for my OCs Birdie and Evelyn! <3
Ft. The crochet plushies and charms I made of them in early 2024. Everything was made by me besides the heart button in the middle and the charm to the left of it. Those were made by Omelettedraws!
11 notes
·
View notes
Text

Mimi and Vera at the goth club 🖤
2 notes
·
View notes
Text

Vera aka Verbearx3! 🌈✨
2 notes
·
View notes
Text


My OCs Evelyn and Birdie in crochet plushie form!
You can find the free base pattern here!
6 notes
·
View notes
Text


Here are all the Christmas presents I made last year!
1) Fawn for Omelettedraws 2) Chibi Moon for Ana-Carolina 3) Apatsona for Apatumo 4) Vin for Kirbst 5) Mira for Taylor 6) Jasmine for Sophia_Sketches
10 notes
·
View notes
Text
Chibi Crochet Plushie Base
This pattern is just for the base of the plush! I'm going to make a full paid pattern with all the bells and whistles eventually.
Sorry for the lack of pictures and vague assembly instructions. If you have any questions feel free to shoot me an ask and I'll reply as soon as I can!
The paid version of this pattern will be a lot more detailed and delve into making the hair, accessories, and faces. I'll link back to it here once it's up!
Without further ado... Enjoy!

EDIT: 3/20/25
I noticed some errors in this pattern (the body section was missing the final row and a couple of the stitch counts were off). I've corrected the errors and added more detail to the assembly instructions.
Sorry for the mistakes!
Stitches:
This pattern uses US crochet terms!
mr - magic ring
sc - single crochet
inc - increase
dec - decrease
Head
Use skin color yarn and a 3.5mm hook
R1: 6 sc into mr (6)
R2: inc around (12)
R3: (sc 1, inc) around (18)
R4: (sc 2, inc) around (24)
R5: (sc 3, inc) around (30)
R6: (sc 4, inc) around (36)
R7: (sc 5, inc) around (42)
R8 - R16 (9 rounds): sc around (42)
R17: (sc 5, dec) around (36)
Start stuffing
R18: (sc 4, dec) around (30)
R19 (sc 3, dec) around (24)
R20: (sc 2, dec) around (18)
R21: (sc 1, dec) around (12)
R22: dec around (6)
Fasten off but do not sew closed! Leave a length of yarn for sewing.
Body
Start with shoe color yarn and 3.5mm hook
R1: 3 sc into mr (3)
R2: inc around (6)
R3: (sc 1, inc) around (9)
Change to pants color yarn
R4: (sc 2, inc) around (12)
R5: sc around (12)
Fasten off and weave in ends
Repeat R1-R5 again but don’t fasten off this time!
Connect the legs together with a single crochet.
To do this, put your hook (that is still attached to the second leg) through a stitch in the first leg, pull up a loop, yarn over, and pull through both loops. This is the first sc of the round.
R6: continue to sc around (24)
Change to shirt color yarn
R7: sc around (24)
R8: sc around (24)
Start stuffing
R9: (sc 2, dec) around (18)
R10: sc around (18)
R11: sc around (18)
R12: (sc 1, dec) around (12)
R13: dec around (6)
Fasten off and weave in ends.
There will probably be a small hole between the legs. Sew it closed with a piece of yarn the same color as the pants!
Arms
Make two. Start with skin color yarn
R1: 6 sc in mr (6)
R2: sc around (6)
R3: sc around (6)
Switch to shirt color for long sleeves
R4: sc around (6)
Switch to shirt color for short sleeves
R5: sc around (6)
R6: sc around (6)
Start lightly stuffing
I use the bottom of a crochet hook to help push the stuffing into the arm
R7: (sc, dec) around (4)
Fasten off and leave a length of yarn for sewing.
Ears
Make two. Use skin color yarn
R1: 6 sc into mr (6)
R2: sc around (6)
Fasten off and weave in end. Leave a length of yarn for sewing.
Assembly
Fold a pipe cleaner in half three times and stick it in the neck area. Add a little more stuffing around the pipe cleaner to make sure it’s secure.
Sew the head onto the body.
I like to sew it multiple times around to make sure it's secure. (i.e, sew the last 6 stitches of the body to the head. Then sew some more of the surrounding stitches to the head as well.)
Sew the arms on either side of the body.
Sew the ears onto either side of the head.
Between the 12th and 15th rows with 17 stitches in-between
With that, your crochet doll base should be done! Like I said, don't hesitate to ask if you have any questions.
Also, I'd love to see any plushies you create with this pattern!
Thanks for reading/using my pattern!

18 notes
·
View notes