
Statistics
We looked inside some of the posts by brief1redvsblue and here's what we found interesting.
Average Info
Notes Per Post
2
Likes Per Post
2
Reblog Per Post
0
Reply Per Post
0
Time Between Posts
1 hour
Number of Posts By Type
Text
7
Last Seen Tumblr Blogs


Fun Fact
Users from the US are the majority of Tumblr visitors.
Text
Brief 1: Red vs Blue (Reflection)

Figure 1 (First render of the artifact in Unreal, 2024)

Figure 2 (Second render of the artifact in Unreal, 2024)

Figure 3 (Third render of the artifact in Unreal, 2024)
This first brief was really fun to tackle and at times, while I did feel lost at how to approach what I had envisioned in my mind, I clawed my way through and created a decent 3D digital artifact despite the time counter. The one thing that really stood out when I was creating the asset was I should definitely focus more on proper topology flow and proper UV unwrapping as that definitely helps in improving and increasing the quality of the texture files.
I also strongly believe that my work in particular could have definitely been more refined. I think the references I collected for the entire project was sufficient but if I do tackle a big assignment, I need to collect perfect reference images to maximize what I create.
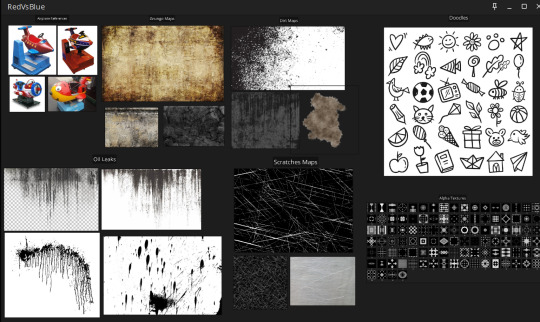
Figure 4 (Reference images collected in PureRef, 2024)
While texturing in Substance Painter, I felt more inclined to texturing the mesh in a stylized manner rather than a realistic manner. However, since I am very new when it comes to stylized meshes and textures, I will definitely work on improving my theoretical knowledge and practical application so that I can direct my focus onto stylized 3D assets. I have been inspired from a lot of strong stylized artists when I was browsing through their artworks in ArtStation and I strongly want to redirect my focus from realistic to stylized and create a stylized shader art style for myself that helps me stand out as an artist in the 3D space.

Figure 5 (Stylized town created by Pinktomato, 2022)

Figure 6 (Stylized streetcar scene created by Melissa Perl, 2022)
Within these 2 weeks of heavily investing my time into creating a model, unwrapping and texturing it and importing it into a game engine where I lighted and rendered out the artifacts appropriately and with a proper workflow, I feel even more immense respect for all of the 3D artists out there that keep their heads down and dedicate their blood, sweat and tears into perfecting their craft. I really learnt a lot during this brief 1 assignment and I am looking forward to the next one where I can push myself a step further as an artist.
REFERENCES:
Perl, M., 2022. ArtStation. [Online] Available at: https://www.artstation.com/artwork/JeD3qd [Accessed 09 October 2024].
Pinktomato, 2022. ArtStation. [Online] Available at: https://www.artstation.com/artwork/JeD3qd [Accessed 09 October 2024].
1 note
·
View note
Text
Brief 1: Red vs Blue (Lighting and Rendering)
The majority of the work was already done for the assignment. All I needed was to set up a lighting system and capture the renders for the assignment and hit submission.
I decided to capture 3 different renders, two with different environmental directional lighting and one with a complete point light system.
To manipulate the directional lighting of the scene, you can hold Ctrl and L keys together and move your mouse to set an appropriate lighting for the scene. I went with an early rise and an evening set lighting for the render.

Figure 1 (Early rise lighting preview, 2024)

Figure 2 (Evening set lighting preview, 2024)
There are multiple ways to capture a high quality render in Unreal Engine. However, I went for one that feels the easiest for me to capture still renders. I opened the three hyphen bar on the top left and clicked on High Resolution Screenshot. I increased the value of the Screenshot Size Multiplier to 2.0 and clicked Capture.

Figure 3 (High Resolution Screenshot, 2024)

Figure 4 (Setting the Size Multiplier and Capturing, 2024)
For the last render, I used a bunch of different point lights and set it in 3 different directions. I used different values for different candela intensity emitted from the 3 point lights and set the directional lighting to night. This was the final point light render.

Figure 5 (Final point light render, 2024)
0 notes
Text
Brief 1: Red vs Blue (Setting up in Unreal)
After the major parts of the creation of the airplane toy asset was concluded, I moved on to importing the asset and the textures into a game engine. I chose to go with Unreal Engine because the latest client version has knocked it out of the park, with better lighting system and support for nanites to introduce a large number of poly counts with very little cost for graphical performance.
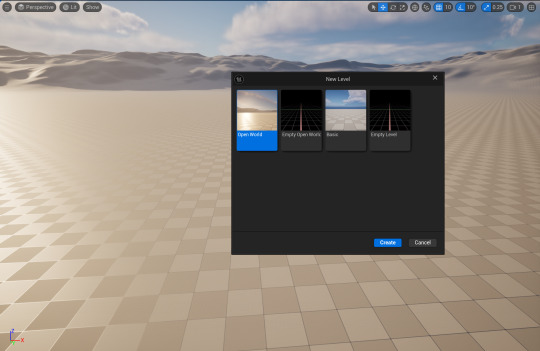
Figure 1 (Opening a new Unreal project file, 2024)
I created a new project file in Unreal Engine. I clicked on the starter assets and selected the third person template and opened a new world.
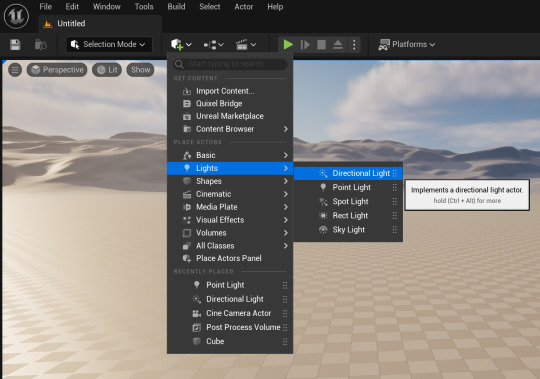
Figure 2 (Adding lights to the scene, 2024)
I added 2 different lighting systems to light up the surrounding environment. I used a directional light which will basically act as the main sunlight for the environment. I also added a sky light which will emulate the sky light with a hint of blue tint to make our scene as natural as possible.
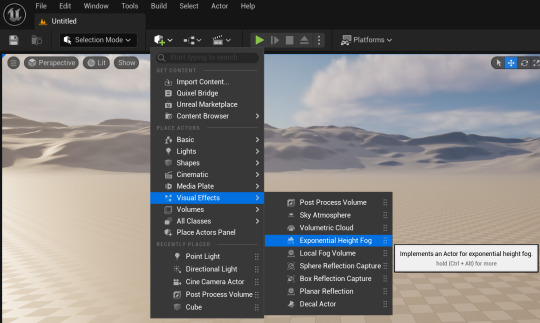
Figure 3 (Adding visual effects to the scene, 2024)
I added a sky atmosphere to the scene. This allows us to simulate a sky environment and calculate accurate light scattering in the scene. I then proceeded with an exponential height fog to get rid of the black outlines in the distant and replace them with a height fog whose attributes can be manipulated to make them seem near or distant. Finally, I added a volumetric cloud effect to the scene to simulate volumetric clouds and make our environment a bit better. This is a very easy and standard way of setting up a scene.

Figure 4 (Adding the assets to the project window, 2024)
As far as I am aware, there are 2 different methods to import textures and meshes to your Unreal project. Firstly, you can just drag and drop it onto your content browser that you can toggle open by pressing your ctrl and space bar keys at the same time. Secondly, you can migrate whatever you need from your maya or blender files that contain meshes and your substance painter files that contain textures straight into your Unreal Engine project files. Both use the same principle and since I had only 1 combined mesh and a bunch of textures to import, I just dragged and dropped it into my file and organized it in new folders.

Figure 5 (Importing the meshes onto the scene, 2024)
I imported the combined mesh of the coin airplane toy onto the scene. I also added a plane and increased its scale and placed it as a mat under the airplane.

Figure 6 (Creating a new material for the mesh, 2024)
To first assign texture maps to a mesh in Unreal Engine, you need to first create a separate material inside the engine and then assign the materials to the mesh. Then, you set up your textures inside the newly assigned material and apply it to the mesh.

Figure 7 (Assigning materials inside the material graph, 2024)
I added all of the texture maps that I exported from Substance Painter into the material graph. Material graph is basically a window where you get to assign your textures and manipulate it so that when you apply it in this graph, the textures act in the main scene.
I plugged the base color to the base color node, metallic to metallic node and roughness into the roughness node. Since I didn't have any emissive texture for my mesh, I simply deleted it.

Figure 8 (Setting up the height and normal maps, 2024)
Since I had both height and normal maps for the mesh, I was a bit confused as to how to combine them both together and plug them into the normal node. So I looked up online for a fix and while not the exact best solution, I used this method.
If you right click, you open a panel where you can search for nodes to add to the material graph. I searched for a normal from heightmap, it extract normal from the height map as its name suggest. I plugged the height map to the height node. To control the intensity of the height, I added a parameter and set its value to 1 and renamed it as height intensity. It will allow us to control the intensity of the height map.
After this, I searched for a blend node to blend both the height and the normal maps together. There is a specific node for this called the BlendAngleCorrectedNormals node, kind of a long name. I plugged the normal map to the Base Normal node and plugged the output from the NormalFromHeightmap to the AdditionalNormal node. Then, I plugged the main output into the shader normal node. Once I saved and applied the textures, I went into the scene and the voila, the textures were working as intended for the static mesh.

Figure 9 (Textured static mesh, 2024)
I added a bunch of primitive cubes and shaped them accordingly to create a small room of sorts. This will act as the main setting for the final render still. However, I also needed to fix the auto exposure issue I was facing whenever I would approach the setting.
I added a PostProcessVolume onto the scene and opened its attribute editor. I opened the Exposure tab and set the metering mode to Manual connection. This way, I eliminated auto exposure by setting it to manual exposure. I then increased the value of the exposure compensation to 10.2 to set the environment exposure to what it was before.
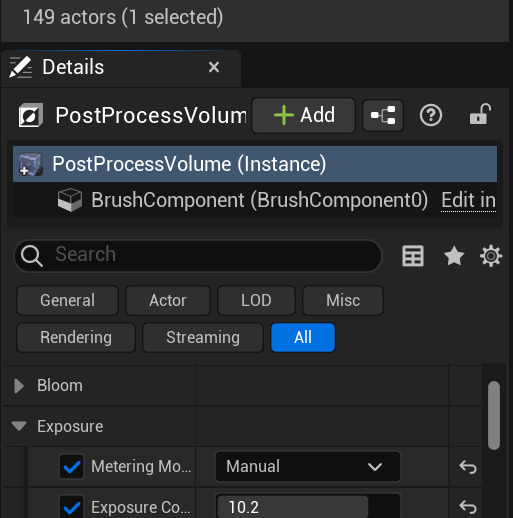
Figure 10 (Setting manual exposure, 2024)
After this, I decided my scene was ready. To get a render capture, I decided to import a camera actor onto the scene and capture the renders through its lenses. I added a Cine Camera Actor onto the scene and switched to camera perspective. I tweaked the focal length to 35 and set the aperture of the lens to 3.75 and previewed it from the lens as displayed.
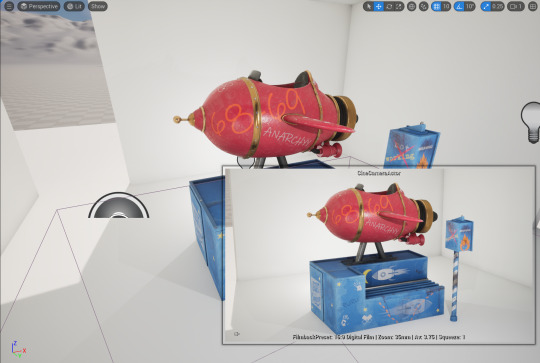
Figure 11 (Preview of the renders, 2024)
0 notes
Text
Brief 1: Red Vs Blue (Texturing)
I now ventured into what could only be described as the creative process of creation of a 3D artifact; texturing. In the most basic of words, texturing literally means to put clothes on the models so they don't appear bare.

Figure 1 (Importing the OBJ file to Substance Painter, 2024)
The exported OBJ file was imported onto Substance Painter. I set the document resolution size to 2048 and chose PBR - Metallic Roughness as my template (don't ask me why, someone said this template's better but I haven't been able to tell the difference and at this point, its a muscle memory).

Figure 2 (Preview of the imported mesh, 2024)
I firmly decided to only work with smart materials; firstly, because they are smart and secondly, they provide a lot more versatility when it comes to tweaking its attributes and properties.
I started coating the main body red by using a smart material and decided to incorporate the prominent red color to the body of the airplane. I also tweaked the attributes for the desired wear and scratches on the body.

Figure 3 (Coating the main body red, 2024)
Since the nail bolts and the circular metal frames around the body of the airplane were all metals, I imported smart materials named 'Silver Armor' and 'Bronze Armor'. I tweaked their base colors and their metallic attributes. I also introduced a smidge of dirt to them.

Figure 4 (Adding metallic colours to the body, 2024)

Figure 5 (Adding blue coating to the box and coin stand, 2024)
I introduced a blue coat to the box and the coin stand to incorporate the second main color 'blue' to my project. I added a bit of dirt and some finger smudges to the box since it looked very empty without any details. I also added a clear film material to the visor and a worn leather to the seat inside the airplane.

Figure 6 (Adding alpha masks to the body, 2024)
This was the most exciting and fun part of the entire texturing; adding alpha masks to the present materials of the meshes. I added a bunch of random alpha masks with different base colors, varied height values and used different fonts. This was where I could express my inner kid and doodle away with brushes.

Figure 7 (Adding alpha masks to the coin stand, 2024)

Figure 8 (Adding alpha masks to the stand, 2024)
I also added masks to the main stand and the coin stand. I used a bunch of default stickers and added them to the stand. One thing I did add was create an image of a basic rocket and add it to the present Substance session. I assigned a new paint fill layer and assigned the rocket as an alpha and stamped the main stand with my brush active.

Figure 9 (Exporting the texture maps for the model, 2024)
After I was satisfied with my model's textures, I decided to export the texture maps so that I can port the mesh and the textures over to Unreal Engine and create my final render image. I set the output template as PBR Metallic Roughness (still no idea why but I will definitely look it up now), the texture map size as 2048 and exported the textures.
These are the final texture maps that I exported from Substance Painter for the mesh.

Figure 10 (Final texture maps, 2024)
1 note
·
View note
Text
Brief 1: Red Vs Blue (UV Unwrapping)
This as by far the easiest part I would say of the entire assignment; UV unwrapping. Not that I love UVs, I think they are weird and when stared at enough, they start eating my braincells but it is one of the core elements of getting a finished 3D artifact and a very vital one at that that cannot be missed or neglected at all.
Since I was using Maya, I was thinking of using the default UV toolset that comes with it. But hold up, I was made aware of this beautiful plugin by a genius guy whose name is Malcolm341 during my time in undergraduate study. He has created a bunch of plugins surrounding the UV toolset that is a bit more convenient than the traditional process. I installed the plugin onto my Maya client and loaded it onto the shelf for quick use and my god is it one of the greatest blessings to have graced us 3D artists. I would highly encourage anyone using Maya as their primary 3D software to install this plugin and try it out for themselves.

Figure 1 (Malcolm341 demonstrating the use of his plugin, 2021)
Using this plugin saved me a ton of time cutting seams and unwrapping the shells and arranging them together in a UV planar.

Figure 2 (Cutting seams and unwrapping the UV shells, 2024)
I did encounter a problem during the unpacking of the entire UV shells. I grouped the airplane, the stand and the coin box as different groups under a singular group. I unwrapped their UV shells as a group so that I would get more real estate to work with when texturing them in Substance Painter. However, because I might have not topologized them properly, the UV maps were overlapping each other in Painter. So unfortunately, due to lack of time, I had to combine all the models together and sacrifice the scales of the three UV shells.

Figure 3 (Exporting the UV maps as OBJ, 2024)
I clicked the entire combined mesh and exported the UV maps of the selection in an OBJ file format. I saved it in an appropriate location and moved on to porting it to Substance Painter so that I could texture those maps.
REFERENCES:
malcolm341, 2021. YouTube. [Online] Available at: https://www.youtube.com/watch?v=HyFFmwf3b7E&t=1s [Accessed 09 October 2024].
0 notes
Text
Brief 1: Red Vs Blue (Modeling)
At this point, I was ready to start blocking out my model. It kinda took me a while to figure out how I was actually going to approach the modeling process and to be completely frank, I am really intimidated by modeling. However, I took my shot at attempting to create it.
Before I started the actual modeling process, I added a basic human mesh to the scene and changed the units to meters to scale the model accurately to real life.

Figure 1 (Adding a basic human mesh to Maya, 2024)

Figure 2 (Changing the units to meters in Settings, 2024)
I first used basic primitive shapes, mostly cubes and cylinders to try and block out the shape for the airplane. I tried to line and arrange them together, just trying to get a basic shape I desired. Its basically a trial and error session until I got what I wanted and I started working on it.

Figure 3 (Blocking around with primitive shapes, 2024)

Figure 4 (Creating an opening for the seat, 2024)
I was using different Maya tools at my disposal and as per the necessity. To create an opening for the seats, I used the edge loop tool to add 2 edge loops at an equal distance with each other and deleted the upper faces that were marked out with a multi-cut tool.

Figure 5 (Creating the rocket exhaust, 2024)
To create the exhaust plates for the airplane, I used a basic cylinder shape, beveled its edges to make it smoother and added edge loops. A clever way of adding details to a model that I have always used is extruding faces off the edge loops and beveling its edges to give it more finer detailing.
From here on out, it's basically a nested process of adding a primitive shape, adding loops, extruding or deleting the faces, beveling its edges and so on.

Figure 6 (Previewing in Smooth view, 2024)
A useful tip I received from my former undergraduate lecturer back in Nepal was to switch from the raw to the smooth view from time to time to ensure that you are getting the correct shape you desire when you introduce more faces and poly counts to the model when smoothing it.

Figure 7 (Adding pipes and greeble pieces to the model, 2024)

Figure 8 (Creating the interior for the airplane, 2024)
It took me a while to figure out a way to tackle the interior of the plane but the easiest method I implemented was to add a cube, scale it elongated and pulling the outermost edges upwards and reversing the face normals. I then previewed it in smooth view and it worked like a charm so I used this taxing method. I do believe there is a better way to create the interior but this works for now.

Figure 9 (Creating the base stand for the toy, 2024)
I used primitive shapes to create the base stand for the toy, adding loops and extruding faces and shaping it as desired until I was satisfied with the stand. I also added a smooth operation to the models that were modeled with the help of smooth view to introduce more poly counts that would aid us later when unwrapping the UVs for the models.

Figure 10 (Creating a visor and adding loops, 2024)

Figure 11 (Modelling the Coin Box)
I had concluded with the modelling process for the airplane. One of the major prop that I created was a coin box for the airplane toy. The image above clearly demonstrates similar techniques that were employed in the creation of this coin pole box model.

Figure 12 (Modelling the loose cable, 2024)
After all of the models that I had envisioned were created, I started smoothing them out and was looking for any irregularities in the topologies. Since, I was on a very tight schedule, I couldn't spend much time debugging the model and I do suspect I have missed a few problems here and there, but for the most part, the models were completed.
0 notes
Text
Brief 1: Red Vs Blue (Research)
For this first brief, all of us students were assigned a challenging yet interesting assignment in 'Red vs Blue'. The takeaway for me after hearing the title for the first time was to somehow incorporate the colors red and blue in the desired digital media you would work on. Gradually, I came to understand that the assignment would allow and motivate us to focus on ideas, visualizing them, collecting the appropriate references needed and creating a digital media artifact based around it.
Since I decided to direct my focus to 3D, I wanted to create something that I have always been familiar with as a young kid. When I was growing up in Kathmandu, there was a small shop where various coin operated toys were stationed. I was particularly fond of a coin operated airplane toy that had seats you could enter. You put a coin in the slot and watch the airplane move about in the hinges.

Figure 1 (Coin Operated Airplane, 2013)
I started collecting a lot of different reference images that centered around the airplane and placed them in a PureRef file in an organized manner.

Figure 2 (PureRef references, 2024)
After this, my research for what I were to undertake was done and I compiled everything together for future references. I also made a mental note of the softwares I would use to create my digital artifact. I decided to model a airplane toy similar to the reference images above with Maya, texture the materials for the toy with Substance Painter and port them to Unreal where I would light the scene and capture few stills for the project.
REFERENCES:
Birmingham Vending Company, n.d. Birmingham Vending Company. [Online] Available at: https://bhmvending.com/Amusements/Smart/smart_jetplane.html [Accessed 09 October 2024].
grays.com, n.d. grays.com. [Online] Available at: https://www.grays.com/ [Accessed 09 October 2024].
Prop Heaven, n.d. Prop Heaven. [Online] Available at: https://www.propheaven.com/?product=1030327811 [Accessed 09 October 2024].
The Pinball Company, n.d. The Pinball Company. [Online] Available at: https://www.pinterest.com/pin/421649583843838729/ [Accessed 09 October 2024 ].
ThisIsFratti, 2013. YouTube. [Online] Available at: https://www.youtube.com/watch?v=D38L7QrBKqw [Accessed 09 October 2024].
0 notes