#settingascene
Explore tagged Tumblr posts
Visit Tumblr Blog
Explore Tumblr blogs with no restrictions, modern design and the best experience.
Last Seen Tumblr Blogs


Fun Fact
Total funding amounts to $125.3M.
Text
Brief 1: Red vs Blue (Setting up in Unreal)
After the major parts of the creation of the airplane toy asset was concluded, I moved on to importing the asset and the textures into a game engine. I chose to go with Unreal Engine because the latest client version has knocked it out of the park, with better lighting system and support for nanites to introduce a large number of poly counts with very little cost for graphical performance.
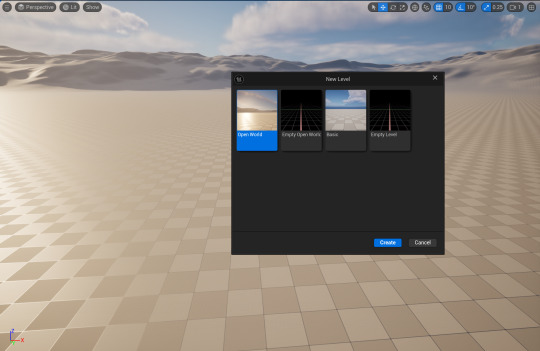
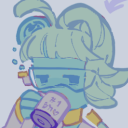
Figure 1 (Opening a new Unreal project file, 2024)
I created a new project file in Unreal Engine. I clicked on the starter assets and selected the third person template and opened a new world.
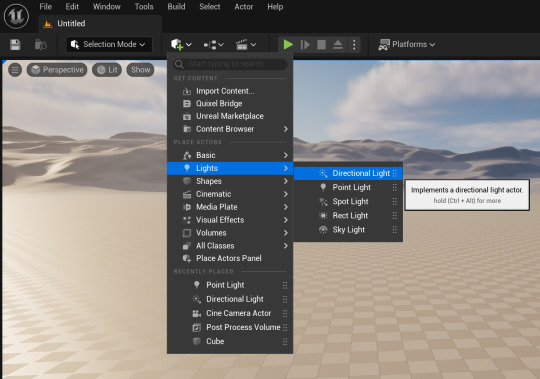
Figure 2 (Adding lights to the scene, 2024)
I added 2 different lighting systems to light up the surrounding environment. I used a directional light which will basically act as the main sunlight for the environment. I also added a sky light which will emulate the sky light with a hint of blue tint to make our scene as natural as possible.
Figure 3 (Adding visual effects to the scene, 2024)
I added a sky atmosphere to the scene. This allows us to simulate a sky environment and calculate accurate light scattering in the scene. I then proceeded with an exponential height fog to get rid of the black outlines in the distant and replace them with a height fog whose attributes can be manipulated to make them seem near or distant. Finally, I added a volumetric cloud effect to the scene to simulate volumetric clouds and make our environment a bit better. This is a very easy and standard way of setting up a scene.

Figure 4 (Adding the assets to the project window, 2024)
As far as I am aware, there are 2 different methods to import textures and meshes to your Unreal project. Firstly, you can just drag and drop it onto your content browser that you can toggle open by pressing your ctrl and space bar keys at the same time. Secondly, you can migrate whatever you need from your maya or blender files that contain meshes and your substance painter files that contain textures straight into your Unreal Engine project files. Both use the same principle and since I had only 1 combined mesh and a bunch of textures to import, I just dragged and dropped it into my file and organized it in new folders.

Figure 5 (Importing the meshes onto the scene, 2024)
I imported the combined mesh of the coin airplane toy onto the scene. I also added a plane and increased its scale and placed it as a mat under the airplane.

Figure 6 (Creating a new material for the mesh, 2024)
To first assign texture maps to a mesh in Unreal Engine, you need to first create a separate material inside the engine and then assign the materials to the mesh. Then, you set up your textures inside the newly assigned material and apply it to the mesh.

Figure 7 (Assigning materials inside the material graph, 2024)
I added all of the texture maps that I exported from Substance Painter into the material graph. Material graph is basically a window where you get to assign your textures and manipulate it so that when you apply it in this graph, the textures act in the main scene.
I plugged the base color to the base color node, metallic to metallic node and roughness into the roughness node. Since I didn't have any emissive texture for my mesh, I simply deleted it.

Figure 8 (Setting up the height and normal maps, 2024)
Since I had both height and normal maps for the mesh, I was a bit confused as to how to combine them both together and plug them into the normal node. So I looked up online for a fix and while not the exact best solution, I used this method.
If you right click, you open a panel where you can search for nodes to add to the material graph. I searched for a normal from heightmap, it extract normal from the height map as its name suggest. I plugged the height map to the height node. To control the intensity of the height, I added a parameter and set its value to 1 and renamed it as height intensity. It will allow us to control the intensity of the height map.
After this, I searched for a blend node to blend both the height and the normal maps together. There is a specific node for this called the BlendAngleCorrectedNormals node, kind of a long name. I plugged the normal map to the Base Normal node and plugged the output from the NormalFromHeightmap to the AdditionalNormal node. Then, I plugged the main output into the shader normal node. Once I saved and applied the textures, I went into the scene and the voila, the textures were working as intended for the static mesh.

Figure 9 (Textured static mesh, 2024)
I added a bunch of primitive cubes and shaped them accordingly to create a small room of sorts. This will act as the main setting for the final render still. However, I also needed to fix the auto exposure issue I was facing whenever I would approach the setting.
I added a PostProcessVolume onto the scene and opened its attribute editor. I opened the Exposure tab and set the metering mode to Manual connection. This way, I eliminated auto exposure by setting it to manual exposure. I then increased the value of the exposure compensation to 10.2 to set the environment exposure to what it was before.
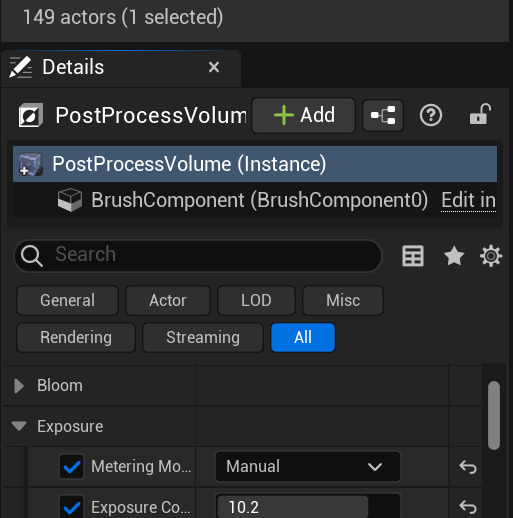
Figure 10 (Setting manual exposure, 2024)
After this, I decided my scene was ready. To get a render capture, I decided to import a camera actor onto the scene and capture the renders through its lenses. I added a Cine Camera Actor onto the scene and switched to camera perspective. I tweaked the focal length to 35 and set the aperture of the lens to 3.75 and previewed it from the lens as displayed.
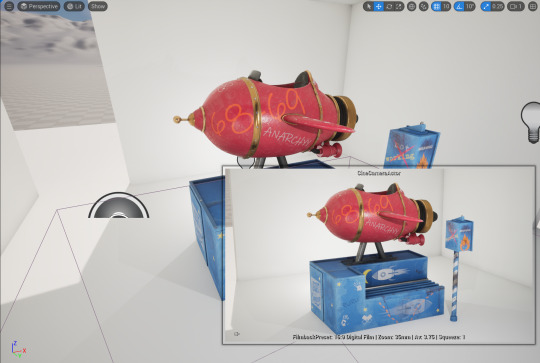
Figure 11 (Preview of the renders, 2024)
0 notes
Photo

Working on a small scene that pans out to show virgel cornered by some neighborhood bullies(hopes to have it done by the weekend)with that said let me know what you think and I'll see y'all in the next one Thx 🙏🏿 * • ° #scene #settingascene #wip #worksinprogress #art #artist #artistoninstagram #artforthegram #draw #drawing #drawinginprogress #drawingwhileblack #drawingforthegram #sketch #sketchwork #sketchbook #sketchoftheday #linework #lineart #graphgear1000 (at Dallas, Texas) https://www.instagram.com/p/B7_U_dgleX-/?igshid=7hw1nymyzlkd
#scene#settingascene#wip#worksinprogress#art#artist#artistoninstagram#artforthegram#draw#drawing#drawinginprogress#drawingwhileblack#drawingforthegram#sketch#sketchwork#sketchbook#sketchoftheday#linework#lineart#graphgear1000
0 notes
Text
The Life of a Forlorn Pirate
My eyes ran over the cold blue waves as our ship rocked to and fro. I used to get sea sick on the voyages but it’s been a long time since my first one and eventually my body got used to the careless motion of the sea that shifted us in such a sickening manner. I can’t even remember how many times I’ve thrown myself into this mess, how many times I’ve set sail with a crew I knew nothing about. Throwing care to the win as an excuse to get away from the pains of the shore and it’s treacherous denizens. It was far more honest out here, the men you served with had no other motive then to get the job done and, for most of them, return home safely to their families and lives. Trying to forget the rigorous journey they had just taken, trying to rid themselves of the pain and terror that had been wrought upon them by the evils of the ocean and it’s cruel master, Poseidon. He truly was evil, making countless widows and orphans as he took life after life without a second thought, to prove what point though? His cruelty has no bounds as many times I had put myself on these ships with reckless captains and idiotic crews, I came back alive, there was close calls sure but nothing came close to killing me. I’ve had captain after captain reward me for my foolish brazen acts that were mistaken for bravery. I never put myself in a situation I would, for sure, lose my life to but I tried many a things that would’ve killed other sailors in a heartbeat, Poseidon had a place for me in his water logged purgatory and I still hadn’t found my way out.
0 notes