
Don't wanna be here? Send us removal request.
Statistics
We looked inside some of the posts by cricutmaker157 and here's what we found interesting.
Average Info
Notes Per Post
495
Likes Per Post
301
Reblog Per Post
187
Reply Per Post
7
Time Between Posts
5 days
Number of Posts By Type
Text
15
Last Seen Tumblr Blogs


Fun Fact
In 2020, 27% of US Tumblr users had an annual household income of over $100,000.
Text

Design Brilliance: Introducing the Cricut Maker 3 Bundle
Cricut is a brand renowned for its smart and versatile cutting machines and heat press tools, each carefully designed with the home crafter in mind and equipped with innovative technology for flawless results. From the Cricut Explore to Cricut Maker, Cricut Joy, and the latest Cricut Venture, there's a machine to suit every crafting need. With Cricut's user-friendly Design Space app, crafting enthusiasts can easily make designs and command their Cricut machines by connecting to a device, ensuring precise cutting every time. Access this innovative software for free at cricut maker 3 bundle.
Visit here for more Information:- https://cricutmakerdesign.space/
0 notes
Text
Creative Cricut Wood Projects You Should Try in 2024
Hey, are you wondering about the possibilities for Cricut Maker wood projects? Look no further than this guide. In this post, I will show you some of the best wood projects with Cricut Maker. Well, I have created several wooden crafts and enjoyed making them. Be it home decor or useful projects, I created all of them. But why did I choose wood for Cricut projects? Well, I was fed up with making crafts with other materials, so I chose wood this time.
There will be lots of exciting projects, such as alphabet puzzles, coasters, front door signs, and much more. Sounds amazing! No? So, get your Cricut and set it up if required! Then head to the following Cricut wood project ideas to try this year! Let’s delve into it!
1. Alphabet Puzzle
Explore the endless possibilities with your Cricut Maker machine that can cut wood in less than a minute. This is one of the best Cricut Maker wood projects every crafter must try. However, I made this for my 3-year-old daughter. I found wood safer for children, so I chose one to make for her. Make sure your wood is not more than the recommended thickness. Otherwise, it can be difficult for you to cut it on Maker.
2. Coasters

Finally, we need something very useful that everyone might like. Here you go – a wooden coaster with a personalized touch. Yes, you can give it a personalized touch just by adding the first letter of your loved one’s name. I made this using Cricut Maker and balsa wood. You can get balsa wood from many e-commerce websites. Afterward, show your artistic skills on these coasters.
3. Bookmark
How about this wooden bookmark? I know you might wonder whether you have seen these wooden bookmarks before or not! Well, there was a time when I was unaware that I could make something like this using wood. Yes, but it was really great when I made this on my Cricut Maker. This engraving is just amazing and will grab everyone’s attention! Just give it a thought; I hope you will love it!
4. Pencil and Phone Holder

Want a desk organizer on your office desk? Create this pencil holder that can also keep your phone. The process is easier than you think. All you need to do is create a design on Cricut Design Space and let your Cricut Maker cut its shape. I really love creating such wooden organizers that I can keep on my home office desk. You can make it for yourself and your loved ones. You just need to be a little creative. I made an elephant, you can try another animal, too! Good luck!
5. DIY Earrings
Finally, here’s one of my favorite Cricut Maker wood projects I have ever created! This looks simple, and making it is also superbly easier than I thought. Doesn’t it look wonderful? If yes, give it a try, and you can gift it to someone you love. However, I made two pairs of wooden earrings. One for my mom and another one for myself. The process of making them was really fun.
6. Picture Puzzle
Do you wonder how to make this picture puzzle? Well, I made this using a chipboard. However, you can make this picture puzzle using the basswood or make its top player from the veneer. With veneer, you can give it a framed-like structure. So, what’s in your mind? Are you going to give it a try? If yes, solving this play with children would be very exciting.
7. Closet Dividers

Tired of your messed-up closet? I think you just need a divider that keeps everything in their order. I made this myself using a chipboard, which is durable and lighter in weight. Also, I kept the design very simple so anyone can make it in less time. Try this today and keep your closet well organized. I made a total of 6 dividers like this. Some of them are in my mom’s closet, and others are in my closet.
8. Supplies Organizer
Finally, here is something for Cricut itself. Being a crater, I understand how tedious it is to keep all the tools and materials in place. Hence, I came up with a solution: try this wooden organizer that keeps your Cricut tools in order and is easily accessible to you. Be it scissors, weeding tools, or other items, you can put all of them with this simple Cricut supplies holder.
9. Front Door Sign

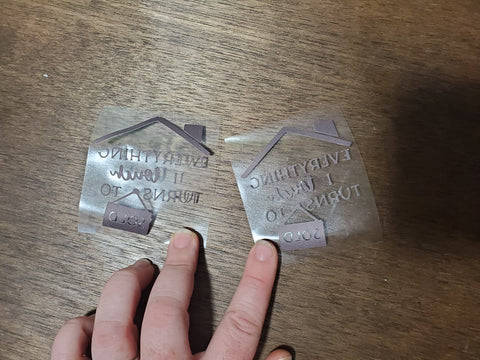
Create this inspiring ‘Home Sweet Home’ sign board for the front door. You can use it for your front door. By the way, it is also made using wood, but I used heat transfer vinyl to make it look beautiful. The unique font gives a unique look. I don’t think creating it in your Design Space is a big deal, as there is only text. Must give thought to such Cricut Maker wood projects.
FAQs
Question 1: What can you make with wood using Cricut?
Answer: If you have Cricut, then there are many projects you can do with wood. Wood is one of the best materials as it is eco-friendly. So, if you are also concerned about the environment, then you should try the following project ideas:
Signs
Jewelry
Earrings
Cake Toppers
Letters
Puzzles And Words
Question 2: Which Cricut machine can cut wood?
Answer: All models of Cricut machines can cut wood. But I always prefer Cricut Maker models, which are robust when cutting wood. This advanced machine is capable of cutting wood (2.4 mm thick). With the Maker machine, you can cut more than 300 materials at a glance. Tough materials such as matboard, leather, and balsa wood are on the list that can be easily cut on Maker.
Question 3: What wood is best for cutting on Cricut?
Answer: Cricut basswood can be the best wood if you want to cut it on a Cricut cutting machine. So, I have used this wood, which is the best for all Cricut machines, including the Maker and Explore series. You can cut the balsa wood by using a Knife Blade on your Maker machine.
Conclusion
In this blog, I have added 9 exciting Cricut Maker wood projects that are easy to make for every crafter. All of them are different from each other, so you don’t need to put much effort. From basswood to chipboard, you will want to try all types of wood with a maximum thickness of 2.4 mm. Yes, that thickness is necessary if you want to cut it on your Cricut cutting machine.
Source Url :- CREATIVE CRICUT WOOD
Visit here for more Information :-
Cricut machines
Cricut supplies holder
picture puzzle
Cricut Design Space
#CREATIVE CRICUT WOOD#CREATIVE WOOD#Cricut Maker wood projects#Cricut basswood#Cricut machines#Cricut supplies holder#picture puzzle#Cricut Design Space
1 note
·
View note
Text

Cricut Maker Magic: Design Space Projects Made Easy
Looking for a way to infuse your crafting projects with innovation? Look no further than Cricut cutting machines. With a vast lineup catering to various crafting styles, Cricut offers endless possibilities to explore new realms of crafts. Set up your machine effortlessly by visiting cricut maker design space. Complete the setup and dive into the creative world of the Cricut machine. To unleash your imagination, the Cricut Design Space app is always there for you!
Visit here for more Information:- https://cricutmakerdesign.space/
#Cricut Design Space#cricut.com/setup#Cricut Design Space app#cricut.com#cricut design space download#design.cricut.com/setup explore air 2#cricut.com/setup maker 3
0 notes
Text
How to Make Cricut Graduation Cards: Full Tutorial
Eighteen years of laughter, tears, birthday parties, prom nights, and dates. It will be a big day for every high school student to bid farewell to their high school and start a new chapter of their journey. Being the senior craft teacher of the school, the principal has given me the duty of making invitations for each of them. I feel lucky that she trusted me, and I would give her the best Cricut graduation cards for this event.
Creating attractive and simple invitations is undoubtedly a difficult task, thanks to my Cricut machine, as it will help me finish the craft on time. I can make several easy-to-make projects from Cricut products for this occasion, but my favorite is customized slider cards. In this tutorial, I've shared step-by-step instructions for making this project.
Step 1: First, Open the Cricut App and Create a Design
Start by opening the Cricut app and pressing the New Project button. Next, tick the Upload option and press the Upload Image box. Now, press the Browse icon, select the image from your system library, and save it. Afterward, go to Recent Upload Images, choose your image, and hit the Insert Image button. Following this, separate the layers by pressing Ungroup under the Layers panel.
Then, find the card base in the Layers section and change the fold line to score lines by selecting Score from the Operation section. At the same time, attach the scoreline and card base by selecting the Attach option in the lower right-hand corner. After that, repeat the same steps for the slider piece and four rosette pieces.
Select the Text tool and enter the text into your Cricut graduation cards. After finishing the text, select the whole text and apply a new font, color, size, and style. Now, you must change the line by returning to the Operation section and pressing the PEN option. Besides you can also change the color of your pen depending on your choice.
Next, cross-check that the design has been made correctly; if there are any mistakes, then instantly change it. Following this, tap the Make It, which appears blank on the top right-hand side of your canvas.
Step 2: Now, Choose the Material for Your Craft
You will see the mat on the mat preview page and press the Continue option. Also, select your material from the list of your choice and load the tools into the respective Clamps. Use a brayer or scraper tool to stick the material on the cutting mat properly. Then, you must prepare for the final writing and cutting process.
Step 3: Next, Insert the Mat Into Your Cricut Machine
Equally important, tap the Double Arrows button to ensure your cutting mat is in the correct position. When your craft machine starts flashing the C button, it indicates that it's time to cut the material. Please press the button and let it make the Cricut graduation cards without any disturbances. You must repeat the same steps until all the layers have been cut.
Step 4: Lastly, Assemble All the Layers
Following this, weed out all the materials from the Cricut mat with your weeding tool or tweezer. Ensure that you are accurately using the tool without causing any damage to the mat or design. It's time to assemble all the layers and give it the shape of a proper invitation.
Start assembling the card by sticking the diploma and Cricut graduation cards with strong adhesive glue. Keep both pieces aside for a few minutes, and let the glue dry completely. Afterward, fold the rosette pieces from the score lines back and forth or as you wish. Now, add a tiny bit of glue to one of the rosettes and stick the second piece of the same color. Then, add glue to the other end and attach both, making a continuous piece.
Just take your time and start folding the rosette flat while gathering all the pleats. Ensure that all the pleats are folded correctly, and it will instantly begin to take its shape. Next, put a small portion of glue in the center and put a diploma or graduation cap on it. Also, set aside the mat and messaging panel. After that, place the yellow mat on the blue base and the sentiment layer on the yellow mat.
Following this, fold the slider piece with the pull tab cutout at first, start with valley fold, mountain fold, and then again valley fold. After doing that, flip the slider and add glue at the bottom of the tab. Flip the pull tab and stick it correctly with the slider, ensuring the edges line up.
Now, you need to add glue on all sides of the slider and attach it to the top of the sentiment layer. Simultaneously, pull up the pull tab and add the rosettes to the raised portion. Once it is done, fold the card base and add the messaging panel on the base. Lastly, complete your Cricut graduation cards by adding the slide to the front of the card base.
That's it! Making this customized project from your cut-die machine will take a few minutes. Moreover, you can also create different crafts for this event, such as dorm moving bags, window signs, cake toppers, car decals, and many more.
Source Url:- cricut graduation cards
Visit here for more Information:- Cricut Design Space,
Cricut Design Space app,
Cricut design space login
#cricut graduation cards#Cricut Design Space#cricut.com/setup#Cricut Design Space app#cricut.com#cricut design space download#cricut design space login#design.cricut.com/setup explore air 2#cricut.com/setup maker 3#cricut.com/setup app#cricut.com/create
0 notes
Text
How to Calibrate Cricut Maker: A Step-by-Step Tutorial
As an aspiring crafter, if you wish to learn how to calibrate CricutMaker machine, then you have come to the right place. I have been using the Cricut machine for a long time and have gained so much experience. Also, I train people on a daily basis to get started on their crafting journey. If you are using a Cricut Maker or any other craft machine, then calibration can help you to make flawless designs. As a result, I will help you understand the whole process so you can easily perform the process.
Also, you can do the calibration on both computers and smartphones. The Cricut machine calibration process varies for both operating systems. Hence, keep reading this blog till the end to understand the entire process thoroughly.
How to Calibrate Cricut Maker on Your Windows/Mac?
If you want to perform the print-then-cut process on your Windows/Mac computer, then these are the steps you need to follow. To learn how to calibrate my Cricut Maker, follow the below steps.
Step 1: Preparing the Cricut Machine for Calibration
After opening and signing into the Cricut Design Space, go to Settings.
Next, go to the machines section and choose the option Machine Calibration > Machines.
There, you need to specify the Maker 3 machine you are using.
Once you have selected the right machine name, choose the Start option.
Afterward, the display will ask which calibration you want to perform; select the Print Then Cut option.
Select the right printer option to print the calibration sheet with it. After that, select the Continue button.
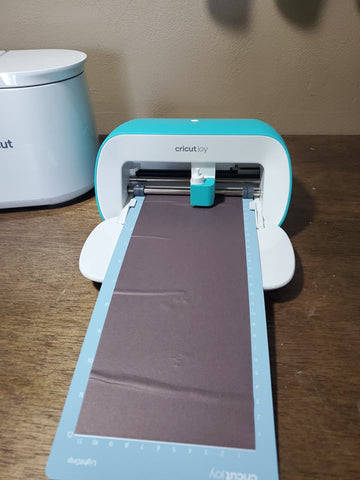
Now, you are required to put the calibration sheet on a mat and load it to your Maker cutting machine. (load the mat into the machine as shown in the below pic)
Then, ensure that your Cricut Maker machine is On and connected to your Windows/Mac computer.
When the next page shows up on the screen, open the drop-down menu to choose your machine name and choose the Go option. Now, continue to the next step to complete the process of how to calibrate Cricut Maker.
Step 2: Perform the Calibration Process
Now, your Maker cutting machine will scan for the calibration marks on the sheet.
After that, it will cut around the small square near the center of the sheet. (Without unloading the mat, check if the cut touches the printing lines or not. )
If you find the cut is touching the lines all the way, then click on the Yes option and select Continue to move forward. (If you choose the no option, then the screen will take you to perform the step once again.)
Also, the machine will start the cut around the large rectangle on the sheet.
When the cut is complete, remove the sheet from the machine and then answer the questions you see on the screen.
If the cuts are right, then select the option Yes, cut is close enough to the center.
Finally, the Cricut machine calibration process will be complete.
Note: If you think you are not happy with the cuts, then you can choose option No; I'd like to do another calibration. Then, it will guide you to the steps to redo the calibration process. You can get professional guidance on how to calibrate the Cricut Maker machine if you are having any issues.
How to Calibrate Cricut Maker on an Android or iOS?
If you want to calibrate your Cricut Maker machine on an Android/iOS computer, then here are the steps you should follow.
Step 1: Preparing Cricut Maker for Calibration
Before moving further, make sure your Cricut Maker is connected to your mobile phone via Bluetooth/USB.
After that, launch the Cricut Design Space app on your iOS/Android device and sign in to your account.
Then, move to the Menu in the upper right corner and select Settings > Print Then Cut Settings.
On the next page, click on the Calibration option.
Based on your preference, select the option Send to Printer, or I have a calibration sheet.
A preview of the calibration sheet will appear on the screen. (The preview can vary depending on the device you are using.)
If you have not selected your printer, then click on "Select a printer."
After selecting your printer name, click on the Next option.
Take the machine mat and then put the calibration sheet on it. (Position the sheet as shown in the following image. Also, choose the Next option.)
Step 2: Complete the Calibration on Your Cricut Machine
Now, you are required to select the right calibration settings for your device.
Then, keep the mat in your Maker machine and then press the Go button.
After that, the machine will start scanning the sheet for the calibration marking.
Once the earlier process is complete, the machine will cut a small square in the center.
Look for the cut marks without unloading the mat and check that it is correct.
If you are satisfied with the cut, then choose the Yes option to move forward.
It will take you to the next step of calibration. (If you select the NO option, then the machine will make the second attempt to cut the design on your calibration sheet.)
Also, the machine will now cut the design on the top and sides of the page.
Without unloading the material from the machine, inspect the lines cut to ensure they are perfect. Some cuts will not be the line, and others will not. From the top and side lines of the sheets, check which line is close to the center of the line.
Once you are done, click on the Next option to move forward.
Next, the machine will perform the final cut on the large rectangle of the sheet.
Follow the further instructions on the display to finish the calibration process.
Conclusion
Here, I have shared the full understanding of the process of how to calibrate Cricut Maker machine. You can use the above guide based on the computer or smartphone you are using. With the help of these methods, you can easily calibrate your Cricut Maker or any other cutting machine. If you are having any issues performing the calibration, then get in touch with the customer support team. Apart from that, it would also be helpful if you take the help of the Cricut experts to get instant assistance with the process.
Frequently Asked Questions
What Is the Benefit of Doing the Calibration in the Cricut Machine?
With the help of the Cricutcutting machine, a crafter can cut a plethora of amazing crafting pieces in no time. However, before you use the knife blades in the machine to cut any fabric or material, it is necessary to perform the machine calibration. This process helps in setting up the knife blade driver housing. As a result, crafters get the best-in-class experience and flawless cuts while working on a project.
Source Url : how to calibrate Cricut Maker Visit here for more Information :- Cricut Design Space
#how to calibrate cricut maker#how to calibrate my cricut maker#Cricut Design Space app#Cricut Design Space#cricut.com/setup
0 notes
Text

Now, make crafting approachable with Cricut’s cutting machine! Cutover 300 materials with the Cricut Maker model and 100 with the less expensive Cricut Explore model. Whether you want a portable machine like Cricut Joy or a huge machine like Venture, Crticut has all the models to meet every crafter’s demand. Setup is as easy as turning on the Bluetooth on your device’s settings. Visit cricut.com/setup to setup your Cricut machine and let your wonderful creation grab people’s attention!
Visit here for more Information:- https://cricutmakerdesign.space/
#cricutdesignspace#cricutdesignspacedownload#cricutdesignspaceupdate#downloadcricutdesignspace#designspacecricut#cricutaccessories
0 notes
Text
How to Download Cricut Design Space Desktop: Stepwise Guide
If you are searching for a complete guide to downloading and installing the Cricut Design Space desktop, this blog will be beneficial for you. I have been working as a professional crafter and training people to start their crafting journey. In this blog, I will share a complete step-by-step guide to downloading the Cricut Design Space app on a Windows and Mac computer.
In addition, you get to learn about the system requirements to download the Cricut app. So, keep reading this blog till the end to acquire a full understanding of the procedure.
System Requirements to Download Cricut Design Space on Windows/Mac
Before you start downloading the Cricut Design Space desktop, it is vital to learn the system requirements.
Your Windows system must be running on the Windows® 10 or later version.
Also, the device must have a CPU: Intel™ Dual-Core or equivalent AMD® processor.
For Mac computers or laptops, at least macOS 11 or later is necessary.
Plus, the macOS device should have a processor minimum of 1.83 GHz.
For storage, 2 GB free space and 4 GB RAM is essential.
The desktop system must have a USB port or Bluetooth connectivity.
The screen resolution should be a minimum of 1024px x 768px.
Download Cricut Design Space Desktop (Windows)
You can perform this guide in order to download the Cricut Design Space for the desktop on your Windows device.
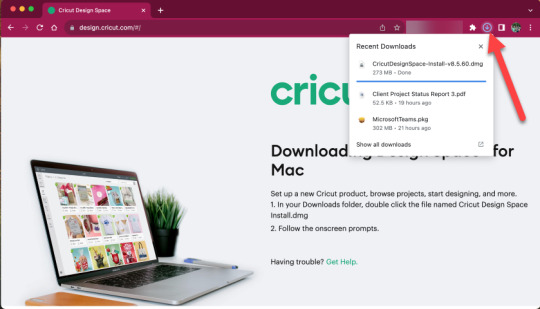
For the first step, access the design.cricut.com website on your Windows browser.
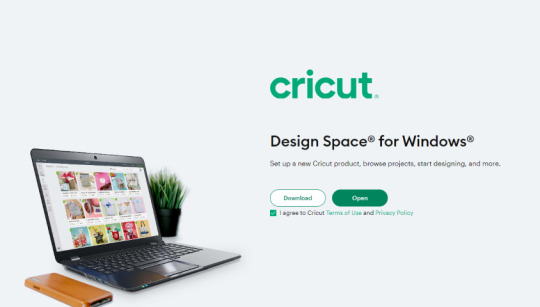
Then, right-tick on the license agreement checkbox and select the Download button.
When the download is complete, go to the Downloads section in the browser and open the download file.
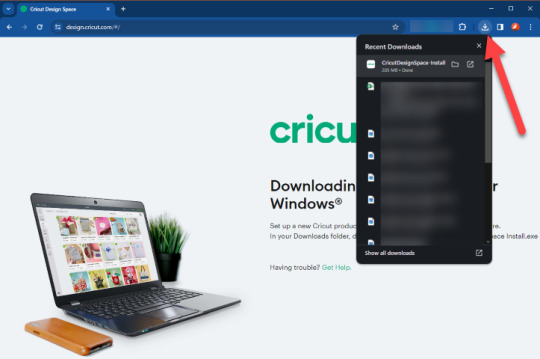
Also, you can access the Downloads folder on your PC to open it.
When the setup screen appears on the screen, it will ask if you trust the app and choose the right option to start the installation.
A pop-up window will show the installation progress on the screen.
Once the app installation process is complete, sign in to your account using the Cricut account login credentials.
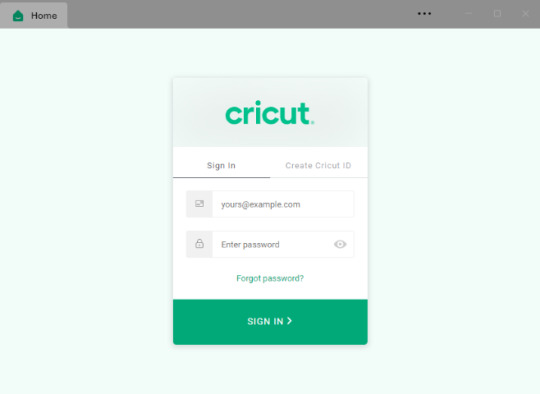
Afterward, a Design Space for Desktop icon will automatically be added to your Windows desktop. (You can pin it to the taskbar if you want)
Now, you can start using the Cricut app to create beautiful designs or set up your Cricut machine to make beautiful crafts.
Download Cricut Design Space Desktop (Mac)
If you want to download the Cricut app to your macOS computer, then these are the steps you can follow.
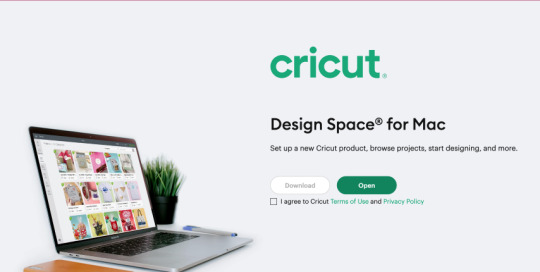
Firstly, visit the Cricut support website on your Mac system.
After that, click on the Download button under the Design Space For Mac option. (If the Download option is grayed out, click on the page’s terms and conditions checkbox.)
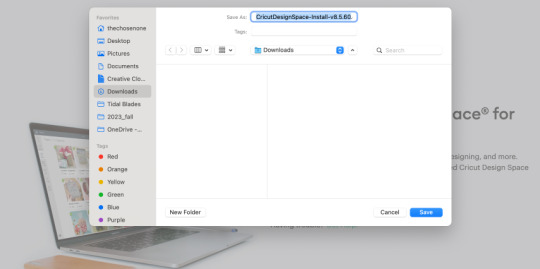
Also, you can go to the selected folder that you chose and open the Cricut app setup file
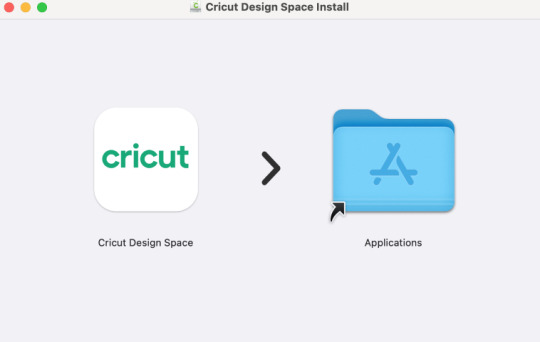
Now, you can launch the Cricut Design Space desktop by double-clicking on the file name in the Applications folder.
A Mac pop-up will come up on the screen to ask if you want to open this file; choose the Open button to move forward.
Frequently Asked Questions
How to Do Cricut Design Space Download for Desktop?
If you want to download the Cricut app to your computer device, then follow the steps below.
Firstly, browse the Cricut support website on an internet browser.
After that, access the Cricut Design Space file according to your operating system.
Next, click on the Download option to initiate the process.
Once the download is complete, double-click on the setup file.
Now, follow the on-screen guide to complete the installation guide.
Finally, they started using the app to create beautiful designs.
Why Can’t I Download Cricut Design Space for Desktop?
Here are some reasons that can cause the issue behind not being able to download the app.
The app is not compatible with your computer device.
The device is facing a network issue.
Your device space is running out of space.
You are downloading and installing the Cricut Design app from a third-party website.
Any file on your PC is blocking it from downloading.
The browser you are using is facing many issues.
Can I Download Cricut Design Space on a Chromebook?
The Cricut app works on both computer and smartphone devices. You can download and use the compatible Windows and Mac computers. However, it does not work with the Chromebook because it is the Google Chrome operating system. You can visit Cricut’s official website to download and install the Cricut Design app on Windows/Mac systems. Also, before downloading the app, you must check the system criteria of the app.
Source Url:- cricut design space desktop
Visit for more Information :- cricut design space for desktop
cricut design space download for desktop
0 notes
Text

Elevate Your Projects: Unleashing Creativity with the Cricut Explore Air 2
Want to elevate celebrations on special occasions? Well, Cricut has something for you. The top-notch Cricut Explore Air 2 accessories have versatile features, allowing you to easily cut 100 to 300 materials in less time. However, depending on your project type, you can get your machine from Cricut’s official website. Further, the machine has to be set up by going to Cricut Explore 3. On this website, you can select the device you are willing to set up and thus follow the screen’s prompts to complete the setup.
Visit here for more Information:- https://cricutmakerdesign.space/
#cricutdesignspace#cricutdesignspacedownload#cricutdesignspaceupdate#downloadcricutdesignspace#designspacecricut#cricutaccessories#cricutexploreair2bundle#cricutheatpress#cricutheatpresguide#cricutheatpresssettings
0 notes
Text
How to Make a Stencil on Cricut: A Step-by-Step Tutorial
Are you wondering how to make a stencil on Cricut? You are probably already familiar with the term stencil, but it is super easy to make one on Cricut! For making stencils with Cricut you need to have some items, which I will discuss later in this blog.
Besides these, I recently finished creating a stencil-based project for one of my clients. I used a simple stencil to etch my client’s glass in that project. They were specifically looking for a pro result because they wanted to describe these glasses to their employees. Similarly, I will walk you through each step of making a stencil using a Cricut stencil vinyl.
I will begin with the essential supplies needed to create stencils in this guide. Then, I will navigate to the Design Space, where I will show you how to create. Finally, you will learn how to cut stencils with Cricut. So look no further than this blog and learn more by reading this post!

Having the right materials and tools makes the project easier for everyone. Therefore, I am providing you with some common items that you must have before you learn how to make a stencil on Cricut.
Here are the supplies needs for supplies:
Cricut stencil vinyl
Cricut Maker (you can also choose the Explore and Joy series)
Weeding tools, such as a scraper tool and brayer
In the next step, I am teaching you how to create a stencil on Design Space.

So, the first thing I’ll do is select a design for my stencil. I have a subscription to Cricut Access library, so I chose one stencil SVG file.
However, if you are making it for the first time, you can also make a simple stencil for trial, such as a letter, a short quote, or an illustration. In addition, you must ensure that your stencil elements are touching or connected. As a result, you can cut it as a whole.
After choosing the design, I upload it to my Design Space. Once you understand how to make a stencil on Cricut, move further to learn how to cut stencils with Cricut.

Now, you have to navigate to the Design Space and send the file to your connected Cricut machine. To send the file to the Cricut machine, follow the steps given below:
First, click on Make It (the green button) in the upper right corner.
On the next prepare screen, you will need to confirm the errors present in the design. If everything is okay, you can click on Continue to proceed.
The next screen is the Make screen, where you must select Browse All Materials and click Stencil.
After following the steps mentioned above, you will be ready to cut stencil designs quickly. Ensure that you have installed the Fine-Point blade on the Cricut machine, and then click the blinking Go button to begin cutting.
Subsequent to cutting the design, you should unload the mat. Afterward, you will want to weed the design. I recommend you use a weeding tool only if required. Otherwise, stenciling with a simple design does not require weeding.
But what if your designs are intricate? No worries! You can use the weeding tool to remove the negative pieces from the stencil carefully. Once done, you are ready to apply and transfer the design to the desirable blank.
Now, you might have understood how to make a stencil on Cricut. I am sure you are going to make something extraordinary using this stencil! All the best!
FAQs
Question 1: What materials should I use to make stencils?
Answer: You can cut many materials on Cricut to make a stencil. These include Cricut stencil vinyl, Mylar stencil film sheets, and regular removable vinyl. But there are some of the best materials you can try for your stencil. For example, I love using freezer paper, cardstock paper, and many more.
Question 2: Which Cricut machine should I use to create stencils?
Answer: You will want to know that all Cricut model cutting machines can cut stencil vinyl, Mylar sheets, and freezer paper. In addition, you can stencil up to 11.5” x 11.5” with a standard-size cutting mat. You can also use the larger mat to create a stencil that measures up to 11.5” x 23.5”.
Question 3: Do I need to weed stencil vinyl?
Answer: It is not necessary to weed the stencil vinyl; however, it depends on your design type. For example, if your stencils have fine or intricate cuts, you might need a weeding tool to weed the excess material. In addition, Cricut stencil vinyl is usually thicker and also stronger than regular vinyl. As a result, you can easily peel it off from its backing, and you do not need to stretch the design. In simpler terms, the simplest stencil design does not need to be weeded.
Final Words
Coming to the end of this blog, I want to summarize how to make a stencil on Cricut. So, making stencils with Cricut required me to use some items such as stencil vinyl and a Cricut Maker machine. Although I used a Maker machine, you can also use the Explore or Joy series. Besides, weeding is optional and only recommended for intricate stencil design. Hence, throughout this blog, I have only focused on how to make this easy stencil using Cricut Maker.
Source Url :- how to make a stencil on Cricut
0 notes
Text

Unleashing Creativity: Transforming Projects with the Cricut Explore Air 2
From intricate to precise cutting, Cricut has several exciting features to offer. Robust machines such as Cricut Maker 3 or Explore 3 are superb collections in Cricut's lineup. They easily cut hundreds of materials in less time. Besides, they work with its companion, Cricut Design Space. This app is used to create an intricate or desirable design. Initially, it connects the cricut com setup to computers or mobile devices. To connect your Cricut to devices, you will need to navigate to Cricut Explore Air 2.
Visit here for more Information:- https://cricutmakerdesign.space/
0 notes
Text

Unleashing Creativity: The Art of Crafting with the Cricut Machine.
Cricut provides various smart tools and supplies that help aspiring crafters explore the world of DIY crafting. Also, with the help of this machine, professional crafters can elevate their craft to get brand-like results. The brand is known for offering both cutting machines and heat press machines, such as Cricut EasyPress Mini, Cricut EasyPress (1,2,3), Cricut Hat Press, Cricut Joy Xtra, Cricut Maker series, and Cricut Explore series. These machines differ from each other in price, color, shape, and features. To learn more about these crafting machines, visit the Cricut com setup website now.
Visit here for more Information :- https://cricutmakerdesign.space/
#designcricutcomsetup#cricutcom#cricutcomsetup#cricutdesignspace#cricutdesignspacedownload#cricut design space download
1 note
·
View note

Text
How to Use Cricut Mug Press (Complete Guide)
Hey, Crafters! Are you here to learn how to use Cricut Mug Press? Today, I am going to cover an important topic on Cricut Mug Press. In this tutorial, I will make a project that will be useful for everyone.
Recently, one of my customers wanted to buy a huge number of mugs for their employees. Prior to that, they asked me to create one sample so that they could see the quality of the mug. Then, I started making a simple mug, and I will share all the steps that I used to create that mug. To me, customer satisfaction is a priority, and I always try my best to give them my best.
So, get ready with all the items required to make this mug. Once you have all the items, you will make mugs that will look excellent. Are you ready to create a mug for yourself or a loved one? If yes, then let’s visit this blog to learn more.
How to Setup Cricut Mug Press on a Computer?
Before setting up the Mug Press, I used some Cricut Mug Press accessories. These items are as follows:
Cricut Mug Press
USB cable
Design Space software
Compatible Windows/Mac computer (with Type A port)
After gathering these items, I moved to set up my Mug Press:
First, I connected my Mug Press to my computer using the USB cable.
Further, I visited the website cricut.com/setup to download the Design Space software to my computer.
After installing the app, I launch the Design Space.
Using my Cricut credentials, I logged into my account. If you haven’t created the Cricut ID yet, then create one.
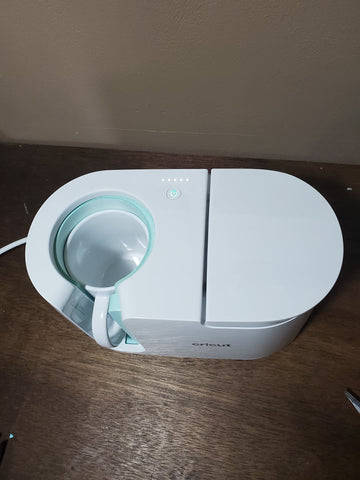
After successfully signing in, a Welcome screen appeared where I selected the Heat Press and then the Cricut Mug Press.
Now, I followed the displayed instructions to complete the activation.
Once the activation was complete, I clicked on the Get Started tab.
Here, my setup procedure is done.
How to Use Cricut Mug Press for the First Time?
Now, I will show you how I create a sample mug for my customer. For this, I used supplies such as Cricut Joy, Mug Press, StandardGrip or LightGrip mat, Mug Blank, Infusible Ink Transfer Sheets, and heat-resistant tape. Let’s start with the first step, where I will show you how to create a design with step-by-step instructions.
Step 1: Choose or Create a Design
First, I am going to select the best design on Design Space. For this, I will click on the Projects icon given on the left side in the Cricut Design Space. Once you click on the Project icon, you get so many options for designs. Here, I chose a simple project called Mug Design Setup.
On the next screen, I was informed about the size of the mug. Further, I clicked on the Customize tab.
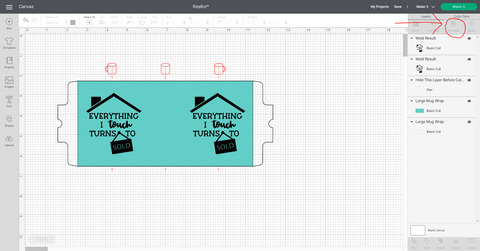
Step 2: Cut & Weed Out Vinyl
Step 3: Apply Your Design on Mug
Now, I am going to place those cut vinyl on my mug. To secure it, I used heat-resistant tape.
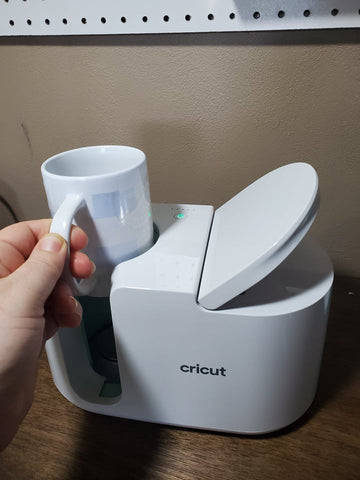

Now, lift up the liver to remove the mug. Next, let it cool off, and then remove the tape and transfer the sheet. Finally, my mug is done!
So, through these 3 steps, you might have learned how to use Cricut Mug Press. Now, create a similar project with these easy steps.
FAQs
Question 1: Can I use the Cricut Mug Press without a computer?
Answer: You will only need a computer when you have to activate your Mug Press and update the firmware. For these two reasons, you will need a computer. In other words, you won’t need it throughout the process. So, if you want to set it up, then use the computer to set it up using Cricut Design Space and computer.
Question 2: How do I setup my Cricut Mug Press on my phone?
Answer: No, you can’t set up Mug Press on the phone. Hence, you will need to use a computer with Design Space installed in it. Here are the steps you need to follow:
Visit Cricut’s site, cricut.com/setup.
Then, you have to download the Design Space.
After that, install the software and click on Setup/Activate.
Next, you will need to sign in to your Cricut credentials.
On the next screen, you will need to select a Heat Press > Mug Press.
Now, perform the instructions to finish the setup process.
Question 3: Do I need to use ink for Cricut Mug Press?
Answer: Not necessarily! It depends on the type of project you are going to make. In simpler terms, your Cricut Mug Press machine is compatible to be used with Infusible Ink products. So, you have the option to use the Cricut pens on your Cricut mug. It works really great when you use it with patience and accuracy.
Conclusion
In this blog, I first started with Cricut Mug Press full setup, as without this setup guide, you can’t make anything on Mug Press. Therefore, setting up the Mug Press and registering with your Cricut ID is essential. So, once you have done the setup, you can start learning how to use Cricut Mug Press. In this post, there are three steps explaining the steps to create a sample mug project. You can follow the same steps for any type of similar project.
Source URL :- how to use Cricut Mug Press
#completeguide#cricutmachinesetup#cricutmugpress#howtouse#howtousecricutmachine#howtousecricutmugpress#setupcricutmachine
0 notes
Text

Cricut Design Space - cricut.com/setup
It doesn’t matter whether you are new in the craft or already an expert; Cricut machines give equal opportunity when it comes to creating DIY projects. This electronic DIY cutting machine cuts materials such as tissue, paper, leather, and balsa wood as well. Before starting any Cricut product, the user must get the Cricut Design Space app on their devices. This easy-to-learn app is available on cricut.com/setup and supports Windows, Mac, Android & iOS devices.
Visit here for more Information :- https://cricutmakerdesign.space/
0 notes
Text
design.cricut.com/setup explore air 2
The crafting industry has experienced rapid growth in recent years. Whether you're a professional crafter or a beginner, it's time to embrace crafting with the help of the Cricut machine. This craft machine offers precise cutting for any shape or design on different materials. The best part is that you can get started by downloading Cricut Design Space from cricut.com/setup.
Visit here for more Information :- https://cricutmakerdesign.space/
1 note
·
View note