#cricut.com/setup app
Explore tagged Tumblr posts
Visit Tumblr Blog
Explore Tumblr blogs with no restrictions, modern design and the best experience.
Last Seen Tumblr Blogs


Fun Fact
The average Tumblr user visits about 67 pages every month.
Text
How to Connect Laptop to Cricut: A Beginners Setup Guide
Have you been planning to purchase a Cricut machine? If yes, you need to know a few things. These include connecting your device to your crafting machine. To connect, you can use a computer or a phone. To learn about the connection process of your device to a machine, you should follow this blog. As a long-time Cricut user, I can guide you through how to connect laptop to Cricut.
When it comes to connecting a laptop to your machine, you can use either a Windows or Mac laptop. Both laptops are capable of working with Design space. But before you use your laptop with your machine, you need to make sure it meets the system requirements for Design Space. In the blog, you will also learn about the features your computer requires. So, let’s dive into it.
Minimum System Requirements to Use Cricut on Your Laptop
In order to learn how to connect laptop to Cricut, you should first check whether your laptop is compatible with the Design Space software or not. If your computer/laptop lacks some features, you may have difficulty downloading the app, and when you use it, you will have to face some problems. To avoid these issues, you must make sure that your computer has these specs.
How to Connect Laptop to Cricut (Windows)?
If you want to connect your laptop to your machine, you can pick one of the Windows or Mac laptops. We will first talk about Windows and then about the Mac. Before connecting it to your machine, you must check your laptop’s compatibility with Cricut. This is the process for the connection.
How to Connect Laptop to Cricut (Mac)?
A Mac is an advanced computer, so if you want to use your Mac laptop for a machine, you can use it perfectly. The laptop will work fine with any machine. Before you use the machine, you should first check the features of the computer and make sure that it is capable of being used with your machine. This is how you will connect a machine to your laptop.
Conclusion
In short, you read how to connect laptop to Cricut. I believe you can now easily connect your Windows or Mac laptop to your machine. You have two connection options for connecting Cricut to your laptop. The first option is Bluetooth, which is a wireless option, and the other is the wired USB cable. Here, we discussed Bluetooth connection in detail as it is more flexible and is preferred by users. Now that you have learned your connection process, you can easily do that and start working on your project.
FAQs
Is a Laptop Necessary for a Cricut Connection?
Not really! A laptop is not at all necessary to work on any project or to connect your machine to it. To start, you need a device. For a device, you can use a phone or a computer. So, if you have a computer, you can use it to connect to your machine as well. A laptop is not necessary to connect your machine. You can use an Android or iPhone smartphone to connect. However, in case you already have a laptop, you can use it.
How Do I Find Out if My Laptop Is Compatible With Cricut or Not?
If you want to know whether your laptop is compatible with your machine or not, you should check a few things on your laptop. You must check your device specifications and make sure that it has all the features that Cricut requires. To be able to use your machine, your laptop needs 4 GB RAM, 2GB free disk space, USB or Bluetooth connection, 1024 x 768 pixels screen resolution, and 2-3 Mbps internet speed.
Can I Connect Cricut to My Android Phone?
Yes, you can! Cricut works with multiple devices, and an Android phone is one of them. If you want to use it on your machine, connect it to your machine. You can connect them using Bluetooth. To do this, you have to turn on your machine and go to Bluetooth settings on the phone. You will have to search for the machine model and select it. Your mobile device will be paired to your machine.
Visit: install cricut design space app
Source: https://connectingcricutmakertocomputer.blogspot.com/2024/08/how-to-connect-laptop-to-cricut.html
#How to Connect Laptop to Cricut#cricut.com/setup#cricut.com/setup app#cricut setup#www.cricut.com/setup#www.cricut.com/setup login#cricut.com/setup login#cricut.com/setup mac#cricut.com/setup windows#cricut.com setup mac#cricut com setup#cricut design space app login#install cricut design space app#www.cricut.com setup login
0 notes
Text

Digital Crafting Delights: Cricut Design Space Wonders
Looking for a way to enhance your crafting experience? Here you go with a Cricut cutting machine. With a plethora of Cricut cutting machine models, Cricut meets every crafter enthusiast’s needs. Get started with your Cricut machine today by simply setting it up - visit cricut.com/setup. With Cricut, you can cut, score, emboss, and write over hundreds of materials. Be it a birthday party or a festive celebration, Cricut is always there for you!
Visit here for more Information :- https://cricutdesignspace-setup.com/
#designcricutcomsetup#cricutcom#cricutcomsetup#cricutdesignspace#cricutdesignspacedownload#cricut design space login#cricut.com/setup maker 3#cricut.com/setup app
0 notes
Text

Designing with Ease: Cricut Design Space Hacks
Whether you’re making custom home decor apparel or party favors, this robust cutting machine will get you to cut, score, emboss, and write on over 300 materials without any trouble. Just get your machine set up by visiting Cricut Accessories. Visit the site download the Design Space app, and finally register using your Cricut ID. Expand your horizons to make crafts that stand out!
Visit here for more Information :- https://mycricutspace.com/
#cricut.com/setup#design.cricut.com/setup#cricut.com#cricut design space#cricut design space download#cricut design space login#design.cricut.com/setup explore air 2#cricut.com/setup app#cricut.com/create#cricut.com/register#cricut machine setup
0 notes
Text
How to Make Cricut Graduation Cards: Full Tutorial
Eighteen years of laughter, tears, birthday parties, prom nights, and dates. It will be a big day for every high school student to bid farewell to their high school and start a new chapter of their journey. Being the senior craft teacher of the school, the principal has given me the duty of making invitations for each of them. I feel lucky that she trusted me, and I would give her the best Cricut graduation cards for this event.
Creating attractive and simple invitations is undoubtedly a difficult task, thanks to my Cricut machine, as it will help me finish the craft on time. I can make several easy-to-make projects from Cricut products for this occasion, but my favorite is customized slider cards. In this tutorial, I've shared step-by-step instructions for making this project.
Step 1: First, Open the Cricut App and Create a Design
Start by opening the Cricut app and pressing the New Project button. Next, tick the Upload option and press the Upload Image box. Now, press the Browse icon, select the image from your system library, and save it. Afterward, go to Recent Upload Images, choose your image, and hit the Insert Image button. Following this, separate the layers by pressing Ungroup under the Layers panel.
Then, find the card base in the Layers section and change the fold line to score lines by selecting Score from the Operation section. At the same time, attach the scoreline and card base by selecting the Attach option in the lower right-hand corner. After that, repeat the same steps for the slider piece and four rosette pieces.
Select the Text tool and enter the text into your Cricut graduation cards. After finishing the text, select the whole text and apply a new font, color, size, and style. Now, you must change the line by returning to the Operation section and pressing the PEN option. Besides you can also change the color of your pen depending on your choice.
Next, cross-check that the design has been made correctly; if there are any mistakes, then instantly change it. Following this, tap the Make It, which appears blank on the top right-hand side of your canvas.
Step 2: Now, Choose the Material for Your Craft
You will see the mat on the mat preview page and press the Continue option. Also, select your material from the list of your choice and load the tools into the respective Clamps. Use a brayer or scraper tool to stick the material on the cutting mat properly. Then, you must prepare for the final writing and cutting process.
Step 3: Next, Insert the Mat Into Your Cricut Machine
Equally important, tap the Double Arrows button to ensure your cutting mat is in the correct position. When your craft machine starts flashing the C button, it indicates that it's time to cut the material. Please press the button and let it make the Cricut graduation cards without any disturbances. You must repeat the same steps until all the layers have been cut.
Step 4: Lastly, Assemble All the Layers
Following this, weed out all the materials from the Cricut mat with your weeding tool or tweezer. Ensure that you are accurately using the tool without causing any damage to the mat or design. It's time to assemble all the layers and give it the shape of a proper invitation.
Start assembling the card by sticking the diploma and Cricut graduation cards with strong adhesive glue. Keep both pieces aside for a few minutes, and let the glue dry completely. Afterward, fold the rosette pieces from the score lines back and forth or as you wish. Now, add a tiny bit of glue to one of the rosettes and stick the second piece of the same color. Then, add glue to the other end and attach both, making a continuous piece.
Just take your time and start folding the rosette flat while gathering all the pleats. Ensure that all the pleats are folded correctly, and it will instantly begin to take its shape. Next, put a small portion of glue in the center and put a diploma or graduation cap on it. Also, set aside the mat and messaging panel. After that, place the yellow mat on the blue base and the sentiment layer on the yellow mat.
Following this, fold the slider piece with the pull tab cutout at first, start with valley fold, mountain fold, and then again valley fold. After doing that, flip the slider and add glue at the bottom of the tab. Flip the pull tab and stick it correctly with the slider, ensuring the edges line up.
Now, you need to add glue on all sides of the slider and attach it to the top of the sentiment layer. Simultaneously, pull up the pull tab and add the rosettes to the raised portion. Once it is done, fold the card base and add the messaging panel on the base. Lastly, complete your Cricut graduation cards by adding the slide to the front of the card base.
That's it! Making this customized project from your cut-die machine will take a few minutes. Moreover, you can also create different crafts for this event, such as dorm moving bags, window signs, cake toppers, car decals, and many more.
Source Url:- cricut graduation cards
Visit here for more Information:- Cricut Design Space,
Cricut Design Space app,
Cricut design space login
#cricut graduation cards#Cricut Design Space#cricut.com/setup#Cricut Design Space app#cricut.com#cricut design space download#cricut design space login#design.cricut.com/setup explore air 2#cricut.com/setup maker 3#cricut.com/setup app#cricut.com/create
0 notes
Text
Cricut Not Connecting to Bluetooth: 5 Effective Solutions

All Cricut machines have Bluetooth connectivity to connect to all types of computers and smartphones. Sometimes, you may face the error message “Cricut not connecting to Bluetooth. “There can be various reasons for this issue, such as compatibility, restrictions, distance between your devices, configuration, and more.
Many factors can cause connectivity problems. To know all the solutions, explore this write-up and find the best method to eliminate this wireless connection error.
Solution 1: Unpair and Restart Your Device
You may face this issue if your machine is far from your device. In this case, you’re going to follow the steps to resolve your connectivity issue:
Firstly, unpair the machine from all devices.
Then, unplug the machine from the main power.
After that, restart your computer or mobile phone.
Next, plug in back your machine and power it on.
Ensure your machine is within 15 feet of your device for Bluetooth connectivity.
Also, confirm that Wi-Fi and Bluetooth are enabled on your device.
Make sure your device has the latest version of the Design Space app.
Click on the Add Bluetooth or other device option.
Now, select the Bluetooth option and wait for the computer to scan your machine.
You click on your machine from the result and pair your machine.
Solution 2: Check for a Firewall or Antivirus Software
The Windows Firewall on your system or antivirus on your phone can stop the machine. Follow the steps below to solve the Cricut not connecting to Bluetooth issue:
To begin, go to the search bar and type Windows Firewall on the search field.
After that, you must agree to give permission to the app through the Windows firewall.
Then, go to the Windows Firewall settings and select the option to Change Settings.
Next, you have to move to the list and click the Design Space software checkbox.
After that, select both the private and public options.
If the option for the app registered does not show, choose to Allow another app option.
Hence, move to the installation folder of your Cricut software.
Solution 3: Remove the Other Device
If your device is already connected with the other device, it can face issues while connecting. Therefore, you need to remove the other device by following the below steps:
Start by pressing the Start menu and choose the Settings option.
Next, open the Devices window by selecting its option.
After that, choose the device you want to remove from your computer and hit the Remove Device option.
Then, confirm the action by choosing the right option.
Finally, you can pair your machine to see if the issue of Cricut not connecting to Bluetooth has been resolved.
Solution 4: Update the Software
The issue can arise even when the machine’s software is outdated. Here are the steps to update your machine’s software:
Start by pressing the Windows and X buttons together on the keyboard.
When a list of options appears on your screen, click the Device Manager option.
In the device manager screen, select the option of the machine and right-click on it.
After that, choose the Update Driver Software option.
Once your driver is updated, try to complete the Bluetooth pairing process.
Solution 5: Check for Device Compatibility
Check the system requirements on the Cricut official website (Cricut.com/setup) to verify your device’s compatibility.
Android: The app is compatible with Android 10.0 or the latest version but only on mobile devices and tablets. It is not supported on Chromebooks. Some qualified devices include Samsung Galaxy, Google Pixel, LG, G, K or V series, Motorola Droid, and One Plus.
iOS: The app is compatible with iOS or later on iPhones, iPads, and iPods.
Windows or Mac: The software can be used on Windows or Mac computers.
First, click the Design Space icon on your desktop.
Then, go to the Start menu, open the file location, and right-click.
Now, open the “Properties” section. In the Properties window, select the Compatibility tab.
Final Thoughts
In conclusion, this issue of Cricut not connecting to Bluetooth can be fixed with this troubleshooting guide. There can be various reasons, such as if your machine has connection issues, is far away, or has outdated software.
Remember to stay patient while resolving these issues. With persistence, you can overcome these problems, enjoy wireless connectivity, and work seamlessly with your machine.
FAQs
How do I connect Cricut machine to my Mac?
To connect a machine to a Mac, you can use Bluetooth or a USB cable; here, if you want to connect with Bluetooth, then follow the steps:
Turn on the machine and make sure it is within the range of 10-15 feet of the computer.
After that, go to System Preferences and choose the Bluetooth option.
Now, check if the Bluetooth is on and choose your machine from the list.
Next, follow the prompt to complete the pairing process.
Why is my Cricut machine not connecting to Bluetooth?
If your crafting machine is not connecting to Bluetooth, there are many reasons like:
Make sure your machine is within 15 feet of your device.
Check the power and whether it is turned on or not.
And check if the Bluetooth device is turned on.
Make sure your device’s Wi-Fi is turned on.
Update your Design Space to the latest version.
Make sure your system has all the minimum system requirements for running the Design Space app.
Unpair your machine from all devices, restart your device, plug it back into the machine, and then re-pair it.
How do I reset my Cricut machine using Bluetooth?
The steps to reset the machine using Bluetooth are as follows:
First, unpair the machine from all devices.
Then, unplug the machine from the power.
Now, restart your computer or mobile device.
Next, plug the machine back in and turn it on.
After that, move the machine within 15 feet of your computer or mobile device.
Make sure your computer or mobile device’s Wi-Fi and Bluetooth are on.
Lastly, update the Design Space app to the latest version.
For more information visit: how to setup cricut maker cricut new machine setup
Source: Cricut Not Connecting to Bluetooth
#cricut not connecting to bluetooth#Cricut Design Space app#Cricut Design Space software#cricut new machine setup#cricut.com/setup
2 notes
·
View notes
Text
Do you take your crafts seriously? Cricut is a perfect machine that allows you to craft with your heart. So, use the machine and employ all your crafting skills to end up with a wide range of personalized and professional handmade items. Also, download and install the Design Space software to add more creativity to your project. Go to cricut.com/setup and get the software right away. Once you make a unique and attractive project, give it a professional touch and take your crafting skills to a commercial level. Cricut Design Space Login You can utilize online platforms to sell them and make some extra bucks while staying in the comfort of your home.
#Cricut Design Space#cricut design space login#cricut design space download#cricut design space for mac#cricut design space app#cricut design space setup#cricut software#cricut.com setup windows#cricut.com/setup windows#cricut.com/setup#cricut.com sign in#cricut.com/create#cricut.com design space#design cricut.com download
2 notes
·
View notes
Text
How to Use Cricut Without a Subscription for DIY Projects
Cricut machines are popular among hobbyists and professional crafters, offering a perfect blend of reliability and versatility. These qualities make them indispensable companions for a variety of DIY projects. To unlock their full potential, Cricut machines rely on an application called Design Space, which serves as a platform for making craft projects. This free software provides access to various fonts, images, and project templates, enabling users to bring their ideas to life. Also, with a Cricut Access plan, users can explore premium features, expanding their creative possibilities even further.
In this blog, we’ll show you how to make the most of your Cricut machine without needing a subscription. So, let’s dive in and explore the possibilities!
Do You Need a Subscription to Use a Cricut?
Not necessarily. Whether you need a subscription depends on your usage and crafting needs. If you are a professional who is great at designing and requires various features at hand to create cutting designs, then a Cricut subscription will work for you. However, if you’re a beginner, you don’t need a Cricut Access plan.
Cricut Access Subscription Features
In this section, we mentioned the main features you’ll receive with the Cricut Access plan. Exploring these will help you understand whether you’ll need a Cricut subscription or not.
Subscription Design Perks:
Unlimited access to over 1,000,000 images
Unlimited access to over 1,000 fonts
10% discount on licensed images
Over 100,000 ready-to-use projects
Unlimited collections
Savings Benefits:
Cricut.com every three months (includes free shipping).
Get 10% off on purchases from cricut.com, with savings of up to $100 per machine.
20% off all Cricut materials
FREE shipping on $50+ orders
Plus:
Priority Member Care
How to Use Cricut Without a Subscription
In this section, we’ll explore how you can use Cricut without a subscription by accessing exclusive features for images and fonts.
Create Your Own Images

If you’re wondering whether you can create your own image with Cricut, the answer is yes! Users can upload original art to Cricut Design Space. It doesn’t matter whether it’s hand-drawn or digitally created. Just save the file in any format: JPG, PNG, or SVG. Upload it to Design Space, and the rest is easy; use your creative mind to start customizing the design. Design Space allows you complete flexibility to create or edit your image as needed.
Upload Images to Design Space

Once you’ve done selecting the image for designing, the next step will be uploading the image to the Design Space software.
Start by launching the Cricut Design Space app on your computer, tablet, or mobile device.
Next, click on the “New Project” button to start creating a new design on the canvas.
Select the “Upload” button in the bottom left corner of the screen.
After that, select the “Upload Image” button on the screen.
Then, select the image file that you want to upload (File format: JPG, PNG, or SVG).
Next, click on Continue and remove the background from the image. To do so in Manual, select Apply & Continue.
Now, convert the image into multiple layers, then select Continue.
Next, choose “Cut Image” if you want to cut the design or “Print Then Cut Image” for printed designs before cutting.
Lastly, click on the “Upload” button, and then your image will appear in the “Recent Uploads” folder.
Note: To insert the uploaded image into your new canvas, select the image and then click on “Add to Canvas” in the bottom right corner of the screen.
Upload Fonts to Design Space

Once you have learned “how to upload and insert an image into the Cricut Design Space app“, the next step is to work with fonts. In this section, we’ll be covering this:
First, download the font you desire to your system.
Next, install the font on your system.
Now, open the Cricut Design Space application and click on the “New Project” button on the top right of the display.
After that, click on the text tool on the left-hand side of the screen.
At this point, start writing the text or phrase that you wanted on your design.
Later, click on the “Font” menu at the upper-left side of the screen.
Click on “System” fonts. A menu will open on your screen, displaying all the fonts on your system (device). Lastly, click on the desired font for your design. That’s how you can use any font you like on Cricut Design Space.
Conclusion
Cricut is a leading brand that is famous for providing excellent crafting tools that are suitable for hobbyists and pro crafters. These machines offer cutting-edge features and extensive customization options, which empower you to elevate your designs to the next level. To enhance the crafting experience further, Cricut offers a subscription plan (Cricut Access), which unlocks exclusive features and provides unlimited access to various text fonts, pictures, and ready-to-make projects. However, if you are not ready to invest in a plan, you can still take advantage of the free features available on the Cricut Design Space app to create unique and beautiful designs. By following the steps mentioned above, you can explore your creativity without limitations. If you have any questions or need help, our team of experts is always here to help you get the crafting experience.
Frequently Asked Questions (FAQs)
How to Crop an Image in Cricut App?
To crop an image in Cricut Design Space, follow these steps:
Insert the image into the canvas.
Add a shape over the area you want to keep.
Select both and click Slice.
Delete the extras and use only the cropped piece.
Note: If your file isn’t an SVG, flatten it before slicing to ensure the system doesn’t treat it as a single object.
How to Downloaded fonts to Cricut on iPhone?
First, download the third-party font app like iFont, then follow the instructions listed below:
Download the font file to your iPhone’s Files app.
Select and install the downloaded font file (usually a zip file).
Open the Cricut Design Space App and click on the Text tool.
Go to the “Font” tab in the Edit panel.
Your newly installed font should be listed under “System Font.” Enjoy it!
How to offload Cricut Design Space?
Uninstalling the iOS app may be mandatory to resolve some issues. However, if you haven’t saved your projects to the Cricut Cloud, do that right away, as uninstalling the app will also delete those projects and any images or fonts you have downloaded to the device.
To offload Cricut Design Space:
Go to the Settings app and select General.
Scroll down and find iPhone/iPad storage.
Find the Cricut Design Space app and click on it.
Select the Offload App and confirm the selection.
After that, click on Reinstall App.
Open the app and attempt your project again.
Source: How to Use Cricut Without a Subscription for DIY Projects
#cricut design space app#cricut design space setup#Cricut.com/setup#Cricut Setup#cricut machine setup#design.cricut.com
0 notes
Text
How to Use a Cricut to Make Shirts? (Full Guide)
Do you want to launch your first project but are still unsure about what to create? If so, let me tell you about one of the most popular and easiest crafts you can make: a personalized T-shirt!

Heat transfer vinyl enables crafters to personalize fabric projects by adding designs and text using heat and pressure. It’s a versatile material that is not limited to making T-shirts. You can create various DIY projects, such as wall hangings, hats, caps, tote bags, shoes, and numerous other items.
What You Need to Create a Shirt With Cricut
Make sure you have the following essentials before you start creating shirts with your machine:
Any Cricut Explore, Maker, or Joy machine
Cricut EasyPress 2
Weeding tool
T-shirt
EasyPress mat
Heat transfer vinyl
Scraper tool
Smart iron-on
StandardGrip cutting mat
How to Use a Cricut to Make Shirts: Easy Steps
If this is your first time crafting, follow these simple steps to make a shirt with your Cricut machine:
Step 1: Download Design Space
Go to a web browser and type design.cricut.com/setup
Now, enter your machine model in the search field.
Next, select the checkbox at the bottom left of the page.
After installation, open Cricut Design Space and Sign In. If you don’t have an account, click on Create Cricut ID and follow the instructions.
Step 2: Click on New Project
Once you have signed in successfully, open your Design Space.
Head over to the Cricut Design Space home page and click the New Project icon to start from scratch.
Then, it will take you directly to the canvas where you’ll design.

Step 3: Select the Text Menu
From the left-hand side of the navigation bar, you’ll see an option for “Text.”
After that, you have to click on the Text button.
Next, a text box will show up on your screen for you to enter text. Type whatever you want to get printed on your T-shirt.

Step 4: Design Your Text
At the top of the dropdown menu, select Font if you want to change the Font.
Get ready to choose your favorite text style from a list of hundreds of fonts.

Click on whichever you find the best.
Step 5: Curve Your Text
In the same dropdown menu at the top, you will find the Curve option. Click on it.
After clicking on the Curve option, a slider will show up on your display, allowing you to adjust the curve of your text by moving it left or right.

Step 6: Finalize Your Design
Once you’re satisfied with your design, click “Make It”.
Then, the Cricut Design Space will command your machine to cut.
You will be asked to choose between using a cutting mat and not using one.
Ensure you select “Mirror” on the cut screen when using iron-on and click Continue.
Step 7: Get Ready to Cut
Switch on your machine by pressing the power button.
Next, choose the base material type that best suits your material. I am selecting Smart Iron-On from the list. This step helps your machine determine the required pressure amount for cutting.
Place the HTV’s shiny, plastic sheet down on the mat. Smooth it out to remove any air bubbles or wrinkles.
Place the mat into your machine, positioning it under the rollers.
Press the up and down arrow buttons on your machine. It will pull up your mat, and it will be loaded successfully.
Finally, click on the Go or Start button to begin the cutting process.
Once cut, remove the excess vinyl using the weeding tool. Slowly lift a corner and pull it gently away from the transfer sheet.
Step 8: Transfer Your Design to T-shirt
Preheat your EasyPress. This will make your machine ready to transfer material to the shirt.
Ensure your shirt is clean and ready to receive the transfer design by using a lint roller to remove lint and debris from the shirt.
Place your shirt on the heat mat to ensure your safety.
Place your design on the shirt wherever you prefer, according to your personal preference.
Visit cricut.com/en/heatguide and select your machine from the available options.
Select your specific heat-transfer material and base material, then click the Apply button.
Follow the Cricut heat guide instructions and set your EasyPress to 315°F for 30 seconds if you’re using HTV.
Use light pressure and place your EasyPress on the design you’ve put on your T-shirt.
If your press is smaller than your design, divide your design into sections and heat it accordingly.
Peel off the backing sheet, and that’s it you’re done! Your design will stay intact on your T-shirt even after multiple washes!
Congratulations! Now that you’re no longer a beginner after learning how to use a Cricut to make shirts, your customized T-shirt is ready to wear and shine.
Final Thoughts
Remember, practice makes a man perfect, so don’t demotivate yourself if it doesn’t go as you want. Keep trying to strive for perfection. One last piece of advice I want to share with you is to always try to wash your T-shirt inside out so that it lasts a long time.
Have fun designing your projects, and share your thoughts with us!
Frequently Asked Questions (FAQs)
How Do I transfer a Cricut Image to a Shirt?
Follow the steps to learn if you want to transfer the image to a shirt:
On the left-hand side of the toolbar panel, click on the Image option if you want to use the image from the Cricut library.
If you want to personalize your T-shirt with your own image, slide down the toolbar, find the “Upload” option, and click on it.
Upload and resize your design. Ensure that the Mirror option is activated.
Finalize your design and cut it using the Cricut Design Space instructions.
Weed your T-shirt design and use the heat press machine to transfer the design.
Which Vinyl Is Best for Shirts?
HTV (Heat Transfer Vinyl) is often considered the best option for crafting T-shirts due to its versatility, ease of use, and durability. It allows for complex designs and is affordable for small orders. It also offers a wide range of special effects, textures, and finishes, making it ideal for personalized and high-end customization. However, you can use adhesive vinyl as a cheaper alternative.
Why Is My Cricut iron-on vinyl Not Sticking?
Iron-on transfers might not adhere properly due to several reasons:
Ensure the EasyPress or iron is set to the correct temperature for your specific vinyl and base material, as recommended in the Cricut Heat Guide.
Use firm, even pressure. Ironing boards and plastic surfaces can both hinder and facilitate proper adhesion.
Apply heat for the recommended duration, and consider reapplying heat to the material for an additional 10-15 seconds.
Ensure you’re using the correct peel type for your specific vinyl.
Source: How to Use a Cricut to Make Shirts
1 note
·
View note
Text
How to Update Cricut Design Space 2025?
Are you a Cricut machine user eager to explore the new updates in its app? If so, then you are in the right place. The new Cricut Design Space update introduces major upgrades to features and the interface, enhancing user-friendliness. In addition, many issues that users were facing previously have also been fixed.
Since the announcement of the update, many Cricut enthusiasts around the world have been looking forward to hearing about the new updates to the app. If you are also one of them, then it would be worthwhile to take a look at the new updates.
Keep reading to get detailed information about everything you need to know.
Cricut Design Space Update: What's New!
Let's take a look at the major changes and new updates in the Cricut app.
In addition, there are some other minor updates you can see in the new update.
How to Update Cricut Design Space app?
These are the methods you need to follow to update Design Space on a computer and smartphone.
Computer
These steps will help you complete the update on both Windows and Mac devices.
Smartphone
With the help of these steps, you can complete the update on Android smartphones/tablets and iPhones & iPad.
Resolved Issues and Updates for Better Crafting
With the new update, ample problems have been fixed to make the app more intuitive and user-friendly. Here are some prominent fixes.
Frequently Asked Questions
How to Download Latest Cricut Design Space?
The brand has recently launched the Design Space for Desktop Beta (v9.8) version. To download it on a Windows or Mac device, you need to update the OS version first, then visit the official website to get the latest driver. In addition, to install the app on a phone, go to the App Store, search for the product, and select Download. Ensure that you are downloading the app only from the official website.
How to Install Latest Cricut Design Space 2025?
Here are the major steps you need to follow to install the app on a Windows system.
How to Download New Cricut Design Space 2025 on iOS?
Follow the below steps if you want to download the new Cricut app on an iPhone or iPad.
Visit: cricut.com/setup www.cricut.com/setup login
Source: https://cricricutdesigncut.wordpress.com/2025/03/20/how-to-update-cricut-design-space-2025/
#design space setup#digital design#cricut setup#cricut setup for pc#cricut setup for mac#cricut setup create account#cricut setup explore air 2 setup#setup cricut design space setup#install cricut design space app#cricut design space app#cricut design space login#cricut design space download#cricut design space setup#cricut design space software#download cricut design space#cricut.com/setup#cricut.com/setup windows#cricut.com/setup explore air 2 setup#cricut.com/setup mac#www.cricut.com/setup#www.cricut.com/setup login
0 notes
Text
How to Use Cricut Heat Press: Customize Your Own T-Shirt
Do you want to create your own designer T-shirts? Are you interested in learning how to use Cricut Heat Press? If yes, you have come to the right place! The Cricut Heat Press machine offers a great way to transform plain T-shirts into stylish designer pieces. To achieve this, you will need to understand how to use it.
It is an easy-to-use tool. Cricut offers several heat press machines, with EasyPress and Easy Press 2 being among the most popular for heat transfers. To use these machines, you must know the necessary supplies and the procedure. This blog will guide you through all the required supplies and how to use the heat press.
Tools and Supplies to Start Using Cricut Heat Press
It is important to learn how to use Cricut Heat Press to design your t-shirt. But even more essential is to learn about the materials you will need to use your machine and how you will use those tools. Here are the supplies you will need for the machine.
How to Use Cricut Heat Press: 4 Simple Steps
Once you learn about all the required supplies, you can proceed to make your customized design for your t-shirt. In this process, you will have to do multiple things, like creating your design on the Design Space app, cutting the design, and applying it to your t-shirt. See all these procedures in detail and learn for yourself.
Step 1: Make a Design in Cricut Software
Step 2: Cut Your Design on Your Machine
The next step in learning how to use Cricut Heat Press is to cut your design. Once your design is ready on the app, you can proceed to cut it on the machine.
To cut the design on your machine, you have to put a mat on it and load it inside. Once the material is loaded inside the machine, you will need to open the Design Space app, select the material inside the app, and then click on Make It.
Before you start cutting, you have to mirror your mat. It is important, so don’t forget it.
Step 3: Use a Weeding Tool
Once you have finished cutting the design on your machine, you must unload the material and remove the remnants of the design. To remove the unwanted parts of the design, you should use a weeding tool. It will help you do it precisely.
Step 4: Apply Your Design
Finally, you have to apply the design to the t-shirt with the help of a press machine. To do so, you must follow these steps.
Conclusion
In short, you learned how to use Cricut Heat Press. Using any heat press machine is not very difficult if you follow the instructions well. In the early part of the blog, you learned about the tools and supplies you need to make any customized t-shirts. After that, you saw the process of using the press machine. You have to pick a design, cut it on Cricut, and finally apply it to your t-shirt with the press machine.
FAQs
What Is a Cricut Heat Press Used For?
This machine is mainly used to apply heat to iron-on material to transfer it to any fabric. For example, if you cut a design on an iron-on with any Cricut machine, put it on a t-shirt or any other cloth, and then apply heat to it with the press machine, that design will be printed on the t-shirt.
Can I Use an Iron Instead of a Cricut Heat Press?
Yes, you can! But that will depend on how often you have to use it and what kind of quality you are expecting from the machine. If you only need the press machine once or twice a year and you are not expecting good-quality results, then you can use a regular home iron. But if you need the machine frequently and you want pro results, you should go for the Heat Press machine.
For How Long Do I Have to Press a Shirt on Cricut Heat Press?
It will depend on the temperature of your machine and the fabric you are using. The higher temperature will take less time, while the lower temperature may require a few more seconds. However, depending on the situation, you may have to apply it somewhere between 15 and 30 seconds.
Visit: cricut.com/setup www.cricut.com/setup login
Source: https://cricutdesigncut0.wordpress.com/2025/03/18/how-to-use-cricut-heat-press-customize-your-own-t-shirt/
#cricut setup#cricut.com/setup#www.cricut.com/setup login#cricut design space#cricut designspace setup#cricut design space app#cricut design space login#cricut design space software#cricut design space download#cricut design space setup
1 note
·
View note
Text

Windows Machine Mastery: cricut design space download
Have you ever wondered what you can do with a Cricut cutting machine? This robust machine is manufactured by a highly experienced team of engineers, encouraging crafters to get the most out of it. Cricut’s lineup has various cutting machines, such as Cricut Explore, Maker, Joy series, and Venture. All of them are designed for different purposes and project types. But before you use them, you will need to set it up. To set up, you can simply navigate to cricut.com/setup. Rest assured, screen prompts will guide you in setting up your machine with your compatible devices.
Visit here for more Information :- https://setupwindowsmachine.com/
#designcricutcomsetup#cricutcom#cricutcomsetup#cricutdesignspace#cricutdesignspacedownload#cricut design space login#design.cricut.com/setup explore air 2#cricut.com/setup maker 3#cricut.com/setup app
0 notes
Text

Cricut can perform a variety of tasks easily in less time. It has the ability to perform various operations, including Iron-On transfer, sewing, personalizing, scoring, writing, or cutting. So, choose the machine that can perform these tasks easily so that you will get what you want. I really love Cricut’s invention as it has made the crafters’ lives easier than before. However, you need to set up the machine when you have bought it recently. For setup, go to cricut explore air 2.
Visit here for more Information :- https://cricutdesignspace-setup.com/
#cricut.com/setup#design.cricut.com/setup#cricut.com#cricut design space#cricut design space download#cricut design space login#design.cricut.com/setup explore air 2#cricut.com/setup maker 3#cricut.com/setup app
0 notes
Text
7 Cricut Machine Projects: Get Inspired & Start Crafting
I know you are looking for Cricut machine projects, and you have landed in the right place. I'm excited to share some unique project ideas you must try. Each idea is created for beginners, keeping it simple, fun as well as inspiration.
In this guide, I won't bore you with unnecessary details. Instead, I will mention the crafting tools needed for each project & their main purpose and sometimes guide you on how to use them. You don't have to tackle anything complicated; just follow the ideas outlined in the blog. Regardless of your Cricut machine, I have covered all the projects you can create. Let's dive into our first project.
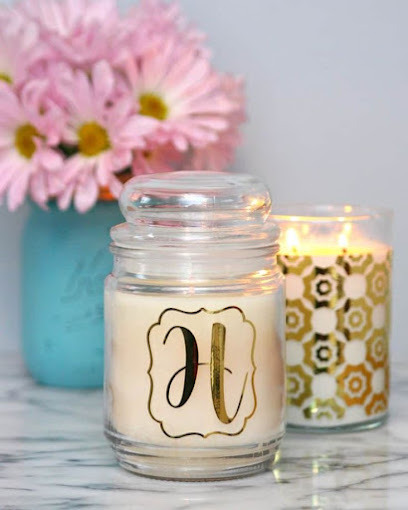
1. Customize Candle Jar
I love decorating my room, and I'm sure you do too. For cozy night time vibes, candles are a must. Why not customize your own candle jar with your Cricut machine? All you need is colored vinyl, a weeding tool, a clean jar, transfer tape, and of course, your Cricut cutting machine. Design in the Cricut software, cut, and apply to the jar!
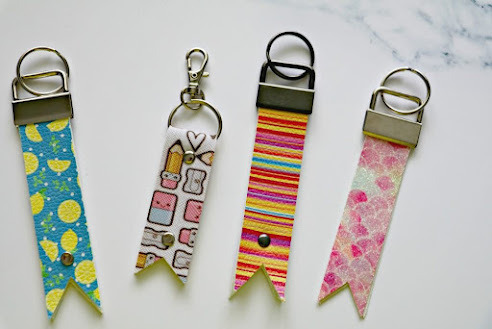
2. Leather Keychains
Keychains are often overlooked, but they are a great way to add personality to your daily items. I make keychains for my car, room, and locker, and people notice! If you are exploring Cricut machine projects, try creating faux leather keychains. You will need a Cricut machine, faux leather, iron-on vinyl, a Cricut Heat Press, and Design Space to get started.
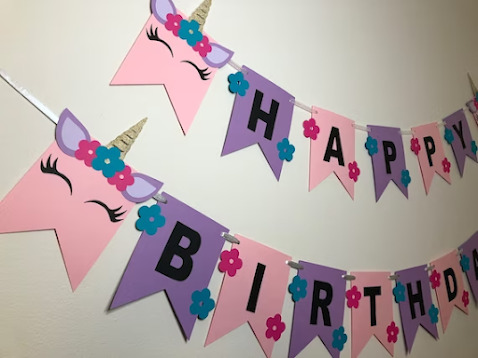
3. Banners
Recently, I celebrated my daughter's birthday. I handled all the decorations with my Cricut machine. One Cricut machine project that stood out was creating a birthday banner. Planning a party becomes more enjoyable with Cricut crafts. With a Cricut cutting machine, cardstock, weeding tools, and designs from the Cricut app, you're all set!
4. Labels
Let's move on to other Cricut machine projects. Turn on your Cricut machine and start cutting out personalized text for your pantry items. You can also add designs with text on chalkboard vinyl if you want. This project will undoubtedly prove to be very useful as it allows you to easily label and identify your items.
5. Decals
If scratches on your laptop are causing trouble, it's time to solve this common issue. Create a custom design with Cricut software, cut it onto printable vinyl in your preferred color, and apply it to your laptop. This DIY solution is not only cost-effective but also allows you to personalize your device exactly how you want it.

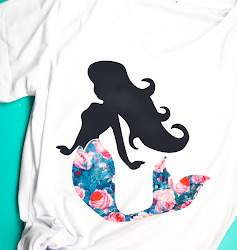
6. T-shirts
I can't overlook the excitement of t-shirt projects with a Cricut machine. It's not just any DIY project; it's an adventure filled with fun. For this, you will need a Cricut cutting machine and a Cricut Heat Press. Once you learn to make T-shirts with Cricut, you'll feel confident with iron-on and infusible ink projects, too.
7. Mug & Tumblers
Well, who doesn't love personalized tumblers or mugs? They add such an attractive and personal touch. The good news is you can make them yourself with the help of a Cricut Mug Press and a Cricut cutting machine. Simply cut the infusible ink and press it into the tumbler or mug using the Mug Press machine.
Final Thoughts
Whether it's the weekend or just a casual occasion, crafting with a Cricut machine is always a lot of fun, isn't it? However, sometimes, finding the right Cricut machine projects can be overwhelming. To address this, I have mentioned 7 creative and unique projects in the blog above, ranging from candle jars to t-shirts and banners. Once you have completed these DIY projects, you will be even more enthusiastic about Cricut crafting.
Frequently Asked Questions
How to get a free Cricut project?
The best and easiest way to make crafts with Cricut is by finding and creating your desired project for free.
First, open the Cricut app and select New Project.
Next, navigate to the design panel and choose images.
Click on Free under the highlighted categories and type in your desired project.
What is the easiest thing to make with a Cricut?
If you are a beginner in Cricut crafting, here are some easy Cricut machine projects you can start with.
Flowers
Shirt
Gift tags
Decals
Tumblers
Mugs
Stickers
Keychains
What can a Cricut machine do?
A Cricut machine is an electronic cutting machine that can cut symbols, designs, and images on a variety of materials with precision. In addition to cutting, the Cricut machine can also write, deboss, foil, and engrave with a variety of tools and blades. Some Cricut machines also have a print-then-cut sensor so you can cut out the printed design.
Source Url :- Cricut machine projects
Visit here for more Information :- cricut design space
Cricut cutting machine
#Cricut machine projects#cricut.com/setup#design.cricut.com/setup#cricut.com#cricut design space#cricut design space download#cricut design space login#design.cricut.com/setup explore air 2#cricut.com/setup maker 3#cricut.com/setup app#cricut.com/create#cricut.com/register
0 notes
Text
How to Connect Cricut via Bluetooth? (Full Guide!)
Learn ‘how to connect Cricut via Bluetooth’. In order to setup any Cricut machine on your phone or computer, laptop it is essential to connect the device to your machine. You can choose either a phone or a computer for this. If you have a desktop, it must be either a Windows or Mac. An Android or iOS device is required for mobile devices. Once you have one of these things, you can connect it to your machine with Bluetooth. After successfully connecting, you can proceed with the rest of the setup and start working on your projects. So, without any further delay, let’s start with the connection process.
How to Connect Cricut via Bluetooth on Mac System?
A Mac computer is an excellent computer for using the Design Space app on it. The computer is compatible with the app, and you can easily download it. You just have to make sure that you are using a macOS 11 or later version of the operating system on your computer. These are the steps for downloading the app on your MacBook.
How to Connect Cricut via Bluetooth on a Windows?
A Windows commuter is equally good to use with a crafting machine. To work on a Windows PC, you need to connect it to a machine with the help of Bluetooth. Below are the steps to follow:
How to Connect Cricut via Bluetooth on an Android Device?
Instead of a computer, a phone can also be a good option for connecting it to a crafting machine. To connect your Android device to a machine, you have to follow these steps:
How to Connect Cricut via Bluetooth on iPhone?
An iPhone is also good for working on a machine. You can connect the phone to your machine via Bluetooth and make projects however you want. The steps you have to follow for that are in the section below:
FAQs
Is Cricut Machine Bluetooth Enabled?
Yes, it is! If you are using the latest machine, then you should not be worried about whether your machine has a Bluetooth connection option or not. All the latest machines are built-in with Bluetooth. You can easily connect them to your device and use them for your projects.
How Can I Connect Cricut to a Computer?
To connect your machine to your computer, you have to do as follows:
Do I Need an External Bluetooth Adapter for My Cricut Machine?
Whether you need an external Bluetooth adapter or not will depend on the type of machine you are using. If you are using one of the oldest Cricut machines that are not built with a Bluetooth connection, you will need an external Bluetooth adapter. But if you are using one of the latest models that are already enabled with Bluetooth, you will not need an external Bluetooth adapter. You can simply connect them via Bluetooth and get ready to work on it.
Visit: cricut.com/setup crcut.com setup mac install cricut design space app www.crcut.com setup login
Source: https://cricuthelpsupport.wordpress.com/2025/03/17/how-to-connect-cricut-via-bluetooth-full-guide/
0 notes
Text
How to Make Stickers on Cricut (Full Guide)
Stickers are fun to create, right? There are so many fun things that you can create in the form of stickers. These products are decorative, and you can use them for your home decor, festivals, special occasions, or phone covers. Sticker making can never be boring with the ultimate Cricut machine. With the help of this blog, I’ll share ‘how to make stickers on Cricut‘.
I’ll tell you each step included in making a good sticker using your crafting machine. Moreover, you’ll also need a printer to print stickers through your machine. Use an inkjet printer to create stickers. Discover all the steps included in making a perfect sticker.
Step 1: Launch Cricut Design Space on Your Device
In this method, I usually use the Print Then Cut feature with a size of 6.75 x 9.25 inches. You can also resize your sticker by choosing a square shape from the library and resizing it according to you. Let’s move to learn how to make stickers on Cricut.
Step 2: Prepare Your Printer
Now that you’ve completed the design and adjusted the print size, you need to create a customized sticker. In the next step, choose your machine from the menu and hit the Make It button.
After that, you’ll see a black line around your design. Then, your crafting machine will scan your image and cut it into the exact size. Now, click on the Continue option to continue, and send the image to your inkjet printer.
Once you hit the Print option, choose the Add Bleed option. After selecting this option, the white margin will be removed from your image’s border. Next, you should hit the System Dialog option to confirm your printer’s settings and keep them adjusted to get premium-quality prints.
Step 3: Print Your Design, and Add an Image to Mat
When everything is optimum, just add the material into your printer to the printer and click the Print button.
Once your sticker design is printed, you can add the print to the mat. Make sure that your sheet perfectly aligns with the mat and doesn’t cover the Cricut logo. Using a machine mat is necessary even if you’re using smart materials.
Step 4: Select Your Material and Start Scanning
Once you’ve followed all the steps carefully, you should select the material you’re using. For instance, if you’re using sticker paper or vinyl, select it. If you create stickers quite often, you can click the Start button next to your material, and your material will be added to the favorites.

After that, let your machine use its sensors to scan the black lines and cut the images. In the next step, your machine will cut the stickers, and now you can use them anywhere you want.
Tips and Tricks to Troubleshoot Sticker-Related Problems
No matter how well you create your design or follow the steps, you may end up with some issues. Sticker-making with Cricut can be a little complicated. Here are some tips and tricks you can use to fix the issues you create while creating your stickers.
Ensure that your machine is On and lit to scan the registration marks.
Then, confirm if the mat is perfectly aligned inside the machine.
You can also increase the white border around your sticker’s design to fix the issue. Sometimes, low margins may also cause issues in cutting.
Power cycle your machine. Turn it off, and disconnect its power cord.
Update the firmware and check it by performing the Print Then Cut feature.
Hence, these are some tricks you can follow to create a well-designed sticker with your crafting machine. That’s it for how to make stickers on Cricut.
FAQs
Is a Printer Necessary for Making Stickers With Cricut?
Not at all! You don’t necessarily need a printer; however, you can use it by choice. You can create a fun sticker with your Cricut and vinyl. There are more fun ways to create the best stickers with your machine without using a printer.
What Materials Do I Need to Create a Sticker With My Cricut?
If you want to create your own stickers with the machine, you need certain materials to get started; check the list here:
A brand new Cricut machine
A design software (Cricut Design Space)
Printable vinyl
LightGrip cutting mat
A scraper tool
Can I Use Something Else Instead of Cricut Design Space?
Yes, there are some alternatives to Design Space, like Canva. It’s one of the best tools for creating fun sticker designs. You can use this tool to print your stickers, and then you can cut them using your machine.
Source: how to make stickers on Cricut
#how to make stickers on Cricut#cricut design space download#cricut machine setup#Cricut.com/setup#cricut design space app#cricut design space software
0 notes
Text
youtube
install cricut design space app
Hi! Lovely crafters. I have been waiting to write this blog for many days after designing a custom label for my daughter’s school assignment. It was fun making it. And most importantly, my daughter loved it. So, I thought, why not share my way of creating labels with a Cricut Explore machine? go to install cricut design space app.
#install cricut design space app#cricut.com/setup#cricut.com/create#cricut.com sign in#cricut.com/register#cricut.com design space#Youtube
0 notes