
Don't wanna be here? Send us removal request.
Statistics
We looked inside some of the posts by d2atech and here's what we found interesting.
Average Info
Notes Per Post
1
Likes Per Post
1
Reblog Per Post
0
Reply Per Post
0
Time Between Posts
12 days
Number of Posts By Type
Text
9
Link
1
Last Seen Tumblr Blogs


Fun Fact
70% of Tumblr users say the Dashboard is their favorite place to spend time online.
Text
What are the use off Function Keys F1 to F12 on the Keyboard
So today we will know what the functional keys do in any computer and where we can use them. These function keys work in different ways in many places and work differently in different function apps. So first we will see the normal use of function keys which can be asked in any exam or anywhere. Along with this we will also see how we can use the function keys in Ms word, Ms excel, power point and chrome and where else they can be used.
Functional keys range from F1 to F12.
The usage of F1 is the same everywhere. So let’s see the use of function keys.
F1 : Help
We can take help with the help of f1.
F1 in uses of chrome : Help
F1 in uses of Word : Help
F1 in uses of Excel : Help
F1 in uses of Power Point : Help
F1 in uses of file : Help
F2 : Rename
If you press F2 on the desktop then nothing will happen but if you click on any folder and press F2 then you will be able to change the name of any folder. That is, you will be able to rename it.
F2 in uses of chrome : Non
F2 in uses of Word : Non
F2 in uses of Excel : Non
F2 in uses of Power Point : Non
F2 in uses of file : Rename
F3 : Searching/Search
If you click on F3 desktop then nothing happens.
F3 in uses of chrome : Searching
F3 in uses of Word : Non
F3 in uses of Excel : Non
F3 in uses of Power Point : Non
F3 in uses of file : Searching
to read this full article go to the website
0 notes
Text
How to fix printer offline problem in windows

Restart the printer and computer
Many times it happens that electric items turn on but do not work. For this, you have to turn off the power of the printer on the computer for 30 seconds. And again after 30 seconds, turn it on and turn on the power supply. This will solve the problem if it is due to power.
Troubleshoot Printer
If your printer is also showing offline then first of all you have to troubleshoot, to troubleshoot you have to follow these steps.
Search Control Panel > Devices & Printers > Select Printer > Right Click on Printer > Troubleshoot
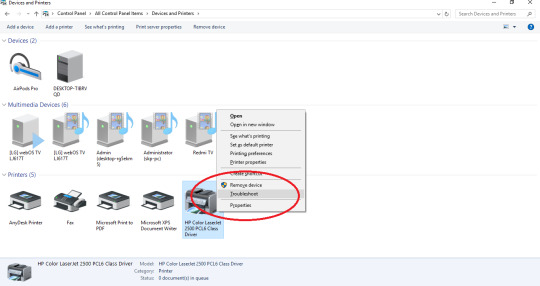
Make sure the printer and computer are connected to the same network and that the cable
You also have to inform that if your printer is being connected with wire then make sure that it is connected properly, if it is connected with USB then check the USB cable properly that it is connected properly and if the printer is connected with WiFi or network then you have to check your network connection properly, if your printer is on the network and is connected with WiFi in any way then also check that the network connection is working properly.
to read this full article go to the website
0 notes
Link
How to fix the error power surge on USB Port?
Many times it happens that in our system, power surge on USB port error starts appearing on the home page of the window. We remove this problem but it starts recurring again. This problem can occur in your laptop due to many reasons. So today we will solve it. For the solution, you will have to follow all the steps.
Follow these tips to fix power surge problem in USB port :-
Most Popular Settings :
Suggestions and Solutions:-
If you face USB port power surge problem in your laptop, first turn off your system and remove the battery
If you have installed any device like hard disk or graphics card in your computer or laptop then remove it
Come to the home page of your system and from there you have to open the device manager option (My Computer-Properties-Device Manager). After going to the device manager, you will find the option of “Universal Serial Bus Conductor”. Now you will find USB devices there which you will update one by one. Also, after going to their properties, you have to go to power management and from there disable “Allow the computer to turn off this device to save power option”. You have to do the same with all the USB drives. After this, restart your PC.
Shutdown your laptop properly
Shutdown your laptop and then remove the battery and then put it back in after some time.
to read this full article go to the website
D2A technical
0 notes
Text
How to convert a Microsoft word document to PDF
https://d2atechnical.com/wp-content/uploads/2024/11/WhatsApp-Image-2024-11-26-at-22.55.32.jpeg
Download PDF Reader :-
Before converting any file into PDF, it is necessary to install a PDF reader in your system. You have to download any kind of PDF reader and install it in your PC. You can also install PDF reader from this app store. You will be able to view PDF only with this PDF reader. You can also go to any website and download the PDF reader. There are three ways to create PDF from a document, so let us know all three ways today.
How do you convert a word document to PDF
Now whatever document file you want to convert into PDF, you have to first open it. There are three easy ways to convert any document into PDF, so let us know those three ways.
You can apply the methods I am going to tell you on any document. These methods will work equally everywhere.
Method: 1
https://d2atechnical.com/wp-content/uploads/2024/11/WhatsApp-Image-2024-11-26-at-22.35.34.jpeg
Method: 2
For this you will have to open your document, by this method you can make the entire document in PDF, you cannot make a PDF of any particular page. For this you will have to save the document as or press f12, as soon as you turn on the save as option, the save as type option will be displayed under the PDF name, word documents, excel documents will be displayed there, from here you will see an arrow downwards, that means more options will be displayed in the document, click on the document and more options will be displayed, as soon as you select it, you will get the save option, as soon as you save it, the PDF will be ready.

Method: 3
The 2 methods we have seen so far were without internet but the method we are going to see now will be online. For this, first you have to save your document file. Then go online to Google and search for document or PDF, then you can upload your document file from any website and convert it into PDF.
Note :
1. All the methods I have mentioned will work in any document of your MS Word, MS Excel, MS PowerPoint, whether it is Hindi or English. You can easily make any document into a PDF using these two or all three methods.
2. If the Method 1 and Method 2 PDF options are not showing for you, then you can go to this website, download and install them from there, then both those options will start showing for you also.
for more tech article visit on my website
0 notes
Text
New Best Download Manager For Windows 10/11
So today we will know what is a download manager and what are its uses and will know about two such download managers which are free for any user.
What is Download Manager? :
A download manager is a software tool that helps users download files from the Internet and manages the file download process, thus increasing the speed of downloads and reducing download problems.
Download Manager Feature:
1. Batch Downloading: Ability to download more than one file simultaneously.
2. Download Acceleration: Use of multiple connections to increase the speed of download.
3. Resume Broken Downloads: Ability to resume download even after stopping the download process.
4. Schedule Downloads: Ability to schedule the download process. File Management: Ability to manage downloaded files.
5. Error Handling: Ability to handle download problems.
6. Security: Ability to scan downloaded files.
Best Download Manager:
1. Ab download Manager:
https://d2atechnical.com/wp-content/uploads/2024/12/Screenshot-37.png
AB Download Manager is a free download manager available for Windows and Linux, you can download it from this website.
How to download ab Download Manager : To use it, first you have to install it. Here is the link of the website for installation. First of all, you have to download it from here. You can use this download in both Windows and Linux. You can download it in either exe file or zip file. As soon as you download and install it, you will also have to download the browser extension along with it, which will be for that file box.
How to use : To use it, first you have to open the app. After opening the app, go to the file, there you will see the option of new download, if you have a link to download, then you can paste it here. If you do not have a link and want to download something from a website, then you will see AB download, from which you can download it in the app.
Download
.Download Manager Feature:
1. Batch Downloading: Ability to download more than one file simultaneously.
2. Download Acceleration: Use of multiple connections to increase the speed of download.
3. Resume Broken Downloads: Ability to resume download even after stopping the download process.
4. Schedule Downloads: Ability to schedule the download process. File Management: Ability to manage downloaded files.
5. Error Handling: Ability to handle download problems.
6. Security: Ability to scan downloaded files.
2. Free download Manager:
This app is free for Windows users. If you have Microsoft Store active, you can download this app for free from there. You can also find its link here. Download link
How to use : It is very easy to use. To use it, you must have a link to whatever you want to download. You can take the link of any file and paste it on this app, then from there you can download this file fast and without any interruption.
Download
Download Manager Feature:
1. Batch Downloading: Ability to download more than one file simultaneously.
2. Download Acceleration: Use of multiple connections to increase the speed of download.
3. Resume Broken Downloads: Ability to resume download even after stopping the download process.
4. Schedule Downloads: Ability to schedule the download process. File Management: Ability to manage downloaded files.
5. Error Handling: Ability to handle download problems.
6. Security: Ability to scan downloaded files.
Benefits of Download Manager
1. Increased Download Speed: Download manager can increase the speed of download.
2. Resume Broken Downloads: Download manager can resume download even after pausing the download process.
3. File Management: Download manager can manage downloaded files.
4. Error Handling: Download manager can handle download problems.
Disadvantages of Download Manager
1. Adware and Malware: Some download manager software comes with adware and malware.
2. System Resources: Download manager software can consume system resources.
3. Compatibility Problems: Download manager software can be a victim of compatibility problems.
0 notes
Text
How to upload videos on YouTube
YouTube is the world’s most popular video sharing platform, in fact it is the most used social app and website in the world. Working on it can make you rich. However, YouTube has been updated so many times by 2024 that it cannot be estimated. YouTube has now become such a platform from where you can start your business. If you work on YouTube, YouTube will definitely give you money in return. Therefore, YouTube has become a source of income for people. So much can be earned from YouTube that it cannot be estimated. Everyone can create a YouTube channel. But not everyone knows the right way to upload videos. YouTube has given so many features and settings to upload videos. You can also give information about the video to YouTube first so that YouTube can send your video to the right people. So today we will know what is the right way to upload a video to YouTube. Before uploading the video, also know from where you will upload the video. You can upload the video from the YouTube app as well as from YouTube studio and also on the YouTube website. The right way to upload videos is used by big YouTubers, so today we are going to tell you the method.
1. Select video:
Before uploading the video, what to upload. Use the method to make sure, whether you want to upload a long video or a short video on YouTube, you should know in advance. From where you want to upload the video, you want to select the video from there, the video should be uploaded from the YouTube app because this is what big YouTubers do. To upload from the YouTube app, go to the YouTube app, click on the + icon and select the video. Select the time, YouTube will ask you, do you want to upload a video or a short video. After this, you select the video, then click on next, you will reach the page to add the description.
Choose the title of the video:
Before selecting it, think carefully because it will play the biggest role in bringing views to the video, so if you search for something, the title you have entered will be true. The title should be short and clear so that the reader can get an idea of the video. The video works like a title key word, so before entering the title, do search on the title. You can create title100 later.
Video thumbnail:
If you want more and more clicks on the video, then the thumbnail has to be made attractive so that the audience will see it, like if they see the thumbnail, they will definitely want to know what is inside the video. Thumbnail plays a very big role in making the video viral. If people never see them and nothing comes to their mind, then there are less chances of the video going viral. The better the thumbnail, the better the views.
How to add thumbnail: After choosing the video to add thumbnail, you will get the option of add detail. On the add detail page, thumbnail is automatically created along with your video. You have to remove it and put a new one there. On the default thumbnail, there will be a pencil icon. As soon as you click on it, the gallery’s background will open. From here you can add your thumbnail. Thumbnail size 1280 * 720 pixels Short video thumbnail 16:9 aspect ratio
Add Description:
Visibility:
Setting visibility is also very important. Whenever you upload a video, unlist the video and then upload it because just uploading the video is not enough. A lot of settings have to be done for it like making it public and adding members and also listing it.
On making the video public: This video will reach your subscribers. The video should be made public only when you are fully ready to upload the video, that is, after doing all the settings, after adding all the tags, after adding hashtags, you will upload the video, only then you should make it public.
Members Only: With this function, you can make the video private and show it to whomever you want to show it. This is a paid option by joining the members. To become a member, you have to pay some amount.
Making the video unlisted: means that until you are completely confirmed to make the video public, until you unlisted it, the video will be uploaded but the video will not reach your subscribers and common people. When it is uploaded, only you can see it.
Private: By making the video private, the video will reach only those people to whom you want to show it.
Schedule: With this feature, you can send your video to people as per your convenience, that is, you can make the video public at a specific time.
Location: If you want to show a location in your video, then you can use this feature.
Add to playlist: If you have already created a playlist in which you want to add your video, then you can add your video to the playlist from Add Playlist, otherwise you can create a separate playlist from here.
Allow video and audio remix : If you are adding a short video then you can use this feature, with this you can add music to the video and increase or decrease the background music, you can also use this in long videos for background music.
Add paid promotion label : If you have promoted any ad in the video, then for that you will have to click on Yash here, otherwise you can click on Joe.
Comment box : If you want people to comment on the video, then you can turn on this comment box, otherwise turn it off
YouTube Studio Settings : Before uploading a video, there are a lot of settings to be done, which we can also do from YouTube Studio. YT Studio also has its own options for description, visibility at playlist, and alternate content. There is something new in it like monetization, audience, more option, take categories, show how many views like this video, and allow embedding.
Monitization : If your channel is monetized then this option will be showing to you, otherwise it will not be showing, you can turn it on.
Audience : If your video is only for children then you can do yes, otherwise do this
Age restriction (advance): If your video has adult content then you can use this function
More Option:
Tag: You can enter tags and keywords related to your video here. Tags and keywords are also important because it helps in ranking your video and it appears higher in many searches.
Category: With this option, you can select the history of your video, that is, you can tell what your channel is related to.
Show like: With this you can hide the text on your video.
YouTube video upload settings on Chrome: The best way to upload videos is to upload videos sequentially or from Google. You can also do it from your phone. For this, you will have to open the mobile in desktop mode in chrome settings. You can directly upload videos through it. The settings that you get on Google, you will get them on the YouTube app and the YouTube studio app. So, if you don’t want to do it on both of them, you can directly upload it from Google. The advantage of this is that now instead of opening two apps, you can upload your videos from just one Google account. For this, you will have to keep your Gmail account logged in on Google and you can upload the video by going to the YouTube site.
Features on Google Chrome:
Video title
Description
Visibility
Playlist
Audience
Paid promotion
Altered content
Tags
Short remixing
Category
Comments
Show how many views like this video
You will not get this feature on YouTube mobile app and YT Studio app.
End screen: With this feature, you can show your other video on the screen at the end of your YouTube video so that the other person can watch your other video as well.
Cards: With the Cards feature, you can show the “I” button in your video. You can give the link of any of your videos in this button. You can use this feature at any place in the video. Also you can add playlist, channel list and any link in the “I” button.
Language and caption Certification: With this feature you can add language to your video. You can write automatic captions.
Recording date and location: Add when and where your video was recorded, viewers can search for video by location.
License and distribution : 1. Standard YouTube license 2.Creative common attribution (”I choose the Standard YouTube license to upload videos”)
Subtitles : You can add subtitles in YouTube Studio on Chrome without any third-party apps
Editor : From here you can also edit the video in which you will get all these features:
Trim & cuts
Blur
Audio
End screen

#how to upload video on youtube#how to upload video on youtube channel#how to upload video on youtube without copyright#how to upload video on youtube from iphone#how to upload video on youtube with high quality#how to upload video on youtube ali tech
0 notes
Text
#wifi adaptor is not working#can't enable wifi adapter windows 10#how to fix wifi adapter not found in windows 10#cannot find wifi adapter windows 10#error code 10 wifi adapter#how to fix missing wifi adapter in windows 10#pc wifi adapter problem#pc not recognizing wifi adapter
0 notes
Text
How to Install Network Adapter Driver windows
for more information click here
It is very important to install a network adapter on Windows. If your computer or laptop does not have a network adapter, then you may face a lot of problems in using the Internet because through the Internet we are able to connect to the whole world. So let us learn how to install a network driver.
The Best Way to Install Network Adapters in Windows
If you want to install a network adapter in any computer or laptop, then first of all you have to provide internet in your system. For providing internet, you will need your phone.
How to use internet from phone: For this (you can also watch the video) you have to connect the cable of your phone’s charger to the system, then you have to connect that cable to your phone, when the phone gets connected to the system, then you have to go to the phone’s settings, from there Internet settings> Hotspot & Tethering> there will be a tethering option, you have to turn it on. Then the internet will start working on your PC or laptop. Settings> Network & Internet settings> Hotspot & Tethering turn on.
When the internet is connected to your PC, now you have to install the internet adapter driver in your system. For this, you have to go to Chrome and from there you have to download the adapter with the name of your laptop or computer. I am telling you about some websites from which you can go directly to the website. After going to the website, you can download the network adapter by entering the model number of your laptop. After downloading the network adapter, you can install it. When you complete the installation process with this, the network adapter driver will be installed in your system and then you will be able to run internet on your PC through Wi-Fi or Ethernet cable.
2. Install the driver via automatic update.
Step 1 : Connect the internet to your computer or laptop
Step 2 : Click on the Start button in the window and type Device Manager and then open it
Step 3 : Click on Network Adapters in Device Manager and then find the network adapter you want to update
Step 4 : Right click on it and click on Update Driver option and then update it from there.
3. Update your drivers with Windows update : Whenever you have to install a driver in your PC, that is, if there is any kind of driver machine in your system, then due to which your computer is not working in any way, then for this you can also update the Windows of your PC. To update, click on the Start button, then search update and find Windows update settings and Windows update check for updates.
Start Button>Search Update>Windows update setting>window update>check for update
4. Installing the network adapter manually can take some time. For this you will have to follow a few steps. First you have to go to the windows start button and search for device manager. As you come to device manager, after that you have to search for the network adapter option, then click on it, an action button will be displayed on the top. As soon as you click on the action button, you will have to open the add legacy hardware option. After that say welcome, then the add hardware wizard option will be displayed. From there, click on the next button, then you will see two options. 1. Search for and install the hardware automatically (recommended) 2. Under install the hardware, select manually from a list (advanced). If you have already installed the driver then go to the second option or click on the first option and then click on next. As soon as you click on next, you will select the device driver you want to install for this hardware. A popper window will appear on the right side of which there will be a manufacturer option from which you can select the company and on the right side there is the model from where you have to install whichever adapter you need.
#technology#knowledge#wifi adapter issues#error code 10 wifi adapter#how to fix missing wifi adapter in windows 10#wifi adaptor is not working
0 notes
Text
Air taxi Bangalore Airport to Electronic City in 19 minutes
Travelers in Bangalore can get relief from traffic jams. Because Sarla Aviation, a company in Bangalore, is planning to launch electric flying taxis. Which will help in controlling the traffic of Bangalore. Sarla Aviation has partnered with Bangalore International Airport Limited (BIAL) to introduce electric vertical take off and landing (eVTOL) air taxi aircraft to give relief to Bangalore from traffic. Electric flying taxis will save travel time and air pollution caused by vehicles in Bangalore is also likely to be reduced.
Bangalore traffic problem :

Traffic ranking
Delhi, Mumbai, Bangalore and Pune all have very slow traffic. A recent survey by geolocation technology company TomTom ranked Bangalore 6th in the world for traffic congestion. It takes an average of 30 minutes to cover a distance of 10 km in Bangalore.
Need Air taxi
The introduction of flying taxis can provide commuters a faster and more sustainable way to navigate the city’s congested roads, besides providing relief from traffic jams and bad roads, especially during rains. It will also save commuters’ time and reduce air pollution in the city.
Sarla Aviation eVTOL, Bangalore
Sarla Aviation’s eVTOL (Electric Vertical Take-Off and Landing) aircraft represents a cutting-edge solution in urban air mobility. It combines the vertical take-off capability of a helicopter with the efficiency and environmental benefits of electric propulsion. This innovative approach positions Sarla’s eVTOL as a key player in transforming urban transportation, offering a quieter, cleaner, and more efficient alternative to conventional ground and air travel.
We’re on a Bold Mission : We’re excited to introduce the country’s first electric vertical take-off and landing aircraft. Targeting four of the world’s most congested cities – Mumbai, Bengaluru, Delhi, and Pune – Sarla is set to revolutionize urban mobility. We’re committed to making aerial ride-sharing as affordable as current Uber or Ola rides, opening up a new realm of accessible and efficient transportation for a diverse array of customers.
when will it be regular :
In any country, when a new technology comes, its build quality is checked by the government or the responsible authority. In that, it is seen how effective this technology will be for the city. When everyone is satisfied, then it will be regulated. In Bangalore, the electric flying taxi is still awaiting regular approval and may take up to three years to become fully operational. Sarla Aviation promises that using air taxis will be more economical than the traditional helicopter services already available in the city.
Taxi Details :
Sarala Elevation’s seven-seater electric flying taxis are expected to reduce travel time. The taxis will initially run between Bangalore Airport and Electronic City, a distance of 52 kms which can be covered in just 19 minutes, while the current travel time during peak hours is around three hours. The fare for this service is expected to be Rs. 1700.
Air taxis are a form of urban air mobility (UAM) that aims to provide on-demand air transportation services, often using electric vertical takeoff and landing (eVTOL) aircraft. They’re designed to reduce congestion on the roads and offer a faster alternative for short-distance travel within cities or from urban areas to nearby destinations.
Key Features:
On-Demand Services: Users can book rides via an app, similar to traditional ride-sharing services.
eVTOL Technology: Most air taxis utilize electric propulsion for quieter and more efficient flights.
Short Distances: Typically designed for trips ranging from a few miles to around 50 miles.
Urban Infrastructure: Requires vertiports (landing and takeoff zones) strategically located throughout cities.
Challenges:
Regulation: Ensuring safety and air traffic management in crowded urban skies.
Public Acceptance: Gaining trust from potential passengers regarding safety and noise concerns.
Infrastructure Development: Building necessary vertiports and charging stations.
Current Developments:
Several companies are actively developing air taxi services, including Uber Elevate (now part of Joby Aviation), Volocopter, and Lilium. Pilot programs and testing phases are ongoing in various cities worldwide
0 notes
Text
How to Fix Automatic Shutdown Problem
To solve the automatic shutdown problem, you have to try 6 methods in your system, which are as follows. (1) Power option settings (2) Virus Scan (3) overheating problem (4) RAM and ROM Clean (5) software problem (6) program update :
It happens many times that the laptop or computer shuts down now we will find a way to fix it in the blog in which you will get the complete solution which can also happen due to software, hardware or any settings getting damaged you will find different solutions in several points below so you can use all these solutions one by one and then solve it.
1 note
·
View note