
Statistics
We looked inside some of the posts by delulouise and here's what we found interesting.
Average Info
Notes Per Post
80K
Likes Per Post
49K
Reblog Per Post
31K
Reply Per Post
247
Time Between Posts
12 hours
Number of Posts By Type
Text
14
Last Seen Tumblr Blogs


Fun Fact
Tumblr was attacked by a cross-site scripting worm deployed by the Internet troll group GNAA on Dec 3, 2012.

Text

Working on a new typeset of Shakespeare.
#typesetting#william shakespere#book#aesthetic layouts#ficbinding#why is affinity publisher not letting us format footnotes????
2 notes
·
View notes
Text
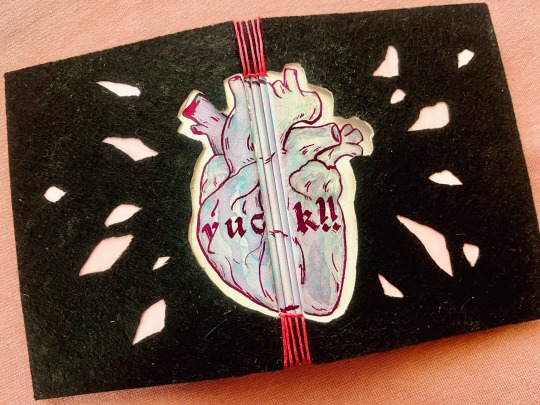


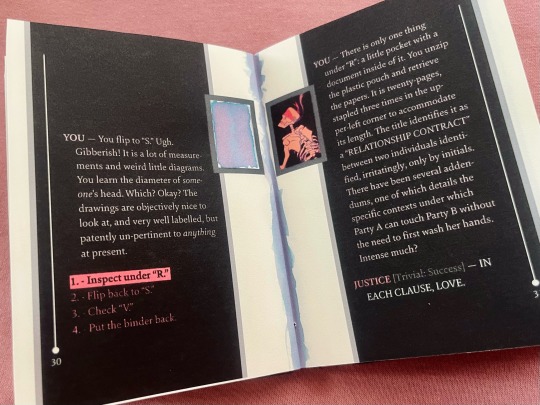

necro elysium (yuck!!) by @mercyisms
A confession: I LOVE fics that use the Disco Elysium format, and The Locked Tomb is just the perfect fit for this type of AUs (and going over the top with book design). And this one is so so so good!
🫀 I knew I wanted to mimic the layout of the text in DE basically as soon as I finished reading and saw the gorgeous illustration by @smapis.
🫀 The cover is inspired by the description of the card, but instead of trying to recreate it exactly (and messing with glitter) I went for the same theme and the kind of DIY arts and crafts style project vibe. Hence my first buttonhole stitch binding, with the heart painted with chromatographic ink (the color is called Unicorn’s Tears) and inked it over in hot pink with a glass dip pen. I also painted the folds of the pages and filled in some of the frames (where the narrator is YOU).
🫀 The rest of the portraits are cropped out of the aforementioned gorgeous illustration, except for Jod’s, which is a photo of a black hole (presented without comment).
🫀 I always want to play with textures for TLT fics, so this time the cover is black felt over a pink gift bag with nice leather-textured pink endpapers, and the textblock paper is a gorgeous 125gsm half-cotton that bravely took everything I threw at it.
I had so much fun working on this 🥰
600 notes
·
View notes
Text
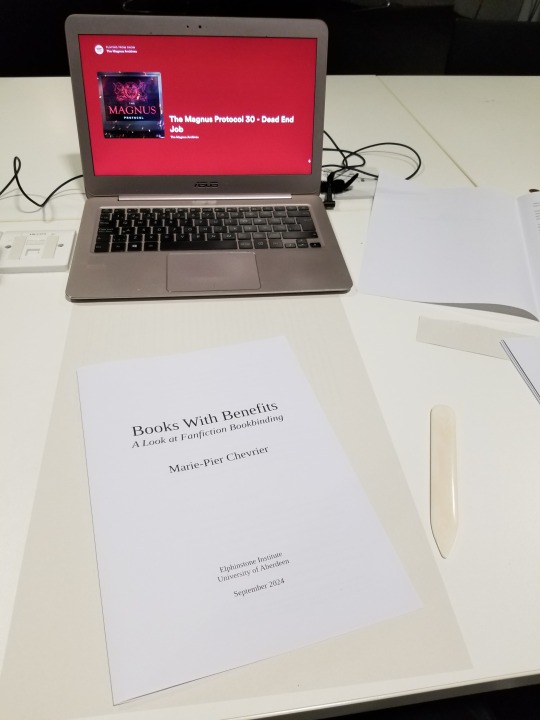
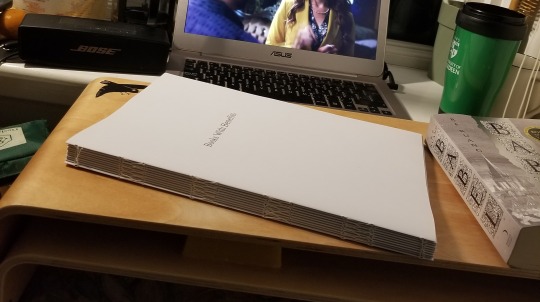
Update on fanbinding dissertation: binding the dissertation itself!
After many days and nights of writing and wrangling footnotes and proofreading (where I couldn't convince my laptop that yes, I meant textualisation, not sexualisation), 'twas time to bind the beasts! In three copies, no less! Which I approached with way too much confidence from my one fanbind experience, and came with many fun little surprises due to the format guidelines I had to follow 🤡
This is going to be a long one, so here's my happy unfocused mug to confirm that it all ends well:
First pickle: The typesetting. I absolutely loved typesetting fanfic, but the dissertation had to be A4 (way less fun, boo-hoo), one-sided, with every page numbered. Did you know that LibreOffice won't let you add blank pages and only number the non-blank ones, without skipping numbers? In order to print signatures I could fold into one-sided pages, only numbered on the right-hand pages, I ended up switching to landscape orientation and including the equivalent of a blank page in the left margin.

Second pickle: The imposing, which I couldn't figure out using the amazing bookbinder with my weird landscape 2-page layout. I finally gave in and rearranged all the pages manually, which looked like p. 1 on the recto / p. 10 on the verso, then p2/p9, p3/p8, p4/p7, p5/p8, p6/p7. And because there was no way I was paying print-in-colour prices for all of this, I further split the manually imposed pages into two files, one for the greyscale printer (cheaper) and one for the colour printer (highway robbery). Still came up to ~£70, just for printing.
Very glad I went in chunks of 10 for the signatures, it made both the math and the folding using sheets from two different piles much easier, highly recommend (if for some absurd reason you also want to bind one-sided numbered pages in folded signatures).
Third pickle: Linear time. Had planned on having so much time to print and bind this thing, but kept writing and rewriting and proofing and oops! It was due in less than 24 hours and it was still not out of the laptop. So.
22/09/24, 6pm: Got to the library, started printing.
6.45pm: Found another printer where all the paper was the same shade of white, started printing again 🤦♂️ (kept the the misprints to use as scrap paper when glueing)
7.30pm: Started folding the 150 sheets of paper (3 x 100-page dissertation, 2 pages per sheet). Went from the last episode of The Magnus Protocol, to an episode of Welcome to Night Vale, to deciding restart The Magnus Archive, which felt almost poetic.
9pm: Headed back home, trimmed the edges (with a borrowed guillotine), folded the endpapers, stabbed everything. Lack of pictures to be blamed on my inability to mess with linear time, and the eventual sleep deprivation.
10.30pm, I think? Started sewing the signatures together, again with Supernatural (which I started rewatching when I submitted my first dissertation assignment in mid-May, and finished 2 days after submitting the dissertation itself, again, such poetry).
2am, probably? Tipped the endpapers and glued cheesecloth over the spines. Somehow figured out where to set the three textblocks to dry (I don't have a press). Sadly gave up on sewing on (or glueing) headbands, because time.
3am-ish: Cut the missing cover pieces out of millboard (had already cut 4 of 6 covers, since I knew it had to be A4), measured the spines of the three textblocks and cut those as well.
???am: Did some math, because sure, that's the right time for that. Cut the bookcloth to size, glued the cover pieces on the bookcloth. Remarkably only messed up the measurements on one of them! That means one of the copies has a millimetre of millboard showing in the inside corners of the back cover, but not enough time/bookcloth/millboard to redo it, onward we go!
Way past dawn: Took a break for food while the covers somewhat dried. Cased the three textblocks in the three covers, with the endpapers bubbling, which took me by surprise since it was the same paper and same glue I had used for the fanbind without any problem. I'm now thinking that bigger book = more time needed to apply the glue = endpapers getting warped, but I was so exhausted by this point that who knows. Again, no time to redo it!
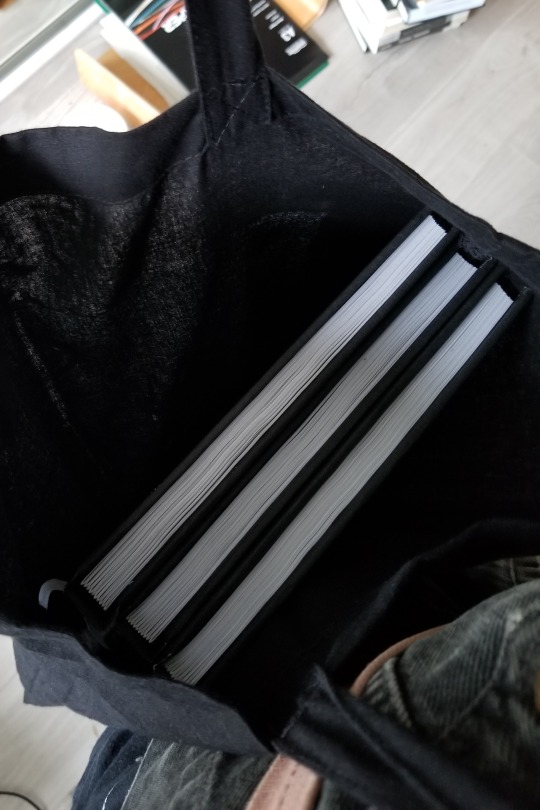
9.30am: Stacked the dissertations under the heavy reference books I used to write the dissertation. Toute est dans toute hein. Went to bed while they (mostly) dried.
2.30pm: Woken up by my neighbour's dj set. Eventually put all that hard work in a tote and walked to school to hand it in at 4.30pm.
Fourth and last pickle: The titling. Couldn't find paper long enough to do a half-dust jacket like I did last time. Had big cutout plans, ran out of time and couldn't finish testing those. Also had some thicker textured paper I thought of cutting and glueing to the cover as a title card, but it turned out too thin and was warping. Finally resigned myself to submitting it with a blank cover, but one of my teachers asked if I would mind adding the title on with metallic markers to make it easier to identify (one copy will eventually be on the shelf at the Institute), and I'm SO HAPPY with how it turned out. Metallic markers. Why didn't I think of that. (I did, however, think about dressing appropriately for the occasion.)
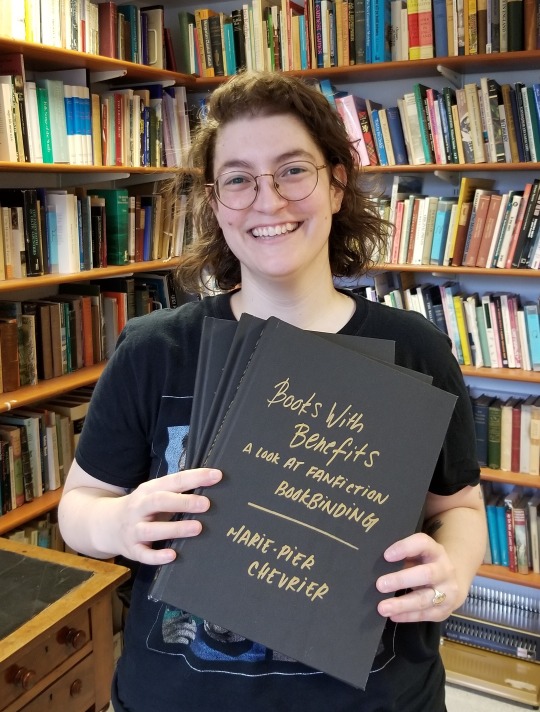

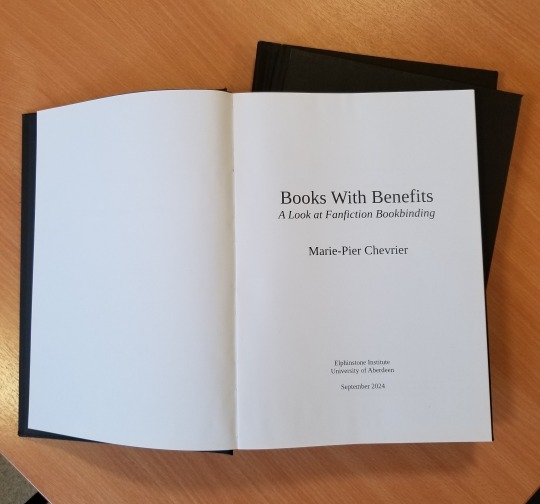
So, is it possible to print and bind 3 books in less than 24 hours? Yes! Am I glad I did it? Also yes, very satisfying, love being extra! Would I do it again? God no, I've been sleeping for two weeks and I still haven't recovered. Can't wait to start binding something else though, so I guess it wasn't that bad.
That's it! That's over! Aaaaaah! Now waiting for the grade and comments, and hopefully soon I'll be able to share the content as well.
I'll also try to post some more about the research/writing process itself, somewhere between the late nights reading international treaties on income tax and the early mornings spent figuring out how to apply for a phd next.
Thank you so much to everyone who followed along, this was way more fun than I ever could have hoped!
503 notes
·
View notes
Text


Question: What is the greatest magic of all? Answer: Friendship, right? [B]: The greatest magic of all is not friendship, it's chronomancy, the ability to control and warp time. If friendship were the greatest magic, look, it's a pet peeve of mine (...)
DUNGEON MASTER BRENNAN LEE MULLIGAN ANSWERS DnD QUESTIONS (TECH SUPPORT | WIRED)
68K notes
·
View notes
Text
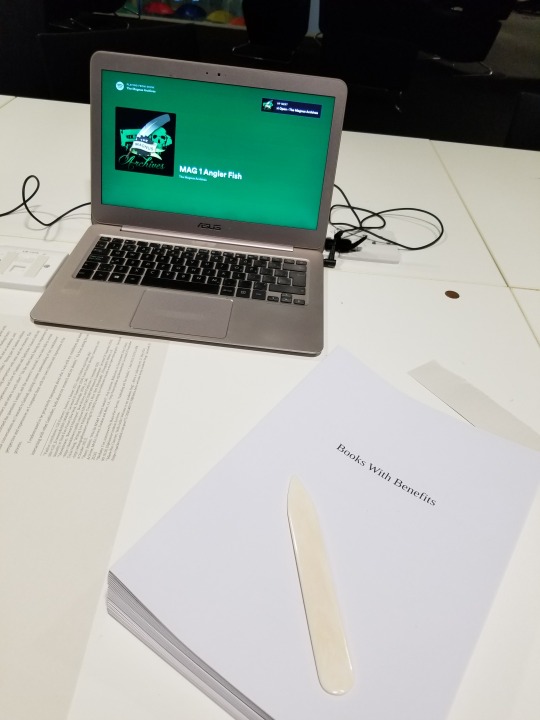
Free Typesetting Template (Letter Folio)
So while I try to get some designs set, I thought I'd clean up and share the template I use for typesetting!
Templates save lots of time, and let me keep 'tools' where I like 'em. Free template here on my google drive ✨.
(As with all my stuff, Personal Use Only!) This file is for Affinity Publisher ONLY. I highly recommend getting Affinity Publisher if you're doing a lot of typesets and want a high degree of control over details. It has most of the features of Indesign, and far more capabilities than Word or Google Docs. There is a learning curve at the start, but overall it is a great program for typesetting and is a one time purchase, versus a subscription like other services. Please note, this template is set for my own personal preferences, and I always adjust it according to the text I'm working on. You can make whatever changes you want to suit it to your needs; I just included the normal settings I tend to use. See below the break for template details! (How to use/notes)*
This template is sized for half letter pages.
140% Leading, 11pt Font Size (Body Text)
The baseline grid is set for these exact preferences. If using a different font size/leading, I change these to match and play with the text boxes for 'Master Body' to make them look nice.
The template has the text boxes set up for where I usually insert text, copy, and headers/footers. I usually fill these out with the relevant details, and adjust the placements and sizes as needed.
I put X down where I usually write my name/imprint. The copyright page has a lot of blank space because I like to include my personal logos on there.
Main text gets copied and pasted into page 9, then flows into the rest of the pages.
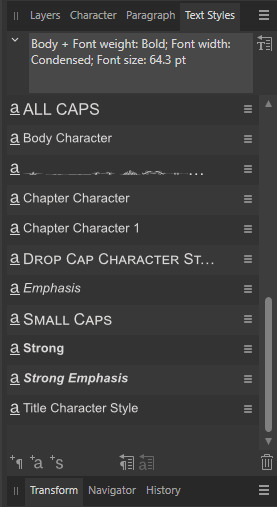
The paragraph and character styles I use are all included.
Very important, after pasting in your text, go to Find and Replace, and turn all italics to 'Emphasis' character style to preserve them.
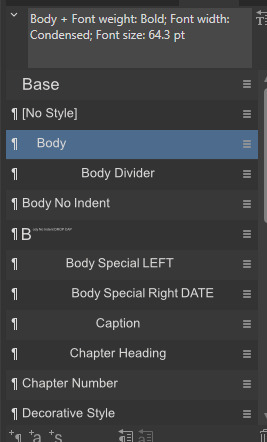
'Body Divider' is how I include dinkuses.
'Special' paragraph styles are for when texts have things like letters or songs included.
Typically, I use 'Chapter Heading' + 'Chapter Character' for chapter titles, and set a table of contents on page 7 using these settings.
You'll notice that on page 9 I have a text box that links into the Master Body pages. This is my sort of 'test' page for chapter titles. I can freely change the size and layout on this specific page. I move it around based on what design I come up with, then copy that design into my 'Master Chapter Heading' spread to apply to the rest of the chapter title pages.
At the very end of a file, I'll usually put in a colophon. This is not in the template, but it's just a blank page at the end with my stamp and notes on the size of the typeset and what fonts I used. *I don't have a fully written tutorial at this time, but I recommend joining Renegade Bindery's discord, where a lot of very talented people have shared their tutorials, and provide very helpful live answers. Edit 9/20: Tutorial post here!
121 notes
·
View notes
Text
Free Typesetting Template (Quarto)

Finally got around to cleaning up a Typesetting Template for Letter Quartos! This is a free Affinity Publisher template for making books that are quartos (quarter letter page size). Please note it only works for Affinity Publisher. Text is sized for 10pt font with 140% leading. See my tutorial for more details on how to typeset in Affinity with a template.
I also updated and refined my old Typesetting Template for Letter Folios, and it should all be current in my Typesetting Resources folder!
22 notes
·
View notes
Text
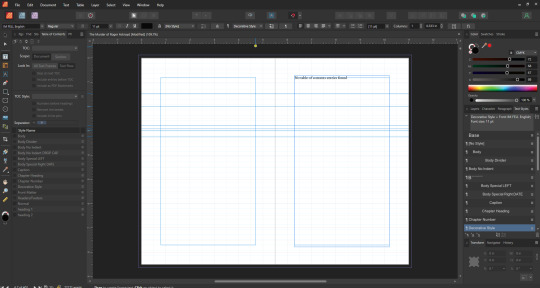
A Tutorial On Typesetting In Affinity (With Template)
This is an semi-abbreviated guide to typesetting in Affinity Publisher, using the template I posted here.
While this is not a comprehensive tutorial, I tried to be as detailed as possible, and hope this help folks with their typesetting journeys! Note: there are different ways to to do this, these are just the ways I've used personally. (And by 'used', I mean all the features and functions I've bashed my head against till something readable came out). Second Note: these steps do apply specifically to the template I posted. This is the template I use to save time when typesetting, as it already has all the Paragraph and Character Styles and text boxes and margins I've made in previous works. Warning: wall of text below the break!
Part 1
Importing your text into Affinity. First things first, this step all depends on where you are getting your text from. If you are typesetting something from Project Gutenburg or a similar site, copy and paste the text into Google Docs. If you are typesetting from AO3 or a similar site, download an html file of the text, then copy and paste that into Google Docs. Once in Google Docs, download the file as Rich Text Format (.rtf). Open the .rtf, and copy and paste that into the Affinity Template. Just stick it into any of the body pages on page 9 or up. It'll 'flow' automatically to fill the pages. Whew. Okay. Now, you can actually work on your text in the template.
Document size (optional). So the template I made is for half letter (letter folio). Letter is the size of the page I would be printing on, and folio is the imposition (which means if I was making it into a physical book, I would fold that page in half. Folio = the page is in halves. Quarto = page is in quarters. Octavo = page is in eighths etc.). You want your document size to be the size of one single page in your book. - Now, again, the template I have is all set up for a single page size equal to half letter. If you want to change the size, you can go to File -> Document Setup -> Dimensions. If you change the size, you will have to go in and change the text boxes and margins I have left in the template to fit your new dimensions.
How to Auto Flow your text. You will notice that the template only has 50 pages. Chances are, you can't see all your text. To get it to automatically appear, just hold down Shift and click the red triangle on the right of one of the text boxes with your body text in it. It should automatically generate the pages you need with your text. - If you need to manually get your text to flow from one text box to another, just click the little triangle on the right of the text box your text starts in, and then click the text box you want it to flow into. Bonus: To make a text box, click the image of the T in the white square on the left, and draw it on the page. This is the Frame Text Tool, or the text box maker, To add a picture, click the rectangle with an X through it. This is the Picture Frame Rectangle. Draw a frame, then go to File -> Place, and add your image.
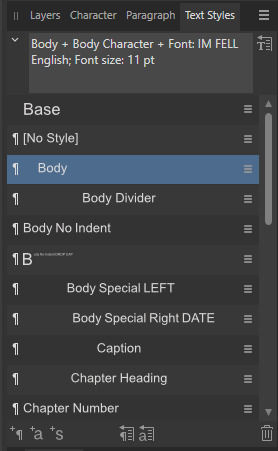
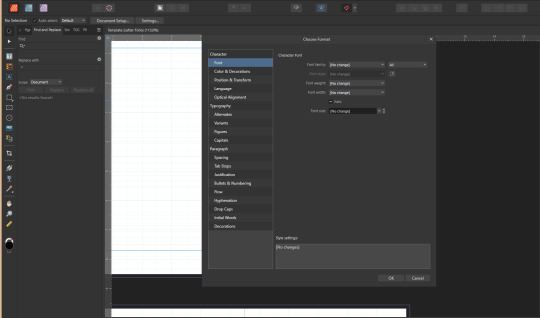
Your text is in the template. Time to get it dressed. Okay, now you need to set up your Text Styles. Text Styles should be located on the right hand tool bar. Text Styles are essentially how you tell Affinity how you want the different parts of text to look like. You can change your fonts, spacing, justification, etc, by playing around in the settings of a Text Style (to do so, just click the three lines next to the text style's name, or create a new one by clicking one of the + symbols at the bottom of the Text Style tool bar. Now, there are two types of Text Styles: Paragraph Styles (have the backwards 'P' looking symbol) and Character Styles (have the underlined 'a' symbol). Think of these like jackets and shirts for your text to where. The Paragraph Styles go on over the Character Styles, but you can still see the Character Styles underneath. - First thing to do is go to Find and Replace. It should be next to the left hand tool bar. - Click the cog to the right of 'Find'. Then click 'Format'. This should bring up the screen below. - Click the box next to Italics so it turns into a check mark. Now hit Ok. This will now allow you to find all Italics in your text. - When you find the Italics, you can now Replace them. Hit the cog next to 'Replace with'. Click Character Style. Click Emphasis. -Find and Replace all.
This will save all your Italics while you work on the text. Note, do NOT select all your text and use a Character Style on it. It will override and remove your Italics. You can only have one Character Style and one Paragraph Style applied to specific text. Because of this, I don't really use any Body Character Styles, and make all my changes usually in Paragraph Styles. Part 2
Chapter Headings. Find and Replace is one your best friends in Affinity. After I have Italics saved, I do the Chapter Headings in the text next. I Find and Replace the Chapter Headings if I can, or manually select them. Then I apply the Chapter Character Style to them. Now, if I ever want to change them en mass, I can just Find them using that Character Style to apply a new Paragraph Style or whatever I want to them.
Body Text. Now is the time to finally use a Paragraph Style. I select my text, and apply the Paragraph Style labeled Body to it. While I have it selected, I can change my font type, size, and leading to whatever I want. If I change leading, I do have to go in and edit the Paragraph Styles to have the same leading across all of them. The template is setup for 11 pt font and 140% leading. - To change leading in a Paragraph Style, click the three lines to the right of the Style -> Edit 'Name' -> Spacing -> Leading. - If you change font size/leading, you will need to change the Baseline Grid. Baseline Grid is the underlying grid that your text will snap to (you can disable this in a Paragraph Style, but I like to use Baseline Grid to make sure the Body Text is all lined up the same). To change Baseline Grid, click the button in the top middle of Affinity that looks like an A with blue lines behind it. Then go to Grid Spacing. I usually set it to whatever is my body text leading equal to.
Back to Chapter Headings. At this point, I usually use Find and Replace again, and Find the Chapter Headings with their Character Style. I use Replace to apply the Paragraph Style 'Chapter Heading' to them.
Other Styles. Okay, so Chapter Headings are set. Body text are set. But there's still text that need different formats, like where there's a body divider/dinkus, or the start of a chapter where there's no indent. From here, I manually go through the text, and start setting the little things that weren't covered by the Body or Chapter Heading styles. I use Body No Indent Drop Cap (Paragraph Style) for the first paragraph of each chapter. I use Body Divider (Paragraph Style) wherever there's a section break. I use Body No Ident (Paragraph Style) wherever there's a new paragraph after a section break. And I use Body Special as needed, if there's unique bits of text in the work, like letters, or poems, or songs, to make them stand out more. - This part of typesetting is a lot of me just going through manually, while scrolling through and checking the original text I am typesetting to see if there's any places that need special attention or different paragraph styles. Lot of side by side scrolling and comparing how the original author/publisher had the fic looking, and making sure my typeset matches in a way that I like.
More on Body Dividers. You can check out my book of dinkuses for potential fonts for section breaks/dividers. Once I find the dinkus I like, I copy and paste it into my text, or use find and replace. Just make sure that the Body Divider Paragraph Style is applied to whatever you put. - Now, you may need to adjust the dinkus because it's not centered or spaced how you like. To do this, click the three lines to the right of Body Divider under the Text Styles tab on right hand side of your screen. This brings up the Text Style Editor Box (see the picture below). - To get the divider looking how I want, I go to Paragraph and then adjust the Leading, Space Before, and Space After until the Body Divider looks how I want. Sometimes you might want a section break with a lot of space, sometimes you might want it narrower. This is the place to do it.

Part 3
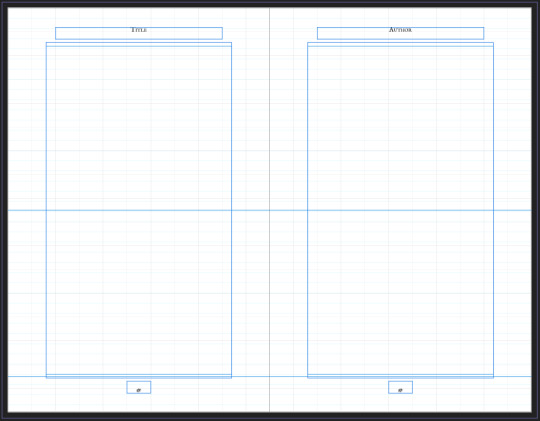
Next step: Working in Master Pages. Master Pages are great. You can apply them to your text to make your text look uniform. Whatever the Master Page is, the other pages must follow. -To apply a Master Page, right click the page you want on the left sidebar under Pages. Then click apply Apply Master. Then choose what Master to apply. The body text pages all have the Master Body text applied to them already, but you may need to change one because it's the start of a new Chapter. -If you want different margins in your text, this is where to do it. I have mine set up for .8 outer and inner margins, and slightly narrower on the top and bottom margins to account for leading. If you want to change this, just drag the text box to whatever size you want to fit your margins.
Headers/Footers. In the Master Page titled Master Body, you can change the placements and formats of the headers/footers. I usually just have these all centered, but you can put them and size them however you like here, and it will apply to all the main body pages of your text. - The template is setup so you can just fill in your title name and author name in the header locations of the Master Body pages. Click the text boxes and type in whatever you want. If you don't want to use these, you can delete them on the Master Pages, and they won't show up at all.
Master Chapter Heading. The Master Chapter Heading pages are not applied to the text. In the template, you will see that page 9 does not have the Master Body applied to it. This is because I like to play around with different text box sizes and chapter heading designs here, then copy and paste them into the Master Chapter Heading when I have one I like. Then, I can just apply the Master Chapter Heading to wherever there is the start of a new chapter.
Part 4
How to add a Table of Contents. Okay, once all the Chapter Headings are formatted and everything is on the page they should be on, you can put in a table of contents. To add a table of contents, put a text box down wherever you'd like your table of contents to be located. This is usually on page 7 of the template for me, but it may be different for you based on your text or how you do your front matter. - Click in that text box. Then, click Text (on top of your Affinity Screen, towards the left). Go to Table of Contents. Then Insert Table of Contents. - See the picture below. Your screen should look similar to this. - On the left, you can see we are in the Table of Contents tab now. Under Style Name, check the one that says Chapter Heading. Now, everything that had the Paragraph Style Chapter Heading will be in our Table of Contents. - Click the three lines to the right of where we checked Chapter Heading. You can then check Include Page Numbers here.
Part 5
Alright! Now we have pretty much everything done. Almost. There's just the front matter to do now. These parts are pretty much just pasting/typing in your information. The front matter in the template I made is set up for Project Gutenburg public domain stuff. When I typeset things from AO3, I put the stats here instead.
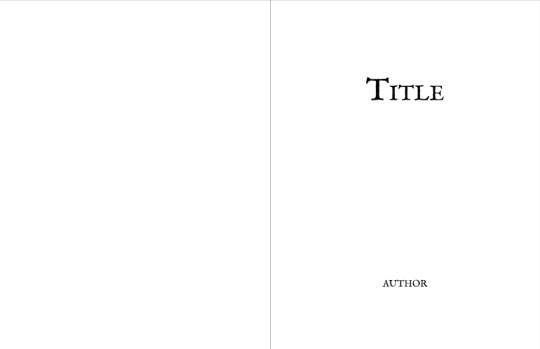
Front matter. What is it exactly. The front matter included in the template is as follows: bastard title page (just the name of the book), blank page, full title page (title and author; you can include publication/imprint info here as well), copyright page, book bound by page (this is not an official thing, just something I decided to add to my templates since mine as free to use), blank page, table of contents. Sometimes a text has a preface or dedication. You can add these pages to the front matter, and if you need more pages to add them, just right click on the left hand side under Pages wherever you would like the new pages to go, then click Add Pages. I use Master A for front matter pages. These are just plain, blank pages with nothing on them.
Title Pages. Title pages. You can pretty much do whatever you want here. I've posted links before to places you get free to use images/art, but you don't need to include any images/art at all. It's all totally optional, I just like to have a bit of fun on my title pages and put in little extra bits.
Anyway, hope this helps and I didn't ramble tooooo much (this started as a short post to just talk about how to import text). If you're looking for more detailed help, I do recommend joining the Renegade Binder discord. I learned how to use Affinity Publisher from someone's tutorial there. I can also try to make more posts in the future further explaining things.
55 notes
·
View notes
Text
Shameless plug of my transcription Fiverr gig 😘
So, a brief introduction of myself.
My name’s Louise, I’m a freelance transcriptionist who has experience working on interview and academic focused transcriptions. I’m looking to expand my work into other forms of general transcribing, like podcasts, lectures, etc.
So if you need some transcripts, hit me up for whatever audio/video file you want transcribed.
I’m also a typesetter, so I can ✨aesthetically format✨ the transcripts as well if you like.
https://www.fiverr.com/s/386P5kL?utm_source=CopyLink_Mobile

1 note
·
View note
Text
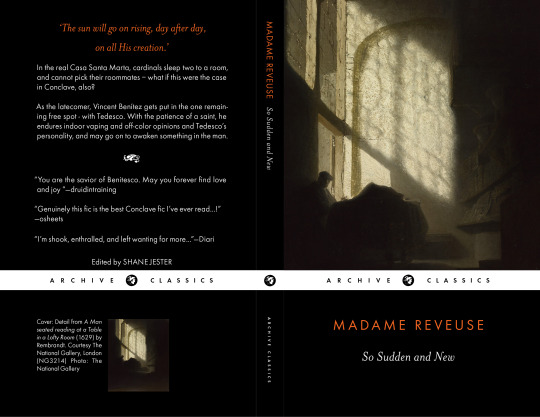

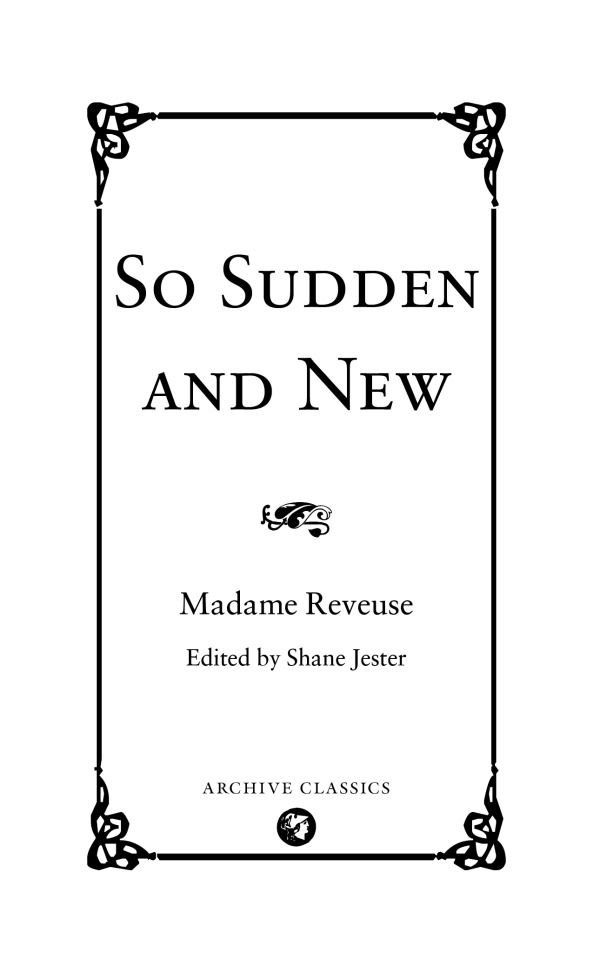


So Sudden and New by MadameReveuse
a little (late) birthday gift for my mutual, @weepylucifer. hope you like it <3
typesetting + cover done in InDesign
full pdf here
81 notes
·
View notes
Text
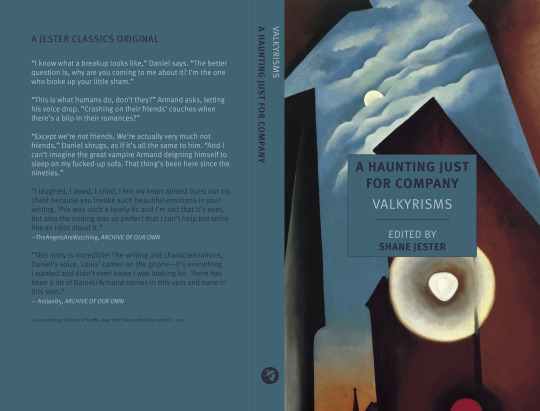

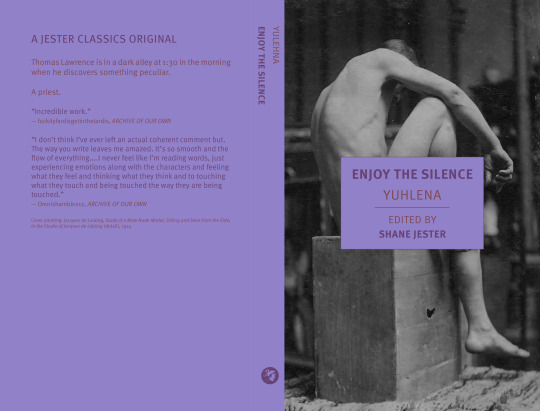
just trying out some new covers, nyrb-inspired :)
a haunting just for company by @valkyrisms
The Exorcist of Venice by @radishanatomy
Enjoy the Silence by @yuhlena
101 notes
·
View notes
Text
Dissertation on Fanfiction Bookbinding — Looking for participants! [EDIT: Thank you so much, participants found!!!]
[Edit continued: I'm still sorting through emails and setting up meetings, will reply to everyone very soon, I can't even begin to thank everyone enough for the visibility that's been given to this 💜 I'll keep the updates coming as I work on the dissertation (and learn how to bookbind), in case anyone would like to follow along. For any questions about the research or comments/suggestions/resources about ficbinding, my asks are wide open. Thank you thank you thank you!!!]
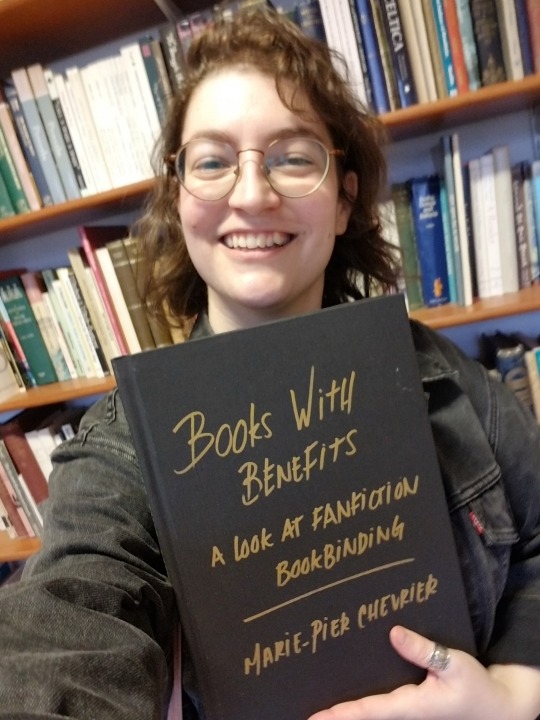
Hi! My name is Marie Chevrier, I’m currently doing my postgraduate dissertation on fanfiction bookbinding, and I’m looking for people to talk to about it!
If you’ve ever taken a fanfic from somewhere online and turned it into a physical copy, either for yourself or as a gift, I’d love to know more. From printer paper stapled together to typesetting and painted edges, nothing is too simple or too complex — I’m interested in the whole process, what motivates readers or authors to bring the story to a different format, and how it’s one more way to interact with stories actively and creatively. This will be the final project of my MLitt in Folklore and Ethnology with the Elphinstone Institute (University of Aberdeen, Scotland).
What to Expect
To participate, you must be 18 or older and speak English. I’ll give you more details and answer any questions you might have via email, and will then set up individual video calls with participants (if you happen to be in North-East Scotland, we could also meet at an agreed public location). I’ll tell you more about the dissertation and explain how what you share will be used, which depends entirely on what you agree to, including if you would prefer your contribution to be credited or anonymised. I will ask you about your experience with fanfiction bookbinding and if you have some examples to show me, I would love to see them! Meetings will last approximately 45–90 minutes and take place in June 2024. You have the right to withdraw your participation at any time.
Contact Information
If you’d like to participate or have any questions, please send me an email at [email protected]
To know more about the Elphinstone Institute, please visit https://www.abdn.ac.uk/elphinstone/
To know more about me, here's an intro post for you.
If for any reason you don’t wish to participate but still have comments/suggestions/resources/musings you’d like to send my way, please do!
509 notes
·
View notes
Text

Bound: Soup-pocalypse and The Great Curry Cataclysm by SquadOfCats
Typeset, bind, and illustrations by: me, @phoenixortheflame.
Eleven years after the war, Draco Malfoy leads a quiet, boring, and perfectly respectable life, thanks very much. Or, at least he does, until a sudden and very unexpected veela awakening causes him to throw soup all over Harry Potter in the middle of the Ministry cafeteria.


Every once in a blue moon I pull together a bind in four days, and other times I agonize over it for months. This was one of those rare occasions where inspiration hit — and then simply did not quit.

The cover of the bind was inspired by the novel Icarus by K. Ancrum. And I drew veela Draco based on a tattoo of a falling Icarus, which is an adaptation of the Phaeton from "The Four Disgracers" (ty @haxkattpress for the art lesson!)


For programs I used Procreate for the illustrations (veela Draco, bowl, waffle), Affinity Publisher for the typeset, Designer for the full-title page typography treatment, and Canva for the book cover.


There are a lot of letters sent between Draco and Harry in this fic, so I chose handwriting for each of them.


Finally, I did a sneaky little inside cover design featuring waffles. Regular or fish — you decide!

I did not make a copy for the author, as they've left the fandom; however, I made sure to check that they have blanket permission for binds. (That said, Squad, if you see this and you want a copy, send me a DM!)
As always, the extra copies are gifts. No money was exchanged.
If you have any questions and want to learn how to bind fic for yourself, feel free to get in touch!
227 notes
·
View notes
Text
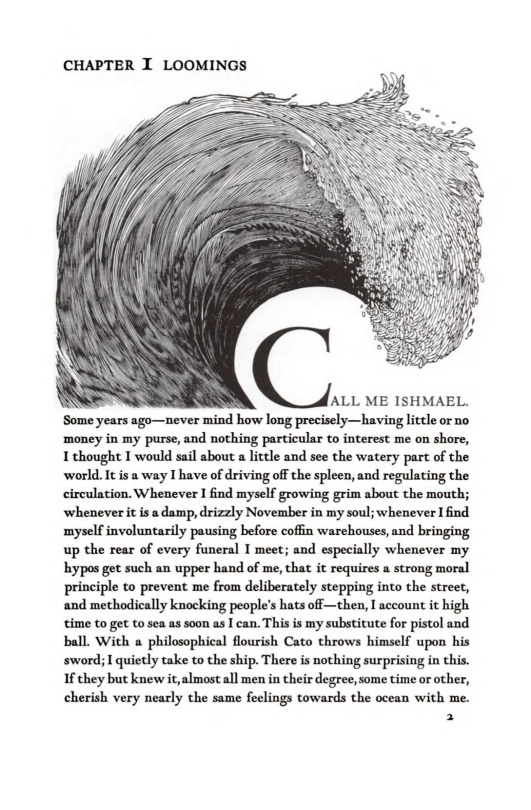
[Source]
God this is a gorgeous way to start a book. I wish more authors and publishers had at least a little bit of fun with their typesetting like this.
5K notes
·
View notes