
Development blog of gamedev, Ajay Karat. This blog contains game demos and concepts made in Construct 3, Cinema 4D, Aseprite, and Adobe Animate.
Don't wanna be here? Send us removal request.
Statistics
We looked inside some of the posts by devilsworkshop and here's what we found interesting.
Average Info
Notes Per Post
21
Likes Per Post
20
Reblog Per Post
0
Reply Per Post
1
Time Between Posts
4 months
Number of Posts By Type
Text
9
Photo
8
Last Seen Tumblr Blogs


Fun Fact
The Tumblr office adopted Tommy, an 11-year-old Pomeranian.
Text
How to Integrate Newgrounds Medals with Construct 3 (PixelPerfect NewgroundsIO API Plugin Method)
After several attempts and a lot of troubleshooting, I’ve finally figured out how to successfully integrate NGIO plugin with Construct 3 to enable Newgrounds medals in my game. I’m writing this tutorial mainly for my own reference, so I’ll have a clear step-by-step guide the next time I want to integrate medals (or other Newgrounds features) into another project. Right now, this covers just the medal setup—when I try out things like scoreboards or cloud saves, I’ll come back and update this with anything important I learn.
1. Newgrounds Account and Project Setup
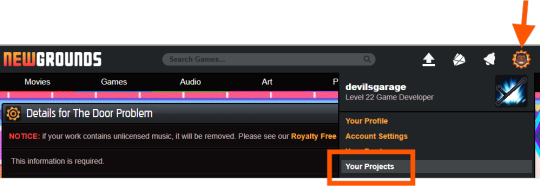
Register or log in at newgrounds.com.
Visit Newgrounds Projects.
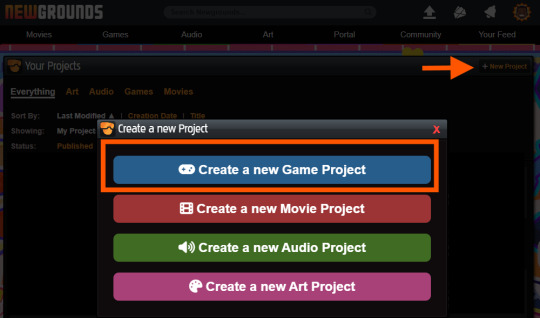
Create a new project and fill in the required information.
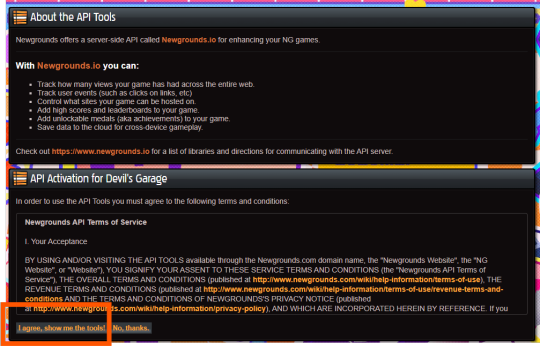
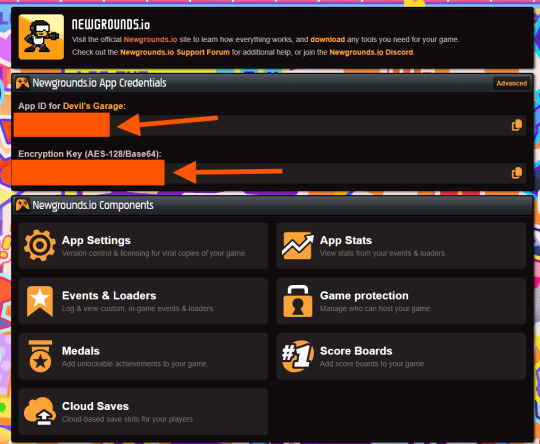
Scroll all the way down to the footer navigation and click API Tools.
After agreeing to the API activation, click “I agree, show me the tools!” to access the Newgrounds.io dashboard.
In the dashboard, locate your App ID and Encryption Key (copy these for the plugin), as well as Medal/Scoreboard/Cloud Save setup and other API tools.
Create medals on the Newgrounds project page. After creating each one, note its numeric ID for use in the plugin.
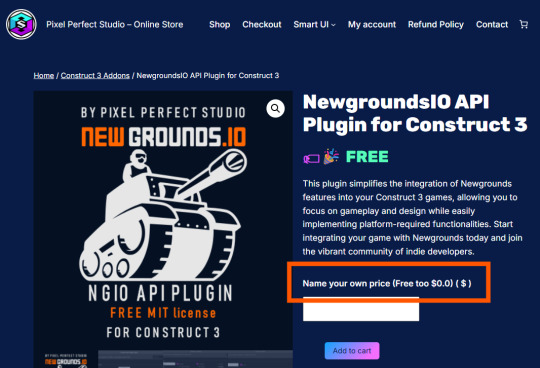
2. Downloading the Plugin
Download the Newgrounds.io plugin from Pixel Perfect Studio.
In Construct 3, go to Menu → Addons → Import Addon, then select the downloaded file.
Add a Newgrounds.io object to your project layout.
When exporting for publishing, ensure the entire exported folder (with all files and plugins) is uploaded to Newgrounds.
3. Setting Up the Construct 3 Project and Plugin Details
Start a new Construct 3 project (or use an existing one).
Check project properties such as viewport size, layout order, and loader style.
Select the Newgrounds.io object in your layout, then enter the App ID and Encryption Key exactly as shown in your Newgrounds API Tools page (no extra spaces or characters).
Set up an event to trigger NGIO login after player input (for example, “Press Any Key” on an intro/title screen). Login should not be called on “Start of Layout,” as browsers may block popups unless triggered by user action.
To unlock a medal during gameplay (such as on player death), use the plugin’s “Unlock medal” action and enter only the numeric Medal ID (not “ID#”).
4. Dos and Don’ts for Publishing the Project
Always export as “HTML5 Website” and upload every file to Newgrounds.
In export options, set Minify Mode to Simple. Using “Advanced” minification can break plugin code and prevent medals or NGIO features from working.
Double-check App ID and AES key for typos—these must match exactly or API communication will fail.
Test only on Newgrounds.com (not localhost or other hosts); medals and login require correct domain and project configuration.
Ignore the “Apps with Access” section unless specifically sharing medals or leaderboards between multiple App IDs or projects.
0 notes
Text

Gonna be a busy 24 hrs winding up the character design
1 note
·
View note
Text

Managed to pull together some art for the crate props.
3 notes
·
View notes
Text
Finished the character design and knocked out a few key poses for the moving crates. Still have a few more things to flesh out on the art side.
2 notes
·
View notes
Text
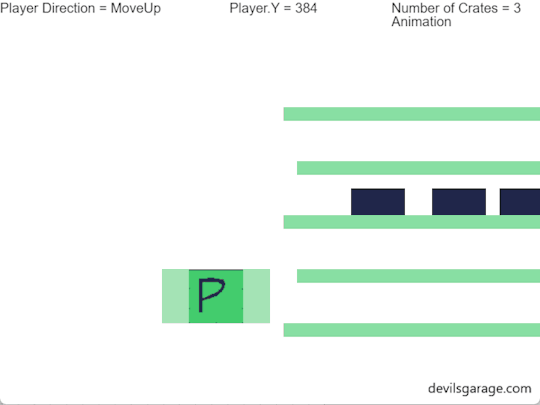
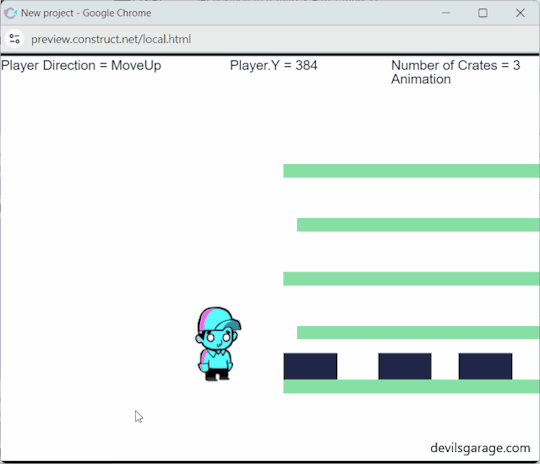
Made a lot more progress this evening:
Crates now spawn in batches of X, created at Y-second intervals
Each crate spawns at a random position between Y1 and Y2
Crates move in one direction until they collide with the player
On collision, the player’s animation changes
The collided crate is destroyed, and a new one is spawned above with an offset
The newly spawned crate moves in the opposite direction
0 notes
Text

Minor update this evening:
Conveyor belts are up and running! Still refining object generation as they roll left to right.
Expanded the player’s hitbox to better catch rolling objects.
The player sprite is now set in a way where it only shows an idle state when it is not carrying anything - need to update the player’s jump animation in a bit
0 notes
Text
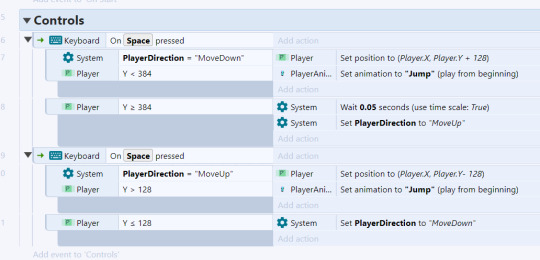
Loving the fun challenge of limiting all actions to a single button. Pressing the spacebar moves the player in one direction. Once they hit a wall or edge, their direction flips on the next press.
1 note
·
View note
Text

Taking part in a small game jam where the only rule is: everything must be controlled with just the spacebar.
Here’s a bit of greybox prototyping I’ve been working on for the character movement—building it in Construct 3, and using Flash-style visuals for that old-school vibe.
1 note
·
View note
Text
Construct 3 and Random Numbers
Here's a good article on how Construct handles random numbers, and the ability to choose from three numbers -------------------- Choose(a,b,c) – C2 will pick a value at random from a comma separated list. There can be infinite values as long as there are 2. -------------------
Floor() – Will round down a float to the nearest integer. For example floor(5.6) would round down to 5.
Round() – Will round up or down to the nearest integer. For example round(5.6) would round up to 6, while round(5.3) would round down to 5.
Ceil() – Will round up to the nearest integer. For example ceil(5.2) would round up to 6.
Let’s use one of our new expressions and add it to random(10) to create some more random numbers . Here are 10 numbers generated using ceil(random(10)).
6, 7, 2, 2, 10, 3, 8, 6, 5, 6 -----------------
0 notes
Photo


Point-and-click Prototype
This prototype will teach you how to create a very basic point-and-click interaction using the ‘Mouse’ Object Type.It involves a basic understanding of
How a Mouse object functions
Families
Start off by creating a project with an empty layout and a default event sheet
Add a ‘Mouse’ Object Type to the project
Create a left and right arrow. - this can be use to navigate the room
Rename the arrows first animation sequence to ‘normal’
Create a new animation sequence called ‘highlight’ and add a highlight state to the arrow to that sequence.
Create a new families - call it ‘interactable’
Add the two arrows to the newly created families
In the Event Sheet use - Mouse / Cursor is over 'interactable’ then Mouse / Cursor changes to Hand Else - Mouse / Cursor changes to Normal
Create an additional family called ‘arrows’
Add the arrows to the newly created families
In the Event Sheet use - Mouse / Cursor is over 'interactable’ then Set ‘arrows’ / animation to “highlight Else - Set ‘arrows’ / animation to ‘normal’
1 note
·
View note
Photo
this demo now has randomly assigned collision objects. Another feature worked on is the introduction of a sound effect, every time the red virus hits the walls / collision object

3 notes
·
View notes
Photo

In this demo - we now have the ability to generate a circle and shoot it out in a random bullet angle. Ah, just realized that this GIF is very distracting with all those flashes inbetween

2 notes
·
View notes
Photo
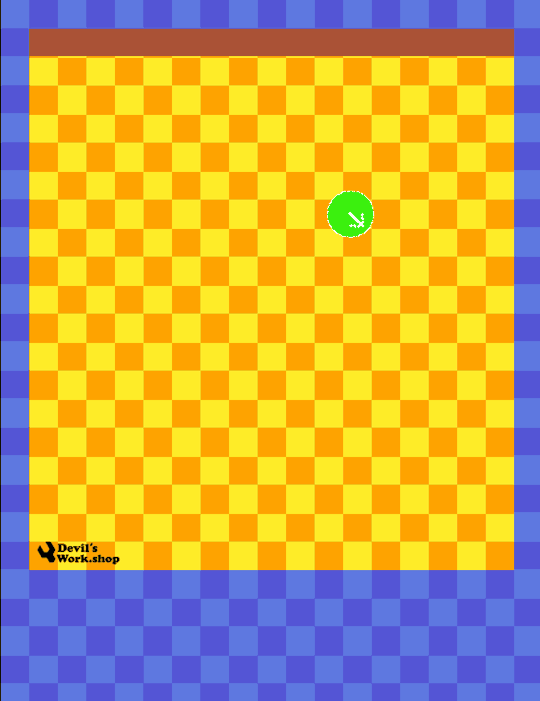
Back to square one
Instruct the system that on start of the layout - create an object (green circle) in the assigned layer (i.e collision layer) and randomly place this object on x, and y - anywhere between 100 to 500 pixels.

This does not really need the ‘round’ but since all the art is pixel art, this makes sure that the new position the green circle is generated without a decimal point to avoid sub-pixel artifacts
1 note
·
View note
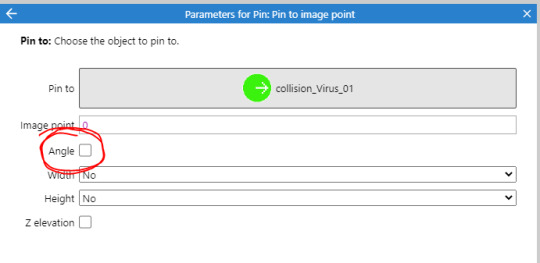
Photo

Excellent! Found a way to prevent the red virus from changing orientation. Ok - that was way simpler than I though by just disabling the “Angle”
2 notes
·
View notes
Photo

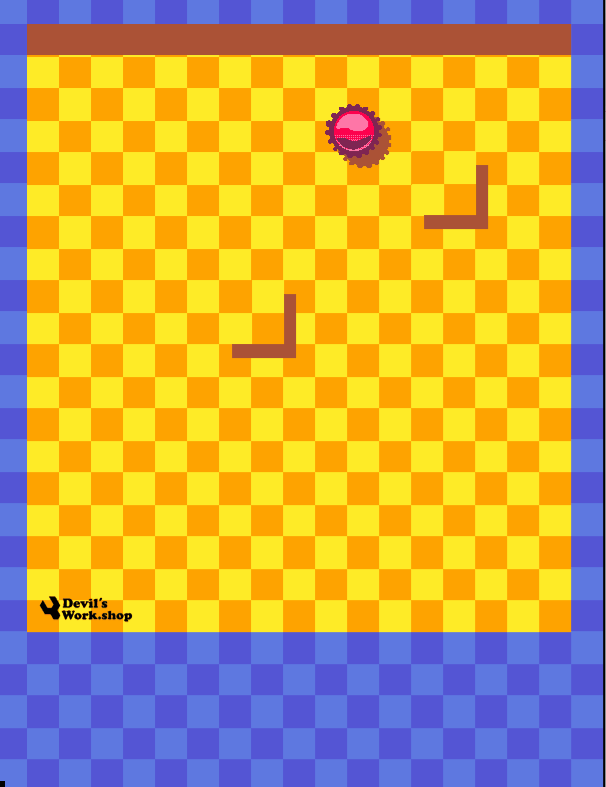
The game starts with the collision invisible, and on runtime the red virus attaches itself to the green collision circle. but the orientation is a bit missed up.
Time to take another stab at this
1 note
·
View note
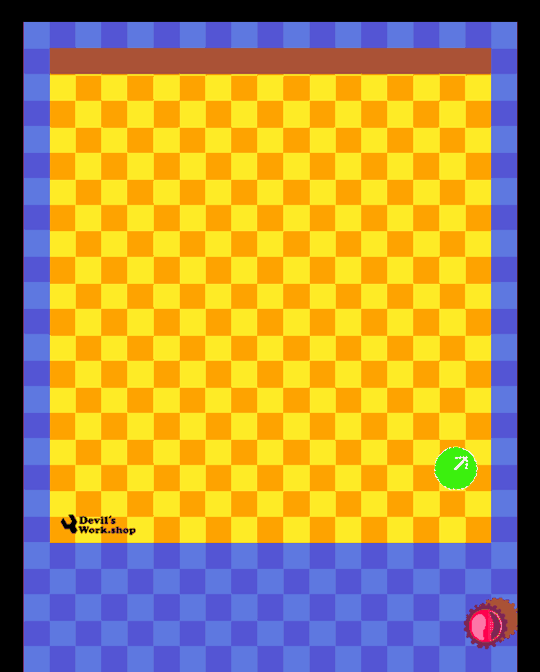
Photo

OuO This is not what I was expecting when I use the Pin - Rope. I might have to save this mechanism up for another game.
2 notes
·
View notes
Photo
Hmm, Pin to Projectile is a bit weird. Now to figure out how make the system generate the red virus on start of layout, and then pin it exactly to the green collision circle
1 note
·
View note