
Statistics
We looked inside some of the posts by dithyrambs and here's what we found interesting.
Average Info
Notes Per Post
15
Likes Per Post
15
Reblog Per Post
0
Reply Per Post
0
Time Between Posts
2 months
Number of Posts By Type
Link
2
Text
13
Video
1
Photo
1
Last Seen Tumblr Blogs


Fun Fact
The KCSC sent more than 20K requests to delete posts related to prostitution and porn to Tumblr from January to June 2017.
Link
Maps Not Meters
Listened to this episode of Soren Johnson’s interview podcast where he got Inkle developer Jon Ingold to spill his secrets. One thing struck me as incredible brilliant, yet in retrospect, completely obvious.
In making their interactive fiction version of Frankenstein, which played out like a novel being written ad hoc in response to player choices, players felt like none of their choices mattered--even though they very much did. Ingold attributed this phenomena to the output UI display of a novel seeming linear.
Their follow up, Sorcery, addressed these concerns by having a map-- which is technically just a UI visualization of the story flow. By marking areas on the map, and charting their course, and importantly, showing where players didn’t go, player’s immediately understood that they were being asked to make tough, consequential choices.
This is the same reason that games with skills now organize them into vizualized three-pronged trees (much replicated to the point of exhaustion); the non-narrative equivalent to a map.
One of the reason my 2D platformer/friendship&dating-sim game prototype failed to get anywhere was that NPC relationships seemed completely arbitrary. It seemed like NPCs had scripted behaviours. I couldn’t communicate to the player that their own subtle behaviours were being recorded by the NPC’s, that their choices were remembered, or that NPCs could have responded differently.
What I’m getting at is, what I needed was a map to chart player’s relationship with NPCs. A map is a weird way to phrase it, but It needs to be a map because it’s progress occurs across two dimensions. Instead of, say, the relationship meter that’s in dating sim like games such as Persona, which is one dimensional.
Meters are one dimensional.
The other benefit of using a map instead of a meter is that you get something as organic as a story-- or a relationship. A map is useful for content that is fundamentally non-linear, complicated, and organic. The problem is, Inkle came up with the brilliant conceit that a story map could be an actual map.
But what the hell is a character relationship map? Maybe there isn’t an elegant solution for this. Maybe it’s the kind of branching paths flow chart found in certain visual novel games. Which, as it turns out, looks exactly like one of those three-pronged skill tries. Go figure.

postscript After thiningk about this for a day, I think I actually have the answer to the problem of finding a clever metaphor to visually represent complicated NPC relationships and player choice. It’s: put them on a map. No really: has an NPC been affected by player behaviour? MOVE THE NPC. If you have a map, mark that NPC at this new location. And have that location reflect the player decision. Well, so this is a bit obvious, perhaps much like Ingold’s observation that a map is the perfect visual metaphor for a player-facing story flow-chart. For whatever reasons, I think of important story-related NPCs as stationary because most games fix them to a position so that the player can find them. Ignoring solving that problem, it’s hard to show the NPC as posessing an interior life, if, they are “sad widow character” who stays in side their apartment, or “gruff shopkeeper” who only lives to sell goods. Perhaps if you’ve contributed to their unahappiness they are found in the tavern drinking their sorrows. Or they go somewhere more out of the way specifically to avoid you. tl;dr on the entire thing: you can communicate possibility easier in a 3D world (or in a 2D representation of a 3D world, a map) for both player-centric story (the critical path) or for relationships with NPCs. Just, anything to get us away from putting actual flowcharts into games.
4 notes
·
View notes
Text
(Super)Tiled2Unity Documentation
Tiled is a great tiled-based 2D map editor, and used to be super essential for Unity projects until recently, as there wasn’t native support for tile maps.
However, Tiled is still a great option, as it allows map files to be authored outside of Unity, allowing artists and level designers to concurrently work on the same scene as developers without merging issues, while making it easier to port the game in the future (should Unity ever become an unideal platform for development).
Thankfully, Seanba has developed a wonderful tool, SuperTIled2Unity that automatically imports Tiled maps into Unity, with tons of bells and whistles to boot. The problem is that it’s documentation is fragmented, with most of the ST2U’s information being buried in Seanba’s blogposts, comments, and forum responses regarding 2T2U’s deprecated predecessor, Tiled2Unity. Yikes!
To untangle this confusing mess, I’ve compiled the links to this fragmented documentation, for posterity. One day I might even build a wiki for this assuming Seanba doesn’t get to it first. (Continuously update)
Seanba’s Official Documentation. As of this writing, only Sorting, and Object Type and Custom Properties are documented. The Legacy documentation for Object Type support is here.
Tutorial for the original Tiled2Unity, although many of the lessons still apply, including setting up a character controller and how to handle sloping collisions and customer importers.
Retrieving Tile Information At Runtime.
Dealing with scale in unity, and defining the Tag and Layer of the layers of your tile map. An update to this post can be found here.
Additional tileset support.
Edge-Colliders support.
Tile Animations. And an update to this here.
Isometric and hex maps.
Importing maps as a Resource (ignore the top section of this post).
Convex Polygon Output (scroll to the bottom. beware that this is untested if this is still how it works in ST2U)
0 notes
Link
Another article with the famed Square Enix translator Alexander O. Smith. This particular quote about reflecting the systems in the dialogue caught my eye: “The game begins with tarot cards representing choices you must make to define the character you will play. In the localization, we took that theme and ran with it, using the tarot cards and the themes they represent as touchstones for dialogue. If your luck is good, you thank the Wheel. If you want to wish someone fortune in battle, you pray that the Chariot rides with them.“
And there’s a lot of other gems in here besides.
0 notes
Text
Game of the Year 2018
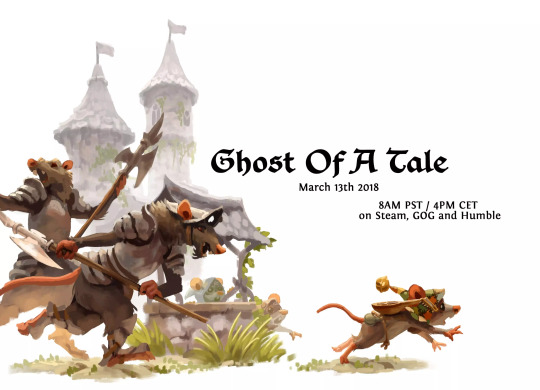
Hands down, the answer is Ghost of a Tale.
This isn’t just the best game of 2018, it’s now one of my favorite games of all time. It’s admittedly unexciting trailer doesn’t really capture the magic of this game in the slightest. It might show off the creator’s beautiful world (Seith is a former Universal and Dreamworks animator, after all). But it doesn’t capture the astoundingly funny, sad, and wonderful dialogue, the poignant story, the brilliant world-building, or the lovable characters. It also doesn’t highlight how you play as a minstrel and singing songs is an important core mechanic, or how changing outfits is as rewarding a mechanic as switching masks in Majora’s Mask. Or that it genuinely just feels good to play, and hits a level of game-feel and overall polish that most indie games never achieve.
Take my word for it. This one’s really special.

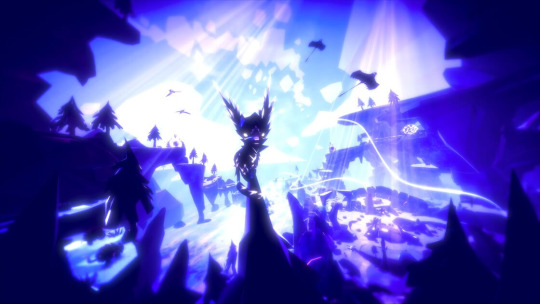
My runner up is another indie title, Fe. Unlike Ghost of a Tale, Fe has a great trailer that perfectly captures the magic of playing it. But to sum up: you are a weirdo fox-bird-creature in a creepy forest, and the core mechanic is howling at other animals so that they become your friends. Between this and Ghost of a Tale, it’s actually a great year for non-violent third-person adventure games! Would love more of this going into 2019.
1 note
·
View note
Video
youtube
As someone who’s making an Ink engine game, I found the above video on designing text UX immensely useful.
Here are some of my takeaways:
A readable typeface is more important than a thematically appropriate one
Margins! Give text room to breathe
Pacing: less text can be revealed slower
Large amounts of text need to be revealed faster
Give players the choice to begin a narrative section, so they always feel in control
80 days had very fast text-reveal animation, but very slow fade-on time for choices
Dynamic animation can be used to draw your eye where it needs to go
Overall, a great talk! Highly recommend.
1 note
·
View note
Text
Fuzzy Puzzle Design
So I’m still making a noir mystery detective game. Right now we have a pretty straightforward game loop that’s sort of tried and true. Investigate environments and collective evidence, interrogate suspects and collect statements, and use the evidence and statements to make deductions about the “case”.
This is more less a variation on all the mystery detective games that have come before, from L.A. Noire to Ace Attorney, and perhaps most recently seen in A Case of Distrust. It’s fine. It’s serviceable. But what it doesn’t do is it doesn’t actually follow what our pulp detective novel/film heroes actually do: lie, manipulate, turn their enemies against each other, get out of tight situations, and lastly, make hunches. Immediately after I realized this I started to become less and less interested in a traditional conversation and deduction-type system (especially since these types of systems tend to halt all forward progress in the game, and are the primary source of frustration in these games).
We can handle lying and manipulating in conversations easily enough in our chosen narrative engine, Ink; before initiating a conversation with the NPC, the player can simply choose to approach the conversation honestly or deceitfully, and specific lines in the following dialogue can check for that condition. (More importantly, the player should be able to choose how they’re going to deceive the NPC). It’s a unique approach to interactive fiction that I haven’t seen much before, where the player can make meta choices about how to proceed with the conversation, in addition to choosing immediate responses during the conversation itself. But Ink can handle that no problem. This was a “freebie” design win.
Hunches, on the other hand, are less straightforward to implement. They pose a pretty interesting design question: how to make a puzzle that doesn’t make you feel bad for getting it wrong? As it turns out, the Ink engine developers have been thinking about this very problem:
Well, here’s what we realised about that: Sudoku doesn’t like you getting things wrong. Get something wrong and your whole puzzle goes in the bin. But crosswords are all about getting things wrong. You see “Vegetable (6)” and write in CARROT, but a bit later you figure out the word going down that put a T where the C should be and you change it to TURNIP. You got it wrong, but it didn’t feel too bad, because you only found out you got it wrong at the moment you got it right. (Well, assuming the answer wasn’t TOMATO, that is.)
The answer is “fuzzy puzzle design”. Puzzles need to not immediately fail you when you get something wrong. You need to continue on with the game, and only realize you failed when you come up with a better answer. Voila.
The Ink dev’s next game, Heaven’s Vault, is built around this concept, by having the player as archaeologist make educated guesses about deciphering an alien language. I’m thinking we can use this concept to have our detective follow hunches about the case. The “solution” to the problem needs to gradually evolve as the player’s understanding of the case evolves. It’s brilliant. It’s great. But the trick is making a game revolve around puzzles that you’re allowed to get wrong while still having an interesting game.
Problem: Removal of “hard failure states” while still having player choice matter.
Solution: Keep soft failure states to signal to players to “evolve” their hunch (reaching a “deadend”, finding new evidence or NPCs giving statements that contradict the hunch, etc). Repercussions for “wrong” choices have narrative consequences: (like arriving too late at a crime scene, negatively impacting an NPC’s emotional state, a worse story outcome for a character you cared about, etc).
In some ways this “hunches system” is about making a meta-meta choice about the story, (whereas choosing to deceive a particular NPC is just about a single conversation). In between locations, players will enter into the “generate hunches phase”, where they’ll see the old hunches they’ve already figured out, and can generate new ones (by matching Questions with Statements and Evidence collected from the previous scene; so we haven’t completely thrown our all the particulars of our Deductions system). This also lends some weight to deciding on a hunch; the player is stuck with it until they finish the sequence.
To wrap up, I’m pretty excited about this new direction for the systems of the game. I think it will better align where the player is and where the protagonist is in terms of their understanding about the case, while allowing the player to progress even if they missed a detail.
0 notes
Text
Language, Metaphor, and Narrative Negative Space
Vagrant Story is the best medieval fantasy tale ever told in a game (in my opinion), and one of the main reasons is its stellar script. In a recent interview with US Gamer, the minds behind the lauded Japanese to English translation spoke about their work, which took a drier, minimal script and brought it to life with colorful Shakespearean language and style.
It’s a fascinating article, and a great study not just in translation but in the writing process.
Here’s the “direct” translation
SOLDIER A Is this "magic" stuff really that easy to use?
SOLDIER B If you believe the studies of ancient legend, there were these "grimoires" that let anyone use it.
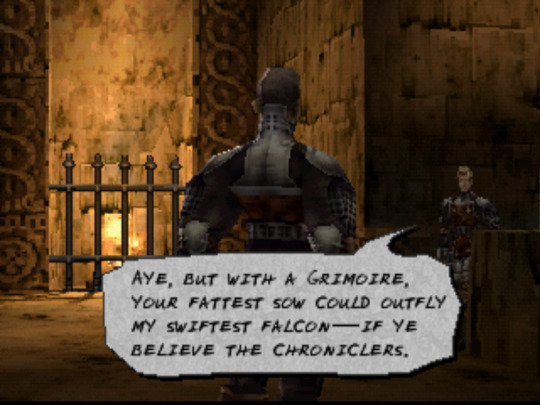
Now compare these selfsame lines post translation
SOLDIER A ...Swine'll take wing ‘fore the likes of us use magick, my friend.
SOLDIER B Aye, but with a grimoire, your fattest sow could outfly my swiftest falcon—if ye believe the chroniclers.
You could write a story with straightforward dialogue, but diction and choice of metaphor tells us so much more about the world and characters. Screenwriters keep reminding us that this is the hallmark of truly great dialogue: lines that accomplish several things at once, but always with character motivation and economy.
The translation’s not the only reason Vagrant’s Story’s narrative was such a success. It features a gripping, labyrinthine plot filled with vibrant characters, with even minor ones possessing memorable personalities. All this, and there’s actually not that many minutes of cutscenes, all told. The economy of the entire story is perhaps one of it’s greatest feats; communicating this much world-building, ideas, characters, arcs, and motivations in such a lean running time is truly impressive.
One of Yasumi Matsuno’s trademark storytelling devices is his ability to reference (fictional) events and books in universe, creating a convincing three-dimensional illusion of a real parallel world with history and culture. This is actually a device that Borges used frequently in his works, which made his short stories feel much larger than they actually were. When you play each Matsuno games, the backstory of the world feels thought out in a way comparable to J.R.R. Tolkien’s universe, the high pinnacle of fantasy.
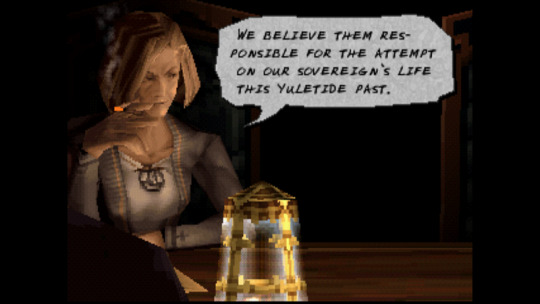
My point is, for any writer building their own world, thinking about the narrative negative space of the story is powerful. You don’t necessarily need to create a Library of Babel-length collection of (mediocre) short stories in order to sell your fictional universe (that was pointed right at you, Skyrim). Look at the above screenshot; the brief reference to an event that transpired months ago, and the mention to the king (neither of which is mentioned again in this story), inspire a larger world in the imagination of the player. Matsuno does this in spades, and he makes it look natural and effortless.
The translator’s (Alexander O. Smith) other work is equally great, with some favorites being other Matsuno games such as Crimson Shroud, and Tactics Ogre: Let Us Cling Together. None of these three games are easy to find or play these days (you’d need a PSP or Vita, and a 3DS to play all of them), and they’re demanding as old-school RPGs, but I can’t recommend them enough. As studies in how to build and write a story in a fictional universe, they should be required reading.
0 notes
Text
Withered Technology and Lateral Thinking
Working out of Glitch City has its benefits. Chief among them is I get to work with insanely talented game developers like Brendon Chung.
This past week I was struggling with a design test that required me to learn the Unreal engine and C++. Which I had to learn within a week, in addition to actually completing the test. I was building a system while struggling with the C++ learning curve cliff, and trying to traverse my beautiful, elaborate data structures. There was some nuance to C++ that was giving me errors in my project when I was passing in certain data types as elements.
Exasperated I eventually grabbed Brendon to help me out. It turns out he was no expert on C++, but I explained what I was trying to do and he simply replied, “why not just do it the simple way?” Well, okay, that hadn’t occurred to me. I had spent longer than I care to admit trying to get it work. So I changed it to be as simple as possible. And it worked.
In Brendon’s own words (from a recent blog post):
Deciding whether to cut your losses and move on is often a murky and wiggly choice. I personally feel low-tech solutions can get you very far – so if I’m having a lot of trouble with a complicated bit, I document it and then try a simpler solution.
He links to the Wikipedia page of one of the Nintendo founders Gunpei Yokoi, who built a career around adopting this way of thinking:
"Withered technology" in this context refers to a mature technology which is cheap and well understood. "Lateral thinking" refers to finding radical new ways of using such technology.
Ironically, the system I was modelling mine after was also meant to be “as simple as possible”. Somewhere along the way I had gotten lost. Thanks to Brendon, I was able to move fast by keeping things “low-tech”. And the seemingly impossible task of learning a new editor, API, and language in a week? Well, I totally finished the test in time.
0 notes
Photo
Testing out some new art in our mystery detective 3D visual novel game. Just in: we have blinking animations, expanding text, some subtle animation using @inkleStudios's SLayout, and context sensitive NPC greetings, and interact prompts! Whew, that's a lot.
0 notes
Text
How to do scalable text box UI elements in Unity
After taking a deep dive into Unity’s UI features, I ran into a pernicious problem. There was a no way, to my knowledge, to set a maximum size of a UI element, while also wanting it to scale down to the minimum size of a variable text box! Constraining your UI elements to a max size is super important, because otherwise you have text boxes that could exceed the size of the screen.
So when you set a ‘Preferred Size’ in Layout Element, using Horizontal Layout Group and Content Size Fitter, you get:

Note how the text is dwarfed by a never-changing size of the text box. While Unity has components that scale UI elements based on other elements, there was no intuitive solution on how to define a max range without this as a result.
Luckily I stumbled upon a Unity forum post from 2014 that, halfway down the page, showed how to sort of do what I was looking for: Why doesn't Layout Element have Max values?
As it turns out, I needed to re-arrange my hierarchy. Rather than have the text and image on the same GameObject, I needed to place them all on nested GameObjects parented by a container object (that itself is a child of the UI Canvas, of course):

Of course, being from 2014, the forum post is now slightly incorrect, so let me explain what these objects are:
Container object
HorizontalLayoutGroup with ChildForceExpand set to false, and ChildControlsSize set to true for both Width and Height
ContentSizeFitter with horizontal/vertical unconstrained
Set the width and height of the transform to the max width/height you want
Nothing visual on it
Image object (as child of Container object)
HorizontalLayoutGroup with ChildForceExpand set to false, and ChildControlsSize set to true for both Width and Height
Background image (a Sprite that’s been 9-sliced, and set to Image Type “Sliced”)
Text object (as child of Image object)
Text
And that results in perfectly scalable elements:
You can also choose to set ChildForceExpand/ChildControlsSize for only Width or only Height, or set the ContentSizeFitter to Preferred for Horizontal or Vertical, to create different results that suit your project.
Figured I’d go ahead and take what I learned and shout about it from the rooftops. I’m still astounded that the solution is this un-intuitive, and the answer buried so deeply. A quick google search reveals that a lot of people seem to have this problem, so hope it helps!
0 notes
Text
Working with Pixel Art Sprites in Unity: That Camera Though
In Part 1 of this series I talked about how to change Unity’s basic import settings to accommodate pixel art. Part 2 went over Unity’s workflow for setting up 2D sprites, and provided an alternative (much quicker) way to define and play sprite animations in script. Part 3 will cover another surprisingly complicated piece of the puzzle of getting Unity to play nice with pixel art: the camera.
Part 3: A Deep Dive into 2D Cameras
Chances are, if you first worked on a pixel art game in Unity you ended up with some problems.
I wish this gif was just a manufactured exaggeration. It’s not.
Unity, being a 3D-first engine, presupposes that you are making a 3D game, or at best a 2D game with a 3D camera. Which is why for retro pixel-art games, you need to manually set the Projection of the camera to “Orthographic” (more on orthographic projection here). Now all elements of the z-axis will be drawn “flat”, as if they are all at the same depth.
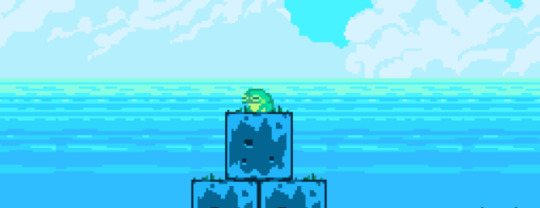
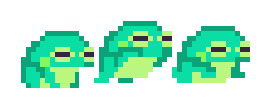
Whether or not you’re making a tile-based game (classic Nintendo game worlds were made out of “tiles”, more on that here), this is a good time to decide the Pixels to Units ratio. (Actually, if you’ve been following along in this series, you should have already decided that when importing the pixel art). The pixel-size of our tiles is a number that’s going to be super important for understanding how to adjust the camera so you don’t end up with glitchy pixel weirdness (professional game dev term) like the above gif. My example world is made out of tiles of 16x16 pixels, and so is our frog character.
The first way tile-size comes into play is in setting the orthographic size. A simple formula for calculating it is cameraSizeInPixels / ( 2 * tileSize). But in order for the camera to not cause glitchy weirdness, the following rule must be strictly obeyed: the resolution of the display window and the resolution of the camera must both be divisible by the Pixels to Units ratio. What this means is that if you are trying to have a classic Super Nintendo camera size of 256x224, but want it to play on a modern 16:9 screen (let’s say 1920x1080 pixels), you are going to have glitchy pixels, even if you change the width to accommodate the 16:9 ratio. In fact, 16 just isn’t a factor of 1080. But, if you set your Unity camera size to 256x144 (perfectly divisible by 16), you will end up with a good result if you display it at 1280x720 (divisible by 256x144, and 16).
Now if you want to display at 1920x1080 using 16x16 tiles there are some clever solutions for handling this, and even some drag and drop solutions on the Unity Asset Store, so no need to abandon hope, but that’s a bit outside the scope of this article.
If you do plan on choosing tile-sizes that will scale naturally to hi-res displays, you might find RetroPixelCameraController useful. I’ve gone ahead and uploaded it on Github. Just drag and drop it onto the same Game Object with your Camera, and fill in the rest of the parameters.
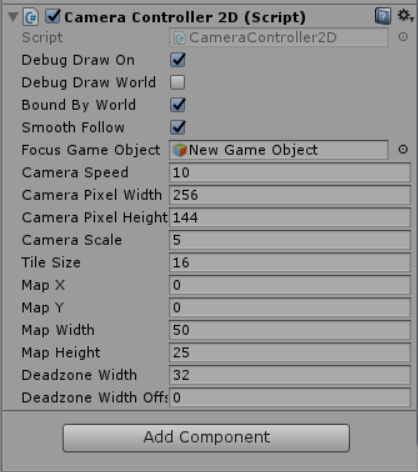
It’ll calculate things like the orthographic size, and change a lot of the camera settings for you. You just need to drag the Focus Game Object (usually whatever game object the player character is attached to). Additionally, like in the previous example if you have a camera of 256x144 dimensions, but want to output to a display resolution of 1280x720, you would set Camera Scale as 5.
Speaking of the display resolution, here’s one of those Unity “gotchyas”: it’s important to note that the display window in the Unity game editor window is not the display window size when you properly build and run the game. While this script will set the build display resolution correctly, it won’t change the game preview window aspect. In other words, you’ll have to manually set the aspect when testing the game in the Unity editor itself, which is easy enough. I recommend just setting it to your camera dimension for testing.
Oh and one more point: the position of the camera must always be rounded to the nearest pixel before translating the camera. Something like:
cameraPositionX = Mathf.Round(cameraPositionX * tileSize) / tileSize; cameraPositionY = Mathf.Round(cameraPositionY * tileSize) / tileSize;
But again, my RetroPixelCameraController script will handle this for you. Bonus Round: Camera Deadzones One of the cool things about this script is it let’s you define a “deadzone” in which, while moving the camera’s focus object inside of it, the camera will not choose a new focus destination. If you go into Scene view (and make sure the Debug Draw On boolean is checked), you should see something like this:
You’ll see the red cross-hairs (the camera’s focus destination) flip sides when the focus object (the frog) reaches the other side of the deadzone (the green area). Oh, and the blue area represents the camera’s size.
One other things the script handles is smooth motion. Combines with the horizontal deadzone, the lack of one-to-one motion should make things feel a bit nicer. Feel free to play around with the deadzone parameters in real-time until you arrive at something you like. One last tip: the camera speed should be at least as fast the player character, if you want the camera to keep up with the player’s movement and not lag behind (unless that’s your intention). But too fast of a camera speed and it will sharply jump across the deadzone when the focus object switches sides. With some tweaks you should end up with something you’re happy with it.
One last thing: you can just as easily add this component in script. Simply use the SetCamera method after you use AddComponent and you should be honky-dory.

And that about wraps this up. Thanks for reading, and feel free to use RetroPixelCameraController in your Unity project.
In the next episode in this series I’ll finally go over my alternate solution for 2D collisions and player movement, so stay tuned!
Special thanks to Luis Zuno (@ansimuz) for his adorably rad pixel art.
Art is under a CC-BY-3.0 License http://creativecommons.org/licenses/by/3.0/
You can find all of this art and more at http://pixelgameart.org/
1 note
·
View note
Text
Bad Wheels Need Reinventing
The first nine-minutes of this video does a really great job at showing the tediousness and limitations of Unity’s workflow for setting up 2D sprites.
youtube
It’s sort of a case-in-point as to why the SpriteProcessorScript and RetroSpriteAnimator component I made are so useful. Not to toot my own horn. Although prime31 kind of does that for me here.
This video is actually prime31′s overview of his excellent Unity component CharacterController2D. Beyond it’s use of handling movement, the area that primarily interests me is the alternate collision detection he concocted. Other developers and I who’ve been using Unity for 2D platformers have encountered crazy collision problems--clipping through level geometry, vibrating sprites, and edge cases where collision detection seems to have completely abandoned us.
While I was knee deep in concocting my own 2D collision detection system to work in conjunction with my (partial) Unity port of Flixel, I stumbled upon prime31′s solution and decided to abandoned my solution in favor of his. No need to go around reinventing wheels.
Unless it’s Unity’s square wheel they were using to handle their 2D sprite workflow. Pretty happy I reinvented that one.
0 notes
Text
Game of the Year 2017
Okay I’m a bit late on this. It’s not for an inability to choose; I’ve know which game was my GotY since I saw the credits roll last summer. It was really just lack of time to write. However, today I’m unable to concentrate (God of War comes out tomorrow, and it already has a 95 on Metacritic! I’m just so beside myself with awe and pride!), but I should be able to hammer out a few words on this.
(Drumroll) My Game of the Year for 2017: Specifically the third play-through of Nier: Automata.
In it’s short time since released, (and very much like the first Nier), Nier: Automata has already achieved a sort of cult-status, although it didn’t get popular enough to the point where anyone I know actually played it. Maybe some of that is the fact that the best part of the game was saved for last.
Don’t get me wrong, the first play-through is marvelous. It’s deeply, deeply weird, has a hauntingly beautiful soundtrack, and has that unparalleled Platinum Games stylish 3D brawler gameplay, which is liberally combined with a 3D bullet-hell shooter. Oh, and the game sometimes switches into a 2D shmup game at a moments notice. Which is to say it’s very weird and very good.
The second play-through is also something special. While the story retreads the same as the first, it does so from a different character’s perspective, drastically re-contextualizing the first’s story, while the gameplay focuses on hacking into robots (via an Asteroids style mini-game) and then commanding a tiny army of them psuedo-RTS style. It’s a very different flavor than the first in a lot of ways.
The third play-through is where it takes all of these (very well done) world-building, characters, and gameplay systems that it’s already established and... well...
The third play-through is nothing short of a tour de force.
It explores some strange and upsetting metaphysical questions. It’s grandiose, and operatic. It takes the characters we’ve come to learn about and love during the first two parts of the game and completely breaks them. And it does it all with such a sense of break-neck pacing, it’s completely unlike anything I’ve ever seen in a video game.
The emotions I remember feeling most during the third-playthrough was that of awe; awe of how this team managed to create this, whatever this was.
The way it controls pacing is actually one of films’ oldest tricks; editing; by cutting between the different characters and gameplay systems on a moments notice. This is how the third-playthrough isn’t amazing despite the first two, but because of it; without teaching the player how to play all of these different styles of games through the earlier run-throughs, the game could never have cut so quickly between them, and expected the player to keep along. The effect is, in a word, breath-taking. And the fact that these transitions are accompanied with gut-wrenching story reversals ads to the breathless speed at which it comes at the player.
Which is all to say I’ve never quite experienced anything like Nier: Automata. But I really really hope I will again, someday.
3 notes
·
View notes
Text
Working with Pixel Art Sprites in Unity: Animations
Edit: After cross-positing this on Gamasutra, once again I’ve been featured! Let’s use that one for nay comments and such.
You can find Part 1 of this series here, where I cover the surprisingly complicated world of importing pixel art assets into Unity, and offered up a script to make the process completely effortless.
Part 2: An Alternative Workflow for Creating and Playing Animations
Placing sprites frame by frame in an animation clip in Unity is tedious, finicky, and brittle. And then after you make an animation clip you still have to arrange them in mecanim, which auto-generates transition animations (for blended animations so useful for 3D), which you then have to manually remove. If it sounds only kind of annoying, I promise you I undersold it. I remember the good old days of Flixel where you could play an animation from a sprite sheet in just three lines of code

Enter RetroSpriteAnimator! A neat little component I cooked up that replicates Flixel's simplicity. And in truth, if you're going to make a tile-based 2D platformer in Unity, you're probably going to be using your tile editor as your game editor for the majority of development. You might as well go whole hog and just use Unity as a glorified file manager, and bypass all that mecanim nonsense. (Later in this series I'll share my code for a component friendly class based state machine that will completely replace mecanim). But anyway, you can start by grabbing RetroSpriteAnimator from GitHub.
So how to get something as simple as the above Flixel snippet? First, add the RetroSpriteAnimator component to the same game object you want to animate. Then, just call the CreateSprite method.

The first parameter is just the asset path to the sprite-sheet (remember, in order to load assets via code, Unity requires that all assets are placed within the /Assets/Resources directory, so the full asset path in this examples is ".../Assets/Resources/Sprites/16/frog.png"). The optional second parameter is Unity layer you want the asset to be associated with.
So now Unity has a reference to this sprite sheet:
Next we need to define an animation to play. We can do this using the AddAnimation method.

In the first parameter, name the animation something. Probably something descriptive and unique. The second parameter defines which animations to use. So with an array of 0, 1, 1, 2, I'm having the game play the first frame, the second frame twice, and then the last frame once (at a frame rate of 7 frames per second, which is what I set agentFrameRate to by the way).
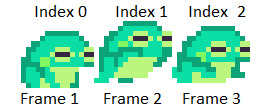
The last two parameters choose whether the animation loops (we're making a walking animation, so yes), and if the animation should be flipped horizontally (in frog.png the frog is facing right, but we're making an animation that's walking left, so that's a yes). Now we just play the animation.

With any luck we'll end up with something like this:
Again, feel free to grab RetroSpriteAnimator on GitHub, and let me know what you think!
Shoutout to Adam Saltsman (@ADAMATOMIC), whose open-source Flixel more than inspired RetroSpriteAnimator, and to Luis Zuno (@ansimuz) for his adorably rad Creative Commons art.
Stay tuned! Next up in this series I’ll cover how I (mostly) circumvented Unity's physics system to handle collision and player movement to achieve that amazing retro feel.
1 note
·
View note
Text
And now this
It’s been a crazy few weeks with GDC and working like crazy to finish this Unity code library. At this point I’ve been working so long on the tech it’s sometimes hard to remember the project I’m making it for!
Digging around, I found this awesome animation from the exceptionally talented Nick Mayo (@VeyoPixel), who came up with this redesign of Morey a year or two back. Unfortunately, the timing wasn’t right (for either of us), but it’s still neat looking at his super bouncey animation.

More updates soon! I have lots to share.
2 notes
·
View notes
Text
Working with Pixel Art Sprites in Unity: Importing Assets
Edit: I cross-posted this to Gamasutra dot com, where it was featured as a Featured Post! Let’s say this is the canonical version from here on.
Welcome to a series of blog posts that will reveal my workflow for importing, animating, and placing 2D sprites in Unity while using the actual Unity editor as little as possible. I’ve taught myself how to navigate Unity’s API by the process of actually making a game, and I figured my long hours of scrambling in the dark could benefit other developers.
Before we can begin animating, we need art to animate with. Welcome to the surprisingly complicated world of simply importing your art assets into Unity
Part 1. Importing Assets for 2D pixel sprite games
Unity was not meant for 2D games. Especially not pixel art sprite and tile-based 2D games. The headache of importing a sprite sheet and slicing it up, especially coming from other more straightforward frameworks, was incredibly disheartening. Imagine importing a sprite sheet into your project only to discover that you had to manually change half-a-dozen attributes each and every time? Or that, instead of slicing up a sprite sheet by simply defining a couple parameters, you had to manually slice up each frame? Well guess what, you don’t have to imagine it, that’s just how Unity works.

I desperately needed a solution that would return this process to the completely trivial category that it belongs in. And then I learned that my salvation lay in editor scripts.
Certain editor scripts execute automatically every time a certain Unity function is performed. Importing assets is one of those functions. To make an editor script, you must first simply create a new script in a directory called “Editor” somewhere inside the “Assets” directory of your project. This should be a class that extends AssetPostprocessor. The code listed in the OnPreprocessTexture and OnPostprocessTexture methods will change the behavior of how your assets are imported into your project.
So instead of manually editing all of these properties every time you import a sprite:
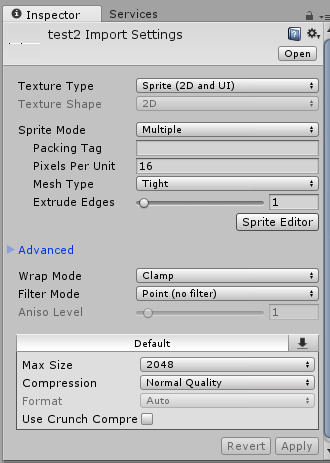
You could just edit this in script, once:
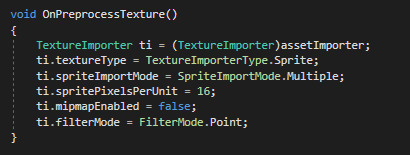
Now I don’t have to manually change filterMode to Point on every single sprite I import! Score. (FilterMode.Point keeps your texture art sharp, which is idea for pixel art. Unity assumes you were importing a large texture to be used in a high-verisimilitude 3D game, in which case, a bilinear/trilinear filter might be better.) However, these properties will probably change from project to project, so don’t assume the code I’ve posted here is canon.
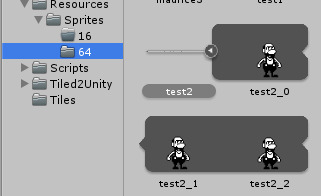
Next we’ll use the OnPostprocessTexture() method to slice up our script for us by iterating through the texture and storing the slices in an array on the metadata of the asset (you can see the code on GitHub if you want the details). The problem, however, was in deciding how to determine the dimensions of the sprites that needs to be sliced, and which of the imported assets should even be sprites in the first place. I didn’t want to have to repeatedly determine these properties in some editor window pop-up every single time I imported a sprite (that would defeat the entire purpose of this exercise). Eventually I settled on an auto-magical solution. Simply drag your asset into a folder named after an integer somewhere in your project’s “Resources” directory (eg. a directory named “16”), and the editor script will assume you want that asset sliced up as a sprite sheet with 16 by 16 pixel sprite dimensions.
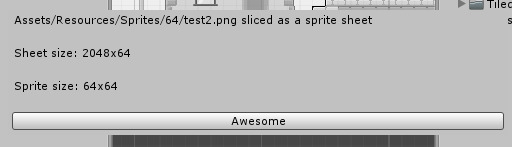
I mean just look at this brilliant, sliced sprite:
In general auto-magic solutions make me slightly nervous. I decided to add a little pop-up window telling the user that the sprite was sliced, so the user was aware that something just happened.
And that’s about it! If you think this script could be useful for your project feel free to grab it on GitHub.
In my next post, I’ll share some of the things I learned defining and playing sprite animations in script rather than via the Unity editor. Until then, be good!
1 note
·
View note
Text
Enter the Flixii Framework
In my last post I revealed that I was making a 2D sprite-based game in Unity. The challenge with that though is that the standard workflow for setting up sprites and animations in Unity is abysmal. I mean just truly time-consuming, and very brittle. Perhaps I should have just grinned and bore it? Well, of course not. Instead I came up with a solution to use Unity’s IDE as little as possible.
For the record, I’m hardly alone in severely disliking Unity’s approach to setting up sprite-based animations, and other developers have even solved this exact problem before me (to be used with AseSprite, specifically). However, I decided to roll my own solution for two reasons:
1. I was already familiar with ProMotion for creating sprite-sheets, and refuse to use another tool for level-tiles anyway, as it’s really just great at that. So learning how to use another (inferior in some ways) tool made little sense to me, and I would probably just confuse myself misremembering keyboard shortcuts, like when I switch from using Sublime to Visual Studio. (And I’m sure AseSprite is great in it’s own way, don’t send hate mail or dox me).
2. There’s zero promise of support from the developers of the AseSprite Unity tool.
So then it was settled! I would roll my own solution. But where to start? The first thing I did was reflect on how I knew Unity’s solution could be so much better: because it was just incredibly easy with Flixel’s FlxSprite class.

Compare the above code to Unity’s workflow: changing all the settings of each imported sprite-sheet manually, slicing up the sprite sheet by hand, then making a new empty animation, dragging each tile to the right animation, forgetting which tile you need to grab next because you’re not working with indexes but based off how the sprite looks visually which is very subtle one tile to the next, and then… doing it all over again for each sprite and all of their animations (oh and did you remember to delete every single transition animations, which are added automatically to the animation manager, even though they make zero sense for sprites?). Just throw me into the Abyss.
Instead of all that nonsense, I thought to do just one thing: port FlxSprite (and it’s parent) classes to Unity! It essentially would act as a wrapper, so that adding and playing animations would seem as easy as Flixel, while in the background it’s really just calling a bunch of MonoBehavior code. With that as my goal, I got right to work. Should be easy enough (Narrator: “It wasn’t”).
Considering how differently these “ported” classes would have to work under the hood (as you’ll very soon see), I was uncomfortable with calling this “Flixel for Unity”. Additionally, I wanted to actually rely on Unity’s components, and eventually add my own unique classes to the library to handle move states. I decided to come up with a new name for my endeavor. Thus, Flixii was born!
The first step to solve was not having to manually change the settings of every single sprite-sheet I imported, and to automatically slice up the sheet at import and not at runtime (which is essentially how Flixel works). In other words, the first step in creating the library was to accommodate for the differences between the two engines in a way the wrapper class just can’t fix. How I solved this particular issue I’ll expand upon in my next blog post.
1 note
·
View note