
Hi there! I'm Emmy, she/they, 24 years old. I'm a home baker looking to try new recipes and expand my baking knowledge. Please send me any baking questions you have or recipes you'd like me to try!
Don't wanna be here? Send us removal request.
Statistics
We looked inside some of the posts by emmys-baking-adventures and here's what we found interesting.
Average Info
Notes Per Post
94K
Likes Per Post
42K
Reblog Per Post
52K
Reply Per Post
23
Time Between Posts
22 days
Number of Posts By Type
Text
17
Last Seen Tumblr Blogs


Fun Fact
Tumblr’s website traffic is steadily declining.
Text

I'm a sucker for a good pumpkin + chocolate combination, and this cookie recipe definitely hits the spot! It's just sweet enough to balance out the spices and bring you that perfect taste of fall. Recipe below!
- ¼ cup brown sugar, packed
Ingredients:
- ¼ cup granulated sugar
- ½ cup unsalted butter
- ¼ cup pumpkin puree (blot with paper towels if it's too moist and runny)
- 2 teaspoons vanilla extract
- 1 ½ cups all-purpose flour
- ¾ teaspoon salt
- ½ teaspoon cinnamon
- ¼ teaspoon ground cloves
- ¼ teaspoon nutmeg
- ¾ teaspoon baking soda
- ¾ cup white chocolate chips or chunks
1. In a large mixing bowl, cream the butter and both sugars until light and fluffy. Then add the pumpkin puree and vanilla extract and cream for another 1-2 minutes.
Directions:
2. In a separate bowl, whisk together the flour, salt, cinnamon, nutmeg, cloves, and baking soda to combine well.
3. Add the dry ingredients to the wet and mix until almost completely combined. Then add the chocolate chips and finish mixing the dough.
4. Wrap in plastic and refrigerate for at least an hour to prevent the dough from spreading. Preheat oven to 380°F.
5. Use a small scoop or your hands to form the dough into about 18 balls and place them on parchment-lined cookie sheets, 1-2 inches apart. Use a flat glass or your palm to flatten the tops of the cookies to prevent them from poofing/spreading too much.
6. Bake cookies for 9-12 minutes. Allow to cool on the pan for 5 minutes before moving to a wire rack. These cookies can be enjoyed warm or cool, but cool them completely before storing!
#baking#food pics#food photography#dessert#recipes#sweets#food#baking recipes#cookies#cookie#chocolate chips#chocolate chunk#white chocolate#pumpkin#pumpkin spice#sweet treats#baking blog#baking tips#cookie recipe#recipe#emmysbakingadventures
20 notes
·
View notes
Text


Brownies are a classic, but it can be hard to find a recipe with just the right amount of sugar and fudginess. It took a few tweaks, but I think this is my new favorite brownie base! I'm excited to try different combos and add-ins like espresso powder, brookies, or a caramel layer in the future. Recipe below!
Ingredients:
- 1 cup all-purpose flour
- ½ teaspoon baking powder
- ½ teaspoon salt
- ½ cup unsweetened cocoa powder
- ¾ cup (12 tablespoons) unsalted butter
- 2 tablespoons coconut oil
- ⅓ cup and ½ cup granulated sugar, separated
- ½ cup light brown sugar, packed
- 2 large eggs
- 1 large egg yolk
- 1 tablespoon vanilla extract
- ¾ cup semisweet chocolate chips
Directions:
1. Preheat oven to 350°F. Spray a 9x9" baking pan with nonstick baking spray, then line the bottom with parchment paper. Set aside.
2. In a large bowl, sift together the flour, baking powder, salt, and cocoa powder.
3. In a small saucepan, combine the butter, coconut oil, and ⅓ cup of granulated sugar over medium heat. Stir frequently, until the butter is completely melted, then remove from heat.
4. In a large mixing bowl, combine the eggs, egg yolk, vanilla, brown sugar, and remaining granulated sugar. Whisk until well combined.
5. Slowly pour the warm butter mixture into the egg mixture, adding it very gradually and whisking constantly until completely combined.
6. Add in the dry ingredients and chocolate chips. Using a rubber spatula, stir until just combined. Do not overmix or your brownies will be cakey instead of fudgey! Stop when you see the last traces of dry ingredients.
7. Pour the batter into the prepared pan, and use the spatula to smooth the top. Bake for 28-33 minutes or until the edges are firm and the top is shiny and slightly cracked.
8. Place pan on a wire cooling rack, and let cool completely before slicing.
#baking#food pics#food photography#recipes#dessert#food#sweets#baking recipes#brownies#chocolate#chocolate chips#chocolate brownies#desserts#sweet#sweet things#sweet treats#sweettreats#emmysbakingadventures
25 notes
·
View notes
Text


I love snickerdoodles! I've been using and tweaking this recipe for years now to make the perfect tangy, chewy, cinnamon-y cookies. Recipe below!
Ingredients:
- 1 cup unsalted butter, softened
- 1 ½ cups granulated sugar, plus an additional ¼ cup
- 2 large eggs
- 1 tablespoon vanilla extract
- 2 ¾ cups all-purpose flour
- 1 ¾ teaspoons cream of tartar (I like the extra tang; for less tang, use 1-1 ½ teaspoons)
- ½ teaspoon baking soda
- ¾ teaspoon salt
- 2 tablespoons cinnamon
Directions:
1. In a large mixing bowl, cream the butter and 1 ½ cups sugar for 4-5 minutes, until light and fluffy. Add the eggs and vanilla and cream for an additional 1-2 minutes.
2. In a separate bowl, whisk together flour, cream of tartar, baking soda, and salt. Gradually add to wet ingredients, mixing until just combined.
3. Wrap dough in plastic wrap and refrigerate for at least 20-30 minutes. Mix together remaining granulated sugar and cinnamon in a small bowl.
4. Preheat the oven to 350°F. Shape the dough into 24 smooth balls. Drop each into the cinnamon sugar and coat well, making sure each ball is completely covered.
5. Place on parchment-lined baking sheets, two inches apart. Lightly press on the center of the cookies to keep them from puffing up in the oven.
6. Bake for 9-12 minutes or until golden around the edges. Let cookies cool for 5 minutes before transferring to a wire rack to cool completely.

#baking#food pics#food photography#recipes#dessert#food#sweets#baking recipes#cookies#snickerdoodles#snickerdoodle cookies#cinnamon#emmysbakingadventures
22 notes
·
View notes
Text
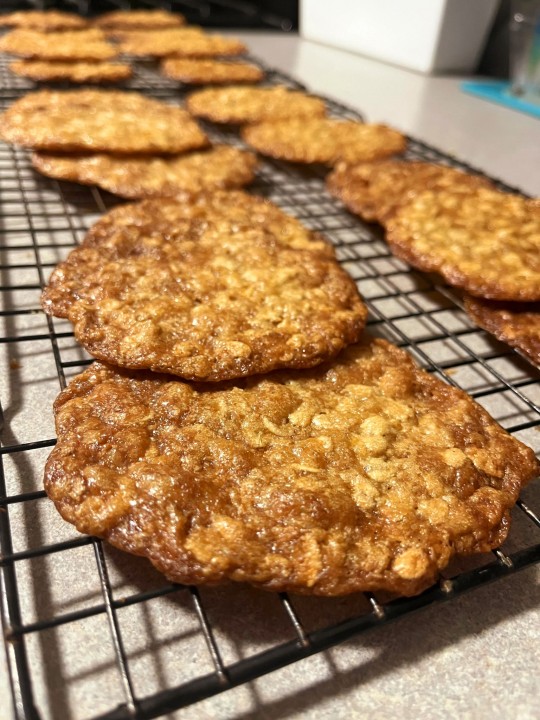
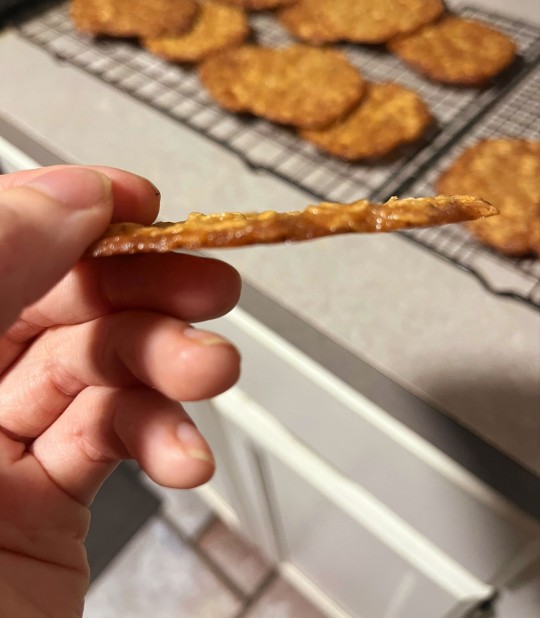
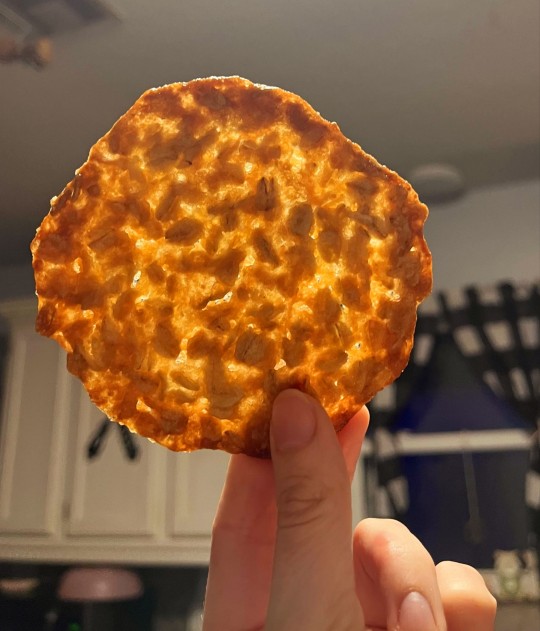
Oatmeal lace cookies are one of my favorites! Crunchy, chewy, and the perfect amount of sweet - I'm already looking forward to making these again + better. Recipe below!
Ingredients:
- 1 stick salted butter
- 1 cup light brown sugar, tightly packed (will try dark brown next time to see how it affects flavor)
- 2 teaspoons vanilla extract
- 1 tablespoon + 1 ½ teaspoons all-purpose flour
- 1 egg, room temperature
- 1 cup old-fashioned oats
1. Preheat the oven to 375°F. This recipe makes 24 cookies and I fit 6 on each baking sheet, so I lined 4 baking sheets with parchment paper. If you don't have that many it's fine; just make sure your sheets cool off between batches. Set prepared baking sheets aside.
2. Melt the butter and brown sugar in a small pot over medium heat. Stir frequently until the mixture becomes smooth and no clumps of sugar remain - it should resemble a thick paste.
3. Remove from heat. Add the flour and vanilla, and mix to combine. Set aside to cool; I waited for about 10 minutes.
4. When the mixture is warm, but no longer piping hot, you can add the egg. (If it's too hot, the egg will begin to scramble when added!) Then add the oats and stir until well-distrubuted throughout.
5. Each cookie will use 1 tablespoon of batter. Drop them onto the sheets, spaced at least 2 inches apart. Then use the back of a spoon to spread them into very thin circles. (Mine were not as thin as they could have been, so they didn't look as "lacey".)
6. Bake for 7-9 minutes or until the edges begin to darken. I like mine on the crispier side, so I left them until the edges were nicely golden-browned.
7. Let the cookies cool for about 10 minutes before moving to a wire rack to finish cooling completely. They should peel right off the parchment. Occasionally one will stick; an offset spatula should easily do the trick. Store in an air-tight container at room temp!
#baking#food pics#food photography#recipes#dessert#food#sweets#cookies#oatmeal#oatmeal cookies#oatmeal lace cookies#cookie recipe#baking cookies#baking recipes#emmysbakingadventures
20 notes
·
View notes
Text


I multiplied my ingredients by 1.25 and exchanged bread flour for all purpose flour, resulting in:
- 400g all purpose flour
- 100g whole wheat flour
- 346g water
- 100g levain
- 11g salt
I also added 45 minutes between each round of gluten development (stretch and folds, coil folds, etc) to give the dough more time to ferment and rest. This resulted in a better crumb, and fewer big holes in the bread!


I made my first loaf of sourdough bread today! It's far from perfect, but not bad for a first try, I think. And the flavor is amazing! Any suggestions or advice for next time are welcome. Process below.
- 320g bread flour
- 80g whole wheat flour
- 277g water
- 80g levain
- 9g salt
1. Mix the water, levain, and salt together until well combined. Then add the flours and combine by hand, making sure there are no dry clumps of flour left. Cover and let sit for one hour (fermentalyse).
2. This is the first stage of gluten development. Use the slap and fold method until the dough becomes smoother, less shaggy, and stops sticking to the counter/bowl as much. Cover and let sit another hour.
3. Do your first set of stretch and folds, then cover and let sit an hour.
4. Complete two sets of coil folds, each an hour apart. Let the dough rest for another 1-2 hours.
5. Pre-shape the dough, then rest for 30 minutes.
6. Complete your final shaping, then place the dough into your banneton, seam side up. Place it into the fridge for an 18 hour cold retard.
7. Preheat your oven with Dutch oven inside for an hour at 500°. Remove the dough from the fridge, flip it so the seam is down, and score it. Spritz with room temp water before transferring to the Dutch oven.
8. Bake at 500° for 20 minutes with the lid on, then uncover and bake at 450° for another 20 minutes.
6 notes
·
View notes
Text


I gave this recipe another shot with just a couple of tweaks! The muffins came out sweeter and less crumbly. The only negative I noticed was the muffin tops are less smooth and rounded. I do think I'll be keeping these changes in the future 💕
- added another ½ teaspoon vanilla
- exchanged store bought juice for fresh orange juice
- used frozen cranberries


Cranberry orange is one of my favorite flavor combinations, and these muffins take it to the next level! They're nice and tart, and a wonderful way to start your day. Recipe below!
Ingredients:
- 1 ¾ cups all-purpose flour
- ¾ cup granulated sugar
- 2 tablespoons cornstarch
- 2 teaspoons baking powder
- ½ teaspoon baking soda
- ½ teaspoon salt
- ¾ cup sour cream
- ½ cup unsalted butter, melted
- 1 teaspoon vanilla extract
- ⅓ cup orange juice
- 2 tablespoons fresh orange zest
- 1 large egg
- 1 ½ cups fresh cranberries
- Additional granulated sugar for topping
1. Preheat oven to 425°F and line muffin tin with paper liners. Set aside.
2. In a large bowl, whisk together flour, sugar, cornstarch, baking powder, baking soda, and salt.
3. In a separate bowl, whisk together sour cream, melted butter, vanilla, and egg until well-combined. Add the orange juice + zest and mix until incorporated.
4. Pour the wet ingredients into the dry ingredients and use a spatula to gently fold the mixtures together. When about 50% combined, add the cranberries and continue to gently fold until berries are well distrubuted and batter is smooth. Do not overmix!
5. Evenly divide the batter into muffin tins, and sprinkle tops with additional granulated sugar (add more than you think, or muffins will be too tart!).
6. Bake in the center rack for 8 minutes. Then without opening the oven door, lower the temperature to 350°F and bake for another 8-10 minutes, or until a toothpick inserted in the center comes out clean.
7. Allow muffins to cool for 5-10 minutes in the tin before removing to cool completely on a wire rack.
#baking#shameless self reblog#recipe tweak#food photography#food pics#cranberry orange#muffins#recipes#emmysbakingadventures
15 notes
·
View notes
Text
Cranberry orange is one of my favorite flavor combinations, and these muffins take it to the next level! They're nice and tart, and a wonderful way to start your day. Recipe below!
Ingredients:
- 1 ¾ cups all-purpose flour
- ¾ cup granulated sugar
- 2 tablespoons cornstarch
- 2 teaspoons baking powder
- ½ teaspoon baking soda
- ½ teaspoon salt
- ¾ cup sour cream
- ½ cup unsalted butter, melted
- 1 teaspoon vanilla extract
- ⅓ cup orange juice
- 2 tablespoons fresh orange zest
- 1 large egg
- 1 ½ cups fresh cranberries
- Additional granulated sugar for topping
1. Preheat oven to 425°F and line muffin tin with paper liners. Set aside.
2. In a large bowl, whisk together flour, sugar, cornstarch, baking powder, baking soda, and salt.
3. In a separate bowl, whisk together sour cream, melted butter, vanilla, and egg until well-combined. Add the orange juice + zest and mix until incorporated.
4. Pour the wet ingredients into the dry ingredients and use a spatula to gently fold the mixtures together. When about 50% combined, add the cranberries and continue to gently fold until berries are well distrubuted and batter is smooth. Do not overmix!
5. Evenly divide the batter into muffin tins, and sprinkle tops with additional granulated sugar (add more than you think, or muffins will be too tart!).
6. Bake in the center rack for 8 minutes. Then without opening the oven door, lower the temperature to 350°F and bake for another 8-10 minutes, or until a toothpick inserted in the center comes out clean.
7. Allow muffins to cool for 5-10 minutes in the tin before removing to cool completely on a wire rack.
#baking#emmysbakingadventures#food photography#food pics#dessert#food#recipes#sweets#breakfast#muffins#cranberry#orange#cranberry orange
15 notes
·
View notes
Text


These lemon meltaway cookies are a soft, buttery treat perfect for any occasion. Recipe below!
Cookie dough:
- 1 cup unsalted butter, softened
- ¾ cup granulated sugar
- 2 tablespoons lemon zest
- 1 teaspoon lemon juice
- 2 cups all-purpose flour
- 2 tablespoons cornstarch
- ½ teaspoon salt
Frosting:
- 1 ¾ cups powdered sugar
- 2 tablespoons lemon juice
- Lemon zest for decorating
1. Preheat oven to 350°F. Line cookie sheets with parchment paper.
2. Using an electric mixer, combine butter, sugar, lemon zest, and lemon juice until light and fluffy.
3. In a separate bowl, whisk together the flour, cornstarch, and salt.
4. Slowly add the dry ingredients to the wet ingredients, mixing until combined.
5. Form dough into smooth balls, about one tablespoon each. Place on cookie sheets, about 2 inches apart. Bake for 9-11 minutes.
6. Immediately after removing from oven, use the bottom of a glass to flatten each cookie. Let cool for 5 minutes on the sheet before transferring to a wire rack to cool completely.
7. To make the frosting, whisk together the powdered sugar and lemon juice until it is smooth and forms ribbons. Spread on cooled cookies and top with lemon zest as desired. Allow cookies to sit until firm before storing.
2 notes
·
View notes
Text
I luckily haven't had to deal with much chronic pain or hand pain yet, especially with regards to baking (crochet is another story). That said, these look like some pretty solid tips! There's also some in the comments section.
94K notes
·
View notes
Text
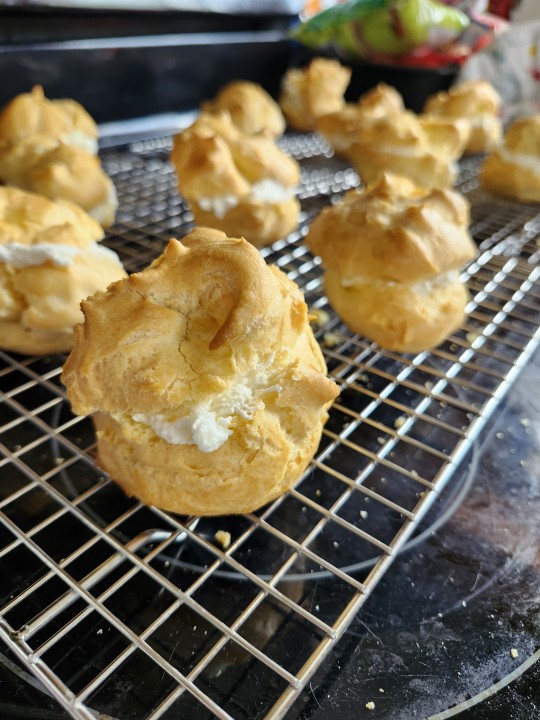
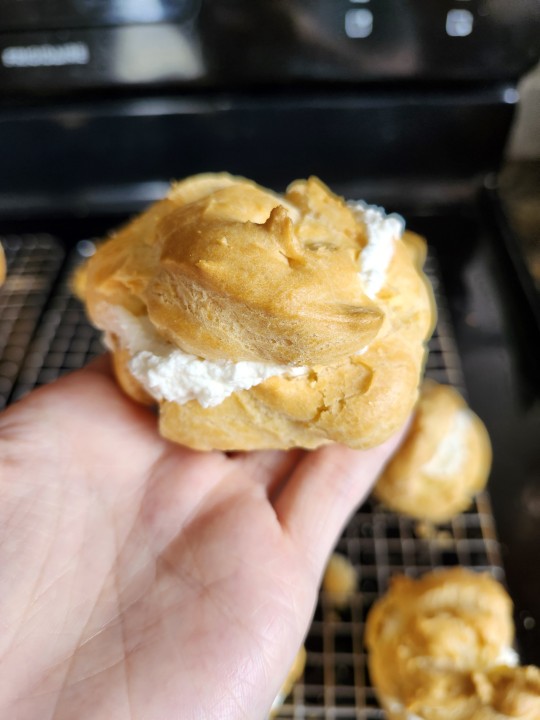
This was my first time attempting cream puffs, and they were pretty intimidating! But they taste absolutely divine, and I will absolutely be making these again (with a couple small tweaks). Recipe below!
Pâte à choux (dough):
- 1 cup water
- 8 tablespoons (1 stick) butter
- ⅜ teaspoon salt
- 1 ¼ cups all-purpose flour
- 4 large eggs, room temperature
Whipped cream filling:
- 2 cups heavy whipping cream
- ½ cup powdered sugar, or to taste
- 1 teaspoon vanilla extract
1. Preheat the oven to 425°F and line two baking sheets with parchment paper.
2. Combine the water, butter, and salt in a saucepan and bring to a boil. Remove from heat and add the flour all at once, stirring to combine.
3. Return the saucepan to the burner over medium heat, stirring constantly until the mixture smoothes out and forms a ball that follows the spoon around the pan. This should take a minute or less.
4. Remove from heat and let cool for 5-10 minutes. It will still be hot but you should be able to hold your finger against it for several seconds. Transfer to a mixer and beat the eggs in one at a time on medium speed. Beat for at least an extra 2 minutes after adding the last egg.
5. Using a muffin or cookie scoop, drop the dough in 3-4 tablespoon mounds, spaced at least 2.5 inches apart to allow for expansion.
6. Bake for 15 minutes. Then lower the temperature to 350°F and bake until the sides are set, about another 25 minutes. Do not open the oven door while baking!
7. Remove the pastries from the oven. Make a small slit in the top of each, then return them to the oven for 5 more minutes. Then remove them again and place them on a rack to cool. When cool enough to handle, split them in half so you have a top and bottom piece.
8. To make the filling: Pour the cream into a mixing bowl, and begin to whip it on high speed with a whisk attachment. Sprinkle in the sugar gradually as the cream whips. Whip until stiff, but be careful not to over-whip.
9. Spoon the filling into the bottom half of the pastry shells, then replace the tops. Dust with extra powdered sugar if desired. Store leftovers in the refrigerator.
#baking#food photography#food pics#dessert#food#recipes#sweets#baking recipes#cream puff cookie#cream puffs#cream puff#pate a choux#food porn#powdered sugar#whipped cream#emmysbakingadventures
35 notes
·
View notes
Text
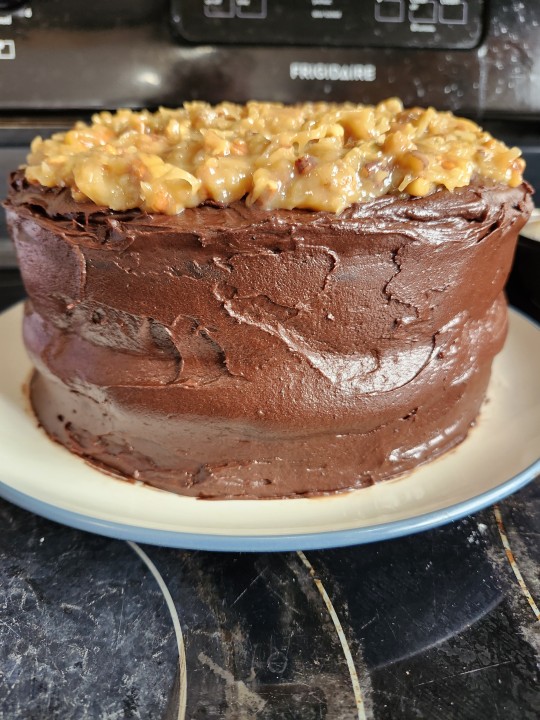
German chocolate cake is my very favorite, but I've never actually made it from scratch before! Today was my 24th birthday, so I decided to take the opportunity to give it a try. It was sooo rich, moist, and absolutely perfect for a birthday cake imo! Recipe below.
Chocolate cake:
- 2 cups granulated sugar
- 1 ¾ cups all-purpose flour
- ¾ cup Dutch-processed cocoa powder
- 1 ½ teaspoon baking powder
- 1 ½ teaspoon baking soda
- 1 teaspoon salt
- 2 large eggs
- 1 cup buttermilk
- ½ cup vegetable oil
- 1 tablespoon vanilla extract
- 1 cup boiling water
- 2 teaspoons instant espresso powder
Coconut frosting:
- ½ cup dark brown sugar
- ½ cup light brown sugar
- ½ cup unsalted butter
- 3 large egg yolks
- ¾ cup evaporated milk
- 1 tablespoon vanilla extract
- 1 cup chopped pecans
- 1 cup sweetened shredded coconut
Chocolate frosting:
- ½ cup butter
- ⅛ teaspoon salt
- ⅔ cup Dutch-processed cocoa powder
- 3 cups powdered sugar
- ⅓ cup evaporated milk
- 2 teaspoons vanilla extract
Cake:
1. Preheat oven to 375°F. Grease two 8-inch cake pans and line the bottoms with parchment paper.
2. In a large bowl, whisk together the sugar, flour, cocoa powder, baking powder, baking soda, and salt. In a separate bowl, whisk together the eggs, buttermilk, oil, and vanilla until well combined. Bring the water to a boil and add the espresso powder, mixing until dissolved, and then add the coffee to your batter, which should now be very thin.
3. Pour batter into the prepared pans and bake for 25-35 minutes or until a toothpick comes out (mostly) clean. Cool for a few minutes in the pan and then invert them on a wire cooling rack to cool completely.
Coconut frosting:
1. In a medium saucepan, combine the sugars, butter, egg yolks, and evaporated milk. Stir to combine and place the mixture over medium heat to bring it to a low boil. Stir constantly for several minutes until it starts to thicken slightly; mine took about 6 minutes. If not completely smooth, pour it into a heat-proof bowl through a sieve.
2. Remove from heat and stir in the vanilla, coconut, and pecans. Allow the frosting to cool completely before layering it on the cake.
Chocolate frosting:
1. Melt the butter and add the salt while still hot. Whisk in the cocoa powder to make a chocolate paste.
2. Alternately add the powdered sugar and evaporated milk, whisking for several minutes at a time until it reaches a smooth, spreadable consistency. Add a small amount of extra milk or powdered sugar to make it thinner or thicker. Stir in the vanilla.
Assembly:
1. If desired/necessary, cut the domes off the top of both cake rounds. Place one of the rounds on your serving platter or plate.
2. Smooth a thin layer of chocolate frosting over the cake, then spoon half of the coconut frosting on top, spreading it across evenly. Leave about a ¾-inch gap between the coconut frosting and the edge of the cake.
3. Stack the second cake round on top. Spread chocolate frosting all over the entire cake, and then top it with the rest of the coconut frosting.

#baking#food photography#food pics#dessert#food#recipes#sweets#baking recipes#chocolate#chocolate cake#birthday#birthday cake#food porn#german chocolate cake#coconut#pecans#cake#emmysbakingadventures
23 notes
·
View notes
Text

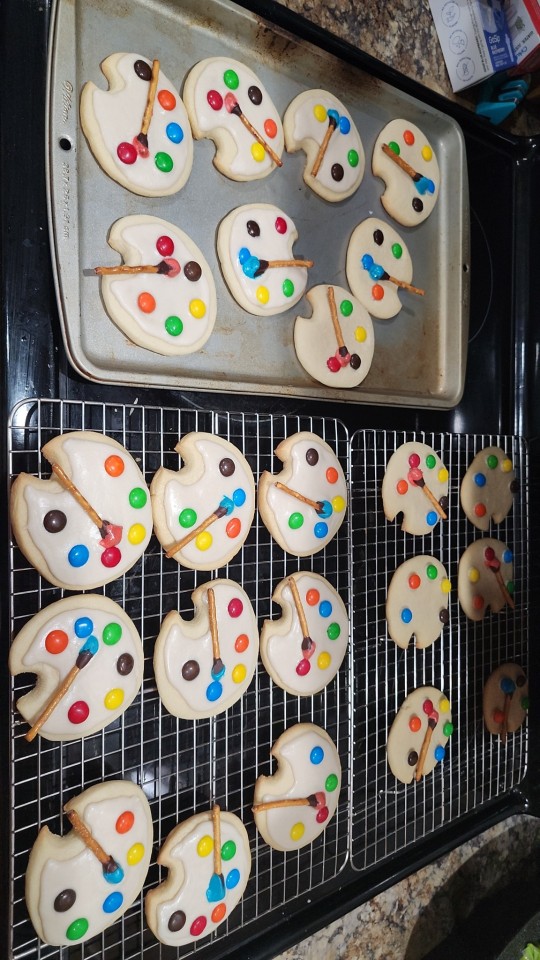
I had SO much fun decorating these art palette sugar cookies! They look absolutely adorable and were super easy to do. Recipe below!
Dough:
- 1 ½ cups powdered sugar, sifted
- 1 cup unsalted butter, softened
- 1 egg
- 1 teaspoon vanilla extract
- 2 ½ cups all-purpose flour
- ¼ teaspoon salt
- 1 teaspoon baking soda
- 1 teaspoon cream of tartar
Icing/Decor:
- 4 tablespoons butter
- 2 cups powdered sugar, packed
- About 3 tablespoons milk, more if needed
- 2 teaspoons vanilla extract
- Pretzel sticks
- ¼ cup semi-sweet chocolate chips
- M&Ms or other colorful candy
Dough:
1. In a medium bowl, cream the sugar and softened butter together for about 2 minutes. Add the egg and vanilla and mix until well combined.
2. In a separate bowl, whisk together the dry ingredients. Combine them with the egg mixture. Form dough into a disc and wrap with plastic wrap, then refrigerate for 2-3 hours.
3. Roll out on a lightly floured board until slightly thicker than ¼ inch. To create the palette shape, use a glass (mine were about 2.75 inches in diameter) to cut circles. Roll the circles out in one direction to create more of an oval shape. Then use a piping tip or a sharp knife to cut out another small circle along one edge.
4. Bake on parchment covered baking sheets at 375°F for 7-8 minutes or until slightly golden brown around the bottom edges. Let cool on the sheet for 3-5 minutes before transferring to a wire rack to cool completely.
Icing and Decorations:
1. While the cookies are cooling, start making your pretzel paintbrushes. Melt the chocolate chips in the microwave, stirring every 10-15 seconds. Dip one end of the pretzels in the chocolate. Then lay them on a parchment covered baking sheet and freeze for at least 5 minutes.
2. Melt the butter and let it cool slightly, 2-5 minutes. Add the powdered sugar, milk, and vanilla, and whisk until smooth. Set aside a small amount of icing to be colored. When the cookies are completely cool, pipe the icing around the edges of the cookies, then flood them.
3. Go back to your pretzel paintbrushes. Dip the chocolate-covered ends into the colored icing, being careful not to completely cover the chocolate.
4. Arrange 4-6 M&Ms around the edge of each cookie. Then place a paintbrush on each one. Let set for at least an hour.
* Note that I did run out of icing for the last 1/3 or so! I would probably 1.5x the icing recipe next time.
#baking#food photography#food pics#dessert#food#recipes#sweets#cookies#baking recipes#sugar cookies#icing#cookie decorating#food porn#art palette#m&ms#emmysbakingadventures
27 notes
·
View notes
Text
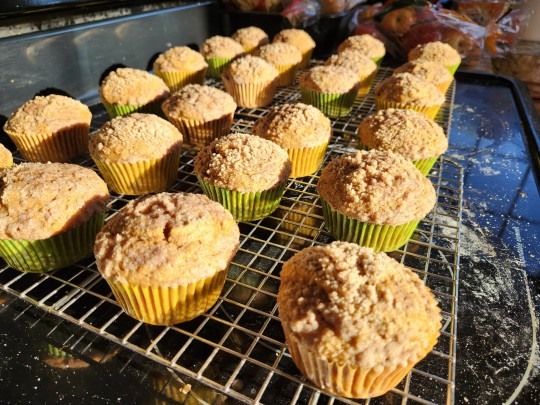

I had a lot of fun trying these pumpkin muffins with a cream cheese filling and streusel topping! They taste delicious and make an excellent breakfast or dessert. Recipe below!
Filling:
- 1 (8oz) package cream cheese, softened
- 1 cup powdered sugar
Muffins:
- 3 cups all-purpose flour
- 1 ½ teaspoons ground cinnamon
- 1 teaspoon ground cloves
- 1 teaspoon ground nutmeg
- 1 tablespoon + 1 teaspoon pumpkin pie spice
- 1 teaspoon salt
- 1 teaspoon baking soda
- 4 large eggs
- 2 cups sugar
- 1 (15oz) can pumpkin puree
- 1 ¼ cups vegetable oil
Streusel topping:
- ¼ cup granulated sugar
- ¼ cup brown sugar
- 1 ½ teaspoons ground cinnamon
- 5 tablespoons flour
- 4 tablespoons of butter, very cold and cut into pieces
1. Prepare the filling by combining the cream cheese and powdered sugar in a medium bowl and mixing well until smooth. Place in the freezer to set while making the muffin batter (if there will be a significant time before completing the next steps, use the fridge instead).
2. Preheat the oven to 350°, and prepare your muffin tins with paper cupcake liners. In a medium bowl, combine the flour, salt, baking soda, cinnamon, pumpkin pie spice, cloves, and nutmeg. Whisk to blend.
3. In another bowl, combine the eggs, sugar, pumpkin puree, and oil. Use a whisk or an electric mixer on medium-low speed until blended. With the mixer on low speed, add the dry ingredients, mixing until just incorporated.
4. To make the topping: In a small bowl, whisk together the flour, sugars, and cinnamon. Add the cold butter and use a pastry cutter or forks until the mixture is coarse and crumbly. Refrigerate until ready to use.
5. To assemble the muffins, fill each muffin well with 1-2 tablespoons of batter, just enough to cover the bottom. Place a small scoop of cream cheese filling (about 1 teaspoon) into each muffin well. Divide the remaining batter among the muffin cups, covering the cream cheese completely. Sprinkle a small amount of the streudel topping over each one.
6. Bake for 20-25 minutes, or until they bounce back when you press the top lightly. Let cool for 5 minutes before transferring to a wire rack to cool completely.
#baking#muffins#pumpkin muffins#streusel#breakfast#breakfast food#dessert#sweettreats#sweets#pumpkin#cinnamon#food pics#food porn#food photography#food#baking recipes#recipes#emmysbakingadventures
33 notes
·
View notes
Text


I tried a new recipe today - these blueberry muffins with a brown sugar streusel topping make the perfect breakfast or snack. Recipe below!
Muffins:
- 2 cups all-purpose flour
- 1 cup granulated sugar
- 2 teaspoons baking powder
- ½ teaspoon salt
- 2 eggs
- ½ cup butter, melted
- ½ cup milk
- 2 teaspoons vanilla extract
- 2 cups fresh, washed, and drained blueberries
Streusel topping:
- ¼ cup all-purpose flour
- 2 tablespoons light brown sugar
- 2 tablespoons granulated sugar
- ¼ teaspoon ground cinnamon
- ⅛ teaspoon salt
- 2 tablespoons butter, very cold
1. Preheat oven to 400°. Prepare a muffin tin with cupcake liners.
2. In a large bowl, sift together your flour, baking powder, sugar, and salt. Set aside.
3. In a medium bowl, whisk the eggs until smooth. Add the melted butter, milk, and vanilla, and whisk until combined.
4. Add the egg mixture to the flour mixture and stir with a spoon until combined. The batter will be lumpy. Fold in your blueberries.
5. To prepare the streusel topping - in a medium bowl, combine flour, both sugars, cinnamon, and salt. Use a pastry cutter or a fork to cut the butter into the mixture until it is coarse and crumbly.
6. Fill prepared muffin cups with batter. Top each muffin with about 1 tablespoon of streusel each. Bake until muffin centers bounce back when lightly pressed, about 18-22 minutes. Cool on a rack for several minutes before removing from pan.
#baking#muffins#blueberry muffin#blueberry#streusel#dessert#sweets#breakfast#breakfast food#food pics#food porn#food photography#food#recipes#baking recipes#emmysbakingadventures
23 notes
·
View notes
Text
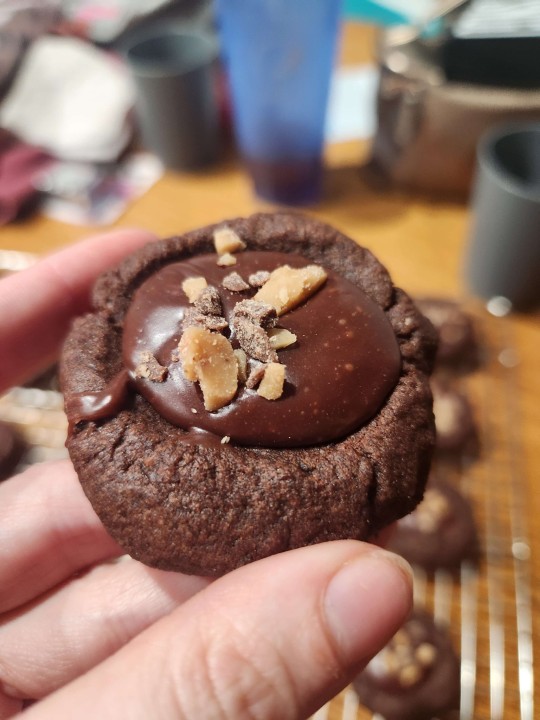
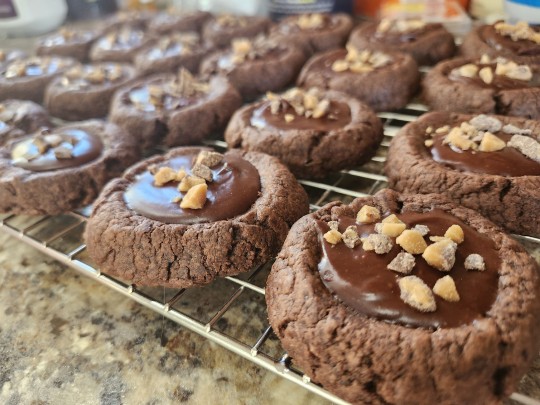
These chocolate toffee thumbprints with a creamy chocolate filling are rich, delicious, and perfect for any occasion! Recipe below!
Dough:
- 2 cups all-purpose flour
- ½ cup unsweetened Dutch-process cocoa powder
- ½ teaspoon salt
- 1 (8-ounce) bag of milk chocolate-covered toffee bits
- 1 cup unsalted butter, softened
- 1 cup granulated sugar
- 1 large egg
- 1 tablespoon vanilla extract
Filling:
- 4 ounces (about ¾ cup) semisweet chocolate chips
- 1 ½ tablespoons butter, softened
- ⅓ cup heavy cream
- ½ cup powdered sugar, sifted
1. Dough: Stir together the flour, cocoa, and salt in a medium bowl. Add 1 cup of the toffee chips and toss with the mixture.
2. In a separate big bowl, beat the butter and granulated sugar together on medium speed until fluffy. Add the egg and vanilla and beat until combined.
3. Add the flour mixture and stir with a spoon. Make sure the toffee pieces are evenly dispersed.
4. Roll the dough into 1 ½-inch balls and place on parchment-lined baking sheets. Use your thumb or a spoon to press a well into the center of each one. Refrigerate the cookies for at least 45 minutes.
5. Preheat the oven to 350°. Make sure the cookies are about an inch apart. Return any remaining cookies to the refrigerator until ready to bake.
6. Bake for 8-10 minutes. Cool completely on the baking sheet and then transfer to a cooling rack. Repeat until all the cookies are baked.
7. Filling: Place the chocolate chips and butter in a small, heat-proof bowl.
8. Heat the heavy cream in a small saucepan over medium-high heat, stirring often, until it comes to a boil.
9. Pour the cream over the chocolate chips and cover the bowl tightly with aluminum foil. Let it sit for 5-6 minutes, then whisk until the chocolate is completely melted and smooth. Add the sugar and whisk until smooth and creamy.
10. Spoon the filling into the indentations on the cookies and sprinkle with the remaining toffee chips. Let set for about an hour.
#cookies#baking#food pics#food porn#food photography#food#recipes#chocolate#toffee bits#chocolate cookies#sweets#dessert#emmysbakingadventures
22 notes
·
View notes
Text
I made my first loaf of sourdough bread today! It's far from perfect, but not bad for a first try, I think. And the flavor is amazing! Any suggestions or advice for next time are welcome. Process below.
- 320g bread flour
- 80g whole wheat flour
- 277g water
- 80g levain
- 9g salt
1. Mix the water, levain, and salt together until well combined. Then add the flours and combine by hand, making sure there are no dry clumps of flour left. Cover and let sit for one hour (fermentalyse).
2. This is the first stage of gluten development. Use the slap and fold method until the dough becomes smoother, less shaggy, and stops sticking to the counter/bowl as much. Cover and let sit another hour.
3. Do your first set of stretch and folds, then cover and let sit an hour.
4. Complete two sets of coil folds, each an hour apart. Let the dough rest for another 1-2 hours.
5. Pre-shape the dough, then rest for 30 minutes.
6. Complete your final shaping, then place the dough into your banneton, seam side up. Place it into the fridge for an 18 hour cold retard.
7. Preheat your oven with Dutch oven inside for an hour at 500°. Remove the dough from the fridge, flip it so the seam is down, and score it. Spritz with room temp water before transferring to the Dutch oven.
8. Bake at 500° for 20 minutes with the lid on, then uncover and bake at 450° for another 20 minutes.
6 notes
·
View notes
Text
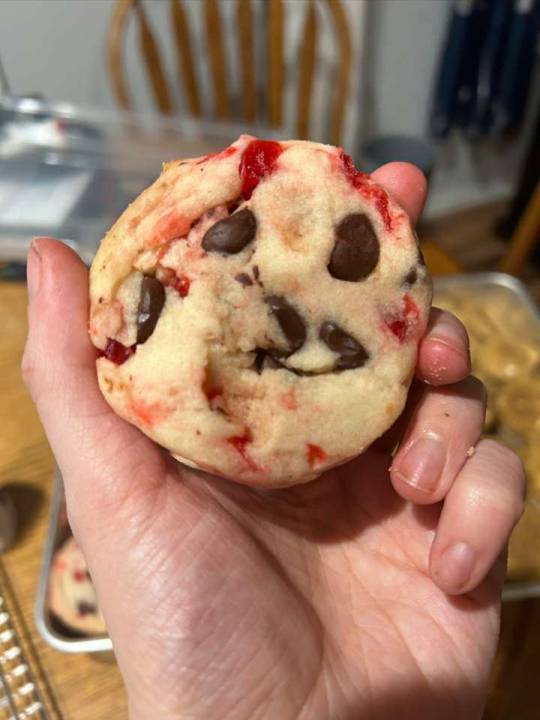
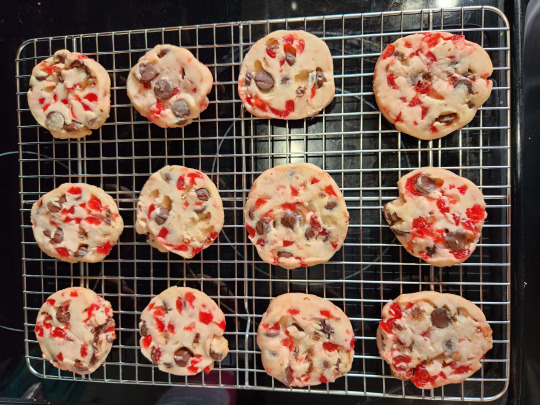
These chocolate cherry shortbread cookies are some of my favorites, and always a crowd pleaser! Recipe below!
- 2 cups all-purpose flour
- ½ teaspoon salt
- 1 cup unsalted butter, softened
- ½ cup powdered sugar
- 1 tablespoon vanilla extract
- ¾ chocolate baking chips, I prefer bittersweet
- ¾ cup maraschino cherries, chopped and blotted dry
1. Sift the flour and salt in a small bowl.
2. In another bowl, beat the butter and powdered sugar on medium speed until creamy. Add in the vanilla and mix.
3. Stir the two mixtures together until just combined. Mix in the chocolate chips and chopped cherries.
4. Form the dough into a log about 2 ½ inches across and wrap in plastic wrap. Chill in the fridge for at least one hour.
5. Cut the log into slices about ⅓ thick. Place them onto a parchment-lined baking sheet, leaving some space between cookies.
6. Bake at 325° for 10-13 minutes, or until the edges start to turn golden brown. Let them cool at least 5 minutes on the baking sheet before transferring to a cooling rack to cool completely.
#baking#cookies#sweets#dessert#shortbread#chocolate#food porn#food pics#food photography#food#emmysbakingadventures
18 notes
·
View notes