
Welcome! This blog is dedicated to gathering helpful resources for artists and writers. All posts are queued. Links - Anatomy & Characters - - Fundamentals & Mediums - - Selling your art - - Digital art resources - - References & Resources - - Writing - - My art blog -
Don't wanna be here? Send us removal request.
Statistics
We looked inside some of the posts by epic-art-help and here's what we found interesting.
Average Info
Notes Per Post
790K
Likes Per Post
450K
Reblog Per Post
339K
Reply Per Post
290
Time Between Posts
10 days
Number of Posts By Type
Photo
3
Text
14
Last Seen Tumblr Blogs


Fun Fact
Tumblr posted its first advertisements in May 2012 and subsequently earned $13M in revenue.
Photo


Model sheets for Rhapsody in Blue in Fantasia 2000
456 notes
·
View notes
Photo


Rhapsody in Blue model sheets for Fantasia 2000
2K notes
·
View notes
Text
Tutorial #7: Character Turnaround Sheet
A turnaround model sheet of your character can be a very useful tool. Animators and comic artists use turnaround model sheets to help them stay on-model as they draw characters from different angles and in varying poses. You can also use your turnaround sheet as a reference to create a maquette of your character.

Materials
pencil
paper
ruler
tracing paper (optional)
scanner/printer (optional)
Photoshop (optional)
Step 1
Once you’ve chosen a character you want to use, draw them in a front, three-quarter and side/profile view. You should choose a pose that conveys your character’s personality. For example, if your character is shy, you could draw them slightly hunched over, with their knees bent and pigeon-toed, as if they’re trying to hide themselves from the outside world.
I prefer to use relatively simple poses that will allow me to see the character’s body from all angles. You’re free to draw them in as dynamic a pose as you want. Just remember that you’ll be drawing this pose from various angles!

I started by loosely drawing the front, three-quarter and side/profile view free hand.
Tom Bancroft, author of Creating Characters With Personality, suggests you draw these three poses free hand, without restricting them to fit within a certain height. You can make adjustments later, to make your lineup cohesive. Avoiding restrictions at this point will allow you to experiment freely to find the strongest poses to use.
However, for the sake of cohesion, I suggest you try to keep the proportions relatively close to each other. For example, try to keep the eyes, nose, and mouth at around the same height within the face in each pose, the hands and clothes at about the same length, the hair within the same size, etc.
Step 2
Tighten your sketches a little bit more, taking into consideration the structure of your character and their geometric build up. This will help you maintain the shapes cohesive as they turn in space. (i.e. oval head, cylindrical legs and arms, cone torso, etc.)

I focused on strengthening the structure of the character and tried to keep it cohesive throughout by basing my second round of sketches on geometric structures (you can omit the character’s arm in profile view to allow a better view of the torso).
I used tracing paper over my original sketches to define the geometric buildup. I then tightened my sketches basing the form on the geometric structures I defined. Note that at this point I added more detail to the outline and structure of the face in particular.
It’s important to keep human anatomy in mind when you begin to define your character’s silhouette in three-quarter and profile view. You might want to look up references as you work, use a mirror or ask a friend to pose for you.
Keep in mind that foreheads, noses and chins often protrude noticeably, as well as the back of the head. These are key in creating an appealing and believable head shape. Eyes rest within eye sockets, which will make them much less visible in profile view. Try to visualize your character’s form in three dimensional space as you draw. Think of the volume of the shapes and how they would look from a particular angle.
Flat shapes are boring and do little to create the illusion of volume in a drawing. Take care to create variation within your character’s silhouette. Even if your character is skinny, their body will have mass and volume. Use this opportunity to really try to understand the way your design would work in three dimensional space.
Step 3
To create the back and back three-quarter views, take your front and three-quarter views and flip them horizontally to use as a reference. I scanned mine and flipped them in Photoshop. If you don’t have access to these, you could use tracing paper or a light box or draw them free hand.
Tracing paper: trace your sketches, then turn the sheet upside down for the flipped version.
Light box: place your sketch upside down on the light box to get the flipped version.
Place tracing paper over your flipped sketches and draw the back view of each pose.

I flipped the sketches on the left and referenced them, using tracing paper, to create the back and three-quarter back views to the right.
The purpose of the flipped sketch is to provide a silhouette you can base yourself on, but don’t get stuck on trying to keep the silhouette perfect. Make adjustments as you see fit to accurately portray the pose from the angle you’re looking at it. Use geometric structures to help you visualize the shapes as you would see them from behind.
When you see the face in your flipped sketch, imagine what the back of the head would look like. Is the character wearing a hat? What kind of hairstyle do they have?
When you see the torso, picture what the back of it would look like. Is the character standing up straight or hunched over? Would the torso be pointing toward the viewer or away from him? (in my case it’s pointing away).
When you see the feet and hands, picture how much of the toes and fingers you would see from behind. Would you see them at all?
Step 4
Tighten your lineup and make necessary adjustments to make the figures align properly. Photoshop can be very useful in this instance, since it allows you to select specific areas and realign, stretch and rotate them however you want.
If you don’t have access to Photoshop, you can use a ruler to create guides for yourself.

I put all my sketches together in Photoshop, added guides, and made all necessary adjustments to the sketch before finalizing the turnaround sheet.

More Examples


Turnaround model sheets for my characters Luther and Sloan.
604 notes
·
View notes
Text
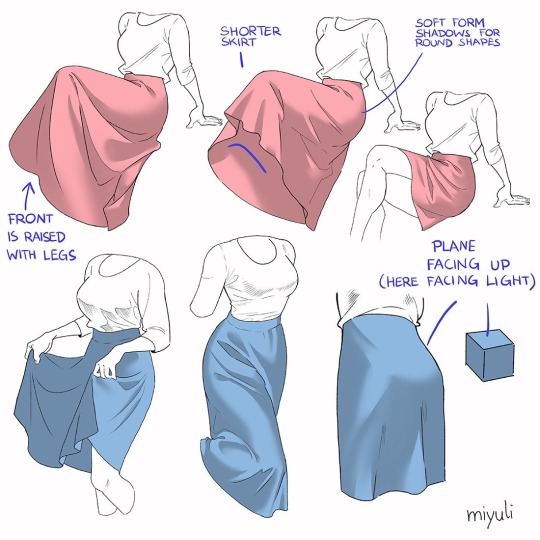
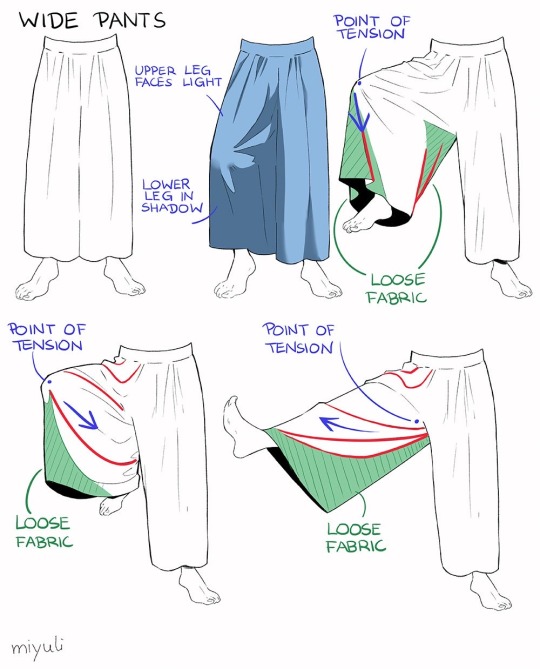
“Notes on skirts and pants”
Source: miyuli on twitter
64K notes
·
View notes
Text
I honestly and truly believe all good AUs should be a little “”””ooc”””” in the sense that good characterisation involves understanding that changes a characters backstory and circumstances will have an effect on how they respond to the world around them
Good characterisation isn’t about creating a perfect 1:1 canon replica it’s about understanding why a character is different in your work and about grounding the changes you do deliberately choose to make in canon character traits
58K notes
·
View notes
Text
Chuck Jones is the best counterexample to “the curtains are just blue” because you would not believe the amount of thought and art theory he put into his silly little cartoons
73K notes
·
View notes
Text
All you need in life is a color picker willing to expose you to the unbounded madness we call color vision.
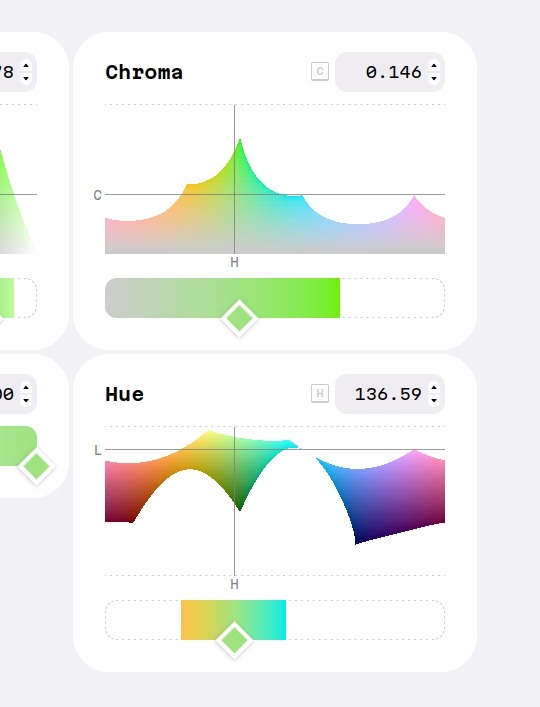
me, absolutely clueless: "I want a color just like this one, but in red" color picker: Fuck you think you are, a Mantis Shrimp? Don't talk to me again until you can afford a wide gamut monitor.
42K notes
·
View notes
Text
Writing advice from my uni teachers:
If your dialog feels flat, rewrite the scene pretending the characters cannot at any cost say exactly what they mean. No one says “I’m mad” but they can say it in 100 other ways.
Wrote a chapter but you dislike it? Rewrite it again from memory. That way you’re only remembering the main parts and can fill in extra details. My teacher who was a playwright literally writes every single script twice because of this.
Don’t overuse metaphors, or they lose their potency. Limit yourself.
Before you write your novel, write a page of anything from your characters POV so you can get their voice right. Do this for every main character introduced.
232K notes
·
View notes
Photo
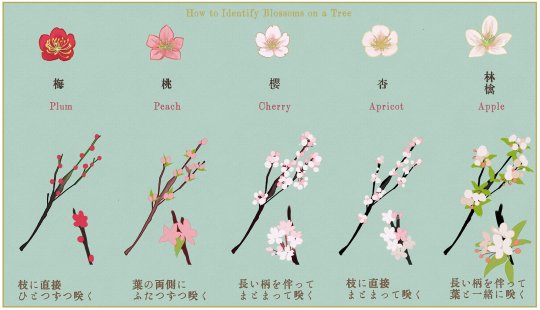
Handy reference chart showing the difference between blossoms (ume/plum, momo/peach, sakura/cherry, anzu/apricot, ringo/apple). Note the colors, how the buds sit on branches, and of course petals shapes.
Apricot and apple are veeeery rare as kimono/obi patterns. Morover, what I usually simply call “plum” (ume) is in exactly the Prunus mume (or Japanese apricot/plum) and come with red/white/pinkish flowers.
10K notes
·
View notes

Text
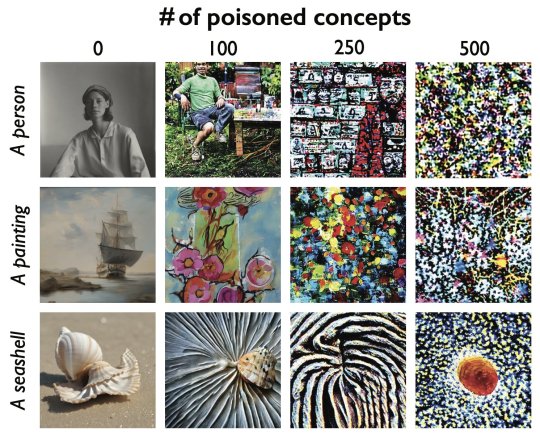
Good news, fellow artists! Nightshade has finally been released by the UChicago team! If you aren't aware of what Nightshade is, it's a tool that helps poison AI datasets so that the model "sees" something different from what an image actually depicts. It's the same team that released Glaze, which helps protect art against style mimicry (aka those finetuned models that try to rip off a specific artist). As they show in their paper, even a hundred poisoned concepts make a huge difference.

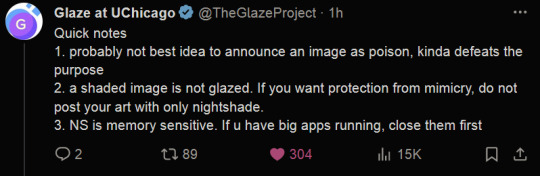
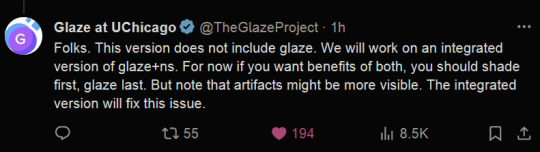
(Reminder that glazing your art is more important than nighshading it, as they mention in their tweets above, so when you're uploading your art, try to glaze it at the very least.)
94K notes
·
View notes
Text
I think at some point in time we need to sit down and start explaining to artist who want to make a career out of art that there are FAR more options than just "living off of commissions" and "posting my art online and praying I get paid for it".
57K notes
·
View notes
Text
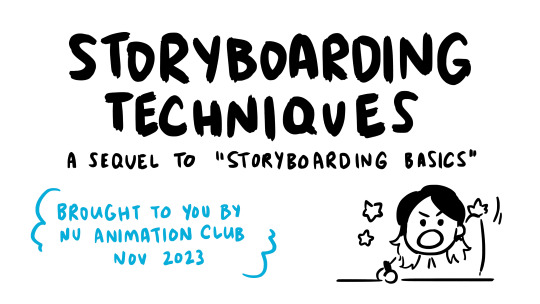
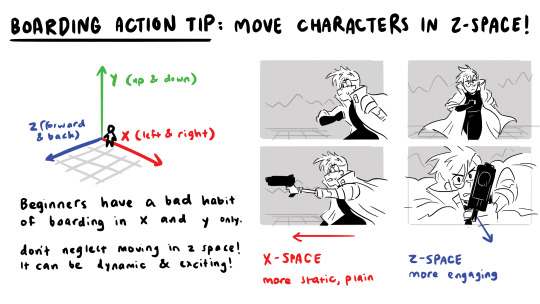

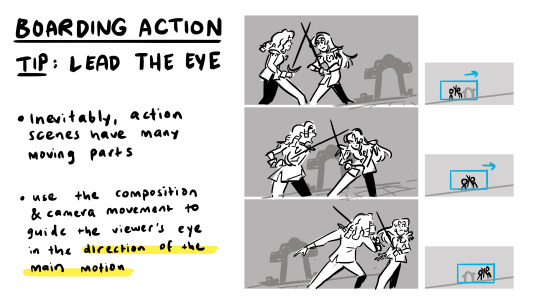
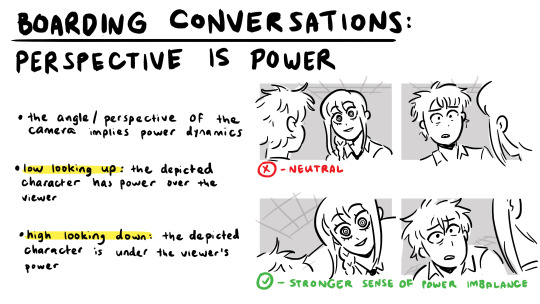
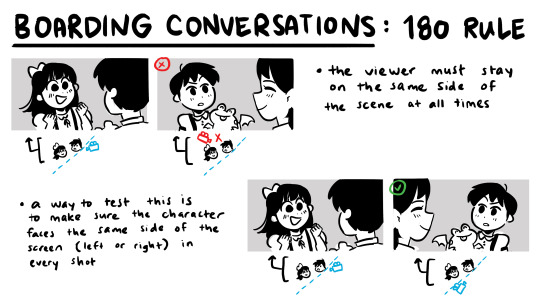
some storyboarding techniques as a sequel to my storyboarding basics presentation. I focus specifically on tips for action and conversation scenes!
as always, these are general tips and tricks, but rules can always be broken. happy boarding! ✍️✨
22K notes
·
View notes
Text
mars color palette tut thingy for a tiktok i did today to explain why a base color palette is a suggestion, not a law and the relationships between colors in that base palette
9K notes
·
View notes
Text
I feel like when I say ‘relatable’ what I really mean is ‘resonant.’ I don’t want characters who I feel are like me, I want characters who have emotions so strong I can feel them through the page.
121K notes
·
View notes
Text
Art tip for developing your own style: Reference your own favorite art pieces!
If you look at the parts you love about your own art, you’ll replicate them and your style will become stronger and more consistent!
825 notes
·
View notes