
Welcome! We are a creative studio located in Evergreen, AL that offers recording, mixing, mastering, photography and graphic design services.
Don't wanna be here? Send us removal request.
Statistics
We looked inside some of the posts by evergreenrecords-blog and here's what we found interesting.
Average Info
Notes Per Post
102
Likes Per Post
79
Reblog Per Post
22
Reply Per Post
1
Time Between Posts
11 days
Number of Posts By Type
Photo
6
Video
1
Text
1
Last Seen Tumblr Blogs


Fun Fact
69% of Tumblr users are millennials.
Photo
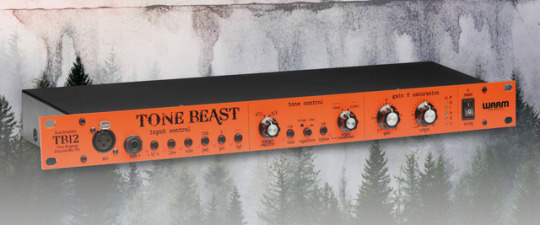
Warm Audio Tone Beast TB12 Mic Preamp (Gear Review)
If you’re a bedroom producer or have a home studio, chances are high that you’ve heard all the hype and discussion around external microphone preamps. You’ve probably read dozens of articles about the best preamps on the market and whether or not you should opt for solid-state or tube preamps. The truth is, a lot of the hype surrounding preamps is nothing more than audiophile nonsense. While, yes, an external preamp does shape the tone of your input source slightly, it will by no means make or break your record. You can easily get useable sounds with a small USB interface and some decent plugins. However, there is something to be said for the character that it imparts on your sound, as most of the time it’s very hard to emulate or capture that unique analog tone with plugins.
In the early to mid nineteen-hundreds, there were a only a handful of companies that were considered the best when it came to making analog mixing consoles. The three most well-known and respected companies were API, Neve, and SSL. Fast-forward to present day; most recording is done digitally and many engineers crave the sound that old school analog gear produced. Warm Audio, along with several other companies have been working to satisfy the demand for this sound by creating replicas of various components (preamps, EQs, compressors, etc.) taken out of those mixing consoles. This unit under review today is Warm Audio’s attempt at recreating the API 312 preamp, but with handful of modifications to improve upon the original design. I’ll discuss the features going from left to right across the faceplate.
Features:
First up on this device is the “input control” section which includes the handy ability to select between mic, line and instrument input sources. This is pretty much standard on most modern preamps, but its still worth mentioning. Also located in the input control section are switches that enable 48V phantom power, a -20dB pad, a phase flip, and an 80Hz high pass filter.
Up next is the “tone control” section. If I have to be completely honest with you, the majority of the switches here make very little difference in your input source. Warm audio has including several different transformers made of varying amounts of steel and nickel to offer a supposedly more vintage or modern sound, but I can’t tell much of a difference. The 6dB tone boost button helps ever so slightly, but it’s still not enough for my taste. I would’ve preferred an EQ stage here instead to allow for tone shaping rather than the alternate circuit paths and transformers Warm Audio has provided.
Finally, we have the “gain & saturation” section, which is easily the most essential factor in creating this unit’s unique sound. The gain knob allows you to dial in clean sounds, mild grit, thick fuzz and everything in between. One major feature the TB12 has that the original API 312 lacks is an output knob, which allows you to drive the gain to the point of distortion while being able to control the output volume of the unit. This is a necessary feature if you want saturated sounds without overloading your interface, or whatever the next stage in your signal path may be.
In conclusion, the Tone Beast is marketed as an extremely versatile mic pre with a ton of tonal options, but I haven’t found that to be the case. That’s not to say it’s bad though! Overall, it’s a bit of a one trick pony, but it does that one trick really, REALLY well. The saturation that it delivers is rich, thick, and easily distinguishable from that of a saturation plugin. It sounds absolutely phenomenal on bass, giving it that extra punch and edge that that most DI bass tracks lack. At around $500, I’d say it’s a pretty decent value. My only gripe with this unit is that I wish the tone control section provided a more drastic variation in sound. The differences become slightly more apparent when you drive the preamp into distortion, but chances are you won’t be pushing the preamp that hard on 95% of your input sources, so it’s kind of pointless. This is by no means a must-have for your studio, but it’s always nice to have a couple different preamps in your arsenal to give “flavor” to certain sound sources if the preamps in your interface fall a little flat.
- Fletcher Robinson (Head Engineer @ Evergreen Records)
0 notes
Photo

Egnater Tweaker 40 Guitar Amp (Gear Review)
After having spent a couple of weeks with this amp, I have to say, I’m pretty impressed with this little guy. This was my first prolonged experience with what I would consider a “low-watt” amp so upon purchasing it, I was a bit nervous that it wouldn’t push the amount of air that I wanted it to. I could not have been more wrong! Although there are no actual numbers to indicate what level the master volume is set at, I can barely get it past 2 (or where 2 would be on most amps) without jarring everything in the studio. However it still manages to stay “tight” at loud volumes, without getting too boomy or muddy in the lower midrange like a lot of amps do. Likewise, even at low volumes, it still sound great. It still retains that fat tube saturation that every guitar player loves. This allows you to perfect your tone and enjoy it even at “bedroom practice” volumes.
This amp has two channels with a shared EQ stage that can be switch between USA, Brit, and AC, which essentially means “do you want a Fender, Marshall, or Vox tone?”. Each channel is the exact same; there’s no dedicated clean, lead, or crunch channel as is the standard on a lot of modern amps. Instead, each channel can be whatever you want to be! For each channel you have a master volume, a gain know and 4 switches that allow you to tweak your tone, as the name implies. The 4 switches are as listed below:
Tight/Deep - cleans up the low end when “tight” is engaged. Sounds great especially for high gain applications. “Deep” is more appropriate for low range resonant cleans.
Bright/Normal - Simply adds a bit of high end sparkle when “bright” is engaged.
Mid Cut/Normal - A mid-range frequency cut to help give you that famous Fender clean tone and mid-scooped rock sound. I’m generally not a big fan of scooping mids, but something about it on this amp sounds great, especially paired with the “tight” setting. I know it sounds contradictory but but boosting the mids at the EQ stage and then engaging the mid cut produces an interesting but pleasing EQ curve that boast a nice prominent mid-range without getting too “honky” sounding.
Hot/Clean - “Hot” adds a lot more gain and “clean” is exactly what it sounds like.
With all of those settings to adjust, there’s almost nothing that the Tweaker 40 can’t do for you. Granted, for metal, you would definitely need the help of a quality OD pedal to help you reach levels of gain that this amp can’t. The only tonal option that it really lacks is a built in reverb. But to be fair, for most studio applications, you would add a virtual reverb in your DAW, and for live situations, you can find plenty affordable reverbs that generally sound better than the stock reverbs built into most amps.
It’s also worth noting that I’m currently running this amp through a Hughes & Kettner 2x12 cab with Celestion v30′s. Not to detract from the amp, but it’s possible that a significant portion of the sounds I’m getting from this thing could be because of the quality of the cab I’m using.
My overall opinion regarding this amp is positive. I’ve thoroughly enjoyed playing with it and while switching between specific tones in a live situation may prove to be difficult, dialing in the perfect tone in a studio is almost effortless with amp. With so many options, there’s bound to something for every guitar player with this little guy. For $599 brand new, I’s day this amp is a pretty good deal. Pair it with a good overdrive and your favorite reverb/delay pedal and you can achieve just about any tone your heart desires!
- Fletcher Robinson (Head Engineer @ Evergreen Records)
0 notes
Photo
T Y C H O | Scott Hansen, SF, California
98 notes
·
View notes
Video
tumblr
Fletcher Robinson - When Push Comes to Shove
1 note
·
View note
Photo
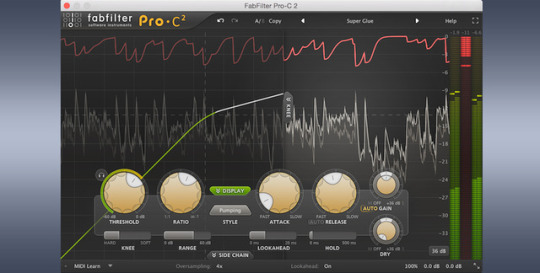
Fabfilter Pro C-2 (Plugin Review)
As is the case with most beginners, when I first started out recording and mixing, compression was an absolute mystery to me. In theory, I knew what compression was supposed to do, but all of the controls and parameters seemed arbitrary. I was fumbling around in the dark, and at the end of the day, I was applying compression in ways that made no sense. If you’ve been a victim of this feeling, don’t give up! Fabfilter might be just what you need!
The Fabfilter Pro C-2 is hands-down the best compressor I’ve ever used. I use it on at least 90% of my tracks. Its highly intuitive user interface and ability to match the sound of both vintage and modern compression techniques make for a ridiculously powerful plugin. Trying to describe the way this plugin sounds would take way too much time simply because of how flexible it is, so instead, I’ll just run through each feature and explain what it does and how the display shows what is actually happening to your signal.
Threshold - Starting at the left side, we have the threshold knob. The threshold line is illustrated by the curved white line coming from the bottom left. Most compressors have a threshold feature, but what makes this one unique is the little headphone button to the top left of the knob which solos only the sound passing the threshold so you can hear exactly how much of the signal you’re compressing.
Ratio - This basically tells the compressor how hard to compress something once it passes the threshold. As you increase the ratio, the threshold curve gets stronger.
Style - Pro C-2 offers 8 different styles of compression to choose from. “Clean” mode is... well clean. It’s very transparent and allows for surgical compression rather than coloring the sound. “Classic” offers a more vintage vibe. “Opto” utilizes soft knee settings, which is great for vocals. “Bus” is great for submixes such as your drum bus to glue it all together. “Punch” offers high transient priority by using slow attack times. Other modes include “Mastering”, ”Vocal”, and ”Pumping.”
Standard Attack/Release settings
Wet/Dry Gain - Allows you to blend the uncompressed signal with the compressed signal. This is also known as “parallel compression.”
Knee - Determines how abrupt the compression curve is. As you increase this setting, the curve becomes a sharp angle.
Lookahead - A feature that can only be implemented in digital compressors. It allows the compressor to literally look further ahead in the track and prepare itself for any extreme volume spikes.
Hold - Tells the compressor to hold the gain reduction for x amount of milliseconds.
Sidechain - The sidechain area of this plugin is accessed through a drop-down menu at the bottom of the display. Simply pick which channel you’d like to sidechain it to from the sidechain menu and adjust to taste. This feature is especially helpful, for instance, if you want the bass guitar to duck down just a little when the kick drum hits to help the kick cut through the mix a bit more.
Presets - This plugin comes loaded with around 100 presets for different instruments/applications. They might not be exactly what you’re looking for but they’ll definitely get you in the ballpark.
Pro C-2 has plenty of other advanced settings/features that I personally don’t feel qualified to talk about. But those features aside, this is easily one of the best software compressors on the market. Not only that, but as a beginner, it will teach you what compression does by literally showing you on an easy-to-interpret graph. This alone is invaluable and a huge time saver.
At $179, I think the Pro C-2 is a stellar deal. That may seem like a lot for one plugin, but I’d go as far to say you may never need to buy another compressor plugin aside from this one. It’s just THAT versatile.
- Fletcher Robinson (Head Engineer @ Evergreen Records)
1 note
·
View note
Text
Audio / Production Terms for Newbies!
I realize that when writing gear reviews and other such articles, there may be some terms that are unfamiliar to people just getting started in the world of music production. I want this website to be as inclusive and beginner-friendly as possible, so I’ve decided to compile a list of these terms with simple definitions in order to help clarify questions regarding any future posts. They are in no specific order, so if you’re reading and you see a term you don’t know, keep looking; it’s probably further down on the list.
BASICS
DAW (Digital Audio Workstation) - Software capable of editing and mixing multiple tracks of audio. Some examples include Logic, Protools, Fruityloops, Cubase and Studio One.
I/O - Refers to your “Input” and “Output” settings within your DAW or other audio software.
Sample Rate - The number of audio samples per second. Think of this as the audio equivalent of pixels on a screen; the higher the number, the better the resolution. Sample rates start at 44.1kHz and go up to 196kHz.
Hertz (Hz) / Kilohertz (kHz) - Hertz are the number of sound wave cycles per second, which in turn create pitch. The lower the Hz, the lower the pitch and vice versa with higher Hz. Once you reach 1000Hz, it becomes known as 1kHz. The range of human hearing is 20Hz to 20kHz.
Gain - Many people think of gain and volume as the same thing, but they are indeed different. While volume is just a change in level of the overall sound coming out of your output devices (speakers/headphones), gain is a signal boost applied to a sound source by a preamp before it reaches the output. Preamp gain can be pushed very hard which can cause distortion which may or may not be desirable.
Dynamic Range - In music, the term “dynamics” refers to changes in volume that create impact or feel. The loud parts in songs have so much punch to them because they are louder than the verses. This change in volume between parts of the song help the song “move” and feel more lively. The difference between the quietest part and the loudest part of the song is known as dynamic range.
Direct Injection/Input (DI) - The act of plugging a guitar, bass, keyboard, or any other line level instrument into your recording interface. This bypasses the need for running your instrument through and amplifier and mic’ing it.
Preamps - Unless you’re recording at a line level signal with an instrument like an electric guitar or keyboard/synth, then you’re gonna need a preamp. Microphones have very low output levels, so we need preamps to boost the gain and make them more sensitive to sound, giving a stronger, more usable recording. The preamps on most modern interfaces are meant to provide a clean and sterile sound, however many people seek out old-school preamps for the warm and fuzzy tonal qualities they provide.
Audio Interface - Unless you’re working with a mixing board that can connect via USB or you have an old $100,000 mixing console and a tape machine, then you’ll need an audio interface. These handy little units connect directly to your computer and convert any source (mic or instrument) into digital audio which can be used in your DAW. All interfaces have preamps built into each channel. However, if you like the character that another external preamp gives your sound, you can run the sound through it before going into the interface.
AD/DA Conversion - Without getting too “tech-y”, AD stands for “analog to digital.” This means taking an analog input signal and turning it into 1′s and 0′s that your computer can read and use. DA is just the opposite, as it takes digital audio and turns it into an analog signal. An example of this would be when you’re listening to a mix in your DAW, your interface is converting that audio into an analog signal and spitting it out through the monitors into your ears.
Latency - The couple milliseconds of delay that result from analog sound having to be converted into digital sound. For example, when you pluck a string on guitar, you don’t actually hear it come through your monitors until 1-5 milliseconds later.
ADAT - Optic technology used to carry information. In the context of recording, it generally refers to the ability of an interface to expand via ADAT so that you can record more tracks simultaneously. If your interface only has 8 channels, but has an ADAT input, you can hook up devices like the Focusrite Octopre to expand to 16 channels.
Monitors - Simply refers to a set of reference speakers you use to listen to your song during the mixing process.
Multitracks - This is simply the multiple separate tracks that you mix within your DAW.
Mixbus or Subgroup - Also referred to as just “bus” or “sub.” Busses are an auxiliary track that you send other tracks to so that you can mix them as a whole. For example, the most common type of bus is a drum bus. You send all of the drum tracks to one single track, and from there you can apply additional eq or compression to add some “glue” or control to the entire drum mix.
Bouncing - This the process of combining your multitrack project into one audio file (MP3 or WAV) by exporting the files from your DAW.
Mastering - The process of adding the final touches to mix and raising the overall volume of the track to a commercially acceptable level through use of compressor and limiters (see below).
PROCESSING
Outboard gear - External units that process sound in unique ways. The different types of processors are listed below
Compressor - When starting out, a compressor can seem a bit complicated. Even worse, what it does to a signal is a bit hard to hear, mainly because the human ear is more perceptive to changes in pitch rather than changes in volume. A compressor takes the loudest parts of a track and lowers them, and boosts the quieter parts of the track to make everything sound dynamically even. You set the compressor to kick in once the level of a track exceeds a certain threshold. Many settings can change the way a compressor affects the signal, such as attack, release, ratio and the knee.
Attack - The rate at which compression begins one the signal passes the threshold.
Release - How quickly the compressor “lets go” of the signal.
Ratio - This determines how hard the signal is being compressed. The higher the ratio, the more gain reduction.
Knee - This work directly with the attack setting to dictate how smoothly or abruptly the compressor kicks in. Not all compressors have this feature.
Multiband Compressor - Essentially a compressor that you can split into different frequency ranges, allowing you to compress, for example, just the low frequency information of a track instead of the whole thing.
De-esser - Basically a compressor specifically for taming harsh high frequencies in a vocal track.
Limiter - A limiter is a compressor with an infinite ratio. In other words, no signal passes the threshold. Sometimes referred to as a “brick wall limiter.”
EQ - EQ stands for equalization. This is used to boost or cut certain frequencies in order to get a clearer and more cohesive mix.
High Pass Filter - An eq adjustment where low frequency information is removed to allow high frequencies to “pass through.” Also referred to sometimes as a “low cut filter”
Low Pass Filter - An eq adjustment where high frequency information is removed to allow low frequencies to “pass through.” Also referred to sometimes as a “high cut filter”
“Q“ - The Q is the curve or shape of an eq adjustment. It determines how broad or narrow of frequency range you boost or cut.
Plugins - These are virtual versions of outboard gear and other signal processors. They can be loaded onto tracks within your DAW. The two main advantage of plugins is 1.) lower costs and 2.) the fact that the processing isn’t “printed” onto the track when it’s recorded into your DAW. This gives you the ability to change settings on them even after the track has been recorded. However some people argue that their analog counterparts have a richer sound.
MICROPHONES
Diaphragm - The part of the mic within the capsule that takes in sound and converts it into electric energy which then goes to your DAW or mixer. In the world of condenser mics, there are Large Diaphragm Condensers (LDCs) and Small Diaphragm Condensers (SDCs). SDCs are sometimes referred to as “pencil mics.”
Sound Pressure Level (SPL) - In simple terms, this is how loud something is. Sound waves creates pressure and move air molecules. SPLs are measured in dB. Around 135dB-140dB is called the “threshold of pain”, where something is so loud, that it hurts and potentially damages our ears.
Dynamic Mic - Chances are you’ve used or at least seen a dynamic mic at some point. The most common examples of a dynamic mic are the Shure SM57 and SM58. The difference between dynamic and condenser mics is in their operating principles. Dynamics have coil that wraps around a magnet. When sound SPLs are strong enough to vibrate and compress this coil, those movements are picked up by the magnet and are converted into electric energy. A good bit of energy is required to affect this coil, so that’s why dynamics are much less sensitive to sound than condensers. This lack of sensitivity makes them more suitable for loud sound sources such as drums, guitar amps and rock vocals.
Condenser Mic - Condensers operate using a metal plate rather than a coil, however, it operates on the same magnetic principle. Once the plate moves, the magnet responds to the movement and sound gets converted into a signal. Condensers are much more sensitive than dynamic mics. They work better for crisp vocals, acoustic guitar, drum room mics, etc. Keep in mind that condenser mics require power to used. This power is known as “Phantom Power” or “48V.” A switch for this power comes standard on most mixers or audio interfaces.
Polar Pattern - The direction in which microphones pick up sound. Common polar patterns are Cardioid (directly in front of the mic), Omni (all sides) and Figure 8 (front and back).
Plosives - Low and boomy sounds produced while singing. Commonly caused by letters such as “b”, ”d”, ”f” and ”p.” This what pop filters or windscreens on mics are meant to prevent.
Sibilance - Harsh “s” and “c” sounds produced by vocalists that can be unpleasant to the ear.
- Fletcher Robinson (Head Engineer @ Evergreen Records)
1 note
·
View note
Photo
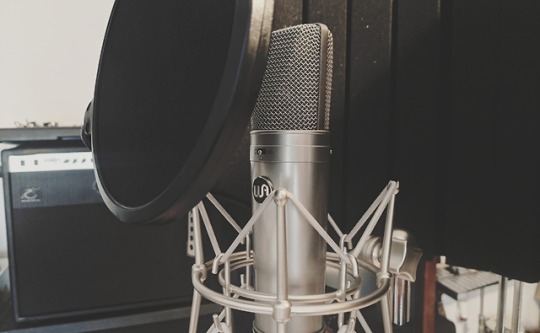
Warm Audio WA87 Condenser Mic (Gear Review)
The WA87 is Warm Audio’s attempt at replicating the legendary Neumann U87 microphone. When it comes to high-end condenser mics, the original U87 has been the gold standard since the 60′s. They sound great on everything: vocals, acoustic guitar, amps, drum overheads, etc. You’d be hard pressed to find a commercial studio that doesn’t have at least one of these babies in their mic locker. The only problem is that the originals cost anywhere from $3000 to $5000, whereas Warm Audio’s version is being marketed at around $500.
With trying to clone such an iconic piece of gear, the people at Warm Audio definitely had their work cut out for them. While they have been known to successfully create faithful replicas of many other vintage units such as the famous LA2A and 1176 compressors, this was their first attempt to clone a microphone.
My first impressions of this mic were good, which is about what I expected. Having owned a few other Warm Audio products, I’ve come to expect high quality products at a ridiculously low price. It has a switchable polar pattern along with a 80Hz rolloff and a 10dB pad. The build is very solid for a condenser mic, and aside from a few rounded edges and the glossy finish, it looks almost identical to a Neumann. When sitting on a mic stand, it almost seems to command your attention. Hell, I don’t even sing, but just looking at it makes me wanna lay down some vocal tracks! But aesthetics and build quality are one thing; how it sounds is another.
In order to test this mic, I figured the best way would be to do an A/B comparison with a real Neumann U87. Unfortunately, I don’t own one, so I had to go to the recording studio on Troy University’s campus. We set the two mics up and had a student volunteer to sing into them. We ran them straight into the Focusrite Control 24 and into Pro-Tools without any external processing. One glaringly obvious difference was the output level of the WA87. It required about an extra 3-4dB of gain from the preamp before it matched the level of the U87. However, once we got the signal hot enough, it was clear that Warm Audio had succeeded in their mission. The sound was almost identical to the Neumann. The only difference is that there was perhaps a bit more high frequency information in the WA87. For instance, the sound of the singer’s mouth opening, and the formation of “s” and “c” sounds were slightly more present, but by no means were they harsh.
Overall, I think this is an excellent microphone! At around 1/10th of the price of the original, it makes professional sound quality accessible to most home or project studios. If you’re looking at upgrading your vocal mic, look no further than the WA87. Don’t skimp and buy some cheap $100 mic and expect amazing results. Go ahead make the investment and it’ll pay off in the long run. If you’ve got the extra cash, go ahead and get a pair to use for stereo mic’ing and/or drum overheads.
- Fletcher Robinson (Head Engineer @ Evergreen Records)
1 note
·
View note
Photo
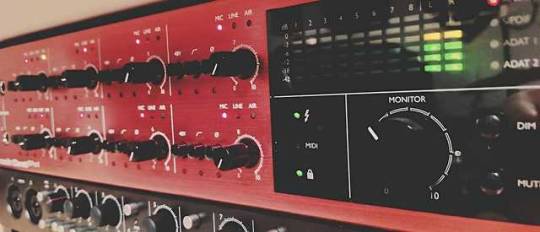
Focusrite Clarett 8PreX Interface (Gear Review)
The Clarett 8PreX is a beautiful piece of modern recording technology. With 26 total inputs (8 analog inputs, 2 ADAT inputs allowing for connection of 16 additional external pre’s, 1 S/PDIF input, and 1 word clock input) and 28 outputs, this interface can handle just about anything you throw at it. It would be more than enough for most home, project and even some semi-pro recording studios.
Everything about this unit screams “quality.” From the heavy-duty brushed steel chassis, to the weight of the gain and monitor knobs, you can feel how well-built it is. This isn’t just a small upgrade from your standard USB interface; this unit is was designed to be the centerpiece and control station of your studio.
This interface connects via thunderbolt, which allows for much lower latency than the conventional USB interface. The preamps in this thing offer an incredibly clean sound and have plenty of low-noise gain at their disposal. An interesting component of this interface is the “Air” feature on each input which enables you to turn on an analog emulation of Focusrite’s old school ISA preamp to give your tracks a nice smooth top end boost. While I love this feature, I feel as though they could’ve made a switch for it on the front of the unit. Instead you have to go into your Focusrite Control app and turn it on there. While I’m on the subject of Focusrite Control, it’s worth mentioning how easily you can create individual headphone mixes for multiple people. You can also save templates of your I/O settings for certain recording sessions should you ever need to recall them.
One thing I instantly noticed when tinkering with this interface is how much better my mixes sounded when being monitored through it. This is because of how great the AD/DA (analog to digital/digital to analog) conversion rate is. This beast has an impressive 119dB of dynamic range which allows you to hear details in your mix that you might never have noticed before with a lower grade interface especially if your monitors are worth their salt.
Overall, the 8PreX has done nothing but impress me since the moment I plugged it in. I bought my unit used at a discounted price, but I’d happily pay retail price for this unit. If you’re looking for a serious upgrade to your studio setup, but don’t want to dish out $2000+ on an 8 channel Universal Audio interface, this would be the next best solution for half the price.
- Fletcher Robinson (Head Engineer @ Evergreen Records)
0 notes