#preamp
Explore tagged Tumblr posts
Visit Tumblr Blog
Explore Tumblr blogs with no restrictions, modern design and the best experience.
Last Seen Tumblr Blogs


Fun Fact
Tumblr has 4 main sources of revenue.
Text


Garnet - Randy Bachman’s Herzog Model G12-H, 1972
Tube Preamp Amp Distortion Unit & Amplifier Head
"... tube overdrive effect, serial number 7616, ... This is the first version, which is the predecessor the slightly later H-Zog. Both The Herzog and it’s successor have a single 12AX7 and a 6V6. This small head is an amazing sounding preamp, but will also function as a 3w amplifier. Randy Bachman was blowing up Tweed Champs by using them as a preamp, so Garnet effectively reconfigured a Tweed Champ schematic with line out, for proper use as a preamp ...
Developed by Thomas “Gar” Gillies, founder of the Garnet Amplifier Company, the Herzog was built in collaboration with The Guess Who and Bachman-Turner Overdrive guitarist, Randy Bachman. A former violin player, Bachman loved the effect of a sustained hum sound, and often tried to mimic it on his guitar by plugging a small amp into a bigger amp, and cranking the volume. After repairing countless blown amps for Bachman, Gillies built him the tube pre-amp seen here. The creamy overdrive and sustained guitar tone produced by the Garnet Herzog went on to become the signature “Winnipeg sound” heard on tracks such as “American Woman” and “No Time”"
cred: reverb.com/GEARLORD
26 notes
·
View notes
Text


Recently my son has gotten more interested in music. A month or two ago, I helped him research and buy a small headphone amplifier for his desktop PC setup.
However, in addition to the amp, he wanted a vacuum tube preamp since he's seen the one I have for my PC (you can see part of it in the last pic) and wanted a similar configuration. :)
So I set about gathering some parts I had on hand to put one together for him. He selected the wood for the case from my stash, and the white aesthetic to match the rest of his PC setup. I used 2 6C4 tubes because I had them and they seemed like a fun choice for this.
Most of the work came in constructing the enclosure. I used my chop saw to cut pieces to length, then resawed them on my bandsaw so they were thinner. I then glued up the wooden box with some support blocks to increase the strength and give me somewhere to mount the metal plate that will hold the parts.
I'd recently scored a bunch of aluminum and steel sheet, so I used one of the aluminum plates to mount all the parts. The thicker plate was really nice to work and drill and allowed me to chamfor the holes so the wires won't scrape. Then I painted it up and mounted in the components.
This project involved a lot of 3D printing as well, all the transformer covers and the capacitor brackets were printed on my FlashForge 3. Boiled Linseed Oil was used on the wood for a natural finish, and the power light enclosure is an old glass bottle that I 3D printed a diffusion cap for.
Overall I'm really happy with this project, and so is my son who's been using it constantly over the Thanksgiving break. :)
Stay tuned for more fun with tubes!
17 notes
·
View notes
Text
Sometimes, you just need TWO KNOBS to rock - that's so true with today's pedal, the Gray Speck OD250™ Overdrive from Chicago Stompworks!! Cloning a classic circuit into a modern enclosure with updated parts, this little beauty goes from boost to crunch and more in an instant…demo out now on our YT channel, have fun!!
youtube
#chicago#chicagostompworks#pedaloftheday#grayspeck#boost#boostpedal#overdrive#overdrivepedal#preamp#preamppedal#guitarpedal#guitarpedals#HappyFathersDay#pedals#knowyourtone#pedalsandeffects#effects#guitareffects#guitar#effectspedals#pedalboard#guitarist#Youtube
4 notes
·
View notes
Text
FX-Audio TUBE-01J recap. Replace the no-brand capacitors with nichicon audio capacitors. The bipolar capacitors were replaced with Shizuki Electric film capacitors (UD25Y105K, 1uF 250V).


2 notes
·
View notes
Text
A little kitchen session with the speaker. YouTube Preamp extension to control the frequency bands/delay/dub siren. To be honest the speaker actually sounds best with dub played through the youtube pre - some other styles of music just don't suit it at all. Convenient!!
#sound system#reggae#dub#preamp#amplifier#jah shaka#Steppas#UK dub#UK Steppas#omnidirectional#omnidirectional speakers#Experimental audio#DIY audio#DIY speakers#MBL Radialstrahlers#Duevel#Hifi#Stereo#Audio engineering#acoustics#Totem Pole#Speaker Design#DIY Speaker#MBL Xtreme#MBL 101#MBL#Channel one Sound System#Jah Shaka Sound System#Aba Shanti#Aba Shanti Sound System
2 notes
·
View notes
Photo
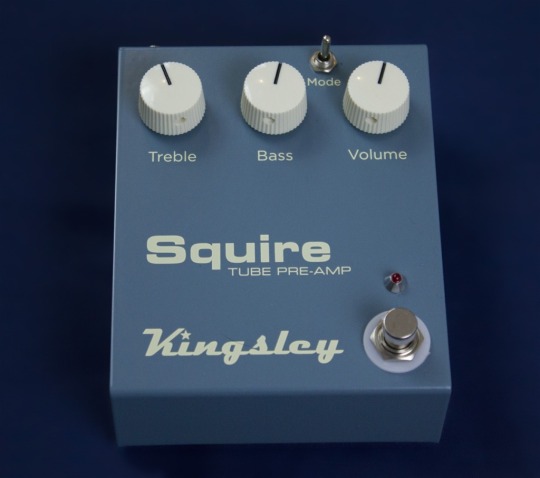

(via Kingsley Squire or Joyo American Sound: a Tale of Two sim(ies))
3 notes
·
View notes
Text

For the Art lovers out there. Amazing preamp.
0 notes
Text

1 note
·
View note
Text
I seem to have good hearing. I chose the better quality preamp each time based on small differences.
1 note
·
View note
Text
0 notes
Text
Tube Preamp ~ Tube Preamp Emulation
The plugin is very unique in the sense that it gives you full control over all aspects of the modelled circuit. All values of all the capacitors, resistors etc. can be tuned by the user.This is a free plugin. It comes in all the usual plugin formats (VST/VST3/AU/AAX), for 32 and 64 bit hosts, and for Mac Intel & Silicon. ddmf.eu/phi-L-Audio-Tube-Preamp
0 notes
Text


Matchless - Hot Box
"This tube preamplifier is equipped with a 12AX7A. Like all MATCHLESS amplifiers, it is built with point-to-point hand-wiring. ... Serial number: 3569"
cred: reverb.com/ISHIBASHI MUSIC
18 notes
·
View notes
Text
🚀 Does a microphone with an audio interface such as Babyface require a preamp with #TLM 103 or 107, and why? 🤔
0 notes
Text
If you dig the D-style overdrive preamp sound, you're gonna really love the Bigger Bloom from Amplified Nation!! 4 knobs and 2 switches provide a lifetime of tonal exploration, pushing your amp right to where it needs to be...demo out now, cheers!!
youtube
#guitarpedal#pedaloftheday#guitarpedals#amplified#amplifiednation#bloom#bigbloom#biggerbloom#overdrive#preamp#effectspedals#pedalsandeffects#knowyourtone#guitar#effects#pedals#guitareffects#pedalboard#guitarist#Youtube
3 notes
·
View notes
Link
I own this amazing One channel Preamp by PreSonus , which I use to record my vocals. it can be used to record also instruments, and the tube vamps preamp is lush! I made a great investment buying this Class A preamp. I really recommend it to any musician and singer who wants something more than a digital compressor and digital preamp. Any professional musician would love this, especially if you want to have a great sound without spending a fortune! The brand is very well known, and the quality of the unit will make it last for a long time. Use this link to purchase the unit (UK) ➡️ https://amzn.to/3TrKIpd Use the link to purchase the unit (USA) ➡️ https://amzn.to/4dZHVfp ____________ As an amazon associate, I earn a commission for each product I sell , when costumers buy the product ONLY using the link provided above. ____________
#amazonassociate#affiliatemarketing#presonus#preamp#valvepreamp#musician#recordingstudio#equipment#amazon
1 note
·
View note
Text
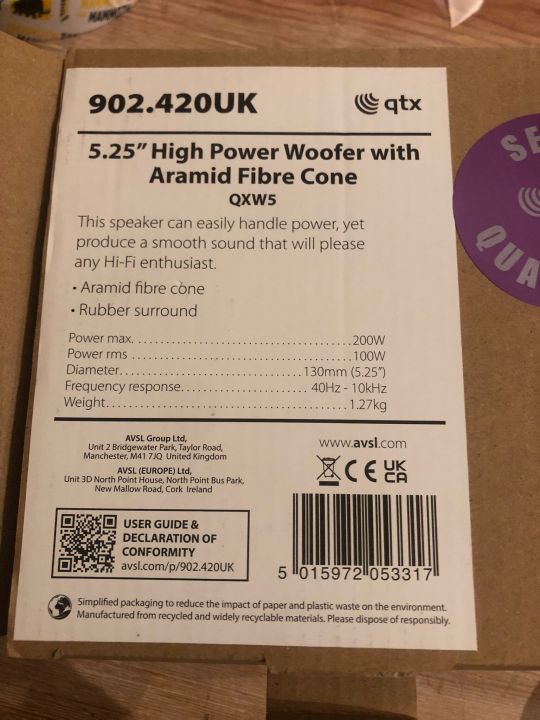
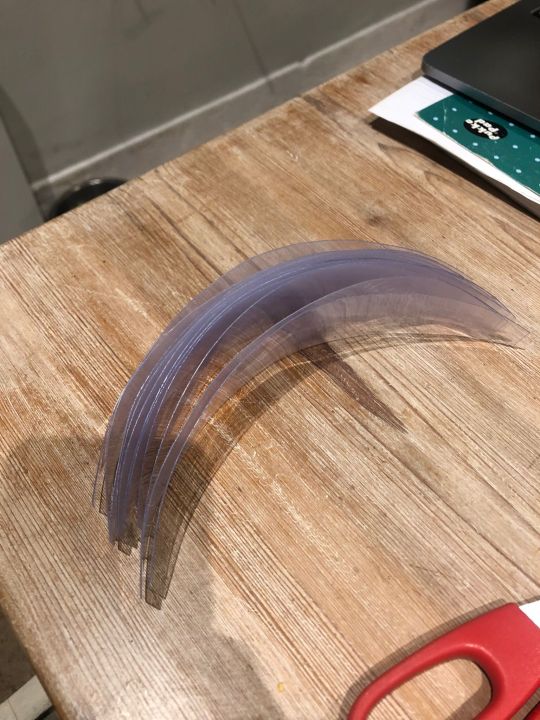
Omnidirectional build Mk0
I got hold of a cheap little driver in London for £15. It's rated for 200W peak power, 40Hz-10kHz (so sadly not much high frequency once the lamellae are attached!) I removed the rubber sleever and the dust-cap
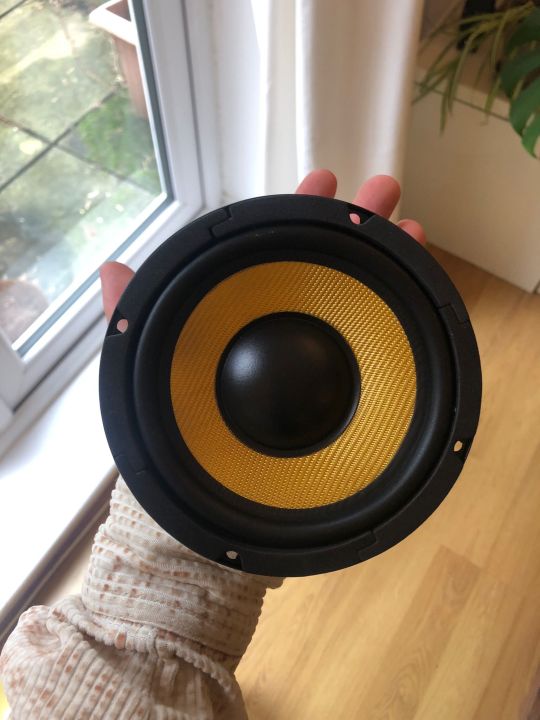

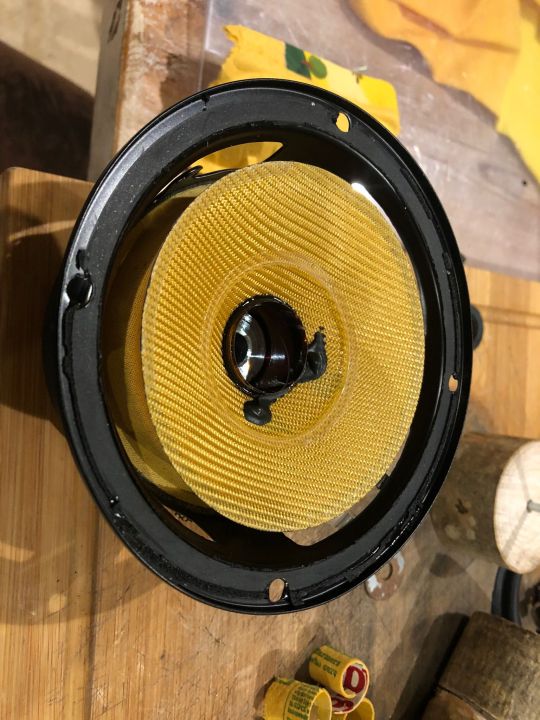
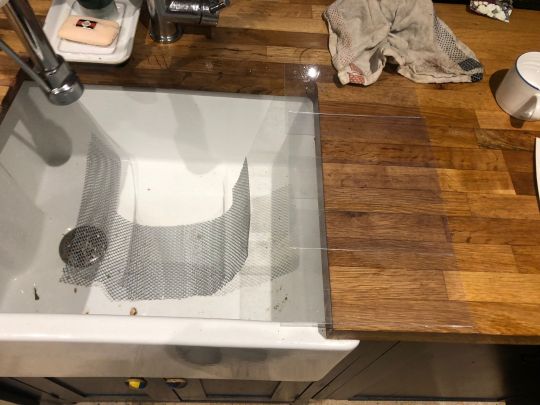
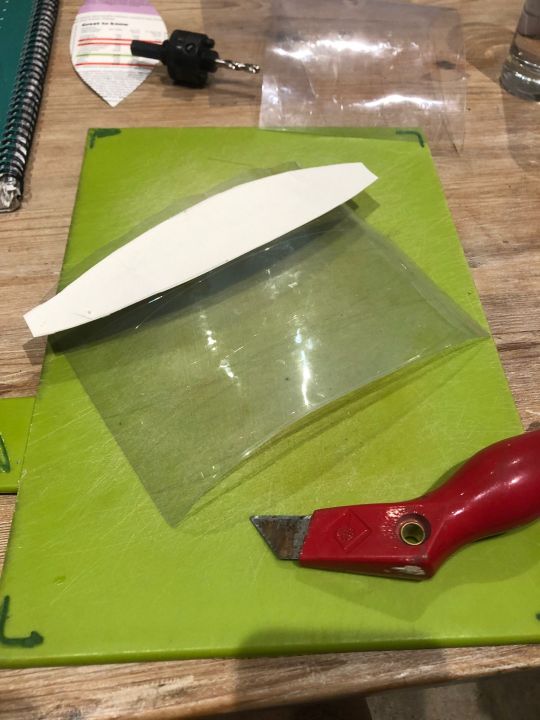
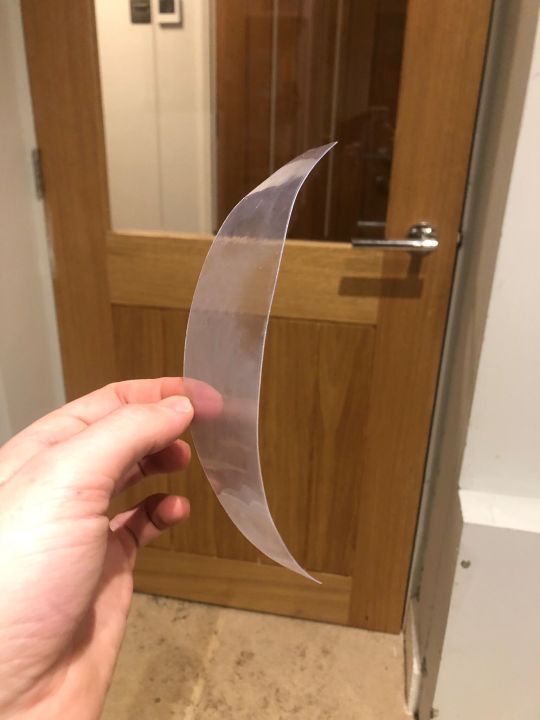
Next I used some grocery-store plastic sheeting (what they put up promotion signs/prices with) that can be moulded using hot water. I used a metal grille bent into a curve to make curves out of the plastic, then cut them into roughly the right shape. I made the paper shape guide by just rotation a ruler held at one end - this was totally eyeballed and could've been done much better, more precisely etc.

Then I attached some sticky-backed weather stripping to each of the lamellae (aka petals), and used double-sided tape to stick them onto the speaker cone. I used a log with a notch cut into it, attached through the speaker magnet's central hole with a long screw, to hold the tops of the lamellae.
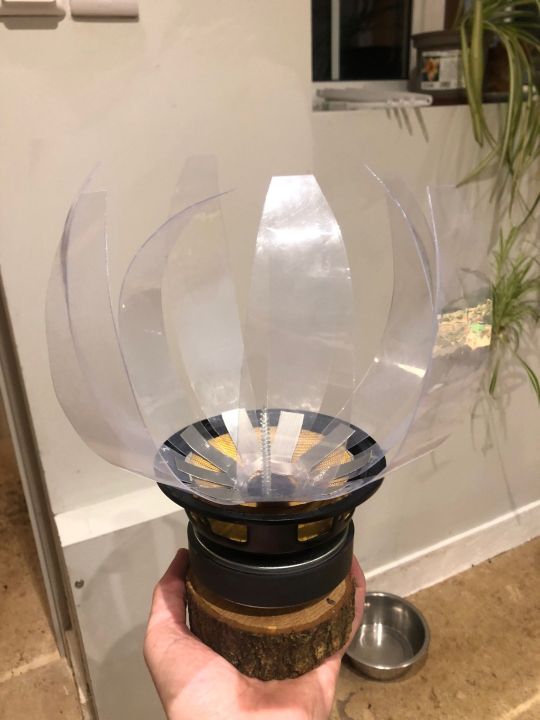
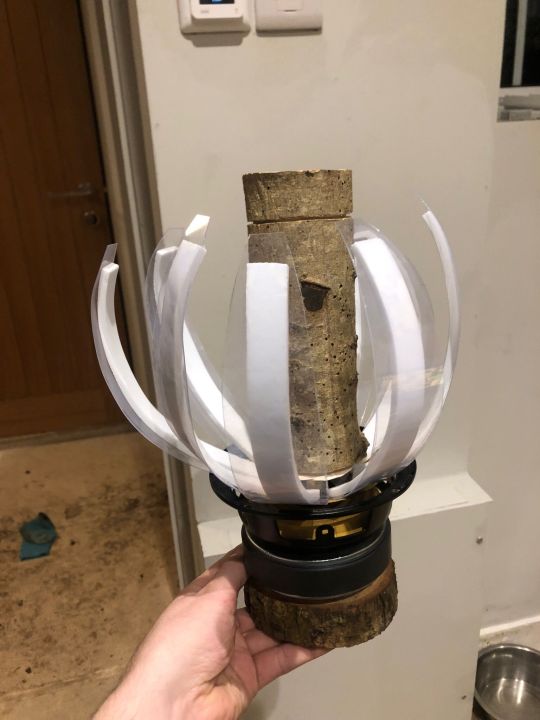

Then with a bit of wiggling and more double-sidede tape I attached all the lamellae together at the top. I used some washing up gloves cut into strips as (very makeshift) gaskets to mostly seal the gaps between the lamellae. Again, I used double sided tape to do this. To be honest that was the most fiddly part. Washing up gloves cut with scissors are not an ideal Radialstrahler gasket material!

And there it is! It doesn't sound terrible on its own, but as the driver is only rated up to 10kHz (and who knows what impact the radialstrahler build has on the theoretical frequency response!) I had to wire it in to an old bookshelf speaker's tweeter to get a bit more high-end.
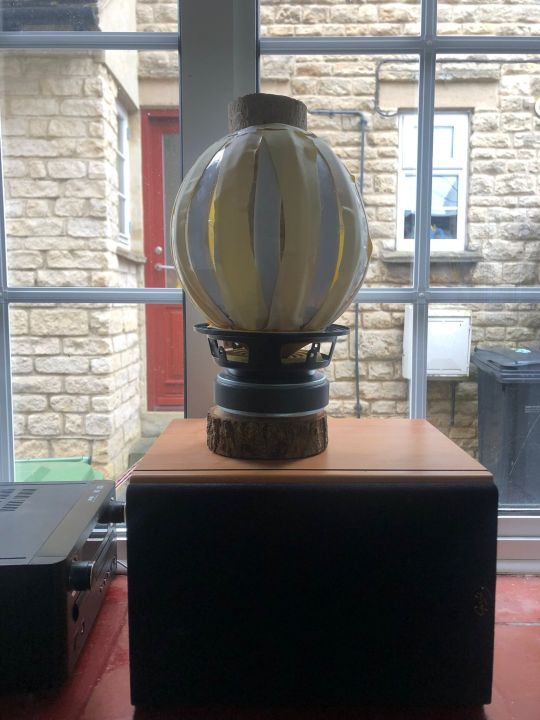
I'll make another post with a few more videos of it playing, along with some discussion of what I've learned so far to take forward to the next prototype!
#sound system#reggae#dub#preamp#amplifier#jah shaka#Steppas#UK dub#UK Steppas#omnidirectional#omnidirectional speakers#Experimental audio#DIY audio#DIY speakers#MBL Radialstrahlers#Duevel#Hifi#Stereo#Audio engineering#acoustics#Totem Pole#Speaker Design#DIY Speaker#MBL Xtreme#MBL 101#MBL#Channel one Sound System#Jah Shaka Sound System#Aba Shanti#Aba Shanti Sound System
2 notes
·
View notes