
A personal blog capturing the learning process, creative experiments, and the highs and lows of building games from scratch, while trying to get into the game development industry.
Don't wanna be here? Send us removal request.
Statistics
We looked inside some of the posts by f0rt1e and here's what we found interesting.
Average Info
Notes Per Post
22
Likes Per Post
19
Reblog Per Post
1
Reply Per Post
2
Time Between Posts
21 days
Number of Posts By Type
Text
5
Last Seen Tumblr Blogs


Fun Fact
In 2020, 44% of users from Denmark used Tumblr daily.
Text
Devlog #4 | Planning & Management

Hey there,
It's been a while, but I'm back—and for a good reason! Over the summer, I spent a lot of time polishing up the game to make it look nicer and feel more solid. Why? I was gearing up to participate in a game development competition.
One of the competition rules was that I couldn't share any updates or materials about the game until it was all over. But now that the competition has wrapped up, I can finally get back to updating this blog.
In my last post, I mentioned that I'd share some thoughts on planning and managing a project, so that's exactly what I'll dive into in this post.

Planning
I won’t dive into the ideation stage of coming up with your game’s main concept—I’m guessing that’ll hit you either by chance or during brainstorming sessions. Instead, let’s focus on the day-to-day routine of game development.
For me, game development is a hobby. I work full-time, so I don’t have eight hours a day to dedicate to my game. Because of that, I have to make the most of my spare time, which means avoiding chaos and carefully planning everything—my resources (time, energy, motivation) and tasks.
Given my limited time, I don’t set strict deadlines for myself, and I don’t prioritize tasks based on time. Estimating time accurately is tough, so instead, I categorize tasks by a few key factors: complexity, type (bug fix, new feature, polish, refactoring), and dependencies—will this task impact others?
For example, let’s say I’m adding a new job for my peasants. It sounds straightforward, but it involves a lot of steps, so I break it down into smaller subtasks. I usually start with the art (assuming I’ve already figured out the functionality). First, I draw the building, then add it to the game and set up the scene. Next, I write the code—what should this building do? Will it function independently, or does it need to connect with another building? These are crucial questions. Once the building and its code are ready, I add the job itself, update existing code as needed, and run tests.

In theory, this process sounds quick and clear, but in practice, you’ll encounter bugs, new ideas, and more testing than you expect.
That’s why I try to avoid tackling big tasks all at once. Instead, I break them down into smaller, manageable pieces. It’s easier to get started, easier to track, and you see progress faster—which, in my experience, is key to staying motivated.
It’s also smart to think ahead when adding new features or updating existing systems. Rather than asking, “How do I implement X feature?” it’s better to ask, “What’s required to implement X feature?” Gather all the requirements upfront, and you’ll have a solid plan with everything laid out. Consider how the new feature interacts with your game’s current systems. For example, if you’re adding a jump mechanic, think about the details:
Is the jump predetermined?
Can the player control their character mid-air?
Can they jump off a ledge before falling?
Will there be a double jump?
Do certain terrains affect jump height or power?
Any new feature can impact your entire game design. For instance, adding jumps to an infinite runner game would significantly alter the level design.
To sum up what I’ve learned so far:
Avoid big, daunting tasks—break them down into smaller, manageable ones.
Gather requirements first, then set your tasks.
Categorize tasks based on factors like complexity or type, not time.

Management
I can’t offer much advice if you’re planning to be a full-time solo game developer. When you have eight hours a day (or more) to dedicate to your game, the process looks very different. But in my case, where game development is a part-time passion, management is just as crucial as development itself.
At first, I thought, “It’s just a hobby game; I don’t need to worry about management. I’ll remember everything.” Yeah, right. As your game grows, you end up with more lines of code, functions, art, assets, sounds, and interconnected systems than you can’t possibly keep track of in your head. That’s when I realized I needed to get serious about task management.
There are plenty of tools out there—from a simple paper notebook to complex solutions like Amazon tools. I wanted something that wasn’t overkill, so I landed on Trello. It’s perfect for my needs: easy to use, easy to adapt, and super flexible.
I use Trello boards to keep everything organized. I’ve got columns for ‘Ideas,’ ‘In Progress,’ and ‘Done,’ and I also categorize tasks by type (new feature, bug, polish), importance (a ‘crushing bug’ is obviously top priority), and category (art, sound, coding, etc.). For me, Trello is a lifesaver. Plus, it’s free!
Honestly, I don’t think complex tools like Azure DevOps are necessary if you’re a hobbyist or solo developer. But it’s all about finding what works best for you.
I’m also a big fan of sticky notes, both physical and digital, for those quick, spur-of-the-moment ideas. Sometimes you don’t have the time or energy to hop over to your Trello board, but you’ve got a great idea in your head. Just jot it down on a sticky note and stick it where you can see it. It’s a simple trick, but it really helps.
To sum up:
Start managing your thoughts and ideas early on, even if it’s just jotting things down. It’ll be a lifesaver as your project grows.
Find a task-tracking tool that works for you—whether it’s digital or physical, like a whiteboard.
Categorize your tasks.
Set small, achievable goals to keep your motivation high.
I hope these tips help you on your game development journey! Feel free to drop any questions in the comments below.
See you in the next post, where I’ll cover what’s changed and what’s been done during my competition prep. Up next: a new interface!
1 note
·
View note
Text
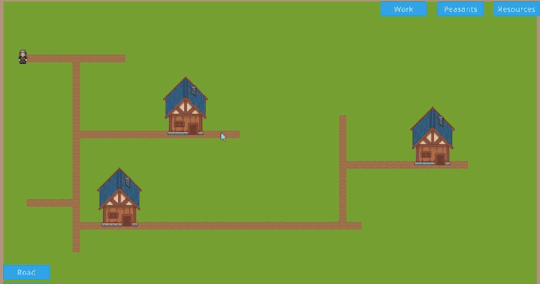
DevLog 3 | Revamping building system
Hello everyone!
It's been a while since my last post. I've been swamped with work and didn't have much time to focus on the game or share any updates. But now, I'm back and ready to dive in!
In this post, I want to tell you about the upgraded building system. If you remember from my previous post, I completely revamped it from a free placement system to a new grid-based system. This new approach feels much better and has helped resolve a lot of issues. Let's dive into the details!
Why redeveloping?
When I first started developing the game, my goal was to provide players with unlimited freedom in placing buildings. I believed a grid-based system might restrict creativity and flexibility, so I opted for a free placement system. However, as development progressed, this decision began to present numerous challenges.
First of all, the free placement system was causing issues on a technical level. It was very demanding in terms of Z sorting and layering, making it extremely difficult to check for overlapping objects. This complexity arose because my game consists of both physical objects and tile objects (which are essentially not nodes). Managing these elements in a free placement environment proved to be a significant challenge.
Grid-based building system easily allows to check overlaps.
Second, the free placement system created challenges when I started developing the navigation system. I had to bake all the regions and areas each time a building was placed, which was not ideal for optimization and overall game performance.
Lastly, I realized how complex the free placement system was. While it has many advantages, the level of complexity it introduced didn't seem necessary for my chill city builder. Balancing creativity and simplicity became crucial, and the free placement system was tipping the scales too far towards complexity.
So, to sum up, the free placement system is indeed interesting and powerful, but the challenges it caused and the underutilized potential were the main reasons I decided to switch to a grid-based system. This new approach offers a better balance of functionality and simplicity, enhancing both development and gameplay experiences.
Free placement was not very accurate...
Redeveloped system
During the redevelopment, I realized that almost all my existing systems would be affected by this change:
- Building system
- Navigation system
- Road system
- And even data management
First, I started by creating a simple grid and covering my whole map with it. Then, I began mapping out the grid. Some objects, such as walls, rocks, and buildings, were considered obstacles. I had to perform calculations and update the data structure of my custom resources to store new values for the heights and weights of buildings in cells.

Whenever user tries to place a building grid shows tips - whether it is suitable place or not
The navigation system also changed. Previously, NPCs had a 'free roam' mode, but now their movement is based on the grid. For instance, diagonal movement is no longer possible. However, this change makes it much easier to identify and navigate around obstacles when needed.

Movement with a grid based system now works more seamlessly
The new grid-based building system makes it much easier to check for overlaps. Now, I don't need to worry about physics, areas, or colliders; I simply check a cell's coordinates to see if it contains any object. This change simplifies many aspects of development.
For example, I can now categorize cells into different dictionaries, such as building cells, road cells, and farm cells. This approach offers a lot of opportunities and flexibility for future development. Currently, I have a separate dictionary to store existing farm fields, which provides an easy and flexible way to add and create new farm fields.
You can make your farm as big as you wish.
Currently, the new grid-based building system feels much more convenient for me. It's easier to develop, easier to use, and offers more freedom and flexibility than my previous system. Does this grid-based system limit the user? Probably yes, but I don't think those limitations will be seen as extremely negative. In fact, the grid-based system feels much more natural to me at this point.
I hope this post has provided insight into why I chose to overhaul my building system and why I believe it significantly enhances my game compared to the previous system. While there will be further updates to the building system, I am already quite satisfied with the results. It feels like a significant leap forward in game development.
In the next post, I will shift focus away from development specifics and delve into my project routine regarding documentation, tickets, and overall management.
Thank you for reading, and please feel free to ask any questions!
6 notes
·
View notes
Text
Devlog #2 | Job prototypes
Hey folks!
In this post of my game development series, we’re going to take a closer look at some of the core functions I’ve been prototyping, specifically focusing on jobs and the management of workers within the game. I’ll walk you through the mechanisms for assigning and removing workers from tasks, and share some insights into a few of the job types that are already up and running. Enough words, let’s dive!
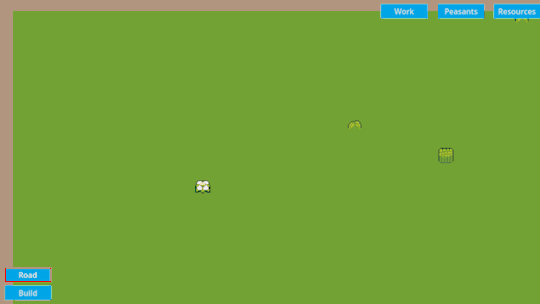
Workers
So, what exactly are workers? In essence, every peasant that appears on the scene is a potential worker. As soon as a peasant is 'born' into the game, they're automatically added to a specialized dictionary designed to track each peasant's status. There are actually several dictionaries managing different aspects, but the primary one records key details about each peasant, including whether they are currently assigned to a job.
In the future, all peasants will have roles, with unassigned ones handling tasks like building or transporting goods. To put it simply, at this point, there are essentially two categories of peasants: those who are assigned to specific tasks and those who are not. And those who are assigned they won’t be able to handle tasks like building.
Currently, assigning and removing workers is managed through an interface panel, separate from the direct building controls. I might integrate these systems later, but for now, this panel displays all the available job slots for your peasants, including the job title, total positions available, and how many workers are currently assigned to each role.

The process of assigning workers is straightforward: simply click the plus button and the system will automatically select a random peasant from the pool of unassigned peasants and assign them to a designated workplace. For instance, if you press the plus button for a Woodcutter role, a random free peasant will be allocated to the woodcutter's hut that has been waiting the longest for a worker. This selection is managed through an array that ranks buildings of the same job type by their waiting time for a worker. Once a worker is assigned to a workplace, they head over and begin their duties.
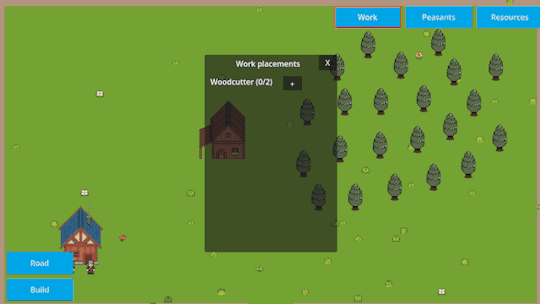
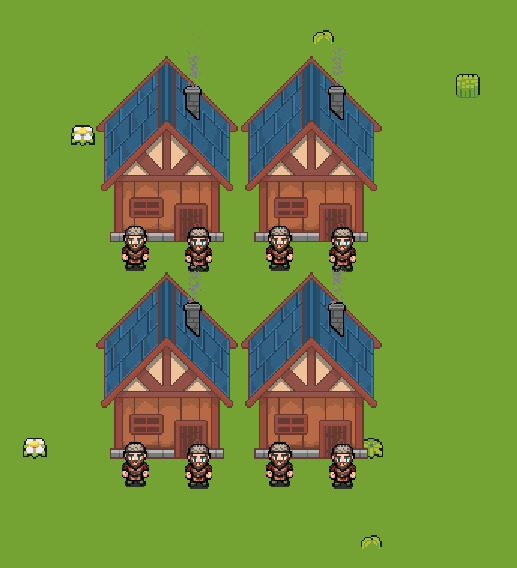
When the worker is assigned it aumatically goes to his new work placement
Removing a worker from a task is a straightforward process as well. The system simply selects the highest priority building—typically the one that a worker was most recently assigned to—and removes a worker from it. The now-unassigned worker will head back home for a bit of downtime to relax.

Unassigned worker always returns home
Current jobs
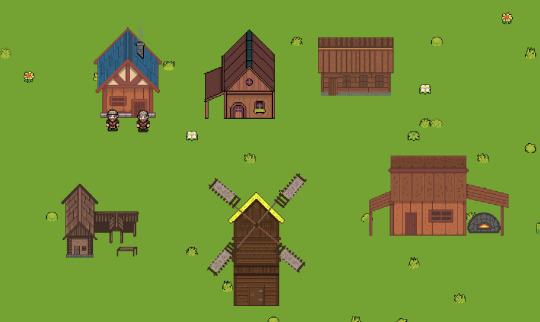
I've already implemented several prototype jobs in the game, including some basic ones that are essential for this genre. Take the woodcutter's hut, for example. This facility enables you to harvest trees and convert them into logs. Simply assign a peasant, select the area for tree cutting, and after a while, you'll have a stockpile of logs. I also added some lively animations—like a peasant pulling a cart filled with logs—which made the development process quite enjoyable.

Woodcutter cuts the tree if any are chosen. You can call selector from the building interface
The overarching concept behind all these job prototypes is integration—every building is a cog in a larger machine. I wanted to keep manufacturing processes from becoming overly complex, yet still intriguing enough to engage players in resource management. For instance, with the woodcutter's role, simply cutting logs isn't the end of the line. Those logs aren’t immediately useful for construction or as firewood for heating. They need to be processed further at a sawmill, where another worker will transform them into planks and firewood, which are essential for building structures or keeping homes warm. The idea is to gradually introduce more intricate and extended production chains as you advance in the game, adding depth and complexity to the gameplay.
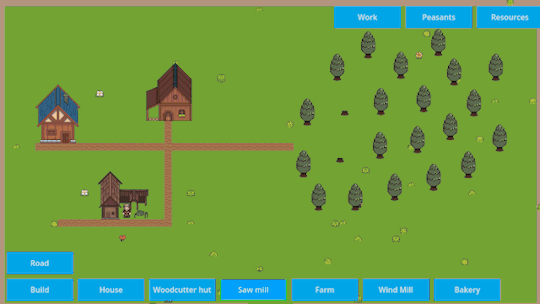
If lumberjack has some logs at his workplace - he will proceed it into a firewood and planks
There are already several prototypes in the game, and I'm currently finalizing the bread-making process. The game includes a farm where players can create dynamic fields and select the type of resource they want to grow. Once the resource, such as wheat, is harvested, it is transported to a sawmill. At the sawmill, the harvested wheat is processed into flour. The flour is then transported to a bakery, where a baker uses it to make bread.
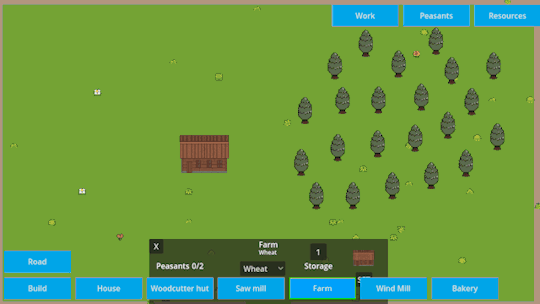
You can make your farm as big as you wish - think about your workers who will take care about it!
I hope this gives you a clear understanding of the current state of the work-related functions. They are still in the early stages, and many improvements are on the way, but overall, I am pleased with the core concept. I am particularly excited about the idea of requiring players to construct separate buildings and make strategic decisions to produce useful products.
In future posts, I will provide more information about the new and updated building system. A grid system is coming, which will be a significant change from what I currently have. Stay tuned, and feel free to ask any questions!
6 notes
·
View notes
Text
Devlog #1 | Major functions prototyping

Today, I'm excited to share a closer look at the nuts and bolts of my indie game development journey—specifically focusing on two pivotal aspects: building and pathfinding. As I've been piecing together my medieval city builder, figuring out the best ways for players to construct their cities and navigate them has been both a challenge and a revelation. In this post, I'll walk you through the different approaches I considered for these key game mechanics, the reasoning behind my choices, and how these decisions are shaping the game's development. Let's dive into the foundations of building systems and the intricacies of pathfinding algorithms!
Pathfinding
Right from the start, I envisioned peasants as the backbone of my game. They're the ones who get things done—building structures, transporting goods, and tackling tasks like woodcutting and farming. I also knew I wanted a user-friendly road system; something as simple as drag, click, and voila—a road appears. My goal was to design the pathfinding in such a way that, when calculating routes, the peasants would prefer paths with road tiles over those with grass tiles. Fortunately, Godot offers some great features like pathfinding and the A* algorithm, which are perfect for this.
I opted for the pathfinding capabilities provided by navigation agents and navigation servers in Godot 4. This system allows for straightforward designation of tiles as walkable or non-walkable. Additionally, it supports the use of navigation obstacles for path avoidance strategies. While Godot offers an extensive toolkit for navigation, it can be challenging when dealing with objects that have collision shapes. This required some intricate coding on my part, involving setting up areas and collisions, creating polygons, and then integrating everything by baking the polygons and areas into a single region that communicates with a server. Fortunately, this approach worked seamlessly, perfectly accommodating the mix of tile obstacles and node-based obstacles present in my game.

Pathfinding with Navigation Agent and Navigation Server alongside with custom solutions to find a road tiles
The real challenge cropped up when I started fine-tuning the path calculations. As you might recall, my goal was for the peasants to prefer roads over any other type of terrain. Unfortunately, I discovered that Godot pathfinding didn’t have built-in functionality to assign different weights to the tiles, which was crucial for my needs. To work around this, I developed a custom solution: I implemented raycasting to dynamically assess the area around the peasant every time they moved. This system checked the six surrounding tiles, prioritizing the road tiles for movement and recalculating the path repeatedly until the peasant reached their destination.
Although this method seemed promising, it was riddled with bugs. It failed to function correctly when moving from the negative Y to positive Y direction, occasionally missed the final destination, and sometimes caused the peasant to loop unnecessarily. Overall, I was quite disappointed with how it turned out.
With A* pathfinding works smoothly - it calculates the path using the roads and considers objects as obstacles
I then switched to another strategy—using the A* algorithm. A* facilitates grid-based movement without actually needing to implement a physical grid. All I had to do was overlay the tilemap and specify which tiles were navigable and which weren’t—similar to what I tried with navigation agents, but this method was far simpler and required significantly less coding. Once I integrated A*, things started to fall into place beautifully. I could easily set obstacles and assign weights to different tiles, influencing movement costs. Now, my peasants automatically prefer roads over any other terrain.
The only snag I hit with A* was dealing with objects that had collision shapes, making them impassable. To handle this, I needed to calculate the space each object occupied, convert that into an array of tile positions, and mark each tile in that array as non-walkable. With these adjustments, A* now functions precisely as I envisioned.
Building
When it came time to decide on a building system, I was torn between a grid-based setup and a freeplacing system. Without a clear preference for the pros and cons of each, I opted for the freeplacing approach simply because it seemed straightforward.
Implementing this system was relatively smooth. I added a few buttons, sketched some designs, and incorporated a handful of aesthetic enhancements like building ghosts for preview, Z sorting for layer management, and obstacle checks to prevent overlap. The mechanics were basic: select a scene, node, or tile, grab the mouse coordinates, and drop the new object right where the cursor is located.

Freeplacing system allows you to put building wherever you want
I didn’t stop there, though. I integrated collision shapes to keep objects from overlapping, devised a road system for constructing pathways, and even developed a feature that snaps buildings to the nearest road if one is nearby, enhancing the building experience.

Road system has a temporary road color. It works only in 4 direction between point A and B - but it's enough at this point
However, over time, I noticed some issues with this freeplacing method, particularly with area checking and pathfinding. It became clear that I needed a more structured approach, prompting me to start transitioning to a grid-based system. This change is still underway, and I’ll share more about it in future updates.
On the bright side, the building system I’ve set up is highly flexible and scalable, thanks to custom resources similar to Unity’s ScriptableObjects. This allows me to easily create a variety of buildings by simply generating new resources from the established custom resource template.
Current system allows to put roads and few types of building, also checking the overlapping
Overall, I was somewhat pleased with how the freeplacing system turned out, but I couldn't shake the feeling that its initial design was a bit off. It ended up being more complicated than necessary, with several superfluous features that only served to clutter the code and lead to a slew of errors. I'm still on the fence about which system is truly better, but considering my future plans and the direction I want to take the game, I'm leaning more towards adopting a grid-based system. It seems like it will better align with my upcoming needs.
Future plans
In my upcoming posts, I’ll dive into some key features I've been prototyping, such as work placement, assigning tasks to peasants, the basic mechanics of their first jobs, and some initial interface designs.
As I mentioned before, I’m currently overhauling the building system. It’s a substantial update, so it's taking a bit of time, but I'm optimistic about sharing some positive updates with you soon. Once the new building system is in place, I plan to introduce additional workplaces to demonstrate how different systems interact. For example, a woodcutter will chop down trees, transport the logs to a hut, and then another worker will take these logs to a sawmill to process them into planks and firewood. This will showcase a linear progression of materials within the game.
Thanks for reading - and do not hesitate to ask any questions if you have some. See you soon!
4 notes
·
View notes
Text
Devlog #0 | An unexpected journey into a game development

What does it take to go from gamer to game creator, especially when you're the team's artist, coder, and tester, all rolled into one? I would like to have an answer!
In this blog, I invite you to join me at the very start of an (hopefully) exciting journey: developing my own indie game, solo. As I dive into the territories of game design and coding, I'll be sharing regular updates about my progress, the hurdles I encounter, the solutions I discover, and the lessons I learn along the way.
Whether you're someone who's interested in the behind-the-scenes of game creation, a fellow developer, or perhaps someone thinking about starting their own project, this blog will give you a window into the real-time ups and downs of bringing a game to life from scratch.
So why do I want to dive into a gamedev? You know, I've always been hooked on video games, always curious about the magic that goes on behind the scenes. Back in school and through university, I dabbled in a few courses on Unity, GameMaker, and Unreal Engine. But, to be honest, I never really threw myself into it—either the motivation wasn't there, or the ideas just didn't spark. Fast forward a few years, I've kicked off a career in tech, working now as a technical architect, yet my love for games hasn't faded a bit.
Recently, I found myself thinking, "Why not take a crack at the gaming industry?" But with little direct experience or relevant skills, just a ton of passion and a nagging curiosity, I realized I needed something solid to show for myself. So, I signed up for some new courses and decided to start my own little project. It’s sort of a mini-portfolio, something to back up my leap into game development. Let's see where this goes!
Sparkling idea
Lately, I've really gotten into city builders. I've played everything from SimCity to Cities Skylines, and from Banished to Settlers — not to mention the recent Manor Lords. It's been a blast, but sometimes these games can get a bit too intricate and overwhelming. That got me thinking — what if I could create a game that's more laid-back, user-friendly, and just easy to dive into? That's when the idea hit me: why not develop a medieval city builder? I imagined a game with a straightforward economy, some interesting research and discovery elements, but nothing too complicated. With just that simple concept in mind, I started developing my game.
As I mentioned, I was somewhat familiar with Unity, so naturally, I started my project there. I even made some headway — created an island with procedural generation complete with biomes and objects like rocks, trees, and flowers, got some pathfinding in place, and even prototype of a building process. But it didn't take long to realize that Unity might be a bit overkill for what I had in mind. My project wasn't that massive, and Unity felt too complex for my needs.

So, I began looking for something a bit simpler and more user-friendly. That's when I stumbled upon Godot. At first, Godot seemed a bit mysterious, but I decided to dive in and give it a shot. I'm really glad I did! Despite a slight shortage of learning materials, Godot has been a dream to work with. It's flexible, feels more approachable, and has everything I need for my 2D city builder, which, by the way, is going to be in pixel art style.
Right from the start, it's clear that being an artist is pretty much a prerequisite for game development. Sure, you could take the easy route and just buy or download assets, but where's the fun in that? Here's the thing—I'm no artist. Drawing a square is about as artistic as I get, and even then, it's a pretty questionable square. So, learning to create my own graphics was a big hurdle I had to overcome. Pixel art caught my eye because it seemed like it had the most forgiving learning curve for a beginner like me. So, I decided to give it a shot.
Current state and future plans
So here I am, just starting out with my project. I recently moved everything over to Godot, and it feels like a fresh start. Right now, I've decided to put the procedural generation on the back burner. Instead, I'm prioritizing what really matters to me at this stage—creating my first pieces of art, laying down the basics of the road system, buildings, navigation, and sketching out the interface placeholders. I’ll dive deeper into the progress I’ve made in my next post.
It's been almost two months since I started developing this game, and boy, it’s been a journey. There aren’t always clear-cut answers in game development—it’s more like an art form, with your imagination and ideas being the only real limits. I’m constantly faced with new questions and challenges, but that’s what makes this process so exhilarating.
I’m really hoping this is the start of something great, not just another fleeting idea. I want to see it grow into something both playable and visually appealing that I’ve created myself. I’ve got plenty of ideas buzzing around, and I’ll be sure to share them as the game develops and hopefully bring them to life.
Just a note to my future self: all you started with was an idea, interest, and a challenge to yourself.
Keep an eye out for more updates—I’ll have more to share very soon!
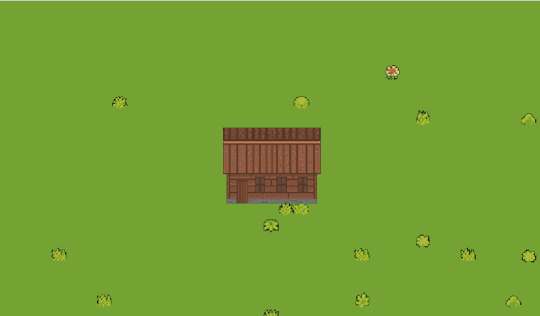
By the way - here is the photo of a project 2 months ago:

This white square is a house. Believe or not.
5 notes
·
View notes