
Don't wanna be here? Send us removal request.
Statistics
We looked inside some of the posts by flutecattle9-blog and here's what we found interesting.
Average Info
Notes Per Post
0
Likes Per Post
0
Reblog Per Post
0
Reply Per Post
0
Time Between Posts
3 days
Number of Posts By Type
Text
17
Last Seen Tumblr Blogs


Fun Fact
Post activity is at the highest at 4:00 pm EDT; notes peak at 10:00 pm EDT.
Text
Gluten Free Pasta Frittata Recipe
This Gluten Free Pasta Frittata is exactly what it sounds like … it’s pasta in a frittata! It is a breakfast-meets-dinner kind of meal and can be served at any time of the day.
This fabulous frittata is a wonderful way to get a meal on the table quickly and is a great way to use up leftover pasta and any leftover meats or even veggies.
Start with your favorite gluten free spaghetti and then add pasture-raised eggs (I use Nature’s Yoke). All the other ingredients are able to be swapped – try diced ham instead of bacon or cheddar cheese instead of mozzarella, throw in some diced bell pepper, the list goes on and on! Use this recipe method as a base and customize with what you have on hand.
If you’re ever having trouble deciding what to make for breakfast, lunch, or dinner, this recipe is the perfect go-to!
Ingredients
Kosher or fine sea salt 12 ounces gluten free spaghetti 4 tablespoons olive oil, divided 2 garlic cloves, smashed 4 slices bacon, chopped 6 large pastured eggs 1 cup grated mozzarella cheese 4 green onions, sliced ½ teaspoon black pepper ½ cup Parmesan cheese
Directions
Bring a large pot of salted water to a boil. Cook the pasta according to the package directions. Drain and toss with 2 tablespoons olive oil.
Preheat the oven to 350 degrees.
Heat the remaining 2 tablespoons olive oil in a large, oven-proof skillet over medium heat. Add the garlic and cook just until fragrant and the garlic is starting to brown slightly. Remove and discard the garlic. Add the bacon, turn the heat up to medium-high and cook the bacon, stirring occasionally, until crisp.
In a large bowl, whisk the eggs. Stir in the mozzarella cheese, green onions, ½ teaspoon salt, and ½ teaspoon pepper.
When the bacon is crisp, add the pasta to combine. Add the egg mixture, allowing it to spread evenly in the pan. Sprinkle the Parmesan cheese on top. Cook on top of the stove just until the bottom sets and is starting to brown. Put the pan in the oven and cook for 10 minutes or until set.
Servings
A gluten-free recipe that serves 4
The views and opinions expressed on this blog are purely the blog owner’s. This blog accepts free manufacturers’ samples and forms of cash advertising, sponsorship, paid insertions or other forms of compensation. Affiliate links may be included in this post.
Share This:
Never Miss a Recipe! Add your email address to receive posts/recipes via email
frittata, Nature's Yoke, pasta
Source: https://simplygluten-free.com/blog/2018/09/gluten-free-pasta-frittata-recipe.html
0 notes
Text
Buffalo Cauliflower Baked Hummus Dip
A twist on the popular buffalo cauliflower dip, my version is made with creamy hummus then baked with cheese before being sprinkled with all your favorite toppings. The perfect vegetarian appetizer for entertaining!
Recently I was invited to a girl’s night and my gal pal asked me to make a healthy version of the popular party appetizer: buffalo cauliflower dip.
After doing a bit of research, I discovered that traditional baked buffalo cauliflower dips are all made with pretty processed ingredients including cream cheese and ranch dressing.
In an effort to put a healthy spin on the classic while also making it my own, I decided to recreate my popular Mexican Baked Hummus Dip into a vegetarian version with a spicy buffalo kick!
The base is roasted cauliflower that is tossed with buffalo sauce. No need for butter – roasting the cauliflower results in a caramelized, slightly sweet veggie that doesn’t need any butter because it’s already full of flavor.
Next, the roasted buffalo cauliflower is mixed with hummus before being spread into a baking sheet and topped with shredded cheese. You can use your favorite store-bought flavor or make homemade hummus.
Before serving with tortilla chips I love to garnish with creamy avocado, roma tomatoes, onions, scallions, black olives or pickled jalapeños. Truly – use whatever you love or have on hand!
You can serve with chips or it’s delicious with thick celery pieces.
No forks required.
A twist on the popular buffalo cauliflower dip, my version is made with creamy hummus then baked with cheese before being sprinkled with all your favorite toppings.
<![CDATA[.wprm-recipe-rating .wprm-rating-star.wprm-rating-star-full svg * fill: #ffffff; ]]> Print Pin Rate
Course: Appetizer
Cuisine: Mexican
Keyword: vegetarian hummus dip
Prep Time: 15 minutes
Cook Time: 55 minutes
Total Time: 1 hour 10 minutes
Servings: 16
Calories: 175kcal
Author: Liz DellaCroce
Ingredients
1 head cauliflower cored and cut into small florets
1 tablespoon olive oil
1/2 teaspoon salt
1/2 teaspoon pepper
1/2 cup buffalo hot sauce
4 cups hummus store-bought or homemade
2 cups shredded cheddar cheese
Optional Garnishes
1 avocado pitted and diced
1 roma tomato seeded and diced
1/2 cup cilantro minced
1/3 cup red onion minced
tortilla chips or crudite to serve
Instructions
Pre-heat oven to 400 degrees and line a baking sheet with foil. Spray with cooking spray. In a large bowl, toss the cauliflower florets with the olive oil, salt and pepper. Roast until browned, about 20-35 minutes.
Place roasted cauliflower back in the same large bowl and toss with buffalo hot sauce. Stir in hummus then spread mixture in the bottom of a 9" x 13" baking sheet. Sprinkle with cheese then bake for 25-30 minutes or until bubbly.
Top with optional garnishes and serve with tortilla chips or veggies.
Nutrition Facts
Buffalo Cauliflower Baked Hummus Dip
Amount Per Serving
Calories 175 Calories from Fat 99
% Daily Value*
Total Fat 11g 17%
Saturated Fat 4g 20%
Cholesterol 14mg 5%
Sodium 634mg 26%
Potassium 261mg 7%
Total Carbohydrates 10g 3%
Dietary Fiber 4g 16%
Sugars 0g
Protein 9g 18%
Vitamin A 3.2%
Vitamin C 21%
Calcium 13.3%
Iron 9.7%
* Percent Daily Values are based on a 2000 calorie diet.
Recipe by The Lemon Bowl // Photography by Alejandro Photography
Want more mouth-watering appetizer recipes? Check out my Pinterest board!
Source: https://thelemonbowl.com/buffalo-cauliflower-baked-hummus-dip/
0 notes
Text
What’s in Season – January Produce Guide
Welcome to the January Produce Guide of our series on seasonal fruits and vegetables!
When I first started cooking I didn’t understand what was even meant by “seasonal” when it came to food. It wasn’t until I started gardening and shopping at our local farmers markets that it hit home.
Every vegetable and fruit has its season—a season when it is ripe and plentiful, when it tastes the best, and costs the least.
Some say our bodies are designed to eat the foods that are in season around us. I don’t know if that’s true or not, but I do know that in middle of winter I crave a big pot of stew with plenty of root vegetables. And in the middle of summer, I rejoice in eating juicy berries and fresh ripe tomatoes.
We in Northern California are blessed to be surrounded by some of the best weather and soil for growing fruits and vegetables. In fact, we grow much of the nation’s produce. So, if it’s in season here, it is likely available at markets across the country.
Lemons, oranges, grapefruit: When it comes to fruit, January is the season for citrus! Meyer lemons, regular lemons, limes, mandarin oranges, navel oranges, and Texas ruby red grapefruit are all abundant. Also look for blood oranges with their deep red interiors (their taste has hints of raspberry), cara cara navel oranges (pink inside), and super-sized pomelos (pre-cursor of grapefruit, sweeter with thicker peels).
Beets, turnips, celery root: You can find root vegetables like beets, turnips, and celery root still in season in January. Younger, smaller turnips will be sweeter and less bitter than more mature turnips. This is also a good time for digging up horseradish roots.
Cabbage, kale, collards, broccoli, cauliflower: Look to the brassicas for your winter green veggies–cabbage, collards, kale, kohlrabi, broccoli and cauliflower. Collards are especially sturdy and are good luck for the new year! Cauliflower comes in all sorts of festive colors now — purple, orange, light green. The color is all natural; the purple comes from the antioxidant anthocyanin and the orange from extra beta-carotene. The taste is the same as white cauliflower, but with more nutritional benefits.
Butternut Squash, acorn squash: Finally, there’s sturdy winter squash! You can still find plenty of butternut squash and acorn squash. While harvested in the fall these squash can keep for months.
Keep scrolling for some terrific recipes for using the best of January produce. Enjoy!
Updated Jan 9, 2019
Source: https://www.simplyrecipes.com/collection/whats_in_season_in_january/

0 notes
Text
Chicken and Basil Wontons
This wonton filling is proudly—if improbably—fashioned after san bei ji or Three Cup Chicken. This is one of the ultimate dishes from Taiwan, and one I love enough to try to twist into different forms any day. It starts with a deeply satisfying blend of soy sauce, sesame oil and rice wine (the eponymous “three cups”), and it’s splashed with copious aromatics—garlic, ginger and basil. I wanted to get its zingy, herbal flavors inside a wonton for a refreshing filling based on chicken (since I didn’t feel like going out of my way to get ground pork).
Dumplings and wontons are perfect vessels for any beloved flavor profile, as I’ve found. And Three Cup Chicken is so good that it doesn’t even need to have chicken—braised squid or clams are classic renditions in Taiwan (included as recipes in The Food of Taiwan). Eggplant, mushrooms and other firm veggies braise very nicely in these flavors, too. Wings, also, turn out great. But I was hankering for wontons after the Brooklyn-based noodle and dumpling skin company, Twin Marquis, asked me to sit in on an upcoming video shoot with the Brooklyn chef, Lien Li of Bricolage. She’s going to be making wontons—and I can’t wait to see what she does.
Ginger, Thai basil and garlic are essential ingredients in Three Cup Chicken—used liberally
Minced or ground chicken chicken is marinated with grated garlic, ginger, soy sauce, sesame oil and rice wine
My mom makes wontons just about every time I come over for dinner, nowadays. Growing up, it was something that we’d make from time to time for an occasion, like a holiday, or for guests and relatives coming over for dinner. Due to their smaller size, they can be a bit more time-consuming to make than dumplings, but you don’t have to make a huge batch. I didn’t this time, although they turned out so tasty that I wish I had a few more to freeze for later. But with just 1 pound of chicken, I made about 45 wontons—you can eat them as a part of a meal, a snack, or as a whole big bowl of them alone.
A small dab of filling is placed in the lower half of the skin
To make the filling, you can always get ground chicken. But I decided to finely chop some boneless chicken thighs, for a bit more of a chunky texture. (This was time-consuming, but you could also opt for a food processor to pulse it a few times, instead.) Then I drenched it with grated ginger, garlic, soy sauce, sesame oil and rice wine, the classic Three Cup Chicken ingredients. Finally, plenty of chopped fresh Thai basil and a couple chopped scallions were added, and the filling was done.
The skin is folded to seal around the sides, and about a half-inch to an inch below the top
There are a few ways to fold wontons, but in this recipe, I’ll show you the way I’ve been doing it lately (thanks to the admonitions of my mom, as heard in this episode of the Why We Eat What We Eat podcast). It requires some dexterity and you should always opt to under-stuff rather than overstuff the wrapper, because if it’s overstuffed it’s likely to burst before or during cooking. And you’ll lose the juices and flavors to the water.
Twist the bottom edges backwards and pinch to close
These wontons are great served in a soup. But you can always serve them straight up, topped with sauces and garnishes like more fresh basil and scallions. Drizzle them with hot sauce, chili oil, sesame oil, soy sauce, rice vinegar, or whathaveyou.
Once you get the hang of making wontons, you can let your own imagination fly. With all the fresh herbs I’ve been getting this spring and early summer from my own plants and my CSA, I’m thinking more greens can fit into just about anything.
Chicken and Basil Wontons (makes about 45 wontons, or 4 servings)
1 lb boneless chicken thighs (or substitute 1 lb ground chicken) 1 Tablespoon soy sauce 1 Tablespoon sesame oil 1 Tablespoon Chinese rice wine (or substitute with dry sake) 1/8 teaspoon salt 1/8 teaspoon ground white or black pepper 2 cloves garlic, grated 2-inch knob ginger, peeled and grated ½ bunch fresh Thai basil, leaves trimmed of stems and finely sliced 2 scallions, chopped 1 package square, yellow wonton wrappers
options for garnish: the remaining half-bunch of Thai basil 1-2 scallions, chopped fresh cilantro, chopped soy sauce your favorite chili sauce chili oil sesame oil rice vinegar
Finely chop the chicken into small pieces about the size of a pea (alternately, you can chop into larger chunks, and pulse a few times in the food processor, stopping to scrape down the sides often). Combine the chicken with the soy sauce, rice wine, sesame oil, salt, pepper, grated garlic and ginger and chopped herbs. (Mixture can be chilled up to a day ahead).
To make a wonton, place about ½ teaspoon of the filling horizontally along the lower half of a wrapper. Dip your finger in water and trace the sides of the wrapper to wet it; wet a line just above the center of the wrapper. Fold the bottom edge over the filling and seal along the sides, and at the top, leaving about a half-inch of wrapper at the top edge (see photos above). Be sure to seal the edges securely shut, and try to squeeze out any air pockets. Wet the corners of both bottom edges of the wrapper, and twist them backwards to meet. Pinch where they meet to seal the wrapper there. Repeat with the rest of the filling and wrappers. (See also photos and instructions in this post.)
Bring a large pot of water to a boil. Drop in the wontons, working in batches if necessary so as not to overcrowd, and boil for 5 minutes. Remove wontons gently with a slotted spoon and transfer to serving bowls. Top with optional garnishes and serve immediately.
Cost Calculator (for 4 servings)
1 lb boneless chicken thighs: $6.00 1 Tb soy sauce: $0.10 1 Tb sesame oil: $0.20 1 Tb rice wine: $0.10 2 cloves garlic: $0.20 2-inch piece ginger: $0.20 1 package wonton wrappers: $3.00 1 bunch Thai basil: $3.00 2-3 scallions: $0.50
Total: $13.30
Health Factor
Five brownie points: This is a lighter take on wontons, if you’re used to the average ground pork filling. Since I used boneless chicken thighs, they come with a good amount of fat for flavor, but it’s not too greasy. And adding lots of fresh, green basil boosts your vitamin intake, so add plenty.
Green Factor
Five maple leaves: Opting for chicken pieces that you either chop, mince or process yourself rather than ground chicken (or any meat) gives you more control over the texture. But it can also more easy to find from the suppliers you like—like those that are organic, humanely raised, or small local farms. Right now is also a great time of year to start your own herb garden, and I may have to add Thai basil to my small collection of pots; it’s a good time of year to find herbs at markets, too. Source: http://noteatingoutinny.com/2018/06/13/chicken-and-basil-wontons/

0 notes
Text
Baked Broccoli Cheese Orzo
Baked orzo smothered in a creamy cheddar cheese sauce with broccoli is the perfect side dish for just about anything – chicken, meatloaf, steak, pork and burgers too.
<![CDATA[ @media screen and (min-width: 1201px) .pxygs5b99f3673faab display: block; @media screen and (min-width: 993px) and (max-width: 1200px) .pxygs5b99f3673faab display: block; @media screen and (min-width: 769px) and (max-width: 992px) .pxygs5b99f3673faab display: block; @media screen and (min-width: 768px) and (max-width: 768px) .pxygs5b99f3673faab display: block; @media screen and (max-width: 767px) .pxygs5b99f3673faab display: block; p margin-bottom: 15px; ]]><![CDATA[ @media screen and (min-width: 1201px) .crtil5b99f3673f703 display: none; @media screen and (min-width: 993px) and (max-width: 1200px) .crtil5b99f3673f703 display: none; @media screen and (min-width: 769px) and (max-width: 992px) .crtil5b99f3673f703 display: block; @media screen and (min-width: 768px) and (max-width: 768px) .crtil5b99f3673f703 display: block; @media screen and (max-width: 767px) .crtil5b99f3673f703 display: block; ]]>
You can also serve it as a vegetarian/meatless main dish if you like or with your holiday meals.
Baked Broccoli Cheese Orzo
Baked orzo smothered in a creamy cheddar cheese sauce with broccoli is the perfect side dish for just about anything.
Author: Reeni
Recipe type: Side Dish
Cuisine: American
Serves: 9 servings
Ingredients
12 ounces orzo
16 ounces frozen broccoli florets
1 tablespoon olive oil
1 small onion
3 cloves garlic
sea or kosher salt and fresh black pepper
2 tablespoons butter
2 tablespoons all-purpose flour
2 cups milk
1 teaspoon Dijon mustard
8 ounce block sharp cheddar cheese, cut into small cubes
⅓ cup grated Parmesan cheese
½ cup shredded sharp cheddar cheese
⅓ cup Japanese Panko or seasoned Italian bread crumbs
Instructions
Preheat the oven to 400 degrees F. Butter a 9x9 or 10x6 casserole dish or baking pan.
In a large saucepan cook the orzo and broccoli together according to the orzo package directions. Drain and add to a large mixing bowl.
Meanwhile make the sauce:
In a large saucepan heat the olive oil over medium-low heat. Cook the onion and garlic with a couple dashes each salt and pepper about 5 minutes stirring often.
Remove the onion and garlic to the bowl with the orzo.
Over medium heat melt the butter, whisk in the flour and cook 2 minutes, stirring often.
Slowly whisk in the milk and Dijon mustard. Bring to a simmer and simmer 3 minutes, stirring often.
Stir in ½ teaspoon salt and ¼ teaspoon black pepper.
Turn the heat down to low and add the cubed cheese a handful at a time whilst stirring. Stir until all the cheddar is melted then stir in the Parmesan. Remove from heat.
Pour the cheese sauce over the orzo and stir to combine.
Pour the orzo into the pan and spread it out evenly. Top with the shredded sharp cheddar and Panko crumbs.
Bake 20 minutes. Let it sit 5 minutes before serving.
Notes
©Cinnamon Spice and Everything Nice by Reeni Pisano All Rights Reserved
3.5.3251
<![CDATA[ .mlocy5b99f3673df38 margin: 10px; padding: 0px; @media screen and (min-width: 1201px) .mlocy5b99f3673df38 display: block; @media screen and (min-width: 993px) and (max-width: 1200px) .mlocy5b99f3673df38 display: block; @media screen and (min-width: 769px) and (max-width: 992px) .mlocy5b99f3673df38 display: block; @media screen and (min-width: 768px) and (max-width: 768px) .mlocy5b99f3673df38 display: block; @media screen and (max-width: 767px) .mlocy5b99f3673df38 display: block; ]]>
Orzo is a pasta shaped like rice only a little bigger and softer. For this dish, you cook the orzo first with frozen broccoli – right in the same pan and then toss it with cheesy sauce.
Before you make the cheddar cheese sauce you cook up a little onion and garlic to add flavor, remove it from the pan and use the same one for the sauce.
The decadent sauce starts with a roux – butter and flour to help thicken it along with milk, a touch of Dijon, cubed sharp cheddar cheese and Parmesan. Once it’s smooth and creamy you toss it with the orzo mixture and pour into a greased casserole pan to bake.
A handful of shredded sharp cheddar is sprinkled over the top along with a smattering of Japanese panko crumbs for crunch.
<![CDATA[ .jwdwt5b99f3673e6c8 margin: 5px; padding: 0px; @media screen and (min-width: 1201px) .jwdwt5b99f3673e6c8 display: block; @media screen and (min-width: 993px) and (max-width: 1200px) .jwdwt5b99f3673e6c8 display: block; @media screen and (min-width: 769px) and (max-width: 992px) .jwdwt5b99f3673e6c8 display: block; @media screen and (min-width: 768px) and (max-width: 768px) .jwdwt5b99f3673e6c8 display: block; @media screen and (max-width: 767px) .jwdwt5b99f3673e6c8 display: block; ]]>
A mere twenty minutes later you have a hot, delicious dish ready for the table. You can’t go wrong. Everyone will love it!
Source: https://www.cinnamonspiceandeverythingnice.com/baked-broccoli-cheese-orzo/
0 notes
Text
Perros Calientes Colombianos
Thu Aug 30, 2018
Until last month, it had been nearly 20 years since I took a solo vacation. Ever since meeting my (now) wife, I've never really thought about, or wanted to, travel alone again, but a large and growing differential in vacation days I had versus what she had left me pondering how to make use of them on my own. I considered staying home to take care of a long backlog of projects (like editing photos from past vacations and also redesigning this blog), but I'm not one to find allure in sitting around the house when there's an entire world out there for exploring. I finally settled on getting away and Colombia ended being the right mixture of distance, value, and sites my wife could live with me seeing on my own. I ha forgotten some of the perils of traveling alone though, the main one among them being dining by myself. I did get out to some nice restaurants and outstanding meals, but I was definitely most in my comfort zone with quick street food bites, and among the many I ate, one that sat the fondest with me was an overloaded hot dog I enjoyed in small corner joint in Medellin that was overflowing with locals all chomping down on the same messy, junky, delicious creation that is the perro caliente Colombiano.
When walking up to this particular hot dog shop, the first thing that struck me were the sheer variety of sauce choices. I saw the standard ketchup and mustard, but there was also a green avocado sauce, mayo, barbecue sauce, pineapple sauce, and salsa rosado. After deciding to recreate these hot dogs at home for my friends, I made a choice to focus on just a couple sauces instead of the full suite, but it's safe to say that you can sauce these dogs as you see fit.
The first sauce I made was the salsa rosado, which is a mixture of mayo and ketchup that's ubiquitous throughout a lot of Latin America. You really only need those two kitchen staples, but a little lemon juice thrown into the mix can add a nice brightness if you happen to have it on hand (I didn't here).
The second sauce I made was the pineapple salsa, which I chose due to a combination of its uniqueness and recipe development challenge. I'm not sure how the sauce is made in Colombia, but I started with actual pineapple that I pureed with water in a blender to make pineapple juice.
I then strained the juice into a medium pan to remove any pulp. Next I brought the juice to a boil, added in a little brown sugar, and let it simmer until it started to reduce slightly. I then made slurry of lime juice and cornstarch and added it into the mix, and almost instantly the sauce began to bubbly immensely thicken. It took another ten minutes or so though until the sauce had thickened into something that could be squeezed out of a bottle and retain some form. Once it was at that point, I transferred the sauce to a squeeze bottle and placed it in the fridge to cool completely.
Beyond the salsas, the hot dogs I experienced in Colombia had three distinct toppings—melted cheese, coleslaw, and potato sticks. The coleslaw wasn't particularly flavorful, it really mostly added a cool crunch and mellow mayo flavor. So to make something similar, I used my base coleslaw recipe that starts with slicing cabbage very thinly and mixing it with grated carrot along with sugar and salt, which work together to draw moisture out of the vegetables. After five minutes of resting, the cabbage mixture is washed and dried before dressing.
For the dressing, I kept the flavor very light with a mostly mayo base. I did add a slight boost in tang from rice vinegar and a little mustard for a background complexity. Other than that, it was just only salt, sugar, and pepper for the seasoning, and this dressing ended up giving the slaw the right mild flavor I was looking for without tasting bland.
The potato sticks topping was both probably the best part, and also easiest to prepare. I just picked up of a tub of these crunchy, fried potatoes and then crushed a large handful of them by placing them in a resealable bag and whacking it with a rolling pin a few times to get broken, but not obliterated, little pieces of crisp potatoes.
The cheese part of the equationI wasn't too sure of. I knew it was a soft and moist queso blanco when I saw the staff at the shop drop bricks of cheese into what looked like a pool of water, and then pull out melted globs of the stuff to spread along the rolls. My problem really occurred when I got to my local grocery and was presented with a wall of queso blancos—which one would be right choice? Then I saw one called Quesito Colombiano and figured that must be the one for me!
I melted the cheese in a small pan on the grill as I cooked the hot dogs. Very similar to what I saw in Colombia, this cheese melted into a pool of water with soft and stringy cheese nestled inside. Because of this separation, there was actually less cheese than I was expecting once it melted. I was certainly happy I had picked up a couple extra rounds of cheese because I ended up needing them to give each hot dog its proper cheesy layer.
The hot dogs themselves weren't really anything special. They tasted like a lightly season blend of pork and beef, so I found a two meat blend frank in the grocery store and picked them up. These natural casing franks from Hofmann were actually way better quality than what I had in Colombia, and compared to the water heated dogs I had there, the grill also gave the links a better flavor, in my opinion.
To assemble the hot dogs once everything was done, I started with a sesame seed bun (they were actually labeled as "sub rolls" and not hot dog buns) and spread a layer of cheese along the bottom. I then nestled a hot dog into the soft cheese and topped with a layer of coleslaw followed by potato sticks. I then squirted on the sauces, not being neat or tidy about it at all—one hallmark of these hot dogs seemed to be how messy they were.
And messy they were, with just the first bite I had some coleslaw and sauces adorning my hands, which was true to my experience in Colombia. The flavor was pretty spot on too, from the salty and soft cheese, squishy sesame seed bun, lightly seasoned dog, crunchy coleslaw, salty potato sticks, and variety of sauces. I ended up coming home from my trip with not enough gifts for everyone, then realized after serving these hot dogs that this is really the best gift I could give anyone anyway—sharing a food experience with my friends I so loved that can hopefully ignite an appreciation for Colombia and desire to travel there too.
Perros Calientes Colombianos
The Colombian hot dog is an overstuffed, messy affair that includes melted queso blanco, coleslaw, potato sticks, and a variety of sauces.
Prep Time:
40 Minutes
Cook Time:
5 Minutes
Total Time:
45 Minutes
Yield:
8 servings
Ingredients
For the Pineapple Sauce
2 cups roughly chopped fresh pineapple
1/3 cup water
2 tablespoons light brown sugar
1 tablespoon lime juice
1 teaspoon cornstarch
For the Salsa Rosado
1/3 cup mayonnaise
3 tablespoons ketchup
2 teaspoons juice from 1 lemon (optional)
For the Coleslaw
1/2 cup mayonnaise
1/3 cup sugar, plus 1 tablespoon, divided
2 tablespoons rice vinegar
2 teaspoon dijon mustard
3/4 teaspoon freshly ground black pepper, plus more to taste
1/2 head green cabbage, core removed and finely shredded
1 medium carrot, peeled and grated
3 tablespoons kosher salt, plus more to taste
For the Hot Dogs
1lb queso blanco
8 hot dogs, preferably a pork and beef blend
8 hot dog buns or small sub rolls, preferably with sesame seeds
2/3 cup potato sticks, lightly crushed
Procedure
To make the pineapple sauce: Place pineapple and water in the jar of a blender and blend until smooth. Strain pureed pineapple through a fine mesh strainer into a medium pan. Place pan over medium-high heat, add in brown sugar, and bring to a boil. Reduce heat to medium and let simmer until slightly reduced, about 10 minutes. In a small bowl, whisk together lime juice and cornstarch. Whisk cornstarch mixture into pineapple juice and let simmer until sauce thickens to a medium syrupy consistency, about 10 minutes more. Remove pan from heat and let sit until cool enough to handle. Transfer pineapple sauce to a squeeze bottle or container and store in refrigerator until ready to use.
To make the salsa rosado: Whisk together mayonnaise, ketchup, and lemon juice (if using), in a small bowl. Transfer sauce to a squeeze bottle or container and store in refrigerator until ready to use.
To make the coleslaw: Whisk together mayonnaise, 1 tablespoon sugar, vinegar, mustard, and black pepper in a small bowl. Set aside. Place cabbage and carrot in a large bowl, sprinkle with remaining 1/3 cup sugar and salt; toss to combine. Let stand five minutes, then transfer to a large colander and rinse thoroughly under cold running water. Transfer cabbage to a salad spinner and spin dry. Alternatively, transfer to a large rimmed baking sheet lined with a triple layer of paper towels or a clean kitchen towel and blot mixture dry with more towels. Return to large bowl. Pour dressing over cabbage and toss to coat. Adjust seasoning to taste with salt, pepper, and/or sugar.
To make the hot dogs: Light one chimney full of charcoal. When all charcoal is lit and covered with gray ash, pour out and spread the coals evenly over entire surface of coal grate. Set cooking grate in place, cover grill and allow to preheat for 5 minutes. Clean and oil the grilling grate. Place cheese in a small pan and place on grill. Let sit until cheese is melted, stirring occasionally. While cheese is melting, place hot dogs on grill and cook, turning occasionally, until heated through and well browned, about 4 minutes.
Using tongs, remove about 1/8 of the melted cheese and spread along the bottom of one bun. Nestle hot dog on top of cheese and top with coleslaw, potato sticks, and the two sauces. Repeat assembly for all hot dogs. Serve immediately.

Source: http://www.meatwave.com/blog/perros-calientes-colombianos-colombian-hot-dogs-with-queso-blanco-coleslaw-and-potato-sticks-recipe
0 notes
Text
Cherry Limeade Recipe – Do It Yourself Better
Cherry Limeade is a fun and refreshing drink. Make it with lime and tart cherry juices instead of dyed syrups and artificial flavors for a real food treat.
Cherry Limeade is the epitome of refreshing drinks. Cold and refreshing, sweet and tart, sparkling and happy, it’s what happy days are made of. You can’t help but smile when someone hands you a glass of Cherry Limeade.
Can you?
Now the problem with Cherry Limeade is that the commercial versions are the epitome of fake food. Artificial sweeteners and colors galore! Not to mention that it can be expensive at take-out joints, especially when you have a crowd craving Cherry Limeades.
Can you make a Cherry Limeade at home?
Yes, yes, you can!
For years I tried to recreate it at home, but it seemed that you had to buy artificial cherry syrup in order to make it really taste right. I didn’t want fake food, as good as it was. I wanted a sweet treat that I didn’t have to feel too guilty about.
After much experimentation with different sweeteners and mixers, I finally landed on the perfect combination: lime juice, tart cherry juice, real sugar, and club soda. I promise you, it’s a winner, folks!
I tested this a few different ways, with sugar and with honey. My kids preferred the version mixed with sugar instead of honey. The honey flavor does try to overpower the cherry and lime flavors. Choose which sweetener you prefer.
Since the lime and cherry juices are not dirt cheap, I am leaning toward sugar since it’s a little more inexpensive. I like to make this with club soda so that it’s a fizzy drink, but you can make it with filtered water if you prefer a flat drink instead.
If you’ve got fresh limes and frozen cherries to use for garnish, you’ll have a super fun drink for any hot summer day or holiday celebration — or any day you need a glass full of Happy. I love it that it’s made from all natural ingredients without dyes and funky stuff.
After you mix up a batch — or two! — of Cherry Limeade, I’d love it if you’d come back and leave a starred review. Thanks in advance for your feedback.
How to make this good and cheap:
Here are some of the strategies you can use to make this recipe more economical:
Stock up on ingredients when they are on sale. Instead of paying full price, buy more than you need when you see it on sale. Then you always have it when you want it. This is particularly true for bottled cherry and lime juices as well as club soda. It’s always nice to have a stockpile of that kind of stuff.
Store your bulk purchase of limes in the fridge. Yes, citrus tastes best and juices more efficiently when it’s at room temperature, but you can extend its shelf life by storing it in the fridge.
Shop the stores that have the best prices. When I did my big grocery store showdown, I learned that ALDI and Costco have the best prices for a lot of the things I buy. You will naturally save money if you shop the best store for the items YOU buy. This may not be ALDI or Costco, so you’ll need to do your own price comparisons. The time investment as your research it is super valuable!
How I make this recipe easy:
This recipe really couldn’t be easier than it is, but having the right kitchen tools can really make your time in the kitchen more enjoyable. Over time, I’ve honed my collection so that they are perfect for my needs.
Here are the tools that I use for this recipe:
Cherry Limeade is a fun and refreshing drink. Make it with lime and tart cherry juices instead of dyed syrups and artificial flavors for a real food treat.
Keyword: cherry limeade, homemade soda, limeade, sonic
1 cup granulated sugar
1/2 cup lime juice
1/2 cup tart cherry juice
1 liter club soda
frozen cherries and lime slices for garnish
In a large pitcher, combine the sugar and juices. Stir until the sugar is completely dissolved.
Slowly add the club soda, stirring gently to combine. Watch for overflowing foam.
Serve the limeade over ice with frozen cherries and lime slices for garnish.
Source: https://goodcheapeats.com/2018/08/cherry-limeade-recipe/
0 notes
Text
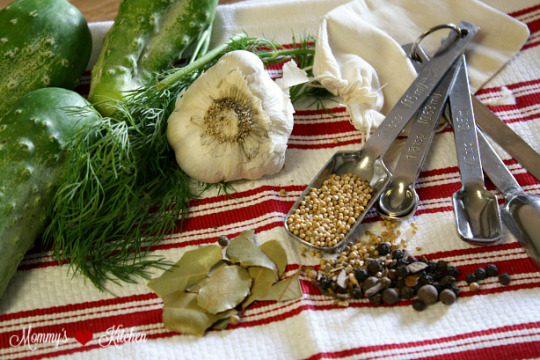
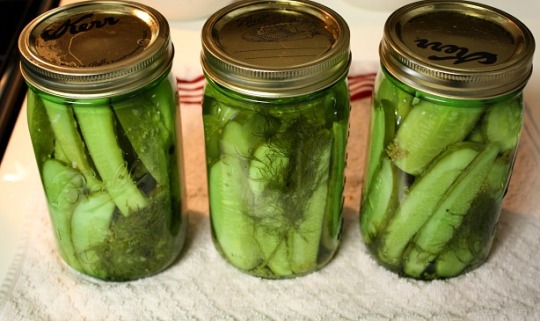
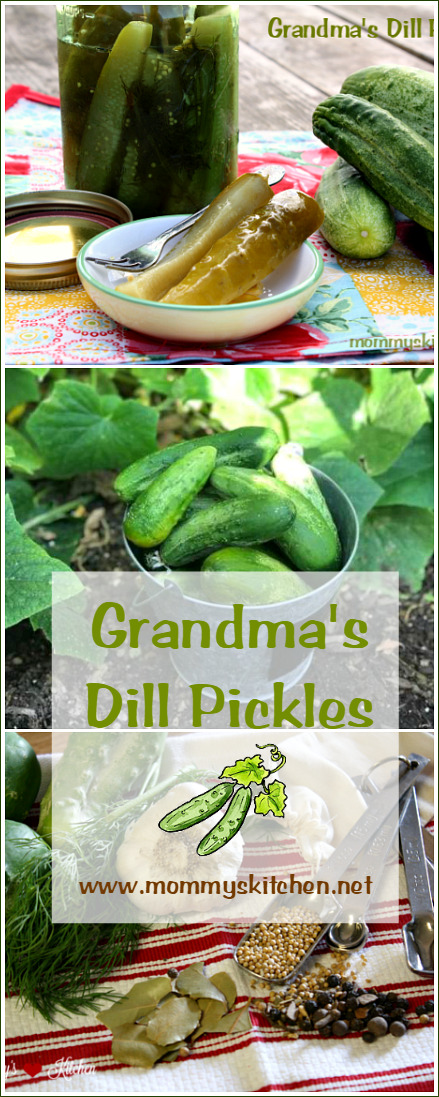
Grandma's Homemade Dill Pickles
Learn how to make these crunchy Dill Pickles using pickling cucumbers from your summer garden and a simple brine.
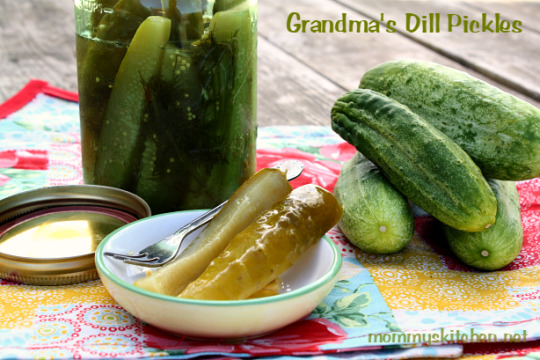
Use this simple recipe to transform garden fresh cucumbers into crisp, delicious Dill Pickles. Last summer was the first year that I made homemade pickles. I always thought it was difficult to do, but I couldn't of been more wrong.
The first pickles I canned were these Bread and Butter Pickles and then I moved onto Kosher Dills and these delicious Homemade Dill Pickles. I made so many pickles last year that I had plenty to last the entire year and still have extras for family and friends.
Well, fast forward to this summer and my pickling cucumbers are overloading in my garden yet again. The only pickling cucumbers seeds that I plant is the Ferry-Morse Sow Easy Boston Pickling Cucumbers. The Ferry-Morse Sow Easy are the one brand that I know will grow and produce a high yield of cucumbers which are perfect for pickling.
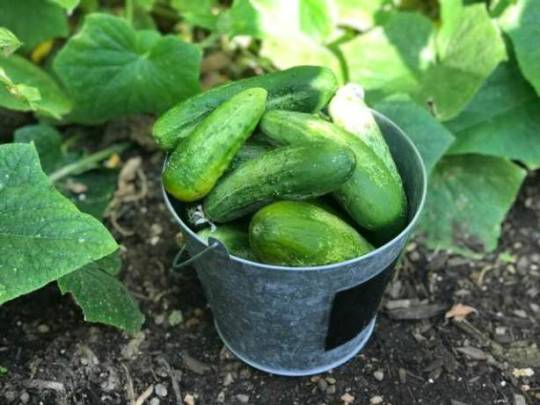
Once the cucumbers start coming in, I end up picking at least 5-7 pickling cukes a day!!! I usually just pick the cucumbers throughout the week and then store them in the refrigerator in a big bowl until I'm ready to make pickles. If you leave them out on the counter they will get limp rather quickly, so keeping them cold is best. I also use Ball's Pickle Crisp Granules when I can pickles which is just another step in ensuring that the pickles stay crisp after canning.

The recipe below is a basic recipe for old fashioned dill pickles that, I found in my Ball Complete Book of Home Preserving cookbook. This is the same cookbook that I used to make my bread and butter pickles so I highly recommend this cookbook if you like to home can.
I have given out numerous jars of pickles and everyone who tastes them always asks for the recipe. I have to say that I was amazed myself the first time I tasted them, because they tasted exact to store bought pickles. Let's get started on the recipe.
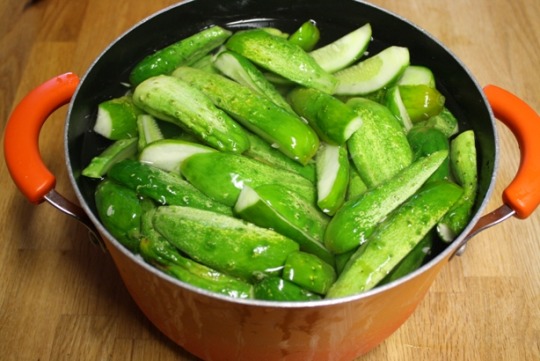
Wash and dry cucumbers and trim away blossom ends (which contain enzymes) that will make the pickles limp. Cut the cucumbers into spears. In a large glass or pot layer cucumbers and ice. Dissolve half of the pickling or canning salt into 4 cups of water. Pour the water mixture over the cucumbers. Refrigerate or let stand in a cool place for 12 hours but no longer than 18. This step is very important in keeping the pickles crisp. No one wants limp pickles.
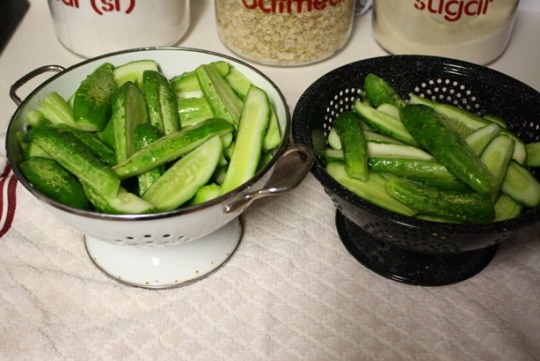
After 12 hours, transfer the cucumbers to a colander placed over the sink and drain. Rinse the cucumbers with cool running water, drain thoroughly and set aside.
Tie the pickling spice and bay leaves in a square of cheesecloth, creating a spice bag. In a large stainless steel saucepan, combine remaining 2 cups of water, vinegar, remaining pickling salt, sugar and spice bag. Bring the mixture to a boil over medium-high heat, stirring to dissolve the salt and sugar. Reduce heat, cover and gently boil for 15 minutes, until the spices have infused the liquid.
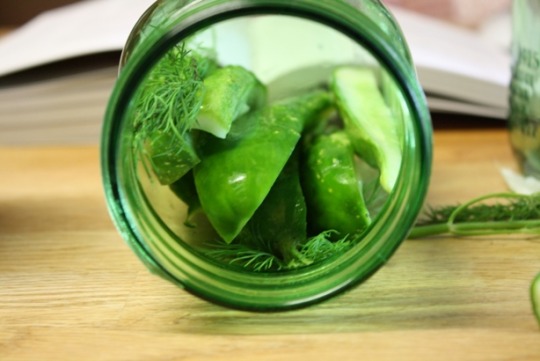
Lay the jars sideways and pack the cucumber spears and fresh dill into the jars within a half inch from the top of the jar. Stand the jars upright and add 1 teaspoon mustard seed, 1 clove garlic and 1/2 teaspoon pickle crisp granules to each hot jar.
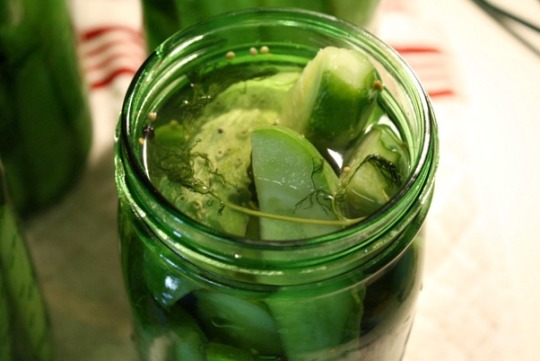
Ladle hot pickling brine into hot jars to cover cucumbers, leaving 1/2 inch head space. Remove any air bubbles and add more hot brine if needed. Wipe the rims of each jar with a clean cloth. Center lids on jars and screw on bands to fingertip tight.
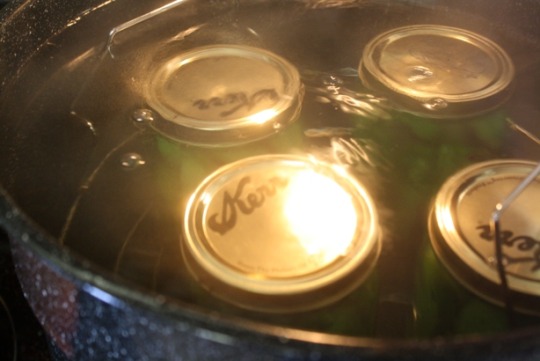
Place the jars in the hot water bath canner, ensuring they are completely covered with water. Bring to a boil, cover and process jars (quart size jars 15 minutes, pint size jars 10 minutes).
Remove canner lid and wait 5 minutes before removing jars to a the counter lined with a thick kitchen towel. As the jars cool the lids will pop and seal. When completely cool make sure lids are pressed down in the middle and sealed. If the lids are not sealed then reprocess again.
Pickles are ready to eat about one week after canning.
Grandma's Homemade Dill Pickles 4 - pounds pickling cucumbers, trimmed and cut into spears 8 - cups ice cubes 3/4 - cup pickling or canning salt, divided 6 - cups of water 3 - cups white or apple cider vinegar 1 - tablespoon pickling spice 2 - bay leaves 1/8 - cup sugar 3 - 4 teaspoons mustard seed (1 teaspoon per jar) 3 - 4 garlic cloves divided (1 clove per jar) fresh dill weed Ball pickle crisp granules (1/2 teaspoon per quart size jar)
Wash and dry cucumbers and trim away blossom ends (which contain enzymes) that will make the pickles limp. Cut the cucumbers into spears.
In a large glass or pot layer cucumbers and ice. Dissolve half of the pickling or canning salt into 4 cups of water. Pour the water mixture over the cucumbers.
If necessary place a large clean inverted plate on top of the cucumbers and weigh the plate down so the cucumbers stay submerged. Refrigerate or let stand in a cool place for 12 hours but no longer than 18.
Transfer the cucumbers to a colander placed over the sink and drain. Rinse the cucumbers with cool running water, drain thoroughly and set aside.
Prepare water-bath- canner, and lids. Wash 3-4 quart size canning jars in hot soapy water and rinse well. Fill the jars with hot water and place in the canning pot and sterilize the jars in boiling water. Remove jars and place on a towel on the counter.
In a small saucepan, bring approximately 3 inches of water to a simmer. Add the lids and rings, cover the saucepan and remove from heat.
Tie the pickling spice and bay leaves in a square of cheesecloth, creating a spice bag.
In a large stainless steel saucepan, combine remaining 2 cups of water, vinegar, remaining pickling salt, sugar and spice bag.
Bring the mixture to a boil over medium-high heat, stirring to dissolve the salt and sugar. Reduce heat, cover and gently boil for 15 minutes, until the spices have infused the liquid (brine).
Pack the cucumber spears into the jars within a half a inch from the top of the jar. Add 1 1/2 fresh head of dill , 1 teaspoon mustard seed, one clove garlic and 1/4 teaspoon pickle crisp granules to each hot jar.
Ladle hot pickling brine into hot jars to cover cucumbers, leaving 1/2 inch head space. Remove any air bubbles and add more hot brine if needed.
Wipe the rims of each jar with a clean cloth. Center lids on jar and screw on bands to fingertip tight.
Place the jars in the hot water bath canner, ensuring they are completely covered with water. Bring to a boil, cover and process jars (quart size jars 15 minutes, pint size jars 10 minutes).
Remove canner lid and wait 5 minutes before removing jars to a the counter lined with a thick kitchen towel. As the jars cool the lids will pop and seal.
When completely cool make sure lids are pressed down in the middle and sealed. If the lids are not sealed then reprocess again.
Pickles are ready to eat about one week after canning. Store jars in a your pantry for up to 12 months.
Recipe yields: 3 - quart size jars adapted from: Ball Complete Book of Home Preserving


Source: https://www.mommyskitchen.net/2018/07/grandmas-homemade-dill-pickles.html
0 notes
Text
Have We Found the Best New Vegan Cake? A Professional Baker Weighs In
On Piglet day 2, Umber Ahmad—James Beard Award-nominated chef/owner of Mah Ze Dahr Bakery in N.Y.C.'s West Village—takes two cozy, comforting books for a spin: JJ Johnson and Alexander Smalls' Between Harlem and Heaven and Nigella Lawson's At My Table. Umber cooks and bakes up a storm from both (including several oh-so-good cakes, and a very memorable peanut sauce), and along the way asks herself the important question: "Which one speaks my food language?"

Got questions? We have answers. What is the Piglet? Which books are in the running? How do I catch up on judgments? Is there a handy bracket for me to follow along with?
From Our Shop
Sale!
Staub Piglet Shallow Wide Round Cocotte, 6QT $249–$279
More Colors
exclusive
Food52 x Staub Piglet Glass-Lidded Braiser, 3.5QT $259
More Colors
Source: https://food52.com/blog/23877-piglet-2019-day-2-umber-ahmad
0 notes
Text
12 Things to Do in SF
Earlier this year, I headed to San Francisco with my cousin for a little long weekend getaway for Memorial Day. Feeling restless, I didn’t want to spend the long weekend staycationing, so we hopped on a plane and headed west. Here’s a list of 12 things to do in SF. What we saw, did, and, of course, ate!
Living in New York, the city seems to always get held up next to SF. Friends and family seem to waffle back and forth as to which city is better for working/living and where you can find the coolest haunts and the coolest people. I of course, being a life long east coast gal am quick to list out the merits of New York, but I gotta say that for a jaded New Yorker, San Francisco made for one of the best weekend trips I’ve had in a long time.
It’s hard to identify a single reason as to why. There’s the perfect mild weather, a little extra cloud cover (I am a little bit nocturnal), plenty of natural sights to check out close to the city limits, culture, and of course food. But here’s a rundown of everything so you can decide for yourself.
12 Things to Do in SF
1. Do a few quick hikes at Point Reyes National Seashore
Our first order of business was actually to escape the city proper and head out into the wilds––that is, drive about an hour to Point Reyes National Seashore. While the sky was a bit overcast, the cool salty breezes and wildflowers were more than enough to please me.
On hikes, I’m a big believer in stopping to smell the flowers. These small orange and yellow ones were particularly lovely.
We stumbled upon small quiet beaches…
At this beach, there were plenty of pre-arranged driftwood picnic sites where folks had clearly enjoyed grilled oysters.
And lagoons…
2. Frolic on the beach (puppies ideal)
These three puppas had it lucky, living in houses on the rocky outcroppings above the water. We report that these three dogs in particular were very good boys.
3. Check out Point Reyes Station
Point Reyes Station was a sleepy little sea town, but dotted with boutiques, bookshops, and markets on the way to other national and state parks and recreation areas. We stopped to check out the murals, peruse the local farm stand, and pick up some books.
Sometimes I think the flowers alone are enough reason for me to up and move to the west coast…
4. Oyster Trail
Oyster Trail is well known by locals as a great place to down tons of fresh oysters for cheap and with views of the ocean while you do it. While a lot of places had a you-shuck model, we opted to sit down at Nick’s Cove, since I’ve sadly not yet sprung for an oyster knife and thought it best to not test my air travel luck with that one.
We started out with a half dozen delicious baked oysters. Just look at those buttery breadcrumbs…! And a little sampling of the house clam chowder, because obviously we cannot turn down clam chowder. It’s basically a law of the universe, and it’s kind of a problem.
Next, there was a wonderfully fresh orange and beet salad, and to be honest, two of the best seafood dishes I’ve ever eaten: stone crab mac n cheese and a kale caesar with avocado, pepperoncinis and the most delicious, meaty boquerones.
Here’s a close up of the mac n cheese because obviously you want to see that.
There were huge lumps of tender crab meat in this mac n cheese and I will show you this less than glamorous shot I took of my plate marveling at this fact. When it comes to seafood, the experts are truly the experts.
The restaurant had a long dock where we stretched our legs after the exertion of the mac n cheese before our next stop…
5. Muir Woods
Muir Woods speaks for itself. The national park is so conveniently located relative to the rest of SF and there are plenty of trails ranging from super easy and paved to a little bit more challenging. We did the convenient long loop that allowed you to see most of the redwoods.
Hilariously, when we ended the loop, we noticed that there were more than a couple of taxis waiting for city dwellers, and heard a few tech bros talking about ill-fated trips wherein they paid a small fortune to be uber-ed to and back from Muir Woods. This bear outside the gift shop isn’t sure how he feels about that.
Believe it or not that was all packed into Day 1 of SF! From Muir Woods we drove back across the Golden Gate and headed back into the city.
6. The harbor seals by Pier 39
The next morning we got an early start and hit Pier 39 to check out the harbor seals. There’s a small visitor’s center where you can learn more about the research being conducted in the area, and how you can have less of an impact on the oceans. I picked up a copy of the Monterey Bay Aquarium seafood guide and took the time to gently shame my friends about single-use plastics.
7. A trolley ride
My cousin and I butted heads on this one because it was an absolute slog to wait in the long lines for the trolley ride, but I have to say I didn’t regret it. Seeing how the trolley was maneuvered manually and cruising up and down the steep San Francisco streets was pretty fun, and honestly, I would probably recommend to any bright eyed and bushy tailed tourists.
We waited for a very long time, so naturally pictures of foliage occurred.
8. San Francisco MoMA
Next we spent a little time wandering through SF MoMa, which was a great stop filled with lots of wonderfully odd thought provoking things.
9. Ate lots of sourdough!
An important stop for me was to Boudin Bakery. Maybe if you’re a local you’re shaking your head at how touristy I am, but this bread is g o o d. Also the soup bread bowls are giant, fluffy, crusty, and delicious, and the soup is the exact thing you would want–the most archetypal and perfect of clam chowder and tomato soup.
Plus, they serve the tomato soup with more croutons on top. How delightfully excessive is that?
Jalapeno cheese rounds, anyone?
For those looking to indulge, you could also buy these ridiculously adorable bread animals.
10. the Mission District
We strolled through the alleys of the Mission District, home to plenty of murals, equal parts abstract and socially-minded.
Not pictured here, sadly, is the burrito that we split for breakfast, because SF, and because burritos, and because we could.
11. Lands End Trail
A highlight of the rip was hiking the trail at Lands End. It was a popular Memorial Day weekend activity, but the wide, long paths made for a pleasant loop around the perimeter of the city and spectacular views of the bridge in the distance.
12. Good meals
I don’t know if it’s because SF is a tech town, or if the locals have particularly high standards, but we were able to have a few great meals despite not having advance reservations to the best dinner spots in town. We went to a few smaller local haunts, where we had delicious burrata and pasta, and the most luscious appetizer of fried pig’s ears and calamari.
Source: https://thewoksoflife.com/2018/09/12-things-to-do-in-sf/
0 notes
Text
Stuffed Sweet Potatoes with Taco Seasoned Ground Turkey
Baked sweet potatoes filled with delicious chili- and cumin-spiced ground turkey taco meat and all your favorite taco toppings! 387 calories or 7 WW points. Think of these stuffed sweet potatoes as a healthy taco shell of sorts, and fill them with all of your favorite toppings: shredded cheddar cheese, chopped cilantro, sour cream, salsa, avocado…anything you want!
If you happened to come and stay at my house for a week, it wouldn’t be a stretch to assume that by Friday night, you would begin to wonder if I ever actually make anything exciting for dinner. And you would be correct. I don’t! I already told you that Daniel and I are devastatingly boring, so to keep true to who I am, I don’t make elaborate recipes all that often anymore—certainly not with an infant and certainly not when I could make something I sincerely enjoy that consists of, like, 4-5 ingredients and a half dozen spices. Also there are showers to be had! TV shows I haven’t had the chance to binge yet! Beds to crawl into!
So this, my friends, is one of the real life dinner recipes you would happen upon at our house: stuffed sweet potatoes with taco seasoned ground turkey. It’s easy, deliciously sweet-meets-savory, and yes, it’s healthy, too. That’s all any of us really need in a weeknight meal.
Think of the sweet potato almost like a healthy taco shell of sorts, and fill it with all of your favorite toppings: shredded cheddar cheese, chopped cilantro, sour cream, salsa, avocado, black beans…anything you want!
The ground turkey gets its taco flavor from a homemade taco seasoning mix made with chili powder, cumin, paprika, garlic powder, oregano, cayenne pepper, salt, and just a touch of brown sugar (light or dark, up to you) to round out the spices. I like to use 93% lean ground turkey because it’s significantly less dry than 99% lean, but if you’re looking to save a few calories, or Weight Watchers points (since the 99% lean is 0 points), you certainly can. Consider adding a few tablespoons more water to your skillet (or even a little salsa), if you notice the turkey drying out.
You can microwave sweet potatoes to save time but I wouldn’t recommend it. Baked sweet potatoes are leaps and bounds better than microwaved ones. They’re sweeter, since the natural sugars have a chance to caramelize; the flesh is moister; and the skin of the potato crisps slightly without becoming papery and dry.
Stuffed Sweet Potatoes with Taco Seasoned Ground Turkey
Baked sweet potatoes filled with delicious chili- and cumin-spiced ground turkey and all your favorite taco toppings! 387 calories or 7 WW points. Think of the sweet potato almost like a healthy taco shell of sorts, and fill it with all of your favorite toppings: shredded cheddar cheese, chopped cilantro, sour cream, salsa, avocado...anything you want!
Ingredients
4 medium sweet potatoes
1 tablespoon plus 1 teaspoon chili powder
2 teaspoons ground cumin
1 teaspoon ground paprika
1 teaspoon garlic powder
½ teaspoon dried oregano
¼ teaspoon cayenne pepper
1 teaspoon salt
2 teaspoons light brown sugar
1 lb ground turkey (see recipe notes below)
2 tablespoons tomato paste
½ cup water
½ cup finely shredded cheddar cheese
Toppings: fresh cilantro, finely diced red onion, salsa, sour cream, etc. (optional)
Instructions
Preheat the oven to 400 degrees F. Wash and dry the sweet potatoes. Prick each one several times with a fork then place on a rimmed baking sheet. Bake until soft and a fork can easily be inserted into the center of the largest one, 45 to 55 minutes.
Meanwhile, in a small bowl, stir together the chili powder, cumin, paprika, garlic powder, oregano, cayenne, salt, and brown sugar.
Spray a large nonstick skillet with cooking spray and set it over medium-high heat. Add the ground turkey and cook, breaking up the meat into crumbles as it browns, until no longer pink and cooked through, about 5 minutes. Add the spice mixture, tomato paste, and water, stirring well. Bring the skillet to a simmer, lower the heat to maintain a gentle simmer, and let cook, stirring occasionally, until the turkey meat has absorbed almost all of the liquid, about 10 minutes.
Cut the sweet potatoes open and use a fork to lightly mash the insides. Plate each potato, spoon the turkey meat evenly among them, and top each with 2 tablespoons of cheese, fresh cilantro, red onion, and/or any other toppings you like!
Nutrition Information & Notes:
1 stuffed potato using 93% lean ground turkey: 11 WW Freestyle points 387 calories, 40g carbs, 13g fat, 29g protein, 312mg sodium, 11g sugar
1 stuffed potato using 99% lean ground turkey: 7 WW Freestyle points 347 calories, 40g carbs, 6g fat, 35g protein, 282mg sodium, 11g sugar
Notes: I like to use 93% lean ground turkey because it’s significantly less dry than 99% lean, but if you’re looking to save a few calories, or Weight Watchers points (since the 99% lean is 0 points), you certainly can. Consider adding a few tablespoons more water to your skillet (or even a little salsa), if you notice the turkey drying out.
Turkey taco meat recipe adapted from All Recipes
http://www.andiemitchell.com/stuffed-sweet-potatoes-with-taco-seasoned-ground-turkey/
Source: http://www.andiemitchell.com/stuffed-sweet-potatoes-with-taco-seasoned-ground-turkey/
0 notes
Text
White Chocolate Pumpkin Cookies
Pumpkin cookies that are soft, moist, and full of pumpkin, cinnamon, nutmeg, and dotted with white chocolate chips. These soft pumpkin cookies will be a favorite every fall!
Things I’m obsessed with:
Fall
Colorful leaves
pumpkin flavored coffee
pumpkin bread
pumpkin flavored candy
pumpkin cookies
basically, pumpkin everything
Except actual straight pumpkin, because have you ever? Ew.
So, what I’m saying is that I’m so basic. I know.
I can’t help myself. I like pumpkin and you people only let me bake with it for a few short months every year, so I tend to go overboard. By the time there is snow on the ground, I’ll be just as happy as you to see the season end. But, until then, I’m still obsessed.
Today, I have a recipe for soft pumpkin cookies. The texture very much reminds me of a quick bread, but these are better because they’re cookies.
I made these cookies the other morning. They’re so moist and fluffy that I couldn’t resist eating them for breakfast.
These easy pumpkin cookies are bursting with Fall flavors. Pumpkin, cinnamon, nutmeg, it’s all in there.
They’re dotted with white chocolate chips, because hey, why not? Dark chocolate chips would be divine too, obviously.
More pumpkin recipes you might like:
Baked Pumpkin Donuts – no need to break out a pot of oil. These are baked instead of fried and they’re amazing.
Pumpkin Chocolate Chip Muffins – gluten free, sweetened with maple syrup, and packed with protein!
Pumpkin Coffee Cake – the only recipe you really need this fall, if we’re being totally honest here. It’s that good.
Pumpkin Cake – the glaze on this one is what really takes it over the top!
Hope you guys give this white chocolate chip pumpkin cookies recipe a try and let me know what you think!
Servings: 24 cookies
Course: Dessert
Cuisine: American
Keyword: autumn
Calories: 151 kcal
Thick, soft, and moist! These pumpkin cookies are loaded with Fall flavor.
1/2 cup butter, softened
3/4 cup brown sugar
1/4 cup white sugar
15 ounces pure pumpkin puree
1 large egg
1 3/4 cup all-purpose flour
2 teaspoons ground cinnamon
1 teaspoon baking soda
1 teaspoon baking powder
1/2 teaspoon salt
1/4 teaspoon nutmeg
1/8 teaspoon ground ginger
1 cup white chocolate chips
Preheat the oven to 350°F. Line a cookie sheet with parchment paper.
In a large bowl, beat together the butter and sugars until light and fluffy. Beat in the egg and pumpkin until well combined.
In a small bowl, combine the flour, cinnamon, baking soda, baking powder, nutmeg, salt, and ginger.
Add the dry ingredients to the wet and stir until well combined. Dough should be light and fluffy.
Stir in white chocolate chips until just combined.
Use a small cookie scoop to drop the dough onto a parchment lined cookie sheet.
Bake for 12 minutes. Remove from the oven and cool on a cookie rack.
Nutrition Facts
White Chocolate Chip Pumpkin Cookies
Amount Per Serving (1 cookie)
Calories 151 Calories from Fat 54
% Daily Value*
Total Fat 6g 9%
Saturated Fat 3g 15%
Cholesterol 19mg 6%
Sodium 140mg 6%
Potassium 96mg 3%
Total Carbohydrates 21g 7%
Sugars 13g
Protein 1g 2%
Vitamin A 57.8%
Vitamin C 0.9%
Calcium 3.8%
Iron 4.4%
* Percent Daily Values are based on a 2000 calorie diet.
Nutrition Disclaimer: All information presented on this site is intended for informational purposes only. I am not a certified nutritionist and any nutritional information shared on bunsinmyoven.com should only be used as a general guideline.
posted on September 5, 2018
Source: https://www.bunsinmyoven.com/white-chocolate-pumpkin-cookies/

0 notes
Text
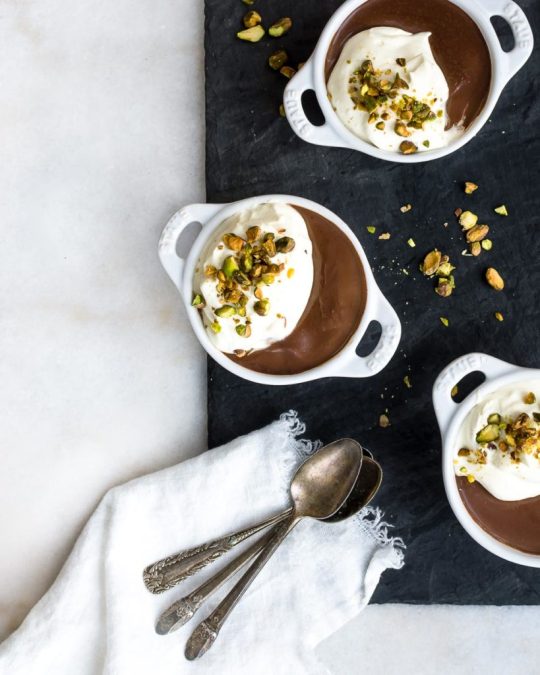
Simplest Chocolate Custard
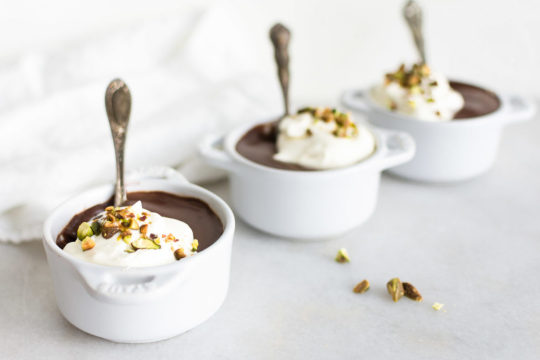
Decadently rich with a smooth and delicate texture, this simple chocolate custard is stirred, not baked, and unlike pudding, there’s absolutely no cornstarch. You can flavor it with vanilla, as we do in the recipe below, or add a splash of almond or mint extract in stead, and it’s excellent served with whipped cream and a sprinkle of chopped nuts.
How to Make Chocolate Custard
Custards differ from puddings in that they’re thickened with eggs and cream rather than with cornstarch, this gives them a resolutely creamy texture and also gives them a boost of nutrition, too, since egg yolks are particularly high in choline, a nutrient that helps to support liver health and that is likewise essential for cognitive health in babies and children as well as adults as we age.
There are two primary types of custard: Stirred custard and baked custards. Stirred custards are thickened in a double boiler, where they are heated very gently over simmering water. Stirring the custard continuously as it cooks over simmering water gives it a luxurious, smooth and creamy consistency. By contrast, baked custards (like this Chai Custard) are baked in a water bath in the oven until they thicken on their own. Stirred custards are typically faster and less finicky to make than baked custards, but they may need to thicken in the refrigerator before serving.
Making Chocolate Custard
To make chocolate custard, you’ll pour heavy cream into a double boiler set over simmering water, and then you’ll whisk in whole, unrefined cane sugar unless you want the deepest, darkest chocolate custard in which case you can simply skip it. You’ll also want to flavor the custard with vanilla bean powder which offers a deep and dusky vanilla flavor, and you can order it from Mountain Rose Herbs here, and it stands up better to the rich flavor of chocolate than vanilla extract.
After simmering cream with sugar and vanilla powder, you’ll temper the egg yolks by whisking a slip of hot cream into the egg yolks to warm them up and ready them for custard making. Once you’ve added egg yolks back into the double boiler with the hot cream, add the chocolate and allow it to melt into the custard base. Both the chocolate itself and its coupling with egg yolks will yield a thick, but spoonable custard.
After pouring the custard into ramekins or a serving bowl, place it into the refrigerator overnight to set completely. You can serve it cold, but the flavor of chocolate and vanilla bloom when they’re served at room temperature, so pull the custard out of the fridge about an hour before you plan to serve it.
Print
<![CDATA[ .tasty-recipes-image float: right; .tasty-recipes-print-button background-color: #666677; display: inline-block; padding-left: 1em; padding-right: 1em; padding-top: 0.5em; padding-bottom: 0.5em; text-decoration: none; a.tasty-recipes-print-button color: #fff; a.tasty-recipes-print-button:hover color: #fff; .tasty-recipes-rating.tasty-recipes-clip-10 -webkit-clip-path: polygon(0 0, 10% 0%, 10% 100%, 0% 100%); clip-path: polygon(0 0, 10% 0%, 10% 100%, 0% 100%); .tasty-recipes-rating.tasty-recipes-clip-20 -webkit-clip-path: polygon(0 0, 20% 0%, 20% 100%, 0% 100%); clip-path: polygon(0 0, 20% 0%, 20% 100%, 0% 100%); .tasty-recipes-rating.tasty-recipes-clip-30 -webkit-clip-path: polygon(0 0, 30% 0%, 30% 100%, 0% 100%); clip-path: polygon(0 0, 30% 0%, 30% 100%, 0% 100%); .tasty-recipes-rating.tasty-recipes-clip-40 -webkit-clip-path: polygon(0 0, 40% 0%, 40% 100%, 0% 100%); clip-path: polygon(0 0, 40% 0%, 40% 100%, 0% 100%); .tasty-recipes-rating.tasty-recipes-clip-50 -webkit-clip-path: polygon(0 0, 50% 0%, 50% 100%, 0% 100%); clip-path: polygon(0 0, 50% 0%, 50% 100%, 0% 100%); .tasty-recipes-rating.tasty-recipes-clip-60 -webkit-clip-path: polygon(0 0, 60% 0%, 60% 100%, 0% 100%); clip-path: polygon(0 0, 60% 0%, 60% 100%, 0% 100%); .tasty-recipes-rating.tasty-recipes-clip-70 -webkit-clip-path: polygon(0 0, 70% 0%, 70% 100%, 0% 100%); clip-path: polygon(0 0, 70% 0%, 70% 100%, 0% 100%); .tasty-recipes-rating.tasty-recipes-clip-80 -webkit-clip-path: polygon(0 0, 80% 0%, 80% 100%, 0% 100%); clip-path: polygon(0 0, 80% 0%, 80% 100%, 0% 100%); .tasty-recipes-rating.tasty-recipes-clip-90 -webkit-clip-path: polygon(0 0, 90% 0%, 90% 100%, 0% 100%); clip-path: polygon(0 0, 90% 0%, 90% 100%, 0% 100%); .tasty-recipes-nutrition ul list-style-type: none; margin: 0; padding: 0; .tasty-recipes-nutrition ul:after display: block; content: ' '; clear: both; .tasty-recipes-nutrition li float: left; margin-right: 1em; .tasty-recipes-plug text-align: center; margin-bottom: 1em; display: -ms-flexbox; display: flex; -ms-flex-align: center; align-items: center; -ms-flex-pack: center; justify-content: center; .tasty-recipes-plug a text-decoration: none; box-shadow: none; .tasty-recipes-plug a img width: 150px; height: auto; margin: 5px 0 0 8px; display: inline-block; @media print .tasty-recipes-no-print, .tasty-recipes-no-print * display: none !important; /* Tasty Recipes simple recipe card styles */ .tasty-recipes-display border: 0.15em solid #ededed; padding: 1.5em; margin-bottom: 1em; .tasty-recipes-plug margin-bottom: 1em; .tasty-recipes-display ul, .tasty-recipes-display ol margin-left: 0; .tasty-recipes-display h2 font-weight: 400; text-transform: lowercase; padding-top: 0; .tasty-recipes-details font-size: 0.8em; .tasty-recipes-label color: #797B7C; .tasty-recipes-details ul li list-style-type: none; .prep-time, .total-time, .cook-time display: inline-block; width: 20%; margin: 0.8em 0; vertical-align: top; .tasty-recipes-print-button margin-top: 0.5em; margin-right: 0.5em; padding: 0.5em 1em !important; float: right; font-size: .9em; font-weight: 800; background-color: #797B7C !important; border: none !important; .tasty-recipes-image border-left: 1.5em solid rgba(0,0,0,0); .tasty-recipes-rating a text-decoration: none; .tasty-recipes-rating p margin-bottom: 1rem; display: inline-block; .tasty-recipes-rating .rating-label font-style: italic; font-size: 0.8em; .tasty-recipes-notes margin-bottom: 1rem; .tasty-recipes-nutrition padding: 0.5em; border-top: .15em solid #ededed; .tasty-recipes-nutrition ul text-align: center; .tasty-recipes-nutrition ul li list-style-type: none; font-size: 0.8em; margin-left: 0; width: 30%; .tasty-recipe-ingredients h3, .tasty-recipes-ingredients h3, .tasty-recipe-instructions h3, .tasty-recipes-instructions h3, .tasty-recipes-notes h3 font-weight: 200; margin-top: 0.6em; margin-bottom: 1.2em; text-transform: lowercase; .tasty-recipe-ingredients h4, .tasty-recipes-ingredients h4, .tasty-recipe-instructions h4, .tasty-recipes-instructions h4 font-size: 1.2em; font-weight: 700; text-transform: lowercase; color: #797B7C; .tasty-recipes-description p font-size: .8em; font-style: italic; .tasty-recipes-nutrition h3 font-size: 1em; text-align: center; margin-top: 1em; .tasty-recipes-notes h3 font-size: 1.2em; .tasty-recipes-notes p, .tasty-recipes-notes ul font-size: 0.8em; .tasty-recipes-keywords p font-size: .8em; margin-top: 1em; margin-bottom: 1em; .tasty-recipes-entry-footer text-align: center; padding-top: 1rem; .tasty-recipes-entry-footer p margin-bottom: 0; .tasty-recipes-source-link text-align: center; ]]>
Simplest Chocolate Custard
Decadently rich, this simple chocolate custard recipe is made with dark chocolate, cream and egg yolks – no cornstarch or baking required.
Author: Jenny McGruther
Prep Time: 5 minutes
Cook Time: 15 minutes
Total Time: 8 hours 20 minutes
Yield: 4 servings
Category: dessert
Method: stovetop
Cuisine: American
Instructions
Fill a medium sauce pan halfway with hot water, and then bring it to a boil over medium-high heat. Turn down the heat to medium, and allow it to continue simmering. Place a double boiler over the simmering water. Pour in the cream into the double boiler, and warm it for three to four minutes, and then whisk in the vanilla bean powder, sugar and salt. Continue whisking until the sugar is dissolved.
Spoon a bit of hot cream into the egg yolks to temper them, then pour the eggs into the double boiler, stirring continuously for two to three minutes. Stir in the chopped chocolate and continue stirring until it melts, combining with the cream and eggs and thickening enough to coat the back of a spoon, eight to ten minutes.
Spoon the custard into individual ramekins, cover with plastic wrap to prevent them from forming a skin, and refrigerate it overnight to set. Pull the custards out of the fridge about an hour before you plan to serve them, to allow them to come to room temperature. Serve with whipped cream.
Notes
For a darker chocolate custard, omit the unrefined sugar.
If you don’t have a double boiler, rest a bowl snugly on top of your saucepan so that its bottom dips into the saucepan without touching the simmering water.
If you’re dairy-free, try replacing the heavy cream with full-fat coconut milk.
Did you make this recipe?
Tag @nourishedkitchen on Instagram and hashtag it #nourishedkitchen
What to Look for When Buying Chocolate
So that the flavor of chocolate really shines through in this custard, you’ll want a fine, 85% dark chocolate. Look for one that is free from emulsifiers like soy lecithin. Ideally it should contain only cocoa beans, cocoa butter, and sugar as well as a small amount of additional flavoring, like vanilla.
Additionally, human trafficking and child labor are issues that plague the chocolate industry, so look for a chocolate that is not only organically produced, but is also Fair Trade. I use this fair-trade, organic 85% dark chocolate.
If you like this chocolate custard recipe, try these:
If you’re partial to this decadent, creamy dark chocolate custard, you might want to give some Nourished Kitchen’s other nourishing desserts a try, too.
Pumpkin Custard is an excellent alternative to pumpkin pie for Thanksgiving.
Mexican-Style Hot Chocolate is sweet and dark with a touch of spice.
Rustic Mayan Chocolate Truffles are marvelous for Valentine’s Day.
Love it? Share it.
Source: https://nourishedkitchen.com/simple-chocolate-custard/
0 notes
Text
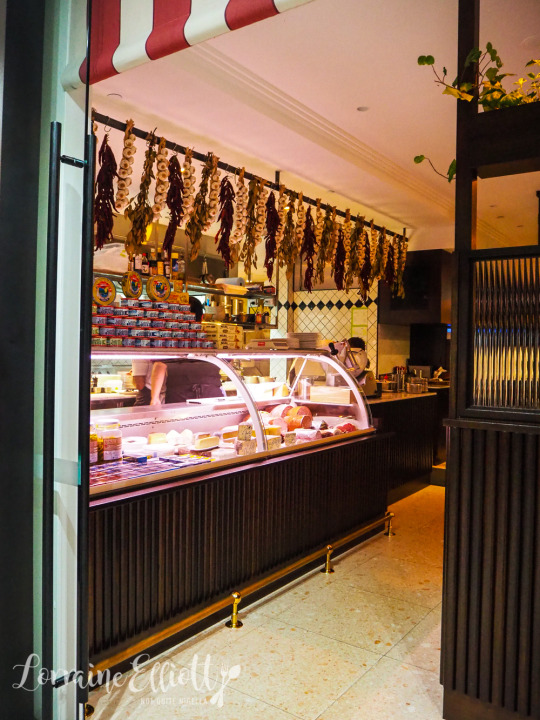
World's Apart At Continental Deli, CBD

Newtown's Continental Deli has a new CBD sister branch to cater to the business crowd. With a different vibe to the Newtown one, Continental Deli CBD has a menu where you could carve out a meal of cheese, charcuterie and a 17 tinned items. There's also steak tartare, a juicy pork chop and an Italo Chinese spaghetti with salami XO and egg yolk.
Because we had just spent the last couple of hours jumping about at Sugar Republic, Sophia and I needed somewhere to go. It was 7:30pm and we had a booking at 8pm so we were early. Our table isn't ready yet but they offer us a table outside.

We take a quick peek inside and it's very animated with a lot of noise bouncing off hard surfaces so we gladly take the outside table option. It has been a few years since I ate at the Newtown branch. The city branch doesn't quite have the same retro charm as the Newtown version and the menu too reflects the different market. Our waitress is friendly and gives us some solid recommendations.
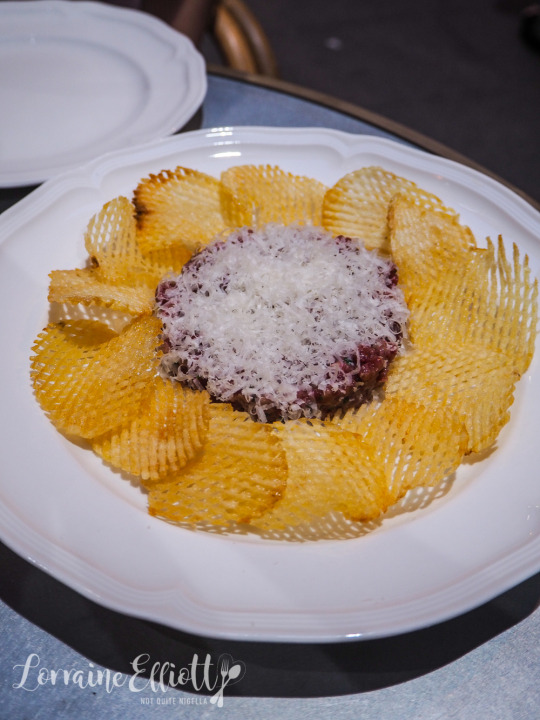
Steak tartare $26
Sophia doesn't eat chilli but is happy to eat most things (apart from avocado and cucumber that is). But I'm used to it with Nina so it's fine. In fact we both agree on what we want to order in record time. The steak tartare is fantastic. Perfectly put together and seasoned it comes with crispy, delicate gaufrette potatoes and grated reggiano cheese on top.
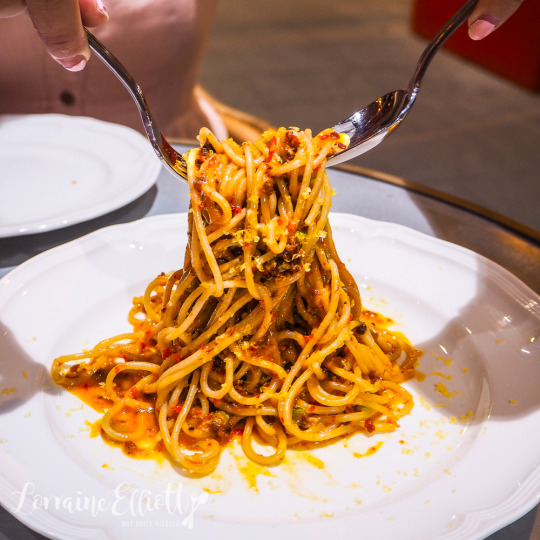
Spaghetti, XO and egg yolk $30
I can't believe I'm saying this but this is such a rich dish that I think it's best shared. While I love XO pasta or noodles I don't think I could finish this if I were eating it on my own. It's intense, with a salami XO with a mild chilli tingle and palate coating richness from the egg yolk with flavours somewhere between Asian and Italian.

Kurobuta Pork Chop $44
The Kurobuta pork chop is simply grilled but full of flavour. It comes with a fresh sweet and sour peach puree and charred spicy green peppers on the side. If you love juicy, fatty pork chops this is for you. Luckily I do but I know some people that just won't eat fat and they'll honestly end up leaving behind about a third of the pork if they order this.
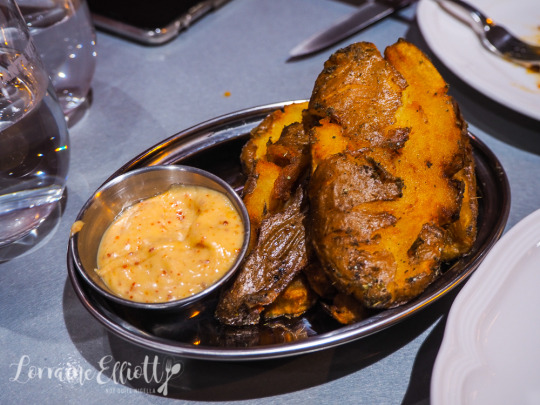
Smoked and fried potato, esplette sauce $12
We were going to go with the green beans but we both set our eyes on the potatoes at the same time. They're wonderfully crunchy and lightly smokey and even good without the sauce (again, did I really say that?).
Watermelon granita, yogurt, mint and lime syrup $14
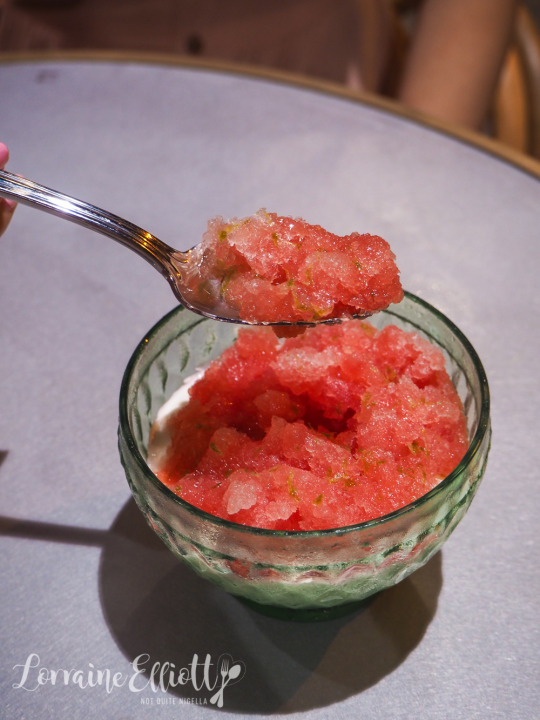
The dessert menu has five offerings including some gelato but we are swayed by our waitress's recommendation. This has a layer of creamy, tart yogurt panna cotta topped with watermelon granita with a mint and lime syrup. It's perfect for a hot summer's night and we both agree that the refreshing granita doesn't really even need the creamy element.
So tell me Dear Reader, is there a food that you don't eat at all that comes up regularly on menus? And given the choice, would you eat inside or outside?
This meal was independently paid for.
167 Phillip St, Sydney NSW 2000 Monday to Wednesday 12–11pm Thursday & Friday 12pm–12am Saturday 5pm–12am Sunday Closed Phone: (02) 9922 7347
Source: https://www.notquitenigella.com/2019/02/13/continental-deli-cbd/
0 notes
Text
Maple Glazed Roasted Butternut Squash with Brussels Sprouts
Maple Glazed Roasted Butternut Squash with Brussels Sprouts – A perfect side dish for your Holiday meals prepared with roasted Butternut Squash and Brussels Sprouts coated with a delicious maple glaze.
Fall-fitting combination of butternut squash, brussels sprouts, plus bacon with a sweet maple glaze gives this side dish a wonderful variety of colors, textures, and flavors. Me thinks you need to add this to your Thanksgiving menu – I can guarantee everyone will love it!
As promised, I am going full-on Thanksgiving recipes on you this entire week. This particular recipe is from the archives, posted back in 2013… sidenote: I can’t believe I’ve been Diethood-ing for, like, 7 years! 😳HIGH-FIVE! 🖐
Thus, if you haven’t noticed by now, the two veggies that this family enjoys a lot OF are brussels sprouts and butternut squash. Broccoli, too. As well as cauliflower. Buuuut, under one condition: all the veggies need to be roasted. We like ’em delicious, warm, lightly browned, and crispy!
This maple glazed roasted butternut squash with brussels sprouts dish is made simple on just one sheet pan. While there are a few basic steps to preparing the dish, the basic premise behind the recipe is simple: layer everything on a sheet pan with seasonings and olive oil and let the oven do most of the work.
ROASTED BUTTERNUT SQUASH WITH BRUSSELS SPROUTS
We are going to start by grabbing a pound of butternut squash and a pound of brussels sprouts plus a good knife for chopping.
Peel the butternut squash; cut it in half, lengthwise, and remove the stringy middle and seeds. Cut into 1/2-inch cubes and place in a large mixing bowl.
Slice ends off the Brussels sprouts; then, cut the Brussels sprouts in half. Cut them in quarters if they are very large. Add to the mixing bowl with the squash.
Get some bacon and dice it; stir it into the mixing bowl with the veggies.
Add olive oil, salt, pepper, and seasonings; mix, then transfer to a foil-lined baking sheet.
Roast for 30 to 35 minutes, stirring around once or twice. Optionally, add pecans the last 7 minutes of cooking. I use walnuts because of my little one who doesn’t like pecans. 🙄
Meanwhile, prepare the maple glaze by combining maple syrup, balsamic vinegar, and olive oil; cook for 4 minutes, or until reduced and syrupy.
Take the veggies out of the oven and brush on the maple glaze.
And you are done! Serve and enjoy!
Results? EVERY bite is salty, sweet, tender, and crunchy. It is not only delicious and bursting with holiday flavors, but it’s also healthy, gluten free, and packed with fiber.
Serve this side dish alongside your Thanksgiving and/or Christmas meal and wait for everyone to ask for seconds.
HOW TO MAKE AHEAD
You can peel and cube the squash AND cut the Brussels sprouts a couple days in advance; put in separate containers and refrigerate until ready to use.
You can also make the entire recipe a day in advance, but cook it slightly less, just until tender, about 20 to 25 minutes. When ready to serve, reheat in the oven at 350F for 12 to 15 minutes, or until tender and heated through.
YOU MIGHT ALSO LIKE
ENJOY!
Maple Glazed Roasted Butternut Squash with Brussels Sprouts
Maple Glazed Roasted Butternut Squash with Brussels Sprouts – A perfect side dish for your Holiday meals prepared with roasted Butternut Squash and Brussels Sprouts coated with a delicious maple glaze.
Course: Holiday, Side Dish
Cuisine: American, American/Southern
Keyword: brussels sprouts recipe, butternut squash recipes, holiday recipes, thanksgiving side dish
Servings: 6 serves
Calories: 321 kcal
Ingredients
FOR THE VEGGIES
1 pound butternut squash peeled and diced into 1/2-inch cubes
1 pound brussels sprouts ends cut off and halved (if they are large, cut in quarters)
4 slices thick-cut bacon diced
2 tablespoons extra virgin olive oil
1/2 teaspoon dried thyme
1/2 teaspoon dried rosemary
salt and fresh ground pepper to taste
1/2 cup halved pecans optional
FOR THE MAPLE GLAZE
3 tablespoons maple syrup
1 tablespoon balsamic vinegar
2 tablespoons extra virgin olive oil
salt and fresh ground pepper to taste
Instructions
Preheat oven to 425F degrees.
Line a large baking sheet with foil and set aside.
In a large mixing bowl combine diced butternut squash, brussels sprouts, bacon, olive oil, thyme, rosemary, salt, and pepper; mix until thoroughly incorporated.
Transfer veggies to prepared baking sheet and roast for 30 to 35 minutes, stirring around halfway through cooking.
In the last 7 minutes, add pecans, if using
Meanwhile, prepare the maple glaze.
In a small saucepan whisk together maple syrup, balsamic vinegar, olive oil, salt, and pepper.
Set saucepan over medium heat and bring to a simmer; stirring often, simmer for 3 to 4 minutes or until reduced and syrupy.
Take veggies out of the oven and brush with prepared glaze.
Arrange on a large plate or bowl and serve.
Recipe Notes
HOW TO MAKE AHEAD
Peel and cube the squash AND cut the Brussels sprouts a couple days in advance; put in separate containers and refrigerate until ready to use.
You can also make the entire recipe a day in advance, but cook it just until tender, about 20 to 25 minutes. When ready to serve, reheat in the oven at 350F for 12 to 15 minutes, or until tender and heated through.
WW FREESTYLE POINTS: 8
Nutrition Facts
Maple Glazed Roasted Butternut Squash with Brussels Sprouts
Amount Per Serving (5 ounces)
Calories 321 Calories from Fat 225
% Daily Value*
Total Fat 25g 38%
Saturated Fat 5g 25%
Cholesterol 15mg 5%
Sodium 195mg 8%
Potassium 641mg 18%
Total Carbohydrates 20g 7%
Dietary Fiber 5g 20%
Sugars 6g
Protein 7g 14%
Vitamin A 172.3%
Vitamin C 97.1%
Calcium 7.4%
Iron 11.1%
* Percent Daily Values are based on a 2000 calorie diet.
SUBSCRIBE TO GET FREE UPDATES & A FREE ECOOKBOOK!
GET AN EMAIL WHEN THERE'S A NEW RECIPE
Source: https://diethood.com/roasted-butternut-squash-brussels-sprouts/
0 notes
Text
Summer Reading List for the Whole Family
I am so psyched to present today’s guest-poster, my friend and reading guru Catherine Hong. You already know and love her because she writes the childrens’ book blog, Mrs. Little and because she’s an OG DALS favorite. (Could she be any cuter in this sleepaway camp shot circa early 80s?) Her family’s reading line-up right now is so perfectly summer — graphic novels, adventures, re-reads of old favorites, memoirs, good old-fashioned schlock — that I knew all you hammock-lying, beach-bumming, long-trip-taking, care-package-shipping book lovers would enjoy it as much as I do. Take it away, Catherine!
I did the best reading of my life during the summers I was 9, 10 and 11 years old. Every day after lunch at sleepaway camp we headed to our bunks for an hour of mandated “quiet time.” And when those counselors said “quiet,” they meant it. There was no talking, whispering, card playing or even getting out of our bunk beds — and for me, it was heaven. I loved camp life, but spending all day in a wild scrum of girls was exhausting and I craved that daily pocket of quiet when you could watch the chipmunks and read your book while the breeze blew through the mosquito netting. (We lived in tents, not cabins, so it was basically like being outside when the canvas flaps were rolled up.) It was there where I remember reading The Witch of Blackbird Farm, Little Women, The Good Earth and a weirdly spellbinding YA book nobody reads anymore called The 79 Squares.
Now that my two kids are away at sleepaway camp, I like to imagine they’re getting in a delicious spell of reading after lunch every day, too. I pack their duffels with a careful selection of books and hope for the best. And in the unusual quiet of our childless house, my husband and I try to get a lot of reading done, too. Here’s what’s on our lists.
. SOPHIA, age 14 Interests: Animals, slime, Shonda Rhimes-produced TV shows Reading MO: Currently in a reading slump. Enjoys telling me, “there are no more good books.” Last book enjoyed: Endangered by Eliot Schrefer (2012 YA novel about a 14-year-old American girl trying to save a group of bonobos in the Democratic Republic of Congo).
Summer reading plan: Sophia made noises about “missing TV” while at camp so I took the “if you can’t beat ’em, join ’em” approach and packed her bag with books related to her favorite shows: a Grey’s Anatomy novelization called Notes from the Nurses’ Station (it’s out of print, so I got her a used copy) and Shonda Rhimes’s bestselling memoir, Year of Yes: How to Dance It Out, Stand in the Sun and Be Your Own Person. Are these sort of … schlocky? Yes. But Sophia said she adored the Grey’s Anatomy book and I think the Rhimes memoir, which combines behind-the-scenes scoop from Grey’s and Scandal with uplifting self-help, could be perfect for a girl figuring out who she is on her way to 9th grade. Next up: something by W. Bruce Cameron, who specializes in novels written from a dog’s perspective– think: A Dog’s Purpose, which was made into a movie.LEO, age 11 Interests: Fortnite, Dungeons & Dragons, trampolines Reading MO: Requests books that are “funny, with fighting.” Last book enjoyed: Harry Potter and the Order of the Phoenix Summer reading plan: Leo started reading Neil Gaiman’s The Graveyard Book before leaving for camp and was instantly hooked by the creepy, thrillerish story of Nobody Owens, a human boy raised in a graveyard by ghosts and werewolves. I also packed him Yvain the Knight of the Lion by M. T. Anderson (shown above) a 2017 graphic novel about a young knight from King Arthur’s court (it’s based on the 12th-century epic poem of the same name). I’m betting its a win-win: a rich and complex literary creation that also delivers dragons, giants, and sword fighting. Next up: a dose of reality with The Stars Beneath our Feet by David Barclay Moore, about a 12-year-old boy growing up in Harlem who starts building an epic Lego city after his brother is killed by gang violence. I read it myself and it’s fantastic.
David, age 47 Interests: Eating out, taking the New York Times weekly news quiz Last book enjoyed: Rabbit is Rich (1981) by John Updike. David is doing this thing where he reads one of the Updike “Rabbit” books every ten years, so he’s the same age as Rabbit Angstrom in the books.
Summer reading plan: Lauren Groff’s latest collection of stories, Florida. He recommends “At the Round Earth’s Imagined Corners,” “Dogs Go Wolf,” and the novella-length last story, “Yport.” Next up: re-reading one of his all-time favorites: George Orwell’s Homage to Catalonia (1938) in preparation for our upcoming trip to Barcelona.
CATHERINE, age: 46 Interests: Cooking, children’s books, unaffordable textiles and furniture Last book enjoyed: Less by Andrew Sean Greer. I cannot recommend this tragicomedy about a washed-up novelist on the edge of 50 highly enough! Then again, it won the Pulitzer, so I guess I don’t have to. (Bonus: It’s now in paperback.)
Summer reading plan: I recently went to my 25th college reunion and am suddenly feeling … middle aged. Appropriately enough, the books I’ve been reading are all about people experiencing midlife crises. I just finished The Ambition Decisions by Hana Schank and Elizabeth Wallace. The authors tracked down classmates who graduated Northwestern with them in the 1990s and find out where they are now with work, family, and life — it feels like a teary heart-to-heart talk with old friends.
Next up: My Ex-Life by Stephen McCauley, which my friend Rory enthusiastically recommended, about a long-divorced couple (both experiencing midlife woes) who find their lives entwined once again. It’s supposed to be hil-ar-ious. Finally, because I have been doing hours of physical therapy for lower back pain (the ravages of age!!!), I have been deep into audio books, which help me bear the tedium of endless pelvic tilts. I’m loving the latest David Sedaris, Calypso, and And Then We Danced: A Voyage Into the Groove, which is part dance history, part comedic memoir by the always wonderful “participatory journalist” Henry Alford.
Thank you Catherine! For more inspired recs, follow her on instagram: @mrslittlebooks. Happy summer reading everybody!
Related: Kids’ Audiobooks for the Road Trip


Source: http://www.dinneralovestory.com/family-reading-list-summer-edition/
0 notes
Text
What to Eat Christmas Morning (12 Recipes)

After the blizzard of wrapping paper quiets, a cozy (but casual!) brunch is one of my favorite Christmas traditions. Everyone is in good spirits and happy to celebrate together. My family typically does a Christmas dinner later in the day, but having a little something special in the morning is always welcome. That said, preparing for the holidays can be tiring, and everyone appreciates recipes you're able to prep ahead of time - which is (thankfully) a lot of breakfast recipes. Here are a dozen recipes to consider for Christmas morning - a little mix of both naughty and nice. ;) xx, -h
1. Green Shakshuka - (Bon Appétit) Probably not what your 7-year-old wants to see on her plate, but it will bring a smile to the faces of grown-ups, especially if they've had one too many glasses of prosecco on Christmas eve.

2. The Best Waffle Recipe - (101 Cookbooks) My friends and family might be tired of these. But, seriously, they are so good. These waffles are a year-round go-to, and perfect for Christmas morning. Setting up a waffle bar with toppings is always a hit.
3. Breakfast Baked Sweet Potato - (Ambitious Kitchen) This one's a wild card - a baked sweet potato for breakfast? I get that not everyone is going to be on board, but it's such good for you food with the almond butter and bananas. Maybe a dollop of Nutella to convince the younger eaters?
4. Wild Mushrooms on Truffle Toast - (By Rosie) I love a savory breakfast, and mushrooms are my jam - so, this has my name on it. Source the best bread you can find (or bake your own!), mushrooms and this is simple perfection.
5. Classic Cinnamon Buns - (101 Cookbooks) This is a great recipe to prep a day ahead. And if you've never baked cinnamon rolls, this is a totally doable recipe. Start a Christmas morning cinnamon bun recipe this year.
6. Black Bean and Tofu Scramble - (Anna Jones) Yes, to this. If you are over cookies, mulled wine and the rest, this is going to be a good first post-holiday breakfast.
7. Roasted Sweet Potato Kale Hash - (Minimalist Baker) Welcoming a solid dose of sweet potato and kale into your morning will give you the energy to face cleaning up that mountain of wrapping paper. Laugh / cry.
8. Perfect Healthy Granola - (101 Cookbooks) If you have a household of granola lovers, consider making a double batch of this. You can set up a topping bar and make granola parfaits.
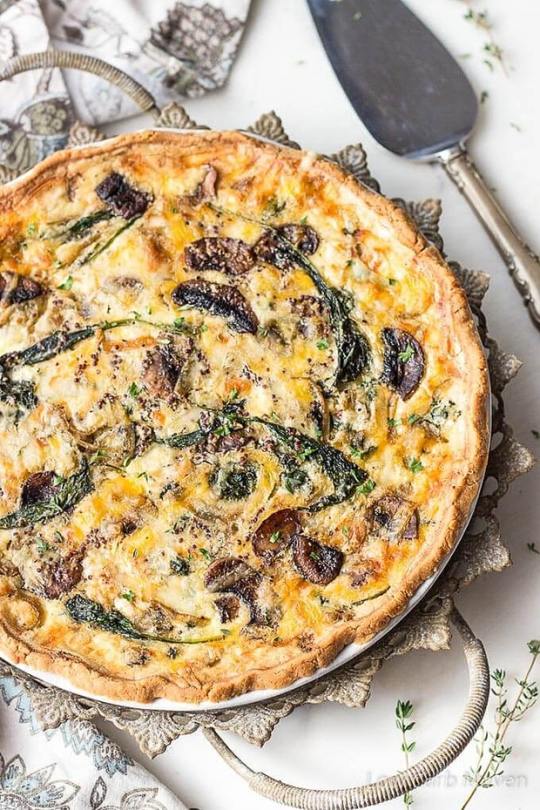
9. Spinach and Mushroom Quiche - (Low Carb Maven) Another recipe for the savory breakfast lovers. This one has an interesting flavor profile: a hint of nutmeg, Dijon mustard and smoked cheese.
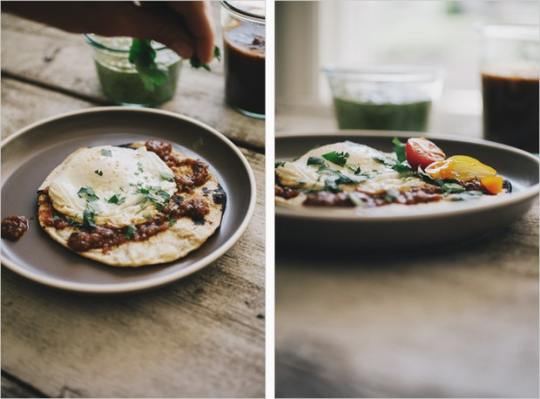
10. Heuvos a la Plaza de Mercado - (Sprouted Kitchen / Tara O'Brady) Sara's version of Tara's recipe is a reminder to let your friends and family bring their influences to your table. Make the red sauce and the charred green onion dressing (!) a day or so ahead of time and it's much easier to put this one together on Christmas morning.
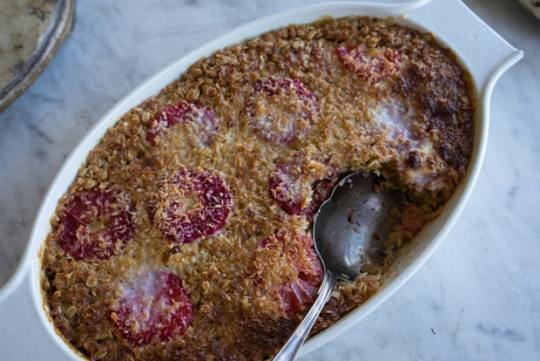
11. Coconut Baked Oatmeal - (101 Cookbooks) There are certain recipes people tell me (in person) are their favorites and this is one of them. I think the reason is the coconut and grapefruit elevates oatmeal beyond basic.
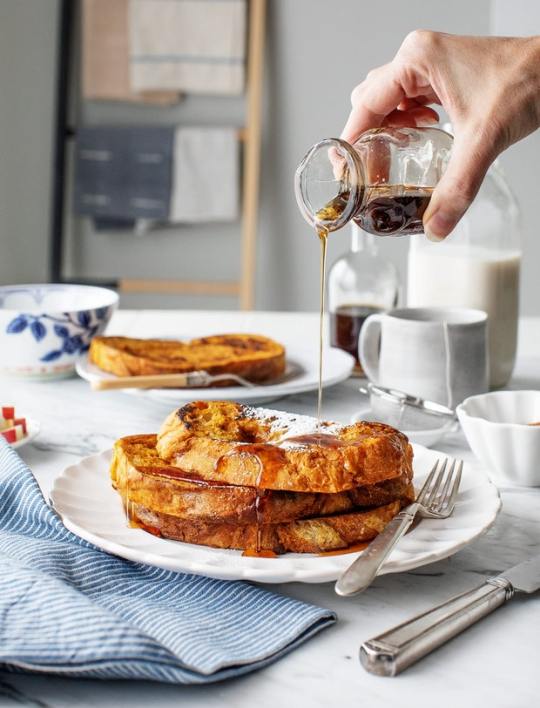
12. Vegan Pumpkin French Toast - (Love and Lemons) French toast that works for the vegans in your family as well.
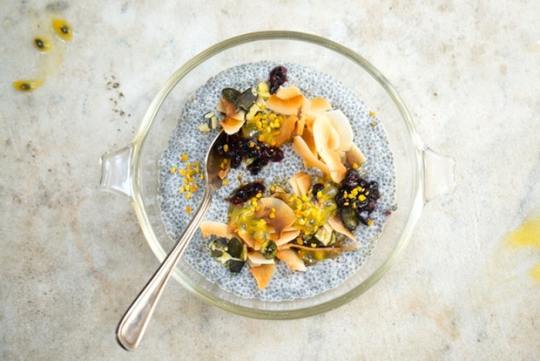
13. Chia Breakfast Bowl - (101 Cookbooks) I couldn't leave out this quick California-style breakfast that you can prep the day before. A diverse array of toppings will make everyone merry.
Share this...
Pinterest
0Facebook
0Google+
0email

WEEKNIGHT EXPRESS features 10 Vegetarian, Plant-centric Recipes for Feel-Good Food — Fast!
Subscribe to get 32-pages of recipes to view on your tablet, e-book reader or phone.

Follow Me:
Instagram
Youtube
Facebook
Pinterest
Related Recipes

Classic Cinnamon Buns
These cinnamon buns are made from a cardamom-flecked, buttery yeast dough with a classic cinnamon-sugar swirl.
Nine Great Muffin Recipes to Bake ASAP
Muffins are one of the great gateways to baking. These are some long-time favorite muffin recipes to add to your line up.
The Best Waffle Recipe
Perhaps the only waffle recipe you need. The best. Enjoy!
More Recipes
Whole Grain
WFPB
Vegetarian
Vegan
Soups
Side Dishes
Sandwiches
Salads
Pasta
Quick
Main Course
Low Carb
Instant Pot
Holiday
High Protein
Gluten Free
Drinks
Dinner Ideas
Desserts
Cookies
Chocolate
Breakfast
Baking
Appetizers
Follow Me:
Instagram
Youtube
Facebook
Pinterest
Popular Ingredients
avocado
egg
herb
kale
lemon
lentil
quinoa
pasta
tomato
turmeric
yogurt
zucchini
arugula
asparagus
basil
broccoli
buttermilk
cauliflower
chickpea
chocolate
curry
tempeh
tofu
ALL
© 101 Cookbooks 2018
Use of this site constitutes acceptance of its User Agreement and Privacy Policy.
Source: https://www.101cookbooks.com/christmas-morning-recipes/

0 notes