
Don't wanna be here? Send us removal request.
Statistics
We looked inside some of the posts by hnd1dabigailthomas-blog and here's what we found interesting.
Average Info
Notes Per Post
6
Likes Per Post
6
Reblog Per Post
0
Reply Per Post
0
Time Between Posts
16 days
Number of Posts By Type
Text
16
Photo
1
Last Seen Tumblr Blogs


Fun Fact
Tumblr posted its first advertisements in May 2012 and subsequently earned $13M in revenue.
Text
structure evaluation
Trying to find a location was pretty difficult for this brief as I wanted to use something different , modern and interesting both for the viewer and myself.
I remembered seeing the v&a on the news as a new building in Dundee it gave new and interesting angles to explore as well as being directly beside the water.
Because it was so far away for me I decided to go with a classmate and we picked the brightest day we could as this would give us the best lighting for the building and bring out the best in this structure.
Inside wasn't as big as I first thought and we struggled to get a image of the interior without members of the public in the shot as this was a busy tourist attraction. Lighting was actually good inside and eventually we got both detailed and all round photographs as best we could.
Our time was limited due to having to buy a return bus ticket as this was cheaper we had to ensure we got back to the bus station in time . When we got outside I found the detailed shots easy as this building just kept on giving with sharp edges and curves to compliment its environment .
A huge issue we sadly coudlnt overcome was trying to get a photograph of the whole building . This was due to it being extremely busy with people as well as lampposts and flags . We attempted taking the image from far away in fact we crossed the street a few times as well as getting down low to see if taking it from new angles would help. In the end I got a image of one side of the building and had to deal with the fact I wouldn't get the perfect full shot of the building.
I think overall we chose the best day weather wise and a interesting structure to photograph but the busy environment just did not help when it came to photographing the wider shots . To get every factor together correctly would have been a lot of time and a lot of planning which with graded unit coming closer we didn't really have . The bus journey alone was expensive and time consuming . We just had to go witht eh best images we had and in future will take into consideration what I have learned from this brief .
Editing
I mainly straightened my images and optimised them to be a lighter brighter but other than that they had little editing done to them In photoshop . Mainly edited in raw as they where pretty well cropped originally and needed only small changes made to them .
final :

0 notes
Text
illuminate evaluation
Illuminate took me two photoshoots to ensure I got what I wanted .
On the first shoot m main downfall was being unsure of a subject and so used a bin to start of with and as the blue sky only lasted around a hour I just had to go as quickly as possible . This made for a rushed and rubbish photoshoot overall but did allow me to think ahead for my next shoot as I would still use this location.
The location offered a great view but little subjects to paint with light . I took my dad with me as a helping hand and as we walked further along the park we found a stand alone bench which we thought would possibly work well . The sky was stunning and I aimed to just make the most of the bold orange glow and the Clyde as it was calm and still in front of the bench.
once I got my images I went into raw and made some minor adjustments and noticed that I didn't have 1 image that had the bench light all over so I took it into photoshop to see if layering them all together would make for one evenly lit image . But due to there being a slight wind the grass had moved behind the bench and this caused a major distraction.
I spoke to my lecturer you gave me the advice to layer the images and mask both the sky and areas which needed more light and also straighten the horizon as it was at a slight angle (possibly cause by the trigger pod being sat on grass).
Painting with light helped me to explore night photography in much more depth and also think much more about subjects . I think I was very lucky with eh night I got but it did make the photograph much more interesting rather than just a photo of a boring old bench .
what I would change
I think I would possibly have a few more visits to the planned location and set my sight on one main subject rather than wasting 10 min of photoshoot trying to find something. When it comes to post production I would perhaps change the brightness a little as when I got the final print it was a little darker than expected.
final image :

0 notes
Text
structure
This brief is going to be a challenging one for myself as architecture isn't something I particularly find interesting.
I looked into some photgraphers who shoot the modern style buildings similar to the ones i will eventually be shooting. Through this I tried to find inspiration and attempt to find interest in the subjects .
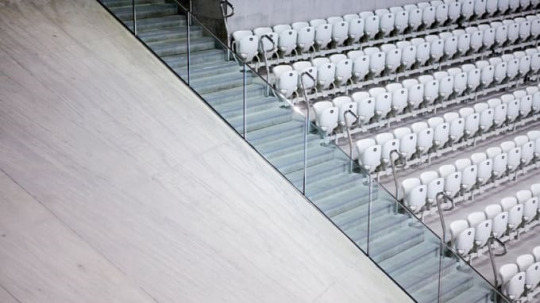
Janie Airey
A photographer who photographed arenas and important buildings which held importance in the 2012 olymipics . The photgraphs produced showed the colour palletes seen and used throughout these Olympics and incorperated this into the photographs they took . Making the arenas look smooth , clean and professional . The example given shows the use of pattern through a simple subject of chairs within the complex , something not usually noticed by sports fans but capturing the eye of a professional photographer .The lighting suggests that this building may have a lot of windows to let in the bright sunshine .
Nick Guttridge
A well known photographer known specifically for his commercial work I was inspired by the way he photographed the buildings chosen . combining both geometery and angles to creating a fine art like photograph of such interesting modern architecture.In the example there is no people but in other work he does include people to show that buildings are made to be lived in .From this I took into consideration the possibility of including people in my photographs for this brief .Here I think the photographer has only just caught a little of the sunshine as I can see a glare on the left hand side window , however the grey sky isn't appealing in this photo.

Simomona Panzironi
This work to me has really taken into consideration how the architect has built this structure . Through taking into consideration the details within buildings we see them like no one else has , showing the artists eye for detail .Putting together both interior and exterior photographs can sometimes feel very commercial but here it is like a pure , clean and soft tour of these stunning buildings.

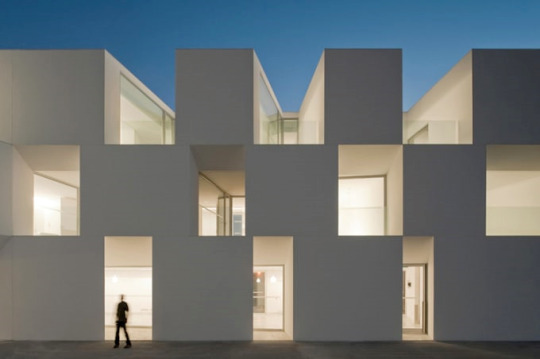
Fernando Guerra
Known much more for his exterior photographs Fernando is always being recognised for the photographs he takes . Taking images mainly of white images he captures the simplicity of the structure he chooses to photograph. The example shows how using people could work well when photographing buildings , making it more interesting with experimenting with shutter speed.
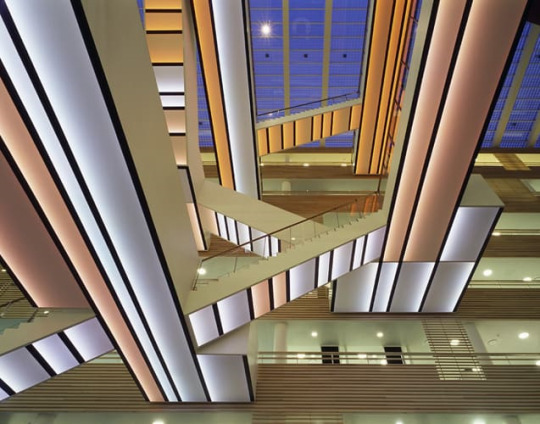
Adam Mork
Here I chose to show His exterior work but this photographer is also well known for his exterior images and how they raise environmental awareness . This photograph taken from below shows detail and lines which make up and hold the building together . Using the lighting provided by the building is pretty hard I imagine but here is is done so effortlessly to show how the building compliments itself .
perspective and distortion control :
1.Photoshop lens correction filter - This allows you to coreect the distorted image of a building though simple sliders given to you by phootshop . However, it is to be noted that if the top of building in the image is too close to the top edge of the image then you will struggle to make the subject parallel .
2. Using a wide angle lens - This allows you to photograph a bigger area and also allows you to show the building to a accurate scale .
3.Pre edit - Vertical distortion happens when the plane of your camera’s sensor is not parallel to the the object you’re shooting. The easiest way to prevent the distortion is to keep the two things close to parallel, and this means minimizing camera tilt. If possible, find a high point that lets you shoot while tilting up as little as possible . Trying compositions from farther away may also help .
4. Tilt shift lens - These are expensive but help to make perspective corrections without losing any data or pixels from the photograph . Well known and professional architectural photographers use these as they need every pixel they can get.
5. stitching - This technique involes you taking several photographs of one building in sections then in post production “stitching “ them together to make on final photograph . This can be time consuming but also rewarding in the end .
I have not yet found a location for definite but have considered the newest Scottish modern building which is the v&a in Dundee . Due to the bright and airy space the architecture has built and the amazing shapes, patterns and leading lines it would give to me to photograph . However, this is quite far away from me and I would need to ensure a bright day as well as a good time scale to photograph this building .
my kit :
tri pod
canon 200d
canon 24-105mm lens
I will get to the location as early as possibly to ensure set up time adn ensure i have a full day to shoot the building .Ideally around 9am would be a good starting time to get set up and shoot . This brief will probably take two visits to the location to ensure i get all the correct shots.
Sources :
https://www.complex.com/style/2013/02/the-25-greatest-architectural-photographers-right-now/adam-mrk
https://www.dpmag.com/how-to/tip-of-the-week/correct-architectural-distortion-easily-photoshop/
https://northrup.photo/controlling-vertical-distortion-in-architectural-photography/
Project:
structure
Location Name:
V&A
Tel:
07845857457
Address:
1 Riverside Esplanade, Dundee DD1 4EZ
Tick any identified hazard.
Access (blocked or restricted) o Dangerous surfaces (slippery, wet)
x Vehicle parking at location o Trip Hazards Found
o Dangerous Services (electricity, water)
o Derelict Buildings (unsafe floors, ceilings)
o Working in confined spaces oHazardous Substances (chemicals)
o Flammable Materials x Water (proximity to water)
o Rubbish/Vermin o Machinery (working, turning parts)
o Working at Height x Working on/near roads
o Driving in traffic o Noise (high sound levels)
o Weapons o Stunts
o Extreme Heat/Cold o Physical Exertion
o Using animals x Public/ Crowds
Hostile Environment (violence)
o Special Needs (inexperienced, child, elderly)
o Other Hazards.
Please specify
HAZARD
SEVERITY
M
People at Risk
Who, how many?
4
Likelihood
M
Risk Control Adequate
Yes / No
Limited space/time
L
4
L
YES
Threats/Theft
M
4
L
YES
Public
M
4
L
YES
Traffic
L
4
L
YES
When completing the form: Consider the nature of the hazard
· The possible severity of the outcome.
· High = severe injuries. Medium = time off college. Low = minor, first aid.
· Who could be at risk, and how many?
· How likely is it that the incident will occur?
· Are the precautions proportionate to the overall risk?
Details of Activity
SHOOTING IN AROUND THE BUILDING
Hazard / Risk
Precautions Required
Theft and water
Keep close to any equipment at all times and stay away from dangers
Source of safety advice at location
Name:
Abbi Thomas
Tel:
Person in charge of safety at location
Name:
Abbi Thomas
Tel:
Signed:
Abbi Thomas
Date:
College Contact
Name:
Faculty Admin Assistance
Tel:
Signed:
(Donna Wilkins)
Date:
Session 2018/19
Risk Assessment undertaken by:
This must be signed before the Shoot can go ahead.
I have read the above risk assessment and am satisfied that:
· Constitutes a proper and adequate risk assessment in respect of the programme activity.
· The precautions identified above are sufficient to control the risks.
· Adequate arrangements are in place to communicate risk assessment findings and to co-ordinate the safety arrangements of all those affected.
Name:
Abbi Thomas
Tel:
Signed:
Abbi Thomas
Date:
0 notes
Text
illuminate research ,plan and progress
After looking closely at the brief for this project and taking into consideration the fact I have done dome similar work in nc I have come up with a plan.
I wish to photograph near my home close the water where a walk way and small beach lies . This means I will have to research photogrpahers who incorporate landscape and painting with light in their photos. I will use the surrounding landscapes to my advantage and shoot subjects such as rocks and trees that can be “painted” with light.
my kit :
a torch to paint the light
my 200d canon camera
50mm lens
tri pod
I noticed the main light sources being used where torches and flash guns on a pole to reach all areas of the subject .A tri pod is also key to this brief as you need to keep your camera steady during a long exposure especially ones which last long periods of time .
Examples of other photographers work :
Andrew stawarz


Using the environment to this advantage Andrew uses long exposures to make a somewhat boring location into something much more interesting.Through using long exposures he achieves capturing details in the night sky and lights areas of the photograph not usually seen at that time of night .Mainly photographing locations in Britain as a british photographer he makes locations and subjects much more appealing to the viewer through this technique.
Toby keller

Using light graffiti Toby uses a beach environment and the dusk skies to his advantage .The shapes and patterns he creates in the photographs add much more character when compared to the usual beach landscape photos we are used to seeing.
Mohammed al-naser

Here the photographer uses a ND filter and long exposures to achieve the chosen look. I think this isn't so much what ill be doing as I want my photograph to be slightly darker and I wish to use much more painting with light in my photos . However, the sky in these images are stunning and the colour combinations really do pop.
Matthew Fang

Taken in Taiwan this photograph captures light trails made by moving traffic down this landscape.The exposure given to achieve this was 117.4 seconds and the photographer had to wait between 4 and 7pm to get the correct sky for this perfect affect . I will also need to take into consideration the time of day I shoot to allow myself the time to set up and also picture the blue dusk sky .
Noise in photographs are caused due to the ISO being too high and long exposures as I will be shooting at dusk this is something I will need to combat .
1. In post production noise reduction is something which can minimise the noise seen on my photographs .Found In the details panel in photoshop camera raw each slider does a different thing to your image . taking into consideration both noise reduction and your photographs details noise reduction needs to be watched closely . To ensure you are seeing how this is impacting your image it is key to zoom into 100% of your photograph and see what needs changed.
2.Shooting several of short exposures in a sequence then adding them together in post production is also a way of reducing the noise . This is called “stacking” and usually means you take several exposures lasting around 30 seconds then put these together to create a photograph which equals the same total exposure time a single long exposure image would .
3.Some cameras have a setting within the camera which reduces noise reduction and eliminates sensor hot spots caused by the sensor heating up during a long exposure . However , it takes twice as long for you to receive the photograph on he back of your camera and when on location time is of the essence .
4.Dark frame subtraction is something I also found when researching noise reduction . You simply take a photograph with the lens cap on or a closed shutter immediately after shooting your long exposure as if shot afterwards the temperature of the sensor will be different .Then when editing in photoshop put this dark image above your chosen image .Change the blending mode of the dark frame to subtract as 100% and watch as the noise is reduced .through this you can select the noise removal around your image , something you are unable to do with noise reduction built into the camera.
5.I noticed that a lot of the examples found on my city the settings seem to be around 100 and in fact the f stop is what you may struggle with when shooting long exposures .Having a low ISO and experimenting much more with aperture can reduce noise . Having your camera on the BULB setting is something else I noted as this allows you to have longer exposures than usual . Shooting raw images means that you are ensured to have the highest quality of photograoh when photographing the long exposures.
1 note
·
View note
Text
live brief

I emailed the city of Glasgow sports coordinator who helped me organise my photoshoot .
Giving him my final photographs from my shoot that he can use for the social media pages or his website .
equipment :
canon 200d
tri pod
20-300 lens
I found this photoshoot suprisingly enjoyable and would like to do more spots photography in the future as its something I found to be fun.
0 notes
Text
artisan
https://spark.adobe.com/page/Hpg3Z4p2DEqzS/
0 notes
Text
artisan video research
https://vimeo.com/18802081
00:05 - Close up of hand drawing
00:22 - over the shoulder showing the photographers perspective reviewing images on his laptop
00:28 - series of clips showing machines used to make fabrics
00:46 panning shot following fabric being unrolled
https://vimeo.com/89760511
from the beginning there is a series of still clips showing equipment used , this sets the scene well for the viewer.
01:10 - close up of what he has made
01:24 panning following the artisan from one room to another
01:26 backdrop out of focus but equipment in focus to show him walking up to his station in a more interesting way .
https://vimeo.com/37747938
00:00 extremely fast pace shots of a photoshoot flashes inbetweeen each shot suggests a photo studio and makes the viewer feel like they are part of this fast paced environment .
00:10 close up of models eyes
00:15 over the shoulder shot
00:28 depth of field showing light out of focus of photographer in focus
https://vimeo.com/16615836
00:08 over the shoulder (shoulder out of focus )
00:20 blurred to sharp focus as he enters the room
00:34 close up of paint being poured
00:56 time lapse of egg timer
https://vimeo.com/58176469
00:00 wide angle shot setting scene
00:30 still shots of men working
00:50 sharp cuts between every shot as each piece is added to the making of the chair
01:29 fast forward to the next stage on the computer
1 note
·
View note
Text
movie poster research
Taking into consideration the fact that in the end result I will be combining two separate photographs I looked at inspiration that I could realistically try to re create or take ideas from .

I thought about this movie poster as Glasgow has a lot of tall buildings which could be used to make this poster my own . I would only use the young boy in my image as lighting three could pose a huge challenge when editing . To add comedy I would use a Scottish newspaper and change the wording to “lost in Glasgow “ ensuring the movie poster is unique . I do think this poster could also pose a challenge to find a building tall enough . I would use this same angle to ensure the viewpoint makes the city look huge compared to the young boy who is lost .

I like the mysterious atmosphere created on this poster through the editing process adding smoke and a grey filter . I think this would be simple poster to try and take inspiration from but the main difficulty would be costumes for models and creating the same smokey edited affect without over doing it .

This tv show poster is a little bit over done in my opinion as it takes away a lot of the background with the editing . However I do like how the main character is centre of the frame and the villain is coming in at the side making the viewer wonder what is going on . This isn't my favourite out of the examples given but is something to keep in mind when shooting .
I wish to shoot many backdrops to give me a variety to work with , this means if one doesn't work out I have others to work with .
my plan :
My plan is to shoot on Friday the 21st of December in the studio. I will ask moel who is also my nephew to wear a scarf and possibly a hat along with a heavy jacket if possible .I plan to also try and create my own newspaper if possible as this will add to the comedic mood of the photograph .
I want to keep my lighting set up as simple as possible and try to not focus on the backdrop as much as possible as this will eventually be cut out in the editing process .
my backdrop will be using the high flats next to the college .

My set up for my portrait shot can be seen here :

Here is one of my studio shots I may use when putting my backdrop and studio photograph together :

1 note
·
View note
Text
Portfolio 1 Evaluation
Firstly , my seeing brief photographs . These took up the most time and thought overall due to the weather and needing to find a few willing strangers to photograph. I decided to experiment with both diffused and reflected light , using reflectors and the natural diffused light made by clouds . During experimenting I learned that at times I showed too much of the background in my images which was becoming distracting for the viewer . I chose to try and use block colours as the backdrops on my final images to ensure the only focus was the model in frame . In the end I am I happy with the results as I got aa variation of models and lighting conditions but in future I will try to plan my shoots better beforehand .If shot again this brief would need to be planned out to the final detail as I forgot to check the weather or take out a reflector on my practice photoshoots I have now learned that planning is key especially with location shoots such as this .
Next ,my who am I photographs . I had a initial idea for this brief but came to the conclusion it would take too much time and that was something I didn't have enough of sadly . I decided to shoot with a mirror , this was to convey reflection and lightly touches on the things , places and people who make me reflect . I chose to make the reflection in the mirror out of focus throughout the photographs as we tend to see things at times as a blur . My self portrait was the most challenging as I didn't want the camera to be shown in any of the photographs . The autumn theme throughput helps to connect the photographs along with the mirror .I enjoy the contrast between the sky and the ground in my location photograph as its something different and a new viewpoint to the viewer.
Finally , my clean white photograph . Referring to my inspiration I used my friend Mike as my model to try and “re create “ a image taken by David Bailey .I enjoyed the experience of shooting both on film and digital in the studio as I was able to control the lighting conditions .Falling in love with film once again I was able to create a contact sheet to help compare the difference between digital and film . Ensuring I got the catch light in my models eyes and creating as natural a atmosphere as possible were my main objectives throughout my shoot. I enjoyed setting up my own studio area and learning how to refine my histogram. The outcome of this shoot was all positive and I am proud of the photographs I made throughout this shoot . I am confident going into any more shoots like this due to how much I have learned the past few weeks .
1 note
·
View note
Text
Catch me if you can research
For my “catch me if you can “ photographs I plan to work alongside “Glasgow sport “ on a event which has not yet been disclosed .I will use an appropriate lens to capture close up photographs along with my tri pod as this will help to stabalise the camera when on location .
kit :
a 70-300 lens
my tri pod
200d canon camera
Examples of the types of photographs I plan on taking can be seen below
Panning :

Frozen movement :

I will also used varied focal lengths and experiment with my composition , both of which will create a much more interesting photograph .
evaluation :
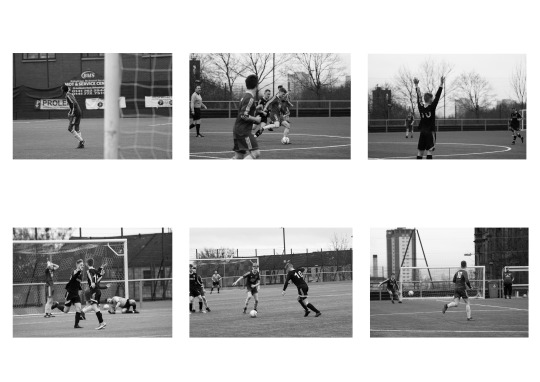
After getting into contact with Andrew kirk who runs the colleges sports events I planned to visit the petershill park in Glasgow to shoot . I took a 70-300 lens with me to shoot and also my tri pod for stability .
It was a overcast day but this wasn't going to stop me photographing this football game .I always thought I wouldn’t like sports photography but in fact proved myself wrong and enjoyed every min of the game . However, it did begin to rain during the second half and so I left . I got the photographs I wanted and so this wasn't a problem but in future I will always check the weather forecast if photographing a sports event again in future .
Due to the horrible grey sky creating a disgusting distraction in my photographs I took the opportunity to make my images black and white , something I don't usually do .
I am proud of the photographs I got and learned a lot more about where to stand when photographing at a football game . I also learned it is all about watching the players reactions to perfectly time the perfect shot .
If I was to change anything it would be the lens as I didn't think I got enough close up shots of the footballers but apart from that I wouldn't change much else as I have learned a lot more about sports photography through this experience .
Here is my final shots on my canvas :
0 notes
Text
Seeing the light research and evaluation
For my seeing the light work I want to explore different angles and compositions to show the person and possibly in ways their story .
The first example photograph below of the girl shows someone with a interesting and quirky personality through the use of a very close up view point and the pose in which the model is making .through analysing this photograph I am reminded to take into consideration the ways in which I aim to interact with the strangers I will be photographing.This image doesn't show very much of the environment that I was taken in , this ensures the viewer isn't distracted away from the model and ensures they are the main focus.
In contrast the second example I found shows much more of the location the photograph was taken in but this works as a advantage as it also tell us some information about the model. I will hopefully take a photograph like this as I think it creates a difference between the other photographs .
I will also aim to show age difference between my chosen strangers and use the sunlight to my advantage along with a reflect. I am to show different genders and age ranges in my final photographs.
When practising my seeing the light photographs I noticed one of my downfalls was not taking into consideration the background for my photographs and not using the reflector enough. Both of these things will be fixed when shooting more to achieve my final photographs .
equipment :
- tri pod possibly
- camera + 50mm lens
- reflector
I will also need to consider my location and the weather forceast before shooting .If it is a little overcast on the day of any shoots I may take this as a advantage and use the natural diffusion made by the clouds.
daylight manipulation techniques :
Using a lens hood
Using a lens hood can improve your daylight photography as they help to cut down lens flare
Filters
A neutral density filter can reduce the amount of light given to the camera but in my case I wouldn't be using this as I want as much light as possible. I could also use a polariser which reduces reflections (if the model is wearing glasses fr example ) .
Reflectors
Using a reflector is a huge helping and when shooting in daylight as it makes the most of the sun and reflects it directly onto you subject.I will use a reflector when shooting to ensure my subject is well lit .


evaluation can be found here :
https://spark.adobe.com/page/TY4KnHXMfkcDw/
final images :

1 note
·
View note


Text
clean white research
Herb Ritts
This American fashion and commercial photographer started his career of in the 80’s and 90’s, photographing many famous faces throughout his career. Most commonly known for his abstract approach to his photographs he was also recognised by huge brands such as Calvin Klein. Herbs approach to his images shows his love for clean whites and strong forms in his photographs, showing as much detail as possible in the simplest of ways. Herb Ritts was not afraid to leave a lasting impression on society by taking social differences, culture and race head on which shows the strong personality he had. Ritts sadly passed away in 2002 but to this day is still used as an inspiration for photographs and he has most definitely left a lasting impression on the photography industry.

David bailey
A contemporary photographer photographing mainly celebrities and fashion from 1959-present, David bailey is a huge icon in the photography world. Bailey is also known for helping to create the “swinging London 60’s” showing the enormous impact his photographs had on the culture in Britain. He attempted to show as much of the model’s personality as possible and in doing this the viewer got to know this person through an image. The clean white approach leaves room for no distractions in the photographs and so Bailey had his viewers’ attention on only the model always, something which was both clever and difficult to make so unique. Baileys photography still to this day continues to amaze and sell to this industry and will continue to be one of the biggest influencers.

Ima Mfon
My favourite photographer out of all these examples is Ima Mfon. A much more modern-day photographer he is one of the up and coming photographers of our generation. I was taken aback by his use of the models he uses and how he portrays these strong characters. Recipient of the 2015 lens culture emerging talents, his latest project “Nigerian identity “featured on CNN catching the attention of thousands. Mfon chooses his models carefully and mainly choosing to photograph African people. When watching a video on this photographer I found that he chooses these models as he relates the most with them and wishes to portray the person rather than they culture they come from as this is sometimes what people focus on the most. He feels it is important to build a “emotional connection “as this can evoke the viewer to see more than just a photograph. Focusing on editorial and fine art photography you can really tell that he has a minimalistic approach to his photography through looking at his catalogue of photographs online.

sources :
http://www.herbritts.com/#/archive/photo/phillip-seymour-hoffman-los-angeles-1999/
https://en.wikipedia.org/wiki/David_Bailey
https://www.lensculture.com/ima-mfon
the kit I will need will be :
- tri pod
-hot shoe adapter
-light meter
-reflector
-a standard lens
-2 spill kills
-a soft box
-2 poly boards
my set up will look similar to this :


This is the photograph I am going to emulate in the studio on both film and digital .This photograph is by David bailey and inspired me to use this same interesting composition and look when taking my own photographs for this brief.
0 notes
Text
#who idea
After re searching other photograhers i decided to take a second look at my who idea and was inspired by many photographers who use mirrors in their work.
For my self portrait I will use a mirror and as plain a background as possible as I don't want any distractions from the mirror or myself as this could take away from the idea .I want to hopefully create a abstract self portrait and use the mirror throughout all three images to create a connection between the photographs .
Diane Arbus and Duane Michaels specifically inspired my mirror idea through both of these photographs.
Here can be seen examples of both of these photographers use of mirrors which inspired me :


For my location I plan to take the mirror to my favourite woodland walk were I go most weekends with family . I will set the mirror up to reflect the location and possibly have myself also in the photograph . I like the idea of using the mirror as a prop in these photographs as mirrors are known for “reflecting “ and so through choosing this location I am not only showing this important place that I love but also reflecting on the memories I have made .
below can be seen a photograph similar to what I aim to achieve when shooting my location found on google :

My object will be a vinyl due to my love of music , this photograph will be a lot more simple compared to the others but again the mirror will be used. Location wise this will be shot in my bedroom much like my portrait one I will most likely just use a plain background and experiment with the reflections I can make with the mirror . Music is also a way for me to reflect on aspects of my life and so through using the vinyl I hope to show this .
Kit :
tri pod
mirror
camera
white backdrop
1 note
·
View note
Text
Exhibition review
Steven Berkoff “Gorbals”
All of these photos are black and white which shows both age and adds a great amount of depth to the photographs in this exhibit. The decade in which this was taken suggests it may have been taken on an analogue camera. Steven Berkoff is a well-known photographer who also is known for his acting and directing. this series of photographs had never been seen before until now and where taken during the time in which Berkoff acted at the Glasgow citizens theatre. Taken as a way for him to address the decaying and ran down Gorbals before it was knocked down. He was most fascinated by these types of places as he himself was brought up in a rundown area.
I have chosen this image of a young boy behind iron railings as it was one which stayed in my mind the longest and really hit home to me just how tough times where in 1966. Times are much different now and when comparing this photograph to photographs in my own childhood it is clear how society has really changed. This photograph shows a young boy with hardly any teeth and looking a bit mucky telling the viewer that healthcare was a huge privilege back then and that children weren’t as well looked after as they are now. The fact Berkoff has chosen to situate the boy behind the iron railing suggests that he is trapped and a prisoner of this run-down area and unable to experience any of the luxuries we do today.
Brian Griffin: POP
Since 1972 Brian Griffin has been a freelance photographer based in London and since then has made a lasting impression on pop culture. This exhibition showed some of the most well known and most appreciated photographs of his career showing many famous faces, including Iggy pop and the clash. Brian’s unique style and unusual way of portraying music and the artist’s captures the viewer straight away, making them question why he has chosen such unique ways to portray a subject.
I have chosen this photograph as it stood out to me the most and was aesthetically pleasing due to the colours and techniques used by the photographer. This photograph shows Iggy Pop standing in an exhausted and strange pose, you can really tell that Brian is trying to portray Iggy’s personality in the best way possible. The colours used really help the photograph stand out and the contrast between the colours also adds a lot of character to the image. Eventually this photograph was used for Iggy’s album called soldier which ended up hitting number 125 on the billboard charts. When researching I found that to make this photograph Brian light the backdrop then applied spray paint. Brian has a real skill in showing a manic and crazy Iggy Pop through just one single image. Taken in the studio this photograph shows the skill and professionalism that Brian has as a photographer, something which I personally look up to.
Comparison
Both Brian and Steven are both highly professional and expert photographers, but both have their own way in approaching photography. Brian is much more imaginative approach, but Stevens photographs seem to be a lot more candid. I am drawn much more towards Brian’s work due to the amount of creative thought put into them, but I am also drawn to the stories to be told behind Stevens work.
sources :
http://streetlevelphotoworks.org/event/steven-berkoff-gorbals
http://www.briangriffin.co.uk/about/about
https://www.scotsman.com/lifestyle/culture/art/art-reviews-pearl-blauvelt-aleana-egan-mark-handforth-steven-berkoff-1-4776093


0 notes
Text
new Photographer book research
Nathalie Grenzaeuser
“Trespassing”
This series featured a lot of abandoned industrial sights and features no people to ensure we are aware of just how abandoned these places are.
Taken near factories or other industrial sights there is a clear contrast between the rundown buildings and the surrounding landscapes which shows us the impact mankind is having on these locations. Nathalie chose to take these images in the Australian outback and the arctic and the viewer is made aware of how mankind impacts other climates in diverse ways but remains to have an equally negative impact in the end.
Taken during the 2000’s this is a fairly modern series of photographs and is set out to make us question how the modern world is effecting these stunning landscapes. Nathalie is known for not only approaching her photographs as an image but also as a painting through adding details such as more clouds to her photographs in the end creating a bigger impact on the viewer.
The name of the book is a total reversal of the phrase “no trespassing” something which Nathalie may have done to welcome the reader into the dangerous and forbidden places she visited, something the viewer may never have or ever will be able to view for themselves as these locations are so shut off to the public.

Here it is clear the photographer has used leading lines to show how this chosen location has an everlasting rail line and through using this technique the viewers eyes are drawn directly into the middle of the photo. The emptiness of this photograph tells us just how abandoned these buildings are and are becoming increasingly run down through time.

This photograph really captures just how stunning these locations are and the photographer has chosen to take this photograph during a sunset which really adds a burst of natural light and colour to the image. The reflection created by the puddle and the crane adds double the amount quirky shapes to the photograph giving an almost abstract feel to this image. The contrast between manmade industry and natural landscapes is shown here as the crane almost takes centre stage and the attention off the mountains behind it.
0 notes
Text
3 photographic events 1900′s
Kodak “brownie camera” brought the future of photography costing only £1.00 this camera seen the uprising of people taking photographs. The camera is simple to use and took 2 ¼ inch square photographs on 117 roll films. Kodak was surprised at how well this camera sold and in fact smashed the marketing goals they had for this product. In its first year of shipping it sold in total 150,000 cameras.
Source of photograph: alamy.com

In 1904 Louis and Auguste Lumiere patented the autochrome process – the first colour process. These inventors where brothers and made history within the cinematic world. Unlike ordinary black-and-white plates used within photography, the Autochrome was loaded into the camera with the bare glass side facing the lens, so that the light passed through the mosaic filter layer before reaching the emulsion. They really did change the way photographers dealt with their film and without them we wouldn’t know as much as we do now.
Source of photography: Wikipedia

In the 1900’s Lewis Hine was and still remembered today for capturing photographs which changed people’s perceptions of situations. He contributed in many ways to reform the America child labour laws and aimed to protect children from danger in the workplace. Hines most famous project was photographing immigrants entering New York and conveying them in a vulnerable and new light giving them a story and individuality, something which wasn’t given to them at the time.
Source of photograph: http://www.historyplace.com/unitedstates/childlabor/

0 notes