
Statistics
We looked inside some of the posts by htsource and here's what we found interesting.
Average Info
Notes Per Post
179K
Likes Per Post
115K
Reblog Per Post
64K
Reply Per Post
237
Time Between Posts
2 days
Number of Posts By Type
Text
16
Photo
1
Last Seen Tumblr Blogs


Fun Fact
The most popular pages on Tumblr are about Minecraft, GIFs, and David J. Peterson.
Text

— DERRY GIRLS, 2018, SEASONS ONE THRU THREE
72663 screencaps, free to use with or without credit reblog to support the blog & future screencaps download in the source link
4 notes
·
View notes
Text
Download: Adobe Photoshop 2025 (v26.5) / Windows
I come bearing the gift of piracy as an early Easter present! Welcome to the most recent (at the time of writing) version of Adobe Photoshop, which was released on March 27th of 2025. As per usual, have a peek at the note below, as it's there to help avoid the most common issue.
Authenticity popup? In case you get a message that says Photoshop needs to be licensed, or it will uninstall itself otherwise, please have a look at this fix! (Always uninstall previous Photoshop installations prior to installing a new one)
Step 1: Download the file from my Google Drive, or Mega.nz Step 2: When done downloading, unzip it (Windows can do it for you, but I personally use a program called 7ZIP) anywhere on your PC, even your desktop works fine, and yes, you can delete it when you're done with all of these steps. Step 3: Go into the unzipped folder, click 'Setup', and Photoshop's usual installation window will pop up. Install it as per your preferences (if you aren’t too tech-savvy, don’t worry, you can leave the default installation options as they are and all will be fine). Step 4: Hit 'Launch', and well— enjoy your copy of Photoshop! (Step 5: I would absolutely love you if you could spare a reblog of this post, which is not even for my own sake, but for anyone else who might be looking to obtain a copy of Photoshop!)
If in the unlikely event that you do run into any sort of issue of any kind, my DMs and askbox are always here for you, so don’t be shy, I promise I’ll welcome you with chocolate and fruit.
While I don’t request for anything in return outside of a like if this helped you (or ideally, a reblog so that others can find this), I was asked in the past whether I had a Ko-fi, so I set one up back in the day. It’s not required at all, but it’s always appreciated. 🤍
453 notes
·
View notes
Text


I just hit 8k followers in January, and I've never really done a celebration giveaway before. And not many do nowadays, but I figured someone out here may benefit from a new action or two!
You are authorized to change or add-on to my actions as you seem fit, but please do not redistribute them as your own work. If you are to take pieces from these actions to create your own and end up redistributing them, please credit this post.
[ Download ]
Disclaimers:
Basic colorings used in examples are not part of the actions.
These actions were made in Photoshop so they will not be compatible for PS-alternative programs like Photopea.
These will only work with the frame load-in way of making gifs with scripts. They do all the work for you including converting your frames into timeline.
Many of these contain camera raw filter. If you have an older version of photoshop that doesn't have this feature, some may not work properly.
If your computer doesn't have decent RAM, converting gifs that contain raw camera filter may be a struggle for your computer. If this is true for you, you can try deleting this feature from the applicable actions or making the smart filter invisible before saving, but unfortunately you won't get the full benefit of the action.
Creator's Notes:
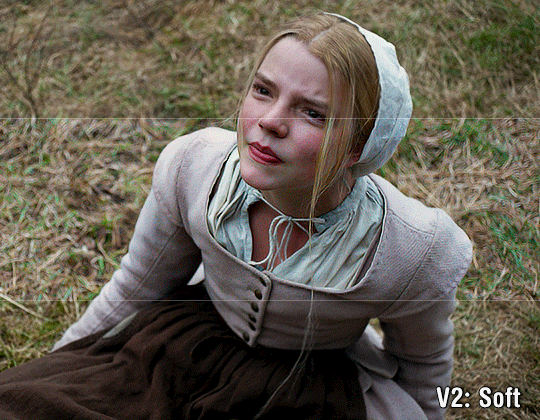
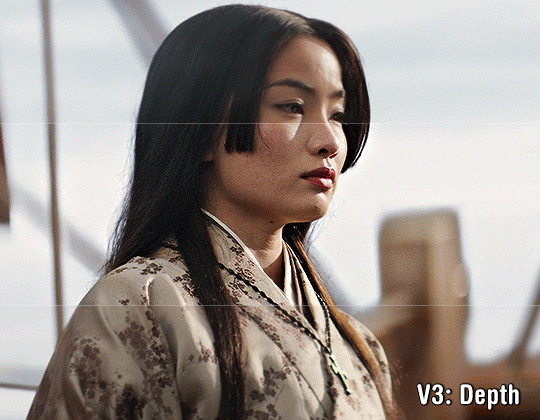
⭐︎ V1 Basic: Self-explanatory, can be used on just about anything.
⭐︎ V2 Soft: If you still prefer softer looking gifs this could be your go-to; brightens colors naturally.
⭐︎ V3 Depth: Creates contrast that makes the subjects appear more HD.
⭐︎ V4 Texture: Similar to V3 but with less noise; has a slight smoothing effect; Brightens colors naturally.
⭐︎ V5 Ultra Sharp: This can can be used on anything if your footage is high quality enough but looks great with 4K footage including 4K youtube videos. Looks AWFUL on anything with high grain though.
⭐︎ Animation (soft): Looks good on animation that has harsh lines.
⭐︎ Universal (crisp): Similar to V1 with more contrast. This also looks good on most animation.
502 notes
·
View notes
Text
My GIF Making process: Screen capturing using MPV player, Organizing files, 3 Sharpening settings, Basic Coloring PSD + Actions set

This is a very long post so heads up.
I’ll try to be as thorough and true as much as possible to the way I make my gifs (I already use Photoshop Actions which I’ve long since set up but now for this tutorial I’m reviewing them to show you the exact steps I’ve learned to create my gifs 😃) and present them to you in a semi-coherent way. Also, please bear with me since English is my second language.
First things first. Below are the things and tools we need to do this:
Downloaded 4K or 1080p quality videos (let’s all assume we know where to get these—especially for high definition movies and tv series—so this post doesn’t get removed, okay? 😛)
Adobe Photoshop CC or the CS versions can work as well, but full disclosure I haven’t created gifs using the CS versions since 2020. I’m currently using Adobe Photoshop 2024.
mpv player. Use mpv player to get those frames/screenshots or any other video player that has a screen grabber feature. I’ve used adapter for the longest time but I’ve switched to mpv because the press to screenshot feature while the video is playing has been a game changer not to mention ultimate time saver for me. For adapter you need to play it in another video player (like VLC player), to get the start and end timestamps of the scene you want to gif which takes me ages before I can even open Photoshop.
Anyway! Please stop reading this post for a moment and head over to this amazing tutorial by kylos. She perfectly tells you how to install and use mpv player, both for Mac and Windows users.
One thing I have to share though, I had a tough time when I updated my MacOS to Sonoma since MPV is suddenly either duplicating frames or when I delete the duplicates the player seems to be skipping frames :/ I searched and found a solution here, though it didn’t work for me lol. My workaround for this in the meantime is decreasing the speed down to 0.70 then start screenshotting—it’s not the same pre Sonoma update but it works so I’ll have to accept it rather than have jumpy looking gifs.
Now, after this part of kylos’ tutorial:

you can continue reading the following sections of my gif tutorial below.
I want to share this little tip (sorry, this will only cater to Mac users) that I hope will be helpful for organizing the screenshots that MPV saved to the folder you have selected. Because believe me you don’t want to go through 1k+ of screenshots to select just 42-50 frames for your gif.
The Control + Command + N shortcut
This shortcut allows you to create a new folder from files you have pre-selected. As you can see below I have already created a couple of folders, and inside each folder I have selected screenshots that I want to include in one single gif. It's up to you how you want to divide yours, assuming you intend to create and post a Tumblr gifset rather than just one gif.

Another tip is making use of tags. Most of, if not all the time, I make supercorp gifs so I tag blue for Kara and red (or green) for Lena—just being ridiculously on brand and all that.
Before we finally open Photoshop, there's one more thing I want to say—I know, please bear with me for the third? fourth? time 😅
It's helpful to organize everything into their respective folders so you know the total number of items/frames you have. This way, you can add or delete excess or unnecessary shots before uploading them in Photoshop.
For example below there are 80 screenshots of Kara inside this folder and for a 1:1 (540 x 540 px) Tumblr gif, Photoshop can just work around with 42-50 max number of frames with color adjustments applied before it exceeds the 10 MB file size limit of Tumblr.

Sometimes I skip this step because it can be exhausting (haha) and include everything so I can decide visually which frames to keep later on. You'll understand what I mean later on. But it's important to keep the Tumblr 10 MB file size limit in mind. Fewer frames, or just the right amount of frames, is better.
So, with the screenshot organization out of the way, let's finally head over to Photoshop.
Giffing in Photoshop, yay!
Let’s begin by navigating to File > Scripts > Load Files into Stack…

The Load Layers window will appear. Click the Browse button next.
Find your chosen screenshots folder, press Command + A to select all files from that folder then click Open. Then click OK.
After importing and stacking your files, Photoshop should display the following view:

By the way, I'll be providing the clip I've used in this tutorial so if want to use them to follow along be my guest :)
If you haven't already opened your Timeline panel, navigate to Windows > Timeline.
Now, let's focus on the Timeline panel for the next couple of steps.
Click Create Video Timeline, then you’ll have this:

Now click the menu icon on the top right corner then go to Convert Frames > Make Frames from Clips

Still working on the Timeline panel, click the bottom left icon this time—the icon with the three tiny boxes—to Convert to Frame Animation
Select Make Frames From Layers from the top right corner menu button.
So now you have this:

Go and click the top right menu icon again to Select All Frames
Then click the small dropdown icon to set another value for Frame Delay. Select Other…

The best for me and for most is 0.05 but you can always play around and see what you think works for you.
Click the top right menu icon again to Reverse Frames.
I think Photoshop has long since fixed this issue but usually the first animation frame is empty so I just delete it but now going through all these steps there seems to be none of that but anyways, the delete icon is the last one among the line of feature buttons at the bottom part of the Timeline panel.
Yay, now we can have our first proper GIF preview of a thirsty Lena 😜

Press spacebar to watch your gif play for the very first time! After an hour and half of selecting and cutting off screenshots! 😛 Play it some more. No really, I’m serious. I do this so even as early (lol) as this part in the gif making process, I can see which frames I can/should delete to be within the 10 MB file size limit. You can also do it at the end of course 🙂
Now, let’s go to the next important steps of this tutorial post which I’ve numbered below.
Crop and resize to meet Tumblr's required dimensions. The width value should be either 540px, 268px, or 177px.
Convert the gif to a Smart Object for sharpening.
Apply lighting and basic color adjustments before the heavy coloring. I will be sharing the base adjustments layers I use for my gifs 😃.
1. Crop and Resize
Click on the Crop tool (shortcut: the C key)

I like my GIFs big so I always set this to 1:1 ratio if the scene allows it. Press the Enter key after selecting the area of the frame that you want to keep.
Side note: If you find that after cropping, you want to adjust the image to the left or another direction, simply unselect the Delete Cropped Pixels option. This way, you will still have the whole frame area available to crop again as needed and as you prefer.
Now we need to resize our gif and the shortcut for that is Command + Opt + I. Type in 540 as the width measurement, then the height will automatically change to follow the ratio you’ve set while cropping.
540 x 540 px for 1:1
540 x 405 px for 4:3
540 x 304 px for 16:9
For the Resample value I prefer Bilinear—but you can always select the other options to see what you like best.
Click OK. Then Command + 0 and Command + - to properly view the those 540 pixels.

Now we get to the exciting part :) the sharpen settings!
2. Sharpen
First we need to have all these layers “compressed” intro a single smart object from which we can apply filters to.
Select this little button on the the bottom left corner of the Timeline panel.


Select > All Layers
Then go to Filter > Convert for Smart Filters
Just click OK when a pop-up shows up.
Now you should have this view on the Layers panel:

Now I have 3 sharpen settings to share but I’ll have download links to the Action packs at the end of this long ass tutorial so if you want to skip ahead, feel free to do so.
Sharpen v1
Go to Filter > Sharpen > Smart Sharpen…
Below are my settings. I don’t adjust anything under Shadows/Highlights.
Amount: 500
Radius: 0.4
Click OK then do another Smart Sharpen but this time with the below adjustments.
Amount: 12
Radius: 10.0

As you can see Lena’s beautiful eyes are “popping out” now with these filters applied. Click OK.
Now we need to Convert to Frame Animation. Follow the steps below.
Click on the menu icon at the top right corner of the Timeline panel, then click Convert Frames > Flatten Frames into Clips
Then Convert Frames > Convert to Frame Animation
One more click to Make Frames From Layers
Delete the first frame then Select All then Set Frame Delay to 0.05

and there you have it! Play your GIF and make sure it’s just around 42-50 frames. This is the time to select and delete.
To preview and save your GIF go to File > Export > Save for Web (Legacy)…
Below are my Export settings. Make sure to have the file size around 9.2 MB to 9.4 MB max and not exactly 10 MB.

This time I got away with 55 frames but this is because I haven’t applied lighting and color adjustments yet and not to mention the smart sharpen settings aren't to heavy so let’s take that into consideration.
Sharpen v1 preview:

Sharpen v2
Go back to this part of the tutorial and apply the v2 settings.
Smart Sharpen 1:
Amount: 500
Radius: 0.3
Smart Sharpen 2:
Amount: 20
Radius: 0.5
We’re adding a new type of Filter which is Reduce Noise (Filter > Noise > Reduce Noise...) with the below settings.

Then one last Smart Sharpen:
Amount: 500
Radius: 0.3
Your Layers panel should look like this:

Then do the Convert to Frames Animation section again and see below preview.
Sharpen v2 preview:

Sharpen v3:
Smart Sharpen 1:
Amount: 500
Radius: 0.4
Smart Sharpen 2:
Amount: 12
Radius: 10.0
Reduce Noise:
Strength: 5
Preserve Details: 50%
Reduce Color Noise: 0%
Sharpen Details: 50%
Sharpen v3 preview:

And here they are next to each other with coloring applied:
v1

v2

v3

Congratulations, you've made it to the end of the post 😂
As promised, here is the download link to all the files I used in this tutorial which include:
supercorp 2.05 Crossfire clip
3 PSD files with sharpen settings and basic coloring PSD
Actions set
As always, if you're feeling generous here's my Ko-fi link :) Thank you guys and I hope this tutorial will help you and make you love gif making.
P.S. In the next post I'll be sharing more references I found helpful especially with coloring. I just have to search and gather them all.
-Jill
733 notes
·
View notes
Text


@usernare sharpen action
by clicking on the source of this post you'll be able to purchase this sharpen action. it's a very basic action and you can edit it as you see fit at the smart sharpen and noise settings. like or reblog if you find this action useful, and don't share it as your own. my inbox is open for all questions about it.
166 notes
·
View notes
Text


psd pack #1 by perotovar
i saw @heroeddiemunson show the difference between their gifs edited vs unedited and it made me wanna do the same! i have a few psds that i cycle through depending on the scene and figured i'd share them with anyone that was interested!
if enough people are interested, i might do a second batch of some fancier/more experimental coloring 👀
they're pretty basic for this first batch, but they can be decently customized for a lot of things. i obviously can't make a universal psd but i can certainly try to cover the basics lol
psd links under the cut! please like or reblog if you use!
you can have all of them in a pack -> here <-
or individually:
base
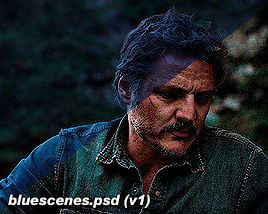
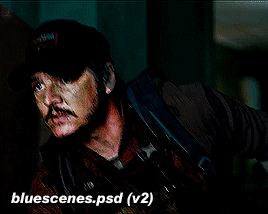
blue scenes (there's 3 versions within the psd)
foggy scenes
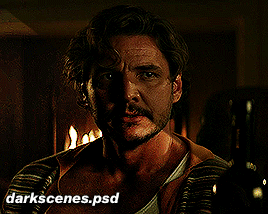
dark scenes
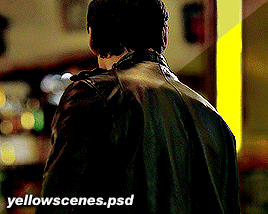
yellow scenes
day scenes
ezra
632 notes
·
View notes
Text
How To Set Up An Ao3 Exchange
One of the first things I say whenever anyone asks me about running exchanges is that if you have more than about 30 people in the exchange, do NOT try to match it by hand. That is so much work and takes so much time. Use Ao3's matching algorithm. And people say sure, and then they look at how Ao3 works and they go uhhhhhhhhhh I think we can make a google form work. Because google forms are reasonably intuitive to make work, and Ao3 exchanges are— not.
But the thing is, once you understand the underlying logic for Ao3 collections, they are not that bad, and seriously I can't overstate the benefit of having Ao3 do the matching for you. That's like the difference between 80 hours of curating data as it comes in and then matching it (what happened with hand-matching 325 people for holiday exchange), or 2 hours of double-checking the matching (what happened with matching 125 people for 48 hour exchange). You have to put in extra work to get an Ao3 exchange set up, but it super pays off in the end. So! Here is an intro to how Ao3 exchanges work on the back end. This explanation assumes you know how to sign up for an exchange because I've posted ones like that before, for example, here.
Let's get into it.
THE COLLECTION
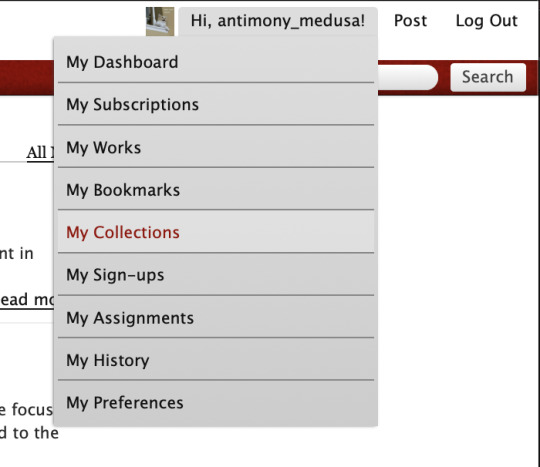
The first thing you want to do is set up your exchange collection. If you go to your right-hand drop-down menu, you click on My Collections.
That brings you to every collection you have ever made, and you go to to the right and click "New collection".

That brings you into the back end of the collection. You want to go down and put in a name for the collection that will be the url (so no spaces), a display name, an email for the collection to email when something happens to the collection (this will be public, so use a fandom email), and a basic description.

There's places there to do custom icons and headers, but those are optional, but you can go in and make your exchange pretty later if you want!
We are still in the "setting up" stage of the exchange, so once we go to preferences, you want to select all the tick boxes and make it look like this.
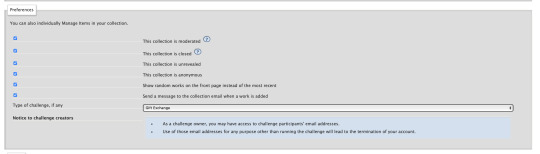
Moderated means that you'll have to manually approve things to be added to the collection (not absolutely necessary but can keep out trolls, and it also means that you can manually check that gifts meet minimums before you let them in to the exchange), Closed means that no one can submit things to the collection yet (once you open your exchange you de-select this), Unrevealed means that any works in the collection will show up as "mystery works" and not be readable (so you keep it unrevealed until the posting date, so people can post early but not spoil the surprise), anonymous means that all authors will be anonymous (this depends on if you have an anonymous portion of your exchange, so it's optional), "show random works" just means that you get a selection of different works when people visit the collection at different times, "send a message to the collection email" is optional but is useful for moderation (like if you're checking people off a list when their gifts get delivered), and "type of challenge" you want to be set to "gift exchange".
and then on this page the only other things of concern are places where you can put in an FAQ, a description and some instructions, but those are all optional! I normally host the FAQ on tumblr, so I just say "go check the tumblr at [link]".
And then you hit the submit button.

Now we get into the nitty-gritty.

First up is some optional stuff— you can add in the times that you're going to do things! This is useful for communication, but not necessary. We're still setting everything up, so you do not want Sign-Ups to be open, that is only selected once you have everything ready to go.
Then scrolling down, you get to Requests and Offers.
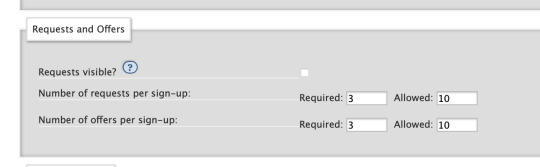
This is where you specify the absolute minimum ships or characters that you want people to give you to sign up. 10 is the maximum Ao3 allows, so I always set it to 10 for both "allowed", which is the maximum the site will allow. And required is the low number. I usually set it to a minimum of three, to make sure someone doesn't sign up with "i will only write one ship" or something. This way, people will have to do a minimum of three separate requests and offers.
The "requests visible" is part of the back end thing, and it's up to you if you want to select it or not. If you keep it unselected, the only person who will be able to see requests is the mods, and eventually each person will see their assignment. If you select it, people will be able to browse everyone's requests and both maybe target offers so they can write for a specific person, and be able to find treats (extra bonus gifts) to write for people whose requests they like. Each side has its own benefits or negatives, it's up to you which ones you want to go with!
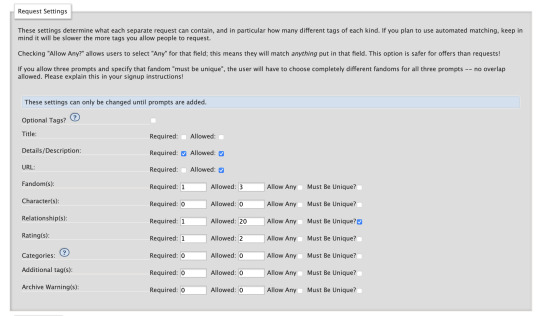
And here we get into more of the matching info! Let's look at Request Settings.

Now this is what the settings would look like for a multi-fandom exchange. The "details/description" box you want to make mandatory because that is where people will put their DNW and their prompts (and you absolutely want to make sure everyone has a DNW), and the url is an optional one which lets people link an off-site letter on google docs or dreamwidth.
Fandom allowing up to three fandoms means that people can do crossovers if they want (or tag a request something like 3rd life/hermitcraft), and if I wanted to say that people had to request 3 separate servers I would say "must be unique" but I'm okay if people sign up with three Dream SMP relationships in this idea hypothetical exchange, so I'm not selecting the unique button.
I'm ignoring the characters button cause that's extra complication, the only other thing I want to look at is the relationship button. A minimum of 1 ship per request (and there's a minimum of three requests), and let's say you can go up to 20, so people can request LOTS of different ships. I did select "must be unique" so someone can't sign up with the same ship three times. The "allow any" button is off, which means that I will have to select relationships that fit under the fandom that I selected one up, I can't request Shubble/Niki Nihachu (Origins), and put it with a fandom request for Hermitcraft. This has set it so that the absolutely minimum someone can sign up with is 3 relationships (3 requests * 1 relationship each), and the absolute maximum is 200 relationships (10 requests * 20 relationships each).
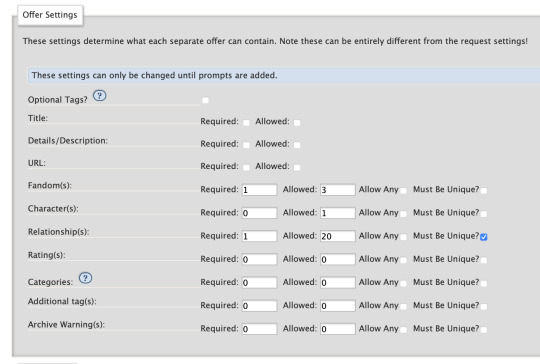
Requests will look much the same, except I am not putting down details/description or a URL, because I'm not letting people submit requests about what ship they "really" want to match on, they are going to be equally matchable to everyone they offered. Some exchanges will let you submit a requests DNW, but honestly that is so much extra work for the mods, I would not recommend it unless you think it's necessary to stop people from dropping their gifts later.
Okay, so now we take a brief digression into a tag set.
THE TAG SET
Okay so basically a tag set is an extra set of sliders that lets you fine-tune your exchange. If you do not use a tag set, when people sign up they will be able to use every canon tag on the archive, and only canon tags. Which is a LOT of tags, but when I ran an exchange without a tag set there were multiple times of hitting non-canon relationships or tags. But it's also a definite extra complication, tag sets are extra fiddly work and they are even less intituive. If you just want to go without a tag set, skip down to the matching segment. If you do want to avoid hitting people signing up with non-canon tags, keep reading.
I'm gonna say right off the bat that tag sets are the single most like "oh I am getting into the GUTS of the machine" part of running Ao3 exchanges, but if you can make them work they can super streamline both the sign-up (for your participants ) and the matching process (for you).
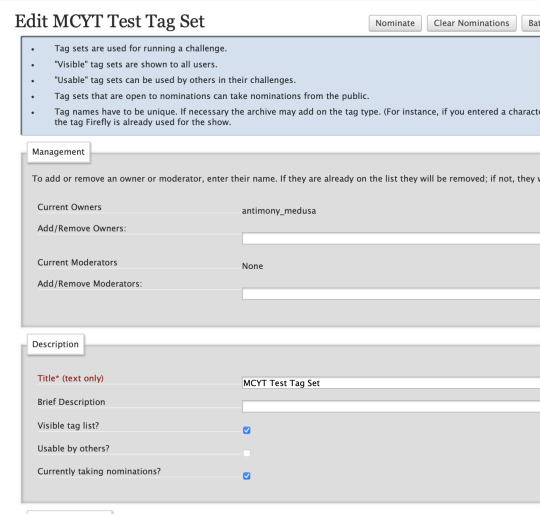
Oh boy, tag sets. Here we start getting into how exchanges start squeezing the interface to make it do what we want it to. I'm using a tag set, so first I clicked on the "tag set" url there and I made my tag set, and then I came back and selected its name from the drop-down menu on the collection.
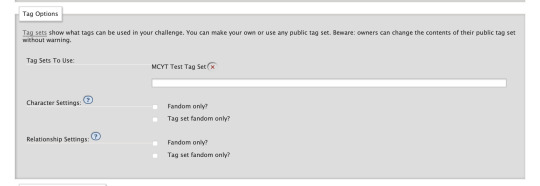
When it comes to the relationship settings, you have three options:
Leaving both boxes unticked will allow someone to input any relationship that has been wrangled into the fandom and any relationship in your tag set.
Clicking Fandom Only will allow people to use any wrangled tag that has been associated to this fandom— but only those tags.
Clicking Tag Set Fandom Only will allow people to use any tag in your tag set that is associated with your fandom— but only those tags.
Fandom Only is not very useful for how we're using tag sets, because we specifically want non-canon unique tags we are designing for our purpose. Both boxes unticked is only useful if you want people to be able to do mash-up signups where someone puts ZombieCleo & LDShadowLady (3rd Life) on a signup for a fandom of Dream SMP— which in most cases you don't want, because matching that is gonna be very difficult. (We do something like this for mcyt recursive, but recursive is— weird.) The usual and simplest way to run is to click Tag Set Fandom Only, and that way your participants will get a drop-down autocomplete menu of the tags in your tag set, the ones they can use, when they sign up. Easy and simple!
I am leaving characters unchecked, because in both cases selecting a box will restrict the options available to someone signing up to character tags that have been associated or wrangled into a fandom, and we are either a) not using characters at all, or b) using the character field for gift types (more on that later), and we specifically want unassociated gift type tags that are not affiliated with any specific fandom. What tags? Well. Let's move over to the tag set itself.
So, I started a new tag set, and I'm over there on that screen, looking at it. What does that screen look like?
Okay so, part of the appeal of a tag set is that your participants are able to specify the difference between "Rendog & InTheLittleWood" and "Rendog/InTheLittleWood". You don't have to worry about people getting undesired shipping, because people were specifying if they wanted shipping when they signed up. You can reduce a great deal of people getting matched badly by using relationship matching, because most of the time even if people want a Tommy-centric fic, there's a pretty big difference between people who want "Tommy & Technoblade" and "Tommy & Dream". By specifying who you want the gift to be about, you remove a big hurdle of matching right away. That's why most exchanges run on relationship matching.
However, if there are 37 people on a given server, that's something like 2,600 possible combinations of people if you include both romantic and platonic, and that's before you start getting into trios, and that's just way too many tags for the mods to enter manually. So what you do is run a nomination period, and for a week or two weeks you go to all your participants and you go "do you want to sign up for this exchange? Nominate the tags you want to use now! If it doesn't get nominated, it can't be used!" And then people head to the tag set to nominate.
So, on this page, you want "visible tag list" to be selected, because you want people to see what's already been nominated so they don't duplicate, and you want "currently taking nominations" to be selected because you will be taking those nominations instead of doing them all yourself.
So you have to set up limits on those nominations.

The point of taking nominations is to make matching easier, so people normally use the same fandom and relationship limits as they are going to use on the sign-up, to make sure there aren't dozens of tags in the tag set that nobody's using, just cluttering up the space. It also helps stop the issue where someone sees a tag in the tag set, goes "oh man I love that ship" and signs up, but its an extra tag that no one intended to offer, so they don't match to anyone. That's why sometimes people keep the amount of tags that can be nominated low, I've seen people limit this to 10 tags per fandom, or even 7, so that's up to you.
And you save, and now when you link your participants the tag set, they will have a "nominate" button.

They will hurry over to press that button, and then they will see a page that looks like this.
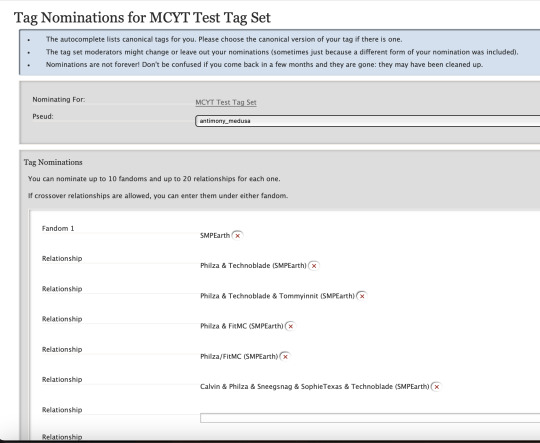
This is a thing where you absolutely want to give your participants detailed instructions, because what Ao3 will try to do is auto-fill people's nominations with canonical tags. WE DO NOT WANT CANONICAL TAGS. CANONICAL TAGS ARE THE ENEMY OF EXCHANGES. CANONICAL TAGS ARE THE ENEMY OF MCYT EXCHANGES IN PARTICULAR.
Remember back when we clicked the button that says tags have to be unique? The canonical tag for Philza & Technoblade doesn't have a server on it, and people might want to be requesting that relationship for SMPEarth, Dream SMP, Origins SMP, or arguably even QSMP. If you only have the canonical tag, people can only request a specific dynamic once, for one server. And that is a problem for every situation where people interacted on multiple servers, and with the network of overlaps that is Empires/SOS/3rd Life/Hermitcraft and DSMP/Origins/SMPEarth/QSMP, that's going to lead to unhappy participants. So you tell people to nominate the ship and also "disambiguate" it, and add the server in parentheses. And then all your participants will hit the button to submit, and you will go into the "review nominations" button, and you will let those tags into the tag set.

Now I just distributed the tag set to a couple friends, so let's look at what this looks like behind the scenes.
Brace yourself, it's gonna be wild, but I believe we can get through it.

Now here is a perfectly standard look at tag set nominations after a few people have gotten into the tag set. This is why they pay tag mods the big bucks.
As you can see, there are a few things to be gathered. The first things is a bunch of people used the canon tags (because that's what Ao3 tries to get them to do), someone else nominated an x-reader ship, we have one tag there twice (spelled differently), and the tags are Piped (they have both the person's tax name and the username). (You can let tags in that are Piped, but I find that it makes the tag set harder to read, and usually exchanges are character-focused unless you're writing video blogging rpf anyways, so I ask people to submit tags unpiped, using usernames.) And for the tags that were nominated in a way that I want (unpiped, and disambiguated so they're unique), Ao3 is trying to get me to use the canon tag. But I don't want the canon tag, I want a unique tag, with the server on it, with no pipes. So.
So were I moderating the tag set, after a few minutes it would look like this.
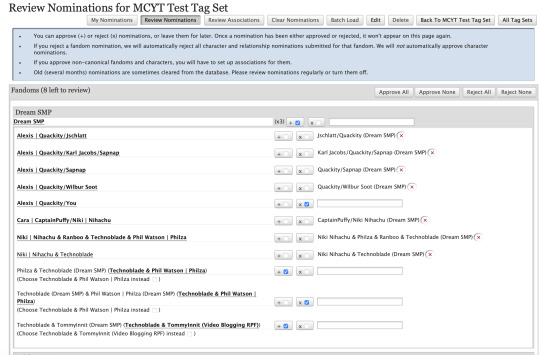
That's going through and disambiguating the tags (adding the server, which I could tell because of the fandom it was nominated under), removing the piping and using the usernames instead of tax names, and then re-ordering the names so they're alphabetical so people can find them on the list later, rejecting the x-reader tag, rejecting the duplicate and allowing the one that's spelled correctly through. Amazing. I have tags that I want to use (I did some other tags that were ready to go in other fandoms as well). I hit submit. Am I ready to go?
Not yet! First, associating tags. If you accepted the tags through the tag nomination process, you will have a button up there that says Review Associations.

If you click on this, on the back end, anything that you accepted under a previously accepted fandom will be helpfully paired up with this fandom, with Ao3 trying to say "ah, does it go here?"

You just go down the list, and if is trying to put it in the right fandom, then you click the box, and at the bottom of the page you press submit, and then there's your tags sorted out to your fandoms! Bingo! Are you done now?
No.
Because tag sets are the most complicated part of exchanges.
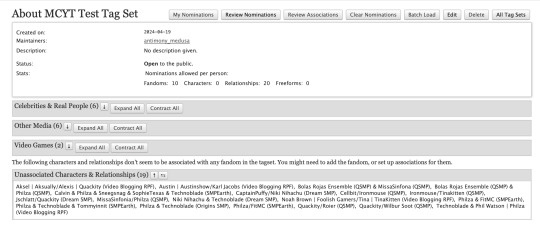
So. if you open up your tag set, and you scroll down to "Unassociated characters and relationships" there are a bunch of tags that are are lost, Ao3 doesn't know where to put them. This happens when a) you accepted a tag that was associated with a fandom that hadn't been accepted yet, b) it was trying to associate it with a basket fandom that you don't want to associate it with so you couldn't accept the suggested associations (for example: Philza hardcore tags will show up in Dream SMP but you don't want to associate them there), c) sometimes Ao3 just breaks, spaghetti code d), you had manually added these tags on the Edit page— more on that later. So all of these tags you have to manually associate.
You hit the Edit button on the tag set, and scroll down to the bottom, to "tag associations", and start selecting where tags go.

Honestly this is a great time to be listening to a stream or a podcast or something, and then you have the tag set open in another tab so you know what all the unassociated tags are, and you just go down the list like a databasing machine. It is not hard, cause you disambiguated each tag with its own server, it's just time consuming. Note. This is why people go in and accept tags regularly during the nomination period, because if you do this all at the end you've got a BIG job ahead of you.
So, you turned on your VOD playlist and you associated all your tags, and all the tags are where they are supposed to go. You have a beautiful tag set.

But wait, you say, looking at this beautiful tag set. Some of those tags look at little different. What is the "Dream smp and only dream smp" that a couple of them have?
Well.
You see.
Ao3 designed tag sets to work a certain way, and nobody uses them that way. It turns out that "Quackity/Wilbur Soot (Dream SMP)" is a wrangled canon tag, and the system goes "ah, I know where this goes, this is a sub-tag of the major tag, and the top-level tag is Video Blogging RPF, so it goes under Video Blogging RPF, as all MCYT tags do. I am very smart. I have stuck this Dream SMP tag under Video Blogging RPF. I am a good machine". And then you go AUUUUUUUUGH, and then you turn up the podcast a little louder, and then you sit down and you delete the old tag and you write out a new tag that the system doesn't know what to do with, and it goes uhhhhhhh and sticks it in "unassociated tags" and then you go in again and you manually associate it into the right server.
Edit in 2024: I use (DFE) at the end of the tag now, because it's shorter.

It's not hard, it's just time consuming. Shouting at the tag set like STOP TELLING ME WHAT TO DO as it helpfully tries to stick dsmp tags in SMPearth and you wrestle it out of SMPEarth and into the right fandom bucket.
Deep breath moment. Honestly that's the most fiddly part of a fiddly process, so if you can get through this you're absolutely golden.
Anyways. You got clean disambiguated unique tags, and then you associated them in the right spot, and then you found the ones that got sorted to the wrong spot and you associated them yourself, and now you have a beautiful tag set ready to go. It's a thing of beauty. Shed a tear. Your participants can select from anything in this tag set, and you know they want to use these specific relationships, because they submitted them to you. What next?
THE MATCHING
Okay. You have your tag set set up and it's accepting nominations. Your participants are filling it out right now. You go back to your collection. it's time to tell it how to match.

This is the "minimum number to match" pane, and this is the minimum numbers to make a successful match. You want 1 for Fandom, and 1 for Relationship, and that's it. People will show up to the machine as a viable match as long as they have submitted a fandom and relationship that matches someone else's offered fandom and relationship.
This is a minimum viable exchange. You're ready to go. As soon as your tag set is done (or immediately if you're not using a tag set), you're ready to go back and open your exchange to sign-ups.
Congratulations!
FURTHER TWEAKING
HOWEVER. There is more that you can do. For example, do you want to allow people to request or opt into NSFW? There's an easy way to do that! First thing is you go back to your tag set, and you scroll down to the "ratings" section that you've been ignoring.

You select G and E, and that way, if people are opting into explicit that means they're okay with NSFW, and if they only select G, that means they only want a non-explicit piece.
Then on the collection you switch the requests and offers sections to include a place to specify a rating.
You want them to definitely specify at least one, and if you maximum allowed is 2, people can opt into both and say "i'm good with whatever"!
Then you scroll down to the matching section, and you tweak that to make sure that people will match on Fandom, Relationship, and at least one Rating.

Bingo. You now have a toggle to turn NSFW on and off.
But a lot of people like to match by TYPE of gift too, specifying if they want art or fic or playlist or web weave etc. How do you do that? Ah, at this point you are master of all you survey, and you can make tag sets do absolutely anything you want. Remember we talked about using the character slot? You go back to the tag set and you scroll down to "characters".

Now we were matching on relationships, so the character box is unused. And it lets you put in your own tags. So what you do is you start to add in custom tags.

And then you go back to the Collection settings, and on the requests and the offers you go in to the "characters" section and you say "must select at least one, can select up to six".
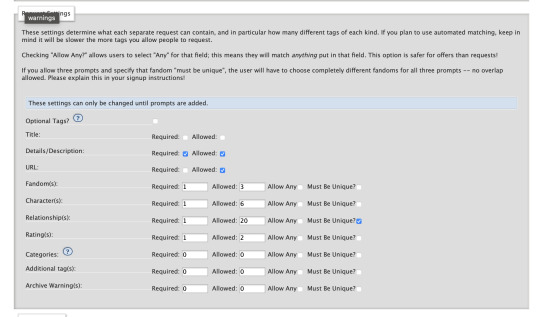
And then, you guessed it— you go back to "minimum number to match" and you set that "characters" tab to 1 minimum, 6 maximum. Now people who specified that they wanted Art can be matchable to artists who Offered Art. You have unlimited power, the world is at your fingertips.
There's even more customization that you can do, too! There's "additional tags", which is entirely custom tags you add yourself, that can be anything from specifying if people want fluff or horror or hurt/comfort etc— with the recursive exchange we used it to specify the works people were recursing— I'm considering using it for holidays with the holiday exchange. You can let people opt in or out of major archive warnings by selecting "archive warnings" as a thing that's in the tag set and that you're matching for. Once you understand how the underpinnings of how the machine works, you can wrestle it into almost any shape you want.
So. Whew. That's how exchanges work, under the hood. When I say that this is significantly easier than hand matching the holiday exchange, I ask you to picture just how complicated hand matching gets. Go forth! Thrive! Set up exchanges if you want! The world is your oyster!
Feel free to message me if you have further questions.
261 notes
·
View notes
Text
Writing Tips
Punctuating Dialogue
✧
➸ “This is a sentence.”
➸ “This is a sentence with a dialogue tag at the end,” she said.
➸ “This,” he said, “is a sentence split by a dialogue tag.”
➸ “This is a sentence,” she said. “This is a new sentence. New sentences are capitalized.”
➸ “This is a sentence followed by an action.” He stood. “They are separate sentences because he did not speak by standing.”
➸ She said, “Use a comma to introduce dialogue. The quote is capitalized when the dialogue tag is at the beginning.”
➸ “Use a comma when a dialogue tag follows a quote,” he said.
“Unless there is a question mark?” she asked.
“Or an exclamation point!” he answered. “The dialogue tag still remains uncapitalized because it’s not truly the end of the sentence.”
➸ “Periods and commas should be inside closing quotations.”
➸ “Hey!” she shouted. “Sometimes exclamation points are inside quotations.”
However, if it’s not dialogue exclamation points can also be “outside”!
➸ “Does this apply to question marks too?” he asked.
If it’s not dialogue, can question marks be “outside”? (Yes, they can.)
➸ “This applies to dashes too. Inside quotations dashes typically express—“
“Interruption” — but there are situations dashes may be outside.
➸ “You’ll notice that exclamation marks, question marks, and dashes do not have a comma after them. Ellipses don’t have a comma after them either…” she said.
➸ “My teacher said, ‘Use single quotation marks when quoting within dialogue.’”
➸ “Use paragraph breaks to indicate a new speaker,” he said.
“The readers will know it’s someone else speaking.”
➸ “If it’s the same speaker but different paragraph, keep the closing quotation off.
“This shows it’s the same character continuing to speak.”
123K notes
·
View notes
Text
Welcome!
I'm going to update this list as I post more. So make sure to check periodically!
Anon Office Hours: Wed 12:30pm - Friday 6:30pm. (EST)
PLEASE CAPITALIZE THE IDENTITY OF "BLACK" IN YOUR ASKS TO ME ☺️
"Your posts are too long"- Teacher's Note
Feedback Rules
FAQs!
Please take the time to review the one relevant to your questions! They are long- some longer than others- but they likely have a link contained within that can better guide your research!
📝Syllabus📝
Lesson 1: "White Man Painted Black"?
Lesson 1.5: "Hair for Thought"- how visualizing affects your writing
Lesson 2: “That One Hairstyle? RETIRE IT!” Black Hair is an Art (pt.1)
Lesson 2.1: Addendum to Hair pt 1
Lesson 2: "It Takes HOW LONG?" Black Hair is an Art (pt.2)
Application! Examples of Protective Hair Coverings
Application! Ice's Lazy Loc Wash Routine
Application! How to: Simplified Braid
Application! Daisy E's Simplified Hair Drawing
Lesson 3: "Defying the Default"- Skin Tones and the Presence of Black Characters
Application! What are Black fans looking for in Commissions?
Lesson 4: "Do Black People Blush?" Bringing brown complexions to life
Application! Humanæ- Resource for Skin Palettes!
Lesson 5: "The Same Place As the Music" Lighting & Color
Lesson 6: "Let's Have A Talk, First" Stereotypes, pt 1
Lesson 6: “Why’s she so rude?” (She’s Not)- Stereotypes, pt 2
Lesson 6: "Is He the Threat (Or Are You?)"- Stereotypes, pt 3
Application! How to Spot a Stereotype: An Example
Lesson 7: "That's the Black one!"- Imagery and "Black-Coded" Characters
Lesson 8: “Across cultures, darker people suffer most. Why?” Multiethnic and Multicultural Blackness
Lesson 9: “Romance Will Not Solve Racism”- Interracial/Biracial/Blended Black and White Relationships and Families
Lesson 10: “The Ambiguously Brown Character™”- The Attachment to Eurocentric Beauty Standards
Lesson 11: “No, That’s Not ‘How Color Works’.” - Whitewashing
Lesson 12: “The bulging eyes and the twisted mouth” - Violence, Violent Imagery & Black Horror
Lesson 13: “It’s Giving” AAVE, and the Denied Yet Undeniable Impact of Black Culture
Lesson 14: “On Human Dignity.” Blackness, Gender & Sexuality
11K notes
·
View notes
Text
NEED HELP WRITING? (a masterlist)
I have likely not added many that I've reblogged to this list. Please feel free to roam my blog and/or ask/message me to add something you'd like to see on this list!
Synonym Lists
Look by @writers-potion
Descriptors
Voices by @saraswritingtipps
Show, Don't Tell by @lyralit
Tips & Tricks
5 Tips for Creating Intimidating Antagonists by @writingwithfolklore
How To (Realistically) Make a Habit of Writing by @byoldervine
Let's Talk About Misdirection by @deception-united
Tips to Improve Character Voice by @tanaor
Stephen King's Top 20 Rules for Writers posted by @toocoolformedschool
Fun Things to Add to a Fight Scene (Hand to Hand Edition) by @illarian-rambling
Questions I Ask My Beta Readers by @burntoutdaydreamer
Skip Google for Research by @s-n-arly
Breaking Writing Rules Right: Don't Write Direct Dialogue by @septemberercfawkes
Databases/Resources
International Clothing
Advice/Uplifting
Too Ashamed of Writing To Write by @writingquestionsanswered
"Said" is Beautiful by @blue-eyed-author
17K notes
·
View notes
Text
COLOURS in DESCRIPTION
colour is the lifeblood of a scene. here are ways not to over-use it.
Red: cardinal, coral, crimson, flaming, maroon, rose, wine, brick red, burgundy, carmine, cerise, cherry, chestnut, claret, copper, dahlia, fuschia, garnet, geranium, infrared, magenta, puce, ruby, russet, rust, salmon, sanguine, scarlet, tition, vermilion, roseate, rubicund, ruddy, rubescent, florid
Orange: apricot, tangerine, merigold, cider, ginger, bronze, cantaloupe orange, clay, honey, marmalade orange, amber
Yellow: blond, chrome, cream, gold, ivory, lemon, saffron, tawny, xanthous, sandy
Green: grassy, leafy, verdant, emerald, aquamarine, chartreuse, fir, forest green, jade, lime, malachite, mossy, pea green, pine, sage, sea green, verdigris, willow, spinach green, viridian
Blue: azure, beryl, cerulean, cobalt, indigo, navy, royal blue, sapphire, teal, turquoise, ultramarine
Purple: violet, indigo, lavender, lilac, mauve, periwinkle, plum, violet, amethyst, heliotrope, mulberry, orchid, pomegranate purple, wine, amaranthine, perse, violaceous, reddish-blue
10K notes
·
View notes
Text
if you've been hearing less about gaza lately, it's because most of the journalists are dead. hassan eslayeh, who was murdered yesterday in his hospital bed by israel, had 351 videos archived on tiktokgenocide.com (an online archive of israeli atrocities i recommend you browse). this single journalist alone had contributed 351 videos. the same database lists that 252 journalists have been killed in gaza since october 7th. the cpj's archive of journalists killed is 178. they have a more conservative and less accurate estimate since they have less information on those media workers who work with local outlets.
regardless of the exact number, the number of journalists killed is so high that it is markedly affecting the footage and documentation we have coming out of gaza now. let me prove it to you: 70 people were killed today, May 14th 2025. did you know that?
15K notes
·
View notes
Text


theme - stingray: preview/code (ko-fi, free)
features: 100% x 300px header image, 300px x auto height sidebar image, blog title, one extra custom link, five custom links, updates section, 450px to 540px text posts
notes: npf posts friendly! ask and submit button will automatically show if allowed (please check your settings). credits link to the resources, tutorials and scripts used to make this theme possible is found on the bottom right corner of the theme. join me on patreon.
38 notes
·
View notes


Text

724e97 - b65c7b - 4874a6 - 008f98 - 549464
58 notes
·
View notes
Text


[2] Beast by sheathemes
preview | code
Features
full support for NPF posts
responsive to all screen sizes
post sizes between 350px - 640px
unlimited amount of custom links
like and reblog buttons
Optional
right/left sidebar position or sidebar as a header option
sidebar image
tags on all display or by toggle
custom links
dark mode
search bar
Important
full credits are here
sidebar image is 120px x 120px
you will use google fonts to change the main font. Search for the font of your choosing and copy/paste the title of said font into the appropriate text field
640 notes
·
View notes
Text

This is but a short list of some campaigns and hotlines around the world for LGBTQAI+ people (specifically Trans ones), you can read about and donate/participate in. Please, understand that right now the situation is particularly dire, so if you can please try and help out. If anyone knows of any campaign or hotline in their area that they want to share, comment it under this post and we will add it to the list. Remember to be PROUD and protect the community!
WORLDWIDE
all out (info + campaign)
united nation free & equals (info + campaigns)
BRAZIL
united nation free & equals (info + campaign)
ITALY
Gay Center (infos + hotlines)
Info Trans (infos + hotlines)
PHILIPPINES
ppath (infos + hotlines)
UK
Not A Phase (info + hotlines + campaigns)
USA
The Trevor Project (info + hotlines + campaigns)
6 notes
·
View notes