
iMAC Geeks is a Professional Mac Solutions Platform. Here we will provide you only interesting content you will like very much. We’re dedicated to providing you with the best Mac Solutions, focusing on dependability and Mac Solutions. We’re working to turn our passion for Mac Solutions into a booming online website. We hope you enjoy our Mac Solutions as much as we enjoy offering them.
Don't wanna be here? Send us removal request.
Statistics
We looked inside some of the posts by imacgeeks1 and here's what we found interesting.
Average Info
Notes Per Post
2
Likes Per Post
2
Reblog Per Post
0
Reply Per Post
0
Time Between Posts
2 days
Number of Posts By Type
Text
17
Last Seen Tumblr Blogs


Fun Fact
The Tumblr app for Google Glass was released on May 16, 2013.
Text
Recover Recently Deleted Passwords On IPhone, IPad, And Mac
If you have recently deleted passwords on your iPhone, iPad, or Mac and want to recover them, you can check if they are stored in iCloud Keychain. Here’s how you can attempt to recover them on each device:
On iPhone and iPad:
Go to Settings:
Open the Settings app.
Navigate to Passwords:
Scroll down and tap on Passwords.
Check iCloud Keychain:
Make sure your device is signed in with your Apple ID and that iCloud Keychain is enabled.
Your passwords should be available here if they were saved in Keychain.
Recently Deleted:
There is currently no direct option to see a “recently deleted” section for passwords, but you may be able to find the password you need by checking each app’s settings for saved passwords.
On Mac:
Open System Preferences:
Click on the Apple menu and select System Preferences.
Navigate to Passwords:
In the System Preferences, go to Passwords or iCloud settings.
Check iCloud Keychain:
Ensure you are signed in with your Apple ID and that iCloud Keychain is enabled.
Use Keychain Access:
Open Keychain Access from the Applications > Utilities folder.
Look through the login and iCloud keychains to find the deleted passwords.

General Tips:
Check for backups:
If you have backed up your device to iCloud or your computer before the passwords were deleted, you may be able to restore them by restoring your device from the backup.
Contact Apple Support:
If you are unable to recover your passwords, consider contacting Apple Support for further assistance.
Please note that there is no direct “recently deleted” folder for passwords like there is for photos, so recovery may depend on whether you have a backup available.
#Recover#Recently#Deleted#passwords#IPhone#ipad#mac#macbook#macos#macos sonoma#foryou#trendingnow#viralpage#sharemypost#imacgeeks#sharepost#trendingtopic#foryourpage
0 notes
Text
How To Use Presenter Overlay In MacOS Sonoma
In macOS Sonoma, Presenter Overlay is a new feature in the FaceTime and video conferencing apps that allows you to keep yourself in view while sharing your screen or content with others. Here’s how you can use Presenter Overlay in macOS Sonoma:
Open a video conferencing app: Presenter Overlay can be accessed while using video conferencing apps like FaceTime, Zoom, or other supported apps.
Start a video call: Begin a video call in the app you are using.
Activate screen sharing: Start screen sharing in your video call. The specific method for this may vary depending on the app you are using.
Access Presenter Overlay: Look for a new option or button in the app’s interface that allows you to enable Presenter Overlay. This feature may be labeled differently depending on the app you are using, but it should be related to your camera or video options.
Choose the overlay style: Once you’ve activated Presenter Overlay, you may have different styles to choose from:
Small Overlay: Your video feed appears as a small circle on the screen.
Large Overlay: Your video feed appears as a larger circle, placing you more prominently on the screen.
Full Screen: You appear in full screen, while your content is overlaid on top.

Adjust your position: Depending on the overlay style, you can adjust your position on the screen, such as moving the small or large circle to a different corner of the screen.
Present your content: With Presenter Overlay active, you can now present your content to the other participants in the video call while remaining in view.
This feature allows you to share your screen or present content without disappearing from view, making your presentations more engaging.
#Presenter#overlay#macos#macos sonoma#macbook#foryou#trendingnow#viralpage#imacgeeks#sharemypost#sharepost#trendingtopic#foryourpage#macosventura#apple macos
0 notes
Text
How To Create Safari Web Apps In MacOS Sonoma
To create Safari web apps in macOS Sonoma, you can follow these steps:
Set Up Your Development Environment: Ensure you have Xcode installed on your Mac. You’ll use Xcode to create and manage your Safari web apps.
Create a New Safari Web App Project: Open Xcode and choose “Create a new Xcode project”. Select the “Safari Web Extension” template under the “macOS” section.
Configure Your Project: Give your project a name and specify its location on your filesystem.
Design Your Interface: In Xcode, you can design the interface of your Safari web app using Interface Builder. This includes creating the user interface elements and defining their functionality.
Write Your Code: Implement the functionality of your Safari web app using Swift or Objective-C. You can add event handlers, make network requests, and interact with the Safari browser using the Safari App Extensions API.
Test Your App: Use the Xcode simulator or deploy your Safari web app to a real device for testing. Ensure that your app behaves as expected and handles different scenarios gracefully.
Publish Your App: Once you’re satisfied with your Safari web app, you can distribute it through the Mac App Store or other distribution channels. Make sure to follow Apple’s guidelines for app distribution and submission.
Update and Maintain Your App: Regularly update your Safari web app to fix bugs, add new features, and ensure compatibility with the latest macOS and Safari versions.
By following these steps, you can create Safari web apps in macOS Sonoma and provide users with a seamless browsing experience tailored to their needs.
#create#safari#webapps#macOS#macOSSonoma#Macbook#foryou#trendingnow#viralpage#imacgeeks#ShareMyPost#SharePost#trendingtopic#foryourpage#viralfb#viralpost#viral
0 notes
Text
MacOS Sonoma Desktop Widgets Not Working? 11 Ways To Fix!
If you’re experiencing issues with MacOS Sonoma desktop widgets not working, there are a few troubleshooting steps you can try:
Restart your Mac: Sometimes, a simple restart can resolve many software issues, including problems with widgets.
Check Widget Settings: Make sure that widgets are enabled in your MacOS settings. Go to System Preferences > Dock & Menu Bar, and ensure that the “Show Widgets” option is enabled.
Update MacOS: Ensure that your MacOS is up to date. Apple frequently releases updates that include bug fixes and performance improvements, which may resolve issues with widgets.
Reset Widgets: You can try resetting the widgets by removing them from the Today View and re-adding them. To remove widgets, click on the “Edit” button at the bottom of the Today View, then click the (-) button next to the widget you want to remove. To re-add widgets, click the “Edit” button again, then use the (+) button to add the widgets back.
Check for Widget Compatibility: Some widgets may not be compatible with the current version of MacOS or may require updates from their developers. Check the developer’s website or the Mac App Store for updates to the widgets you’re experiencing issues with.
Check for System-wide Issues: If widgets are not working for any application, there might be a broader issue with your system. In this case, you may want to consider contacting Apple Support for further assistance.
Reinstall MacOS: If all else fails and widgets are still not working, you may need to consider reinstalling MacOS. This should only be done as a last resort and after backing up your important data.
By following these steps, you should be able to troubleshoot and resolve any issues you’re experiencing with MacOS Sonoma desktop widgets not working.
#macOSSonoma#macOS#desktop#widgets#working#Macbook#foryou#trendingnow#viralpage#imacgeeks#ShareMyPost#SharePost#trendingtopic#foryourpage#viral
0 notes
Text
How to use Google Password Manager on iPhone and Mac
To use Google Password Manager on your iPhone and Mac, follow these steps:
On iPhone:
Open the Settings app on your iPhone.
Scroll down and tap on “Passwords & Accounts.”
Select “Website & App Passwords.”
You might need to authenticate using Face ID, Touch ID, or your device passcode.
Tap on “Use Strong Passwords” to enable the feature if it’s not already enabled.
Whenever you sign in to a website or app, iOS will suggest strong, unique passwords and save them to iCloud Keychain.
To access passwords saved in Google Password Manager, you can use the Google Chrome app on your iPhone.
Open the Google Chrome app, tap the three dots in the bottom-right corner, then tap “Settings.”
Under the “Basics” section, tap “Passwords.”
You will see a list of passwords saved in your Google account. Tap on any entry to view the password.

On Mac:
Open Google Chrome on your Mac.
Click on the three dots in the top-right corner and select “Settings” from the dropdown menu.
In the Settings menu, click on “Passwords” under the “Autofill” section.
You will see a list of passwords saved in your Google account. Click on any entry to view the password.
To access passwords stored in iCloud Keychain, you can use Safari on your Mac.
Open Safari, go to Safari > Preferences in the menu bar.
Click on the “Passwords” tab.
You might need to authenticate using your Mac’s password.
You’ll see a list of saved passwords. You can click on any entry to view the password.
By following these steps, you can easily use Google Password Manager on both your iPhone and Mac to manage your saved passwords.
#google#chrome#password#manager#iphone#mac#macbook#foryou#trendingnow#viralpage#imacgeeks#macos#sharemypost#sharepost#trendingtopic#foryourpage#viral
0 notes
Text
Minecraft For Mac Latest Version {2024}
To play Minecraft on your Mac, you can follow these steps:
Purchase Minecraft: If you haven't already, you need to purchase Minecraft. You can buy it from the official Minecraft website or through the Mac App Store.
System Requirements Check: Ensure that your Mac meets the minimum system requirements to run Minecraft smoothly. You can find these requirements on the Minecraft website.
Download Minecraft Launcher: Visit the Minecraft website and download the Minecraft Launcher for Mac.
Install Minecraft Launcher: Once the launcher is downloaded, open the .dmg file and drag the Minecraft icon to your Applications folder to install it.
Launch Minecraft: Open the Applications folder and double-click on the Minecraft icon to launch the game.

Log in or Create Account: If you already have a Minecraft account, log in using your credentials. If not, you'll need to create an account to play.
Download Minecraft: Once logged in, the launcher will prompt you to download the game files. Follow the on-screen instructions to complete the download and installation process.
Play Minecraft: After the game is downloaded and installed, you can launch it from the launcher and start playing!
Remember to keep your Mac updated and allocate enough system resources for Minecraft to run smoothly. Enjoy your adventures in the blocky world of Minecraft!
#minecraft#download#downloadnow#latest#version#mac#macos#macbook#foryou#trendingnow#viralpage#imacgeeks#sharemypost#sharepost#trendingtopic#foryourpage#software#apps
0 notes
Text
How To Start Mac In Recovery Mode [2024 Updated]
To start your Mac in Recovery Mode, follow these steps:
Shut Down Your Mac: If your Mac is turned on, go to the Apple menu in the top-left corner of the screen and choose "Shut Down."
Start Up Your Mac: Press and hold the power button on your Mac to turn it on.
Press and Hold Command-R: As soon as you hear the startup sound, immediately press and hold the Command (⌘) and R keys on your keyboard. Keep holding them until you see the Apple logo or a spinning globe and the Mac boots into Recovery Mode.
Release the Keys: Once you see the Apple logo or the spinning globe, you can release the Command (⌘) and R keys.
Wait for Recovery Mode to Load: Your Mac will boot into Recovery Mode, which may take some time depending on your Mac's hardware and the version of macOS installed.
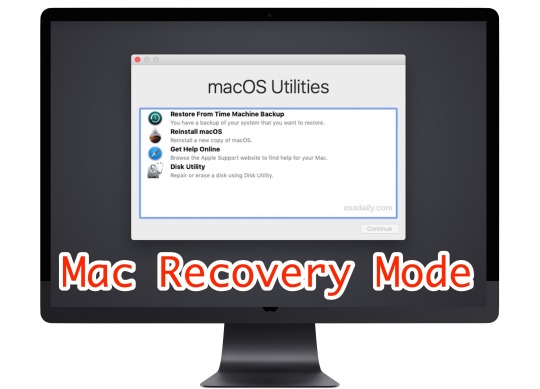
Use Recovery Mode: In Recovery Mode, you'll see options to restore your Mac from a Time Machine backup, reinstall macOS, get help online, or use Disk Utility to repair or erase disks.
Exit Recovery Mode: To exit Recovery Mode, simply restart your Mac by selecting "Restart" from the Apple menu, or by pressing the power button and choosing "Restart" from the menu.
That's it! You've successfully started your Mac in Recovery Mode.
#macbook#recovery#start#mode#macossonoma#macos#macbookair#macbookpro#macosventura#foryou#foryourpage#viralpage#viralposts#trendingtopic#trendingnow#sharepost#sharemypost#imacgeeks
0 notes
Text
YTD Video Downloader For Mac Latest Version {2024}
YTD Video Downloader is not available for Mac operating systems. However, there are several alternatives you can consider for downloading videos on your Mac:
4K Video Downloader: This is a popular choice for Mac users to download videos from various platforms including YouTube, Vimeo, Facebook, and more. It allows you to download videos in high quality up to 4K resolution.
ClipGrab: ClipGrab is a free downloader and converter for YouTube, Vimeo, Facebook, and many other online video sites. It supports various video formats and resolutions.
MacX YouTube Downloader: This is another free tool specifically designed for Mac users to download videos from YouTube and other video-sharing websites. It offers fast downloading speed and supports batch downloading.

iTube Studio: iTube Studio is a comprehensive video downloader for Mac that supports downloading videos from YouTube, Vimeo, Dailymotion, and other sites. It also includes features for video conversion and recording.
Airy: Airy is a simple yet powerful YouTube downloader for Mac that allows you to download videos in various formats and resolutions. It also supports downloading entire YouTube playlists.
These are just a few options available for downloading videos on Mac. Make sure to check the features and compatibility of each tool to find the one that best suits your needs.
#YTD#videos#Download#DownloadNow#dowloader#latest#Version2024#Macbook#macbookair#macbookpro#macOS#macossonoma#macosventura#foryou#foryourpage#viralpage#viralposts#trendingtopic#trendingnow#SharePost#ShareMyPost#imacgeeks
0 notes
Text
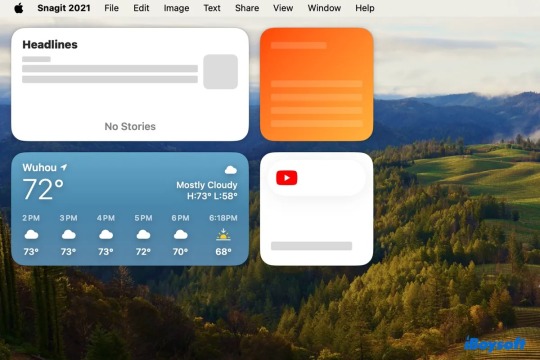
Best Widgets For Mac In {2024}
As of 2024, some of the best widgets for Mac include:
Fantastical: A powerful calendar app that offers a widget for quick access to your schedule and upcoming events.
Weather Line: Provides a detailed weather forecast right on your Mac's dashboard, helping you stay informed about current and future weather conditions.
Clocker: A handy widget that displays multiple time zones, perfect for individuals who work with teams or clients in different parts of the world.
Widgetsmith: This versatile widget app allows you to customize widgets for various purposes such as displaying calendar events, weather updates, reminders, and more.
Delivery Status: Keep track of your packages from various carriers directly from your Mac's dashboard with this widget.
Battery Health 3: Monitor the health of your Mac's battery, including its current capacity, cycle count, and more, with this useful widget.
Sticky Notes: Quickly jot down notes and reminders on your Mac's dashboard with this widget, helping you stay organized and productive.
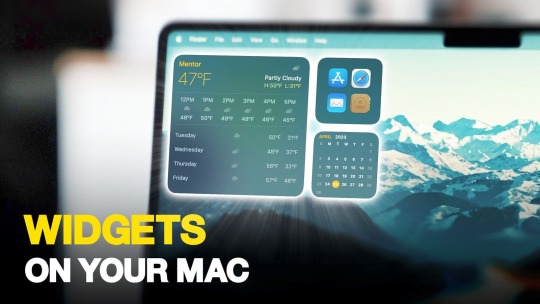
DataMan Next: Monitor your data usage for Wi-Fi, cellular, and more with this widget, helping you stay within your data limits and avoid overage charges.
Countdown Widget: Keep track of important events and deadlines with this widget, which allows you to set countdowns for various occasions.
Currency Converter: Easily convert between different currencies with this widget, which provides up-to-date exchange rates for accurate conversions.
These widgets can enhance your productivity, keep you informed, and streamline various tasks on your Mac's dashboard.
#bestapps#widgets#Macbook#macossonoma#macOS#APPS#Download#imacgeeks#foryou#foryourpage#viralpage#viralposts2024#trendingtopic#trendingnow#SharePost#ShareMyPost
0 notes
Text
Microsoft Office 2011 For Mac Latest Version {2024}
As of my last update in January 2022, Microsoft Office 2011 for Mac was outdated and no longer supported by Microsoft. The latest version of Microsoft Office for Mac at that time was Microsoft Office 2019, followed by Microsoft 365 (formerly Office 365), which offered ongoing updates and features through subscription-based services.

It's essential to keep your software up to date for security, compatibility, and feature enhancements. Therefore, I recommend checking Microsoft's official website or authorized retailers for the latest versions of Microsoft Office for Mac available in 2024.
#MicrosoftOffice#MacApps#software#Download#Microsoft#downloadsoftware#downloadapp#imacgeeks#foryou#foryourpageシ#viralpage#viralposts2024#trendingtopic#trendingnow#SharePost#ShareMyPost
0 notes
Text
MacX YouTube Downloader For Mac
Sure, here's some information about MacX YouTube Downloader for Mac:
MacX YouTube Downloader is a software designed specifically for macOS systems, allowing users to easily download videos from YouTube and various other video-sharing platforms. With this application, users can save their favorite videos for offline viewing, creating backups, or sharing with others.
Key features of MacX YouTube Downloader include:
Easy Video Downloading: The software provides a user-friendly interface, making it simple to download videos from YouTube by just pasting the URL.
Multiple Formats Supported: MacX YouTube Downloader supports a wide range of video formats, allowing users to download videos in formats suitable for various devices, such as MP4, FLV, 3GP, and more.
High-Quality Downloads: Users can download videos in high quality, including HD and 4K resolutions, ensuring a premium viewing experience.
Batch Downloading: The software enables users to download multiple videos simultaneously, saving time and effort.

Conversion Options: MacX YouTube Downloader also offers options to convert downloaded videos to different formats, making them compatible with different devices or media players.
Fast Download Speeds: The application is optimized for fast download speeds, providing efficient downloading of large video files.
Regular Updates: The developers frequently update the software to ensure compatibility with the latest macOS versions and to add new features or improvements.
Overall, MacX YouTube Downloader for Mac is a convenient tool for macOS users who want to easily download and save videos from YouTube and other online platforms for offline viewing or archival purposes.
#macx#Youtubedownloader#latest#Version#MacApps#software#Download#downloadsoftware#downloadapp#imacgeeks#foryou#foryourpage#viralpage#viralposts2024#trendingtopic#trendingnow#SharePost#ShareMyPost
0 notes
Text
Apple M1 Ultra: All You Need To Know About This Powerful Chip
Apple has once again pushed the boundaries of innovation with its latest chip offering, the M1 Ultra. Announced in [insert date], this new silicon represents the pinnacle of Apple's in-house chip design prowess, promising unprecedented levels of performance and efficiency across a range of devices. Here's everything you need to know about this groundbreaking chip:
1. Unmatched Power: The M1 Ultra is Apple's most powerful chip to date, boasting an incredible 20-core CPU configuration. This configuration comprises a mix of high-performance and high-efficiency cores, ensuring optimal performance for a wide variety of tasks, from intensive computational workloads to everyday browsing.
2. Cutting-Edge Architecture: Built on a 5-nanometer process, the M1 Ultra leverages Apple's advanced chip architecture to deliver exceptional performance while maintaining energy efficiency. With a unified memory architecture and integrated graphics, this chip ensures seamless operation across different applications and workflows.
3. Graphics Performance: In addition to its impressive CPU capabilities, the M1 Ultra features a staggering 64-core GPU, providing unparalleled graphics performance for demanding tasks such as gaming, content creation, and professional-grade rendering. Whether you're editing high-resolution videos or playing the latest AAA titles, the M1 Ultra delivers stunning visuals and smooth gameplay.
4. Machine Learning Powerhouse: Thanks to its dedicated machine learning accelerator, the M1 Ultra excels at handling AI and ML tasks with ease. Whether it's real-time voice recognition, image processing, or natural language understanding, this chip delivers lightning-fast performance for a wide range of machine learning applications.
5. Enhanced Connectivity: The M1 Ultra incorporates advanced connectivity features, including support for Thunderbolt 4 and USB 4, enabling lightning-fast data transfer speeds and seamless integration with a wide range of peripherals and accessories. Whether you're connecting external displays, storage devices, or high-speed networking equipment, the M1 Ultra ensures optimal performance and compatibility.

6. Power Efficiency: Despite its impressive performance capabilities, the M1 Ultra remains incredibly power-efficient, allowing for extended battery life and reduced energy consumption. Whether you're using a MacBook, iMac, or Mac Pro powered by the M1 Ultra, you can expect exceptional performance without compromising on battery life or heat generation.
7. Future-Proofing: As with previous Apple silicon chips, the M1 Ultra is designed with future-proofing in mind, ensuring compatibility with upcoming software updates and applications. Whether you're a professional user or a casual enthusiast, investing in a device powered by the M1 Ultra guarantees a seamless and responsive computing experience for years to come.
In summary, the Apple M1 Ultra represents a significant leap forward in chip design, delivering unmatched performance, efficiency, and versatility across a range of devices. Whether you're a professional user or a casual enthusiast, the M1 Ultra sets a new standard for what's possible with silicon technology, reaffirming Apple's position as a leader in the industry.
#AppleM1#applem1ultra#powerful#M1Ultra#macossonoma#Macbook#macbookpro#macOS#review#imacgeeks#foryou#foryourpage#viralpage#viralposts2024#trendingtopic#trendingnow#SharePost#ShareMyPost
0 notes
Text
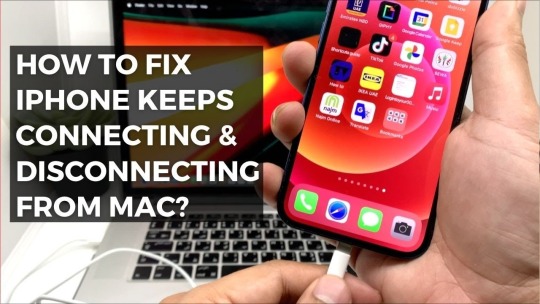
IPhone Keeps Disconnecting From Mac? 7 Fixes
If your iPhone keeps disconnecting from your Mac, there could be several reasons behind this issue. Here are some troubleshooting steps you can try:
Check Cable and Ports: Make sure the Lightning cable you're using to connect your iPhone to the Mac is in good condition and properly inserted into both the iPhone and the Mac's USB port. Also, try using a different USB port on your Mac to rule out any port-related issues.
Restart Devices: Sometimes, a simple restart can fix connectivity issues. Restart both your iPhone and your Mac, then try connecting them again.
Update Software: Ensure that both your iPhone and your Mac are running the latest software versions. Software updates often include bug fixes and improvements that can resolve connectivity issues.
Trust the Computer: When you connect your iPhone to your Mac, you may need to trust the computer on your iPhone. If you haven't done this yet, unlock your iPhone and tap "Trust" when prompted.
Reset Location & Privacy Settings: On your iPhone, go to Settings > General > Reset > Reset Location & Privacy. This won't erase your data but will reset location and privacy settings, which might help resolve the issue.
Check for Interference: Make sure there's no interference between your devices. Remove any cases or covers from your iPhone, as they could be obstructing the connection.
Reset Network Settings: On your iPhone, go to Settings > General > Reset > Reset Network Settings. This will reset Wi-Fi, cellular, and VPN settings, which might help if the issue is related to network configurations.
Try Another Cable/Port: If possible, try using a different Lightning cable or USB port to see if the issue persists. This can help determine if the problem lies with the cable or port.
Check for Software Conflicts: Sometimes, third-party software or settings on your Mac can interfere with the connection. Try connecting your iPhone in Safe Mode (hold down the Shift key while booting your Mac) to see if the issue persists without third-party software running.
Contact Apple Support: If none of the above steps resolve the issue, it's possible there's a hardware problem with either your iPhone or your Mac. Contact Apple Support for further assistance or visit an Apple Store for diagnosis and repair.
By following these steps, you should be able to troubleshoot and resolve the issue of your iPhone disconnecting from your Mac.
#iphone#disconnecting#fixes#Macbook#macbookair#macbookpro#macOS#macossonoma#macosventura#foryou#foryourpage#viralpage#viralposts#trendingtopic#trendingnow#SharePost#ShareMyPost
1 note
·
View note
Text
VLC Media Player For Mac Latest Version {2024}
VLC Media Player is a popular open-source multimedia player that supports a wide range of audio and video formats. It is known for its versatility, allowing users to play media files, stream content, and even convert formats. Here are some key features of VLC Media Player:
Wide Format Support: VLC can play almost any multimedia file, including popular formats like MP4, AVI, MKV, MOV, MP3, FLAC, and more. This versatility makes it a go-to choice for users who encounter various types of media files.
Cross-Platform Compatibility: VLC is available for multiple operating systems, including Windows, macOS, Linux, Android, and iOS. This cross-platform support allows users to enjoy a consistent media playback experience across different devices.
Customizable Interface: VLC offers customization options for its interface, allowing users to adjust settings such as playback controls, visualizations, and skins to suit their preferences. Users can also install extensions to add additional features or enhance functionality.
Streaming Capabilities: VLC can stream media over networks, including local network streaming (DLNA/UPnP) and internet streaming protocols such as HTTP, RTSP, and RTP. This feature enables users to watch online videos or listen to internet radio stations directly within the player.
Playback Controls: VLC provides a range of playback controls, including play, pause, stop, fast forward, rewind, and volume adjustment. Users can also control playback speed, loop sections of a video or audio file, and take snapshots of the playback.

Advanced Features: VLC includes advanced features such as subtitle synchronization, audio/video synchronization adjustment, audio equalizer, and support for playlists. It also offers options for video effects and filters to enhance the viewing experience.
Free and Open Source: VLC is free to download and use, and it is distributed under the GNU General Public License (GPL). Being open-source software, VLC benefits from contributions from a global community of developers, ensuring continuous improvement and updates.
Overall, VLC Media Player is a versatile and feature-rich multimedia player that caters to the needs of both casual users and enthusiasts alike. Its wide format support, cross-platform compatibility, and customizable interface make it a popular choice for playing media files on various devices.
#VLC#media#players#latest#Version2024#Macbook#macbookair#macbookpro#macOS#macossonoma#macosventura#foryou#foryourpage#viralpage#viralposts#trendingtopic#trendingnow#SharePost#ShareMyPost#imacgeeks#viralpost
1 note
·
View note
Text
Apple M1 Ultra Vs. M1 Max: Which Chip Is For You?
Choosing between the Apple M1 Ultra and M1 Max depends on your specific needs and requirements. Both chips offer impressive performance, but there are key differences to consider.
Performance: The M1 Ultra is Apple's most powerful chip, boasting unmatched performance for demanding tasks such as video editing, 3D rendering, and machine learning. It features a 20-core CPU (16 high-performance cores and 4 high-efficiency cores) and up to a 64-core GPU, making it ideal for professionals who need the highest level of performance. On the other hand, the M1 Max offers excellent performance as well, with a 10-core CPU (8 high-performance cores and 2 high-efficiency cores) and up to a 32-core GPU. While not as powerful as the M1 Ultra, the M1 Max is still capable of handling demanding tasks with ease.
Power Efficiency: Both chips are built on Apple's advanced 5nm process technology, which ensures high performance while maintaining power efficiency. However, the M1 Ultra may consume slightly more power due to its higher core count and performance capabilities.
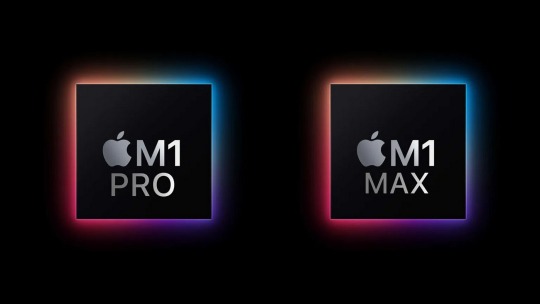
Price: The M1 Ultra is likely to come at a higher price point compared to the M1 Max, reflecting its superior performance and capabilities. If budget is a concern, the M1 Max may be a more cost-effective option without sacrificing too much performance.
Use Case: Consider your specific use case and whether you truly need the extreme performance offered by the M1 Ultra. If you're a professional video editor, animator, or developer working on resource-intensive tasks, the M1 Ultra might be worth the investment. However, if your tasks are less demanding or if you're on a tighter budget, the M1 Max could still meet your needs effectively.
In summary, choose the Apple chip that aligns best with your performance requirements, budget, and intended use case. If you need the utmost performance and are willing to pay a premium for it, the M1 Ultra is the way to go. Otherwise, the M1 Max offers excellent performance at a more affordable price point.
#AppleM1#M1Ultra#M1Max#M1#PowerfulChip#Macbook#macbookair#macbookpro#macOS#macossonoma#macosventura#foryou#foryourpage#viralpage#viralposts#trendingtopic#trendingnow#SharePost#ShareMyPost#imacgeeks
0 notes
Text
How To Create New Apple ID On IPhone, IPad, And Mac
Creating a new Apple ID on your iPhone, iPad, or Mac is a straightforward process. Here's how you can do it:
On iPhone or iPad:
Open Settings: Tap on the "Settings" app on your device's home screen.
Sign Out (Optional): If you're currently signed in with another Apple ID, you may want to sign out first. Scroll down and tap on "Sign Out" at the bottom. This step is optional if you're creating a new ID.
Sign in to Your iPhone or iPad: Tap on "Sign in to your iPhone" or "Sign in to your iPad" at the top of the screen. If you're signed out, tap "Create a new Apple ID" instead.
Enter Your Information: Follow the on-screen prompts to enter your name, email address (or create a new one), password, security questions, and date of birth.
Verify Your Email: After entering your email, you'll need to verify it. Apple will send a verification code to the email you provided. Enter this code when prompted.
Agree to Terms and Conditions: Read through Apple's Terms and Conditions, then tap "Agree" to proceed.
Set Up Payment Method (Optional): If you want to make purchases from the App Store, iTunes Store, or Apple Books, you'll need to set up a payment method. You can choose to use a credit/debit card or select "None" if you don't want to add one right now.
Done: Once you've completed all the steps, your new Apple ID is created, and you can start using it.

On Mac:
Open System Preferences: Click on the Apple logo in the top-left corner of your screen, then select "System Preferences" from the drop-down menu.
Apple ID: If you're signed in with an existing Apple ID, click on "Apple ID" at the bottom of the sidebar. If you're not signed in, click on "Sign In" instead.
Create Apple ID: If you're signed out, click on "Create Apple ID" and follow the on-screen instructions. If you're already signed in, click on "Overview" in the sidebar, then click on "Sign Out" and follow the prompts to sign out. After signing out, click on "Create Apple ID" and follow the same steps.
Enter Your Information: Enter your name, email address (or create a new one), password, security questions, and date of birth.
Verify Your Email: After entering your email, Apple will send a verification code to the email you provided. Enter this code when prompted.
Agree to Terms and Conditions: Read through Apple's Terms and Conditions, then click "Agree" to proceed.
Set Up Payment Method (Optional): Similar to the iPhone/iPad setup, you may need to set up a payment method if you want to make purchases.
Done: Once you've completed all the steps, your new Apple ID is created, and you can start using it.
That's it! You've successfully created a new Apple ID on your iPhone, iPad, or Mac. You can now use this ID to access Apple services, such as the App Store, iCloud, and more.
#create#apple id#iphone#ipad#mac#macbook#macos#macos sonoma#ios#solutions#imacgeeks#fix issue#foryou#foryoupage#viral#viralpost#viralpage#trending#trendingnow
0 notes
Text
Fix “These Settings Have Been Configured By A Profile” MacOS
When encountering the message "These settings have been configured by a profile" on MacOS, it typically indicates that certain system settings have been restricted or enforced by a configuration profile set up by an administrator or through a mobile device management (MDM) solution.
Here's a general guide to address this issue:
Identify the Profile: Go to "System Preferences" and click on "Profiles" (if available). This will show any profiles that have been installed on your system.
Remove the Profile: If the profile is causing unwanted restrictions, you may want to remove it. To do this, select the profile and click the "-" button at the bottom to remove it. You may need administrative privileges to do this.
Check MDM Settings: If your Mac is enrolled in an MDM solution, such as Jamf or Intune, the settings may be controlled centrally by your organization. You may need to contact your IT department or administrator to make changes.

Resetting SMC and NVRAM: Sometimes, resetting the System Management Controller (SMC) and Non-Volatile Random Access Memory (NVRAM) can resolve certain system issues. Instructions for resetting these can be found on Apple's support website.
Reinstall macOS: If the issue persists and you're unable to identify or remove the profile causing the problem, you may need to consider reinstalling macOS. This will remove any configurations or profiles that have been applied to the system.
It's important to note that modifying or removing certain profiles may affect the functionality or security of your system, especially if it's managed by an organization. Therefore, it's recommended to proceed with caution and, if necessary, consult with your IT department or administrator for guidance.
#fix#settings#configured#profile#macos#apple macos#macbook#macos sonoma#tumblr fyp#foryou#foryoupage#viral#viralpost#viralpage#trending#trendingnow
0 notes