
Don't wanna be here? Send us removal request.
Statistics
We looked inside some of the posts by islahwebservice and here's what we found interesting.
Average Info
Notes Per Post
0
Likes Per Post
0
Reblog Per Post
0
Reply Per Post
0
Time Between Posts
13 days
Number of Posts By Type
Link
1
Text
16
Last Seen Tumblr Blogs


Fun Fact
Tumblr has been banned in Indonesia for providing people with access to pornographic content.
Link
0 notes
Text
Are They Feeling It? 22 Expert Ideas for Connecting With Your Audience


So much about human interaction changed in the last 18 months. But one constant remains: People crave connections – to other people, things, and ideas. Creating, maintaining, and growing a connection with audiences is the No. 1 goal in content marketing. What’s the best way to do that in 2021? We asked the experts at Content Marketing World 2021 (where the theme happens to be connections) what they recommend. Here’s the advice they shared.
1. Accept questions from your audience
Take a page from TikTok and Reddit: To build community, give your audience a safe space to ask questions they’ve always wanted to ask without judgment. Livestreams, AMAs (ask me anything), and Twitter chats are just the beginning, but they’re not the only ways to build conversation while providing value. – Zontee Hou, head of strategy, Convince & Convert Give your audience the space to ask questions without judgment (in livestreams, AMAs, Twitter chats, etc.) to build community and connection, says @ZonteeHou via @CMIContent. #CMWorld Click To Tweet
2. Ask questions of your audience
Talk to your customers. Stop hiding behind the mandates you’re given and the deadlines you’re working toward. If you invest the time, energy, and resources to get to know your customer, what they are struggling with, and what matters to them, you will organically connect in a meaningful and authentic way through your content. – Sydni Craig-Hart, CEO and co-founder, Smart Simple Marketing Stop hiding behind deadlines – invest time and energy into getting to know your customers’ struggles and values to connect through #Content, says @SydniCraigHart via @CMIContent. #CMWorld Click To Tweet HANDPICKED RELATED CONTENT: How to Get in Your Customers’ Heads for Invaluable Research
3. Double down on empathy
Start with empathy. If the pandemic taught us anything, it is the utmost importance of thinking about our audience with compassion and using emotional intelligence in our messaging and design. We must not forget this lesson, and we must invest deeper into our audience value matrix. – Jacquie Chakirelis, director of digital strategy, Great Lakes Publishing/Quest Digital The pandemic taught us the importance of using emotional intelligence in messaging and design. We must not forget, says @JacquieChak via @CMIContent #CMWorld Click To Tweet
4. Adopt the right mindset
Building connections is all about psychology. Your content needs to exhibit the characteristics that are going to make your audience have an amenable reaction to it. Provide them something that they will find valuable in their lives. Our audiences are smart. They know when companies are being insincere. Put yourself in their shoes. Would you feel a connection with your own marketing? – Andi Robinson, global digital content leader, Corteva Agriscience Building connections is all about psychology. Provide your audience with something that they will find valuable, says @hijinxmarketing via @CMIContent. #CMWorld Click To Tweet
5. Use context
Omnichannel journey mapping paired with a customer jobs-to-be-done approach helps you go both wide and deep around the solutions you’re offering. Go beyond what you think you want to publish to understand the surrounding customer context and how your content can solve their most emotionally intense questions. Consider journey mapping not to be a “bucketing” process where you look at your funnel but about an exercise of looking at customer questions over time, weighted for emotion. This will tell you how and where you can add the value that will support deeper engagement in your relationships. – Noz Urbina, omnichannel content strategist, Urbina Consulting Consider journey mapping customer questions over time. This will tell you how and where you can add value that will support deeper engagement, says @nozurbina via @CMIContent. #CMWorld Click To Tweet
6. Talk about your values
Be authentic and talk about why you’re doing what you’re doing. We ungated our content because we felt our community truly needed the resources we were producing during the pandemic. Our downloads and email subscriptions went way up because we communicated the why of what we were doing. It allowed us to talk about our values in the open, something we had not really done before. – Ahava Leibtag, president, Aha Media Group Be authentic and talk about why you're doing what you're doing, says @ahaval via @CMIContent. #CMWorld Click To Tweet HANDPICKED RELATED CONTENT: To Gate or Not to Gate? Is That Really the Question?
7. Pick the right hero
One of the best ways to build connections with audiences through content marketing is to tell stories with your client as the hero. Companies cannot copy your stories. They’re unique to your company. – Meryl Evans, digital marketing pro, meryl.net One of the best ways to build connections with audiences through #ContentMarketing is to tell stories with your client as the hero, says @merylkevans via @CMIContent. #CMWorld Click To Tweet
8. Work together
Co-create. Build on their ideas. This is an improvisational way of thinking. Stop pushing content on audiences and start building with them. – Kathy Klotz-Guest, founder, Keeping it Human Stop pushing #content on audiences and start building with them, says @kathyklotzguest via @CMIContent. #CMWorld Click To Tweet
9. Work with your audience
Never miss the chance to collaborate with a member of your audience. During the process of creating something, reach out and ask for their input. Get a quote. Include them in a roundup. Interview them. Don’t wait for the article to go live to get value. Use the content creation process as an opportunity to build connections with key influencers. That’s called zero-waste marketing. You’re winning even before you hit publish. You’re the press. Your outreach to them is a press hit. Your blog is your best networking tool because everyone loves to be interviewed. – Andy Crestodina, co-founder and CMO, Orbit Media Use the content creation process as an opportunity to build connections with key influencers, says @crestodina via @CMIContent. #CMWorld Click To Tweet
10. Reply (to) all
Respond. Every day we teach our learners how to create content on LinkedIn – not to create content – but to spark engagement and conversations. But how many people are sharing content and then forgetting it’s out there, thereby missing out on so many opportunities to engage with their audience and prospects. – Viveka von Rosen, chief visibility officer, Vengreso Respond. People are sharing #content and then forgetting it's out there, thereby missing out on so many opportunities to engage with their audience and prospects, says @LinkedInExpert via @CMIContent. #CMWorld Click To Tweet
11. Change your view
Build a community, not an audience. – Drew McLellan, CEO, Agency Management Institute Build a community, not an audience, says @drewmclellan via @CMIContent. #CMWorld Click To Tweet HANDPICKED RELATED CONTENT: Read the full article
0 notes
Text
Sustainable Web Design, An Excerpt – A List Apart
In the 1950s, many in the elite running community had begun to believe it wasn’t possible to run a mile in less than four minutes. Runners had been attempting it since the late 19th century and were beginning to draw the conclusion that the human body simply wasn’t built for the task. Article Continues Below But on May 6, 1956, Roger Bannister took everyone by surprise. It was a cold, wet day in Oxford, England—conditions no one expected to lend themselves to record-setting—and yet Bannister did just that, running a mile in 3:59.4 and becoming the first person in the record books to run a mile in under four minutes. This shift in the benchmark had profound effects; the world now knew that the four-minute mile was possible. Bannister’s record lasted only forty-six days, when it was snatched away by Australian runner John Landy. Then a year later, three runners all beat the four-minute barrier together in the same race. Since then, over 1,400 runners have officially run a mile in under four minutes; the current record is 3:43.13, held by Moroccan athlete Hicham El Guerrouj. We achieve far more when we believe that something is possible, and we will believe it’s possible only when we see someone else has already done it—and as with human running speed, so it is with what we believe are the hard limits for how a website needs to perform.
Establishing standards for a sustainable web#section2
In most major industries, the key metrics of environmental performance are fairly well established, such as miles per gallon for cars or energy per square meter for homes. The tools and methods for calculating those metrics are standardized as well, which keeps everyone on the same page when doing environmental assessments. In the world of websites and apps, however, we aren’t held to any particular environmental standards, and only recently have gained the tools and methods we need to even make an environmental assessment. The primary goal in sustainable web design is to reduce carbon emissions. However, it’s almost impossible to actually measure the amount of CO2 produced by a web product. We can’t measure the fumes coming out of the exhaust pipes on our laptops. The emissions of our websites are far away, out of sight and out of mind, coming out of power stations burning coal and gas. We have no way to trace the electrons from a website or app back to the power station where the electricity is being generated and actually know the exact amount of greenhouse gas produced. So what do we do? If we can’t measure the actual carbon emissions, then we need to find what we can measure. The primary factors that could be used as indicators of carbon emissions are: - Data transfer - Carbon intensity of electricity Let’s take a look at how we can use these metrics to quantify the energy consumption, and in turn the carbon footprint, of the websites and web apps we create. Data transfer#section3 Most researchers use kilowatt-hours per gigabyte (kWh/GB) as a metric of energy efficiency when measuring the amount of data transferred over the internet when a website or application is used. This provides a great reference point for energy consumption and carbon emissions. As a rule of thumb, the more data transferred, the more energy used in the data center, telecoms networks, and end user devices. For web pages, data transfer for a single visit can be most easily estimated by measuring the page weight, meaning the transfer size of the page in kilobytes the first time someone visits the page. It’s fairly easy to measure using the developer tools in any modern web browser. Often your web hosting account will include statistics for the total data transfer of any web application (Fig 2.1).
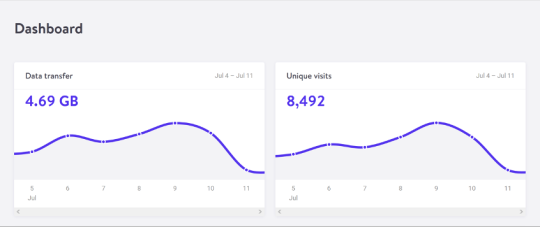
Fig 2.1: The Kinsta hosting dashboard displays data transfer alongside traffic volumes. If you divide data transfer by visits, you get the average data per visit, which can be used as a metric of efficiency. The nice thing about page weight as a metric is that it allows us to compare the efficiency of web pages on a level playing field without confusing the issue with constantly changing traffic volumes. Reducing page weight requires a large scope. By early 2020, the median page weight was 1.97 MB for setups the HTTP Archive classifies as “desktop” and 1.77 MB for “mobile,” with desktop increasing 36 percent since January 2016 and mobile page weights nearly doubling in the same period (Fig 2.2). Roughly half of this data transfer is image files, making images the single biggest source of carbon emissions on the average website. History clearly shows us that our web pages can be smaller, if only we set our minds to it. While most technologies become ever more energy efficient, including the underlying technology of the web such as data centers and transmission networks, websites themselves are a technology that becomes less efficient as time goes on.

Fig 2.2: The historical page weight data from HTTP Archive can teach us a lot about what is possible in the future. You might be familiar with the concept of performance budgeting as a way of focusing a project team on creating faster user experiences. For example, we might specify that the website must load in a maximum of one second on a broadband connection and three seconds on a 3G connection. Much like speed limits while driving, performance budgets are upper limits rather than vague suggestions, so the goal should always be to come in under budget. Designing for fast performance does often lead to reduced data transfer and emissions, but it isn’t always the case. Web performance is often more about the subjective perception of load times than it is about the true efficiency of the underlying system, whereas page weight and transfer size are more objective measures and more reliable benchmarks for sustainable web design. We can set a page weight budget in reference to a benchmark of industry averages, using data from sources like HTTP Archive. We can also benchmark page weight against competitors or the old version of the website we’re replacing. For example, we might set a maximum page weight budget as equal to our most efficient competitor, or we could set the benchmark lower to guarantee we are best in class. If we want to take it to the next level, then we could also start looking at the transfer size of our web pages for repeat visitors. Although page weight for the first time someone visits is the easiest thing to measure, and easy to compare on a like-for-like basis, we can learn even more if we start looking at transfer size in other scenarios too. For example, visitors who load the same page multiple times will likely have a high percentage of the files cached in their browser, meaning they don’t need to transfer all of the files on subsequent visits. Likewise, a visitor who navigates to new pages on the same website will likely not need to load the full page each time, as some global assets from areas like the header and footer may already be cached in their browser. Measuring transfer size at this next level of detail can help us learn even more about how we can optimize efficiency for users who regularly visit our pages, and enable us to set page weight budgets for additional scenarios beyond the first visit. Page weight budgets are easy to track throughout a design and development process. Although they don’t actually tell us carbon emission and energy consumption analytics directly, they give us a clear indication of efficiency relative to other websites. And as transfer size is an effective analog for energy consumption, we can actually use it to estimate energy consumption too. In summary, reduced data transfer translates to energy efficiency, a key factor to reducing carbon emissions of web products. The more efficient our products, the less electricity they use, and the less fossil fuels need to be burned to produce the electricity to power them. But as we’ll see next, since all web products demand some power, it’s important to consider the source of that electricity, too. Carbon intensity of electricity#section4 Regardless of energy efficiency, the level of pollution caused by digital products depends on the carbon intensity of the energy being used to power them. Carbon intensity is a term used to define the grams of CO2 produced for every kilowatt-hour of electricity (gCO2/kWh). This varies widely, with renewable energy sources and nuclear having an extremely low carbon intensity of less than 10 gCO2/kWh (even when factoring in their construction); whereas fossil fuels have very high carbon intensity of approximately 200–400 gCO2/kWh. Most electricity comes from national or state grids, where energy from a variety of different sources is mixed together with varying levels of carbon intensity. The distributed nature of the internet means that a single user of a website or app might be using energy from multiple different grids simultaneously; a website user in Paris uses electricity from the French national grid to power their home internet and devices, but the website’s data center could be in Dallas, USA, pulling electricity from the Texas grid, while the telecoms networks use energy from everywhere between Dallas and Paris. We don’t have control over the full energy supply of web services, but we do have some control over where we host our projects. With a data center using a significant proportion of the energy of any website, locating the data center in an area with low carbon energy will tangibly reduce its carbon emissions. Danish startup Tomorrow reports and maps this user-contributed data, and a glance at their map shows how, for example, choosing a data center in France will have significantly lower carbon emissions than a data center in the Netherlands (Fig 2.3).
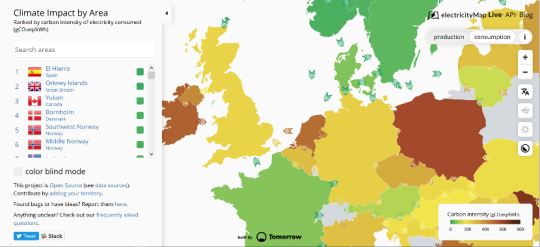
Fig 2.3: Tomorrow’s electricityMap shows live data for the carbon intensity of electricity by country. That said, we don’t want to locate our servers too far away from our users; it takes energy to transmit data through the telecom’s networks, and the further the data travels, the more energy is consumed. Just like food miles, we can think of the distance from the data center to the website’s core user base as “megabyte miles”—and we want it to be as small as possible. Using the distance itself as a benchmark, we can use website analytics to identify the country, state, or even city where our core user group is located and measure the distance from that location to the data center used by our hosting company. This will be a somewhat fuzzy metric as we don’t know the precise center of mass of our users or the exact location of a data center, but we can at least get a rough idea. For example, if a website is hosted in London but the primary user base is on the West Coast of the USA, then we could look up the distance from London to San Francisco, which is 5,300 miles. That’s a long way! We can see that hosting it somewhere in North America, ideally on the West Coast, would significantly reduce the distance and thus the energy used to transmit the data. In addition, locating our servers closer to our visitors helps reduce latency and delivers better user experience, so it’s a win-win. Converting it back to carbon emissions#section5 If we combine carbon intensity with a calculation for energy consumption, we can calculate the carbon emissions of our websites and apps. A tool my team created does this by measuring the data transfer over the wire when loading a web page, calculating the amount of electricity associated, and then converting that into a figure for CO2 (Fig 2.4). It also factors in whether or not the web hosting is powered by renewable energy. If you want to take it to the next level and tailor the data more accurately to the unique aspects of your project, the Energy and Emissions Worksheet accompanying this book shows you how.

Fig 2.4: The Website Carbon Calculator shows how the Riverford Organic website embodies their commitment to sustainability, being both low carbon and hosted in a data center using renewable energy. With the ability to calculate carbon emissions for our projects, we could actually take a page weight budget one step further and set carbon budgets as well. CO2 is not a metric commonly used in web projects; we’re more familiar with kilobytes and megabytes, and can fairly easily look at design options and files to assess how big they are. Translating that into carbon adds a layer of abstraction that isn’t as intuitive—but carbon budgets do focus our minds on the primary thing we’re trying to reduce, and support the core objective of sustainable web design: reducing carbon emissions. Browser Energy#section6 Data transfer might be the simplest and most complete analog for energy consumption in our digital projects, but by giving us one number to represent the energy used in the data center, the telecoms networks, and the end user’s devices, it can’t offer us insights into the efficiency in any specific part of the system. One part of the system we can look at in more detail is the energy used by end users’ devices. As front-end web technologies become more advanced, the computational load is increasingly moving from the data center to users’ devices, whether they be phones, tablets, laptops, desktops, or even smart TVs. Modern web browsers allow us to implement more complex styling and animation on the fly using CSS and JavaScript. Furthermore, JavaScript libraries such as Angular and React allow us to create applications where the “thinking” work is done partly or entirely in the browser. All of these advances are exciting and open up new possibilities for what the web can do to serve society and create positive experiences. However, more computation in the user’s web browser means more energy used by their devices. This has implications not just environmentally, but also for user experience and inclusivity. Applications that put a heavy processing load on the user’s device can inadvertently exclude users with older, slower devices and cause batteries on phones and laptops to drain faster. Furthermore, if we build web applications that require the user to have up-to-date, powerful devices, people throw away old devices much more frequently. This isn’t just bad for the environment, but it puts a disproportionate financial burden on the poorest in society. In part because the tools are limited, and partly because there are so many different models of devices, it’s difficult to measure website energy consumption on end users’ devices. One tool we do currently have is the Energy Impact monitor inside the developer console of the Safari browser (Fig 2.5).

Fig 2.5: The Energy Impact meter in Safari (on the right) shows how a website consumes CPU energy. You know when you load a website and your computer’s cooling fans start spinning so frantically you think it might actually take off? That’s essentially what this tool is measuring. It shows us the percentage of CPU used and the duration of CPU usage when loading the web page, and uses these figures to generate an energy impact rating. It doesn’t give us precise data for the amount of electricity used in kilowatts, but the information it does provide can be used to benchmark how efficiently your websites use energy and set targets for improvement. Source link Read the full article
0 notes
Text
12 Important PPC Trends to Watch in 2021

Technology is getting advanced day by day, hence making it necessary for brands to function according to the new trends. By understanding these new PPC trends, brands and marketers can stay ahead of the competition and provide better ROI. Otherwise, businesses will fall behind those who invested the time and resources to keep up with the latest trends. Brands and marketers who develop the latest trends into their present marketing strategy will reach their audience easier and build relationships that nurture leads through the sales process more efficiently. Without further delay, let’s jump into the 12 important PPC trends to watch in 2021. NOTE: As per the statistics, about 50% of people land on the brands directly from the paid ads links.
1- Responsive Search Ads (RSAs)
Image Source Responsive search ad is one of Google’s most flexible search ad formats. It lets the marketer create an ad that shows more texts and more relevant messages to the customer. While creating RSAs, you can use up to 15 unique headlines and four descriptions. Google then runs a test and chooses the best combination of headlines and descriptions that will reach your target audience. With RSAs, you can create ads for different screen resolutions, save time and money in testing which works the best for you, reach more potential customers, and attract more clicks and conversions. Using RSAs has numerous benefits and this is the reason why marketers are flocking towards it. This makes it one of the trendiest factors in PPC marketing this year.
2- PPC Automation

Image Source Automation is considered one of the biggest trends among many. The use of machine learning (ML) and artificial intelligence (AI) tools has automated the workload associated with search engines ads.The proof proposes that automation will be utilized to streamline PPC campaigns and will be promptly received by PPC specialists to:- Ascertain the best bidding strategy for various objectives. - Set bids to get whatever the number of transformations could reasonably be expected at a set objective CPA. - Upgrade CPC by searching for ad bids that are bound to produce conversions. - Stop low-performing ads and focus on the ones creating the best outcomes. - Distinguish execution issues inside the data. - Progressively produce promotions dependent on client behavior and site content. - Produce ad execution reports consequently.
3- Diversification Will Become More Important
In 2021, you should expand your range of abilities and go beyond Google promotion. With greater variety, you’re setting out for success. It permits you to oversee your reach, spending, and message.Diversification is vital if you need to get a winning PPC technique. It gives you agility, permitting you to put yourself in an extraordinary position. You can profit from additional scaling openings while rearranging your financial plan as your necessities change.To pursue these trends, test different platforms. A portion of these incorporate YouTube, Facebook, Instagram, Twitter, and TikTok.
4- Harness The Power Of First-Party Data
The way in which advertisers source information will experience disruptions this year. The essential cause is the progressions in worldwide strategies for the protection of data privacy. It means limitations to third-party cookies data for any internet browser.You can still have access to valuable information even in this scene. It just means creating fresh solutions that will not depend on cookies.However, having first-party data implies getting higher precision. You can segment them with more customization choices.
5- New Instagram Opportunities

Image Source Watch out for Instagram since it’s one of the hottest paid social media platforms in 2021. Most marketers agree that it will not take some time before the platform offers more ad campaigns. They’ll utilize IGTV and Reels since they’re acquiring organic traffic.Ad formats like Stories surpassed most publicists’ assumptions. With the dispatch of Reels, Instagram desires to follow TikTok’s promotion designs.
6- Goodbye Data
The jumbling of information will, sadly, be a demanding trend in 2021.Between Google Ads restricting access to search data to the unwanted tracking cookies, marketers must adjust in a significant way again.So, how can PPC advertisers deal with succeeding in this environment?Imperfect or incomplete information is nobody’s top pick, yet savvy advertisers should utilize fragmented data to see the signal from the noise. Rather than focusing on the loss, marketers need to focus on what they have now and make the best out of it.
7- Big Picture Strategy Will Become More Valuable
The PPC industry can change quickly. Realizing the right planning requires a significant range of abilities. Have an inventive outlook while keeping up with your capacity to see the big picture.Gather your PPC strategies utilizing a common theme. Guarantee that every ad and offer will speak to your particular audience group.Your market is simpler to target when considering their practices and preferences. Never depend on the noticed difference in your accumulated data. Always adjust your choices to your objective.
8- More Targeted Ad Message
Image Source The viability of your ad message affects your PPC strategy to a great extent. In 2021, marketers are giving this a higher priority than any other factor to compose a great ad targeted to the specific target audience. To accomplish this, you must understand your audience as people rather than data.You may get perfect traffic at the perfect time. But, if you don’t have the right sales copy, you’ll miss out on the chance to hit your target audience. Creativity can bring your audience closer to your brand and increase engagement. Hence, creating a targeted ad message is another topic trending in the PPC world this year.
9- Ads Data Hub

Image Source With Google’s announcement in 2020 to stop allowing third-party pixels to track the YouTube campaigns, Ads Data Hub is getting top on the list of PPC trends in 2021. Google took to the decision keeping security concerns in mind and came up with the alternative to help YouTube marketers to monitor their campaigns.With Google’s Ads Data Hub, you can tailor your marketing measurement approach to your unique business needs. Ads Data Hub will help marketers to understand the effectiveness of their ads across screens, including mobile devices, by providing comprehensive reporting and measurements, which was a limitation in the case of pixel technology.
10 – Great Mobile Experience
Image Source In a new market overview, economic researchers tracked down that over 27.6% i.e $2.4 billion of individuals shop online through their cell phones. At the same time, they admitted that they bounce back from the site if it requires over 3 seconds to load. Hence, to make your PPC promotion more effective and productive, you should create your site so well that your audience can get to it on any device, particularly on mobile phones.
11- Voice Search For PPC Campaigns
Here are some stats that might surprise you: - At least 50% of consumers will be using voice shopping by 2022 - Voice Commerce sales will reach $40 billion by 2022 - Voice-based ad revenues are expected to reach $19 billion by 2022 Running through these figures, you might now be convinced why you should look towards Voice-based search campaigns if you haven’t already. When you plan your PPC campaign voice-search oriented, remember three things in general:- It should be mobile friendly as most of the voice search comes from mobile devices. - It should be more natural and in a conversational style (long-tail keywords). - It should be question-oriented and most people ask questions while using voice search.
12- Video Ads And PPC
Image Source To give you a base measurement, by 2022, the number of videos uploaded on the web each second would cross the 1 million mark. Thus, the ideal opportunity to begin is right now.With the expanding expenses of keywords, your ROI for PPC can be confronting a descending slope. Video Adwords are a lot less expensive yet face lesser competition. Also, a considerably more exact segment can be focused on with video ads set up.Video Ads can be pay-per-view or PPC depend upon the length and placement.
Conclusion
As a marketer, you need to incorporate these “12 important PPC trends to watch in 2021” in your marketing strategy in order to make the most out of it. In 2021, AI and automation are at the forefront. Marketers are more focused on the buyer’s journey. You can apply these trends and see the changes in your marketing campaigns. Source link Read the full article
0 notes
Text
Building a Basic Adobe Analytics Dashboard for SEO

The author's views are entirely his or her own (excluding the unlikely event of hypnosis) and may not always reflect the views of Moz.Note: This guide was co-authored by Caitlin Boroden and Kristi Barrow.The largest players in website analytics are Adobe Analytics and Google Analytics (GA), and for many SEOs, GA is typically their first foray into the world of analytics. While there are plenty of guides to self-learn GA, there is noticeably less documentation for Adobe Analytics. In this new guide, we’ll cover the basics of Adobe Analytics for SEO, guide you through creating a simple dashboard, and help you ensure your Adobe Analytics implementation is set up correctly for your business needs. Then, we’ll show you how to add a few new and exciting elements to your SEO dashboard.
What is Adobe Analytics and why is it important for SEO?
On a basic level, Adobe Analytics functions just like Google Analytics. They both allow you to monitor website traffic across channels, track conversions, and understand customer behavior. However, Adobe Analytics has many advanced features that allow you to get down and dirty with the data. As for SEO, with even a basic setup, it can provide you with a wealth of information about your website and its visitors. Ready to learn? Read the Full Guide to Adobe Analytics for SEO!For an excerpt, read on for a brief how-to on building a basic SEO dashboard.
Build your first SEO dashboard
In this section, we guide you through creating your first SEO dashboard. By the end, you’ll have built a dashboard that includes all the SEO basics in one place. Now, open up a blank Adobe Analytics Workspace and let's get started!1. Organic Traffic Overview
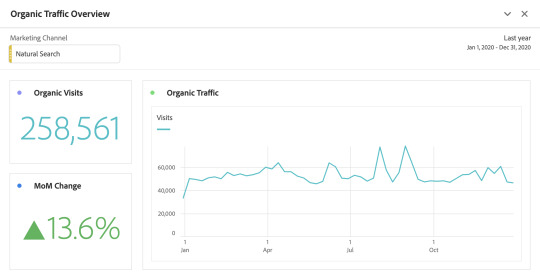
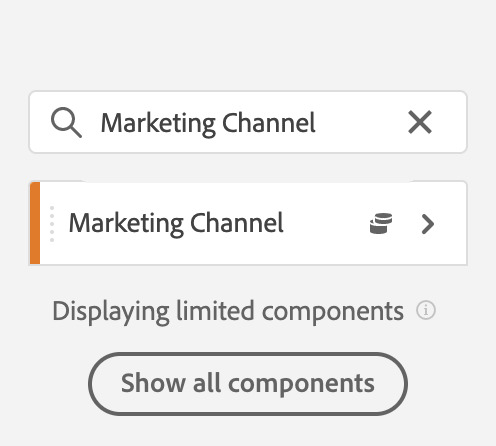
The first panel we’ll be creating is an Organic Traffic Overview. This panel is simple and meant to give a quick gauge of SEO performance. Here are the steps to recreate this panel:1. First things first, create a new workspace panel and add a Natural Search segment. To do so, within the components panel, search for Marketing Channel. Once found, click the small > to refine the dimension. Find Natural Search and drag and drop into the top of the panel.

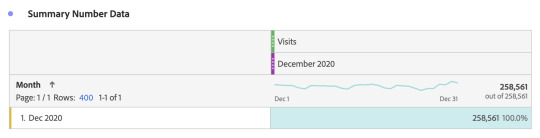
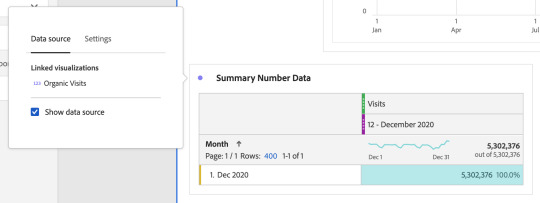
2. To create the field that summarizes the total Organic Visits, within the visualization panel, select Summary Number, and drag and drop into the panel. Two things will pop up: Summary Number and Summary Number Data. In the Summary Number Data chart, drag and drop Visits into the Drop a Metric Here (or any other component) placeholder. If you only want to report on December, for example, within the component panel search, search for Last Month or any time frame you desire. Drag and drop this into the chart too. It should look like this:
Your summary number should now be showing. To hide the chart and only show the line graph, click the colored dot next to the title of your Summary Number. Then toggle off Show Data Source. Lastly, rename and resize the summary number as you see fit.
3. To create the month-over-month (MoM) change visualization, within the visualization panel, select Summary Change, and drag and drop into the panel. Two things will pop up: Summary Change and Summary Change Data. In the Summary Change Data chart, drag and drop Visits into the Drop a Metric Here (or any other component) placeholder. Then filter visits with the time periods you want to compare. For example, add a filter for Last Month vs. 2 Months Ago for a MoM comparison. Then, drag and drop All Visits into the chart as well. It will look like this:

Now, your summary change should be showing. To hide the chart and only show the line graph, click the colored dot next to the title of your Summary Number. Then toggle off Show Data Source. Lastly, rename and resize the summary change to your liking.4. Finally, to create the line graph, first update the time panel to Last Year (or whatever time period you plan to report on). Then, from the visualization panel, select Line and drag and drop into the panel. Two things will pop up: Line and Line Data. In the Line Data chart, drag and drop Visits into the Drop a Metric Here (or any other component) placeholder. Your line graph should now populate. To hide the chart and only show the line graph, click the colored dot next to the title of your line graph. Then toggle off Show Data Source. Lastly, rename and resize the line graph as you see fit.
2. Top Entry Pages Report

The second panel we’ll be creating is a Top Entry Pages Report. This panel is also relatively simple and is meant to quickly show which website’s pages are performing best in the SERPs. Here are the steps to recreate this panel:1. First, add a new panel to your dashboard and add a Natural Search segment. To do so, within the components panel search Marketing Channel. Once found, click the small > to refine the dimension. Find Natural Search and drag and drop into the panel.2. To create the table, within the visualization panel, select Freeform Table, and drag and drop into the panel. An empty table will show up. In the Freeform Table, drag and drop Entry Page into the body of the table. In the Drop a Metric Here (or any other component) placeholder, drag and drop Visits, Bounce Rate, and Average Time on Site side-by-side. Lastly, rename and resize the table as you see fit.3. Marketing Channels Report

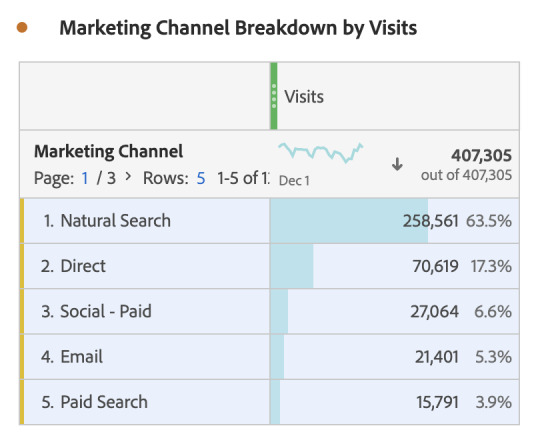
The third panel we’ll be creating is a Marketing Channels Report. This panel will break down your website’s marketing channels with two different visualizations: a donut chart and a freeform table.1. To begin, add a new panel to your dashboard. No segment is needed for this report. 2. To create the table, within the visualization panel, select Freeform Table, and drag and drop into the panel. An empty table will show up. In the Freeform Table, drag and drop Marketing Channel into the body of the table. In the Drop a Metric Here (or any other component) placeholder, drag and drop Visits. Lastly, rename and resize the table as you see fit.3. To create the donut chart, within the Freeform Table you just created, highlight the Marketing Channels like so:
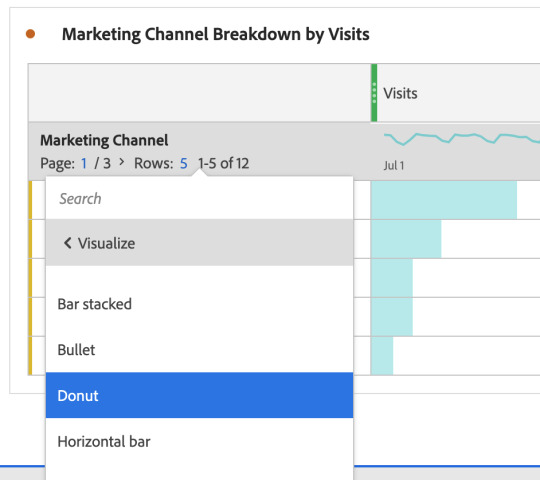
Then, right click, go to Visualize, and select Donut. A Donut Chart should appear and be populated with your information. Lastly, rename and resize the donut chart as you wish.
4. Referral Reports

The fourth panel we will be creating is a Referral Report. This panel is meant to provide a glimpse into what external websites are driving traffic to your website. Here are the steps to recreate this panel:1. To start, add a new panel to your dashboard. No segment is needed for this report. 2. To create the table, within the visualization panel, select Freeform Table, and drag and drop into the panel. An empty table will show up. In the Freeform Table, drag and drop Referring Domain into the body of the table. In the Drop a Metric Here (or any other component) placeholder, drag and drop Visits and Unique Visitors. Lastly, rename and resize the table as you see fit.5. Conversion Reports/Examples

In this final panel, we’ll be creating a Conversion Report to highlight the top conversions for the website. In this example, we will simply be using Summary Numbers. However, feel free to include a line graph, bar graph, or any other visualization that fits your needs. If you’ve been following along so far, you’ve got all the skills you need to create these visualizations, too.1. To start, add a new panel to your dashboard and add a Natural Search segment. To do so, within the components panel search Marketing Channel. Once found, click the small > to refine the dimension. Find Natural Search and drag and drop into the panel.2. To create the various Summary Number visualizations, in the visualization panel, select Summary Number, and drag and drop into the panel. Two things will pop up: Summary Number and Summary Number Data. In the Summary Number Data chart, drag and drop your Goal Metric into the Drop a Metric Here (or any other component) placeholder. Your summary number should now be showing. At this time, don’t forget to update the time period range to fit your needs. To hide the chart and only show the summary number, click the colored dot next to the title of your Summary Number. Then toggle off Show Data Source. Lastly, rename and resize the summary number as you see fit.3. Repeat step two for all the conversions you want to display, renaming and resizing each Summary Name to your liking.
Celebrate — you did it!
That’s that! You have created a simple SEO dashboard in Adobe Analytics, and are hopefully feeling more confident about the basics. Source link Read the full article
0 notes
Text
How to Respond To Negative Reviews

Approximately 22% of customers will leave a business after receiving just one negative review, whereas around three negative reviews can drive away 59% of customers. Reviews assist consumers in making quick decisions about purchases in their research by providing a clear picture of your company. Studies show that of businesses who respond to bad reviews, 33% turn around and post a good review, and 34% delete the original negative review. Whether a review is good or bad, it makes sense to respond. When someone leaves a negative review about your company, it can be really difficult to know how to respond. There are many ways you could handle the situation, but one of the best responses is simply asking for more information and trying to find out what went wrong. Despite your natural feeling of frustration, make your best effort to remedy the situation. Resolve the problem by apologizing and repairing it. If you resolve the issue, many customers will be happy to change their reviews. Below I’ll run through the steps to consider when responding to a negative online review.
1. Keep calm and take a breath
It can be hard not to take personal insults and low-star ratings as being directed at us, but it is important to remember that sometimes people are venting their frustrations about something else. A good way of responding might be to thank them for taking the time—yes, even if they didn’t like your business or service—and to ask what could have been done better in order to make things right with them. Before responding to an angry customer, take a moment to breathe deeply and think about it. If necessary, get up and walk around the block. The best thing to do is to settle your emotions before responding, as being angry is never a good outcome. You might find it helpful to have a list of standard responses to refer to when responding to a customer who’s had a bad experience. In writing a reply to the reviewer, you can use these “canned” responses as a starting point. Then tailor your canned responses to each reviewer’s feedback to ensure people reading your reviewers don’t see too much repetition. Taking a moment to think about what you want to say, or the kind of response you want to use, can be incredibly helpful—especially if you’re upset. Take the below response, for example. If emotions had been settled before responding, the responder might have delivered a better response, without the sarcasm. It would have been better to look at this situation from the perspective of asking if anything could have been done better to make things right with the reviewer.

2. Remember that you must respond to the negative review
Bad reviews actually have the power to improve conversion rates, so it would be a shame not to take this golden opportunity to respond. Taking the time to respond to a negative review can result in a 16% boost in customer advocacy. Remember that the most effective form of marketing is word of mouth. Businesses experience a 37% decline in customer advocacy simply by the act of not responding to a negative review. Be empathetic in your approach. Reviewers often just want to be heard. Sometimes, all it takes to make a customer happy is to show them that you have heard them and that you want to solve their problem. Customer satisfaction can be doubled by resolving a customer issue in a single contact, as you’re far more likely to get a repeat sale. Over 70% of buying decisions are based on how a customer feels they are being treated, so do your best to make all of your customers feel valued – even the unhappy ones, as below.

3. Consider the type of reviewer you’re dealing with
There are many different types of reviews and reviewers, but there are a few categories into which most people fall. You’re guaranteed to make the response process faster and more effective if you take advantage of BrightLocal’s tips on different types of reviewers, like first-time, sharpshooters, and serial complainers, for example. First-time reviewers: Consider whether the negative feedback is accurate. If it is, make internal changes to remedy the problem. When applicable, explain how you will prevent this issue from occurring again in the future. Also, if you disagree with the reviewer’s assertions, politely and professionally present your point of view. Sharpshooters: When dealing with a short, confident review from an expert, keep in mind that brevity is the goal. Condense your response into clear and concise sentences rather than lengthy ones to better reflect this type of reviewer’s communication style. Serial Complainers: The serial complainer can really hurt your business, so tread carefully. These reviewers have experience with similar businesses and know how to make them look bad in the process. To avoid this, take note of what other companies did when responding with them as well as avoiding making mistakes they made! Top Tip: If you’re working with Google reviews, click on the reviewer’s profile and you should be able to say all the reviews they’ve left for other businesses. Looking at how other businesses have responded to these reviews (and how successful they’ve been in turning the reviewer around) will give you a great idea of how to approach their review of your business.
4. Resolve the issue
Sometimes customers leave reviews because they are disappointed or disgruntled, and not because of something you’ve done. If possible, try contacting them privately with a response that politely addresses their message. Work to solve the problem with more than just a response. Discover what went wrong and why the reviewer was so dissatisfied. Search your database for their email or phone number and contact them. Instead of addressing the issue online, you’ll be able to speak directly and resolve it “in person.” Efforts to resolve the problem show the customer (and others) you mean business. When customer trust is broken, it is critical to go the extra mile. Fixing the problem not only makes the customer happier, but other potential clients will see how important your customers are to your business, as you can see below. Read the full article
0 notes
Text
What is a Customer Satisfaction (CSAT) Score? And Why Does it Matter?

Working in customer service, you probably want to make sure your clients are having positive experiences with your brand and its products. Instead of assuming that you’re doing everything right, turn to the data — that means knowing your CSAT score. In this article, we’ll cover: - What CSAT score means. - What can be considered a good CSAT score. - How to measure your CSAT score and the CSAT score formula. - The difference between NPS and CSAT scores. - How to improve your business’s CSAT score. Let’s dive right in. Bonus: Get a free, easy-to-use Customer Service Report Template that helps you track and calculate your monthly customer service efforts all in one place.
What is a CSAT score?
So, first things first: what does CSAT score mean? CSAT stands for “customer satisfaction.” So a CSAT score is a customer service metric that reflects customer sentiment, experience and contentment with your brand. It’s a way to qualitatively show how customers perceived their experience with your brand or its products. And because it’s qualitative, it’s a useful Key Performance Indicator (KPI) that your business can track. Your CSAT score is important to measure for a few reasons: - You’ll have data that reflects whether your customers are feeling satisfied (or dissatisfied) with your brand. - If the CSAT score could be higher, you’ll know where you can make improvements. - If the CSAT score is good, you can use that in your marketing materials to promote your business and show how it stands out from your competitors. - If you know where customers are having issues with your brand or its products, you can resolve pain points before you lose customer loyalty.
What is a good CSAT score?
Basically, it depends! A good CSAT score varies by industry. The American Customer Satisfaction Index (ACSI) measures average CSAT scores across 10 different industries. According to its 2020 data, if you’re scoring over 80% then no matter what industry your business is in, you’re doing really well. On the flip side, regardless of your industry, if your CSAT score is below 60%, there is lots of room for improvement.
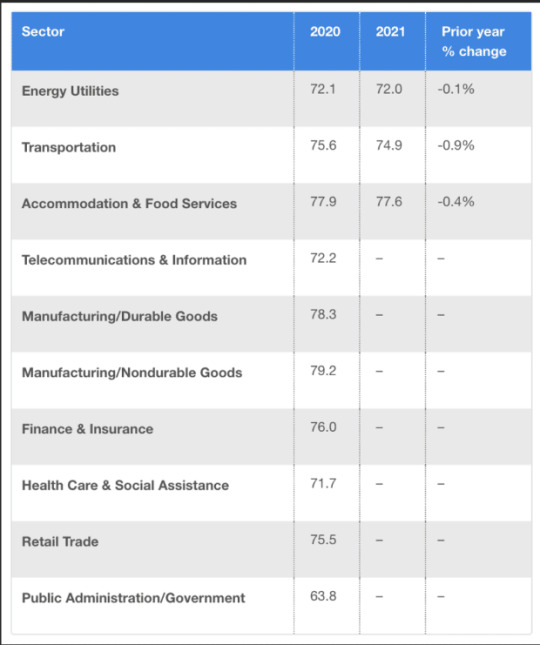
Source: ACSI But really, what counts as a good CSAT score will depend on where your business is starting out. In other words, focus on your own business first. Collect feedback via surveys and social media, stay on top of the metrics and try to identify room for improvements. Then, compare past CSAT scores to current ones to make sure you’re either improving the CSAT score or staying consistently high. That way, you’ll have data driving new business decisions.
The CSAT score scale
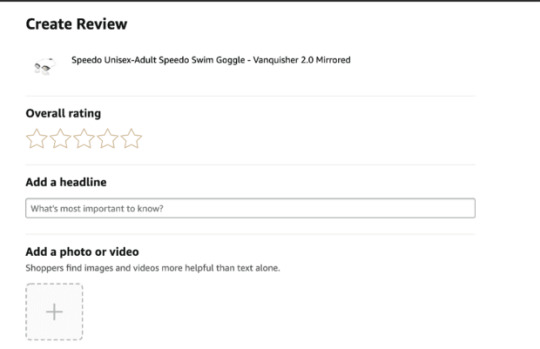
Turning a sentiment into a number involves creating a simple — and non-time consuming! — survey made up of just one or two questions. That survey will include a CSAT score scale, which asks customers to rank their experience shopping with your brand or their perception of a product they purchased. You give customers a 1 to 5 scale, where 1 represents the worst possible experience and 5 represents the best. Maybe the CSAT score scale is just the numbers, shown as 1 through 5. But the scale can also be displayed creatively. For example, Amazon encourages buyers to review products using the star scale:
Or, you can also display the scale through the use of emojis showcasing 5 emotions ranging from very unhappy to very satisfied. To get customers to share their experience — and therefore, to get reliable data to help inform your CSAT score — follow these useful tips: - Be specific with your questions. Make sure they’re open-ended questions and not yes/no questions. And be sure they specifically address the experience you’re looking to collect data on. For example, ask “How satisfied were you with your experience at the ABC Cafe?” or “Does the product meet your expectations?” - Keep it short. You want customers to respond so you can get a reflective CSAT score, so focus on just one or two customer experience touchpoints. - Keep the CSAT score as a 1 to 5 scale. This keeps it easy for your customers and doesn’t overwhelm them with options. But at the same time, it provides enough range to give you quality data. - Leave space for open-ended comments. While this won’t contribute to the CSAT score, it can be helpful if customers wish to provide explicit examples about what made their experience positive or negative. It’s a way to get direct feedback and make specific plans going forward.
How to measure your CSAT score
If you’re interested in knowing how to measure your CSAT score, you need to know the CSAT score formula. Simply, calculating your CSAT score means calculating a percentage based on the feedback you collected in the customer surveys. Because it’s a percentage, the score will range from 0 to 100. Step 1: Add up the number of satisfied responses. Consider your customers satisfied with your brand if they rank 4 or 5. So, if 30 customers ranked 4 in the CSAT score scale and 50 ranked 5, that brings your total to 80. Step 2: Divide that number by all the responses you received. Perhaps your survey received a total of 112 responses. So divide 80 by 112 for a value of 0.71. Step 3: Multiply by 100. This gives you the percentage. So based on this example, the CSAT score would be 71.
What is the difference between a CSAT score and a NPS score?
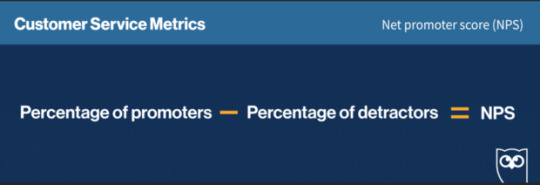
NPS and CSAT scores aren’t the same. NPS stands for “net promoter score.” Like CSAT score, NPS score is based on a customer survey and qualifies those responses. But unlike CSAT score, this is a measurement of how likely customers are to recommend your business’s products or services to others, not a direct reflection of their own experience. Also like CSAT score, NPS score uses a score scale to determine these metrics. Most NPS surveys ask customers to rate how likely they are to recommend your brand on a scale of 1 to 10. 10 means they are sure to recommend you, while 1 means there’s no chance they would. It’s also a different formula to calculate NPS score. To calculate NPS score, subtract the percentage of detractors (people who score 0 to 6) from the percentage of of promoters (people who score 9 and 10):
Interested in other customer service metrics that are useful to track? Here are 14 metrics to track, plus a free reporting template.
5 tips for improving your CSAT score
If your brand’s CSAT score isn’t quite where you’d like it to be, these 5 tips will help. Respond to issues quickly and professionally As a customer service manager, you’ll hear if someone is dissatisfied with their experience or upset with your product. Maybe the customer shares that sentiment via a social media post, a Google My Business review or a DM. Regardless, don’t sit on the issue. Address things quickly and professionally. One way to always ensure professionalism is to make sure you’ve set up brand guidelines for your social media channels, addressing things like response time, tone and protocol for escalating issues. Similarly, if your brand constantly gets the same questions, take the time to publicly display answers to FAQs. For example, Instagram Highlights are a great for posting FAQs:

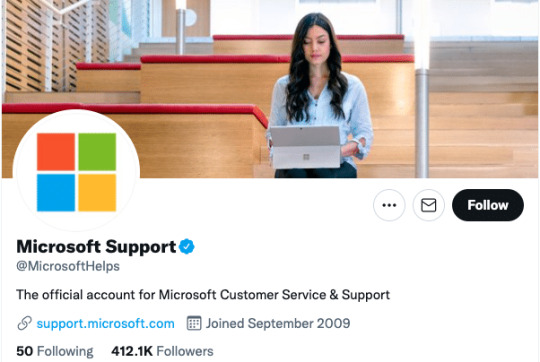
Source: Hello Bello Have dedicated customer support channels on social media Make it easy for your customers to voice complaints or ask questions. As well as having a dedicated email address for customer support, having channels on social media specific to customer support can be useful too. This way you can distinguish the calls for support from the more general requests, making it easier for your brand to respond quickly and accurately. Brands that do this include Microsoft:
Snapchat:
And Twitter:
Identify customer conversations If your brand is active on social, consider using Hootsuite’s social listening streams. This helps you monitor multiple social networks and “hear” the conversations happening around your brand. And this way, you can quickly address support requests, even if you’re not tagged. Learn more here: Manage customer messages in one place A customer service tool like Sparkcentral by Hootsuite makes managing customer messages easier. Its features include AI-powered chatbots to improve response times and automated message distribution to help manage a high-volume of incoming support requests across many different channels, including: - Instagram - SMS - Twitter - Facebook - WeChat - Telegram - And more! Consider implementing SMS marketing Finally, consider incorporating SMS marketing into your business’s marketing strategy. This allows brands to interact directly with customers via text. In terms of elevating customer satisfaction, this allows customers to directly access your customer service reps, helping them feel taken care of quickly. Save time building an efficient customer support system with Sparkcentral by Hootsuite. Quickly respond to questions and complaints across a variety of channels, create tickets, and work with chatbots all from one dashboard. Try it free today. Request a Demo Manage every customer inquiry on a single platform with Sparkcentral. Never miss a message, improve customer satisfaction, and save time. See it in action. Source link Read the full article
0 notes
Text
Webinar Planning: The Ultimate Checklist


Updated Aug. 25, 2021 Webinars are a high form of content marketing, as they can breathe life into static content such as a case study or research report. An engaging webinar is like a well-produced radio show with pictures. It is a five-act, mini-theatrical event. A webinar done well can help you move your buyer’s sales needle from “just researching” to “ready to buy now.” In the latest CMI research, two-thirds (67%) of B2B marketers say they do webinars. Two-thirds (67%) of B2B marketers say they do webinars via @CMIContent. #research Click To Tweet As with any well-produced event, success starts with planning. For a demand-generation webinar, it should take about six to eight weeks from the time you say “let’s go” to showtime. Now, let’s get on with this show and the five acts of a successful webinar.

Click to enlarge
Prologue
A webinar is about more than just technology. It’s about aligning business drivers with desired outcomes all while managing the ever-changing scheduling, logistics, and human factors. The glue that holds all of this together is a deadline-driven project-management methodology, a set of best practices, and the use of email and webinar metrics to benchmark performance across the entire webinar life cycle. Each act’s objectives and task checklist offer you a strong basis for a successful methodology.
Act 1 – Setting the stage for a smooth production

Click to enlarge Top-line objectives - Determine webinar objectives and desired outcomes. - Identify technology tools and team skills needed. - Build a project plan and successfully kick this off. Tasks - Determine the content type: case study, tutorial/how-to, or compliance and standards. - Detail the target audience. - Develop a working title. - Identify audience pain points this webinar addresses. - Consider if this is a “must-have” or “nice-to-have” topic. - Identify sources for content. - List the business objectives. - Determine the call to action (before, during, and after the webinar). - List success factors and desired outcomes. - Determine when to go live. - Develop a project timeline. - Identify who will be part of the project team. - Determine whether internal and/or external speakers will be used. - Evaluate which webinar hosting platform will be used. - Determine hosting platform compatibility/integration with marketing automation tools. - Assess audio and video camera/webcam/lighting requirements. - Determine if your built-in webcam is sufficient or consider an external webcam. - If using a webcam for video, consider using a pleasant virtual background to “mask” overhead fans, sunlight, natural lights, and busy bookshelves. - Consider placement and adjustment of your webcam, lighting, looking your best, webinar platform video considerations, etc. - Hold a kick-off meeting to set the tone with all players. - Follow up the kick-off meeting to get buy-in and start the production.
Act II – Attracting the right audience

Click to enlarge Top-line objectives - Develop the email invitation and email campaign schedule. - Identify list-sourcing options beyond your house list. - Execute the email campaign. HANDPICKED RELATED CONTENT: 10 Things to Think About When Using Email Marketing Tasks - Select a winning topic that connects with your target audience (e.g., solving a pain point, describing how to get better outcomes, or keeping the audience in the know with industry and market shifts). - Develop an audience profile to align with the topic and value proposition. - Detail industries, job titles/functions, revenue thresholds, and geographic regions of your audience. - Size and source your audience beyond your house list to meet your registration goals. - Identify list-sourcing options (e.g., media sponsors, trade associations, purchased lists). - Determine the email invitation format: HTML, text, or both. - Ensure that the email invite addresses the problem statement and deliverables of what people will learn. - Develop the webinar registration landing page (webinar hosting or marketing-automation platform). - Create the email campaign drip schedule (how many and when to start). - Develop attention-getting email subject lines for each drip. - Establish benchmark metrics for the email campaign and daily registration tracking. - Make sure emails are CAN-SPAM compliant. - Identify social media promotion channels. - Test email and social media campaigns before launching. - Execute the email marketing campaign and start daily tracking of registrations. - Use email and registration metrics to determine whether the message is connecting to attract the desired audience and registration outcomes. HANDPICKED RELATED CONTENT: How To Make Webinar Content Shine: A No-Fail Formula
Act III – Engaging your audience

Click to enlarge Top-line objectives - Gather and convert registration data into actionable intelligence. - Hold a table-read meeting to brainstorm structure and flow. - Hold the first dress rehearsal to perform the initial walk-through. HANDPICKED RELATED CONTENT: Data: The Missing Piece in Your Content Marketing Strategy Tasks - Monitor the key email webinar invitation metrics (sent, hard bounces, soft bounces, delivered, open rate, click rate, unsubscribes/opt-outs, and spam complaints). - Monitor the key webinar performance metric before you go live. (The click-through ratio measures how many people register vs. those who don’t complete the process.) - Gather and analyze additional registration data from the landing page (e.g., what you can learn about the organization, industry, and job function; what would they like to get out of attending the webinar; how did they hear about this webinar?). - Create a dashboard to view daily registration tracking progress (e.g., email campaign metrics by touchpoint, audience demographics, and daily registration by touchpoint, including CTR metrics). - Monitor campaign metrics to see if they are on track and adjust the campaign messaging, if necessary. - Consider getting fence-sitters (those who opened the email but did not complete registration) to commit by sending reminder emails. - Schedule one hour for the table read of the webinar. - Prepare and send the table-read meeting agenda for key organizers and speakers. - Hold the table-read meeting (virtual or in-person): - Ensure that webinar content matches the invitation. - Discuss the structure, timing, and flow. - Create a production script – identify each segment, duration, and speaker. - Prepare PowerPoint slides and template. - Make sure speakers have appropriate audio devices, supply them with a USB headset, if needed. - Schedule 90 minutes for the first dress rehearsal. - Prepare and send the first dress rehearsal agenda. - Hold the first dress rehearsal: - Share insights gathered from daily registration. - Modify and optimize the content as needed. - Walk through the slides. - Test speakers and audio devices. - Begin development of questions for online polls (ice breaker, closing, and next steps). - Schedule 90 minutes for the second dress rehearsal. - Create six bookend slides – splash screen, speaker intro, who’s in the audience, housekeeping, call to action, ask the experts. - Create the final survey to measure satisfaction and other qualitative feedback. - Draft thank-you emails for all attendees and no-shows with a link to view the webinar and any other next steps to continue the conversation. - Test the recording software. - Hold the second dress rehearsal: - Perform a timed run-through of the slides and polls (ice breaker, closing, and next steps). - Optimize the moderator’s role. - Create seed questions for the Q&A. - Does the story sound natural and authentic? HANDPICKED RELATED CONTENT: Fill All the Seats at Your Webinar With These 6 Steps
Act IV – Going live

Click to enlarge Top-line objectives - Perform the final sound and video check. - Go live and debrief. - Execute immediate post-webinar action steps. Tasks - Prepare the webinar-day agenda. - Meet with your team one hour before the webinar. - Perform the final sound and video check. - Review the slide deck one last time. - Make sure polls, surveys, and seed questions are loaded into the webinar platform. - Set up a Plan B – backup audio and network. - Record the webinar and assign two people to create a backup recording. - Give the team a debriefing number to call after the webinar. - Launch the splash screen at least 15 minutes before going live. - Silence all ringers and anything that can beep or bark. - Mute all non-speakers. - Send a welcome message to the audience one to two minutes before starting the broadcast. - Start on time, welcome the audience, and have fun. - Monitor real-time tracking of performance metrics to measure engagement. - Deliver a clear call to action and next steps to your audience one to two minutes prior to adjourning. - End on time, and thank the speakers and the audience. - Get on a separate call for a 15-minute team debrief. - Edit the webinar recording to remove housekeeping instructions and any ums and ahs. - Send thank-you emails 24 to 48 hours after the webinar.
Act V – Converting your audience

Click to enlarge Top-line objectives HANDPICKED RELATED CONTENT: How Read the full article
0 notes
Text
Voice Content and Usability – A List Apart
We’ve been having conversations for thousands of years. Whether to convey information, conduct transactions, or simply to check in on one another, people have yammered away, chattering and gesticulating, through spoken conversation for countless generations. Only in the last few millennia have we begun to commit our conversations to writing, and only in the last few decades have we begun to outsource them to the computer, a machine that shows much more affinity for written correspondence than for the slangy vagaries of spoken language. Article Continues Below Computers have trouble because between spoken and written language, speech is more primordial. To have successful conversations with us, machines must grapple with the messiness of human speech: the disfluencies and pauses, the gestures and body language, and the variations in word choice and spoken dialect that can stymie even the most carefully crafted human-computer interaction. In the human-to-human scenario, spoken language also has the privilege of face-to-face contact, where we can readily interpret nonverbal social cues. In contrast, written language immediately concretizes as we commit it to record and retains usages long after they become obsolete in spoken communication (the salutation “To whom it may concern,” for example), generating its own fossil record of outdated terms and phrases. Because it tends to be more consistent, polished, and formal, written text is fundamentally much easier for machines to parse and understand. Spoken language has no such luxury. Besides the nonverbal cues that decorate conversations with emphasis and emotional context, there are also verbal cues and vocal behaviors that modulate conversation in nuanced ways: how something is said, not what. Whether rapid-fire, low-pitched, or high-decibel, whether sarcastic, stilted, or sighing, our spoken language conveys much more than the written word could ever muster. So when it comes to voice interfaces—the machines we conduct spoken conversations with—we face exciting challenges as designers and content strategists. We interact with voice interfaces for a variety of reasons, but according to Michael McTear, Zoraida Callejas, and David Griol in The Conversational Interface, those motivations by and large mirror the reasons we initiate conversations with other people, too (http://bkaprt.com/vcu36/01-01). Generally, we start up a conversation because: - we need something done (such as a transaction), - we want to know something (information of some sort), or - we are social beings and want someone to talk to (conversation for conversation’s sake). These three categories—which I call transactional, informational, and prosocial—also characterize essentially every voice interaction: a single conversation from beginning to end that realizes some outcome for the user, starting with the voice interface’s first greeting and ending with the user exiting the interface. Note here that a conversation in our human sense—a chat between people that leads to some result and lasts an arbitrary length of time—could encompass multiple transactional, informational, and prosocial voice interactions in succession. In other words, a voice interaction is a conversation, but a conversation is not necessarily a single voice interaction. Purely prosocial conversations are more gimmicky than captivating in most voice interfaces, because machines don’t yet have the capacity to really want to know how we’re doing and to do the sort of glad-handing humans crave. There’s also ongoing debate as to whether users actually prefer the sort of organic human conversation that begins with a prosocial voice interaction and shifts seamlessly into other types. In fact, in Voice User Interface Design, Michael Cohen, James Giangola, and Jennifer Balogh recommend sticking to users’ expectations by mimicking how they interact with other voice interfaces rather than trying too hard to be human—potentially alienating them in the process (http://bkaprt.com/vcu36/01-01). That leaves two genres of conversations we can have with one another that a voice interface can easily have with us, too: a transactional voice interaction realizing some outcome (“buy iced tea”) and an informational voice interaction teaching us something new (“discuss a musical”).
Transactional voice interactions#section3
Unless you’re tapping buttons on a food delivery app, you’re generally having a conversation—and therefore a voice interaction—when you order a Hawaiian pizza with extra pineapple. Even when we walk up to the counter and place an order, the conversation quickly pivots from an initial smattering of neighborly small talk to the real mission at hand: ordering a pizza (generously topped with pineapple, as it should be). Alison: Hey, how’s it going?Burhan: Hi, welcome to Crust Deluxe! It’s cold out there. How can I help you?Alison: Can I get a Hawaiian pizza with extra pineapple?Burhan: Sure, what size?Alison: Large.Burhan: Anything else?Alison: No thanks, that’s it.Burhan: Something to drink?Alison: I’ll have a bottle of Coke.Burhan: You got it. That’ll be $13.55 and about fifteen minutes. Each progressive disclosure in this transactional conversation reveals more and more of the desired outcome of the transaction: a service rendered or a product delivered. Transactional conversations have certain key traits: they’re direct, to the point, and economical. They quickly dispense with pleasantries.
Informational voice interactions#section4
Meanwhile, some conversations are primarily about obtaining information. Though Alison might visit Crust Deluxe with the sole purpose of placing an order, she might not actually want to walk out with a pizza at all. She might be just as interested in whether they serve halal or kosher dishes, gluten-free options, or something else. Here, though we again have a prosocial mini-conversation at the beginning to establish politeness, we’re after much more. Alison: Hey, how’s it going?Burhan: Hi, welcome to Crust Deluxe! It’s cold out there. How can I help you?Alison: Can I ask a few questions?Burhan: Of course! Go right ahead.Alison: Do you have any halal options on the menu?Burhan: Absolutely! We can make any pie halal by request. We also have lots of vegetarian, ovo-lacto, and vegan options. Are you thinking about any other dietary restrictions?Alison: What about gluten-free pizzas?Burhan: We can definitely do a gluten-free crust for you, no problem, for both our deep-dish and thin-crust pizzas. Anything else I can answer for you?Alison: That’s it for now. Good to know. Thanks!Burhan: Anytime, come back soon! This is a very different dialogue. Here, the goal is to get a certain set of facts. Informational conversations are investigative quests for the truth—research expeditions to gather data, news, or facts. Voice interactions that are informational might be more long-winded than transactional conversations by necessity. Responses tend to be lengthier, more informative, and carefully communicated so the customer understands the key takeaways. At their core, voice interfaces employ speech to support users in reaching their goals. But simply because an interface has a voice component doesn’t mean that every user interaction with it is mediated through voice. Because multimodal voice interfaces can lean on visual components like screens as crutches, we’re most concerned in this book with pure voice interfaces, which depend entirely on spoken conversation, lack any visual component whatsoever, and are therefore much more nuanced and challenging to tackle. Though voice interfaces have long been integral to the imagined future of humanity in science fiction, only recently have those lofty visions become fully realized in genuine voice interfaces. Interactive voice response (IVR) systems#section6 Though written conversational interfaces have been fixtures of computing for many decades, voice interfaces first emerged in the early 1990s with text-to-speech (TTS) dictation programs that recited written text aloud, as well as speech-enabled in-car systems that gave directions to a user-provided address. With the advent of interactive voice response (IVR) systems, intended as an alternative to overburdened customer service representatives, we became acquainted with the first true voice interfaces that engaged in authentic conversation. IVR systems allowed organizations to reduce their reliance on call centers but soon became notorious for their clunkiness. Commonplace in the corporate world, these systems were primarily designed as metaphorical switchboards to guide customers to a real phone agent (“Say Reservations to book a flight or check an itinerary”); chances are you will enter a conversation with one when you call an airline or hotel conglomerate. Despite their functional issues and users’ frustration with their inability to speak to an actual human right away, IVR systems proliferated in the early 1990s across a variety of industries (http://bkaprt.com/vcu36/01-02, PDF). While IVR systems are great for highly repetitive, monotonous conversations that generally don’t veer from a single format, they have a reputation for less scintillating conversation than we’re used to in real life (or even in science fiction). Screen readers#section7 Parallel to the evolution of IVR systems was the invention of the screen reader, a tool that transcribes visual content into synthesized speech. For Blind or visually impaired website users, it’s the predominant method of interacting with text, multimedia, or form elements. Screen readers represent perhaps the closest equivalent we have today to an out-of-the-box implementation of content delivered through voice. Among the first screen readers known by that moniker was the Screen Reader for the BBC Micro and NEEC Portable developed by the Research Centre for the Education of the Visually Handicapped (RCEVH) at the University of Birmingham in 1986 (http://bkaprt.com/vcu36/01-03). That same year, Jim Thatcher created the first IBM Screen Reader for text-based computers, later recreated for computers with graphical user interfaces (GUIs) (http://bkaprt.com/vcu36/01-04). With the rapid growth of the web in the 1990s, the demand for accessible tools for websites exploded. Thanks to the introduction of semantic HTML and especially ARIA roles beginning in 2008, screen readers started facilitating speedy interactions with web pages that ostensibly allow disabled users to traverse the page as an aural and temporal space rather than a visual and physical one. In other words, screen readers for the web “provide mechanisms that translate visual design constructs—proximity, proportion, etc.—into useful information,” writes Aaron Gustafson in A List Apart. “At least they do when documents are authored thoughtfully” (http://bkaprt.com/vcu36/01-05). Though deeply instructive for voice interface designers, there’s one significant problem with screen readers: they’re difficult to use and unremittingly verbose. The visual structures of websites and web navigation don’t translate well to screen readers, sometimes resulting in unwieldy pronouncements that name every manipulable HTML element and announce every formatting change. For many screen reader users, working with web-based interfaces exacts a cognitive toll. In Wired, accessibility advocate and voice engineer Chris Maury considers why the screen reader experience is ill-suited to users relying on voice: From the beginning, I hated the way that Screen Readers work. Why are they designed the way they are? It makes no sense to present information visually and then, and only then, translate that into audio. All of the time and energy that goes into creating the perfect user experience for an app is wasted, or even worse, adversely impacting the experience for blind users. (http://bkaprt.com/vcu36/01-06) In many cases, well-designed voice interfaces can speed users to their destination better than long-winded screen reader monologues. After all, visual interface users have the benefit of darting around the viewport freely to find information, ignoring areas irrelevant to them. Blind users, meanwhile, are obligated to listen to every utterance synthesized into speech and therefore prize brevity and efficiency. Disabled users who have long had no choice but to employ clunky screen readers may find that voice interfaces, particularly more modern voice assistants, offer a more streamlined experience. Voice assistants#section8 When we think of voice assistants (the subset of voice interfaces now commonplace in living rooms, smart homes, and offices), many of us immediately picture HAL from 2001: A Space Odyssey or hear Majel Barrett’s voice as the omniscient computer in Star Trek. Voice assistants are akin to personal concierges that can answer questions, schedule appointments, conduct searches, and perform other common day-to-day tasks. And they’re rapidly gaining more attention from accessibility advocates for their assistive potential. Before the earliest IVR systems found success in the enterprise, Apple published a demonstration video in 1987 depicting the Knowledge Navigator, a voice assistant that could transcribe spoken words and recognize human speech to a great degree of accuracy. Then, in 2001, Tim Berners-Lee and others formulated their vision for a Semantic Web “agent” that would perform typical errands like “checking calendars, making appointments, and finding locations” (http://bkaprt.com/vcu36/01-07, behind paywall). It wasn’t until 2011 that Apple’s Siri finally entered the picture, making voice assistants a tangible reality for consumers. Thanks to the plethora of voice assistants available today, there is considerable variation in how programmable and customizable certain voice assistants are over others (Fig 1.1). At one extreme, everything except vendor-provided features is locked down; for example, at the time of their release, the core functionality of Apple’s Siri and Microsoft’s Cortana couldn’t be extended beyond their existing capabilities. Even today, it isn’t possible to program Siri to perform arbitrary functions, because there’s no means by which developers can interact with Siri at a low level, apart from predefined categories of tasks like sending messages, hailing rideshares, making restaurant reservations, and certain others. At the opposite end of the spectrum, voice assistants like Amazon Alexa and Google Home offer a core foundation on which developers can build custom voice interfaces. For this reason, programmable voice assistants that lend themselves to customization and extensibility are becoming increasingly popular for developers who feel stifled by the limitations of Siri and Cortana. Amazon offers the Alexa Skills Kit, a developer framework for building custom voice interfaces for Amazon Alexa, while Google Home offers the ability to program arbitrary Google Assistant skills. Today, users can choose from among thousands of custom-built skills within both the Amazon Alexa and Google Assistant ecosystems.

Fig 1.1: Voice assistants like Amazon Alexa and Google Home tend to be more programmable, and thus more flexible, than their counterpart Apple Siri. As corporations like Amazon, Apple, Microsoft, and Google continue to stake their territory, they’re also selling and open-sourcing an unprecedented array of tools and frameworks for designers and developers that aim to make building voice interfaces as easy as possible, even without code. Often by necessity, voice assistants like Amazon Alexa tend to be monochannel—they’re tightly coupled to a device and can’t be accessed on a computer or smartphone instead. By contrast, many development platforms like Google’s Dialogflow have introduced omnichannel capabilities so users can build a single conversational interface that then manifests as a voice interface, textual chatbot, and IVR system upon deployment. I don’t prescribe any specific implementation approaches in this design-focused book, but in Chapter 4 we’ll get into some of the implications these variables might have on the way you build out your design artifacts. Simply put, voice content is content delivered through voice. To preserve what makes human conversation so compelling in the first place, voice content needs to be free-flowing and organic, contextless and concise—everything written content isn’t. Our world is replete with voice content in various forms: screen readers reciting website content, voice assistants rattling off a weather forecast, and automated phone hotline responses governed by IVR systems. In this book, we’re most concerned with content delivered auditorily—not as an option, but as a necessity. For many of us, our first foray into informational voice interfaces will be to deliver content to users. There’s only one problem: any content we already have isn’t in any way ready for this new habitat. So how do we make the content trapped on our websites more conversational? And how do we write new copy that lends itself to voice interactions? Lately, we’ve begun slicing and dicing our content in unprecedented ways. Websites are, in many respects, colossal vaults of what I call macrocontent: lengthy prose that can extend for infinitely scrollable miles in a browser window, like microfilm viewers of newspaper archives. Back in 2002, well before the present-day ubiquity of voice assistants, technologist Anil Dash defined microcontent as permalinked pieces of content that stay legible regardless of environment, such as email or text messages: A day’s weather forcast , the arrival and departure times for an airplane flight, an abstract from a long publication, or a single instant message can all be examples of microcontent. (http://bkaprt.com/vcu36/01-08) I’d update Dash’s definition of microcontent to include all examples of bite-sized content that go well beyond written communiqués. Read the full article
0 notes
Text
2021 Amazon Advertising Trends | PPC Hero

Amazon as an eCommerce platform has a very powerful internal advertising system. You can argue that it’s way more potent than any other digital advertising system since customers on Amazon are there with an intention to purchase something. Advertising systems such as social media ads and Google ads are not necessarily guaranteed to be displayed to people that are looking to make a purchase. The point is that it’s easier to sell something to someone that already has “their wallet out” than otherwise. Amazon sellers are very aware of the impact that Amazon Pay-per-click (PPC) ads have on their sales. Good Amazon sellers are the ones that constantly put effort into PPC and maintain their structures for maximum efficiency. Amazon PPC is very versatile and there are many tools in its toolbox. When sellers were asked about which subtype of ads gives them the best returns, sponsored products came out on top. This is good news since this is the basic toolkit available to all professional sellers. We can also see that other tools, available to registered brands, have also proven to be impactful, even if they aren’t as effective as sponsoring. Since these tools can be used parallel to the standard sponsored products, there is only more profit to be made by using them as well. This suggests that no matter what type of product you sell, and regardless of niche, you can find a way to utilize at least some tools of the Amazon Ads system to your advantage. If you are not familiar with the basic ad types that are available, this guide might help. Let’s examine some trends and features that you might not have considered yet:
1. Video Ads
Video Ads are, unfortunately, available only to brands that are enrolled in the Amazon Brand Registry program.
When it comes to targeting, video campaigns are limited in a similar way as sponsored brand campaigns are. You can have only the 3 basic types of keyword targeting: exact, phrase, and broad. You also cannot have ad groups in your campaigns. The video that you include has to meet certain requirements, such as the video cannot be longer than 30 seconds and larger than 500MB. This gives you plenty of room to experiment and represent your brand. When it comes to creating your brand identity you might find some interesting tips in this Brainlabs’ article. Keep in mind that it’s quite possible for video ads to cost more since there is less room for them to be displayed. This also depends on how many other registered brands you are competing with and how many of them have made videos for advertising.
2. More Personalization Options With Your Amazon Ads
Amazon is constantly upgrading the system and adding new options. This has mostly been in the sponsored brands system, which makes sense, since personalization is the most potent way of creating a brand identity. For example, for a very long time you could customize your brand ads with a logo and a 50 character slogan. Now there is a new addition:

This allows you to include a small banner alongside your ad. However, there are rules and guidelines for this. This new feature is in beta, but features like these tend to remain in the long term. It is very important to keep an eye on any changes that Amazon adds into their system, especially considering the fact that if you become an early adopter of a new feature, you might be able to carve out a larger piece of your niche for yourself before your competitors become adept at using the newly added feature.
3. Amazon DSP
Amazon DSP (Demand Side Platform) is a system that’s been available for a while but was originally very difficult to access. This is actually an immensely broad topic, but the most notable feature of this system is that you can advertise outside of Amazon. Amazon now allows its registered brands to create ads and materials that can be displayed on other platforms and properties of Amazon in order to bring traffic to your store as well as Amazon. If you have the option of using Amazon DSP, you should do your best to educate yourself on what it exactly is and how you can personally use it to your advantage. It can be a game changer!
4. Ads Potentially Getting More Expensive
As we went through the various stages of fluctuations in spending habits during the pandemic, there were some trends emerging in the general state of Amazon ads. The average Cost Per Click (CPC) has gone up significantly, and it still seems to be on the rise. There can be many factors attributed to this trend, such as the fact that during the pandemic supply chain disruptions, many brands ran out of stock and had to compensate with more aggressive PPC spending once they were in stock in order to recover their organic rankings. The fact that there are more advertising options might be a factor as well since we have more competition between ad types. The newer advertising options are more competitive since sellers are competing for a smaller number of eligible display spots. Either way, this is something to pay attention to and keep in mind that you might have to commit more funds than usual in order to visibly increase your ranking and sales volume, as opposed to what was the case before.
5. Mobile Advertising
It’s no secret that a large portion of Amazon shoppers do their shopping on their mobile devices. If you have paid close attention to your campaign creation options in sponsored brand ads, there are options that allow you to see how your ad will look both on mobile and desktop:
You should make sure that any ad you create or any material that is included in your ad works both as a mobile and a desktop ad. Basically, just keep an eye on the details.
In Conclusion
The best chance you have as an Amazon seller in 2021 is to make sure that you get into the brand registry as soon as possible. Now, it’s easier than before since you don’t have to wait for your trademark process to be complete in order to apply. Make sure that you get acquainted with all of the different mechanisms that are available. Odds are that you are not even aware of all the options you have! You should also try and adapt to any new changes or features as quickly as you can since they may give you a short-term advantage that you can capitalize on later. Finally, be prepared to spend more in order to get ahead, at least for the moment. Good luck, sellers! Source link Read the full article
0 notes
Text
Say Hello to a Bolder, Brighter BrightLocal

You’ve probably noticed that things look a little different around here. That’s because we’ve just launched our new brand identity!

Taking our brand forward
We’re big believers in the power of brand, which is why we’ve continued to invest in ours over the years. We’re confident that we have one of the most recognized and trusted brands in local SEO, but as with everything we do, we’re not going to rest on our laurels. We have a restless nature that urges us to always question what could be improved and how we can do things better. This isn’t the first time we’ve refreshed our brand. After all, we exist in an industry that is constantly evolving. Sitting still is not an option. Our business is constantly evolving, too. In the years since we last refreshed our brand identity, we’ve welcomed over 70 new faces to the BrightLocal team and expanded our offering with Local Search Grid, Showcase Reviews, BrightLocal Academy, BrightLocal Agency Directory, Local RankFlux, and much more. Whereas previous rebrands have mainly been motivated by the need for a visual refresh to reflect changing design trends, this time we’ve gone much deeper and asked ourselves to really think about who we are, who we’re here for, and what’s important for our customers to know about us. So without further delay, let me guide you through the new BrightLocal brand identity.
No change of heart
Our logo has undergone a subtle change. It’s an evolution more than a revolution because, quite frankly, we really liked our logo!

The ‘Heart Pin’ is one of the most recognizable and iconic aspects of our identity. It proudly displays our love of all things local and communicates the importance of teamwork, community and generosity within the business. It’s also the symbol of our monthly team awards, The Big Heart Awards, where we recognize the team members who have done exceptionally amazing work and gone above and beyond for their colleagues and/or customers. Each month, BrightLocal makes a donation to a charity that’s important to the winners. Since the launch of the awards last year, we’ve donated $10,000 to 24 charities.

It was a no-brainer to keep the ‘Heart Pin’ sitting proudly within our logo. The text in the logo is now lowercase, and the eagle-eyed amongst you will notice the font type has changed. The lowercase text is less formal and more approachable, which better reflects our welcoming culture. While the logotype is changing to be lowercase, rest assured we’re not changing the company name formatting. Everywhere else, we’re still good old ‘BrightLocal’, with the capital B and the capital L.
Color me impressed
Color was a major area we wanted to look at. Over the years, our color palette has expanded considerably, so it was important for us to question the role that color was playing within our identity. We’ve used color to distinguish between different products within our platform. We also slightly diverted from our palette when creating the identities for BrightLocal Academy and BrightLocal Agency Directory. It’s fair to say we had had a lot of colors competing for attention! Read the full article
0 notes
Text
Organic Reach is in Decline—Here's What You Can Do About It
When it comes to organic reach, not a lot has changed over the past few years. The average number of people who see posts on social media that aren’t backed by ad dollars is still low. It’s no secret that most social platforms operate on a pay-to-play model for brands. The average reach of an organic post on a Facebook Page hovers around 5.20%. That means roughly one in every 19 fans sees the page’s non-promoted content. The easiest way to boost distribution and direct sales is to boost your ad budget. As a result, businesses often underestimate the importance of organic marketing. But organic social is the foundation that your ad strategy rests on. Behind every successful ad campaign with high paid reach is a consistent and creative social media presence that strengthens the brand, relationships, and trust. With ad budgets down, competition for organic reach is up. To stay on top, the best brands will be the most creative. Bonus: Read the step-by-step social media strategy guide with pro tips on how to grow your social media presence.
What is organic reach?
On social media, organic reach is the number of people who have seen your content through unpaid distribution, i.e. without you putting a budget towards reaching a specific audience. The metric is represented as a number of unique accounts and can include users who saw your post in their News Feed, watched a Story, or browsed your account. Unlike paid content (such as Facebook ads), organic posts are generally not served to specific target audiences. Each social media network has a proprietary algorithm that defines how organic content is distributed on the platform (a.k.a. who gets to see your posts).
11 tips to improve your organic reach on social media
1. Learn best practices for each social media platform Having general knowledge of how to write a caption or how to create a video is good. Knowing how to write a good caption for Instagram and create videos for LinkedIn is better. Never take a one-size-fits-all approach to social media marketing, especially with organic content. To reach the most people, organic posts need to be optimized. And to optimize content, you need to understand the platform and audience you’re optimizing for. A good place to start is by getting familiar with social media demographics. Focus on the platforms that make the most sense for your business and set out to master them. For example, if you plan to reach the younger crowd, you should probably figure out Snapchat filters, TikTok hashtag challenges, and Instagram Stories. B2B companies, on the other hand, might be better off connecting via LinkedIn hashtags or Twitter Live. As a general rule, content that is designed specifically for the platform it’s going on performs better. Learn the in’s and out’s so you can use social media features to their fullest potential. Tools like hashtags, geotags, and people tags and shopping tags can all boost the reach of organic content if you know how to use them. 2. Develop a content strategy No shortcuts here. If you want organic content to perform well on social media, you have to put some thought into it. If you don’t spend time on a social media content strategy, why would a stranger spend time on your content? To start, learn about your audience. What are they interested in? What are your audience demographics? How do they vary by platform? Most social media platforms offer business accounts access to these insights through their native analytics tools. If you have a presence on more than one platform, you can access your social media insights from one place using a social media management tool like Hootsuite. Learn how to use Hootsuite Analytics: Social listening is another way to learn what content your audience—and competitors—are engaging with. Look at what some of your favorite brands are doing for inspiration. Establish goals for your content strategy, but keep them realistic. You won’t grow an organic audience by pushing sales all the time. Ergo, you won’t drive sales that way either. Focus on building your brand, audience, and community. Measure your success with growth and interaction metrics. As Matthew Kobach, Head of Content Marketing at Fast, put it on Twitter, organic social media marketing is akin to the wining and dining portion of a sales pitch. Don’t skip straight to dessert. Develop a relationship. 3. Engage your employees An engaged community of brand advocates consistently interacting with your posts and sharing your content on social media can improve organic reach across the board. And what better place to look for brand advocates than your own team? Studies show that potential customers trust a business’s employees more than journalists, advertisers and CEOs. So, getting your team involved in distributing your content on social media can win you more than just improved organic reach. If you’re not sure how to streamline distributing content to your team (and come up with perks that will make posting worth their while), an employee advocacy platform like Hootsuite Amplify will help. It makes it safe and easy for employees to share approved social content with their friends and followers. Learn more about building an engaging employee advocacy program. 4. Focus on value Organic content should offer followers something of value. Give people a reason to follow and share your posts. That could mean entertainment value, pearls of wisdom or motivation, or the opportunity to connect with a community. Merriam Webster’s Twitter account taps the dictionary for its full value potential. In addition to tweeting the Word of the Day, the account tweets “look up” trends that are often as revealing as they are relevant. 📈Top lookups, in order: quid pro quo, oligarchy, outlandish, integrity, insight — Merriam-Webster (@MerriamWebster) November 13, 2019 There’s also value for your brand in this approach. Take Lululemon, for example. Technically the company is an apparel retailer. By sharing tips and hosting workouts on IGTV and Instagram Live, the athleisure brand is able to position itself as an authority on all things fitness. With workouts, Lululemon inserts its brand into its customers’ daily routine, and shows off its products, too. 5. Be consistently awesome You know the drill. Post regularly and post at the right time. When is that, exactly? It’s when your audience is online and active. Hootsuite found the best times to post on Facebook, Instagram, Twitter, and LinkedIn. But definitely double-check your analytics and adjust accordingly. (Or use Hootsuite’s Best Time to Publish feature and get personalized recommendations for times to post on Facebook, Instagram, Twitter, and LinkedIn that will work best for your unique audience.)
Post consistently to establish and maintain a presence. But remember, when it comes to organic social media, quality always trumps quantity. This is why creating a quality content strategy and social media content calendar is so important. Planning ahead keeps the routine sustainable, and prevents burn-out. Think long-term. Develop content themes, regular installments, or a recurring series. Ellevest, a financial company that aims to close gender gaps, hosts #EllevestOfficeHours once a week. Canadian designer Tanya Taylor turns historically sad paintings into happy works of art with her #HappyFrameOfMind series. 6. Connect with people Here’s a little hack: Go to any brand’s Instagram account on desktop. Hover over each piece of content, and compare like and comment counts as you go. Notice anything? It’s likely that pictures with people in them have more likes and comments. A study by the Georgia Institute of Technology and Yahoo Labs confirms this trend. After looking at 1.1 million photos on Instagram, researchers found that photos that contain faces are 38% more likely to receive likes and 32% more comments. People connect with people more than products and services. Plus, consumers increasingly want to know the faces behind a brand. A recent survey by Deloitte asked consumers what they cared most about when making decisions about brands. The answer? How the company treats its people. Build a strong community by showcasing the talent, diversity and values that are already in your company’s community. Be inclusive and representative. The more people who see themselves in your content, the more people there are to engage with it. This may not translate to direct sales. But galvanizing your community around people and purpose pays off in the long run. Purpose-driven brands grow three times faster than competitors. 7. Call for engagement Want better engagement rates on your organic posts? Just ask. Questions are a great prompt. Ask your followers something you’re interested in hearing about. Use this as an opportunity to learn more about your audience. Fashion and lifestyle content creators Shelcy and Christy received more than 100 responses when they asked followers what books they’re reading. Fenty Beauty asked followers to reply with a picture and matched them with a lipstick shade. The single tweet received more than 1.5K responses and 2.7K favs. Penguin Random House took a similar approach, offering book suggestions based on favorite authors. Cash App offered six words of advice to anyone who asked a question. REPLY with a picture and we will match you to a Slip Shine Sheer Shiny Lipstick shade! 👄💋✨ — FENTY BEAUTY (@fentybeauty) June 22, 2020 One LinkedIn professional took a poll from followers through the creative use of LinkedIn’s reaction options. Her survey got more than 4K responses. Polls in general great feedback and engagement tools. As are stickers in Stories. 8. Respond fast and often Get down in the comment sections of your posts. People are much more likely to engage if they know they may get a response from you. Response time is of the essence here, too. After you post something, stick around and respond to your first few comments. This will increase the odds of you receiving more. It’s also a good opportunity to promote brand values and personality. If you spot abusive comments, address them right away so you can maintain a safe and inclusive space. investigocean is inconclusive so far but we otter get some results soon — Monterey Bay Aquarium (@MontereyAq) June 24, 2020 Influencer and entrepreneur Jenna Kutcher has found success with this strategy. “When people see that I am online and commenting back on comments, they are far more likely to engage with my post,” she said on her podcast, Goal Digger. Responding to customers on social media pays off in the long run. Twitter research shows customers are willing to spend 3-20% more with brands that respond to their tweets. On the flipside, those who don’t get responses are less likely to recommend brands. Use tools like Hootsuite’s Inbox to keep tabs on direct messages, comments and mentions across all platforms and easily handle responses as a team. 9. Know the algorithms If you’ve followed steps 1-7 so far, you’re already in good shape for the almighty algorithms. But it’s still worthwhile to stay in the loop on the tweaks and changes platforms make. Social media algorithms use ranking signals to sort the order of organic content in their timelines and newsfeeds. These factors typically include relevance, timeliness, and the relationship someone has with the account. Algorithms prioritize posts that have a high probability of generating engagement. Early engagement is often taken to be a good indicator. Posts that use rich media such as videos, images, and GIFs also tend to be favored. Video is still the star of social media content. Learn more with our platform-specific guides: 10. Collaborate and tag A good way to signal boost organic content is with tags. Beyond partnering with an influencer, which technically qualifies as paid content, look for ways to collaborate with other accounts. That may include like-minded brands, creators, or even customers. Warby Parker’s showcased the different styles of influencers and customers in its #WearingWarby series. Prados Beauty reposts pictures its customers share wearing the company’s makeup and lashes. Elate Cosmetics invites partners and creators like Flora & Fauna and @ericaethrifts for account takeovers. Collabs and crossovers like these have the potential to spark early engagement and expose accounts to similar audiences. Need more inspiration? To celebrate 100 years of drag, Sephora teamed up with and tagged 15 queens. While this was likely a paid promotion, the idea could easily be adapted to work within your brand’s community. 11. Stage virtual events Host a virtual event to up the entertainment ante and build buzz around your brand. Virtual events can include anything from Ask Me Anythings (AMAs) to social media contests and live streams on Instagram, YouTube, Facebook, or Twitter. The runaway success of Cash App Fridays rolls the best of virtual events, series, and social contests into one. Since 2017, every Friday, Twitter followers who share their Cash App tag and retweet enter for a chance to win Cash App coin. Super Cash App Fridays up the stakes by increasing the jackpot, and sometimes the entry requirements. For its January 31 giveaway, participants were asked to tag seven friends. The stats speak for themselves. This contest isn’t 100% organic, since it involves cash prizes. But it is a creative way to circumvent social advertising. If you don’t have the budget for prizes, be resourceful. Feature winners on your account. Let them name your next product. Ultimately, when it comes to organic marketing, the most creative brands will prevail. Use Hootsuite to easily integrate your paid and organic social marketing efforts. From a single dashboard, you can schedule and publish posts, boost top-performing content, create ads, measure performance, and much more. Try it for free today. Get Started Easily manage all your social media in one place and save time with Hootsuite. Read the full article
0 notes
Text
13 Brainstorming Techniques to Spur Creativity on Content Marketing Teams


Your editorial calendar has holes. Your content creators aren’t feeling creative. Your content marketing strategy is wilting. When challenged to create, rejuvenate, or rethink what your team does, it’s time to connect for a good brainstorming session.
What is brainstorming?
Introduced by advertising executive Alex Osborn in 1953 in his book Applied Imagination, brainstorming uses lateral thinking to solve problems. In the almost 70 years since researchers have improved upon his process. Keeping a relaxed and informal environment matters. When brainstorming is too structured, it inhibits the creative process and disrupts the flow of ideas, which is the antithesis of the concept. Here are a few rules of group brainstorming: - There are no bad ideas. - There’s no need to stop and evaluate or expand on ideas until the end of the session. - Don’t set a numerical goal for your ideas. - Don’t be afraid to use multiple techniques in a single brainstorming session. - Save all your ideas. What you don’t use right away may be the inspiration for getting “unstuck” in the future. Brainstorming #ContentMarketing ideas? Don’t be afraid to use many different in a single session, says @DarrenDeMatas via @CMIContent. Click To Tweet 1. Gap filling Start with a statement of where you are and a statement of where you want to be. Then, ask everybody in the brainstorming meeting to come up with ideas for how to get from point A to point B. You’ll get everything from highly specific suggestions to generalized overviews. At the end of the session, you can organize all the thoughts to develop your vision and action plan. (Flow charts can help). For instance: “Right now, we sell 10,000 units per month of our best-selling product – vegan vanilla protein powder. By the end of the year, we want to reach 20,000 units of our bestselling product.” Gap-filling brainstorming might produce ideas like: HANDPICKED RELATED CONTENT: How to Find and Fill a Content Gap for SEO and UX 2. Brainwriting With brainwriting (also called slip writing), each participant gets a piece of paper or an index card to use to write down ideas. In some versions, participants pass the paper to another person who adds their ideas. Once the papers have made a full journey around the room, the participants share and discuss the ideas. All answers are anonymous, so no one should write down their name. This method works because no one has to worry about whether the group will support them. It also prevents discussion before all the ideas are in. Evaluating ideas too early in the process can derail brainstorming. Sometimes everyone agrees with one of the early ideas for harmony’s sake or from a desire to end the meeting faster. 3. Collaborative brainwriting Collaborative brainwriting is similar to brainwriting, but the idea generation may happen asynchronously. To start, have someone write a question or problem on a large piece of paper or a whiteboard displayed in a public place. A leader asks team members to write down their ideas over a week or so. From there, the team can collate the ideas.

Image source 4. Brain-netting Also known as online brainstorming, this technique works well for remote teams. Set up a system where people can share their ideas independently, then collaborate. A Google Doc or a Slack channel can work well in this process. Have each team member contribute ideas to the system on their own time. Set a deadline, then schedule a meeting where everyone comes together in real-time to discuss the ideas. Brain-netting is a way to take brainstorming online. Have people post #content ideas to a shared chat channel or doc by a deadline, then collaborate in an online meeting @DarrenDeMatas via @CMIContent. Click To Tweet HANDPICKED RELATED CONTENT: Brainstorming Tools: 25 Tips for a Remote World 5. The 5 whys With this brainstorming method, keep asking “why” – drilling down from one central idea to a variety of related niche topics you can use to move forward. Start with a problematic outcome. For instance, “We missed our sales target for the third month in a row.” Then, ask, “Why did this happen?” Answer that question, then ask again, “Why did this happen?” Repeat until you get to the root of the issue. You may get there in fewer than five whys. Sometimes, you may need more. Both results are OK. This approach works best when used as a group brainstorming technique, and it helps to have a facilitator guide the conversation. Before you begin, make sure everyone agrees on exactly what problematic outcome you’re trying to solve. Once you’ve gone through the five whys, analyze the findings and begin to develop an action plan. Remember, though, the brainstorming session isn’t a planning process. 6. Mind mapping Mind mapping is among the most popular brainstorming techniques because it adds a visual component. By drawing a picture of the relationships between ideas, you and your fellow team members can develop more creative ideas. It’s a good option because you can do it alone, too. Here’s how to do it: Write down your goal, challenge, or content idea. Think of related issues. Add related ideas to the map to show how they all relate and connect. You can find mind-mapping software online, but old-fashioned pen and paper will work well, too.

7. Round robin In a round-robin session, each participant shares an idea and until everyone has shared something. Only then does the floor open for additional ideas and critiques. This is a great way to get some creative ideas from team members who are shy or otherwise uninterested. It also keeps one or two people from dominating the conversation. Try brainstorming #content ideas round-robin style (everyone submits idea) to prevent one or two people from dominating the conversation, says @DarrenDeMatas via @CMIContent. Click To Tweet 8. Trigger Trigger brainstorming is a version of the round-robin technique. As the name implies, it begins with a trigger that encourages creative thinking. The best way to get this ball rolling is to start with a proactive statement or open-ended question. Let’s say you were trying to come up with a list of blog topic ideas for a healthcare client. Triggers could be: - Our client’s customers always seem to interact with content on … - Our client’s target audience needs to learn more about … 9. Role The role-storming technique works best as a group discussion. Ask group members to imagine themselves in the role of someone who relates to your goal. For instance, if you’re trying to get some great ideas for blog posts, place yourselves in the role of your target audience. From there, act out a scene, with each team member playing that role. What would that audience want to know? What would they not care about? What would motivate them to take an action? Generate ideas from this perspective to change things up. HANDPICKED RELATED CONTENT: How to Stop Creating Content That Disappoints Your Audience 10. Figure A slight variation on role-storming, figure-storming involves using a fictional or historical figure, like Superman or Abraham Lincoln, or a well-known person (who isn’t in the room). What would that person do to manage the issue or opportunity you’re solving in your group brainstorm? How would this figure’s approach work well? How might it backfire? Exploring these options encourages imagination and can result in some highly creative ideas. 11. Charrette The charrette method, or design charrette, works best when brainstorming with a large group. This approach breaks the large group into smaller that discuss one element of the problem for a set period. When time’s up, each group passes its ideas to the next one to build on. You can run multiple groups at the same time, as long as they work on different parts of the problem. At the end of the Charrette, each idea has been discussed and refined multiple times. 12. Image method The image method, another type of visual brainstorming, involves setting your intention. To start, close your eyes and describe what you want to create. For instance, “a new e-book for a software provider client.” Each person in the group sets the intention in their mind, then closes their eyes again. This time, they create a vivid image based on the intention. Then they add on to the picture as a direction is given: “Picture the e-book with the client’s brand on it.” “See the features or topics it should cover.” Randomly ask one team member to share their ideas. Record the idea. Next, have everyone picture the new version of the e-book and start layering additional ideas. Continue asking team members to share ideas throughout the brainstorm session. This approach works best when you want to enhance, not reinvent the wheel. 13. Stepladder The stepladder technique encourages team building while ensuring everyone has a chance in the spotlight. You start by sharing a challenge with everyone in the room. Then, you send all but two people out of the room. The duo in the room has a set amount of time to come up with ideas. After that, you send one more person into the room. The new person shares their ideas before the previous ideas are discussed. Every few minutes, another person comes in, and the process repeats. Eventually, everyone will be back in the room and have shared their ideas. From there, you can discuss all the good ideas as a team and decide what to move forward with.
Which technique will you use first?
Brainstorming focuses on idea generation. Each of these techniques promotes creative approaches to a problem or issue. You may find some of your best ideas coming from these exercises. Generate lots of ideas for your team at Content Marketing World, Sept. 28 to Oct. 1. Join us in Cleveland, Ohio, or virtually. Register today. Use code CMIBLOG100 to save $100. Cover image by Joseph Kalinowski/Content Marketing Institute Source link Read the full article
0 notes
Text
Designing for the Unexpected – A List Apart
I’m not sure when I first heard this quote, but it’s something that has stayed with me over the years. How do you create services for situations you can’t imagine? Or design products that work on devices yet to be invented? Article Continues Below
Flash, Photoshop, and responsive design#section2
When I first started designing websites, my go-to software was Photoshop. I created a 960px canvas and set about creating a layout that I would later drop content in. The development phase was about attaining pixel-perfect accuracy using fixed widths, fixed heights, and absolute positioning. Ethan Marcotte’s talk at An Event Apart and subsequent article “Responsive Web Design” in A List Apart in 2010 changed all this. I was sold on responsive design as soon as I heard about it, but I was also terrified. The pixel-perfect designs full of magic numbers that I had previously prided myself on producing were no longer good enough. The fear wasn’t helped by my first experience with responsive design. My first project was to take an existing fixed-width website and make it responsive. What I learned the hard way was that you can’t just add responsiveness at the end of a project. To create fluid layouts, you need to plan throughout the design phase. A new way to design#section3 Designing responsive or fluid sites has always been about removing limitations, producing content that can be viewed on any device. It relies on the use of percentage-based layouts, which I initially achieved with native CSS and utility classes: .column-span-6 { width: 49%; float: left; margin-right: 0.5%; margin-left: 0.5%; } .column-span-4 { width: 32%; float: left; margin-right: 0.5%; margin-left: 0.5%; } .column-span-3 { width: 24%; float: left; margin-right: 0.5%; margin-left: 0.5%; } Then with Sass so I could take advantage of @includes to re-use repeated blocks of code and move back to more semantic markup: .logo { @include colSpan(6); } .search { @include colSpan(3); } .social-share { @include colSpan(3); } Media queries#section4 The second ingredient for responsive design is media queries. Without them, content would shrink to fit the available space regardless of whether that content remained readable (The exact opposite problem occurred with the introduction of a mobile-first approach).

Components becoming too small at mobile breakpoints Media queries prevented this by allowing us to add breakpoints where the design could adapt. Like most people, I started out with three breakpoints: one for desktop, one for tablets, and one for mobile. Over the years, I added more and more for phablets, wide screens, and so on. For years, I happily worked this way and improved both my design and front-end skills in the process. The only problem I encountered was making changes to content, since with our Sass grid system in place, there was no way for the site owners to add content without amending the markup—something a small business owner might struggle with. This is because each row in the grid was defined using a div as a container. Adding content meant creating new row markup, which requires a level of HTML knowledge. Row markup was a staple of early responsive design, present in all the widely used frameworks like Bootstrap and Skeleton. 1 of 7 2 of 7 3 of 7 4 of 7 5 of 7 6 of 7 7 of 7

Components placed in the rows of a Sass grid Another problem arose as I moved from a design agency building websites for small- to medium-sized businesses, to larger in-house teams where I worked across a suite of related sites. In those roles I started to work much more with reusable components. Our reliance on media queries resulted in components that were tied to common viewport sizes. If the goal of component libraries is reuse, then this is a real problem because you can only use these components if the devices you’re designing for correspond to the viewport sizes used in the pattern library—in the process not really hitting that “devices that don’t yet exist” goal. Then there’s the problem of space. Media queries allow components to adapt based on the viewport size, but what if I put a component into a sidebar, like in the figure below?

Components responding to the viewport width with media queries Container queries: our savior or a false dawn?#section5 Container queries have long been touted as an improvement upon media queries, but at the time of writing are unsupported in most browsers. There are JavaScript workarounds, but they can create dependency and compatibility issues. The basic theory underlying container queries is that elements should change based on the size of their parent container and not the viewport width, as seen in the following illustrations.

Components responding to their parent container with container queries One of the biggest arguments in favor of container queries is that they help us create components or design patterns that are truly reusable because they can be picked up and placed anywhere in a layout. This is an important step in moving toward a form of component-based design that works at any size on any device. In other words, responsive components to replace responsive layouts. Container queries will help us move from designing pages that respond to the browser or device size to designing components that can be placed in a sidebar or in the main content, and respond accordingly. My concern is that we are still using layout to determine when a design needs to adapt. This approach will always be restrictive, as we will still need pre-defined breakpoints. For this reason, my main question with container queries is, How would we decide when to change the CSS used by a component? A component library removed from context and real content is probably not the best place for that decision. As the diagrams below illustrate, we can use container queries to create designs for specific container widths, but what if I want to change the design based on the image size or ratio?

Cards responding to their parent container with container queries

Cards responding based on their own content In this example, the dimensions of the container are not what should dictate the design; rather, the image is. It’s hard to say for sure whether container queries will be a success story until we have solid cross-browser support for them. Responsive component libraries would definitely evolve how we design and would improve the possibilities for reuse and design at scale. But maybe we will always need to adjust these components to suit our content. CSS is changing#section6 Whilst the container query debate rumbles on, there have been numerous advances in CSS that change the way we think about design. The days of fixed-width elements measured in pixels and floated div elements used to cobble layouts together are long gone, consigned to history along with table layouts. Flexbox and CSS Grid have revolutionized layouts for the web. We can now create elements that wrap onto new rows when they run out of space, not when the device changes. .wrapper { display: grid; grid-template-columns: repeat(auto-fit, 450px); gap: 10px; } The repeat() function paired with auto-fit or auto-fill allows us to specify how much space each column should use while leaving it up to the browser to decide when to spill the columns onto a new line. Similar things can be achieved with Flexbox, as elements can wrap over multiple rows and “flex” to fill available space. .wrapper { display: flex; flex-wrap: wrap; justify-content: space-between; } .child { flex-basis: 32%; margin-bottom: 20px; } The biggest benefit of all this is you don’t need to wrap elements in container rows. Without rows, content isn’t tied to page markup in quite the same way, allowing for removals or additions of content without additional development.

A traditional Grid layout without the usual row containers This is a big step forward when it comes to creating designs that allow for evolving content, but the real game changer for flexible designs is CSS Subgrid. Remember the days of crafting perfectly aligned interfaces, only for the customer to add an unbelievably long header almost as soon as they’re given CMS access, like the illustration below?

Cards unable to respond to a sibling’s content changes Subgrid allows elements to respond to adjustments in their own content and in the content of sibling elements, helping us create designs more resilient to change.

Cards responding to content in sibling cards .wrapper { display: grid; grid-template-columns: repeat(auto-fit, minmax(150px, 1fr)); grid-template-rows: auto 1fr auto; gap: 10px; } .sub-grid { display: grid; grid-row: span 3; grid-template-rows: subgrid; /* sets rows to parent grid */ } CSS Grid allows us to separate layout and content, thereby enabling flexible designs. Meanwhile, Subgrid allows us to create designs that can adapt in order to suit morphing content. Subgrid at the time of writing is only supported in Firefox but the above code can be implemented behind an @supports feature query. Intrinsic layouts #section7 I’d be remiss not to mention intrinsic layouts, the term created by Jen Simmons to describe a mixture of new and old CSS features used to create layouts that respond to available space. Responsive layouts have flexible columns using percentages. Intrinsic layouts, on the other hand, use the fr unit to create flexible columns that won’t ever shrink so much that they render the content illegible. fr units is a way to say I want you to distribute the extra space in this way, but…don’t ever make it smaller than the content that’s inside of it. —Jen Simmons, “Designing Intrinsic Layouts” Intrinsic layouts can also utilize a mixture of fixed and flexible units, allowing the content to dictate the space it takes up.

Slide from “Designing Intrinsic Layouts” by Jen Simmons What makes intrinsic design stand out is that it not only creates designs that can withstand future devices but also helps scale design without losing flexibility. Components and patterns can be lifted and reused without the prerequisite of having the same breakpoints or the same amount of content as in the previous implementation. We can now create designs that adapt to the space they have, the content within them, and the content around them. With an intrinsic approach, we can construct responsive components without depending on container queries. Another 2010 moment?#section8 This intrinsic approach should in my view be every bit as groundbreaking as responsive web design was ten years ago. For me, it’s another “everything changed” moment. But it doesn’t seem to be moving quite as fast; I haven’t yet had that same career-changing moment I had with responsive design, despite the widely shared and brilliant talk that brought it to my attention. One reason for that could be that I now work in a large organization, which is quite different from the design agency role I had in 2010. In my agency days, every new project was a clean slate, a chance to try something new. Nowadays, projects use existing tools and frameworks and are often improvements to existing websites with an existing codebase. Another could be that I feel more prepared for change now. In 2010 I was new to design in general; the shift was frightening and required a lot of learning. Also, an intrinsic approach isn’t exactly all-new; it’s about using existing skills and existing CSS knowledge in a different way. You can’t framework your way out of a content problem#section9 Another reason for the slightly slower adoption of intrinsic design could be the lack of quick-fix framework solutions available to kick-start the change. Responsive grid systems were all over the place ten years ago. With a framework like Bootstrap or Skeleton, you had a responsive design template at your fingertips. Intrinsic design and frameworks do not go hand in hand quite so well because the benefit of having a selection of units is a hindrance when it comes to creating layout templates. The beauty of intrinsic design is combining different units and experimenting with techniques to get the best for your content. And then there are design tools. We probably all, at some point in our careers, used Photoshop templates for desktop, tablet, and mobile devices to drop designs in and show how the site would look at all three stages. How do you do that now, with each component responding to content and layouts flexing as and when they need to? This type of design must happen in the browser, which personally I’m a big fan of. The debate about “whether designers should code” is another that has rumbled on for years. When designing a digital product, we should, at the very least, design for a best- and worst-case scenario when it comes to content. To do this in a graphics-based software package is far from ideal. In code, we can add longer sentences, more radio buttons, and extra tabs, and watch in real time as the design adapts. Does it still work? Is the design too reliant on the current content? Personally, I look forward to the day intrinsic design is the standard for design, when a design component can be truly flexible and adapt to both its space and content with no reliance on device or container dimensions. Content is not constant. After all, to design for the unknown or unexpected we need to account for content changes like our earlier Subgrid card example that allowed the cards to respond to adjustments to their own content and the content of sibling elements. Thankfully, there’s more to CSS than layout, and plenty of properties and values can help us put content first. Subgrid and pseudo-elements like ::first-line and ::first-letter help to separate design from markup so we can create designs that allow for changes. Instead of old markup hacks like this— First line of text with different styling... —we can target content based on where it appears. .element::first-line { font-size: 1.4em; } .element::first-letter { color: red; } Much bigger additions to CSS include logical properties, which change the way we construct designs using logical dimensions (start and end) instead of physical ones (left and right), something CSS Grid also does with functions like min(), max(), and clamp(). This flexibility allows for directional changes according to content, a common requirement when we need to present content in multiple languages. In the past, this was often achieved with Sass mixins but was often limited to switching from left-to-right to right-to-left orientation. In the Sass version, directional variables need to be set. $direction: rtl; $opposite-direction: ltr; $start-direction: right; $end-direction: left; These variables can be used as values— body { direction: $direction; text-align: $start-direction; } —or as properties. margin-#{$end-direction}: 10px; padding-#{$start-direction}: 10px; However, now we have native logical properties, removing the reliance on both Sass (or a similar tool) and pre-planning that necessitated using variables throughout a codebase. These properties also start to break apart the tight coupling between a design and strict physical dimensions, creating more flexibility for changes in language and in direction. margin-block-end: 10px; padding-block-start: 10px; There are also native start and end values for properties like text-align, which means we can replace text-align: right with text-align: start. Like the earlier examples, these properties help to build out designs that aren’t constrained to one language; the design will reflect the content’s needs. Read the full article
0 notes
Text
Facebook Ad Sets Optimization: 5 Crucial Tips For Maximum ROI

Even though all the teens seem to be living their best lives on TikTok, Facebook is still very far from dead and over. The platform reaches 59% of the world’s population, and is the third most-visited website in the world. As such, it can certainly be leveraged for brand growth in a number of ways: paid advertising being one of the most lucrative ones. Let’s explore the 5 essential tips for optimizing your Facebook ad sets, for maximum return on investment and improved conversions.
1- Install Facebook Pixel
First of all, you need to ensure you have installed Facebook Pixel on your website. The Pixel is a tiny piece of code that you add to your website, which then tracks how visitors interact with your pages. This data informs Facebook about their background, interests and behaviors, and enables better ad targeting based on real-life user data. Configuring Pixel is fairly easy, and the data it reaps will ensure your ads are always shown to the right audience segment, increasing your click-through rates, and improving your ROI.In order to get the best results, you need to make sure you are also optimizing for iOS 14 users – make sure your domain is verified, re-configure your preset settings in the Ads Manager, and select a single domain for tracking conversions.
Image source
2- Create Target Audience Personas
Defining your target audience is the second critically important step in ad set optimization. You can rely on Facebook’s own Lookalike Audiences or Audience Insights features, or you can also create your own personas based on user data you have previously gathered. Relying on your own information sources (like Google Analytics and Search Console, or any other apps you use for the purpose) can give you that much-needed edge. After all, Facebook doesn’t understand your audience as well as you do. Always start with the pain points your brand can solve. Why would someone do business with you? What can you do to help them solve an issue? What is it they would like to know about your brand?Once you have an answer to these questions, start defining different audience segments based on demographics, interests, behaviors, etc. Make sure you have distinct personas for different services or product categories, pain points and income levels, age groups, and brand experiences.Not only will this research help you increase your ad ROI, it’s a great way to lower your cost-per-click too.
3- A/B Test Your Ads
In paid advertising, copywriting and design are often just as important as targeting and ad timings. In order to ensure your ad sets are doing their best for your brand, you should A/B test them as often as possible. For one, Facebook may have implemented changes you were not aware of, and it also gives you the chance to further improve even your best ad campaigns.The ad elements you should A/B test (always one at a time!) include:- Ad design - Ad visuals - Ad copy – specifically focusing on the headline - Ad placement - Call to action - Bidding method - Target audience A/B testing is made easy through the Ads Manager, so you should have no trouble implementing various tests as often as you need to.
Image source
4- Use Intelligent (Re)targeting
Targeting and retargeting play a vital role in paid advertising. First, you want to be crystal clear about the kinds of ads that certain audience segments want to see. For example, if you have a product that specifically appeals to parents, don’t serve it to teenagers. Sticking to our point about “know what the pain point is and solve it”, make sure you match the ad to the user as granularly as possible. This might initially be a tougher cookie to crack, but the longer you run your ads, and the more Facebook Pixel learns about your audience, the easier it will become. When it comes to retargeting, make sure you add those who have already visited your site to this audience. You also need to choose the right time frame: if your products can be considered an impulse purchase, or if you sell an item that is often shopped for, you can target 30-day audiences. But if customers need more time to make a decision, then you can target 60-day audiences. Always ensure that audiences who have previously converted see a different ad than first-time potential customers and leads. Show them something extra, give them a discount, make a special offer – they will appreciate it.

Image source
5- Stand Out and Be True to Yourself
Finally, in order to truly make the most of your ad spend, you should do your very best to stand out from your competition. Most brands will do some competitor research (whether through the Ads Manager or on another platform or even through Google) before running an ad campaign. They will then merely adapt the targeting practices and ad formats that work best in the niche.While this practice is perfectly legitimate, you risk becoming no more than just another business in the crowd. Instead, try to put a twist on the best practices. If most competitors use images, try doing video. If they keep promoting their blog posts, make yours more informative and more valuable. By structuring your ads so that they are likely to spark high engagement rates, you will instantly be seeing an improved ROI as well.
Final Thoughts
Ultimately, the formula for maximizing the return on investment of your Facebook ad sets is simple: you need to create ads that are in line with your target audience’s needs and interests, and put them out at the right time. With a bit of research, clever copywriting, and continuous testing, you will be able to optimize your ads for better conversions – and take your brand to the next level. Source link Read the full article
0 notes
Text
Google Now Shows 'Ranking Factors Box' in SERPs to Explain Results

Want to find out why your competitor’s page is No. 1 in Google organic SERPs? Well, now you can! (To the extent that Google is willing to tell you, anyway.) That’s because Google yesterday announced a feature that shows a selection of reasons for ranking individual pages in SERPs, bringing some much-needed transparency to search. via GIPHY Source: Google This feature is a section called ‘Your search & this result’ but it doesn’t have a catchy name yet, so we’re calling it the ‘Ranking Factors Box’, simply because, well, it’s a box that displays ranking factors! The Ranking Factors Box is an extension of the ‘About this result’ box, which is accessible by clicking the ‘three vertical dots’ at the end of a search result and was originally launched back in February of this year.
Where is the Ranking Factors Box currently live?
According to Barry Schwartz’s excellent overview for Search Engine Land, the feature is currently live for around 10% of English-language queries in the USA, and Google aims to have it 100% live by next week for both mobile and desktop.

Source: Google
When will the Ranking Factors Box be available outside of the US?
Google’s own page says: “This expansion of About This Result is rolling out in English in the U.S. to start, and we look forward to bringing this and other related features to more people in the coming months.” Google, ‘Learn more – and get more – from Search‘ However, after witnessing the glacial pace of other rollouts (I’m looking at you, Local Services Ads) some are understandably not holding their breath on playing with this feature any time soon. Like most things with Google Search, it'll probably be about another 12 months before we even see that in the UK ? — ? Geoff Jackson (@zigojacko) July 23, 2021
What sort of information does the Ranking Factors Box show?
In the aforementioned Search Engine Land piece, Barry Schwartz discovered the following (non-exhaustive) list of factors as reasons for ranking a page: Search terms that appear in the result Search terms related to your search Other websites with your search terms link to this result This result has images related to your search This result is This result is relevant for searches in I’d encourage you to head over to his post for more detail on each of these.
How are SEOs reacting to the Ranking Factors Box?
It’s my tendency to catastrophize (I more charitably call it ‘black-sky thinking’), so my initial response to the announcement was to immediately decry the end of SEO as we know it. via GIPHY I figured that with potential SEO clients now being able to see why they rank, and getting keyword ideas from competitors right there in the SERP, smaller businesses would have much less need to invest in assistance with understanding their online visibility. Luckily, I’m alone in my cries of “Ranknarok is here!” (hat tip to my colleague, Mark Crowe, for that one). Judging by the online response to the Search Engine Land piece, SEOs are split between being excited… This is a big deal. Google now providing details about why it chose to rank certain results. More transparency in the SERPs. https://t.co/NCBan3B9Th pic.twitter.com/k99QAJV9p6 — Lily Ray ? (@lilyraynyc) July 22, 2021 …justifiably cynical… Secret sauce stays secret while providing crumbs of transparency for legal protection against lawsuits & more EU fines. Defensive moat against breaking up big tech gets another sandbag. ??⚖️ https://t.co/bTTrxTRqN7 — Andrew McGarry (@beyondcontent) July 23, 2021 ….or nonplussed. But are they really though? I mean they kinda are but not really, aren't they? https://t.co/9OGPZnttNx — Martin Nolan (@nolano89) July 22, 2021 Don’t let your hot take cool down: let us know what you think in the comments below!
What does this mean for SEO?
While I’m cautiously optimistic about the positives of such transparency, I personally share Mordy Oberstein’s concerns about a race to the bottom: I don't know how I feel about this. I LOVE the transparency. I am afraid it will result in SEOs thinking too linearly about Search. https://t.co/cOeGjbYLfd — Mordy Oberstein (@MordyOberstein) July 22, 2021 I’ve been in this business long enough—*strokes gray beard*—to know that your average SEO will do anything to make their job easier. (Understandably—it’s not an easy gig!) My concern is that easy access to the keywords that Google itself says will lead to a top spot will just mean SEOs optimising for the same few terms and chasing the same links; potentially to the point that high-ranking websites are indistinguishable from one another. However, this is precisely why having access to digital marketing tools like rank trackers, keyword research tools and the like could become, if anything, more important. Free access to this information technically leads to all parties playing on a level playing field, and so it’s more critical than ever to one-up your competitors. And that’s true whether you’re an in-house marketer for a small business, or a nationwide digital marketing agency. Besides, Google might be telling you which keywords are leading to a result, but it’s not telling you how to optimise for those keywords, how to structure your site’s architecture around them, or how to get those all-important links. This is where creative SEOs, and the tools they use to get more insights than their competitors, can truly shine. Will we develop new SEO practices thanks to this update? Probably not. None of the ranking factors uncovered so far are a surprise, but this does provide fantastic ammunition for anyone looking to prove the worth of optimization to their clients.
What does this mean for local SEO?
“Yadda yadda organic SERPs blah blah whatever…” I know, I know: you’re here to find out about how this impacts local search and your local business clients. If we’re talking purely about Google My Business rankings in the Local Finder and Google Maps, then no, this doesn’t really change anything. Google’s organic and local algorithms function separately, and this feature isn’t available in the Local Pack… yet (who knows?!) As with anything Google, it’s always good to consider what even a small change might bring. Knowing that Google is starting to take transparency of search results seriously (perhaps at the behest of its army of lawyers, perhaps not), could mean that SERP transparency could be coming to the local pack? After all, Google has already made a start on this by including ‘justifications’ in local SERPs, using info from everything from Google My Business Services, to customers reviews, to the content of the linked website, in order to show the searcher why it’s shared a particular local business.
What do local SEOs say about the Ranking Factors Box?
Whether or not this update was going to impact local search right away, I was still interested in the opinions of the local search community, and so reached out to some local SEO pros to get their takes. Their responses range from interested and intrigued to the comparatively unruffled: “It’s important to remember that most searchers won’t know this exists, and don’t really care about how things rank. A couple of years ago, a friend of mine thought Google ranked results alphabetically! So I think this is only really going to be of interest to SEOs. For SEOs, though, there is a lot they could do with this information: it’s great for looking at the competition in SERPs and seeing what you need in your content to compete, it highlights the importance of geo-focusing your content for local SEO, and can help with image optimization. It also proves, once and for all, that links do matter to Google. And we might finally be able to see why that terrible website ranks higher in the search results!” Andy Simpson, Digital Law Marketing “I think it’s interesting that Google is showing their cards by showing why a search result was ranked the way it was. I feel like they could be doing it for a couple of reasons: 1. It could be to give everyday users a better idea of the difference in ads and search results (although, people would have to know to click on the three dots and I doubt a lot of non-marketers will do that). 2. Maybe they are trying to help marketers a bit? Either way, I’ll be very curious to see if it sticks around.” Niki Mosier, AgentSync “As SEO’s, it seems to me that this feature has the potential to help provide additional insight when trying to reverse-engineer why a competitor is outranking you. I don’t think it would be wise to base a full strategy on the data, but at the very least it provides one more data point to consider, which is a good thing. Google’s never going to give us the inner workings of its mind, but when we take all the available information, we can make better decisions for ourselves and the businesses we work with.” Colan Nielsen, Sterling Sky “I like that Google is doing this but I don’t think it changes our approach to SEO. I’m guessing someone is going to figure out a way to scrape this info and package it as some cool new tool to improve your rankings, but it’s really just ‘SEO with training wheels’, and the wheels are plastic.” Andrew Shotland, Local SEO Guide “At a high level, I doubt that it’s going to be anything insightful – it’ll likely be just the basics, so it might be cool for someone who doesn’t know SEO, but will likely be painfully obvious to anyone who knows how Google works.” Greg Gifford, SearchLab
Conclusion
What this all means for Google and SEOs remains to be seen, but while it’s a feature that’s left many cold, I do believe it signals a seachange for Google’s relationship with SEOs. Read the full article
0 notes
Text
How to Add a Link to Instagram Stories (RIP Swipe Up Link)

Want to add a link to your Instagram Story? We have good news and bad news. (And then more good news!) The good news is that even though Instagram has retired its swipe-up feature, you can still add links to Stories using Instagram link stickers. The bad news is that, so far, you still need 10,000 subscribers or a verified account to get access to link stickers. Which leads us to the OTHER good news: we have a simple hack to add a link even if you don’t have access to link stickers, yet! Read on for all the steps. Download your free pack of 20 customizable Instagram Stories templates now. Save time and look professional while promoting your brand in style.
Wait, what was the Instagram swipe up feature?
The Instagram swipe up feature helped brands and influencers reach their audiences and gain more followers by allowing them to add links directly to their Instagram Stories. Viewers could swipe up on a Story or tap an arrow at the bottom of their screen to access a link without leaving the Instagram app or navigating all the way back to the bio to find that “link in bio.” But in August 2021 Instagram announced it was retiring the swipe-up feature. Why? Random theories abounded: perhaps Instagram has secret plans to make Stories move vertically like TikTok, rather than horizontally? The mystery remains unsolved. (Actually, Instagram did give its reasons, which we’ll get to in a second.) Regardless, the end result is that now users can include links in their Stories by adding a link sticker, instead.
What is the Instagram link sticker?
The Instagram link sticker replaces the swipe up feature, letting users add an external link to an Instagram Story. Story link stickers are the easiest way to promote multiple pieces of content and products on Instagram, while allowing analytics to help you optimize your Stories strategy. Instagram says that when it comes to links, the sticker has three major advantages over the swipe-up feature: - Stickers are familiar and popular with users, who use them for music, questions, locations and polls, etc. - Stickers allow more creative control over how a Story looks than swipe up links did. - And most importantly, stickers allow viewers to engage with a Story, whereas the swipe-up feature didn’t allow replies or reactions. Simply put: just like swipe-up before them, Instagram link stickers are an important tool for any Instagram business strategy.
How to use the Instagram link sticker
Instagram Stories only stay up for 24 hours, but adding a link to your Instagram Story is helpful for increasing your conversions, boosting organic engagement, and making it easier for your followers to access the content you want to share.

Source: Instagram Here’s how to add a link sticker to your Instagram Story. (Spoiler: it’s the same as any sticker.) - In the Instagram app, press the plus sign on the bottom center - Scroll to select Story (rather than Post or Live). - Create your Story using all the gorgeous media you have at your disposal. - Tap the Sticker icon in the top row. - Add your link. - Then send to your Story, and you’re done! Once you’ve posted your first link sticker, don’t forget to track your metrics so you can optimize. If you aren’t getting as many taps as you want, make sure you have a clear call to action, and that you don’t overload one Instagram post with too much information. Still stumped? Read our five other reasons that your Stories might be failing to convert.
Who can use the Instagram link sticker?
Since the Instagram link sticker launched, access has been limited to those accounts that also had access to the swipe-up feature. In other words, your account must be a business account with 10,000 followers or be verified on Instagram to use a link sticker. Instagram says it is evaluating whether to make link stickers available to everyone, but it is concerned about safety and integrity, as well as the spread of spam and misinformation on the platform. Rest assured that we’ll keep our ears peeled for more news on this front.
How to use Instagram swipe up or link sticker without 10,000 followers
If you’re not verified or don’t have 10,000 followers, don’t worry. You can still add a link to your photo or video Story with this IGTV workaround: Here’s how to add a link to your Instagram Story if you DON’T have 10,000 followers: - In the Instagram app, make or upload a 60 second video. - Write a title that says something like “Get the link!”. - Paste the link you want people to click in the caption. - Post the video to IGTV. - Now, on your feed, tap the paper plane icon under your new IGTV video. - Tap add video to your Story. - Tap on the link icon on top of your screen. - Select + IGTV Video. - Select the IGTV video with the link that you just created. - Tap Done. And that’s it! You won’t be able to see it on your screen, but people will be able to swipe up, see your video, and tap on your link in your IGTV caption.
Other ways to use links on Instagram without the link sticker
Sharing links with your audience is useful whether your goals are relationship-building or converting. If getting your Instagram followers up to 10,000 is not in the cards quite yet, here are some alternatives: Link in bio You’re probably doing this already, but you can add a call to action and a link in the bio section of your Instagram profile. Some IG users choose to put the one specific link they want in their bio or use link shortening tools for customization. You can also use tools that allow you to host multiple links on one landing page (less updating your links, more conversions!). It’s called an Instagram link tree and it’s very easy to make. Just remember to say “link in bio” in your caption when you post (we did an experiment, and don’t worry, it won’t hurt your engagement if you say it.) Use your DMs Post your Story and let your followers know that they can DM you for a direct link. It’s super easy for them, and a great way to build a relationship with your audience since it might feel even more personal when they receive the link directly from you. Bonus Tip: Use the DM Me sticker: your followers can get in touch with you in one tap! Create a poll Share your content and then create a poll that asks people if they want to be sent the link. All you have to do is check who said ‘yes’ to your poll and you can follow up with a link sent via direct message in the Instagram app. Ready to start driving traffic to your website from Instagram? Use Hootsuite to schedule Stories, posts, and carousels, engage your audience, and analyze performance—alongside all your other social networks. Read the full article
0 notes