
Don't wanna be here? Send us removal request.
Statistics
We looked inside some of the posts by javakys and here's what we found interesting.
Average Info
Notes Per Post
0
Likes Per Post
0
Reblog Per Post
0
Reply Per Post
0
Time Between Posts
1 month
Number of Posts By Type
Text
17
Last Seen Tumblr Blogs


Fun Fact
Tumblr.com is the 103rd most visited website in the world.
Text
[Python] Python으로 CMSIS-DAP 장치 제어하기
pyOCD 설치 github를 이용하는 방법 https://github.com/mbedmicro/pyOCD 위 사이트에서 Zip 파일을 다운로드해서 원하는 디렉토리에 설치한다. pip를 이용하는 방법 $ pip install –pre -u pyocd pyUSB 사용을 위한 환경 설정 pyOCD는 USB 장치를 통해서 CMSIS-DAP 장치와 통신을 한다. pyOCD는 pyUSB 클래스를 이용하는 데 pyUSB가 직접 USB장치를 이용하게 된다. ubuntu와 같은 linux 시스템에서 pyOCD를 사용하기위해서는 udev rules에 USB device에 접근할 수 있는 permission을 부여해야한다. /etc/udev/rules.d/ 위치에 mbed.rules라는 파일을…
View On WordPress
0 notes
Text
[Python] Ubuntu에서 Python과 MySQL을 사용하기 위한 설정
Ubuntu에서 Python을 이용해서 MySQL DB에 접속할 필요가 자주 생긴다. Python에서 MySQL을 접속하기 위해서는 필요한 라이브러리와 mysql client 모듈을 설치해야한다. 이 작업은 사용자가 어떤 버전의 Python을 사용하는 지에 따라서 다르게 수행해야한다. Python과 무관하게 mysqlclient 라이브러리의 설치가 필요한데 아래 ‘공통’ 부분에 표시된 것처럼 수행하면 된다. 공통 $ apt-get install python-dev libmysqlclient-dev 이후 단계는 Python 버전에 따라서 아래 안내와 같이 설치 단계를 수행한다. Python 2.x Python 2.x 버전에서는 MySQL-python을 설치한다. $ pip install…
View On WordPress
0 notes
Text
[STM32F4] Introduction to STM32F4 CPP Library from twareLAB
The original text of this article can be found at https://twarelab.com/blog/introduction-to-stm32f4-stm32f4-cpp-library For many embedded system developers, the STM32 series from STMicro can be considered a familiar MCU. One important reason for this is the use of ARM Cortex core and the stability of various peripherals, but the fact that the development environment, including IDE tools and…

View On WordPress
0 notes
Text
[STM32F4] STM32F4 CPP Library 소개
이글의 원본은 https://twarelab.com/blog/stm32f4-stm32f4-cpp-library-소개 머리말 많은 임베디드 시스템 개발자들에게 친숙한 MCU는 STMicro의 STM32 시리즈라고 할 수 있다. ARM Cortex Core를 사용하고 다양한 Peripheral이 안정적이라는 점이 중요한 이유이겠지만 무료로 사용할 수 있는 IDE 툴과 Flash 다운로드 툴 등 개발환경 구축에 비용이 들지 않는다는 점도 사용자의 선택을 받는데 도움이 되고 있다. 또한 많은 사용자들이 사용함으로써 참조할만한 예제들이 풍부하고 존재하고 있고 온라인에서 참조할만한 튜토리얼이나 블로그들이 존재한다는 것도 ST MCU를 선택하는 이유이다. 하지만 그만큼 많은 사용자들이 미세한 제어를 하는데…

View On WordPress
0 notes
Text
STM32에서 EEPROM 읽기 쓰기 오류 대응
STM32에서 EEPROM 읽기 쓰기 오류 대응
EEPROM Read/Write를 위한 오픈 라이브러리 https://github.com/sinadarvi/SD_HAL_AT24 오픈 라이브러리 사용시 문제점 32바이트의 경계를 넘는 범위로 Read/Write를 할 때, 값이 제대로 읽고 쓰지지 않는 문제가 발생한다. 라이브러리 내부 함수에서 이런 문제를 일으키는 것으로 보인다. 해결책 EEPROM 공간이 32바이트 단위를 걸치지 않도록 Dummy 블록을 지정하는 방식으로 Read/Write 오류를 수정한다.
View On WordPress
0 notes
Text
UART-to-Ethernet Loopback Example
This post is the final step of this project. In this post, I implement an example that receives data from ethernet and feed back through UART, then send data to the peer system via ethernet again, and a brief explanation is attached. Variable Declaration As UART communication is done with DMA, we need some buffers for UART DMA Tx and UART DMA Rx. And we don’t know when data arrives in UART DMA…

View On WordPress
0 notes
Text
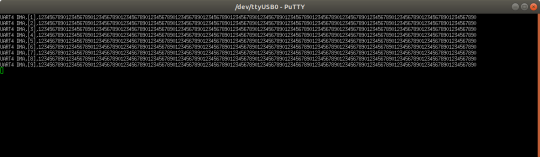
UART-to-Ethernet Loopback Example
이번 포스팅은 본 프로젝트의 마지막 단계로 Ethernet에서 수신한 데이터를 UART를 통해서 Loopback 한 다음에 Peer system으로 되돌려주는 예제를 구현하고 구현 내용을 설명한다. 변수 정의 UART 송수신을 DMA를 통해서 수행하기 때문에 UART DMA Tx를 위한 버퍼와 UART DMA Rx를 위한 버퍼가 있어야 한다. 또, UART DMA Rx의 경우는 데이터가 수신되는 시점을 알 수 없기 때문에 현재 수신된 데이터를 가리키는 포인터와 수신 버퍼에서 다음에 읽어가야할 데이터를 가리키는 포인터가 필요하다. 아래 그림은 이런 개념을 설명하고 있다. 여기서 가장 중요한 버퍼는 DMARxBuf인데 UART DMA Rx는 Circular 모드로 지정하였기 때문에 데이터가 언제…

View On WordPress
0 notes
Text
How to use UART DMA RX on STM32F103 MCU
How to use UART DMA RX on STM32F103 MCU
On the last post, I explained how to use UART DMA on STM32F103 MCU using HAL Library. I’ll explain how to use UART DMA RX here. First, thanks to Majerie Tilen and his tutorial and github repo regarding using UART DMA RX. His tutorial is very helpful for us to understand the mechanism of UART DMA RX on STM32 MCU. Why uses UART DMA RX When receiving a bulk data, using only interrupt may…

View On WordPress
0 notes
Text
STM32F103 MCU에서 UART DMA 수신 사용하기
STM32F103 MCU에서 UART DMA 수신 사용하기
지난번 포스팅에서 STM32F103 MCU에서 HAL Library를 사용해서 UART DMA를 사용하는 법에 대해서 살펴보았다. 이번 포스팅에서는 UART 데이터 수신에 DMA를 사용하는 법을 알아볼 것이다. UART DMA 수신의 장점 대량의 데이터가 수신될 때 인터럽트 방식을 사용하면 매 바이트가 입려될 때마다 인터럽트 처리 루틴이 호출되기 때문에 다른 중요한 처리를 하는 데 방해가 될 수 있다. 이런 경우에 UART DMA 수신을 사용하면 아무리 큰 용량의 데이터가 들어오더라도 HT(Half Transfer) 인터럽트, TC(Transfer Completion) 인터럽트 만 발생하기 때문에 MCU 간섭을 최소화할 수 있는 장점이 있다. UART DMA 수신시 고려사항 UART DMA 수신은…

View On WordPress
0 notes
Text
How to use UART DMA on STM32103 MCU
How to use UART DMA on STM32103 MCU
For UART communication, you can do it in blocking mode or nonblocking mode using interrupt.In Blocking mode, all other operation is blocked until UART communication finishes, whereas other operations can be run independently from UART communication in nonblocking mode and time-critical operations run in real time. UART DMA is nonblocking operation, and it reduces interrupts and enhances its…
View On WordPress
0 notes
Text
STM32103 MCU에서 UART DMA 사용하기
STM32103 MCU에서 UART DMA 사용하기
UART 송수신은 blocking 방식을 쓰거나 인터럽트를 이용한 nonblocking 방식을 사용할 수 있다. Blocking 방식은 UART 송수신이 완료될 때까지 다른 작업을 할 수 없는 반면에 nonblocking 방식을 사용하면 UART 송수신을 메인 루틴과 독립적으로 사용할 수 있기 때문에 리얼타임을 보장하는 데 도움이 된다. UART DMA는 기본적으로 nonblocking의 일종이면서 인터럽트 발생의 횟수를 줄여서 더 리얼타임성을 높일 수 있다. 본 포스팅에서는 STM32103 MCU에서 UART DMA를 사용하는 방법을 설명한다. Hardware Configuration 이전 포스팅에서와 같이 하드웨어 환경은 WIZnet WIZ145SR을 사용한다. UART DMA를 사용하기 위한…

View On WordPress
0 notes
Text
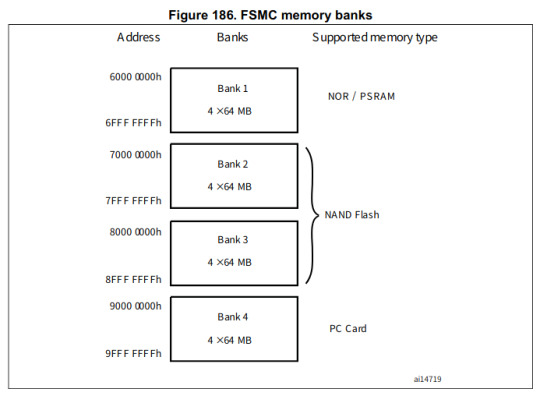
Connecting W5300 to STM32F103 via FSMC interface
Connecting W5300 to STM32F103 via FSMC interface
As W5300 supports only Parallel Bus Interface to Host MCU, connecting W5300 to STM32F103 MCU needs FSMC(Flexible Static Memory Controller) interface. I’ll show you here how to configure FSMC interface for W5300 and how to set up a loopback application as an example of TCP/IP communication using W5300 Configure FSMC In Pinout and Configuration Tab, select Connectivity->FSMC and. In FSMC Mode…

View On WordPress
0 notes
Text
FSMC 인터페이스로 STM32F103과 W5300 연결하기
FSMC 인터페이스로 STM32F103과 W5300 연결하기
FSMC 핀 설정하기 Pinout and Configuration 탭에서 Connectivity->FSMC를 선택하고 FSMC Mode 블록에서 “NOR Flash/PSRAM/SRAM/ROM/LCD 3” 를 클릭한 후, Chip Select는 “NE3”, Memory type은 “SRAM”, Address는 “10 bits”, Data는 “16 bit”를 선택한다. FSMC Configuration 블록에서 Write operation은 “Enable”로 변경하고, NOR/PSRAM timing에서 “Data setup time in HCLK clock cycles”는 3, 나머지는 0으로 설정한다. ioLibrary 설치하기 WIZnet에서는 ioLibrary (internet offload…
View On WordPress
0 notes
Text
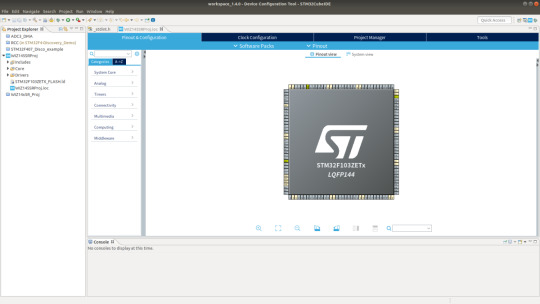
How to make STM32CubeIDE Project for WIZ145SR
How to make STM32CubeIDE Project for WIZ145SR
MCU and Clock Selection New Project First, select File->New->STM32 Project to make a new project like below image. Target Selection Window pops up automatically and waits for you to choose a MCU you want. Please check “Arm Cortex M3” in Core section, “STM32F103” in Line section, and select STM32F103ZE LQFP144 package on the right plane. MCU Selection After selected, the window will change as…
View On WordPress
0 notes
Text
High speed UART-to-Ethernet Example with WIZnet W5300
High speed UART-to-Ethernet Example with WIZnet W5300
Basic Communication Peripheral – UART UART is the basic and common communication peripheral on embedded devices. Even tiny mcu supports 1 or 2 UART essentially and industrial devices exchange data each other via serial communcation, and so UART is still most popular and appealing. SPI or Ethernet is getting more popular due to its high speed communication capability whereas poor performance of…

View On WordPress
0 notes
Text
WIZ145SR용 STM32CubeIDE Project 만들기
WIZ145SR용 STM32CubeIDE Project 만들기
MCU and Clock Selection 새 Project 만들기 먼저 아래 그림과 같이 File->New->STM32 Project 를 선택해서 새 프로젝트를 만든다. 자동으로 Target 선택 창이 나타나는 데 WIZnet WIZ145SR은 STM32F103ZE를 사용하기 때문에 Target Selection 윈도우에서 해당 MCU를 선택한다. Core는 Arm Cortex M3, Line은 STM32F103, MCUs/MPUs List에서 STM32F103ZE, 그 중에서도 LQFP144를 선택한다. MCU Selection 선택이 완료되면 아래와 같은 화면이 표시된다. Clock Configuration MCU를 선택하고 나면 기본적으로 Clock 설정을…

View On WordPress
0 notes
Text
WIZnet W5300을 이용한 고속 UART-to-Ethernet 응용 개발
WIZnet W5300을 이용한 고속 UART-to-Ethernet 응용 개발
기본 통신 장치 – UART Embedded Device에서 UART는 가장 기본이 되는 통신 방식이다. Tiny MCU에도 UART 1, 2개는 기본으로 장착되어 있고 산업 현장에서 운용중인 장치들은 예전부터 Serial 통신이라는 방식으로 다른 장치들과 데이터를 교환해 왔기 때문에 Serial 통신 방식중에 가장 대중적인 UART는 여전히 매력적인 통신 방식이다. UART 통신의 데이터 전송 능력의 한계로 SPI, Ethernet 등 고속의 통신 방식으로 전환하려는 시도가 활발하게 진행되고 있지만 오히려 최근에는 UART의 전송 속도를 올리는 방식의 접근이 활발하게 이루어 지고 있다. 일부 MCU에서는 13.5Mbps의 baud rate까지 지원하고 있어서 익숙한 UART 통신 방식으로 문자열…

View On WordPress
0 notes