
Statistics
We looked inside some of the posts by jmpgames-blog and here's what we found interesting.
Average Info
Notes Per Post
0
Likes Per Post
0
Reblog Per Post
0
Reply Per Post
0
Time Between Posts
12 days
Number of Posts By Type
Text
17
Last Seen Tumblr Blogs


Fun Fact
Celebrities use Tumblr as well.
Text
Version 0.20
Let the music play!
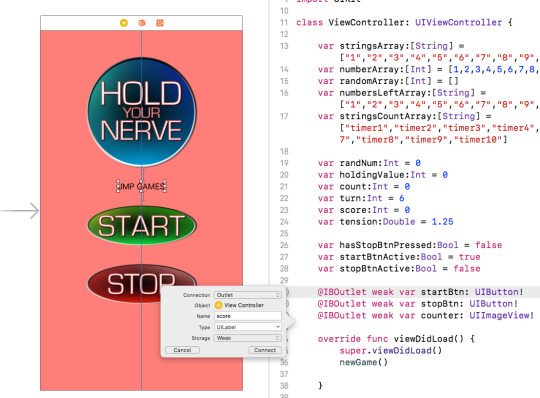
So far the app has been silent. But now that the functionality is there, working soundly without issue, its time to add some music.
I’ve got four sound files that I will be using within the app. They are MainMenuMusic, GameLoopMusic, StopBtnPressedSound and XReachedSound.
To start, I imported the AVFoundation into the MenuViewController, then I created four variable for each of the sound files I want to use within the app. I gave each of these the data type AVAudioPlayer.
var MainMenuMusic:AVAudioPlayer! var GameLoopMusic:AVAudioPlayer! var StopBtnPressedSound:AVAudioPlayer! var XReachedSound:AVAudioPlayer!
Then, I created a do and catch block of code within the viewDidLoad function. The purpose of this is to tell Xcode that the variable I just created is linked to the mp3 file. Below is the code for this do, catch block for the MainMenuMusic. My original mp3 file is called mainmenumusic. The catch block is left empty because if the music fails to load, I don't want it to do anything.
do { let MainMenuMusicURL:URL = URL(fileURLWithPath: Bundle.main.path(forResource: "mainmenumusic", ofType: "mp3")!)
self.MainMenuMusic = try AVAudioPlayer(contentsOf: MainMenuMusicURL) } catch {
}
I then added the following three lines of code:
self.MainMenuMusic.play() self.MainMenuMusic.currentTime = 0 self.MainMenuMusic.numberOfLoops = -1
The purpose of these is to play the music, starting at the beginning, an infinite number of times. In that order.
One thing I noticed when testing was that although the music played as expected, it continued playing when I moved onto a new screen. This is fine, I’m happy for the music to play on the HTPViewController and the ContactViewController, however upon returning to the MenuViewController the previous version of the music continues to play along with a new instance of the music. this causes some issues in terms of sound quality.
Lucky, this was a quick fix. In the prepare for segue function, I created new selection statements for all the segues. This then allowed me to use the code:
self.MainMenuMusic.stop()
In order to stop the music form playing. Then on the ContactViewController and HTPViewController, I’ll put the same code to start the MainMenuMusic from the start again.
I’m pleased to say that this works as expected, and I’m happy with the result. I’ve replicated this onto the HTPViewController as well.
Next is the GameViewController’s music. This one is going to be more complex than the others. Essentially, I want the MainMenuMusic to play until the ‘startbtn’ is pressed. At this point, the MainMenuMusic needs to stop and the GameLoopMusic should start. Then, If the player presses stop, the GameLoopMusic needs to stop and the StopBtnPressedSound kicks in. Likewise, if the player fails to press stop, then the GameLoopMusic should stop and the XReachedSound should kick in. Once the player dismisses the UIAlert window, the MainMenuMusic should start again.
I used the same four variables from before, but this time I made a do, catch block for each of the four sounds. In the newGame function, I add the code from above to start the MainMenuMusic playing, from the start, looping forever.
In the startBtn function, I did the same thing, only this time for the GameLoopMusic variable. I also used the self.MainMenuMusic.stop() command here as well.
Within the stopBtn action function, I added the following code. Its job is to stop the GameLoopMusic and start the StopBtnPressedSound. I didn’t add the looping code, as I only want this to play once, as soon as the button is pressed.
I added the same code to the function endOfTurnX.
Both of these worked as expected. All of the sounds work as you expect them to.
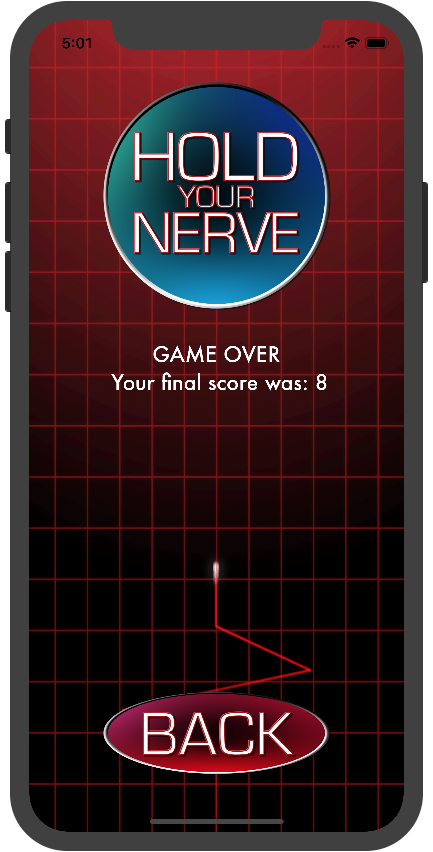
The final thing I did was to set up the MainMenuMusic on the FinalViewController page. You can see and hear the music in the video below.
youtube
0 notes
Text
Version 0.19b
In the last version, I tried to add a RevealViewController in order to display confirmation of what you stopped it at, and where it would have stopped. As you may have read. I couldn't get this to work. The code remains and it’s definitely something I’m planning on coming back to, however, right now I’ve decided that getting the game completed is more important than a feature which, although nice, isn’t required for the game to function.
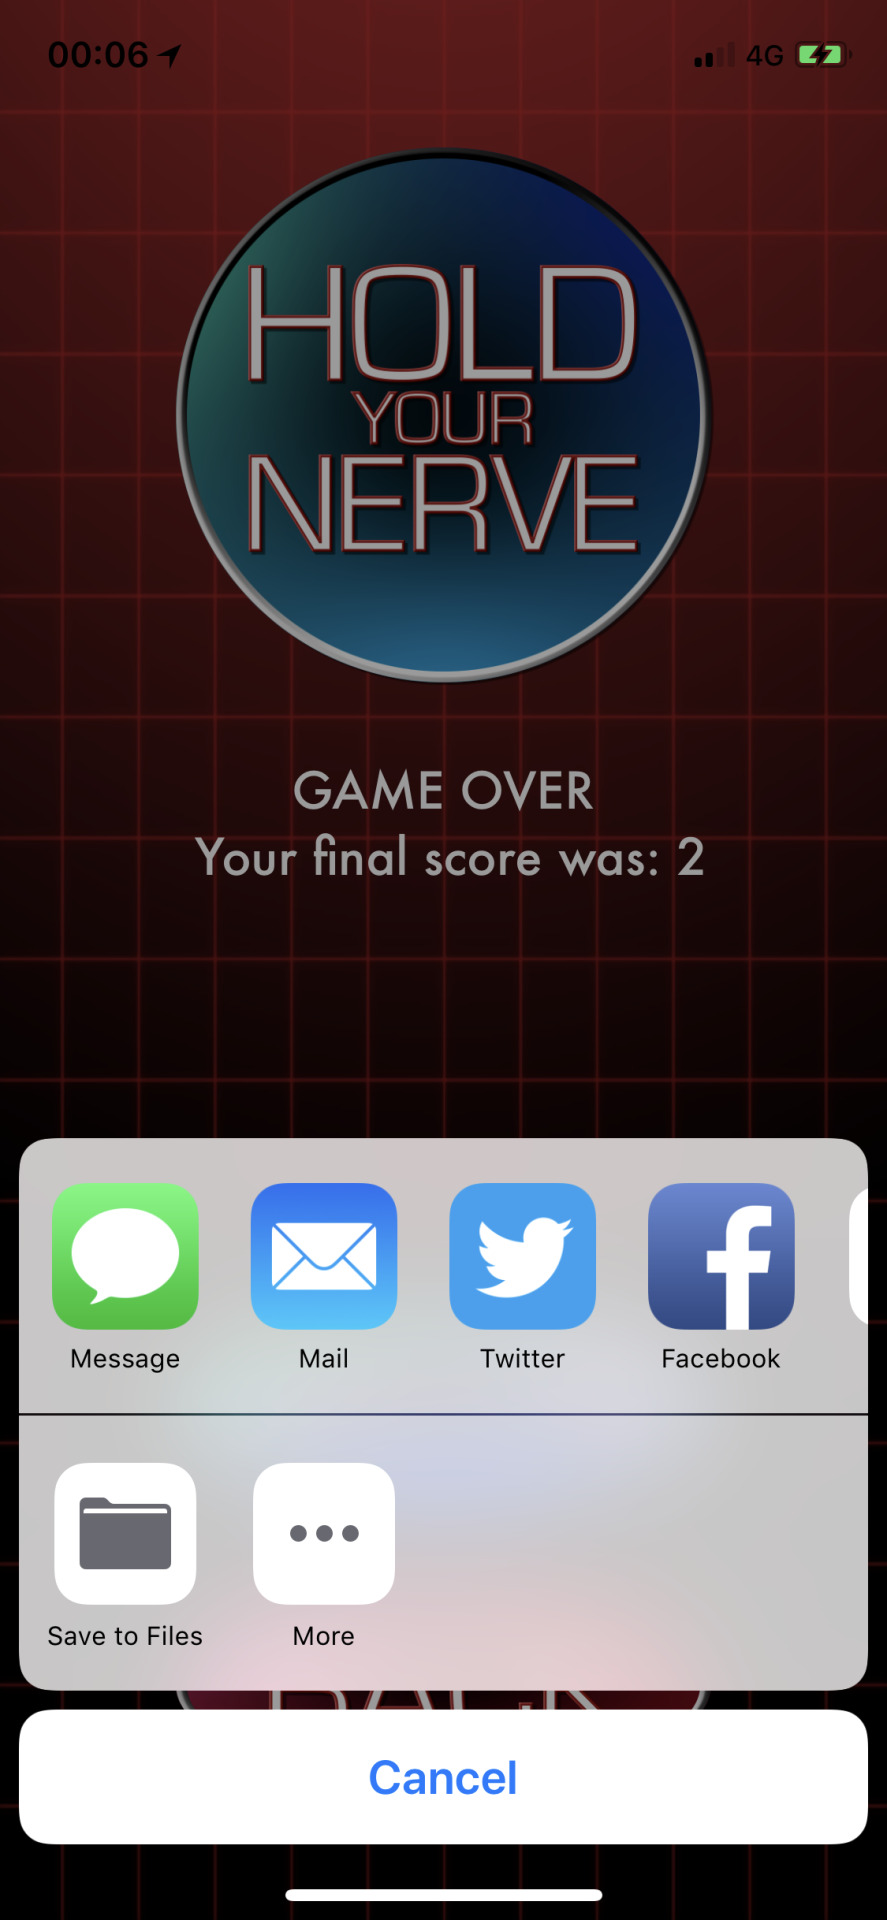
Having said that. Neither is the ability to share your score on social media. But hey, this feature was always part of the plan. The RevealViewController wasn’t.
Sharing is going to happen after the game has finished. So it makes sense that everything happens on this ViewController.
I'm going to start by creating a ‘Share Score’ button and attached it to the FinalViewController.

In iOS 11, Apple has updated the way in which you are able to share to different places. Previously, you would have had to make a new function for each sharing option, then authenticate and check for details etc. Now it is much much easier. I created a new string called ‘socialMessage’ with no data. Then when I press the ‘share score’ button the first thing I do is set socialMessage to be my message that I want to send out. In this case:
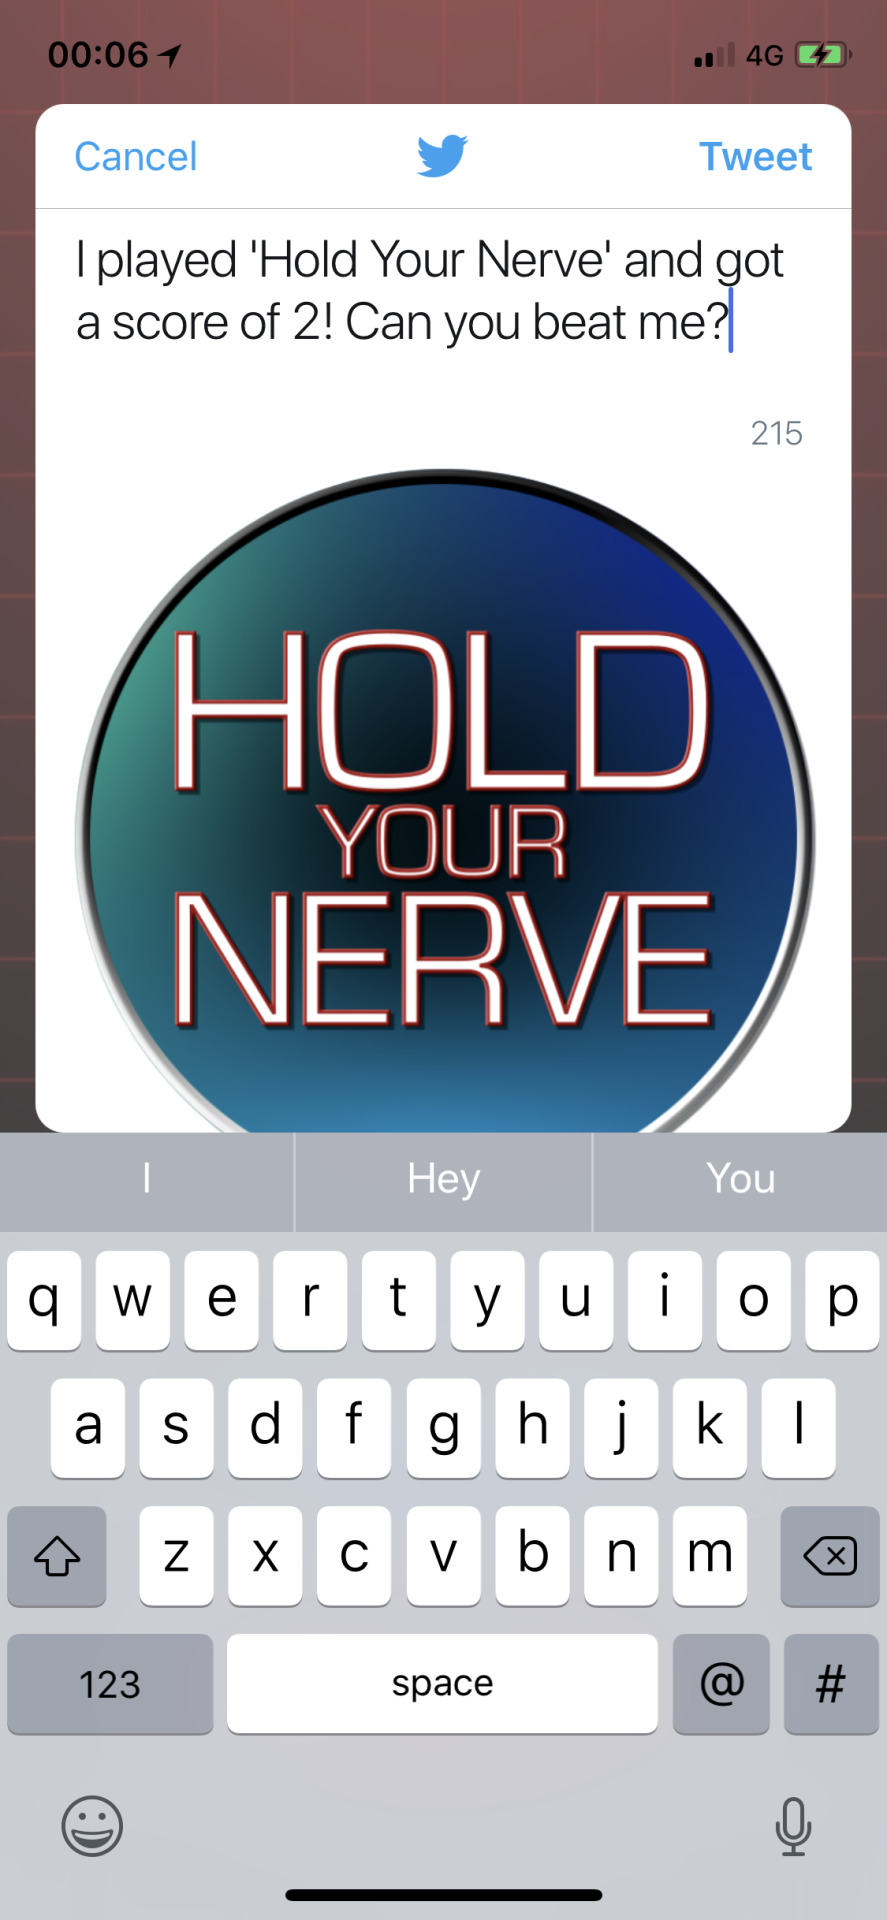
socialMessage = "I played 'Hold Your Nerve' and got a score of " + StringToSegue + "! Can you beat me?"
Where StringToSegue is the final score that was passed over from the GameViewController.
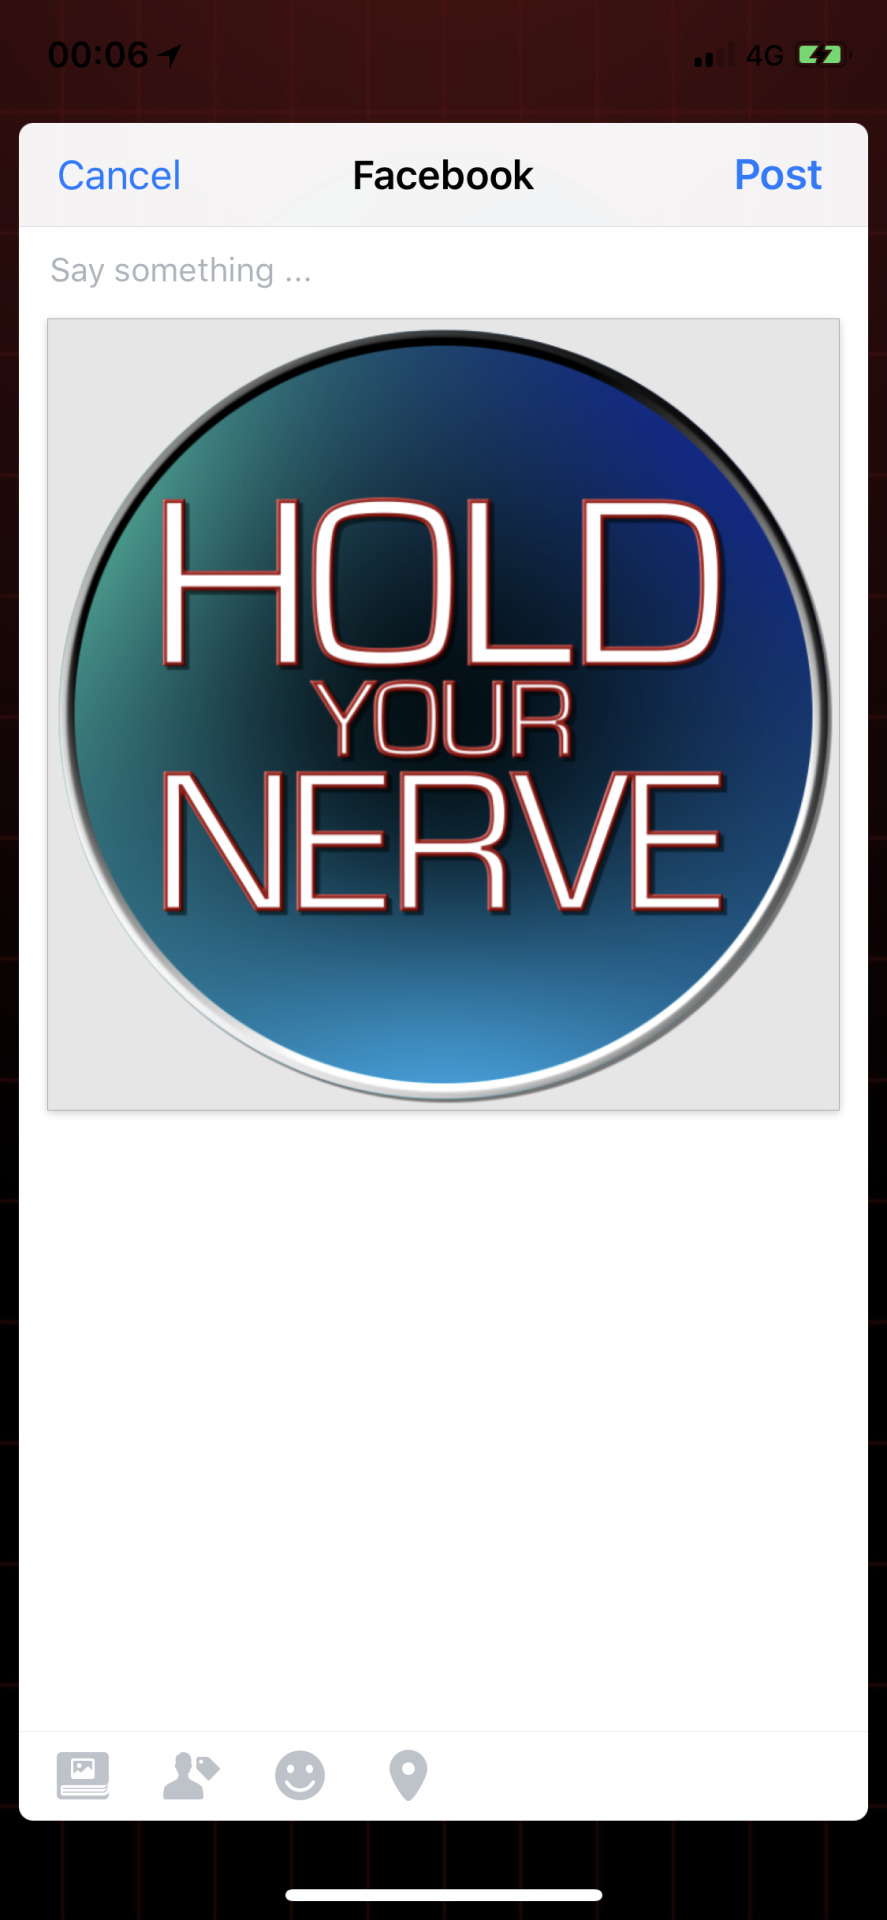
Then I created a new UIActivityViewController called shareSheet. There are two options here: activityItems and applicationActiviities. activiityItems needs to be saved as an array, so within this array I’ve added socialMessage and an image containing the games logo. I then present the shareSheet.
That's it. Literally. If the user has Facebook, Twitter, Whatsapp installed the shareSheet will allow them to post to those various other applications. No other code required. It will also allow you to use this info with all of Apple built-in functions such as Message, Email, Print, AirDrop, Copy, Save to camera roll, Assign to contact etc. Whilst some of these are good and I want to include. Others aren’t appropriate. You can use the ‘excludeActivityTypes’ module to remove certain features from the UIActivityController. I removed the following from mine:
UIActivityType.print, UIActivityType.assignToContact, UIActivityType.copyToPasteboard,UIActivityType.saveToCameraRoll, UIActivityType.airDrop
You can see the outcome of the shareSheet below.
The only issue with this is Facebook. The Facebook API doesn’t allow you to populate the field with text that the user didn't write themselves. You can however still push an image or hashtags.
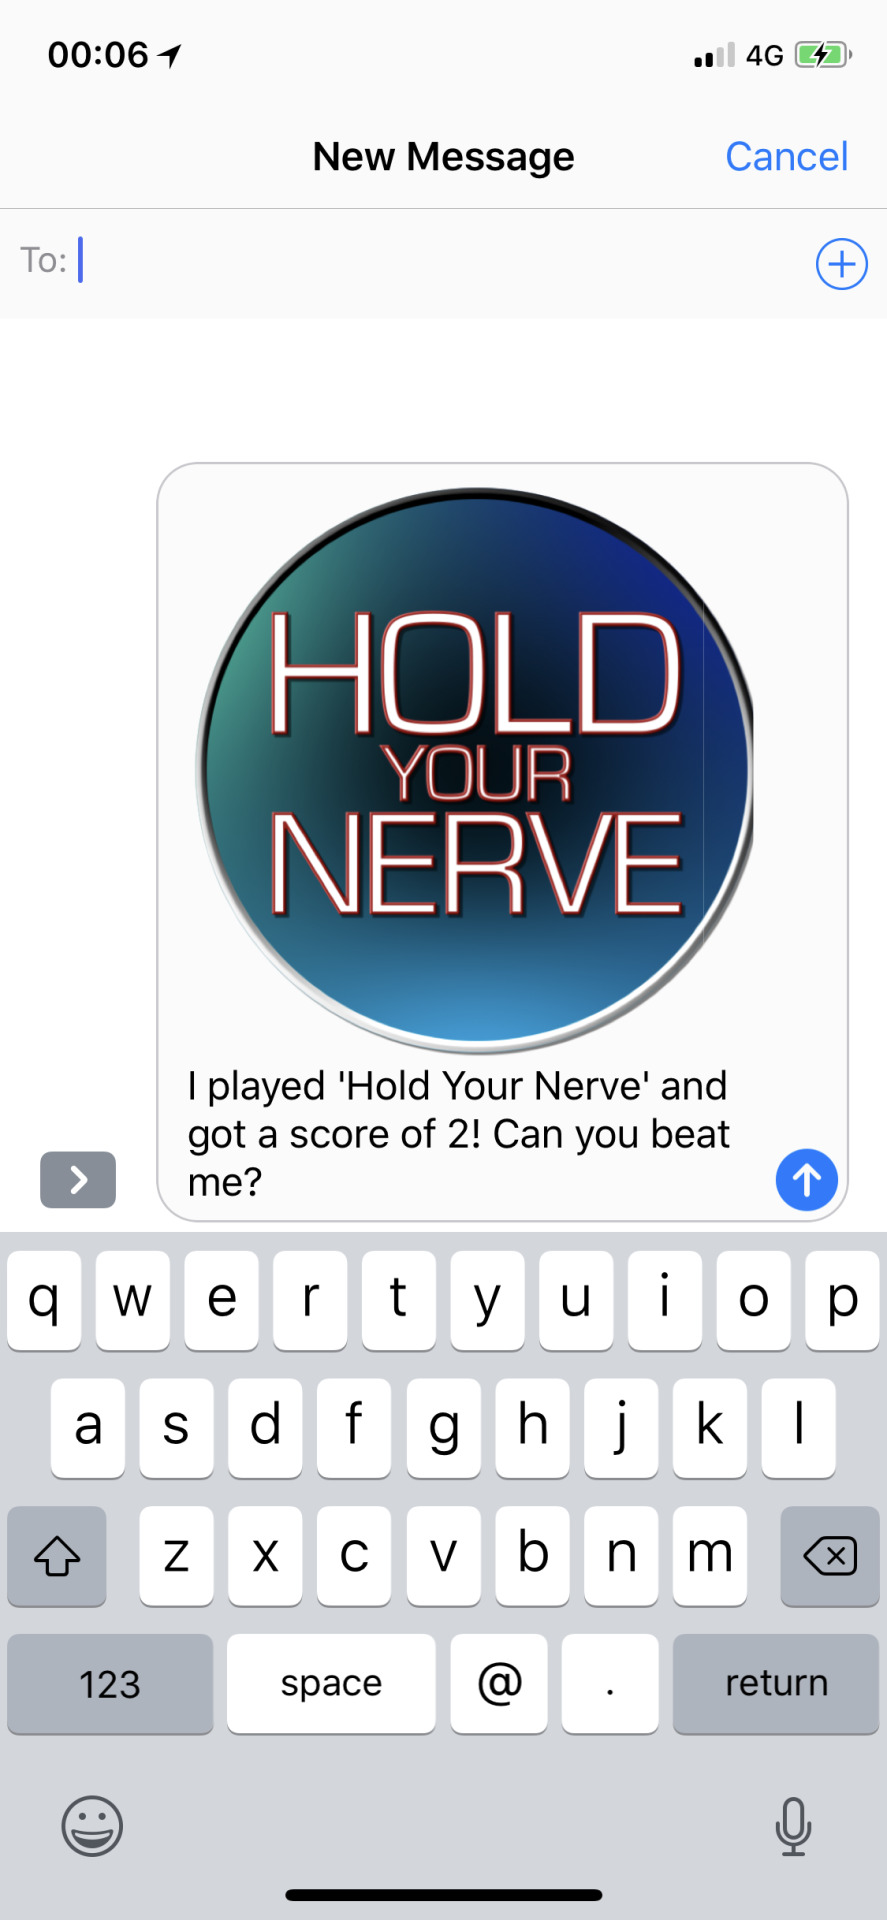
Really simple and straightforward. The message is a little basic, so I added the link to my website: https://jmpgames.online I did this by creating an NSURL called URL, then adding URL to the array of things to share. This ended up being quite a lot, so, I removed the image as the weblink is far more important.
let shareSheet = UIActivityViewController(activityItems: [socialMessage, URL as Any], applicationActivities: nil)
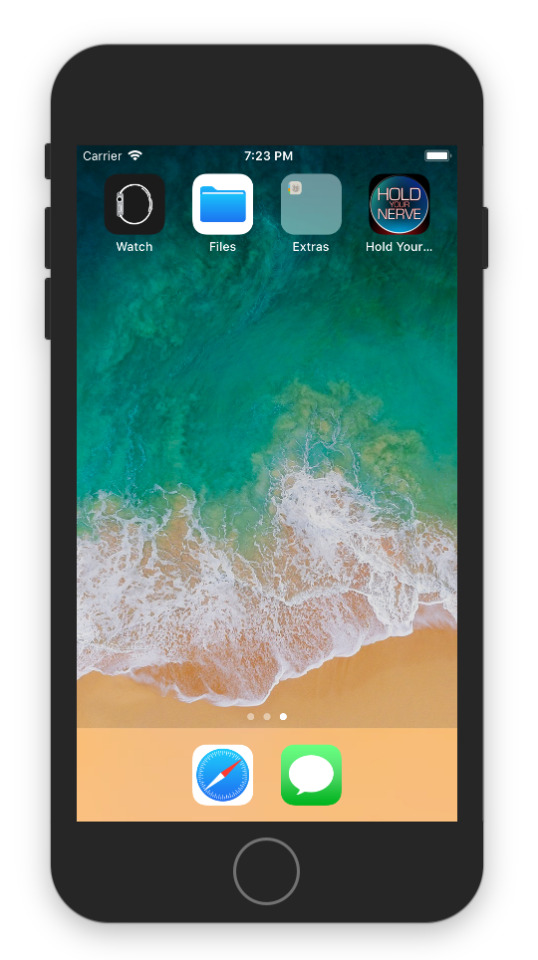
This then got me thinking. Looking at other apps, they have a way to share info about the app from the main menu. So, I decided my app should do the same. I decided to create a new ViewController called ContactViewController. Here I’m going to have buttons that take you directly to the Website, Facebook page and Twitter feed.
I created a new ViewController called ContactViewController and set up the relevant segues and buttons.
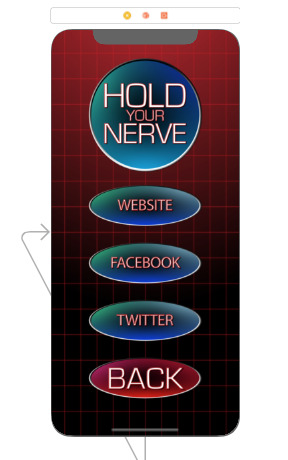
The next thing was to decide how to display these web pages. I could have done this simply by making the app close and opening facebook, twitter, safari in order to display the relevant pages. However, I decided to use an SFSafariViewController in order to display a safari page from within my app.
I create three variables, each one of type NSURL: webURL, facebokURL and twitterURL, each with the link to the correct page.
Within each of the buttons, I created a new SFSafariViewController called webVC. I passed the variables I just created to each one and used the present feature to display the new webVC. The code for displaying the website is shown below:
let webVC = SFSafariViewController(url: webURL! as URL) present(webVC, animated: true, completion: nil)
You can view the contact page here:
youtube
0 notes
Text
Version 0.19a
In my roadmap, V0.19 was planned to be the fine adjustments before submission to Apple for an App Store debut. But, as always, one thing leads to another and the roadmap was more like a guide as to what I need to do.
Before I get to this update, when I was testing the app, a few times I had the app crash due to a memory issue. I can only assume its the GIF background. Because of this, I decided to leave the background on the Game Screen for now and replace the other screens just with a fixed image of the grid and the red to black gradient.
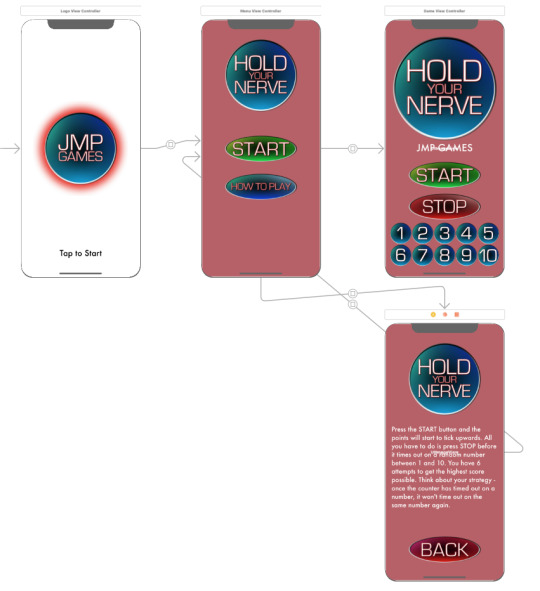
This update, however... Won’t fit with the roadmap either. Essentially, it's the UIAlerts. I really like how it goes to the final screen at the end of the game. I think it works well. So, the plan for this update is to create another new screen. The reveal screen.
The reveal screen will need to one of two things, all depending on whether you press the ‘stop’ button, or if the points run out. If the points run out, the reveal screen will just feature the number it ran out at, followed by your current total score. If you pressed the ‘stop’ button, the idea is that it’ll then start the count again, a bit faster, until it reaches the end of the points for that turn.
So, the first thing I did was to create another screen for the reveal. This screen contains a label to display some sort of message - haven’t decided on the exact wording yet, however, it’ll change based on whether you managed to press the button or not. It also contains a back button and a UIImageView to display the reveal counter. I've added segues from the Game Screen to the Reveal Screen and back again.
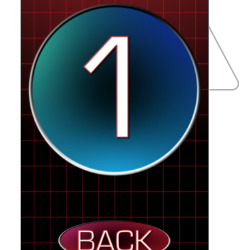
I’ve tried to think ahead and plan what I need. Firstly, I need a red version of each of the numbers for the reveal. My idea is that if you pressed the stop button, on the reveal screen it’ll start at 1 and count up to the final number. This number will be in red. I’ll also be using these red numbers for the reveal if you don't press the button. The second thing is the variables that I need to pass from the game screen to the reveal screen. Off the top of my head, I can think of two variables to pass, the final number it counted/would have counted too and a boolean to show if the button was actually pressed or not. At this time I’m not going to pass the score variable across, however, this might change later.
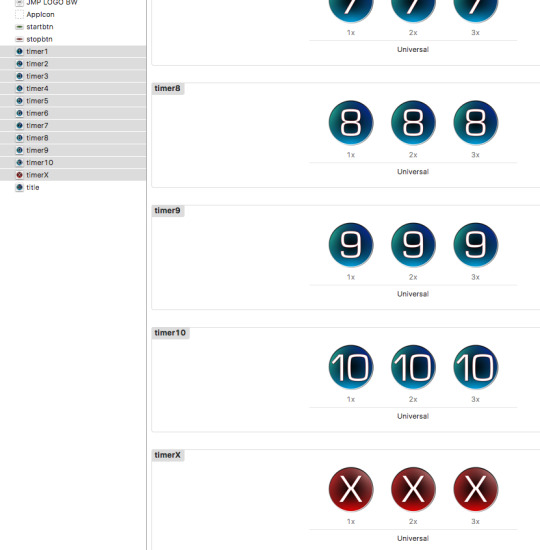
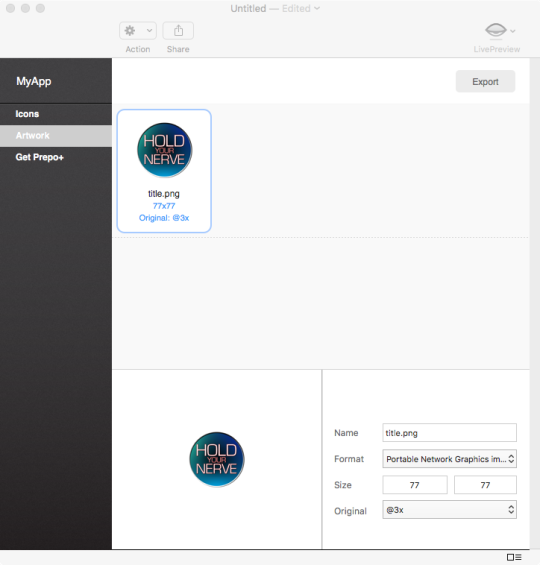
With this, I created the red numbers. They are identical to the blue and green numbers I previously made, however this time they just have the red background from the X. I ran all of them through Prepo in order to get an x1, x2 and x3 versions of the image set. You can see the number 1 below, trust me, the others match up like you’d expect.

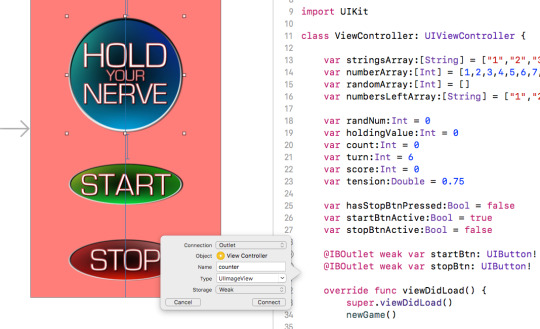
Firstly on the reveal screen, I created two variables. An integer called ‘valueCountedSegue’ and a boolean called ‘didPressSegue’. I created these in the same way as I created the way to pass the score variable from the game screen to the final screen.
I added the following code to the prepareForSegue override function on the game screen:
let RevealViewController = segue.destination as! RevealViewController RevealViewController.valueCountedSegue = holdingValue RevealViewController.didPressSegue = hasStopBtnPressed
This should be able to pass these two variables across and over to the reveal screen where I can then use it.
The first thing I’m going to do it if you failed to press stop. This should be the simpler of the two things that need to happen. Essentially, if you fail to press the stop button, all the reveal screen will show is the final number in red, and a message on the label. Something along the lines of “You failed to press stop, it stopped at:”
Again, this became a bigger issue than I thought it would be. Essentially the issue was with the prepareToSegue function. It didn’t know when and where to send the data to because I was trying to send it to two different places at the same time.
I fixed this issue using some conditions statements within the prepareForSegue function:
override func prepare(for segue: UIStoryboardSegue, sender: Any?) { if segue.identifier == "gametofinal" { let FinalViewController = segue.destination as! FinalViewController FinalViewController.StringToSegue = String(score) } if segue.identifier == "gametoreveal" { let RevealViewController = segue.destination as! RevealViewController RevealViewController.didStopButtonPressSegue = String(hasStopBtnPressed) }
}
These ‘if’ statements fixed the issue and I was able to pass the data required across. This however caused a new massive issue. As soon as I press the back button and go back from the RevealScreen to the GameScreen the newGame function is called and run. This essentially resets the entire game so erases the score and starts the game fresh.
I added in another selection statement to the GameViewController. I also created more variables to pass across ViewControllers. On the MenuViewController, I passed over a variable ‘Yes’. I put the selection statement to say If = Yes, do NewGame function. On the RevealViewController I did the same thing but passed over a ‘No’
Whilst this initially fixed the issue, in terms of not resetting the game, more and more errors kept coming.
Every time I do this I get more and more errors, so I’ve made the difficult discussion to leave the RevealViewController.
For now.
I’ve reverted the game back to using the UIAlert feature to display where it would have counted too. Whilst disapointing, I have learnt all about segues and the ability to pass data between ViewControllers in more detail, and as I said, its something I’ll definitely return to because I really like the idea. How to make it work? I don't know right now, its not as simple and straightforward as I thought. My current thinking is that I’d have to have six separate GameViewControllers and six separate RevealGameControllers, one for each turn. That way I should be able to keep passing the data across? I’m not sure if this is the best way to do it though.
For now, though, I’m going to revert back to the previous version and just move along with the version that is working for now. The next thing on the list is Social Sharing. Version 0.19b if you will...
0 notes
Text
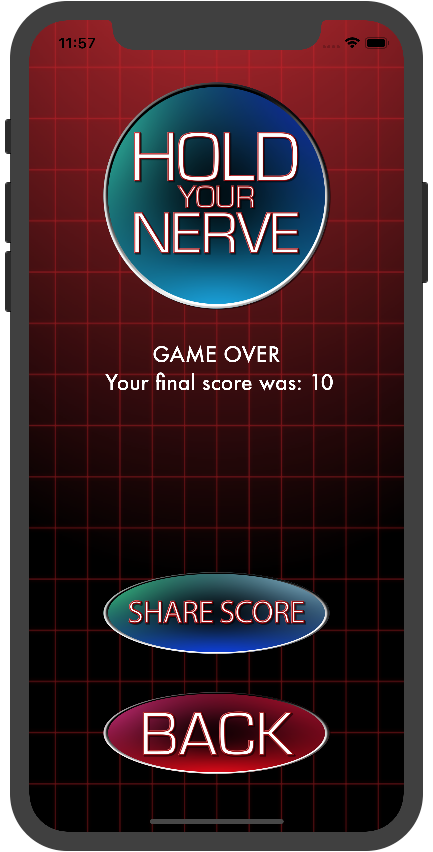
Version 0.18
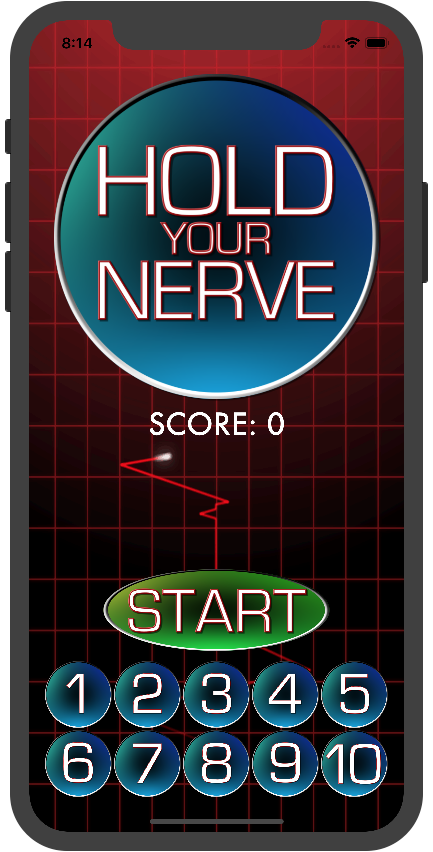
After all the ‘fun’ i had with segues last time, I didn't actually get around to creating a final ‘game over you scored X’ screen.
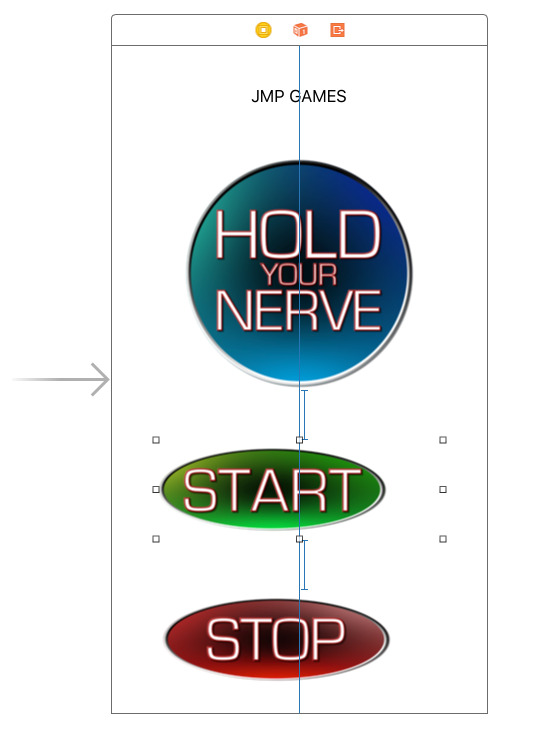
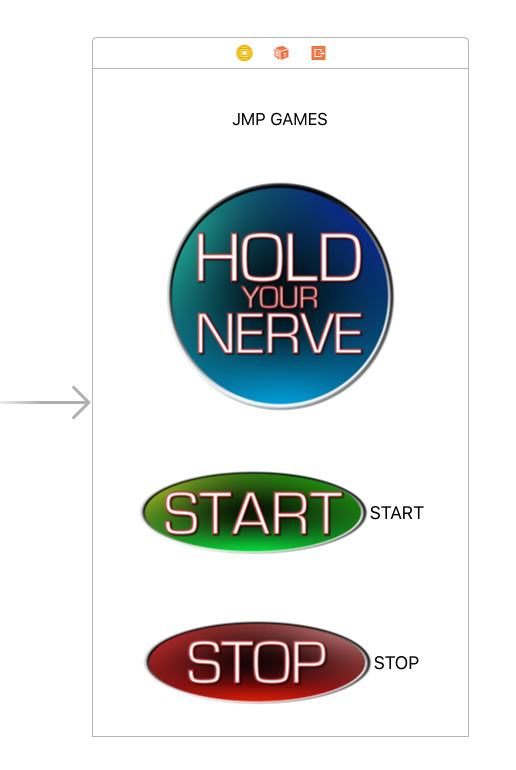
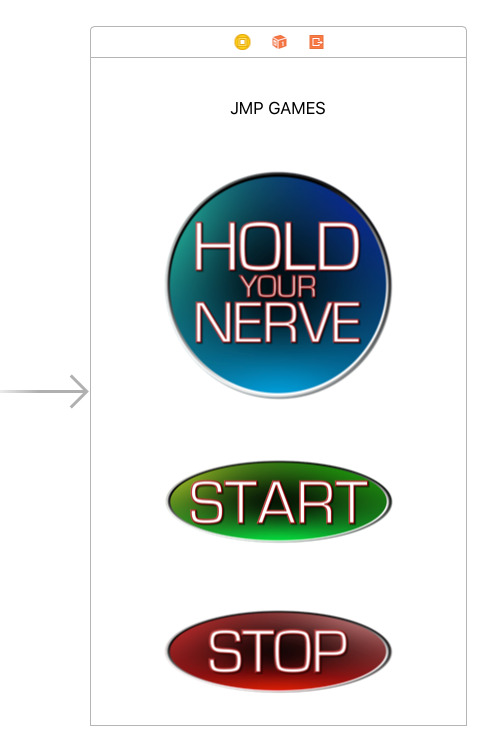
First thing I did was create this page. Its simple enough in terms of content. we have the logo at the top, the players final score as a text field, then a back button to return the player to the main menu. I also created the required segues from the game to this final page, then from the final page back to the menu. This is my finished storyboard:
Next, I needed to go into the game ViewController and edit the code slightly. Essentially, I need to change the last UIAlert message box that appears. All of the information displayed here I want to transfer to the final screen.
In the GameViewController swift file, I went to the GameOver section. Instead of calling the GameOver function, I replaced it with this code:
performSegue(withIdentifier: "gametofinal", sender: self)
In order to go straight to the final screen.
On the final screen view controller, I edited the instance of the textbox so that it would display all of the key information. Then needed to pass the variable score from the Game ViewController to the Final ViewController.
To do this, in the Final ViewController I created a vairable called ‘StringToSegue’ and set it as a String variable. Then in the Game ViewController, I added the following code.
override func prepare(for segue: UIStoryboardSegue, sender: Any?) { let FinalViewController = segue.destination as! FinalViewController FinalViewController.StringToSegue = String(score) }
This code essentially links the two ViewControllers together so that they can pass data. I then set the variable FinalViewController as the casted String of variable Score.
The final result allows me to get the final score passed across and displayed at the end of the game on the final screen.
0 notes
Text
Version 0.17
The purpose of this version is to implement a menu system rather than just being dumped straight into the game. I’ve also used this update to edit some of the general aesthetics of the app as well.
Firstly the stack. I’ve reduced the width of the stack slightly by increasing the leading and trailing edge from 5 to 15. It just makes it look a bit better, not hugging the sides as much.
The other thing I did was the background gif. Having previewed it on an actual iPhone X, I didn't like the fact the gradient went from red to black, left to right across the screen. It felt like the right-hand side of the notch at the top was lost. You could just make out some stuff, but not a great deal. So I changed the background animation slightly. Instead of going left to right, its now going top to bottom.
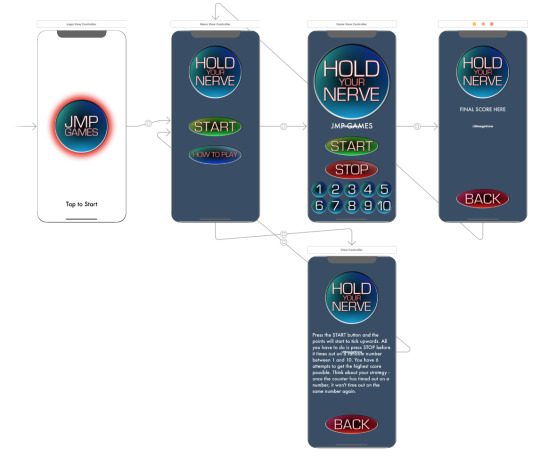
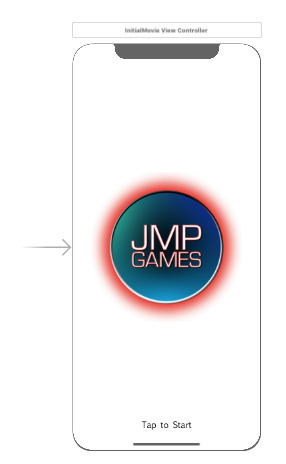
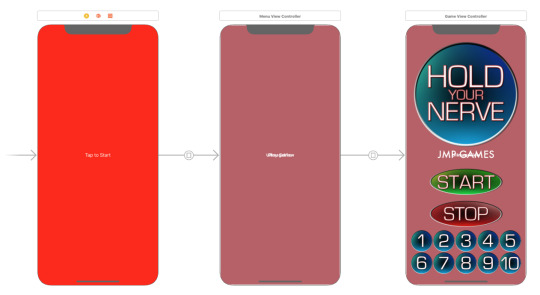
As I said already, the main purpose of this version is to implement a menu and navigation system. I’m going to do this using segues. A segue in swift and Xcode is a way of moving between view controllers, so will work well for a menu system. At the moment I’m planning on having 4 screens - The Game, How to Play, Main Menu and Logo screen. This last one is a bit weird, let me try to explain what I’m planning on doing.
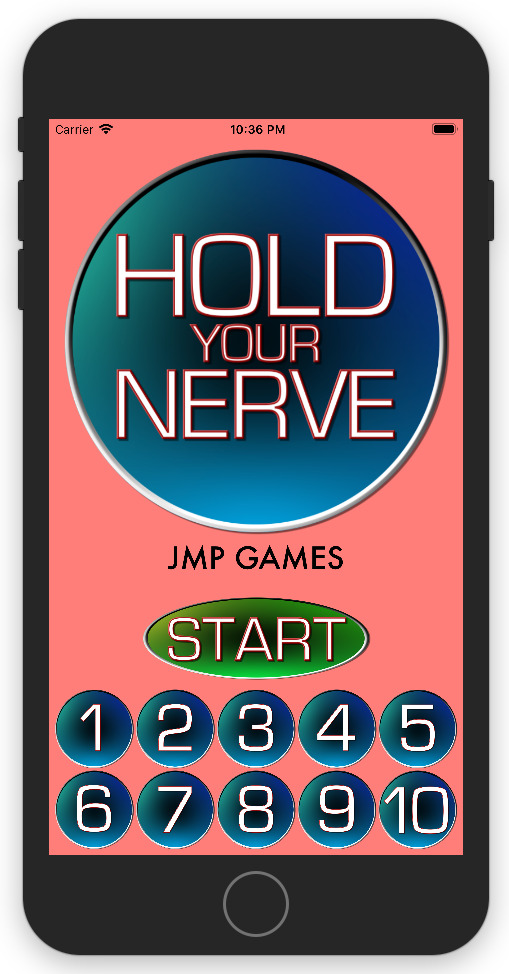
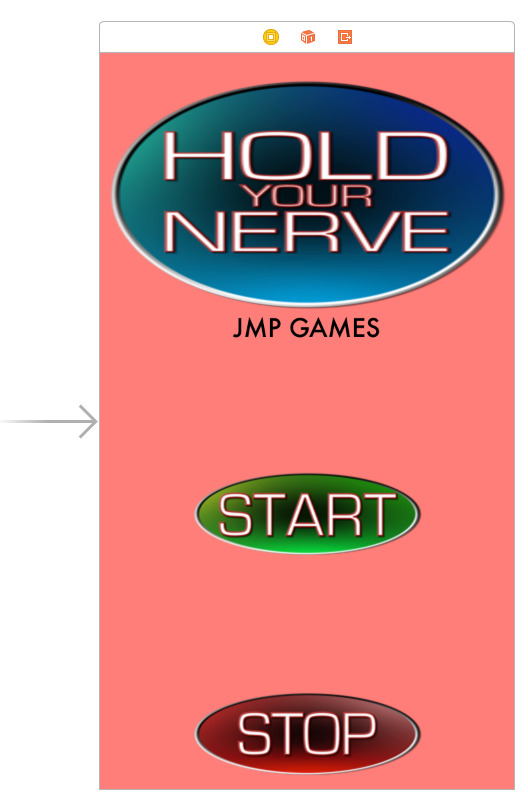
When the app initially loads up, the screen below is presented:
This will be the standard loading screen that appears for all the games I make. My idea is that once everything is loaded in the background, this will transition to the Logo screen. The logo screen will be near identical to this one, with the JMP GAMES logo in a circle, however, it will be styled to match the look and theme of the game itself. Something like this:

The plan is for it to then automatically transition, or segue if you will, into the main menu screen.
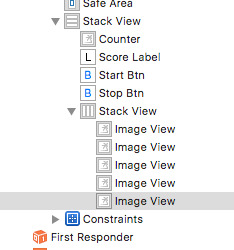
I started in the main.storyboard and created three new ViewControllers. I renamed all four so that it would be easy to follow and keep track of what was going on.
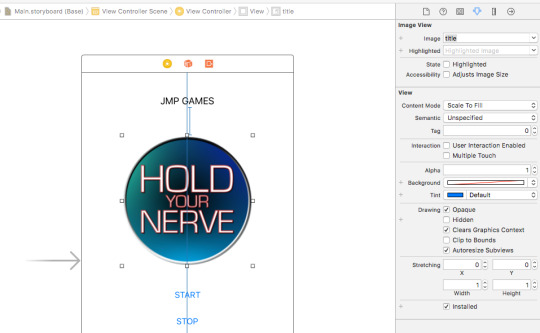
After creating the four ViewControllers, I started work on the logo view. This is the one where the above JMP GAMES logo will be displayed to match the theme of Hold Your Nerve. There were three main things I did with this one, firstly, added in the logo with centre vertical and horizontal constraints. Then at the bottom of the screen, added a basic button with the words ‘Tap to Start’. I will change this later on but for now, it's just a placeholder. The final thing I did was to move the ‘Storyboard Entry Point’ this is the arrow that points to the ViewController. This tells Xcode where to start the app after the LaunchScreen.storyabord has played out.
I then went on to create the ‘main menu’ and the ‘how to play’ screens. I did this by firstly copying the backgroundGIF UIImage and pasting it onto the other ViewControllers.Using StackView I then created the Main Menu. This consisted of a UIImage for the logo, and two buttons, start game and how to play.
On the ‘How to Play’ screen, I again added an UIImage Controller for the logo at the top of the screen, and a button at the bottom of the screen. The purpose ofthis is to take me back to the ‘Main Menu’. For now I’ve added the instructions straight from the website. I will more than likely change this later, however, again, it’ll serve as a placeholder. For now.
I then created the segue links. To do this, I ctrl clicked the button, then draged it tot he ViewController I want it to transistion to.
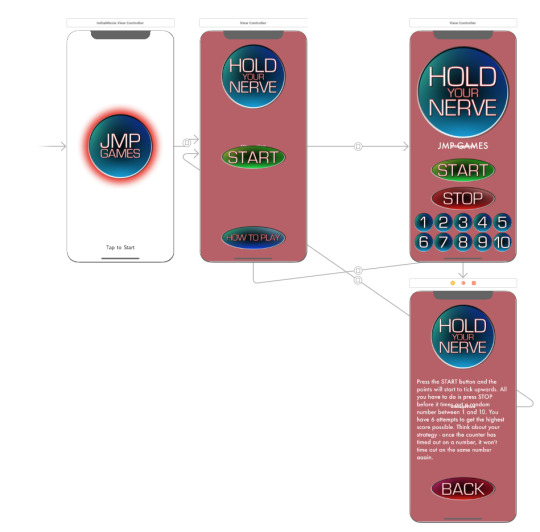
After some trial and error, I played around with the transition settings. For me personally, I liked the ‘Present Modally’ kind with a ‘Cross Dissolve’ transition effect.

After testing, the segues worked well and as expected, however the backgroundGIF only appeared on the actual game ViewController. I realised that this was because I hadn’t created instances of them within the swift and file, and told it to load th background gif file. This is where I ran into major problems.
Firstly, I wasn’t able to ctrl click and drag the UIImage that I was using for the background into the swift file. I realised that this was becaise I hadn’t set the class of the View Controller. So I set this to ViewController and was able to ctrl click and drag the UIIamge used for the background into the swift file. I then called the loadGif function and assumed it would work.
It didn’t.
I got onto the logo screen, then the app crashed with a fatal error. The reason being, it was trying to load th assests such as the stopbtn, but the stop button isnt present on this ViewController.
So, its only been seconds since you read the last paragraph, but for me its been hours. I ended up using Time Machine and pulling back an earlier verison without any of the additional ViewControllers. I got myself into such a mess, that starting this part again was the only way of fixing it. What went wrong last time? I don’t know. How will I aviod the issue (whatever it was) this time? Slow, steady, debugging every step of the way.
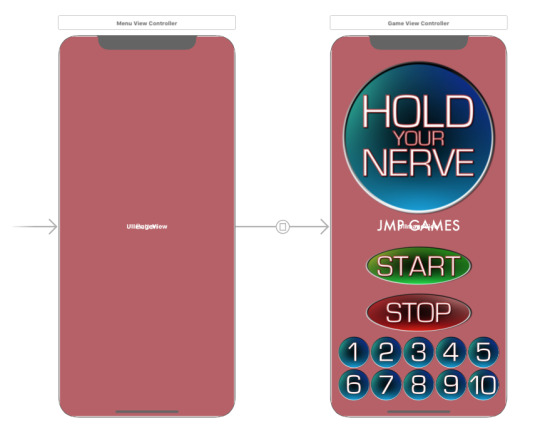
After resetting, I recreated the main menu view controller with just the UIImageView to use as the background and a button for testing. To ensure that there wouldn’t be issues like last time, I decided to go slow and take it step by step. I started by creating a new cocoa touch class with the property ViewController. I called this MenuViewController and assigned it to the new ViewController I had just made. Within this swift file added the Outlet for the UIImage and the Action for the button. I then recreated the Segue in the same way as beofre, but this time under the ‘identifier’ option, gave it the name ‘menutogame’. Within the button action I used the code:
performSegue(withIdentifier: "menutogame", sender: self)
This allowed me to move from the menu to the game itself. I then tested this to check it was working as expected. Im pleased to say it did.
From there I repeated this process for the inital logo screen. I created a new Cocoa file, linked the Logo ViewController to this file, added a button, added the segue and then tested. Again this worked as expected.
Again, I repeated this process once more for the ‘how to play’ ViewController. Again, taking my time, completing all the steps, then testing. The only difference with this one was also adding another button to the menu ViewController in order to access it.
I then added all of the other features back into each of the view controllers. This included, the logos, images on the buttons and the instructions. Below you can see the final storyboard. The only issue ive dsicvoered when testing is the loading of the gif background. When seguing into both the menu and the how to play page there is a noticable delay before the gif loads up. This doesnt happen with the actual game though, where the gif it almost preloaded? Anyway. Thats an issue for another time.
0 notes
Text
Version 0.16
It's time to ditch the red/pink background and go all out with some fancy animation.
Firstly I created an animated GIF of a heartbeat monitor like you see on TV. I’ve gone for a red fading to a black background, red gird and a red pulse line running vertically up the centre of the screen. You can see the final GIF below. Except that you can‘t. Tumblr won’t let me upload a GIF directly from my machine. This works though... added it to Giphy and hosted it there.

As it turns out, adding a GIF to an app is a lot harder than just adding an image.
I found this set of code on GitHub and after looking through it realised that I only actually needed 1 file - located within the SwiftGifCommon folder. You can see the files for yourself here:
https://github.com/bahlo/SwiftGif/tree/master/SwiftGifCommon
After importing this swift file into my project I then imported my animation. In order to make it work, I created a new UIImageView within my main storyboard. I set the constraints to absolute top and absolute bottom. The reason for this is that with the new iPhone X it has the notch at the top and the swipe up to close, replacing the home button. As this is just going to be for the background, it doesn't matter that the Gif is interfering with these. I did, however, change the bottom constraint of the stackview so that it doesn't impact on the swipe up to close feature. The final thing I did was change the colour of the scorelabel from black to white in order for it to be seen better. I then tested the app.
Unfortunately, this didn’t work. It took a while to figure out, however, I eventually realised that the gif I had imported, under ‘file inspector’, ‘identity and type’ the target membership icon was unselected. After selecting my app, the background gif started to play the next time I ran it.
0 notes
Text
Version 0.15
Here we go... getting back into this...
So... Confirmation as to the points the counter would have gone to if you failed to press stop, or if you did press stop. At the moment, the only way you know is if you look at the list at the bottom of the screen and see what has turned to an ‘X’. However, as more and more turn to an ‘X’ it’ll get harder to keep track, so I’m going to implement a pop-up message.
To do this, I’m going to use the UIAlertController to act as a pop-up window and inform the player. I’m going to use variables for the 3 settings within the UIAlert - the title, the message and the button message.
The variables I created are:
var alertTitle:String = "" var alertMessage:String = "" var alertOption:String = ""
This way, I can just change these variables and call them rather than having to keep editing the UIAlert each time.
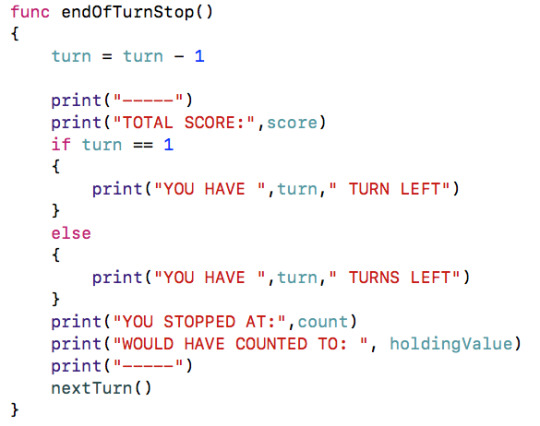
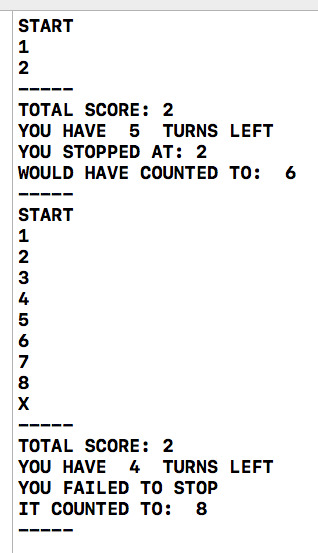
I’ve started by going to the endOfTurnStop function. Currently, I have a load of print commands that were used for testing the app within Xcode. Essentially, I’m just going to turn those print commands into the UIAlert. I ended up removing the print commands altogether.
Used the ‘\n’ function I was able to put different messages on different lines within the message window. The variable used to save the score, the turns left, the count that the points would have gone to and the count that you stopped at are all saved as integers. For them to be displayed within the message, they needed to be cast as Strings. This was done easily, but using the cast as string function shown below:
String(count)
So the final message to be displayed to the player is as follows:
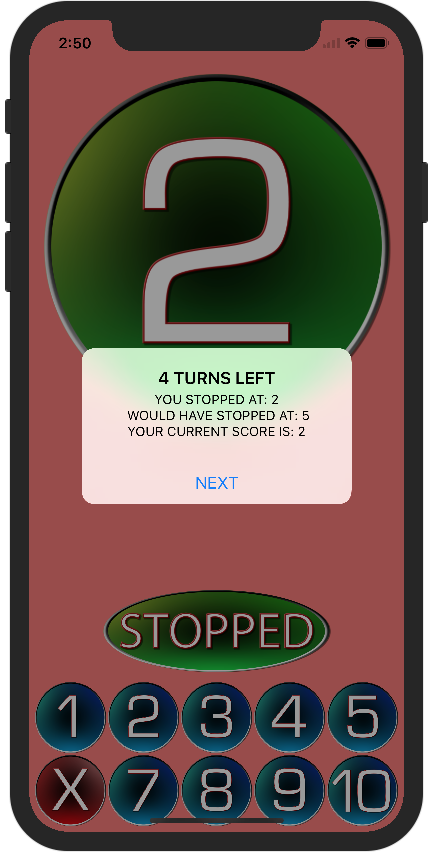
alertMessage = "YOU STOPPED AT: " + String(count) + "\n WOULD HAVE STOPPED AT: " + String(holdingValue) + "\nYOUR CURRENT SCORE IS: " + String(score)
I also removed the timer that automatically moves onto the next round, instead, I added this command directly yo the UIALert button press. The function endOfTurnStop now looks like this:
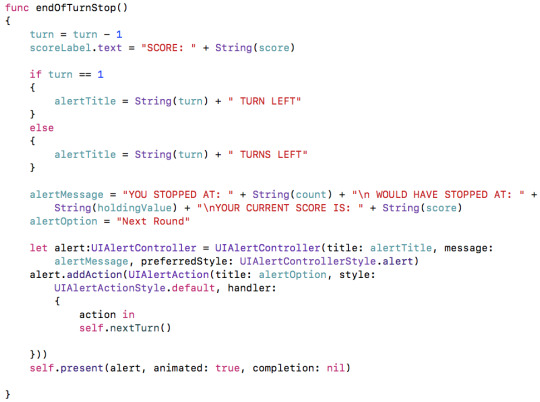
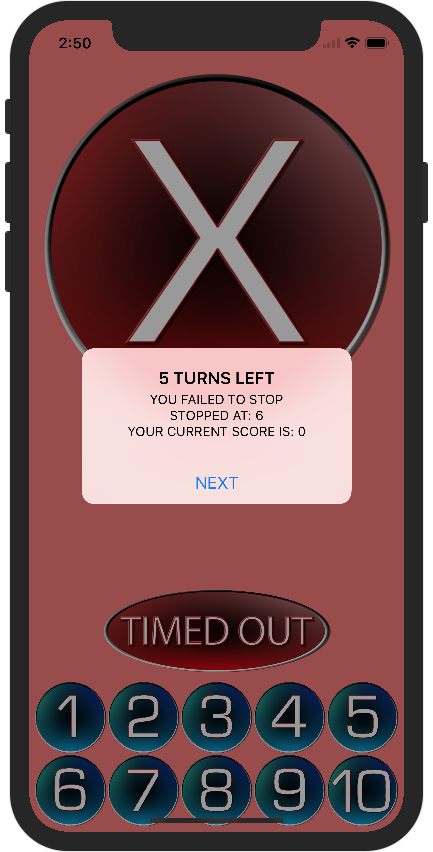
I repeated this process for function endOfTurnX, but edited the message that is produced slightly. The new function can be seen below:
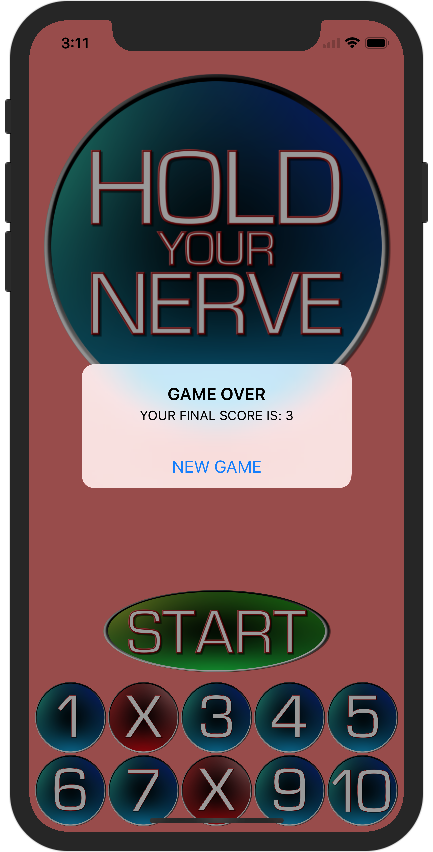
I then tested using the new iPhone X simulator (fancy!). It works as expected, however, upon reflection, there is still one issue. GAME OVER. The button says ‘Next Round’ even if there isn't another turn. As a quick fix, for now, I’ve just changed it to say ‘Next’. I’ve also added a UIAlert to the GameOver function, which displays the final score. This can be seen below:
Below are some screens from the simulator to test the popup window:
It was here that I found a major problem. I ended up getting to ‘0 turns left’ but then the game over function didn’t kick in, so was displayed with a ‘-1 turns left’ message.
After testing with various print commands to see exactly what was happening, I realised that I had failed to include the following line of code:
self.present(alert, animated: true, completion: nil)
Becuase of this, the UIAlert wasn’t actually being told to display. After adding this line of code in, the Game Over message was displayed as expected.
Whilst this isn't the most elegant solution, for now, its the way I’m going to do it. Hopefully, in the future, I’ll change it and make it look better, even if just the wording of the actual messages.
0 notes
Text
I’m back...
Hey... so... been a while...
I was building this app in my spare time during my annual leave. Then I went back to work. Then I got a promotion and moved house and iOS11 and the iPhone X came out. Ok, so maybe the last two weren’t the real reason for stopping work, but maybe they had some deep down psychological impact? Who knows?
Anyway, I have another week annual leave. No work, no house moves and no significant updates to either iOS, iPhone or Xcode.
So, with that in mind, in my last post, the game was basically working, the basic functionality was there. Going forward, this is the roadmap of what to do next:
0.15 - Message to confirm where the points would have counted too if you didn't press the stop button.
0.16 - Background animation
0.17 - Menus and segues between them, including a ‘final score’ page
0.18 - Sharing on social media, both before and after the game
0.19 - Music
1.0 - Submit for testing to Apple
Long term roadmap, once the iPhone app is out, includes a version for the iPad, landscape mode, Apple TV app
Also, have a new game idea. But let's get Hold Your Nerve published before worrying about that!!
So, that's the plan... let's see how it goes...
0 notes
Text
Version 0.14
So, after completely failing last time to actually implement the list of non-timed out numbers last time, that is the sole purpose of today's post. The way I've decided to implement this is to have stacks within stacks. stack-ception if you will!
So, I'm thinking to have all of the numbers displayed on the screen at all times in 2 rows of 5. Once the counter has timed out on a certain number, change that number to an ‘X’. Hopefully, it’ll be quick and easy to see exactly which numbers have timed out and which haven't - adding the strategy element to the game.
My plan is to have 2 horizontal stacks containing the numbers 1-5 and 6-10 receptively, and have these contained with a vertical stack.
I created the first horizontal stack by simply dragged the Object Library, then 5 imageViews and arranging them in the left-hand menu as shown below:
For each imageView, I added the appropriate number (I reused the numbers from the counter) and set the stackView distribution to fill equally and each of the imageViews to Aspect Fit.
I then repeated this process with a second Horizontal stack for numbers 6 - 10, using the same settings as above.

For some reason, the ‘score’ label wasn't showing up in the preview, however on both my iPhone and the emulator it appears.
Next thing to do is to implement the ‘timed out’ number system. To do this, I added each imageView as an IBOutlet so that I can then manipulate the image via the code.
In the newGame function, I then added the following code for each of the timed out numbers so that they would reset back to their original after each game:
self.timer1.image = UIImage(named: “timer1″)
I amended the numbersLeft function as follows, so that whatever the holdingValue is equal to, that number in the list gets swapped for an ‘X’
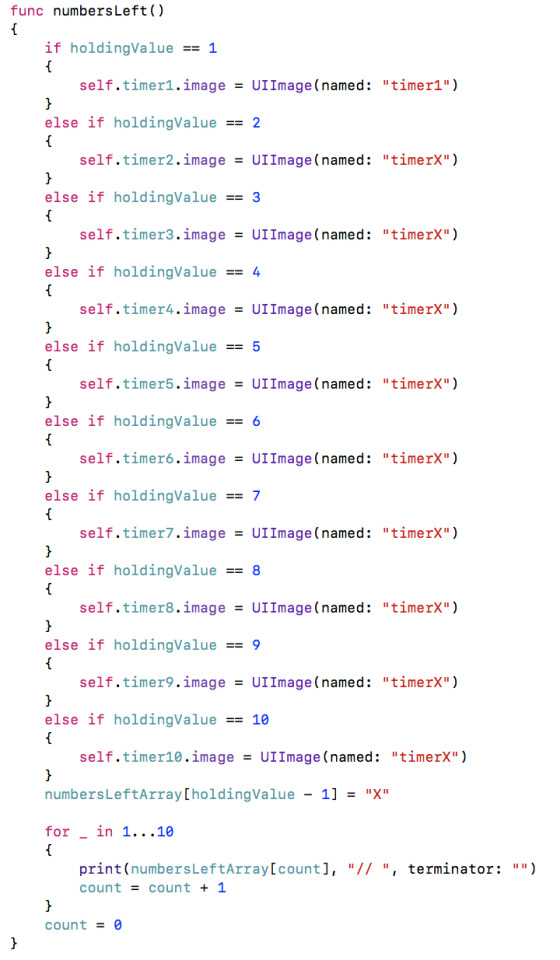
This now works as expected, the timed out numbers reset after the game has finished and they cross themselves off as the player progresses through the game.
As I was testing the game at this point, I noticed a few minor bugs and a major one. The minor bugs were to do with the images being displayed. I had misspelt ‘timer7green’ as ‘timergreen7′ so the green timer wasn't being called to appear. Also, with the timedout numbers, I hadn’t told timer 1 to change to timerX, so again this wasn't being displayed.
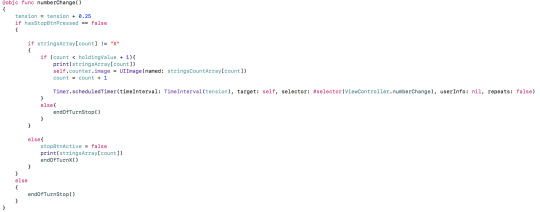
Whilst they were easy to fix, I had another major problem. If the count was going to 7 for example, and you pressed stop on 7, the score would increase by 7, however, the ‘X’ would still appear.
From my understanding, it is because of the numberChange function. When I'm in the function it has already called itself again on delay, so, when it repeats itself the IF equal to X condition kicks in running the endOfTurnX function.

I came up with a solution by moving the “&& hasStopBtnPressed == false” condition to a new IF statement, with everything inside it. The ELSE part of the IF statement is simply to run the endOfTurnStop function.
You can see everything working in the video below.
youtube
0 notes
Text
Version 0.13
In this update - adapting to different screen sizes and displaying the numbers which have timed out.
Screen sizes. I’m developing this game just for the iPhone at the moment, so the range of screen sizes are limited, however, they are something that I need to take into account. Having done some research, the use of stacks seems to be the best option for me.
From the Object Library in the Main.Storyboard view, I selected Vertical Stack View and dragged it onto the canvas.
Everything currently on the canvas - the counter, the startBtn, the stopBtn and the scoreLabel needs to be added to the stack. To do this, I just dragged the objects into the stack on the left-hand side menu.
The objects are stacked vertically based on their order in the StackView:

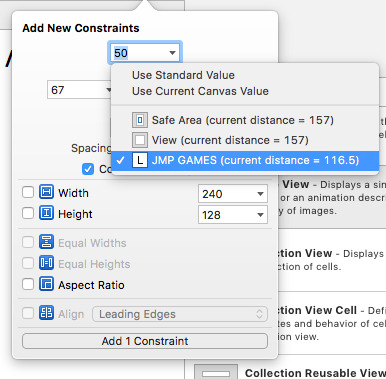
I was then able to apply constraints the StackView, to ensure that it fills the screen - regardless of what size the screen is. I set each constraint to be 5 away from the edge of the safe area. The result generated surprised me:
To fix this, I had to play around with the Content mode in the Attributes tabs for both the counter image and the Stack View itself.

Eventually, I managed to find a combination that worked me the game. This made the title/counter big and filled the screen, then the score and the buttons appeared underneath. At this point, I decided to test the game to see how the stack was working. This is when I hit a major problem. StackView lists everything one after another. So the startBtn and stopBtn were appearing one after another, without a way to overlap them.
I spent a long period of time thinking about how best to overcome this problem when I realised that I'd already created a solution to this problem earlier without knowing it. I’d already coding boolean values - startBtnActive and stopBtnActive.
My idea was to combine the startBtn and stopBtn into one button, whose images and function changed depending on the results of those boolean variables.
To change the image of the button, I found that the code I needed was this:
startBtn.setImage(UIImage(named: "stopbtn"), for: UIControlState.normal)
It's a little more complex than selecting a new image for the imageView, because it is a button and the button has different states to take into account.
Having experimented with having a single button a problem arose. The way the I had set the code up, after I combined the start and stop functions into one button, as soon as I pressed the button in ‘startmode’ stop mode would instantly activate as well, thus making the turn and an 1 each single time.
I went back to the drawing board and found a much better, much easier solution. Instead of using alpha values, I could use another piece of code - isHidden.
By swapping all of the alpha commands to isHidden commands I could swap out the buttons as and when required. This, however, caused another issue. When there was neither button on the screen, the stackView would resize everything to fill the screen.
For now, the quickest solution was to make 2 new graphics - one saying ‘STOPPED’ and one saying ‘TIMED OUT’. I then made the ‘STOPPED’ graphic appear when the player presses the stopBtn, and the ‘TIMER OUT’ graphic appear when the user fails to press the stopBtn.
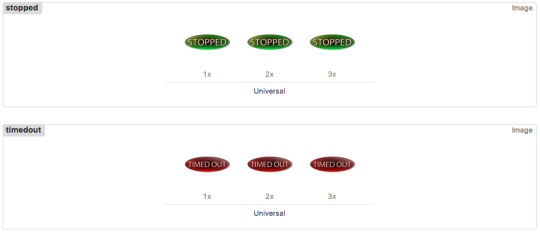
Using the code I found before to change the graphic on a button, I wrote code so that if the stopBtn was pressed the “STOPPED” graphic would appear and likewise, if the counter timed out, have the ‘TIMED OUT” graphic appear.
I’m pleased to say that the game works as expected, and I actually like the ‘STOPPED’ and ‘TIMED OUT’ graphics more than I thought I would.
This post is getting quite long, so I’m going to save the list of what number have timed out until next time. I have a few ideas as to how to do this - more stacks required I think!
0 notes
Text
Version 0.12
I’m aiming to do a couple of things in this update related to the user interface. Hopefully, I’ll be able to sort the App Icon, the score is displayed, a visual confirmation that the stop button press has worked and a better interface in terms of the START/STOP buttons.
To start, the App Icon. Really easy to get this sorted - First, I took the title image and added a small red fade to the bottom. I then used Prepo to create a set of App Icons.
Then came the frustrating part - matching each of the images that Prepo created with the various resolutions XCode demands. I couldn’t find a way to bulk import them, so had to manually drag and drop each one. There were only 2 that I could find, and so had to make myself - the “1x iPad 20pt” and the “App Store” icon.
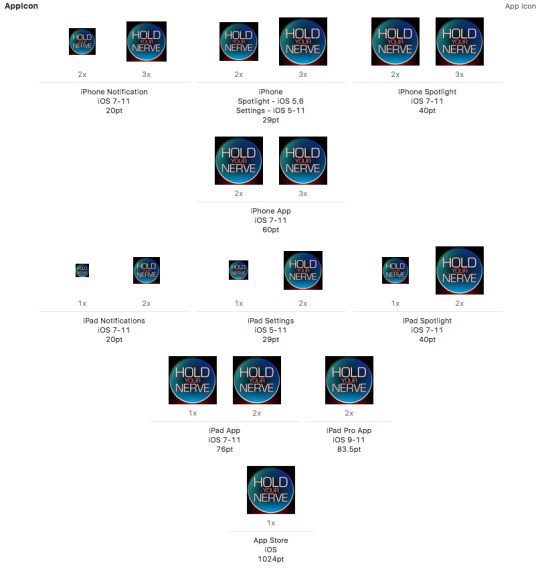
As you can see, the App Icon loaded as expected, and, personally, I think it looks good - not out of place for a real app!
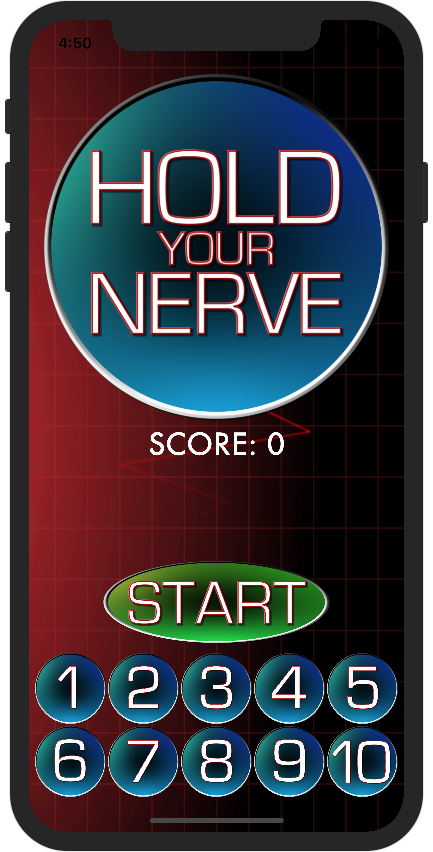
Second on the list for this post is to get the score displayed on the screen, not just in the printout. I decided to just use the label I already had created that currently just sits at the top of the screen saying ‘JMP GAMES’. I rearranged and replaced the current constraints with new ones so that the START and STOP buttons were closer together and so that the soon-to-be score label was in between the counter and the START button. I also created an IBOutlet for the label called ‘scoreLabel’.
In the nextTurn function, I added the following line of code. Hopefully, this will display the total score every time the nextTurn function is run.
scoreLabel.text = "SCORE: " + String(score)
I also added this line of code to the newGame function, so that the odd score isn't displayed just before starting a new game.
scoreLabel.text = "JMP GAMES”
Both of these worked as expected. It’s worth noting that at this point I changed the font of the score label to match everything else.
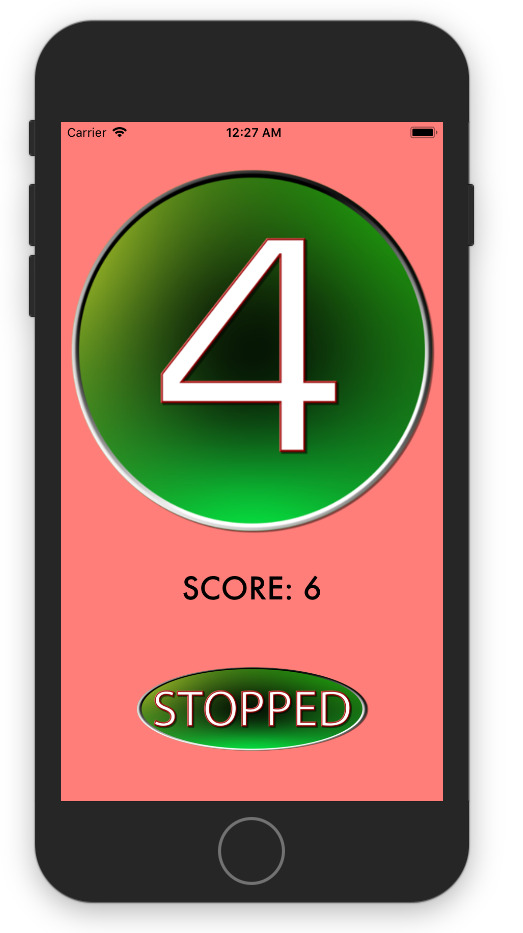
Next, an indication that the STOP button has been pressed. I thought the best way to do this was to have the counter colour change to green. I create graphics for each on the numbers with a green background, ran them through Prepo, and imported them into XCode.

I then created another array, this time for the green timers:
var stringsGreenCountArray:[String] = ["timer1green","timer2green","timer3green","timer4green","timer5green","timer6green","timergreen7","timer8green","timer9green","timer10green"]
I then added the following line of code to the stopBtn function so that when the button is pressed it displays the count - 1 element in the stringsGrenCountArray:
self.counter.image = UIImage(named: stringsGreenCountArray[count-1])
This means that as soon as you press stop, the green version of the number appears as a visual response to the stopBtn press.
The final thing to do in this update is to sort out the startBtn and stopBtn. Currently, they are always displayed on the screen, which, although I’ve added code to disable them, could still cause confusion. To solve this, I used the Alpha functionality within swift to show and hide the buttons as and when required. Using the code:
startBtn.alpha = 0
or
startBtn.alpha = 1
Will allow for the button to be displayed or hidden (0 for hidden, 1 for displayed) As soon as the game loads, in the viewDidLoad function, I set the stopbtn alpha value to 0 and the startBtns alpha value to 1.
When the startBtn is press, I have hidden the startBtn and displayed the stopBtn.
in the endOfTurnStop and endOfTurnX functions, I set the stopBtn alpha value back to 0 again to hide it away. Finally, in the nextTurn I set the startBtn alpha value back to visible. This worked as expected. The only issue I have is the massive gap between the stopBtn and the score when startBtn is hidden.
I edited the constraints of the stopBtn so that it effectively overlays the startBtn. I can’t envision a time when both of these buttons will be on the screen at the same time, so there shouldn't be a problem with them overlapping.
I’ve uploaded a video showing the game working on the simulator in its current state.
youtube
0 notes
Text
Version 0.11
The aim of this post is to try and move the counter from the printout to the actual iPhone screen.
I started by importing the 1-10 & ‘X’ images that I'm going to be using. I've made them in the same style as the title, I'm hoping to use that ImageViewer and just change the destination as and when? Will see.
In the main.storyboard I selected the imageView and added a link to the code as an IBOutlet with the name counter.
Having done some research, the following code should be able to get the ImageView:counter to display any image I want from my assets library.
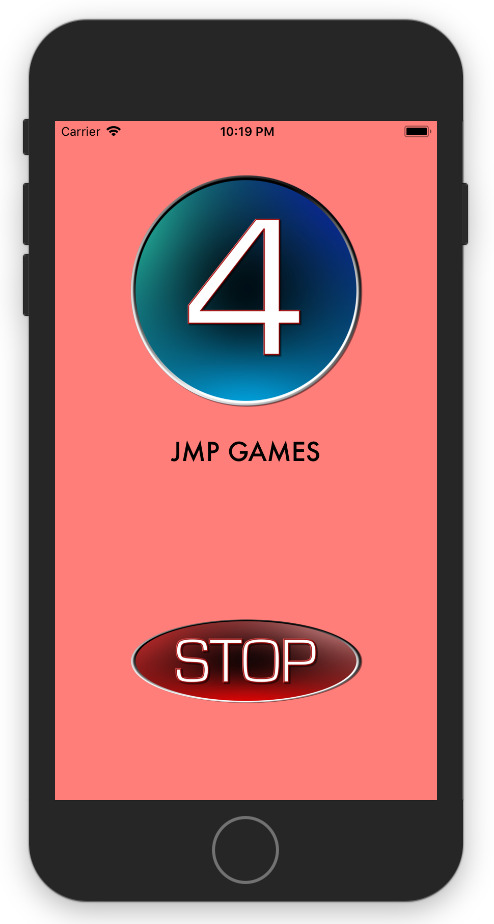
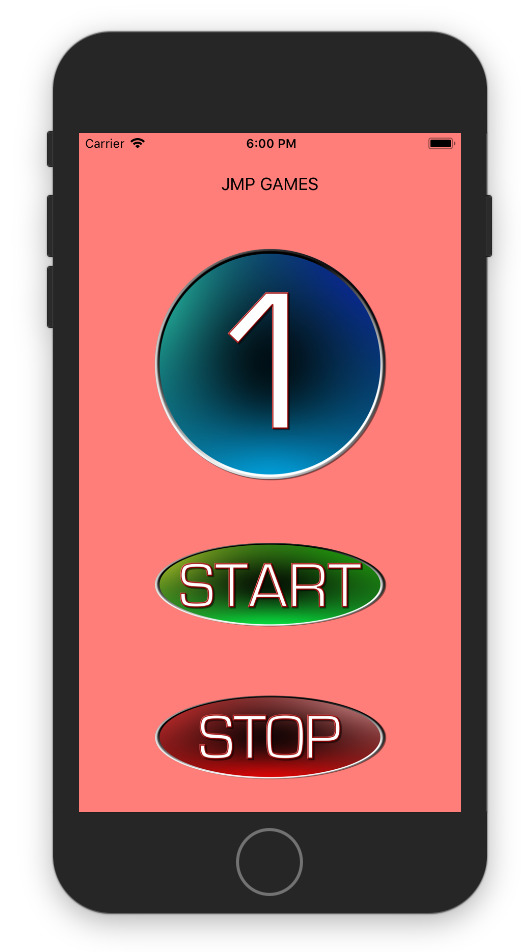
self.counter.image = UIImage(named: "timer1")
Where ‘counter’ in the name of the ImageView and ‘timer1′ is the name of the image from my assets. I added that line of code to the viewDidLoad function, and, as you can see from the simulator, as soon as the app launches, the number 1 is displayed.
In the numberChange function, every time it is called, I'm checking the count variable against the value in the strgingsArrys. So, I'm hoping that by using the same count variable, I could iterate through a new array and display the image based on the image name at that point in the array?
So, a new array called stringsCountArray containing all of the names of the timers images in order.
var stringsCountArray:[String] = ["timer1","timer2","timer3","timer4","timer5","timer6","timer7","timer8","timer9","timer10"]
By combining the code to display an image with the code to select an element from an array I get this result:
self.counter.image = UIImage(named: stringsCountArray[count])
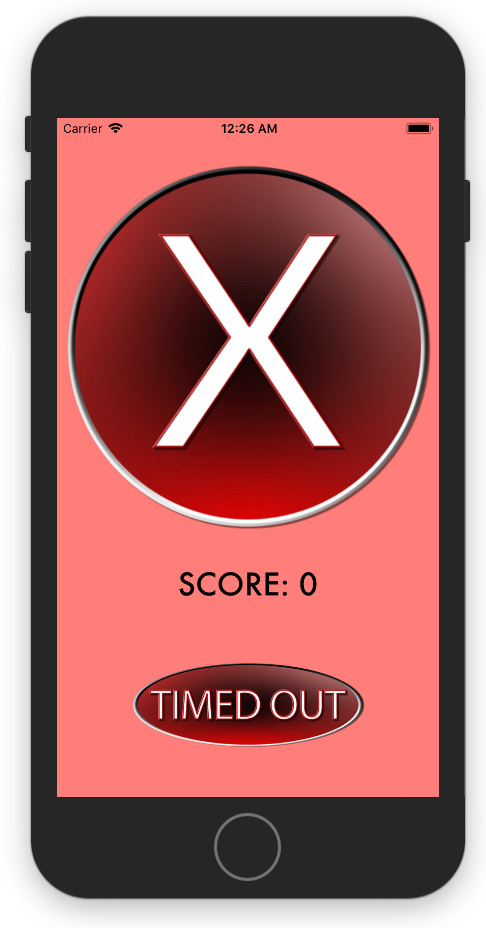
I’m pleased to say that the code works as expected and does display the counter. There are a few things to fix with this though. Firstly, ‘X’. This was an easy fix, I simply added the following line of code to the endOfTurnX function, so that whenever it gets called it displays the X timer. As it only ever gets called if the counter runs out it seemed to make sense to put it there.
self.counter.image = UIImage(named: "timerX")
Secondly, the next turn. Currently, every time the turn ends, the number that it counted too is displayed. So I added the following line to the nextTurn function, to simply display the title:
self.counter.image = UIImage(named: "title")
Whilst this did work and it did display the title whilst waiting for the next turn, the ‘X’ barely appeared (if at all). Likewise when I actually pressed the stop button, the count I stopped at remains on the screen briefly before changing back to the title. I had the idea of editing the endOfTurnX/Stop functions so that instead of just calling the nextTurn function, they both used the same delay function as before, but for a fixed 4 seconds.
The result worked perfectly as expected, but seeing the game actually play on the iPhone screen made me realise that, whilst the tension variable is good and does exactly what I wanted it to, it races through the smaller numbers far too quickly. I, therefore, changed the initial value to 1.25, so that the first delay worked out to be 1.5 seconds in length.
0 notes
Text
Version 0.10
Coincidentally, version 0.10 is where I'm going to start looking at the user interface part of the game. It was always my intention to start the user interface and the new .1, .2, .3 etc and it's a genuine fluke that it lines put perfectly with no breaks. Can't promise that it’ll happen again in future though!
Currently, my user interface is... well... basic at best. I'm not going to document how I created the (basic) graphics here. I might do that in a separate post. My aim in this post is to do a few things, namely: add a background, a proper start button, a proper stop button and a placeholder for where the counter will be located.
I haven’t 100% decided on the final colour scheme/layout etc of the game, but these graphics I created are what I’m going to use for now. Introducing the title, startBtn and stopBtn:


I kept the graphics uniform and simple. White/Black bevel border, with a black fill, fading to a range of colours towards the outer edge. White text with red border and shadow. Overall I’m quite happy with them.
When importing graphics into Xcode, you are required to have 3 different versions at different resolutions. Xcode will then automatically decide which resolution to use, based on the device the app is running on. I used an app from the Mac App Store called “Prepo” whereby you can import a graphic and it will generate the 3 different resolutions for you. There is also an option to be able to create App Icons. Something I might look at in the next version.
Prepo names the graphics accordingly, so it's just a case of selecting Assets from the right-hand menu in Xcode and dragging in the graphics. Xcode does the rest!
They are then ready to use within XCode. The only other thing I did, was to find the font that I want any text to be written in and import that into Xcode as well. This again is just a case of dragging and dropping.
I started by moving the ‘JMP GAMES’ text box to the top of the screen, still horizontally aligned in the centre, with a fixed constraint of 20 from the top of the screen - known as the safe area.
I then decided to add my title graphic. I did this by selecting the ImageView from the Object Library.
I want this image horizontally aligned and to be 50 below the ‘JMP GAMES’ title, so when adding the constraint, this time I made sure that that the distance was from the ‘JMP GAMES’ title and not the safe area.
In the Attributes Inspector on the left-hand side, I was able to select ‘Title’ from the ImageView drop-down menu, which then allowed me to get the image displayed on the screen.
I added constraints for the buttons as well, spacing them both 50 part from each other and horizontally aligning them as well. In the attributes inspector for the buttons, there is an option for the image, so I simply selected the startBtn image for the startBtn and the same for the stopBtn.
At first, I couldn't understand why both of the images were left aligned within the box, then I realised that the words ‘START’ and ‘STOP’ were both still present in the button and that the text colour had been changed to white.
I removed the text from each of the buttons to leave just the centre aligned image.
Now seemed like a good time to test the app on my iPhone, so running it, I got the following result:
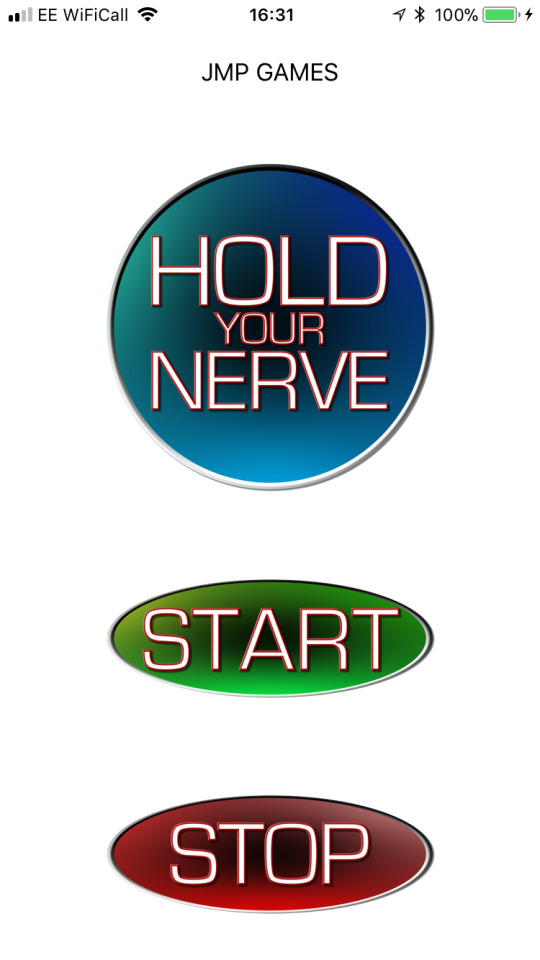
I’m pleased to say that everything works as expected, with the start/stop buttons doing their job exactly the same as before. I’ve added a temporary light red background to the app and the only other thing I did was to go into the LaunchScreen.storyboard and add the ‘JMP GAMES’ logo both horizontally and vertically aligned. This LanuchScreen.storyboard in the first thing that appears when the app is loaded. It serves as a placeholder so that iOS can get everything else ready in the background.
To show you the game in ‘action’ so far, I have screen recorded XCode and the Simulator so you can see the impact the buttons are having on the code and the printouts in real time. Eventually, everything in the printouts will be displayed within the app itself - one thing at a time!
youtube
0 notes
Text
Version 0.09
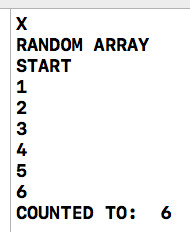
This is the last thing I want to implement in the code, before starting on the user interface - at the end of each turn, I'd like it to display a list of all 10 numbers, with the numbers that have already been counted to crossed off. Hopefully, this will add to the strategy element of game - You will know which numbers have gone and which are left so you can think “8, 9 and 10 have gone so I must stop on 7 at the latest” or “3, 4, 5 and 6 have gone, so if it counts to 3 it will definitely continue until 7.” I started by creating a new array called ‘numbersLeftArray’ and initialised it in the following way:
var numbersLeftArray:[String] = ["1","2","3","4","5","6","7","8","9","10"]
I then created a new function called ‘numbersLeft’ then iterated through the array printing out the numbers. Using the ‘terminator: “”’ I was able to get all of these to print onto 1 line, rather than being printed on separate lines. The function looks like this, and it generates this output:
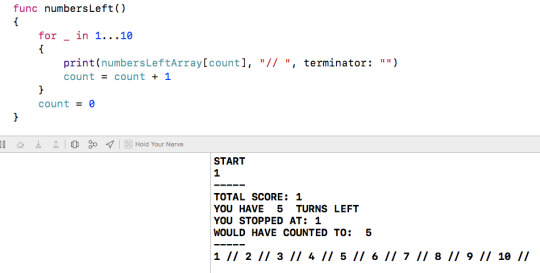
To update the numbersLeftArray with the actual numbers that haven't yet been counted to, I added the following line of code to the start of the numbersLeft function.
numbersLeftArray[holdingValue - 1] = "X"
holdingValue - 1 has been used because arrays start at 0, so subtracting 1 means that the numbers and the positions match up.
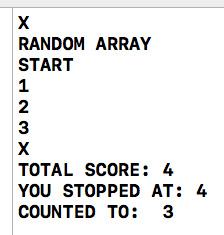
As you can see from the screenshot below, this is the sort of strategy element I was going for - 9 and 8 have gone, so you now know that the change of it going higher than 7 is very low. You can plan accordingly.
If I play on until the final turn, you can see that you now know, if it counts past 1, it will definitely make it to 4 and that if it counts past 7 will go all the way to 10.
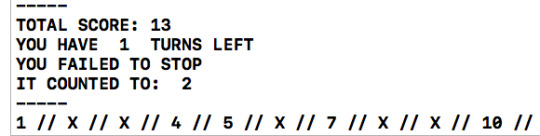
As it happened, it stopped at 4.
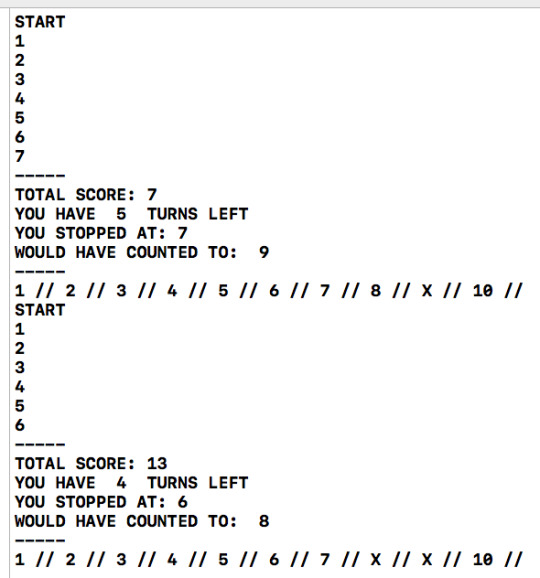
I took this time to address a few small issues with the code. Firstly, grammar. As you can see from the screenshot above, when it gets to the last turn, it still has the plural ‘s’ on the end of turns. It should be: 2 turns left, 1 turn left. This was easy to fix and didn't take long - in the endOfTurnStop and endOfTurnX functions I added an IF statement to check the number of turns that a player has left. If it is equal to 1, then display the singular, other display the plural.
The other thing I changed was the TimeInterval. Currently, it is set to 2, and that's great for adding to the tension, however, I feel that the tension would increase it the interval was a little longer toward the higher numbers. So, I created a new variable called ‘tension’ with a data type of double and set it equal to 0.75. I also added the following line of code to the start of the numberChange function:
tension = tension + 0.25
That way, the pause between 1 and 2 is 1 second, between 2 and 3 is 1.25 seconds, etc. So the pause between 9 and 10 is 3 seconds. This really does add to the tension.
With that, the gameplay functionality is completed. There will be more to add in as the game takes more shape, but for now, it is a working text based game. The next stage is to start the user interface. At the moment, it's just a pieces of text saying ‘JMP GAMES’ and 2 buttons, both of which are pieces of text.
I’ve also decide to stick with the name I had in the back of my mind the whole time I’ve been creating and documenting this - HOLD YOUR NERVE.
0 notes
Text
Version 0.08
In terms of gameplay itself, there are 10 numbers that the game will count up, in order for you to try and get the highest score possible. I'm thinking that a player should be given 6 attempts at getting the best score possible. IE they'll get to try and stop the counter 6 times per game. Because of this, I’ve changed all of the ‘ GAME OVER’ messages to say ‘X’ so as to differentiate between the end of a count and the end of the game.
To implement this, I created a variable called ‘turn’ with data type integer. I have made a new function called ‘gameOver’ which will be called when ‘turn’ is equal to 6. The purpose of this function is to display the final score a player gets, then allow them to start a brand new game. The function is called from the end of the endOfTurn function, located within an IF statement. IF turn = 6, run the gameOver function
In the gameOver function, I have added a print statement to show the final score the player achieves. I wanted to add code to reset the game as well, I realised that I already had all of this code at the start where I declare the initial variables and run the random generation. I moved this code into another new function called ‘newGame’. The newGame function looks like this:
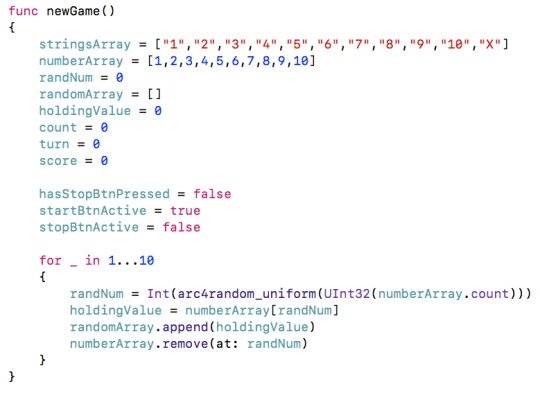
And the gameOver function like this:

It was at this point that I encountered a fundamental issue with the code. Having played through the game once, everything works as expected. However, having tried to start a new game - errors occurred. Firstly, the score did not reset to 0. Secondly, the randomArray/count did not reset - causing the remaining 4 values to be counted to, then a fatal error to occur:
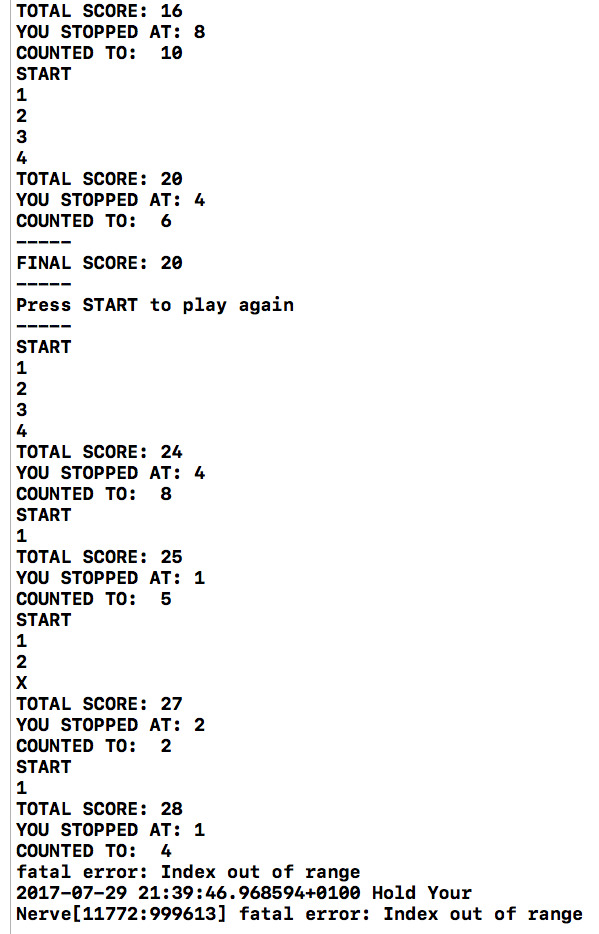
It took me longer than it should have to find the cause of this problem. It the gameOver function, I hadn't actually told it to then call the newGame function. After adding in the call, it works seamlessly and I was able to play game after game without issue.
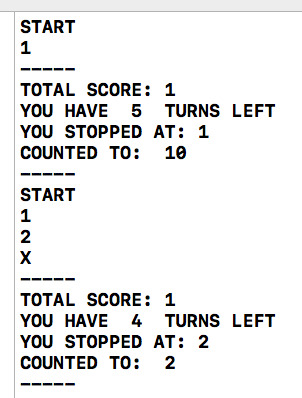
I took this time to also tidy up a few things in the code. Firstly, I changed the TimeInterval to 2 seconds. This really did increase the tension no end. Secondly, I wanted it to display how many turns you have left, so instead of setting the turn variable to 0, adding 1 each time and waiting for it to hit 6, I reversed it. It now initialises at 6, subtracts 1 each turn, and waits to hit 0. Becuase of this, I was able to add in the following code to show how many turns a player has left:
print("YOU HAVE ",turn," TURNS LEFT")
Finally, the print out messages generated all display the same messages, regardless as to how you ended the turn. IE either pressing the stopBtn, or hitting ‘X’.
On the second turn, I didn't press the stopBtn at all, so saying ‘YOU STOPPED AT : 2″ seems pointless, however on the first turn when I did press stopBtn, it is essential. The easier way I could think of to solve this is to have 2 endOfTurn functions. Both would do essentially the same thing, just with slightly different wording based on how you got there. I copied and pasted the code in the endOfTurn function, then called one of them ‘endOfTurnStop’ and the other endOfTurnX’ The numberChange function now looks like this:
And this is an example of the output received:
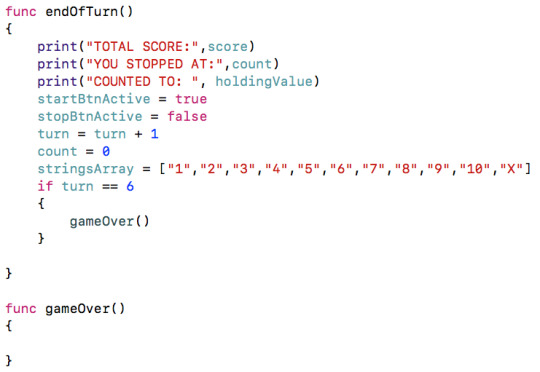
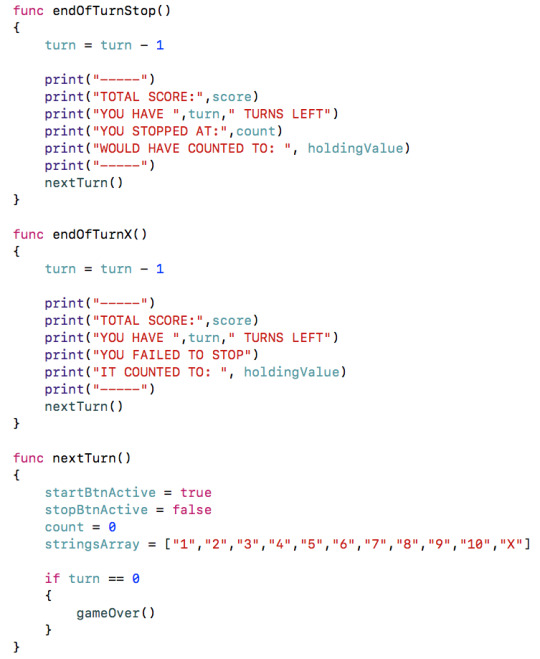
There is a large amount of duplicate code in both endOfTurnStop and endOfTurnX, so, to tidy the code up, even more, I created a new function called ‘nextTurn’ and moved as much of the duplicate code into it. The functions endOfTurnStop, endOfTurnX and nextTurn now look like this:
0 notes
Text
Version 0.07
After V0.06, I think that the majority of the actual gameplay code is completed. I'm sure that there are many more features and functions that I will want to add, but for now, the game (although basic) works.
An issue I’ve noticed is the ability to spam the startBtn numerous times. This is having an impact on the time difference between counts and the functionality of the stopBtn. To fix this issue, I’ve created 2 new boolean variables - startBtnActive & stopBtnActive. I set startBtnActive to true and stopBtnActive to false when the game first loads. Then inside of the button press functions, I added IF statements to only run if the ACTIVE boolean is equal to true. I also added commands to swap the value of each boolean. You can see the changes below:
As I was testing this new code (which works as expected) I discovered another bug. When the printout reaches ‘X’ you can still press stop and calm points 1 higher than the last number displayed. EG, if the last number to appear before the X was 3, you would be awarded 4 points:
Initially I thought it would be an easy fix - I could just add the code
stopBtnActive = false
to the ELSE part of the IF statement, however, this proved ineffective. I then added a third condition to the IF statement, another && to say that IF the count had reached an ‘X’ to go to the ELSE part
if (count < holdingValue + 1) && (hasStopBtnPressed == false) && (stringsArray[count] != "X")
This also proved both effective and ineffective. Whilst it did stop me from being able to press stop on the ’X’, the issue is that there isn't an ‘X’ displayed anymore.
Also, because the score printout appears in the stopBtn function if the turn reaches ‘X’ the total score isn't displayed to the player. This was happening already, however, now seemed like a good time to try and fix it as well. Ideally, this will be displayed regardless at the end of a turn.
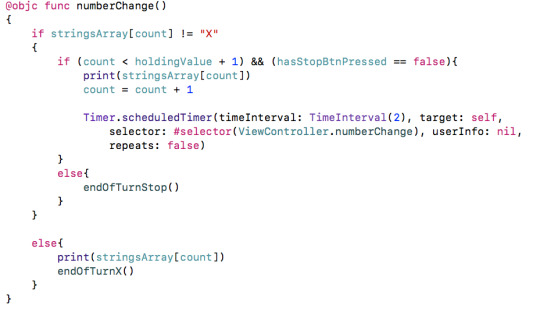
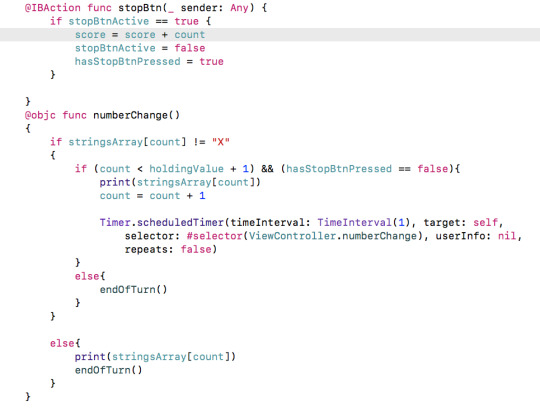
After a lot of trial and error, I managed to find a solution that works. Firstly, I created a new function called endOfTurn. In this function, I added everything that I wanted to be displayed at the end of a turn, regardless if the stopBtn was pressed or the ‘X’ was hit.

Any of this code, that appeared elsewhere I removed so that I wouldn't be duplicating myself. In the numberChange function, I added a new IF statement around the already existing IF statement to create a nested IF. The original IF remains the same (with the removal of the && stringsArray != “X” however, the ELSE part now only contains the line of code:
else{ endOfTurn() }
The new IF statement surrounding the original IF has the following condition, checking to see if we have reached ‘X’ or not:
if stringsArray[count] != "X"
IF we have not reached ‘X’, then it runs the original IF statement, if we have reached ‘X’ it runs the ELSE part, which simply prints out the ‘X’ then also runs the endOfTurn function. You can see the new stopBtn and numberChange function code below.
After these changes, everything seems to be running smoothly.
0 notes
Text
Updates
Just a quick post about some of the updates I’ve done today across the front-of-house.
Firstly, the logo. I’ve replaced the logo with a shiny new one! I’ve kept the design very similar and at first glance, they look the same. My idea with the logo is to have a very plain, simple logo for the main website/branding, but then to customise it for each game. EG, Change the font, colour scheme, etc to match the style of the game. Old on top, new down below:


There are however some key differences. Firstly, the text within the circle. In the old logo, there was vertical alignment straight down the middle. The more I looked at it though, the more I realised that the word ‘GAMES’ was annoying me. Mostly due to the fact that it was small and because of the letter ‘P’ looked like it wasn’t aligned at all. I’ve tidied it up by reducing the size of the ‘JMP’ and increasing the size of the ‘GAMES’ so that they are both now the same width. This also made it easier to align both vertically and horizontally.
Secondly, I’ve reduced the border thickness everywhere. Both in the outer circle and the texts itself.
Finally, I changed the font. It's down to personal preference more than anything else - I just prefer it.

Also, its terms of updates, I created a header banner (above) that is now up on all the sites - Tumblr, Twitter, YouTube and my actual website - https://jmpgames.online Out with the Orange - in with the Red! It’s mostly just so that it's more uniform and linked together. I'm hoping that eventually, I'll be able to start replacing some of the stock textures used with images from the games I create. But that's a long way off for now!
0 notes