
Statistics
We looked inside some of the posts by kamccormickhnd1b and here's what we found interesting.
Average Info
Notes Per Post
15
Likes Per Post
14
Reblog Per Post
1
Reply Per Post
0
Time Between Posts
5 days
Number of Posts By Type
Text
16
Video
1
Last Seen Tumblr Blogs


Fun Fact
There are dozens of funny blogs to kill time on Tumblr.
Text
Portrait Task
As part of our first day back on campus grounds, we were tasked with a portrait task that was a constructed way for us to all get to know one another, talk to people and maybe make new friends in the process.
Throughout the two studios, multiple set ups had been constructed for us, in each set up was a different diffuser, light source, reflector and let us play about with the different pieces of equipment available to us at that time.


The 3 photos above are from my first set up, for this I used:
•Beauty dish
•TRIFLECTOR
•DIFFUSER
•Wall reflector
•Grey background
•Camera: EOS 6D
•Lens: 24-105mm
I liked this set up a lot, it was simple and easy to use, but between the other set ups going on and the blind next to us unable to be pulled down, there was quite a bit of exposure. But I liked the outcomes nonetheless.


These photos are from my second set up:
•Two soft box strip lights
•Chair
•Same Camera and lens
•Pink background
I liked this set up lot, I enjoy using strip lights because they help to create strong catcheyes in the model. I also feel they add a rather moody look to my photos, especially when combined with the background. I liked this set up a lot.


This was my third set up:
•Beauty dish
•Snoot light (looks up from ground)
•Orange background
•Same camera and lens
•Camera trigger
I enjoyed this set up a lot! It was a very dramatic and moody atmosphered lightning style, between the orange background and the warmth of the light, this set up created rather dramatic shots for me.
All in all: I enjoyed my first day of year 2! It was fun getting to know some new people, especially when meeting people is a severe challenge for me thanks to my anxiety and aspergers, so it was really nice to be welcomed into a group who already knew one another. I found it daunting as everyone knew everyone but I didn't, so it was a big relief to be able to talk to people thanks to this task.
7 notes
·
View notes
Text
Long Exposure Practice
During my time off, I headed out to Tay Forest Park and had a great day out and captured so many beautiful sights, my main goal was to play about with creative exposures more. I live in the city so the biggest waterfalls I can get don’t show much of the effect of a long exposure, while here, there was rivers and waterfalls everywhere and it gave me plenty of opportunity to practice my long exposures. Below are some of my favourites from that trip that I felt could be shared on here.


#creativeexposure#long exposure#long exposure photography#tay forest park#student#Photography student#nature photography#outdoors#outdoor photography#caves#waterfalls#rivers#creative exposure
5 notes
·
View notes
Text
Moving Image: Evaluation
The goal for this project was to research camera techniques, compositions, angles and videos of advertising videos for inspiration and to boost our creativity.
This was a project I had been dreading and immediately fell into a panic while college was still in session, I don’t have much experience with video making other than the video I made in a group project in NQ and I remembered there being nothing but stress for myself. So I assumed this video would be the exact same and I panicked, I didn’t the workshop classes out of panic and got in contact with the staff about it, with how worked up I had gotten, they were kind and understanding and agreed to put it off for me during year 2. But I was given the option to do it over the summer and in my own time, which is what I did, and now that my video is finished, submitted and has received good criticism, I feel a lot more confident in my abilities to make videos and even put them together.
My goal was to create a video that expressed the idea of being one with nature, I wanted to get the point across about enjoying the outdoors and taking some time to yourself and just taking in your surroundings some more.
I already knew a location I wanted to use for this project, a nature trail down by the River Clyde, there was the river on one side and then trees, bushes and grass all around me, so I felt these would have a big impact on my video itself because the main concept was nature, my model was more or less a bonus to the video, but the main idea was the scenery around her. While planning out my storyboard, I watched multiple videos and adverts involving nature trails and scenery, I wanted to get a better idea of how to shoot my video and what to show and capture.
We were to show three different camera techniques to try out for the video, but I used a few because I wanted to try out different techniques and angles as I go, I had three main techniques to try, Pan, tilt and a full body shot, but I wanted to try out the other angles as well to make my video more interesting to look at.
I had a lot of fun making the video, I chose my best friend to be my model and she took it rather seriously and we had some giggles in between filming, my most challenging part was trying to perform a tracking shot. I don’t have any equipment that could have moved my camera in a very smooth action, all I had was my phone’s camera and a selfie tripod, I used that tripod because if I had done the shot while holding the camera in my hands, the shot would have been awful and very shaky. Using the tripod helped me to get a much smoother outcome, although not perfect, I actually did a good job considering I didn’t have any proper filming equipment. Overall, I’m pleased with my outcome, I had no confidence in my video or my video making skills, but this video helped to make me feel more ease about it all and I found an app on my phone that I was comfortable with using. I know how to make a video in premier pro, but I don’t currently have a laptop that allows Adobe products, so I couldn’t use my DSLR or any better software for video making.
In future, I will be shooting it again and attending some additonal classes for video, I feel that if I had been attending the video classes and not panicking, I would have gotten a much better video for myself, so I will be attending the classes and will be working on remaking my video but instead of using a phone camera, I will be using my DSLR camera and prferably some additional equipment to get smoother footage.
I would also film on a day where I’m guaranteed constant sunshine, the day I had chosen to film on, we had sunlight, but not much until the end of the day, in my video you can see it’s rather dull until the end when the sun has come out, so if I had gone on a much brighter day, my video would have been a lot stronger. Another thing I would change is the way I shot my video, I shot in both landscape and portrait, but it would look better if I had done the entire video in landscape, the videos would have been the same size and it would look a lot better compared to switching between the two.
But considering I didn’t have official filming equipment to work with, I am rather pleased with my outcome and learned that video isn’t as difficult as I was thinking it to be. It was a little bit stressful when I was beginning to put the footage together, but once I learned how the software worked, I quickly became confident with it and made a video I can be pleased with. So I’m looking forward to remaking my video but with my DSLR camera and better equipment.
1 note
·
View note
Text
Moving Image: "One with Nature"
After uploading my video for the Moving Image project, I saw that the quality was awful and decided to redo the video with different sound and the correct sizing. I hadn't realised that I had changed the sizing without noticing so here is the same video but with different music I liked and an "ending".
0 notes
Text
Moving Image: "One with Nature".
This is my final video for the Moving Image project. All in all, I'm happy with the outcome of my video, and while I misunderstood the brief due to being focused on making a video and not recreating one, I made it work and I'm rather happy with my outcome.
0 notes
Text
My Storyboard
Below is my storyboard for my video and idea of it. I used Canva to write up my storyboard as it was a lot easier than having to draw one out, my art skills aren’t the best!
My idea: I kind misunderstood the brief, it wasn’t until I took a proper look at the brief word for word that I realised I wasn’t to make my own video, but to recreate one with my own take on it. That’s my fault so I admit to that, but the idea I had for my video was that I wanted to record my friend, Mairead, walking through a nature trail close to the River Clyde and I wanted to film her “adventure”, the adventure being Mairead walking and enjoying the scenery around her and showing interest and enjoying a calming walk.
I wanted to make a point of showing off what she was surrounded by, I wanted to show the scenery more and involve it, which is seen in some of my footage. I wanted to try out different techniques for this video as well, the camera movement techniques I involved are as below:
Pan shot
Full body shot
Still close up
Medium shot
Zoom
Tracking shot
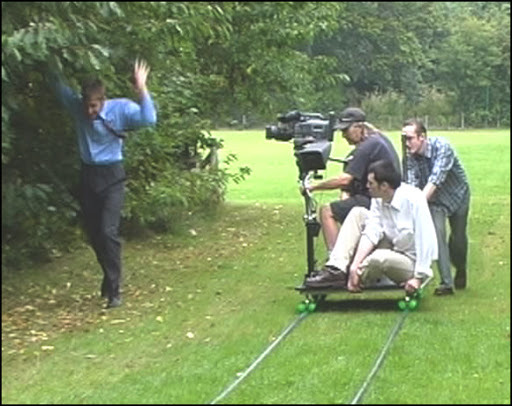
The main shot I wanted to test and try to perfect was the tracking shot, this is the scene where I’m following Mairead’s feet as she walks, I had no skateboard or anything I could sit my phone on to get a very smooth transition, but I did have a selfie stick tripod that came in handy for the project. The tripod helped me to get a more still video and it helped me to keep a less shaky hold of my phone, I wanted to use my DSLR originally, but I’ve been having space issues on my hard drive and once college finished up, I had to return the college laptop and couldn’t use an official video making software as the laptop I do own is old and doesn’t allow Adobe products.
So it was easier to use my phone and that meant I could use the tripod to try and get a smooth outcome, it isn’t quite perfect, but after six attempts to get it smooth as possible, I got what I could!
The main idea of my video was adventure and tranquility, I wanted to tie the two together in one video.
Scene 1: for this scene, I wanted to use a panning shot to show the scenery above and slightly around us, I was unsure of where to take it, but I rather liked the idea of doing a panning shot turning into a downward tilt to show off more of what was ahead.
Scene 2: for this scene, I wanted a full body shot of my friend Mairead coming into view, the original shot was a full body shot and a panning shot where I would follow Mairead with a pan shot as she walked, and while I recorded that, in editing, I decided it was better to keep it as a full body shot and move the scenes about, so the pan would come later.
Scene 3: for this scene, I wanted a shot of Mairead’s feet coming into view and moving from one side of the screen to the other, in editing, I liked the idea of slowing that down more.
Scene 4: For my fourth scene, my original idea was to add another full body shot there of Mairead on the bridge, but like I said before, in editing the video, I thought it would look better if I used only so much of the full body shot for scene 2 and then use the rest of the clip later in the video. This scene is a continuation of scene 2, this scene involves another pan shot.
Scene 5: this scene wasn’t intended to be put into my video, I had my storyboard planned out and I knew what I wanted to try and capture, but along the way, we found a chain hanging from a fence and I liked the idea of involving it into my video, so this was added into my storyboard later. There was nothing exciting in this scene other than I just wanted to see how it would look with Mairead dragging her fingers along it and letting go.
Scene 6: this scene was to be a simple shot of Mairead walking as normal before moving into slowly spinning around and taking in the scenery around her, she moved out of shot a little and I had to follow her more, so there’s a scene there where it’s quite shaky, but I made it work for my video nonetheless.
Scene 7: I wanted to use a zooming shot for my next scene, but I was unsure of what I wanted to use the zoom on that would look interesting, in the end, I settled for zooming in on some flowers.
Scene 8: This is the scene I struggled with the most, my tracking shot, I knew this shot would be difficult to pull off without a skateboard to push along or any official tracking equipment. All I had that could be useful was a selfie tripod, it worked out relatively well, unfortunately it’s shaky, but not as shaky as it would be if I’d hand held the phone instead of using the tripod.
Scene 9: I wanted my final scene to be a simple full bodied shot of Mairead simply walking away from the camera and walking down a path, she added a little personal touch of touching some leaves while leaving, and while a biker came into view, I planned on reshooting the video so he wasn’t in it, but I decided that I liked that because it shows more adventure in our location.
While on Canva, I forgot to get rid of the other scenes in the final screenshot of my storyboard, so it gets a little confusing after the track shot scene, so I actually have 9 scenes, not 12.


0 notes
Text
Moving Image: Adverts
Advert 1:
Where is the advert displayed?
This particular advert is displayed on TV and online, an advert like this is shown mainly on the TV more than anything else.
What moving image techniques can be seen in these adverts?
The camera techniques used in this, from what I can see, is a close up shot, which seems to be the main shot used in the video, a pan shot, tracking shot, a tilt shot, over the shoulder shot and a wide angle shot.
What makes this advert successful?
I feel what makes this advert successful is the music and the involvement of a child, it’s a simple advert but has a pleasantness to it thanks to the music and the little girl having a “friend” that isn’t as you’d expect.
How does the advert help communicate the brand?
The advert helps to communicate the brand by showing you a lot of beautiful scenic scenes to go with the story itself in following the girl on her little adventure, the scenery helps to strengthen the advert even more because it’s about nature.
youtube
Where is the advert displayed (TV, online, digital billboard etc)
The advert is displayed on TV only.
What moving image techniques can be seen in these adverts?
Some of the techniques used in this involve a pan shot, tracking shot, a tilt shot, a focus shot.
What makes this advert successful?
What makes the advert so successful is the comical use of a famous actor and a childhood icon, “Mr Bean”, by adding someone that millions associate with comedy, the advert has a comical use to it.
How does the advert help communicate the brand?
The advert shows off the brand in a rather subtle way I think, you don’t see the Snickers bar until the very end, so you spend your time wondering what the advert is advertising, and with it having a comical atmosphere to it and some fast paced shots, it keeps you intrigued.
youtube
Where is the advert displayed (TV, online, digital billboard etc)
The advert is displayed on TV, radio and on billboard.
What moving image techniques can be seen in these adverts?
Some of the techniques used in this advert are a close up, a zoom and reversed zoom, Dutch shot.
What makes this advert successful? (is it simple, is it humerous etc)
The advert has comical use to it, but I think what makes it so successful is the strangeness of it, it comes across as a normal advert until the music begins and then the viewers are met with a strangeness from the eyebrows and it helps to keep viewers watching.
How does the advert help communicate the brand?
It advertises the brand relatively well.
youtube
0 notes
Text
Moving Image: Types of Shots
In moving image, there many different styles and shots that you can shoot for your video. The different camera movements can add a lot more meaning to your footage, so it’s fairly important to understand how different types of movement are interpreted by viewers.
In this post, I will be talking about a few techniques that are popular when used in film making, the first one is below:
Pan
Pan is a technique that’s used when you move your camera from one side to the other. This technique can be used for any idea in mind, but the main use of it is to reveal a larger scene, such as a crowd or to reveal something off screen or even just to show your viewer the entire area. By upping your speed a little, you can get the Whip Pan, which is handy for transitions showing the passing of time or travelling a distance in a dramatic way.

Tilt
This technique is as it sounds: imagine your camera is your head nodding up and down. This technique is often used as a revealing technique, either to show something from top to bottom or reverse.

Zoom
The Zoom technique is one of the most commonly used camera movements, it lets you easily move in closer to the subject without actually physically moving, but in order to use the zoom, you have to be careful, zooming in lessens the quality of your image. When using a zoom, it’s best to keep the movement as still and smooth as possible, then your shot will look nice and smoothly pulled off.

Tracking shot
The tracking shot is a technique used when the camera moves alongside what it’s recording,tracking shots are sometimes called dolly shots, but they can be differentiated by the direction they take.
Some common uses of the tracking shot is walking and talking scenes where a tracking shot stays on the subjects as they move.
Dolly shot
A dolly shot is one in which the camera moves toward or away from the subject you’re shooting. So instead of utilising the zoom to get closer, the camera is actually physically moving in relation to the subject.
Using a dolly to slowly push is useful for building drama or tension in a scene, or it can imply some sort of significance to the subject it’s moving in on.
Following shot
This is a type of tracking shot in which the camera continuously follows the subject’s action, if you want to achieve a smooth following shot, a steady cam or gimbal will help. Otherwise, shaky handheld following shots give a sense of realism or unease.
1 note
·
View note
Text
Unseen: Creative Exposures
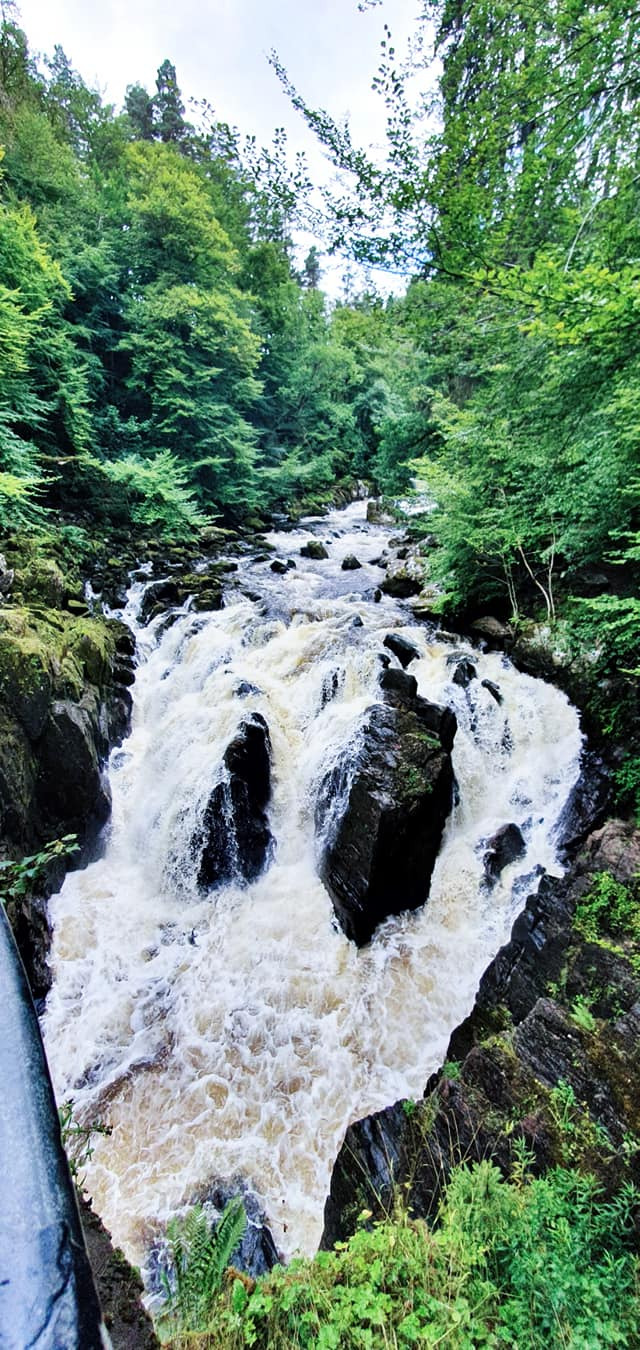
Below are the two images I liked best that I created during my creative exposure task. I had a lot of fun shooting these two because the outcome genuinely fascinates me, it was pretty entertaining seeing the outcomes and the patterns created by the water and anything in the water.

The above image is my favourite in the way of really showing what my long exposure had done, with the long shutter speed, I was able to turn fast moving water into a mist, I did this for my Lost and Found project and it completely fascinated me, so I wanted to try it again for the Unseen.

The image above is my favourite out of the two, I really love this outcome because I had seen the river’s current was forming a sort of whirlpool, but not quite, but everything on the water’s surface was moving around the river as though it was in a whirlpool, a slow one, I wondered how that would look using the long shutter speeds and the outcome was that I can see the trails the bubbles on the water takes and it leaves trails that, to me, resemble the light trails you get in light painting. I thought this was a really cool effect and I am rather proud of it so I had to involve it in my Tumblr!
1 note
·
View note
Text
Unseen: Word Document Screenshots
Below are screenshots of the word document for my Unseen project.


0 notes
Text
Unseen: Time Lapse Video 2
Below is the second time lapse video I made, aa you can see there's a lot more obvious movement in the time lapse but I personally think it's not very appealing to watch, so I prefer the first time lapse I put together.
0 notes
Text
Unseen: Time Lapse Video
Below is the video I made for the time lapse, I have two and will be uploading both to my Tumblr, but this is the time lapse I preferred as you can actually see more movement ranging from the wind against the bushes and trees to the movements in the river itself.
0 notes
Video
tumblr
Unseen: Slow Motion Video
Below is my video for the Slow Motion task of the Unseen word document. For this, I looked to inspiration on Pinterest and rather liked the idea of watching something burn slowly so you can see the details of the fire going until it stops. Recording it was a little more difficult though as it was a tad windy, but I worked with what I had and below is the outcome.
Equipment:
Phone camera
Lighter
Dandelion
0 notes
Text
Recycle-Layers Panel
Below is a screenshot of the final layers panel used for my Recycle project, I’ve taken multiple screenshots of my panel entirely and then close ups of the panels too.


0 notes
Text
Photoshop’s Selection Tools
For this image, I'd like to keep the original colors in the main subject (the child pushing the wheelbarrow filled with pumpkins) and colorize the rest of the background with a single color. To do that, I'll first need to select the main subject. I could try drawing a freehand selection around everything with the Lasso Tool, but Lasso Tool selections tend to look rough and unprofessional. The Pen Tool would work great with this image thanks to all the sharp edges and smooth curves, but drawing a path around the main subject would take some time. The Magnetic Lasso Tool would also work well due to the strong contrast between the main subject and the background. But let's see how well the Quick Selection Tool can select the area we need.To begin my selection, I'll move the Quick Selection Tool's cursor into the top left corner of the child's sweater and I'll click once with my mouse. An initial selection outline appears around the area I clicked on:An initial selection outline appears in the top left of the sweater.So far so good, but obviously there's much more I still need to select, which means I'll need to add to my existing selection. Normally, to add to a selection, we need to hold down the Shift key on the keyboard to switch the tool to its "Add to selection" mode, but the Quick Selection Tool is different. It's already in "Add to selection" mode by default, indicated by the small plus sign (+) displayed in the center of the tool's cursor.If you look in the Options Bar along the top of the screen, you'll see a series of three icons which let us switch between the tool's three selection modes (from left to right - New selection, Add to selection and Subtract from selection). The "Add to selection" option (middle one) is already chosen for us, since the whole point of the Quick Selection Tool is to continue adding to the selection until you've selected everything you need:For a faster way to select the Lasso Tool, simply press the letter L on your keyboard. There are two other types of lasso tools as well - the Polygonal Lasso Tool and the Magnetic Lasso Tool, both of which are hiding behind the standard Lasso Tool in the Tools panel. We'll look at both of these tools in separate tutorials, but to access either of them, simply click and hold your mouse button down on the standard Lasso Tool until a small fly-out menu appears, then select either tool from the menu:If you find that you didn't begin your selection in exactly the right spot, there's no need to start over. Just hold down your spacebar, then drag your mouse to move the selection where you need it. When you're done, release your spacebar and continue dragging out the selection.To complete the selection, all I need to do is release my mouse button. The wooden block is now selected (or at least, the pixels that make up what we see as the block are selected), and a selection outline appears around the block in the document window. Any edits I make at this point will affect that specific block and no others:Photoshop is a software that comes with a wide variety of tools to help you create brand new masterpieces with intricate details, in this post, I will be talking about the main selection tools used in Photoshop.Selection tools are what you use to select parts of an image in order to edit them, while each of these tools are for selection, they’re all different, meaning that they each have their own unique ways to go about selecting parts of an image.
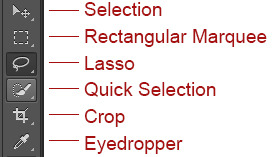
Rectangular Marquee
The Rectangular Marquee: this particular selection tool helps you to select rectangular portions of an image, this tool can be found sitting at the very top of the Tools panel in Photoshop. It's the tool with the icon that looks like the outline of a square.
The Rectangular Marquee Tool is an easy tool to use in selection making, you click with your mouse at the point where you want to begin the selection, which will usually be in the top left corner of the object or area you need to select, then continue holding your mouse button down as you drag towards the bottom right corner of the object or area. When you release your mouse button, the selection is complete.
Example: below is a series of colourful blocks. If you want to change a certain thing, example, the red block in the top row, it’s an easy thing to do, Photoshop may not be able to identify the wooden block, since all it sees are pixels, but the user can see it and can identify it as a rectangle, which means that the task of selecting it is perfectly suited for the Rectangular Marquee Tool. Selecting this tool, pressing “M” on your keyboard will instantly select the Rectangular Marquee Tool. Then, to begin the selection, click the top left corner of the block. While still holding down the mouse button, you can drag towards the bottom right corner of the block:
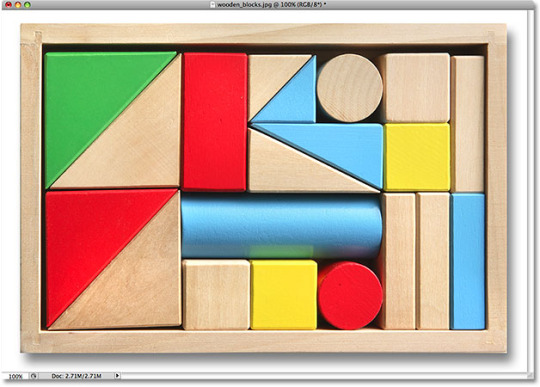
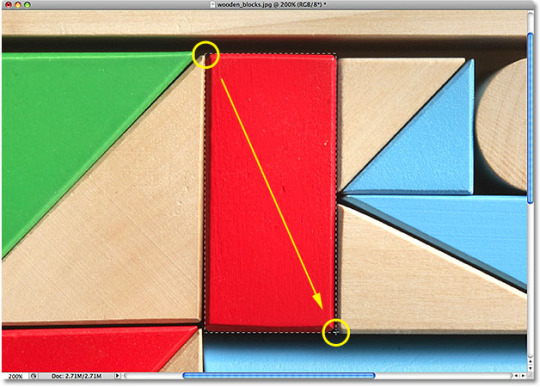
If you feel you didn’t select the parts of the image you wanted to select, you don’t need to start over, holding down the space bar and then dragging your mouse to move the selection where you need it will work. When you're done, release your space bar and continue dragging out the selection. in order to complete this selection, all you need do is release the mouse button.
The wooden block will then be selected and an outline will appear that shows the selection is made, from that point on, only the selected area will be changed should you do any editing.
Lasso
The Lasso tool allows you to draw your own free form outline of what you wish to select, it works best for areas not quite considered as shapes. The Lasso tool has a few variations to it, but I’m focusing on the standard Lasso, you can find this tool by clicking its icon in the tools panel, it’s recognised by how it sounds: it resembles the sort of lasso a cowboy would swing at a rodeo.
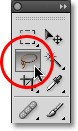
The Lasso’s shortcut is “L” on your keyboard, there are two more lasso tools too:
the Polygonal Lasso Tool and the Magnetic Lasso Tool
Both of these tools are found behind the standard lasso tool, the options pop up in an additional panel and you can select them from there.
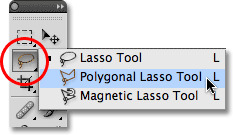
All three lasso tools share the letter L as their keyboard shortcut for selecting them, so depending on how you have things set up in Photoshop, you can cycle through the three tools by pressing the letter L repeatedly or by pressing Shift+L.
The Lasso is one of the easiest tools to use and understand, to use it, all you need to do is drag a freehand selection around the object or area you want to select. With the Lasso Tool selected, your mouse cursor will appear as a small lasso icon, and you click at the areas in an image you want to begin the selection, and then continue holding your mouse button down and drag to draw a free form selection outline:
In order to complete the selection, return to the spot where you began and release your mouse button.
The Lasso Tool isn’t the most accurate of selection tools, but its usefulness is greatly improved with Photoshop's ability to add to and subtract from selections.
Example:

To begin the selection, grab the Lasso Tool from the Tools panel, click somewhere along the top of the sleeve of the person on the left to begin the selection, although it really makes no difference where along the object you begin your selection with the Lasso Tool. Once you have your starting point, continue holding the mouse button down as you drag to draw an outline around the area of the photo.

Keep going until you return to your starting point and then release and marching ants will appear around the selection.

Quick Selection
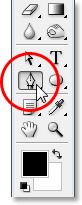
This tool is used similar to the lasso tool except it works best on an area with a clearly defined edge, when using it, you click and drag and the outline automatically selects the edges. To select the Quick Selection Tool, click on its icon in the tools panel or you can press W on your keyboard to select it with the shortcut:

Example: in the image below, we want to keep the original colours in the main subject and colorize the rest of the background with a single color. To do that, select the main subject. To begin the selection, move the Quick Selection Tool's cursor into the top left corner of the child's sweater and click once with the mouse. An initial selection outline appears around the area that’s been clicked on:
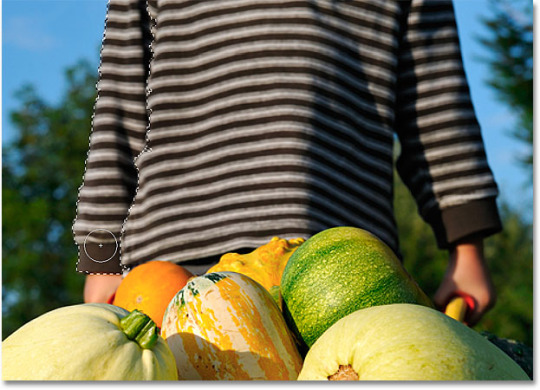
To select the rest of the area you want, you need to add to the existing selection. The Quick Selection Tool is already in "Add to selection" mode by default, you can see this by seeing the plus sign (+) displayed in the center of the tool's cursor. From the options bar, you can see three icons that help to alternate between the tool’s modes: new selection, add to selection and subtract from selection. The "Add to selection" option is already chosen, since the whole point of the Quick Selection Tool is to continue adding to the selection until you've selected everything you need.
With this tool, you can continue to keep adding to your selection or you can remove the selections until you select the entire area you wish to work with.

Pen tool
The Pen tool is located in the tools panel like any other tool, but it’s grouped in with the Shape Tools, the Type Tool, the Path Selection and Direct Selection.
Despite the name implying it to be a pen, the tool is no such thing, at least, not the sort of pen you'd normally think of when you hear the word "pen". If you were to use the tool like an ordinary pen, you’d end up with a twisted, tangled mess and things looping all over each other.
Example:

The icon on the right is the Fill pixels icon, this is grayed out and not available when working with the Pen Tool. It's only available when working with the various Shape Tools, so there's really only two icons we need to look at.
The icon on the left is the Shape layers icon, and it's the one that's selected by default. If we were to work with the Pen Tool with that icon selected, we'd be drawing shapes, just as if we were using any of the various Shape Tools, except that instead of drawing a predefined shape like a rectangle or an ellipse, we could draw any shape we wanted. Select the Paths icon:

With the Pen Tool selected and the Paths icon selected in the Options Bar, click once anywhere inside your document, don't click and drag, just click. When you do, you'll add a small square point.

The first point added is the starting point of our path. The "point" is called an anchor or anchor point, and it's named that because it anchors the path into place. This first point will anchor the beginning of the path to this spot inside the document. As we add more points, each of them will anchor the path into place at that location. To add another point, click somewhere else inside the document, anywhere will do.

Adding a second anchor point gives you a straight line joining the two points together, that is the path, to add more points, a click a few more times at different spots, just click, don’t drag.
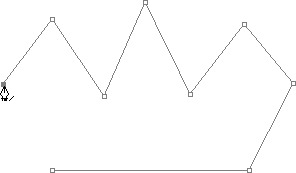
In the image above, more anchor points have been added by clicking at different spots with the Pen Tool.
Closing A Path
To close a path, all we need to do is click once again on our initial starting point. When you hover your mouse cursor over the starting point, you'll see a small circle appear in the bottom right corner of the pen icon:

A small circle appears in the bottom right corner of the pen icon when hovering the cursor over the initial starting point of the path, that circle tells us that we're about to come "full circle" with our path, finishing it off where it began. To close it, simply click directly on the starting point.
The path is now closed, finishing at the starting point, creating a closed path.
Crop
The crop tool allows you to select a portion of the image and get rid of everything not included in the selection, it’s useful for getting rid of backdrops you don't want.
Eyedropper
The eyedropper tool is used to sample a colour in the image you’re working on and matches it to the one in Photoshop, it’s useful if you want to retouch part of an image but can't tell which color to use.
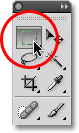
The icons in the tools panel each have their own “house” with other tools, other variations of the standard tool you select, all you need to do is hover your cursor over the tool’s icon and a separate panel will drop down.
Rectangular Marquee Tool:
Eliptical Marquee Tool
Single Row Marquee Tool
Single Column Marquee Tool
Lasso Tool:
Polygonal Lasso Tool Magnetic
Lasso Tool
Quick Selection Tool:
Magic Wand Tool
Crop Tool: Slice Tool
Slice Select Tool
Eyedropper Tool:
Colour Sampler Tool
Ruler Tool
Note Tool
Count Tool
0 notes
Text
Structure-Evaluation
I rather enjoyed the Structure project. Our goal was to photograph 5 different shots and perspectives of a building of our choice that shows unique and interesting views of the subject. We were to photograph more or less anything we want, as long as it fell into the brief, in order to show the building as a whole, any unique patterns around or on it, and whatever makes the building stand out to us. We were to make it as interesting as we could, so it was a nice challenge to really get me thinking about how to make my building of choice look good, and I felt it was pretty challenging for me.
My choice of location was Cranhill Community Beacon, otherwise known in my area as “the Beacon”, it’s an old building that has been in the community for over 20 years, it was there when I moved into the building I call home and I grew up with it always being there and going through multiple refurbishments to improve it and get more people keen on going to it. Over the years it’s changed, when I was a child, it was for both children and teenagers, they had two huge halls inside, one for the teenagers and one for the children along with an arts and crafts room and a soft play area. I have a lot of memories of the Beacon, my fondest memory is being in the play area and they had aglow in the dark walk in tunnel play area that was dark inside and had giant ghosts painted onto the walls. They used to freak me out but I loved the fun in it.
On the grounds, there is a play area, as you can see, there was one at the back too for the older children but I think it was taken away thanks to teenagers hanging out there and drinking on the grounds. There used to be a pirate ship too that I was rather gutted about not being able to photograph, it’s been gone for years now but it would have been amazing for my project!
As you can see, the Beacon isn’t a very pleasant looking building, it’s made up of reds, oranges and blues and has always been a bit of an eye sore, it’s been these colours for as long as I can remember. So I felt it would be challenging to try and make a building like this look good, I had to return multiple times and I had to go through the process of speaking to staff to get permission, mostly for my own benefit so the guards weren’t wondering what I was doing and would just leave me be.
Problem 1:
The first problem I encountered was the weather. Most days, it was warm with the sun soaring the skies up until I would grab my gear and get moving to the Beacon to photograph it. Often, by the time I got there, a mere 10 minute walk, the sun would decide to disappear and hide behind the clouds or it would begin to rain instead. On my practice round, it was sunny to begin with and quickly began raining, but it helped me to get an idea on which parts of the building I liked most for photographing.
Problem 2:
The second problem I encountered was too much light in my photos, but any time I lowered the aperture or ISO, it would ruin the photos by adding noise and grain and there wasn’t an option for me to get the best photos the way it was. Even with the sun being out, there was too much light and my camera wasn’t very good at being able to find a middle ground where everything looked good but not overly exposed.
Problem 3:
The third problem was children. Since it’s a community centre FOR children, you find them often in the play park, so any time I was aiming to shoot, a child would run into my line of sight and I had to stop and wait until they left so I could photograph as I didn’t have permission from the parents to photograph them and at one point I had asked nicely if one parent would mind moving for a quick minute so I could photograph the building and was abruptly told “no”, not very pleasantly either!
Solution 1:
In order to combat the coming and going sunshine, I was constantly looking at my weather app and the news weather forecasts to try and determine when the best time would be to go photographing the building, when to expect the most sunshine, when to expect rain, I was checking so much that I’m now in the habit of checking the apps even though I have no plans to photograph the building again time soon.
Unfortunately, the weather was constantly changing and while the reports were giving me one report, the weather itself would do the opposite, at one point, I was expecting horrible weather on a Sunday and decided to charge my camera and the batteries for the following day, but while my equipment was charging.......the sun was out. I quickly grabbed my equipment and headed out, only for the skies to darken and it continued to rain all afternoon. It was decided that the best time for me to shoot the building was early in the morning, so I went at half past 8 in the morning and I stayed there all the way through to half past 10 when it began raining, by that point though, I had already planned out every shot I wanted and when to take it, but when the rain began, I only had one shot left and it frustrated me. I had to leave it for the time being and I headed out with my mum and dog for a walk and came back around 2ish, I saw no children were around and I captured the building while the sun was out and shining.
Solution 2:
To solve my second problem, I bought myself an ND filter, something that I absolutely love! The ND filter helps me to control my lighting and adds stronger colouring to my colours that my camera sees, my blues are bluer, my reeds are redder and the whites are clearer but not as bright, which was the aim. Using the ND filter allowed me to use an aperture of f8, which is my most preferred aperture to use as it’s not too over exposed and not too under exposed, I like how f8 looks on things and it looks more natural for me.
With the ND filter being used, I was able to brighten my location shots all without ruining the images with noise and grain, and even though I’m no longer working on the project as I’ve finished and submitted my presentation of it, I still use the ND filter and I love how images look thanks to it.
Solution 3:
To solve my third problem, I had to determine when the children would be in school or least likely to be in the play park, early morning was the best time for that, and I found out the hard way why I had to plan that better. On one of the Monday bank holidays, I decided that would be the best time to go down to the Beacon and photograph it.......only to find children everywhere! It was 10 in the morning and I admit, I was surprised to see them, I waited around for a little bit but more were showing up and it was just easier to go down another day when they’re at school!
Speaking to the staff and guards and getting permission to photograph the building helped me to adjust to people again, during the many lockdowns, my social anxiety has gone out of control and I’ve been struggling to get out of that rut and socialise and adapt again. This project helped me a lot as it forced me to speak to the staff to gain permission, I could have done it without permission but I was paranoid about anyone thinking I was scoping the building out or being sketchy!
But while it helped my anxiety, I also had a bad encounter with a woman in the Beacon, she wasn’t the nicest of people and she was in the park with her kids and talking loudly on her phone. I needed only the one image at this point and I walked up to her, I was nice about it and I even showed her my student ID to show I’m a photography student and not some random girl in the park with a camera. Her response was to rudely swear at me, to tell me to leave and not come back, it upset me a lot but more for the fact I was anxious enough as it is to speak to her only for her to react rudely towards me despite me asking nicely.
While it upset me, I didn’t dwell on it, I was bound to meet one person who won’t play ball, and while always anxious, I’m prepared for people like that as I need to toughen my skin more so people like that won’t bother me. But despite that, I came back another day and while she wasn’t there, I photographed the entire building and was happy with my photos.
While preparing them to be presented and not just uploaded to MyCity, I used Canva to make a slideshow as it looked a lot better and it meant I could talk about the project as well. I was unsure if we were able to do that or not but I did it anyway as I felt it helped to strengthen the things I photographed, I like the presentation I made, it wasn’t very long or heavily detailed but with this project, I was able to make images I’m rather proud of and enjoyed photographing. The overall Structure project was challenging for me, with the weather and my anxiety, but I achieved a good outcome and even with its horrid colours, I was able to make the Beacon look rather pleasant.
If I could do anything again with the project, honestly I would choose a different location, recently I visited a friend and where she lives, 20 minutes from where I live, I saw multiple buildings and I was looking at them and realised they would have been more ideal for my project. They were a church and chapel, although I also began thinking that the churches and chapels were a bit over used, so I guess it would have just looked like another gothic building. So in that regard, I’m happy that I used the Beacon and I gained plenty of challenges from this building alone. I learned more about using lens filters during this project, I knew of ND filters and the many others you can use, but I hadn’t owned any of my own until now. All I had was a camera and a lens, and over time I’ve been able to get myself a 250mm lens and an ND filter which has helped to drastically improve my photography. I really enjoyed this project a lot, it took some doing and multiple attempts, but with it being so close to home, it was easy to go out and get it done.

#Structure#structurephotography#Architecture#architecturalPhotography#evaluation#evaluations#structureevaluation
0 notes
Text
Unseen-Long Exposure
I’ve been trying to upload my Long Exposure image onto MyCity, but I haven’t found an area to upload it as the “Unseen images” section only allows one thing and that was my slow motion video and now I can’t upload anything at all to that section. So until I find out where I’m supposed to put it for the submissions, I’ll be posting it onto here.
This is a long exposure shot I took while working on the Lost and Found project, my aim was to photograph a river and capture a misty effect using a slower shutter speed of between 3, 5 and 10 seconds, an ISO of 100 and my aperture was f8. I encountered multiple problems when shooting for this project and to capture this image, mostly they involved timing the sun’s position to get it just right in order to brighten my location with natural light and sunshine on the water.
It took me multiple attempts to get an image I liked most, I have multiple shots and angles, but this is the one I liked the most that I could use for the Long Exposure image.

0 notes