
Last Seen Blogs

botanycrewmember
To Be Loved Is to Be Changed

caitycake94
Caity

megatubarao-2-dublado-portugues
!!Baixar — Megatubarão 2 (2023) Filme Completo em português

babiisuit-blog
Smilee💋🙈

vjvandal
Existence Precedes Essence
Text


Corset Bra // Mermaid Lucia on Etsy
1K notes
·
View notes
Text
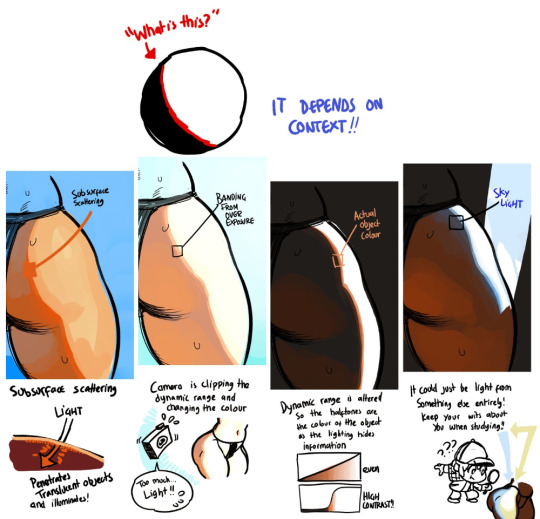
I am so serious when I say if you want to learn about light, you NEED to at least look at modeseven’s tutorials. even if you’re not pursuing a painterly style, this is all essential theory that can be easily adapted to different coloring styles. notice how none of these ever say ‘light with these colors and shade with these colors’? notice how this is teaching how light works on a mechanical level, and reminding the audience to adjust the actual colors they choose by context? THAT is good advice.
(if you’re thinking ‘wow I want to study more of this persons art!’ I encourage you to do so, but proceed with the knowledge that modeseven draws pretty much exclusively weird as hell kink art. sometimes wisdom comes from horny places)
57K notes
·
View notes
Text
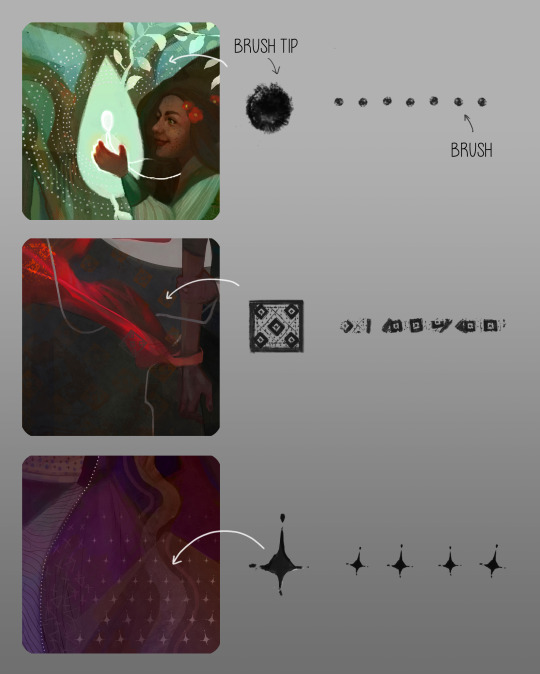
Some Photoshop Tips
I’ve been getting quite a few asks about the process for the patterns in my stylized artworks, so I decided to put together a couple of tips regarding them.
Firstly, what you need are
— CUSTOM BRUSHES —
Most of the patterns I use are custom brushes I made, such as those:
For the longest time I was convinced making brushes must be super extra complicated. I was super extra wrong. All you need to start is a transparent canvas (2500px x 2500px max):
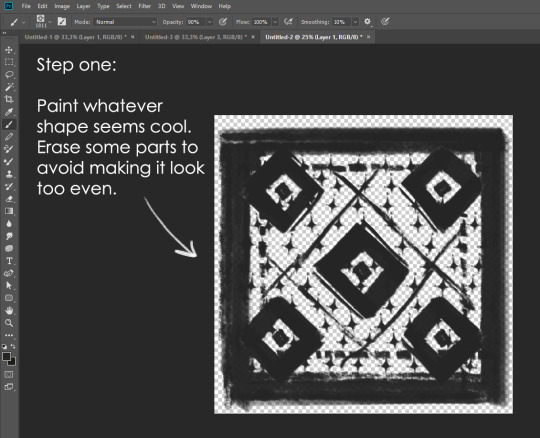
This will be your brush tip. When you’re satisfied how it looks, click Ctrl+A to select the whole canvas and go to ‘define brush preset’ under the edit menu
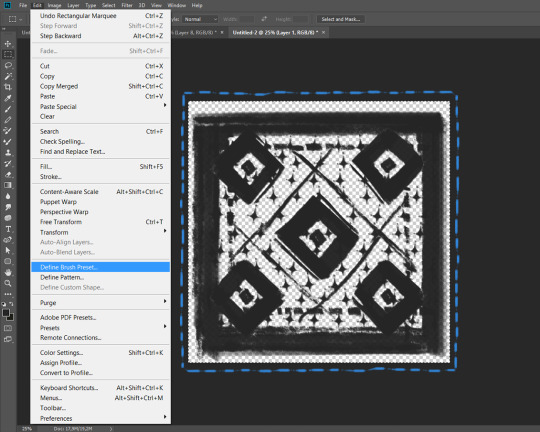
You will be asked to name your new glorious creation. Choose something that describes it well, so you can easily find it between all the ‘asfsfgdgd’ brushes you’ve created to be only used once

This is it. Look at it, you have just created a photoshop brush. First time i did I felt like I was cheated my whole life. IT’S SO EASY WHY HASN’T ANYONE TOLD ME
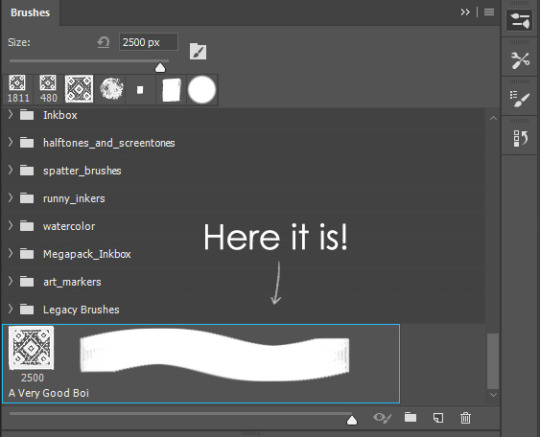
Time to edit the Good Boi to be more random, so it can be used as a Cool Fancy Pattern. Go into brush settings and change whatever you’d like. Here’s a list of what I do for patterns:
- under Shape Dynamics, I increase Size Jitter and Angle jitter by 5%-15%
- under Brush Tip Shape, I increase spacing by a shitload. Sometimes it’s like 150%, the point is to get the initial brush tip we painted to be visible.
- If I want it to look random and noisy, I enable the Dual Brush option, which acts like another brush was put on top of the one we’ve created. You can adjust all of the Dual Brush options (Size, Spacing, Scatter, Count) as you wish to get a very nice random brush to smear on your backgrounds

The result is as above. You can follow the same steps to create whatever brush you need: evenly spaced dots that look like you painted them by hand, geometric pattern to fill the background, a line of perfectly drawn XDs and so on.
BUT WAIT, THERE’S MORE
— PATHS —
But what if you want to get lots of circles made of tiny dots? Or you need rows of triangles for your cool background? Photoshop can do all of that for you, thanks to the magic of paths.
Typically, paths window can be found right next to Layers:

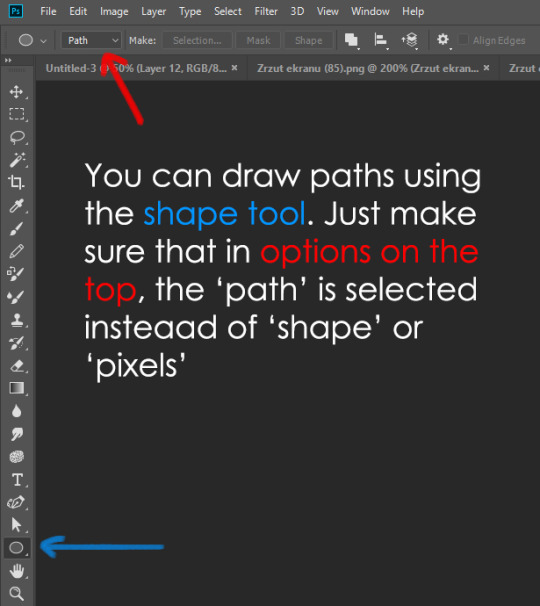
Draw whatever path you want, the Shape Tool has quite a bit of options. Remember, paths are completely different from brush strokes and they won’t show up in the navigator. To move a path around, click A to enable path selection tool. You can use Ctrl+T to transform it, and if you move a path while pressing Alt it will be duplicated.
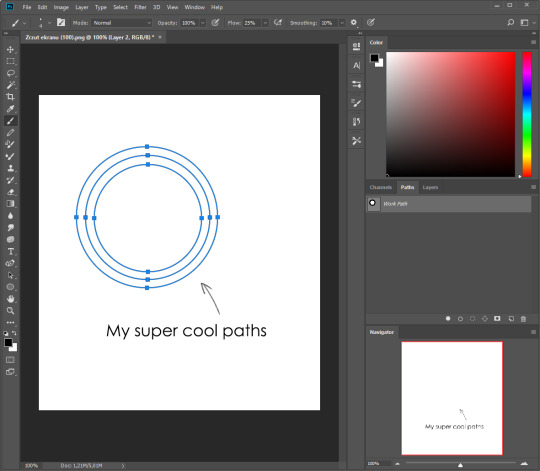
Now, pick a brush you wish really was in place of that path you’ve drawn and go to layers, then choose the layer you want it to be drawn on. Then, click this tiny circle under the Paths window:

Then witness the magic of photoshop doing the drawing for you while you wonder how tf have you managed to forget about this option for the past 2 years
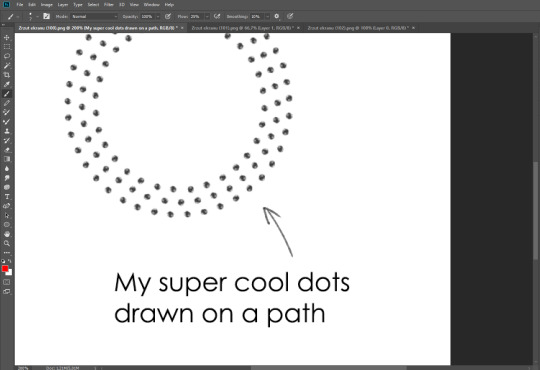
You can combine special brushes and paths for all sorts of cool effects. I mostly use them in backgrounds for my cards, but you can do whatever you want with them.
I hope that answers the questions for all of the people who were sending me inquires about the patterns. If you have any questions regarding this or any other Photoshop matter feel free to message me, I’m always up for complaining about how great and terrible Photoshop is C’:
93K notes
·
View notes
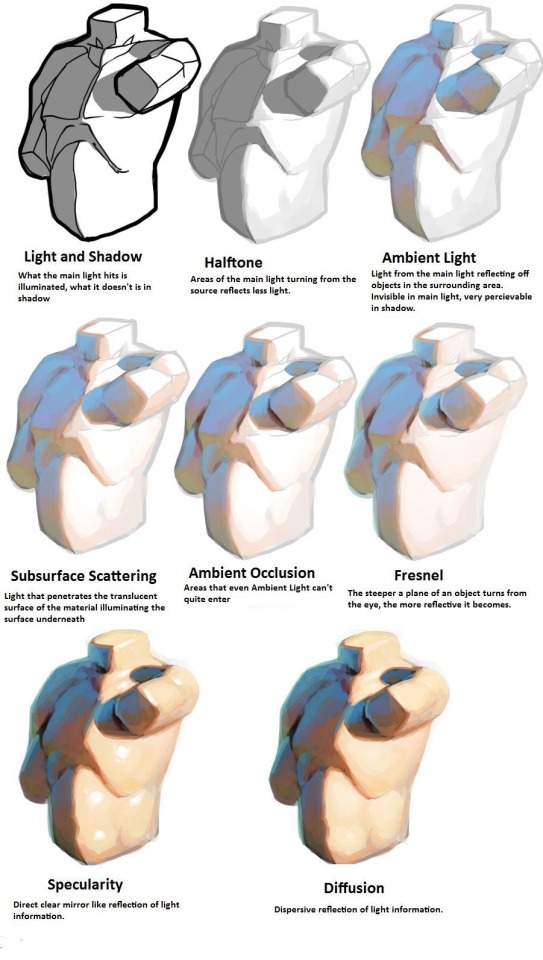
Photo


Trakoclock asked:
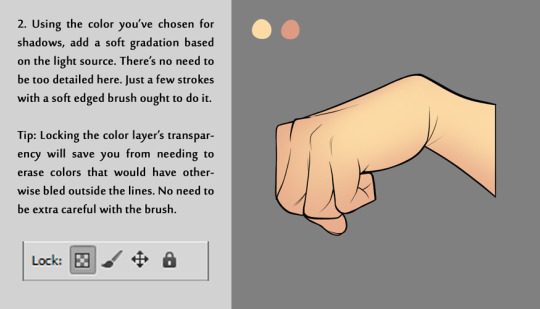
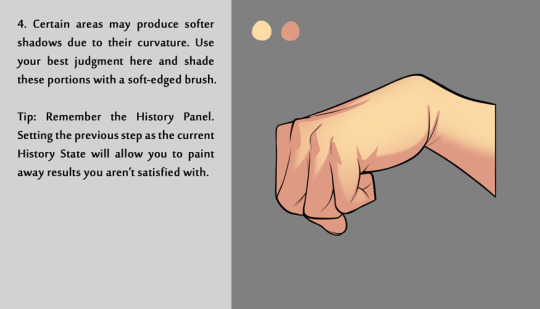
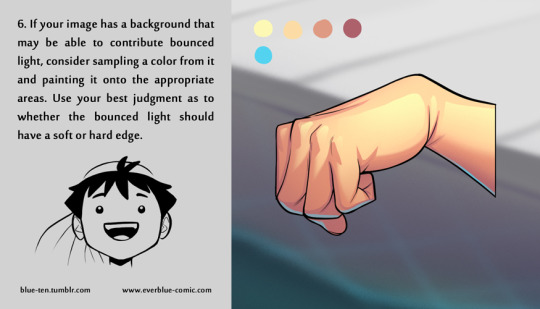
Hey, if you don’t mind sharing, I’ve always wondered how you got that soft celling look on your characters in your comic. Any tips? I’m currently working on my own comic and I kind of want to go for a less harsh form of cell shading. Thanks!
A couple people have asked about the way I color things and I’ve been meaning to post a tutorial on it :]. I’ve never been too good at describing my process, but I hope this helps!
122K notes
·
View notes
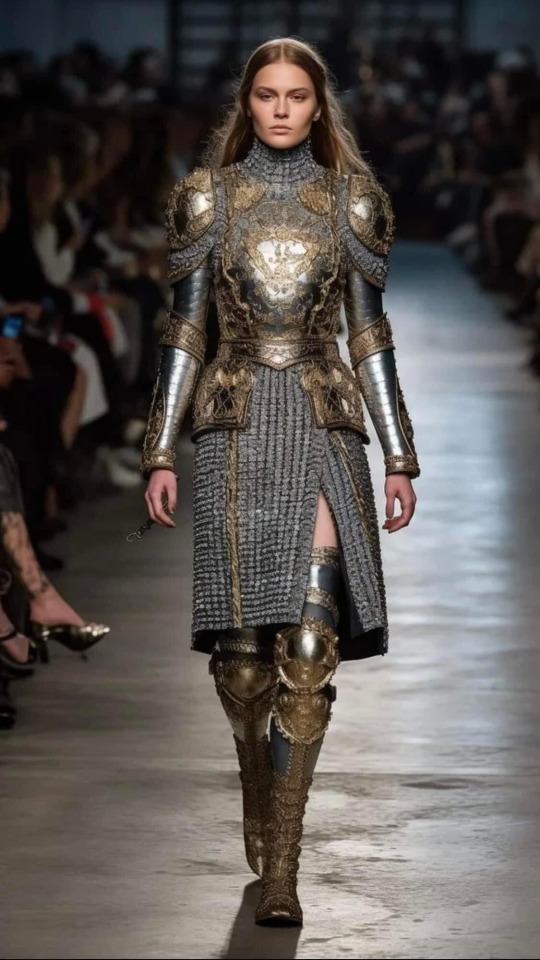
Photo


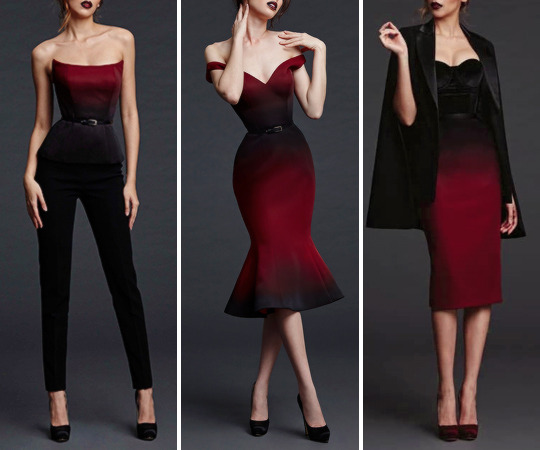
POEM “Tale of the Luminaries” a/w 2018-2019 collection
74K notes
·
View notes
Photo
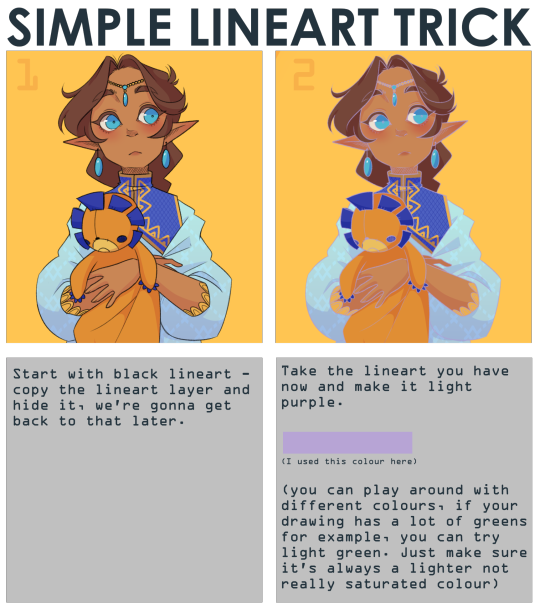

note that it works best with thin lineart
(I used SAI2 for this, but I think you can use any art program with a overlay layer mode)
38K notes
·
View notes

Photo

That’s a Puzzle - Submitted by @zedetta
#6d5f90 #ad87ae #d892af #fd9f9a #ffd790
4K notes
·
View notes


Photo

ELF HAIR!!
Found via Facebook but then I went and hunted down the name on the watermark and HairByJaneY’s instagram is here and it’s pretty damn awesome. There are a lot of speed-up videos showing how the braids were accomplished, and apparently the same videos exist (at normal speed) as tutorials over on her YouTube channel.
(Also if you just do a google search for “hairbyjaney braids” you get THIS stunning view.)
@morgynleri this looks up your alley; are you familiar with her stuff already?
10K notes
·
View notes
Text
Attention anyone who needs hairstyle references
I want to introduce all of you to this amazing place called the ukhairdressers style gallery.
It’s basically a massive database full of high-quality images of different hairstyles. I mean, look at all the options in that sidebar (and part of it’s cut off):

In total they have 976 pages of hairstyles with about 17 styles each, that’s about 16592 hairstyles to look at.
Look at all the stuff they’ve got! Long hair:

Short hair:

Straight hair:

Curly hair:

Afro hair:

Men’s hair:

Hair on older models:

Extra-fancy hair:

Even crazy avant-garde hair:

So if you need help with designing a character or you just want to practice drawing hair, this is a fantastic resource.
353K notes
·
View notes


Photo

@blankmuse and I did an art trade and it was glorious. This is her character Lillian and I love her very much. check out her art over at @blankmuseartwork
6 notes
·
View notes
Photo

Dag Vandra, my character Ashild Vandra’s estranged husband. I had fun designing him. UvU
3 notes
·
View notes
Photo

An RP character I made for a discord RP group I’m a part of. Her name is Teagen Clements and she’s a werewolf and I love her.
3 notes
·
View notes