
mamtabhutani
My Food Legacy
Easy to make recipes, from one generation to another!
13 posts
Don't wanna be here? Send us removal request.
Last Seen Blogs

aishwaryaanair
Aishwarya Nair

stargo-star
STARGO

noodot
the noo he doodles

charlunday
Charlie

ehran
Sans titre
Text
Dum Aaloo…a little bit of my childhood that can never be lost!
9th May 2020
I have been mulling over the idea for this story for quite some time and it just so happens that the day I decide to actually pen it down happens to be my cousin Anita’s birthday. Anita Mahajan nee’ Nayyar is my sister from another mother. Even though we live miles apart, the distance has not dulled our affection for each other. We discovered the recipe of ‘Dum Aaloo’ during one of our adventures (could have just as easily been a mishap) and hence, it is just right that I dedicate it to both ourselves.
Our fathers were cousins and as my uncle was a Professor at the Delhi University, their place was my home away from home. Me and my brother, Anita and her brother – what fun all four of us had growing up together! There are so many adventures from our childhood that I can recall but the most fun Anita & I had was when we would gang up against the brothers.
So this one summer, probably in the early 80s, I was staying over at Anita’s place and one lazy afternoon we decided to cook a surprise snack for everyone. We looked up one of aunty’s cookbooks, found the recipe for ‘Dum Aaloo’ that seemed doable and because it was made from potatoes, we thought it would go well with the evening tea. A note here – we had never stepped into the kitchen before this, albeit to eat & we had no clue about what actually we were going to make & how. But that’s where the fun lay!
As the mothers took their afternoon nap, we gathered the ingredients, bolted the kitchen door from inside (lest my cousin brother, who was hovering around, get a clue of what’s happening inside). Little did he know that tormenting him with the idea that he was missing out on all the fun that we were having inside the kitchen was just the spice we needed to make the dish perfect!
We read the instructions carefully and followed the steps one-by-one to cook our first dish together. The dish was finally ready but to our dismay, it was not a snack as we had thought it would be. We rolled in laughter as we served it. We wanted to surprise everyone and surprise we did…including ourselves!
The recipe that I am sharing is not the one that we had cooked that day but comes to you with the same joy & happiness that we felt on that one lazy afternoon in the summer of early ‘80s.
Ingredients:
1. Potatoes – 250 gms (preferably baby potatoes but you can go with small sized ones also); boiled and peeled. Take a fork and make tiny holes on the potatoes to allow the flavours to seep in.
2. Tomatoes - 2 large ones (par boiled, skinned and pureed)
3. Onions – 2 large ones (grated)
4. Ginger & Garlic Paste – 1 tsp full
5. Asafoetida or Hing powder – a pinch
6. Curd – 1 cup, beaten
7. Salt to taste
8. Red Chiili powder – to taste (you can add half the quantity of deghi or kashmiri mirch for colour)
9. Turmeric – 1/2 tsp.
10. Coriander Powder – 1 tsp.
11. Garam Masala - 3/4 tsp.
12. Coriander leaves for garnish
13. Cooking oil – 1.5 tbsp.
Method:
• Heat oil in heavy bottomed pan or kadhai.
• Once the oil is hot, gently add the grated onions and fry till golden brown in colour.
• Add a bit of water to make them mushy and cook till the water dries up.
• Now, add the ginger-garlic paste and cook for a few minutes.
• Next, add the tomato puree and cook till the oil leaves the gravy mixture and is visible on the sides of the pan.
• Add coriander powder and cook for a brief second.
• Meanwhile, take the beaten curd and add the hing powder, salt, red chilli powder and salt to the curd and mix well. You may add half a cup of water to this mixture in case the curd is very thick.
• Please note – thick curd will curdle on hitting the hot gravy mixture, so remember to add water to lighten its consistency.
• Once the onion-tomato mixture is cooked, slowly add the curd mix to it while stirring continuously.
• Let the mixture come to a slow boil and look out for oil glistening on the sides of the gravy.
• Once done, add the potatoes, a cup of water and let it simmer for at least 10 minutes.
• Add the garam masala and garnish with chopped coriander leaves. Serve hot with paranthas.


0 notes
Text
Mutton Biryani nee’ Pulao
“A life that touches others goes on forever”
Today, Feb 11th marks the second death anniversary of my mother-in-law, Mrs. Pushpa Bhutani. The recipe that I am sharing today was learnt by watching her make it and was practiced under her watchful eyes. It is nowhere near the original but the attempt to recreate it every time refreshes our memory of Mummy and each time, my husband loves to tell us about the original creator of the dish…Mathur aunty, their neighbour when they lived at Moti Bagh in Delhi. He tells us that whenever Mathur aunty made her famous mutton biryani, the fragrance would engulf the entire block of flats and the children would start salivating…in fact, it was a standing and an open invitation to all the kids in the neighbourhood to have their meal at the Mathur household that day…an invitation they never refused!
The idea of celebrating Mummy’s life and all that she meant to us came from my daughter, Ridhima. She encouraged me to write this post and the credit for clicking all the pictures while I made the biryani goes to her.
My mother-in-law left us at a ripe age of 87 but for the last couple of years of her life she was quite oblivious to what was happening around her. Owing to dementia, her memory and communication became impaired but, at times, one could see a glimmer of recognition in her eyes when her loved ones were around.
She was a simple woman, a devoted wife, a mother who tried to do the best for her children, a loving grandmother and to me; she was a mentor in many ways. We had our moments of disagreement but I will always treasure the memories of her childhood that she shared with me, just before she slipped into her own world. May her soul rest in peace!
About the dish, if we go into the technicality, then this dish is not a biryani but a pulao, a rice preparation in which the rice is cooked in the stock with spices, meat or vegetables. Biryani, on the other hand, is a preparation in which the rice is cooked separately, then mixed/layered with meat or vegetables and cooked in its own steam. Let’s get to the recipe now…
MUTTON BIRYANI NEE’ PULAO
Ingredients:
(Please note: The quantities are all approximations and can be modified as per taste)
1. Mutton pieces with bones , preferably loin chops & ribs – 1 kg (cleaned and washed)
2. Onions – 10 medium sized ones (sliced length-wise)
3. Garlic – 10 to12 cloves (peeled and chopped finely)
4. Ginger – Appox. 40 gms (peeled; half chopped finely and other half sliced into thin slivers)
5. Black peppercorns– 10 to 15 nos.
6. Cumin seeds – 1 tsp.
7. Black cardamom – 4 to 5 nos.
8. Cloves – 4 to 5 nos.
9. Cinnamon – 1 inch piece (2 nos.)
10. Bay leaves – 2 nos.
11. Salt to taste
12. Red chili powder to taste
13. Garam Masala – 1.5 tsp.
14. Refined Oil – 2.5 tbsp.
15. Basmati Rice – 500 gms. (appox. 2.5 cups)
For Garnish (optional): 2 Onions, sliced & fried till golden brown in colour
Method:
• Take a pressure cooker, add 1.5 tbsp. oil and let it heat.
• Once it’s hot, add half the quantity of all the whole spices (#5 till #10). When the spices begin to splutter, add half the quantity of sliced onions, the chopped ginger and garlic. Fry till light brown.
• Add the washed mutton pieces, a little salt, red chili powder and let it cook together for a while.
• After about 10 minutes of cooking, add a cup of water and close the lid of the cooker. Allow at least 2 whistles to blow and then switch off the flame. Allow it to cool.
• When cool, open the pressure cooker and drain the stock and mutton pieces in two separate pans.
• Remove the bay leaves but leave rest of the whole spices along with the cooked mutton.
• At this point, take the rice, wash it well (at least 3 times) and soak it in equal quantity of water, i.e. 2.5 cups.
• Take a large bottomed vessel or kadhai (preferably with a well-fitted lid) and pour 1 tbsp. oil in it. When the oil is hot, put the remaining whole spices one by one in this order – black pepper, cumin, cloves, cinnamon and black cardamom. To ensure that they don’t get burnt, lower the flame when you add the spices.
• Next add the remaining onions, garlic and sliced ginger. Fry till they turn light brown.
• Add the mutton pieces and cook on slow flame till tender and well carmalised. Add salt, red chili powder and garam masala to taste.
• When the meat starts falling off the bone, its time to add the stock that you had kept aside.
• A note here about cooking rice – normally good quality basmati rice will require about half an hour soaking time and twice the amount of water to cook.
• So, for the quantity of rice that we are cooking, we will need 5 cups of water. Measure the quantity of stock that you have and add the remaining water to the mutton to make it 5 cups.
• Once the stock comes to a boil, add the rice, mix and cover it with a lid.
• Cook the rice on low flame. Keep checking to see if its done but do not open the lid too often as the fragrance might be lost.
• In case the stock has dried up and the rice is still not done, keep the pan/kadhai on an iron griddle/tawa and leave it on slow heat for a few minutes.
• Open the pan only when ready to serve.
• Biryani tastes best with Pudina/Mint Raita.


0 notes
Text
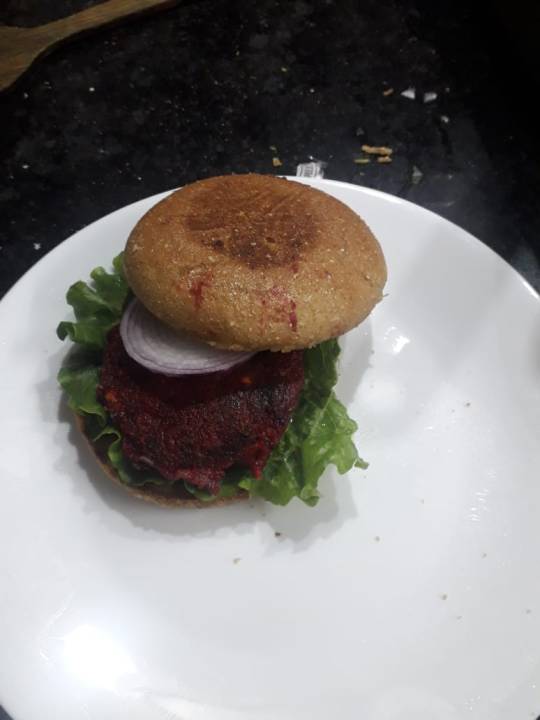
Reimagining the Beetroot as a Burger!
Hi, It’s nice to be back!
A lot has happened in the last 2 years. We are still in Chandigarh but life has moved on. Middle age arrived some time back and has been accepted with grace. Most of our experiences are now being arranged on the shelf labeled “Yesteryears”. But just how much time had changed became obvious by the freaked out look on my children’s faces when I told them that in our younger days, we would often freak out with our friends, while listening to our favourite bands! I was corrected and updated with the current meaning of the slang. Although I am open to change, but am also not one to lose my ground so easily. I researched and I quote, “At the first Mothers of Invention concerts (around 1966), audience members were invited to "freak out!” which meant to express themselves freely, be it through dancing, screaming, or letting a band member spray them with whipped cream”.* We never got anywhere near the whipped cream, but “freak out” we did!
While still on words, another one that’s gaining popularity is the word “Reimagining”. It all started with my daughter’s project on “Reimagining Doctor-Patient communication” and now everyone seems to be in the mode – from reimagining the future to marketing strategies to teaching pedagogies to simply one’s own life! Not one to be left behind, I decided to tackle a vegetable that has always escaped our kitchen – the beetroot, and reimagine how it could be included in our diet other than as salad.
Beetroot is being heralded as a superfood, a nutrient-rich food considered beneficial for health and well-being. During my weekly visits to the Chandigarh Apni-Mandi (farmer’s market where vendors come from nearby villages to sell their produce), I have seen many people buy beetroots but I have never done so. The trigger to buy some and try a dish came from Twinkle Khanna’s Instagram account. She had thrown up a “What’s in your dabba today?” challenge to a few celebrity friends and one of them was carrying a beetroot cutlet! The wheels were set in motion and I thought of a clever way of camouflaging the cutlet in a bun & voila, the beetroot burger was born.
So, must thank Mrs. Funnybones for this one and dedicate it to all the young supermoms who could do with some superfoods!
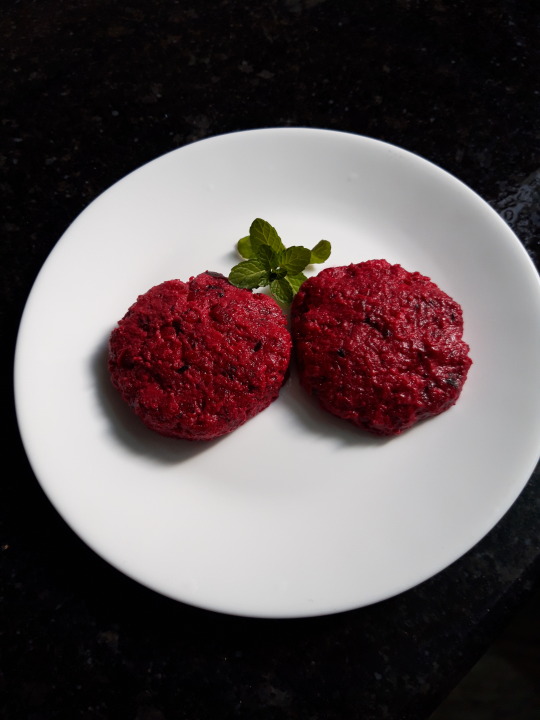
Beetroot Burger
Ingredients (For making four burgers):
• Beetroots - 2 medium sized
• Potatoes – 4 medium sized
• Paneer/Cottage cheese – 50 gms.
• Green chillies – as per taste
• Coriander – a few sprigs
• Lettuce leaves – a few
• Onion rings – 4 nos. (pre-soaked in water so that they lose some of their pungent taste)
• Besan/Gramflour – 2 tablespoons
• Salt to taste
• Pepper to taste
• Olive Oil – 2 tablespoons
• Burger Buns – White/Brown/Multi-grain/Wheat Bran (I chose the latter)
Method:
1. First, a note about buying beetroots. Avoid beets with soft, moist spots or shriveled, flabby skin. The taproot, which extends from the bulbous part of the beet, should be slender. Try and pick equal-sized ones so that they will cook evenly. If the leaves are attached, they should be crisp and dark green. The leaves can be discarded though!
2. The first step in preparing the cutlet is to boil the potatoes and the beets. Both should be boiled separately with the skin on. Before removing them from the pan/pressure cooker, take a knife/fork and prick the vegetables. If they feel tender, then remove them from the hot water and leave them to cool.
3. Once they have cooled down, remove their skins and mash them well.
4. Meanwhile, grate the cottage cheese and chop green chilies and coriander finely.
5. Next, dry roast the besan on a tawa/iron griddle or any flat non-stick pan that you have till its light brown. Please ensure that it is roasted on a slow flame, otherwise it will burn soon.
6. Now, in a large bowl, add the potato & beet mash, cottage cheese, the greens, salt, pepper and blend well.
7. Add the roasted besan little by little, till you feel that the cutlet dough does not have excess moisture and will bind well.
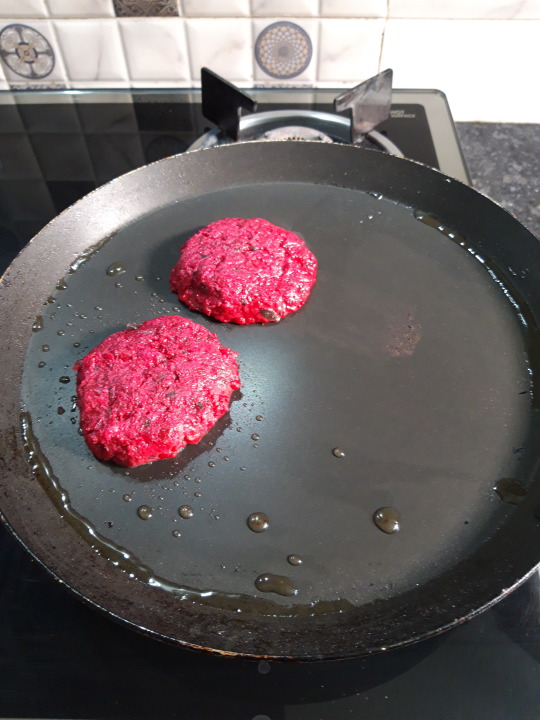
8. Grease your palms a bit, take a handful of the dough and roll it into cutlets about half an inch in thickness. The size of the cutlet should be such that when you bite into the burger, you get its taste in each mouthful.
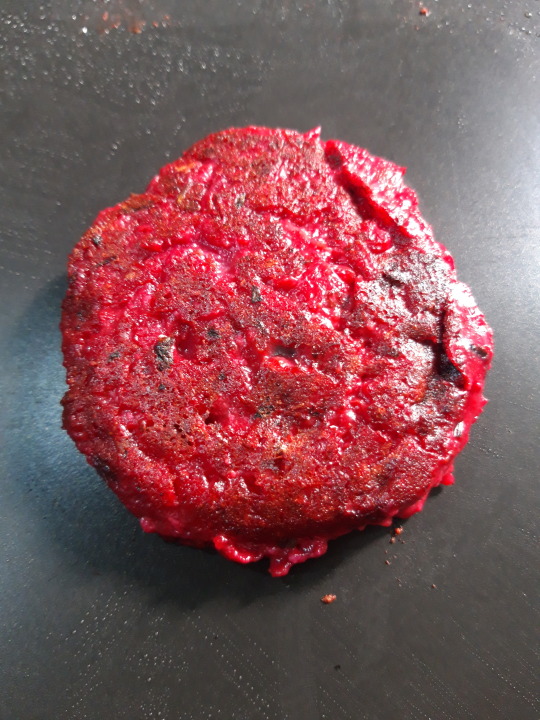
9. Heat a non-stick pan, grease it with a little olive oil and shallow fry the cutlets till you can see a slightly golden brown crust beginning to appear.
10. Flip its side to get a similar golden brown crust.
11. The texture of the cutlet should be soft and melt-in-your-mouth. That’s why I prefer to add besan and not bread for binding the dough.
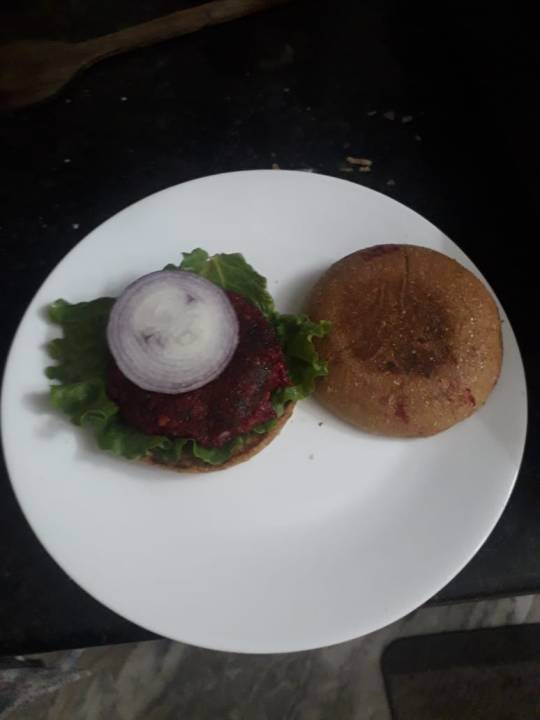
12. On another pan, heat the buns. You can butter the insides of the bun for extra taste (and of course, calories!)
13. Once the ingredients are ready, all you need to do is arrange the layers in the burger bun.
14. Take the bottom layer of the bun, place a lettuce leaf, then the beetroot cutlet, an onion slice and top it with the top layer of the bun. For those who don’t like eating raw onions, you can replace it with cucumber.
15. The Beetroot Burger is ready and it is best eaten with tomato ketchup.
Bon Apetiti!
*(Credits: https://en.wikipedia.org/wiki/Freak_scene)
0 notes
Text
Time to celebrate!
A celebratory meal in my household would be incomplete without a chicken dish. Over time, I devised ways of taking simple dishes to the next level by adding one or two special ingredients that would make all the difference. Here, I am sharing with you my recipe of kadhai chicken, made special by the use of capsicum & kasoori methi, both of which lend a distinct taste and flavour to the dish.
Kadhai Chicken
Ingredients:
Chicken - 750 gms. (Cleaned & cut into 12 pieces)
Bay leaves - 1 or 2
Onions – 4 big sized sliced/grated, as per convenience (appox. 300 gms.)
Ginger & Garlic paste – 1 tsp.
Tomatoes – 5 nos. grated/pureed, as per convenience (appox. 350 gms.)
Green Bell peppers/Capsicum – 1 small (Halved & diced)
Kasoori Methi – 1 tbsp. (easily available in dry and packaged form)
Refined Oil/Ghee – 1.5 tbsp.
Red chilli powder - 1/2 tsp.
Turmeric powder – 1 tsp.
Salt - to taste
Garam Masala* – 1 tsp.
Method:
1. Take a heavy bottomed pan, add the oil and let it heat.
2. When hot, lower the flame and drop the bay leaves. After 2 minutes, add the onions. Make sure that you drop them gently from the side or else the oil will splutter all over.
3. Stir occasionally till the onions turn golden brown. Add a tbsp. of water and cook till the water dries and the oil leaves the sides of the pan.
4. Add ginger-garlic paste and cook for 2 minutes. Add a tbsp. of water again to blend the ginger-garlic paste into the onion paste.
5. Next, add the tomatoes and mix well. Cover the pan with a lid and cook till the tomatoes have softened and blended well into the mixture.
6. Keep checking on the mix and stir occasionally to prevent it from sticking to the sides of the pan.
7. Once the oil has left the mixture and is glistening on the sides, you know your basic gravy masala is done.
8. Add the spices – salt to taste, red chilli powder, and turmeric. Stir well.
9. Now, add the chicken pieces and mix well. Cover the lid to let it cook. You may add a little water (not more than 2 tbsps.).
10. The chicken should be cooked in the gravy masala till it is done. Keep checking on it from time to time. The cooking time depends on the size of the chicken. Bigger ones take longer to cook.
11. Once the chicken starts to peel off the bone and looks white on the inside, you know its done.
12. Add the diced capsicum, a cup of water and simmer on slow heat for another 10-15 minutes till the oil comes on top. The desired gravy consistency should be thick and not runny. Sprinkle garam masala and dried kasoori methi and serve hot with either paranthas or naan.
*The garam masala recipe has been shared on one of my earlier posts.

0 notes
Photo

My Food Legacy turned 3 today!
0 notes
Text
Aam Panna - a perfect summer cooler!
It’s been a long hiatus and a lot has changed. For a first, I have shifted my base. Making a big life change is scary but what is even scarier, is, regret! Not wanting to live with one for the rest of our lives, hubby and I took a big step…to move out from a city that had always been home to me. Born and brought up in Delhi, I have not known another life. My first baby step was around 10 years ago when we moved to Gurgaon but then, we still lived in the NCR. I could have access to the kind of big city life that I knew. The only thing that required getting used to was the long distances and the traffic. Easily done…or so I thought, till I moved to Chandigarh!
Chandigarh – the city beautiful! It truly is. From my perspective, there are a lot of positives – planned layout, wide clean roads, hardly any traffic, beautifully manicured parks, green zones, a lake, fresher air, proximity to the hills and to top it all, friends who are now family. Dilli bhi door nahin! But what takes the cake is the variety of flora that thrives here. Most houses have beautifully maintained lawns and the ones that have the luxury of space have fruit trees growing too. At this time of the year, mangoes and litchis abound. Much to my delight, my neighbour’s mango tree has had a good bounty this year and has been magnanimously shedding its fruit on to my balcony. I have had a whale of a time gathering my booty every morning and churning out summer coolers out of raw mangoes.
Summer Coolers! That’s the theme this time. I am going to share a series of recipes of a few homemade beverages that are perfect to beat the heat. I will start with the ‘Aam Panna’, the recipe for which was not formally shared with me by anyone but I picked it up by watching my parents as they used to make it every summer. Rightly so, the credit for this recipe goes to my parents.
AAM PANNA
Ingredients:
1. Raw mangoes – 500 Gms. (around 3 -4 medium sized ones)
2. Sugar – 3 tbsp. (can start by adding 2 tbsp. and add more, if required)
3. Salt – I tsp.
4. Black salt – 1 tsp.
5. Black pepper powder – ¾ tsp.
6. Cumin (jeera) powder – dry roasted and ground finely (preferably freshly done)
7. Fresh mint leaves - 1 cup (100 gms. approx.)
Method:
1. Pick raw mangoes that are firm to touch and have shiny skin.
2. Rinse them in water; remove the stem and steam in the pressure cooker. Make sure that you are using potable water as the same will be used to make the beverage. Allow 3-4 whistles till they become completely soft and pulpy.
3. When cool, drain the mangoes, remove their peel and take out the mango pulp.
4. In a blender, add the mango pulp, sugar, salt (both black and white), black pepper powder, roasted jeera powder and fresh mint leaves. . Blend it into a smooth mixture. Add the drained water (if any) and mix well.
5. Do a taste test to check the balance. In case it feels sour, add some more sugar & salt.
6. Store it in an airtight bottle and keep it in the refrigerator. Ensure that the aam panna is consumed in the next 4-5 days.
7. Shake well before serving. If the mix that you had made is quite thick, then add the water in the ratio of 1:3. Otherwise, go with your taste and add water accordingly. Stir well and add ice cubes.
Aam Panna is best served chilled.
0 notes
Text
Adrak* Chicken - Mughlai made easy!
A toast to the future
A salute to the past
A tribute to love
And a friendship that lasts.
I dedicate these lines and the following recipe to you, dear husband.
My husband never learnt to cook, he still hasn’t, but there is one recipe in my repertoire that is easy to make and delicious in taste and surprisingly, it was taught to me by my husband. He in turn attributes this dish to a very graceful lady, Pushpinder Aunty, who happened to be our neighbour in Delhi. It was picked up not in pursuit of any passion but as a survival technique as the mother was away from home for more than a few days.
Nevertheless, I am grateful!
It does seem like yesterday that the children were little and my time was spent worrying over how to make them eat healthy and nourishing food. The children have grown up and left home in pursuit of their dreams, but I am still there…still worrying whether they are eating healthy and nourishing food. This recipe is a quick-fix recipe for all those kids out there who are away from home and longing for a taste of India.
Bon Appetit!
Ingredients:
Chicken - 800 gms. (cleaned & cut into 12 pieces)
Curd - 500 gms.(preferably, set at home)
*Adrak/Ginger - 100 gms. (peeled and grated coarsely)
Pure ghee/Clarified Butter - 1 tbsp.
Red chilli powder - 1/2 tsp.
Salt - to taste
Freshly ground black pepper (can use black pepper powder too)
Method:
Take a heavy bottomed pan, add 1 tbsp. ghee and let it heat.
When hot, lower the flame and add the grated ginger. Make sure that you drop it gently from the side or else it will splutter all over.
Keep stirring to prevent the ginger from getting stuck to the bottom of the pan.
When it turns light pink, add the chicken pieces and mix.
Next, add the curd, salt & red chilli powder to taste.
Mix well and cover with a lid. Soon, the curd will split and the water from it will be released.
Let it cook on slow heat.
Keep checking occasionally to turn the sides and ensure that the chicken is cooking evenly.
Allow the water to dry completely and cook till the ghee leaves the sides of the dish.
Sprinkle freshly ground pepper and serve hot with green mint chutney.
0 notes
Text
Raw Papaya Salad - an easy to make Thai salad
Hi! I am back with a recipe that, although, is ideally suited for summers but can be served as a starter any time of the year - it kind of helps balance the heavy non-vegetarian snacks that are a must at most of our parties. I had this salad for the first time at my friend Mini Sachdeva’s house and liked it instantly. It took me a while to guess what the main element in the salad was. Mini was kind enough to share the recipe with me and since then it is a regular at my parties. There are many variants of this salad and I shall share with you my version. Hope you enjoy making it and eating it as well!
Unripe papayas are readily available in the market round the year. Select one that is very firm with shiny green peel suggesting that it is as freshly picked as possible. Any very firm unripe green papaya can be used for this recipe. Select the firmest one you can find. Even green fruits eventually ripen and turn soft if allowed to sit around for some time so buy them only when you are ready to cook.

Ingredients
Raw Papaya – 1 medium sized (approximately 750 Gms.)
Salted peanuts whole – 100 Gms. (You can add more if you are crazy about peanuts!)
Juice of two lemons
Curry leaves – about 20 leaves
Green chilies – 3
Olive oil – 1 tbsp.
Salt to taste
Method
Peel the skin of the raw papaya and cut it into two halves. Remove the seeds, if any.
Wash the fruit and grate it. You may cut it into fine juliennes if you are good with the chopping knife.
Sprinkle some salt over the papaya and set aside.
Meanwhile, pound the peanuts coarsely. Do not grind them into a fine paste.
Wash the curry leaves well. Cut the green chilies into halves and then lengthwise. You may remove their seeds if you don’t like your salad hot.
Get back to the grated papaya and with a light hand, squeeze out some water from it. Please ensure that you do not squeeze it completely dry as it will lose its crispiness.
In a salad bowl, toss the grated papaya, ground peanuts, lemon juice and salt (if required) together.
Heat the olive oil in a pan and when the oil is hot, add curry leaves and green chilies to it. When they begin to splutter, pour them over the salad and mix well.
Although raw papaya salad can be eaten at room temperature, the flavour is best when served cold.
0 notes
Text
The humble bread roll
Roll in nostalgia...
It rained heavily the other day and brought back memories of the days when the first splash of water would make us run to Mum with requests of hot pakoras and tea. The experience of rains was incomplete without this feast – any Punjabi household will vouch for that.
The sedentary lifestyle of the 21st century has taken its toll and most of us in my age group refrain from such indulgences. The global palate of the young generation prefers Kentucky fried chickens to fried pakoras. There are some snacks which are almost on the verge of extinction – the humble bread roll being one of them. I wonder if you can remember when you last had one.
Today, I shall share with you the recipe of a bread roll, yet another simple snack, but very easy to make and a boon for those young mothers who are constantly trying to find ways and means to make their little ones eat veggies. It makes a good choice for the school lunch box too!
Since this recipe is inspired from my childhood, it is dedicated to my mother, Ms. Kamla Puri.
Ingredients:
Your choice of bread (White/Brown/Multi-grain) – 2 slices
Potatoes – 2 medium sized (boiled and mashed)
Peas – 1 tbsp. (parboiled*)
Carrot – 1 tbsp.(finely chopped and parboiled)
Onion – 1 tbsp. (finely chopped and parboiled)
Green chilies – 1 (optional)
Coriander leaves – a bunch (finely chopped)
Salt – to taste
Red chilli powder – ½ tsp. (optional)
Raw mango powder or amchur – ½ tsp.
A bowl of water
Oil for frying
Method:
For the filling:
Take a large mixing bowl and add the chopped onions, boiled potatoes, peas, carrots, finely chopped green chilies, coriander leaves and mix well.
Add the salt and amchur powder to taste to this mixture. You may add red chili powder if you like your food hot.
Mix all the ingredients well.
For the roll:
Take a bread slice and cut it into two.
Take one half and dip it in lightly in water.
Now, place the bread slice flatly across your palm and press lightly using your other hand to remove excess water.
Take 1 tablespoon of the filling and place it in the centre of the bread slice.
Join the ends of the bread together and roll it using both your hands.
Once the filling is sealed inside properly and the roll looks smooth, deep fry it in hot oil till golden brown.
Serve it hot along with tomato ketchup.
PS: You can try different variants for the filling, for example:
Cottage cheese or Paneer filling
Plain Mozzarella cheese or with onion and peppers
__________________________________________________________________
* to boil something until it is partly cooked, usually before frying or roasting
it

0 notes
Text
Chana Kebab - a favourite party snack
Birthdays were always fun but I had no idea how prominently and how often they would feature in my life once I had a family of my own. Both my kids are grown up now and their birthday celebrations are increasingly falling out of my purview but there was a time when all I did was pick up and drop my kids to some birthday party or the other. The search for a “unique” birthday gift that would luckily also fall within my budget was an ongoing struggle. Often I would also get invited to these birthday parties. Mostly, standard fare was served but sometimes one would come across a dish that was unique and, being a foodie that I am, I always ensured that I learnt how to make it.
I first ate the Chana Kebab at Aayush Juneja’s birthday party. Aayush went to the same class as my son. When I went to fetch my son back, the friend’s mother insisted that I stay and have a bite. I did just that and never regretted the moment. I fell for the kebab – the first timers will always be left wondering whether it is a vegetarian snack or made out of mutton.
The Chana kebab, till date, remains a hot favourite at my parties and has my guests asking for the recipe after they have devoured them. Dr. (Mrs.) Juneja, thanks for sharing this recipe with me.
Let’s hope you can master it too!
Chana Kebab
Ingredients
Black gram – 1 cup
Ginger – 1/2” x 1/2” piece
Garlic - 3 flakes
Green chilies – 1 medium ( you may add more if you like your food spicy)
Fresh coriander – 1 tbsp. (chopped)
Salt to taste
Raw mango powder (Amchur) – 1 tsp.
Garam Masala* – 1 tsp.
Bread slices – as per requirement
Oil for frying
Method:
Soak the black gram overnight.
Grind it to coarse paste along with ginger, garlic, green chilies and coriander leaves.
Add the spices along with the salt and adjust it to taste.
You must ensure that the batter for the kebab is light but it should not be runny. In case of excess water, you may add bread slices to soak up the moisture and bind the kebab.
Heat the oil in a deep pan for frying the kebabs.
Take a tablespoon of the batter in your palm and shape it like a kebab before dropping it carefully in the hot oil.
Fry on high flame for a few minutes to seal the crust. Once the crust turns light brown in colour, turn down the heat and fry on low flame till done. Press gently while frying to ensure that the inside is well done.
Serve hot along with mint chutney.
___________________________________________________________________
* The composition of garam masala differs regionally, with many recipes across India according to regional and personal taste. The components of the mix are toasted and then ground together.
A typical Indian version of garam masala contains:
black peppercorns
cloves
cinnamon
black cumin seeds
brown and green cardamom pods
nutmeg
bay leaf
PS: This spice-mix is easily available in Indian stores outside India as well.
0 notes
Text
BANANA CAKE
In India, anything new or auspicious is generally welcomed with sweet items. In the same tradition, the first recipe that I wish to share is of a cake which is very easy to make and has been a hit with whoever has eaten it.
Ingredients:
Self raising flour or maida – 2 cups
Oil or unsweetened butter – ¾ cup
Castor sugar – ¾ cup
Eggs – 2
Baking powder – 1 level teaspoon
Baking Soda (sweet soda) – 1 level teaspoon
Fully ripe bananas - 3
Vanilla or banana essence – 3 to 4 drops
Method:
Pass the flour, baking soda and baking powder through a sieve twice so that all the three ingredients are properly mixed together.
Next, take a large bowl and mix the oil/butter and castor sugar together.
* Please note that, unlike most cakes, this recipe does not require any heavy duty beating or whisking. The ingredients only need to be mixed together evenly and smoothly.
Break the two eggs in a bowl and lightly whisk them. Add them to the oil & sugar mixture and mix them well.
Next, fold in half the flour into this mixture. When it’s well blended, add the remaining half and keep mixing till the batter looks smooth.
*Remember, you do not have to beat the mixture till it’s light and fluffy. You only have to mix it till it is smooth.
Now, peel the bananas and mash them. Add the bananas to the cake mixture and mix well.
Last but not the least; add the vanilla/banana essence.
Cover the cake mixture and keep it aside for two hours.
An hour and about fifty minutes later, set your oven to preheat.
Take a cake-tin of any shape and lightly oil the insides and line the base with butter paper. Pour the cake mixture into this tin.
Bake the cake at 180 degree Celsius for 55 minutes. You can check the progress of the cake at half-way. Close to time-up, pierce a tooth pick in the centre of the cake to see if it comes out clean – if it does, your cake is ready.
Take it out of the Oven/Microwave and let it cool.
The task won’t be complete till I acknowledge the source of this recipe. If my memory doesn’t fail me, this recipe was given to me by my dear friend Shalini Bhatia née Verma more than 25 years ago. We’ve had many more adventures in the kitchen together…and I promise to share most of them with you.
Till then, enjoy!
Photo credit: <a href="https://www.flickr.com/photos/greatbritishchefs/6332489268/">Great British Chefs</a> via <a href="http://photopin.com">photopin</a> <a href="http://creativecommons.org/licenses/by-nc-sa/2.0/">cc</a>

0 notes
Text
From My Kitchen
Hello World!
I’ve wanted to do this for a long time but had no idea of what it was that I could pass down to my future generations. The idea of a ‘heritage’ that is built, shared and safeguarded by communities to be passed on to the future generations held a certain romantic appeal to me. It could be, because as a teacher of social science, I’ve waxed eloquently about ‘heritage’ in many a classroom discussion.
Here, I would like to explain the word “heritage”, in brief, for the sake of the uninitiated. Anything that can be passed on from one generation to another comprises “heritage”. It could be something tangible like buildings, structures, monuments, artifacts, natural resources etc. or intangible like knowledge, customs, traditions or practices that are born out of a community’s interaction with its environment.
Now that I had decided that this is what I wanted to do, came the next important question - exactly what is it that I want to share with the future generation? What followed was a prolonged period of thinking till it struck me that we are a family of foodies. Well, I am not sure what qualifies one to be labeled a “foodie” but yes, we as a family, share a passion for food.
So, I’ve decided to compile our own “family cookbook” which will have all those recipes which have been tried and served from my own kitchen. These recipes are simple yet are sacred to me – some have been taught to me by my mother and my father; some, passed on to me by friends; still others, practiced and perfected under the watchful eyes of my mother-in-law and some, are a result of my own “hit and trial” in the kitchen.
I could have closely guarded these recipes. I must confess that the idea of a hand-written manual is still playing in my mind but the reason I have decided to share them with everyone is because, I believe, that good food brings joy…and joys shared are joys doubled. Besides, it’s not just about food, it’s about our heritage. India is a land of diversity and each region of our country has a cuisine that is influenced by its environment. Today, our children are moving and settling down all over the world. I want them to read these recipes, try them, enjoy them, share some of their own and take pride in their own culture.

3 notes
·
View notes
Text
My Chocolate Pudding
Hi! It’s been an awfully hot summer.
If there is one dish that has transcended all age barriers and has my guests asking for more, it’s the chocolate pudding. Barring one or two occasions, I have never gone wrong with it. I can’t claim to have created this dish but I can’t even exactly remember from where or from whom I learned it. I have been making it for the last 25 years. It was a must and a big hit at my children’s birthday parties. May be my dear friend Shalini Bhatia could help me with this because I have a faint feeling that we might have learnt it together at “Mrs. Singh’s Cookery Classes” where our mothers sent us with the hope that we would use our summers constructively. Whether we did, is another story!
Ingredients
Milk (preferably full cream) – 1.25 litres
Custard powder – 4 heaped tbsp.
Cocoa powder – 4 heaped tbsp.
Sugar - 2 tbsp.
Glucose biscuits – 3 packets (small sized)
Garnishes – Black grapes/Gems/any other
Method
Pour 1 litre milk in a heavy bottomed pan and put it on heat. Keep a watch and stir intermittently as we do not want the milk to either overflow or get burnt.
Take the remaining milk in a large bowl and add about 4 heaped tbsp. of custard powder. The milk should either be cold or at the room temperature. Along with that, add about 2 tbsp. of cocoa powder and mix well. There should be no lumps left and the mixture should be smooth.
Once the milk that is on heat nears boiling temperature, reduce the heat and add the custard powder-cocoa mix into it.
Add sugar and stir continuously till the entire mixture reaches a thick custard-like consistency.
Switch off the heat and do the plate test. Drop a tsp. of the custard on a flat plate. The custard should not be runny but should spread itself slowly on the plate.
If required, add more custard powder but remember, it should be mixed well in cold milk before adding into the chocolate custard.
Once the chocolate custard is ready, keep it aside for cooling.
Now, take the biscuits from the three packets and pound them into a powder. You may use a blender for this purpose but the biscuit mix should not become too fine. There should be some tiny coarse pieces of biscuits as well.
Add 2 tbsp. of cocoa powder to this biscuit powder and mix well. Keep aside.
The quantities mentioned in this recipe are sufficient for a 2. 5 inch deep serving dish of 9 inch diameter. Gather the pudding dish in which you plan to serve the dessert, the chocolate custard and the biscuit mix and get ready to assemble your dessert.
Start by putting a thick layer of the biscuit mix at the bottom of the dish. Top it with a layer of the chocolate custard in such a way that the biscuits at the bottom should not be visible through the custard layer.
Next, add another layer of the biscuit mix and then top it with the second and final layer of the custard mix.
Remember: Divide the custard in such a manner that both the layers should be almost equal in thickness.
The last layer of custard should be covered with a fine layer of the biscuit powder. Spread it evenly and sprinkle some cocoa powder on top to give a smooth finish to the top layer.
Garnish your way using black grapes, colourful gems or any other sprinklers that you may desire.
Keep it to set in the fridge.
Serve chilled but not frozen.
While serving, ensure that you cut through all the layers and then serve.
Hope you enjoy trying out this recipe as much as I enjoyed sharing it with you!


2 notes
·
View notes