
Last Seen Blogs

sovereignsystem
Sovereign

mayomhospital78
Top Maternity Hospital

cooki-13
Unbetitelt

notwonk4
notwonk4

Photo

r/MostBeautiful - Penguin polonaise in Antarctica
39 votes and 1 comment so far on Reddit
https://www.reddit.com/r/MostBeautiful/comments/ev9odp/penguin_polonaise_in_antarctica/
#marketingtips #socialmediamarketingstrategy #facebook
0 notes
Photo

r/MostBeautiful - Mount Shuksan, Whatcom County, Washington, United States
6,008 votes and 29 comments so far on Reddit
https://www.reddit.com/r/MostBeautiful/comments/ev8y3k/mount_shuksan_whatcom_county_washington_united/
#onlinemarketing #marketingtips #entrepreneurship #email
0 notes
Link
México, Mich (OC)
submitted by /u/Chrisibra007 [link] [comments]
#seo #socialmediaSEO #digitalmarketingstrategy #emailmarketing
0 notes
Photo
#onlinemarketing #digitalmarketingbusiness #commerce
0 notes
Photo
I will create a linkedin company page and facebook page
I will create a linkedin company page and facebook page
#digital #onlinemarketing #internetmarketing #socialmediamarketingstrategy
0 notes
Photo

Alfa Digi Marketing Training
Whether you’re a complete Beginner, Business owner or marketing professional looking to upskill, this digital marketing program is perfect for you to become a Digital marketer. This comprehensive course, delivered 100% online, teaches the key Digital marketing skills required for the modern workplace. Learn Google Tricks, social media marketing, and SEO, Analytics, mobile marketing and much more. We Provide the Best Digital Marketing Training Course in Indore. www.bestinternationaleducation.com/2020/02/alfa-digi-mark...
#digitalmarketing #onlinemarketing #webdevelopment #tiktok
0 notes
Photo
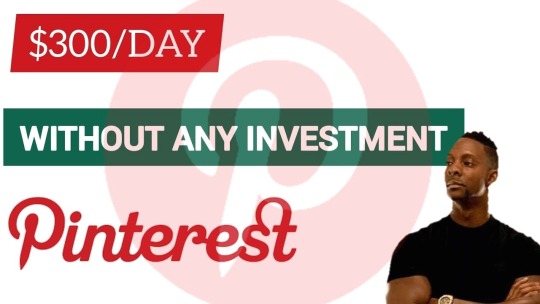
How Wesley Virgin makes $300/day on #Pinterest for free
I watched an interesting video on #YouTube of Wesley Virgin showing how he makes around $300/day on #Pinterest without spending any money. If you don’t know who that is, Wesley Virgin is an online entrepreneur, a fitness coach, and probably one of the most motivational guy you want to be around. Wesley is known particularly […]
https://socialtipster.co/make-300-dollars-day-pinterest/?utm_source=rss&utm_medium=rss&utm_campaign=make-300-dollars-day-pinterest
#smm #Digitalmarketing #marketingdigital #onlinemarketing #graphicdesign
0 notes
Photo
How to get more subscribers on #Youtube in 2020
Learn how to get massive subcribers quickly and effectively Have you ever had a #YouTube video get over 100,000 views? Are you curious what that’s like?
I can tell you…it feels amazing and a little bit surreal getting massive subcribers on #Youtube.
With 4 billion video views per day, YouTube isn’t just the third most popular site in the world. It has also quietly become one of the world’s biggest search engines. Meanwhile, Google has shifted its algorithms to favor videos, often putting YouTube videos near the top of its results.
Some have taken advantage of its incredible power to expand their influence and get more subscribers on Youtube. You could use the good old methods which work but takes more time. Alternatively, you can embrace modern technology and automate your youtube channel. This amazing tool will automate most (if not all ) of your youtube channel growth strategies. This affords you time to focus on content creation.
Dominate Youtube using Automation
Get massive traffic , viewers , and subscribers from your Youtube channel with JARVEE’s NEW automation tools. With JARVEE you’ll not only build and grow your Youtube channel faster than your competition, but you will join one of the most powerful trends in marketing of the moment: video marketing. If you’re not already doing Youtube marketing you’re missing out on a lot of easy to get traffic
More Subscribers, Viewers, and Traffic from Youtube
PS: Jarvee also supports: #Instagram , #Facebook , #Twitter , Quora , #Pinterest , Tumblr, and LinkedIn platforms
With jarvee you will enjoy the following feature in order to dominate Youtube;
Auto Follow Get more exposure and more subscribers by following other people in your target audience. They will notice your content and start following you by subscribing to your channel.
Auto Unfollow Use this popular growth tactic to unfollow people that you followed before but did not follow you back. This is youtube marketing 1 on 1.
Auto-Like This is a popular and effective growth technique for any social platform. You can either like your own videos in case you have multiple accounts or like other people’s videos to look like a regular user
Comment on Videos Leave thoughtful comments on other videos to get the attention of people in your target market and speed up the growth of your Youtube channel.
Like Comments Keep your followers engaged by liking the comments they leave on your Youtube channel. Or like comments on other videos to get noticed by prospects.
Full Browser Experience With this ingenious tool, your account will look more natural with random activity to simulate human behavior. Advanced Youtube marketing that only pros use
Auto-Watch Videos Set up this tool to automatically watch videos for you. You can use it to increase your video’s view count, or you can watch other people’s videos so your account blends better
Spin Syntax Support All the text fields are spin syntax ready to help you create unique messages. Use this so your activity will always look natural.
Proxy Support With JARVEE you can run each Youtube channel on its own HTTP proxy!
Try Jarvee for a week absolutely free of charge (no financial details required)
https://socialtipster.co/how-to-dominate-youtube-in-2019/?utm_source=rss&utm_medium=rss&utm_campaign=how-to-dominate-youtube-in-2019
0 notes
Photo
Best Tiktok bot in 2020 to gain 10k+ followers on autopilot?
What’s the best bot for Tiktok in 2020? Tiktok became so popular recently that most of us couldn’t wait for a Tiktok bot to come out.
At first, you didn’t need an automation tool to be able to gain a huge following on Tiktok, but as more and more people discovered the platform, just as it happened on #Instagram, gaining a massive following on Tiktok became harder.
Today, if you want to grow on Tiktok you’ll need to do quite a bit before you can start to see some meaningful results. This, of course, can be very time consuming especially when other areas of your business require your attention.
For this reason, a reliable Tiktok bot that can automate most of its features while keeping your Tiktok account safe from shadowbans and/or from getting disabled became necessary.
Jarvee became one of the first tools to offer automation for Tiktok.
For those still in the dark, Jarvee is currently the best automation tool for social media . As at the time of publishing this article, Jarvee allows you to automate the following platforms:
#Facebook , #Instagram , #Twitter , LinkedIn , Pinterest , Tumblr , YouTube , Quora , and now Tiktok . You can now get a 5-day free trial of Jarvee right from their website . They don’t even ask for your credit card or other payment information. You’ll only need an email address!
Related: How to send auto Direct Messages on #Twitter . The tools menu on Jarvee for Tiktok presents us with the main options available. This may change with future updates as Jarvee usually gets updated almost on a weekly basis.
The current features of this bot for Tiktok include: Follow ; Unfollow ; Like ; Comment ; Like Comments , and Full Browser Experience .
Let’s have a closer look at each of those features:
Follow tool
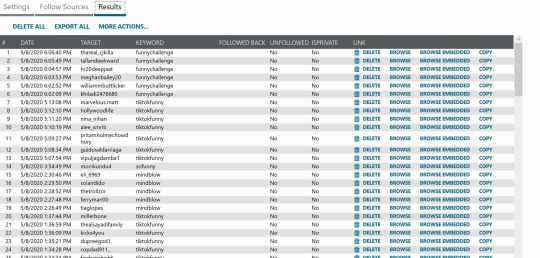
We have 3 tabs under the follow feature: Settings; Follow Sources and Results. All three are self-explanatory, so I’ll just share the screenshots.
Follow Sources
I’m using the Follow users by hashtag search options, so, my Results screenshot will reflect that.
Results
Let’s move on to the next main feature.
Unfollow tool
I like to give it a few days after following a user before unfollowing them. Here, I have it set to unfollow after 5 days.
Related: Best Jarvee #Instagram settings Like tool The Like feature has 3 tabs under it: Settings; Sources and Results
Sources
Comment tool The comment feature has 3 tabs under it: Settings ; Sources and Results .
Sources
Like Comments tool Here too we have 3 tabs: Settings ; Sources and Results.
Comments Sources
Full Browser Experience This is a feature in this bot where apart from performing the main Tiktok activities, the bot will also visit random websites so as to appear human-like.
Getting Started With Jarvee Tiktok Bot It’s pretty easy to get started with this Tiktok bot. Just head over to Jarvee for Tiktok , register, and download this automation tool. Once you’ve registered, an email with your log in details will be sent to your email.
Your email will be your login username and your password will be provided in the email.
Once you’ve downloaded and installed Jarvee, log in and start adding your Tiktok accounts. Here’s how to go about it:
Click on SOCIAL PROFILES on the vertical bar to the left then click on ADD PROFILE and then select Tiktok :
Next, add your Tiktok username and password and then hit VALIDATE . Wait for it to say VALID and then you can go to the TOOLS menu to start setting up the activities you wish to automate.
When you’re running a Tiktok bot for the first time I recommend that you start with very low settings and gradually increase them day by day until you reach your preferred number of activities per day.
Leave any questions you may have in the comments section below and I’ll get back to you as soon as I can.
Related: Best #Instagram unfollow app Until next time!
https://socialtipster.co/tik-tok-bot/?utm_source=rss&utm_medium=rss&utm_campaign=tik-tok-bot
0 notes
Link
How to Set Up #Instagram Gift Cards Stickers and food order button 2020
How to Set Up #Instagram Gift Cards Stickers
#Instagram now has the option to offer gift cards to your audience. Have you tried to set them up and it didn’t quite work out right? Don’t worry, in this article, we will share all the things you need to know to set up the gift card feature.
The gift card and similar order food feature was launched by #Instagram in order to help businesses find other ways to generate revenue using #Instagram.
You can either add a sticker to your stories or you can add an action button to your profile and we’re going to explain how both of those work. Before we get started, there are a couple of things you need to know. First of all, the gift card sticker is only available to business profiles, not creators or personal profiles.
Secondly, they have to be digital gift cards. If you don’t already have these set up you can go to any of #Instagram’s approved partners like Square or Raise and set up your digital gift cards.
Why and where should you buy #Instagram followers in 2020? [Non Drop!]
Once you’ve set up that third-party integration for digital gift-card, you’ll get a specific link for that feature and that’s what you’re going to add to your Instagram profile for either the sticker or the action button. If you already have digital gift cards set up through one of these third-party tools just log in, snag that link that you need and you’ll be ready to go.
Now that you have your link for your digital gift card, if you want to add it to your story as a sticker, you’re going to launch your story just like you normally would.
How to Optimize Instagram Posts for More Engagement in 2020
Build it with any texts, doodles, gifts, any of that sort of stuff that you want. Then you’re going to select the gift card sticker from the sticker tray. When you do that, it’s going to open a new screen to allow you to select the third-party tool for your digital gift cards. Select that partner and that will take you to another screen where you’ll be prompted to paste your shared URL.
Go ahead and paste the link that you just snagged from the third party tool, put it in there, hit the save or the checkmark option and you’re ready to go.
Now you’ll see your sticker as it’s going to appear on the story but before you move on you actually have the option to do a little formatting. You can tap on the little colored wheel at the top of the screen. That will allow you to change the color background of the sticker.
When you’re all set, go ahead and tap done and it will add the sticker to your story. From here, you can pinch and zoom, you can drag and move around, put it wherever you want, within your story and you’re all ready to go.
Instagram account disabled for violating terms 2020 – How to get it back
The order food sticker works very similarly to the gift card sticker. You can use third-party approved tools like Chow Now,Uber Eats, GrubHub and others. You choose the order food sticker from the sticker tray on a story, you choose your third-party approved partner and then you paste in the partner link that you have set up and then, you have your sticker ready to go. Of course, you’re going to want to check your insights to see how this story is performing.
Just like any other story, you can open it up and view your insights and view sticker taps or any other navigation or actions taken on that story. Just make sure you check them before the 24 hours expire because any archived story doesn’t always have all those same details.
So that’s how the Instagram story sticker works. We also mentioned that you could add an action button to your profile. It works just like the sticker in that you’re going to need the partner URL to set it up. To set up the button, you’re going to go to your profile on Instagram, tap on edit profile and then scroll down to the option for action buttons.
20 Crucial FAQs about Instagram Automation on Jarvee
From the action button options, select a gift card option, paste in your partner URL, click on the checkmark and you’ll be back on the add sticker screen. You’ll notice at the bottom, there is an option for buttons active on your profile. You’re going to select that option.
When you tap on that, you can choose which of those various action buttons you want to enable on your profile. If you don’t select one of those even though you’ve set up the partner URL, the action button won’t actually appear on your profile.
Select the button you want tap the checkmark, save your changes back through the edit profile and then, there you go. The action button is helpful because it lives on your profile at all times, which means, anybody can make use of it at any time, not just when it’s active in your story.
Ways you can get even more attention on those stickers or the action button
Here are some ways you can get even more attention to those stickers or the action button. If you’re using the order food option, consider offering a coupon code. It will incentivize people to use it immediately and it will allow you to have better tracking in terms of how that sticker and action button are performing for you.
Also, many people aren’t really familiar with how these stickers work and may not be super confident going through the process of clicking on them to order food or buying a gift card.
Offer some help, some information, some tips about how it works. Throw some emojis in there, make it fun, so they feel a little more comfortable following through with that action. Because Instagram stories only last 24 hours, we want to get the most use as possible out of that sticker.
So try using it multiple days in a row or even multiple days within a month to give your audience more familiarity and confidence in using that function.
We all love some good user-generated content especially as a business that has their gift cards or food available.
So if someone has taken photos of your product or service, feel free to share those to your story as UGC, and add that gift card or order food sticker that way, so that people can see it from a different perspective.
In the interest of convenience, if you’re using this as a sticker on your stories, you can always add that to your Instagram highlights for ordering online or order now. Where people can navigate through those different options where you have that sticker and can immediately order that way as well.
0 notes
Photo
Flick Tech Hashtags Review: Is this the best ever hashtags tool for Instagram?
If you’re looking to grow on Instagram, you probably already know that hashtags are one of the best free tools that you have at your disposal on Instagram to attract new followers and more importantly, targeted followers that are highly motivated for your content and, your business.
Although most people know that, very few know how to use them effectively, and that’s exactly why I’m writing this review of Flick hashtags.
I get tons of questions in my email from people looking for advice on how to conduct hashtag research and a better and more time-efficient way to do it.
That’s exactly what we’re talking about today
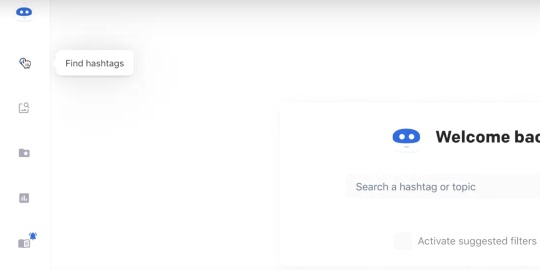
We’re going to walk through a tool which is my favorite hashtag research platform called Flick.
This entire article is going be dedicated to showing you behind Flick and explaining why it’s so valuable, how much time it can save you and how much extra reach you can be getting from hashtags with all the tools that Flick provides.
Let’s dive right in to the computer and show you why Flick is awesome!
The URL is flick.tech . The landing page is super aesthetically pleasing, a very simple clean-cut design, which is consistent throughout.
We’re first going to log in. If you haven’t registered already, do it quickly so you can catch up with the rest of us.
Your tools will be outlined to the left so you can find hashtags , find viral posts , your h ashtag collections (which will create in a moment), and then your analytics as well and then some resources.
So we’re going to start with finding hashtags because this is one of the most powerful tools that there is to do that.
When it comes to finding the right hashtags, it really comes down to understanding your niche and sub-niches that your content and business fall into.
For this hypothetical scenario, I am a fitness Instagram or just someone who focuses on physical fitness and workouts as well as diet and nutrition. Let’s say I’m a keto nutrition guy.
You can search through a topic. Let’s start with Keto then, say, Fitness then, let’s say Nutrition and then say, athomeworkouts.
In this example, I have at least outlined four niches and sub-niches that my content aligns very well with and that I can use for targeting purposes.
This is why the Flick Hashtag tool is so special This where the magic really happens. You now have the ability to add hashtag filters. Once you’ve connected your account to Flick, you can actually activate suggested filters and this will automatically do it based on your typical engagement levels.
For the sake of this exercise, I’m going to show you exactly how you can do this yourself. What you do is you would add a new filter and through you’re going to say Ave. Likes , as an option, and then Media Count.
Media Count is how many other posts are assigned to that hashtag and then Ave. Likes is the average number of likes that a piece of content receives that ranks in that hashtag.
So, to rank in a hashtag it means that you showed up in the top nine posts of that hashtag. That’s what’s called ranking in a tag.
Why the Ave. Likes is so important is that if you fall within that level, if you’re within that range, you have a more likely opportunity to rank within that tag and get the benefits that come from that.
That’s why doing this research specific to you and your account is so important. That’s why Flick makes it so easy.
For this hypothetical scenario let’s say we never get less than 100 likes and then we don’t get more than 400 likes. We’re going to apply that filter.
Flick will automatically adjust the tags that it suggests for you, that’s why this is a completely custom-tailored experience. It is going to suggest tags that are associated with the niche or sub-niche that we outlined earlier.
We can then start to create collections. Flick shows you some really useful information right here. For instance, competition score is the level of competition that you’re going into if you’re trying to rank on this tag which is super important to know.
The other metric that they show you is your potential reach . You want to keep that in mind when you’re formulating your strategy and the tags you’re going to use on a specific post.
So what you want to do is to put a mix of low, medium, and high competition tags. You can actually so easily just do that right here.
Okay, we’re going to start building some collections here. It’s as simple as just looking at the information that Flick gives you and then starting to compile them all together.
Keep the relevancy of the specific piece of content in mind. The more relevant your tags are when combined with the right strategy, the better your results are going to be.
Another reason why Flick is so awesome is that, normally, to find all these would be a lot more labor-intensive, and to have these metrics out here in front of you can save you so much time.
Another question I get asked about all the time is how many tags should I be using on a specific post .
I view it as an opportunity that if I’m throwing a dart against a dartboard I would want all 30 shots if I have them. A lot of people say you get penalized if you use all 30 or you get flagged by Instagram.
That’s just simply not true and I’ve seen no information to back that up so use 30 if you can find 30 solid tags.
At this point, we’ve now populated our first search with 30 tags and we’ve clicked all of them and added them to the side which is going to then allow us to put them into a collection.
As you can see through our quick research again I did this very fast. It speaks to the efficiency of Flick but you probably want to spend a little more time when you’re doing this.
Once you create this collection you now have it at your disposal whenever you want to use this collection again.
Flick also has a companion mobile app where you can access your collections for super easy copying and pasting when you’re posting onto Instagram.
All right, so, we just created a collection based on our filters. Now let’s go back in and look under the next feature that I want to show you.
Flick Viral Post Finder
Alright, so the next tool I’m going to show you is their viral post finder . This tool is super important super, valuable for a ton of reasons that I’ll explain.
Again, let’s use the same example. Let’s search up viral posts within Kito . You’ll see the type of content that it’s doing well with the hashtag Keto .
This is a super important tool because it allows you to get creative and figure out what’s working at the time.
There’s such a term as social listening and what that is, is actively looking at what’s currently working on the platform and what people are resonating with.
What this tool does is it allows you to do that in real-time and actually have a visual representation of what’s working on Instagram associated with your niche and sub-niches so you can actually see the content right here.
Say you’re hard-pressed for content ideas. You can literally just type in the tag you’re targeting and boom you have all kinds of ideas that you could replicate which align with your brand, your messaging, and have a good opportunity for it to go viral or perform better than your typical posts.
Flick Hashtag Collections
Now let’s move on to the next tool which is hashtag collections . This is simply where you can go and access all the collections that you’ve made. You can see right here anything that you’ve made in the past and easily access that as well and see the current levels of things because hashtags are a fluid thing. They’re changing all the time based on feedback and user activity.
Another thing I hear all the time is I had tons of success using this one group of hashtags and now I get nothing from it . That speaks to exactly what this feature is about. These things do change and you want to stay on top of them to get the best results.
You can create all kinds of collections right here and you can view them and all the data that goes along with them.
Flick Analytics
The next thing we’re going to dive into is the analytics section of Flick, and something that I think is super cool is it provides all of your data on your content right here in front of you in a very easy to consume way.
Once you connect your account Flick will actually track to see which hashtags you ranked in. Why this is important is because then you can go back and use that tag again and again and actually refine down to just tags that you’ve had great success in.
You can replicate that moving forward with a more refined approach.
Flick Resources
Alright, so, now we’re into the resources section. There’s a ton of free resources that Flick provides to all of its users to best use hashtags because if you find great success using tags, you’re going to stick around, you’re going to keep using their service and you’re going to tell a lot more people.
One more thing I want to mention about collections is, a lot of people aren’t aware that there are actually banned hashtags that you do not want to be using.
Flick will actually highlight these tags and tell you which ones are banned so that you don’t use them in the future. That’s another huge benefit to using a hashtag tool like Flick.
That was a brief review of Flick, there’s a lot of tools at your disposal there so I hope you captured how you can go about using that and actually maximize your use of hashtags again if you want to.
Get a free week trial of Flick and see the benefit of using hashtags for yourself.
How to get 71k likes on a single photo with just 15k followers
https://socialtipster.co/flick-tech-hashtags-review/?utm_source=rss&utm_medium=rss&utm_campaign=flick-tech-hashtags-review
0 notes
Photo
How to Use #Instagram Tagging for More Exposure in 2020
How to Use #Instagram Tagging for More Exposure
Hashtags have long been recognized, as the popular way to get exposure on #Instagram but did you know there’s actually a number of other tagging options available to grow your followers and build your account? We’re going to talk about the different types of tagging options available on #Instagram including how to tag another account, how to add location tags, and even how to add product tags. We’re only talking about how to tag regular feed posts on #Instagram, not #Instagram stories. Although, there are some similarities, and things you can do over there. Let’s break down some funky terminology on #Instagram.
Tagging vs @mentioning an account There is tagging an account and @-mentioning an account . These often used interchangeably but they’re actually different. So let’s break that down, @-mention is where you put the @ symbol in front of somebody’s username whether that’s in a comment, in your caption, to mention them and get their attention.,Tagging someone on Instagram is where in your original post, you can add a tag and tag a number of other accounts, in that image. Only the content creator can tag people in the post itself, but an @-mention can be done on any content by anyone.
How to tell if someone blocked you on Instagram in 2020
Why tag instead of @ mention an account You may be asking why you would want to tag an account if you could simply @-mention them. Well, there are two reasons,@-mentions show up in the regular notification feed and can easily get lost since that notification feed only shows the 100 most recent notifications. So if that account got 200 notifications, they didn’t see the first 100. They only saw the last 100. Tagging that account, however, shows up in a separate notification.
This allows you to stand out against all the other notifications and makes sure that they saw your content, And that brings me to the second reason. When an account is tagged on Instagram, that content is actually housed in a separate tab, on that person’s Instagram profile. That tagged content basically becomes a giant gallery of user-generated content about your brand. All of this being said, there is a downside to only tagging an account on Instagram, and not @-mentioning them.
The tag on a post does show all of the accounts tagged but most users won’t tap on the content to see who is tagged in it and they won’t be able to see the accounts that were mentioned. In this case, it’s best to @-mention all of those tagged accounts in the caption as well so that the average user reading it, sees those usernames too. Let’s now take you through the steps to tag another account on your Instagram content.
To add a tag to a new post that you’re uploading to Instagram, upload your post like normal, whether it’s a photo or a video add your filters, any edits, and when you get to the caption screen, you will see an option to tag people. If you’re uploading an image, tap anywhere on the photo and you will see the pop-up box appear where you can type in the name of the person you wanna tag. Select them from the list and the tag will appear.
You can even drag and move around that tag, so it’s right over their head, or you can put them off to the side if you don’t want to cover up your image. If you’re uploading a video, tap on the Tag People option and you’ll be able to add the tags of people in a line below the video. To add multiple people, simply tap anywhere on the image again and you can add another person. You can tag up to 20 people per post. When you’re done tagging people, tap on the checkmark in the upper right corner and that will return you to your regular upload screen.
Continue loading it like normal and you’re all set. If you wanted to go back and edit an existing post already on your Instagram profile, you can do that too. Navigate to that piece of content in your Gallery, tap on the three-line button in the top right corner, and select the Edit option. On the image itself in the lower-left corner, you’ll see the Tag People option. Simply tap on that and follow the same steps to type in the name and select the person that you want to tag in the image, save your changes, and you’re all set.
Remove your tag from other peoples content Now that you know how to tag somebody in a post, chances are you may get tagged in posts as well, but what if you don’t wanna be tagged in that post content? No worries, there’s a quick and easy way to remove your tag from that content. Go to the post you’ve been tagged in, at the very top, you’ll see the three-dot button, Choose Hide Options, and then tap on ‘Remove Me From Post’. Then your tag is removed and you won’t appear in that content anymore.
When you should and shouldn’t tag people in a post on Instagram That leads us to when you should and shouldn’t tag people in a post on Instagram. You should only be tagging people or brands that are actually in that post. We don’t want to tag a bunch of people in a post in which they do not appear simply to get their attention. This is frowned upon and may get you flagged for spam, and actually hurt your chances of success on Instagram.
Location tags Now that you understand how to tag accounts, let’s talk about location tags, When you tap on Tag Location, the location options will default to what is close, in and around you. If that’s not the location you want to tag, simply start typing in the location you want and you will see a list of options that match appear. Select the location and you’re all set.
Once you upload your Instagram content, you will see that location appears right below your username. That’s actually clickable, Someone can tap on that and navigate to search results for that location.
Why use location tags Why would you want to use location tags? The primary reason is searchability. People on Instagram are looking at locations all the time for things to do or what’s going on or what a business looks like. So if you’re tagging that location in your content, there’s a good chance that you could show up in those search results and other people will see your content related to that location. If you’re a local business and you’re creating content and tagging your business location, it is important to encourage your customers to tag your business location.
This will give anyone looking at that location a wider perspective of what it’s like. If your business doesn’t have a physical location, you can use tags in and around the vicinity where you live, where you travel. If you attend venues, events, or anything related to your business, that is at a physical location you can tag those locations too.
I don’t recommend adding a location to every single post all the time, but when doing it strategically it can help boost that exposure to more people. If you already have your store set up, you can add product tags to your Instagram posts, that have your products in them. Those posts have a little shopping bag icon on them, so people know that they’re shoppable and by tapping on the photo itself, they will see all the product information and can navigate through the shop to complete the purchase.
Now that you’re familiar, with all these different types of tags, there’s one caveat, that we want to make sure you’re familiar with. Your Instagram account has to be public in order for tags to really work. If you tag an account and your account is private, and that account isn’t following you, they won’t be able to see your content that’s been tagged.
How to watch blocked youtube videos in 2020
How to combine all of these tags for maximum exposure All right, it’s time for that bonus, how to combine all of these tags for maximum exposure. Let’s say you’re out at a business or a restaurant. You can tag the business in the photo itself. You can @-mention the business in the caption, so all your friends and family can see that @-mention, and you can add the location tag to show up in possible search results. This gets you maximum exposure from searches, friends, family, and the brand that you’ve tagged.
But what if it’s your own business you’re trying to promote, can you still use all these tags? Yes, you can, maybe do it a little conservatively, but you can still technically tag yourself in your content. But of course, we can’t neglect our favorite tag, the hashtag, which is known for growth, and exposure opportunities on Instagram, and if you wanna get a hold of my super-secret recipe, that I tell everybody, with proven success for growth and exposure, check out this amazing social media automation software .
How to get more subscribers on Youtube in 2020
https://socialtipster.co/instagram-tagging-more-exposure/?utm_source=rss&utm_medium=rss&utm_campaign=instagram-tagging-more-exposure
0 notes
Photo
Jarvee Alternative in 2020? We’ve found the best!
Best Jarvee alternative for 2020 JARVEE is a Social Media Automation Software that enables marketers and entrepreneurs to share their content across all the social networking platforms, like Facebook, Twitter, Google Plus, Tumblr, LinkedIn, and Pinterest, all from one single and easy to use dashboard.
Even more, JARVEE’s growth hacking tools help you grow your accounts and reach your audience much faster than with traditional methods.
With #Instagram being the most utilized and popular social media platform worldwide, keeping in touch with everyone who represents a point of interest for you might be time-consuming. Especially if you are new on #Instagram.
Moreover, if you’ve been with Jarvee for a while now, you may have heard of all the #Instagram algorithm updates that are blocking most automation tools.
Moreover, jarvee is an aggregate tool for most of the social media platforms combine into one. In this regard, it may seem costly if you want to focus on just one platform (in our case #Instagram ) – so you might be interested in trying an alternative.
Related: Best #Instagram Hashtags For Photographers Ingramer as a Jarvee alternative tool for #Instagram As a result of our extensive research, we’ve landed on this jarvee alternative tool specifically for #Instagram users who wish to leverage the numerous benefits that come with automation. Let’s dig in deeper, shall we!
Ingramer provides full automation of likes, follows/ unfollows on your behalf . The service starts performance smoothly according to Instagram limits .
Ingramer synchronizes your promotion for you to effectively reach your target audience. Ingramer uses 3 promotion strategies
Hashtags Location Username Ingramer is based on recent AI technology that facilitate the most appropriate targeting that is aligned to your unique Instagram growth strategy.
It enables targeting by specific hashtags that your target audience uses, by the location which they use in posts and the list of usernames that you make (that can be your competitors, for instance).
Related: Best Instagram Unfollow App Moreover, this jarvee alternative avails you the option to add certain hashtags, locations, and usernames to the blacklist so that Ingramer won’t target its actions toward such accounts. Ingramer imitates a real person’s behavior, this is essential in ensuring your Instagram account is not flagged or shadowbanned or worse banned!
On your dashboard you can turn on/off the next features: like, follow, unfollow.
There are 4 methods of unfollowing:
Ingramer is able to automatically unfollow: -New Ingramer follows -New, not mutual Ingramer follows -All accounts -All not mutual accounts
Note that once you enable Unfollow, it starts to unfollow only those accounts that system was following 3 days before and more. On the fourth day, Ingramer unfollows those who it followed the first day, on the fifth those who followed the second day, and so on. You can choose which accounts you want to unfollow in your settings.
Related: How To Remove Followers On Instagram What tools does Ingramer provide? The main feature of the service is a great combination of simplicity and effectiveness.
The system uses new automatization technologies, that make the service one of the fastest in the market. in 2020 Ingramer stands out among the lot for Instagram automation with auto likes, follows/unfollows, free hashtag generator and personal analysis.
Ingramer smart algorithm completely simulates a real person activity and brings to the account only active followers and customers.
If you are not familiar with such services, you can ask the technical support team for help. Ingramer can also make an analysis of your account for better promotion on Instagram.
If you’d like to learn how to automate Instagram yourself, in a way that isn’t spammy, then this Automation tool is for you. Ingramer provides 3 basic smart tools which help you to grow your Instagram account:
Promotion by auto l ike/ follow/ unfollow Targeting by hashtags, locations, and usernames. Advanced filters and Statistics provided. Auto Direct Messages Sending auto DM to all existing followers or to the new ones. Try 10 free messages. Scheduled Posting Ingramer offers you Posts and stories planner at the scheduled time, saving you priceless time to focus on content creation Instagram automation saves you valuable time to focus on more important roles such as content creation and targeting. It follows then that you need to leverage the exponential benefits accrued with automation to achieve your Instagram growth strategy
Related: Who Unfollowed Me On Instagram?
https://socialtipster.co/jarvee-alternative/?utm_source=rss&utm_medium=rss&utm_campaign=jarvee-alternative
0 notes
Photo
7 Top Event Marketing Strategies on Facebook 2020
7 Top Event Marketing Strategies on Facebook
Today, I want to share with you seven-event marketing strategies on Facebook, increasing the attendance of your live event whether it’s an online live event such as a webinar or a live event such as a seminar.
There are a few ways you can use social media to promote your live event either through paid advertising, organically leveraging the different marketing features on Facebook.
#1 Update your Facebook page banner The first of our event marketing strategies on Facebook is to update your Facebook page banner. Since Facebook now allows you to have a video banner instead of a static image cover, it is important to leverage this feature to help promote your event.
When creating your video, make sure you follow the size recommendation. Ideally, your cover video should be 820×462 pixels. In terms of length, it should be from 20 seconds to 90 seconds long.
If people view your video from a mobile device though the size of the video won’t show so make sure important elements such as text overlay are closer to the middle of the video so it’s not cut off when watched from a mobile device.
The video should include all the important information about your event such as the time, location, the date, the benefits of attending, who will be presenting, and who the event is for.
Make sure you also add a call to action asking people to register for the event. You can also redirect the call-to-action tab below the banner to the registration page.
How to Use Facebook Hashtags to Increase Your Reach in 2020
#2 Publish posts about your event on a regular basis The second of our event marketing strategies on Facebook to promote your live event is to publish posts about your event on a regular basis. Your post should not just be about promoting the event, but also build momentum about the event. If a new speaker has been confirmed and announced it and share information about the speaker and what makes them special.
Other posts that can help build momentum is sharing behind-the-scenes pictures of videos leading up to the events. For example, if it’s a live event you can record the event space being prepared and share it as a post.
Other posts you can publish can be short videos giving insights on what will be shared either from you, the organizer, or from the speakers. If your event includes guest speakers, make sure that any post you publish also includes a call to action redirecting people to register.
#3 Leveraging influencers The third of our event marketing strategies on Facebook to promote your live event is leveraging influencers. Influencers are people in your industry who have large and engaged audiences as well as authority and credibility.
This means you can ask an influencer to market your event. You can either pay influences a flat fee or commissions or negotiate something else to make it a win-win situation for both you and the influencer.
In order to identify online influencers, you can start by performing a simple google search, for instance, if you want to find influencers in the makeup industry look for makeup tutorial bloggers.
Once on the blog make sure it is being updated regularly and that the content is aligned with the values of your brand. If the blog is being updated regularly that means it’s still active. If so explore the person’s social media accounts such as Facebook, Twitter, and YouTube.
Their audience video views and engagement rate must be much higher than the average audience size of social media users in your industry. You could consider partnering with them to promote your event.
Get more followers on Facebook in 2020
#4 Use live videos The fourth of our event marketing strategies on Facebook to promote your live event is to use live videos. One of Facebooks’ advantages is Facebook’s live streaming video functionality. Facebook users can find your live videos in the newsfeed if they are your friends or follow you or can find your live videos broadcast from your business page.
If they are fans of your page Facebook, line is a good tool to use because Facebook prioritizes live videos in other words Facebook will show your live broadcasts in the newsfeed of more people and they will show your standard posts.
Make sure that your live video includes all the important information about your event such as the time, location, the date, the benefits of attending, who will be presenting, and who the event is for. Make sure you also add a call to action asking people to register to the event.
Get More Instagram Story Views in 2020
#5 Use Facebook stories The fifth of our event marketing strategies on Facebook to promote your live event is to use Facebook stories. A Facebook story is a new visual way to publish a post on Facebook and is very similar to Instagram stories . A Facebook story can be a series of photos ,videos or animations and once posted they disappear after 24 hours.
Since they disappear after 24 hours, you can use them to promote your events without cluttering your Facebook profile. Your Facebook page with promotional posts plus Facebook stories can be much more engaging than standard posts because they’re visual and you can add different types of effects and filters which makes your content much more interesting to viewers.
When creating your story make sure it includes all the important information about your event such as the time, the location, the date, the benefits of attending who will be presenting and who the event is for and make sure you also add a call to action asking people to register to the event.
Once you are ready to publish a story follow these steps:
Through the Facebook app on your phone, you can directly post Stories by:
Going to your brand’s page Scroll down to where you see ‘Your Page’s Story’ or ‘Publish’ Click ‘Create a Story’. (If you do not see this option on your page yet, you might have to download Facebook’s Page Manager app instead) Create your Story by taking photos or video, or upload photos and video from your Camera Roll You can add filters and text Once you’re done, at the bottom of your screen, click the ‘Next’ button You will be prompted to add it as a Story, or as a post to your page Select “Your Page’s Story” and click the arrow button at the bottom #6 Use Facebook Ads The sixth of our event marketing strategies on Facebook to promote your live event is to use Facebook Ads. When you choose this option, you’ll have to decide which campaign objective to select among the 11 different campaign objectives available.
The most common ones you select when promoting an event is a conversion campaign objective as it will allow you to see exactly how many registrants you’ve gotten as a result of your ads.
Make sure you install the Facebook pixel on both your event registration page and on the Thank You page in order to track your conversions.
Flick Tech Hashtags Review: Is this the best ever hashtags tool for Instagram?
Steps to set your Ads Campaign Step 1: Select Your Campaign Objective Now, on Facebook, you can choose from a handful of campaign objectives that match your advertising goals. For example, if you are looking to drive traffic to a physical location you would use “Local Awareness”. If you’re driving traffic to a website, you want to use “Conversions”.
Here’s the complete list of Facebook campaign objectives available:
Brand awareness Local awareness Reach Traffic Engagement App installs Video views Lead generation Conversions Product catalog sales Store traffic Messages How to choose your campaign objective? Choosing your objective is important, as Facebook uses this to determine other elements of your campaign such as available ad formats, bidding options, and the way it optimizes the campaign.
You should always select the objective that best reflects your desired outcome for the campaign. If you are promoting a website, you will most likely be running a conversions campaign. That’s the campaign type we will create today.
If your campaign’s end goal is to for example submit information to you via a lead form, then you should select the lead generation objective instead.
So, we’re creating our conversions campaign.
Step 2: Give Your Ad Campaign a Name After we have decided our campaign type, let’s give our campaign a name. This may seem like a fairly simple step, but it is actually very important to adopt useful naming conventions for your campaigns when you start with Facebook advertising so you can easily organize your campaigns as you scale and run more of them. It also sets you up for hyper-efficient reporting later on when it comes time to analyze your results.
For example, you should always include the date range the campaign will be running in your campaign name. Depending on whether you are advertising for your own business or for clients, you can add more elements in your campaign name:
Client name/ website Target Audience/ Location Custom Audiences Creative Type ( Video? Carousel?) Facebook Page, etc Hopefully this gives you some good ideas to keep your campaigns organized and simplify reporting later on with custom campaign names. After you select your objective, you can also choose to create a split test on the campaign or optimize your budget.
Creating a split test, or an A/B test allows you to run experiments and collect data that shows you the best performing creative, placement, audience and delivery optimization strategies Lets move on and set up our audience!
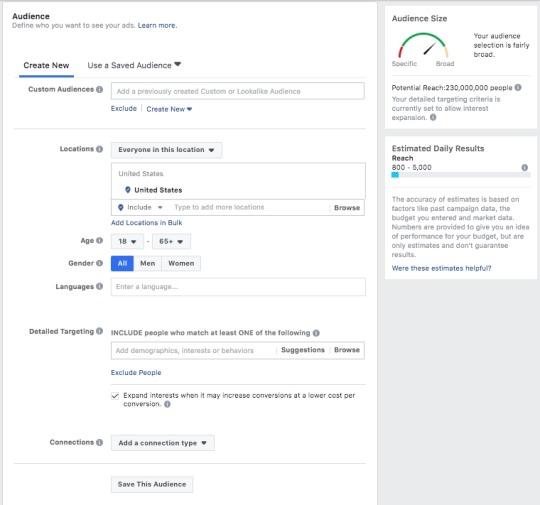
Step 3: Set Up the Audience Targeting Facebook offers a lot of powerful ways to target audiences.The next step is where you will create your adsets, or audiences.
You should recall your main ads manager screen has a campaigns tab, adsets tab and an ads tab.
The ads and adsets are contained within your campaign, with the ads containing a specific combination of creative and an adset containing a specific audience and budget.
In this phase of your campaign setup, you have two options:
Create a new Facebook target audience Use a Saved Audience Custom or lookalike audiences are another extremely powerful targeting option for you. With custom audiences, you can create audiences based on your website traffic with something called the Facebook Pixel . The pixel allows you to build audiences in addition to track events “conversions” that occur on your website, so this is something you will want to install immediately if you haven’t done so already. You need to create these custom audiences from the assets -> audiences section of your ads manager. They cannot be created during campaign creation.
Now lets fast forward to our audience. This section looks like this:
As you build your audience, Facebook will display your estimated daily reach and tell you if your audience is too big, too small or if it’s just right using the meter. You can target “likes” or interests on Facebook, behaviors or demographics, and create very specific audiences to target in your campaign.
Setting up the right Facebook target audience is of unparalleled importance for the final results of your advertising, and we’ll discuss more about how to create custom or lookalike audiences later on.
Right now, let’s keep on walking through the rest of the Facebook campaign setup.
Step 4: Set Up Your Ad Placement By default, Facebook will have “automatic placements” selected which can include Facebook, Instagram and Audience Network, but generally will use the placements optimized to give you best results. You can also choose to edit your placements if you have some data on what placement works best for you.
The full list of placements are:
Facebook
Feed Instant Articles In-stream videos Right column Marketplace Stories Instagram Feed Stories Audience Network
Native, banner and interstitial In-stream videos Rewarded videos Messenger Inbox Sponsored messages
While Facebook does a pretty good job auto-optimizing your ad placements, our Facebook ad cost data shows that the cost-per-results can differ deeply, depending on the placement you’re using. This is why split testing many elements of your campaign is extremely important to do. You need to know where your customers are, and meet them there.
How to select your Facebook ad placements? If you’re setting up your first campaign, we recommend that you use the Automatic Placements.
However, if you’re trying to get people to convert on your website and it’s difficult to navigate on mobile, de-select the Mobile Newsfeed, Instagram, and Audience Network placements.
Here are the ad placements recommended by Facebook for every campaign objective:
Brand awareness : Facebook and Instagram Engagement: Facebook and Instagram Video views : Facebook, Instagram and Audience Network App installs : Facebook, Instagram and Audience Network Traffic (for website clicks and app engagement): Facebook and Audience Network Product catalog sales : Facebook and Audience Network Conversions : Facebook and Audience Network Step 5: Set Up Your Facebook Ads The actual ads are what users on Facebook will see, and you want them to look good. This is the final step of your campaign creation process, you can select your preferred Facebook ad type and insert your ad images and copy.
There are two options here: you can either select an existing Facebook Page post or create new ads:
#7 Create a Facebook event The seventh of our event marketing strategies on Facebook to promote your live event is to create a Facebook event. Facebook events can be very powerful for businesses as they can be promoted to thousands of people in a very short space of time and help drive ticket sales and increase attendance rates.
What also makes Facebook events a very powerful marketing tool is the fact that guests can invite other people to attend so you can really benefit from word-of-mouth.
In order to create a Facebook event simply go to your Facebook page click on event then follow the prompts.
Thanks so much and feel free to leave us a comment or question in the comments section.
https://socialtipster.co/event-marketing-strategies-on-facebook/?utm_source=rss&utm_medium=rss&utm_campaign=event-marketing-strategies-on-facebook
0 notes
Link
How to Generate Leads With #Instagram Stories in 2020
How to Generate Leads With #Instagram Stories
How do I generate leads using #Instagram Stories? Don’t I need the Swipe Up feature and can’t I only have that if I have 10,000 followers? There are some very easy ways to generate leads even if you don’t have 10,000 followers yet. Today I will talk to you guys about some strategies and tools that you should be using to generate leads on #Instagram Stories so that you can create a community that’s thriving. As social media marketers, we all know that email marketing is one of the most powerful ways to generate sales and to really build your brand.
#1 Get your followers on your email list Because of that my first tip of the day has to do with using your #Instagram Stories to constantly remind people to get on your email list . I see so many people forgetting to do this and it really hurts my soul. Use your #Instagram stories to get people who are already engaging with your brand onto your email list. An example of a way to do this is to keep it really short and sweet. Even if you have a graphic that is story sized that you can quickly and easily upload into your #Instagram Stories.
Use that Swipe Up feature if you do have those 10,000 followers and just acting as a constant tap on the shoulder to be like, Hey, are you on our email list yet? Cause you should be.
How the Instagram Algorithm Actually Works in 2020
#2 Use the Questions feature So the second tip that I have for you is how to use the Questions feature which you can find in the stickers section of your Instagram Story. This one kind of has a few different ways that you can do this. The first one is by opening up the conversation with your audience using the Question Sticker simply by asking them to tell you more about a problem that they’re having that they’re struggling with that might be related to your industry or niche.
Essentially what this is doing is it’s getting a micro piece of commitment from them right? Which we’re always looking to get from our audience.
Another thing that it’s allowing us to do is really learn like what are people struggling with and how can we maybe use the information that they’re giving us to create better, stronger, marketing messages. And the third thing is that this is going to help you identify who your warmest leads are.
The people who are talking to you, the people who are stepping forward to have that conversation are likely some of your warmest leads. Another way you can use the Question Sticker is to use it to collect the contact information of your Instagram Story viewers. But as a disclaimer please make sure that you are abiding by the rules and regulations of your country and service provider.
Instagram insights explained 2020
#3 Tag bigger accounts whenever you get the chance The third tip is to tag bigger accounts whenever you get the chance and whenever it makes sense. The reason why you want to do this is that if a bigger account sees a piece of content that you’ve posted as valuable, they are of course going to repost it to their stories which are then going to get you in front of thousands and potentially millions of new people which will help your discoverability immensely.
One thing to keep in mind though is that you do not want to be spammy. This should be natural. This should be where you’re serving and adding value. It should not be a situation where bigger accounts are getting annoyed.
#4 Find new leads through your existing audience
Do you wanna know the best way to find new leads? Through your existing audience. You should make sure that when a client buys from you there’s a clear call to action that’s encouraging them to take a picture and celebrate their purchase and post it to their story and tag you. You would be shocked at how many business owners are still not capitalizing on this. Make sure that your new clients are posting and tagging you, encourage them to do it.
And then when they do post and tag you ensure to repost it to your own story. This is not only getting your brand in front of all of their friends, it’s also acting as social proof to your existing followers and showing them that there are other people who are loving your products and services and buying from you.
An additional tip is that you can prompt people to tag you in their stories from a variety of different places. You can remind them in your podcasts to take a picture of where they are when they’re listening. You could also send out a note whether that’s with a physical product or a digital product just reminding them to tag you and celebrate the purchase. Discoverability on Instagram Stories can be really difficult.
How to Use Hashtags on Instagram Stories in 2020: The Do’s and Don’ts
#5 Create content that’s impossible for your audience not to share Tip number five is to create the kind of content that’s impossible for your audience not to share. So when you’re creating content for your Instagram Stories really ask yourself, how can I create the kind of content that my audience is going to want to share with their friends? So you know that little paper plane icon at the bottom right-hand side of your stories. That is the icon that we want your viewers to tap on to share with all of their friends so that your account can be more discoverable.
In order to do that, we need to create content that people are actually going to share. What I want you to do because I know you’re a good marketer is think of all the different types of content that you’ve created in the past and ask yourself which pieces of content almost have that viral effect? The kind of effect where they’re getting a lot of responses and people seem very interested in it. That is the type of content that you need to be creating on your Instagram Stories.
So start with the content that you already know is going to be highly share-worthy. If you’re not sure what that is, just use the Question Sticker on your stories and ask people, what are you most interested to hear about?
How to get more visibility on Instagram in 2020
0 notes
Photo
Does #Instagram notify when you screenshot a story? (Update 2020)
Does #Instagram notify when you screenshot a story? Yes and No
#Instagram turns a big 10 years in 2020 and it’s safe to say that the social networking app has changed many lives during its existence.
The visual-centric platform that began as a photo-posting app has grown into a source of income for creators and a new sales channel for businesses.
Will users be notified when you screenshot a story While using #Instagram, you often come across the content you may wish to forward to other users, which means you need to screenshot the specific story, post or DM.
You, however, are faced with the dilemma of whether #Instagram notifies people when you screenshot.
In Feb 2018, #Instagram started notifying people every time their #Instagram stories were screenshotted.
While this has always been a common Snapchat feature, it was quite peculiar for Instagram users. This meant that stalking days were over.
Even worse, it was a test, which meant that only a sample of users would get these notifications.
Well, 4 months later, Instagram has decided the feature would not be released.
The company declined to comment but it seems the feature was not thought to be worth the potential backlash, had it been rolled out to all users. So, in this regard, you’re safe to screenshot friends’ stories.
Related: How to tell if someone blocked you on Instagram If you screenshot a picture someone has DM’d you, Instagram will notify them You should, however, be careful with DMs, they are quite a different lot altogether. Instagram does send notifications if you screenshot of a disappearing photo or a video they have sent you as a direct message (DMs).
Related: How to monetize your Instagram How to screenshot on the DM without alerting the owner There are 2 sneaky ways of screenshotting on a DM without alerting the owner.
Activate the airplane mode on your phone, then open the photo (or video) you wish to screenshot. Take a screenshot and close the Instagram app completely. When you have done this its safe to switch the airplane mode back off. Use the Instagram desktop site instead of the app to screenshot pictures within your DM. Log on to https://www.instagram.com/ on either your desktop or phone. While this method works, it has a bad user interphase Does Instagram notify when you Screen Record The answer is NO! Instagram won’t notify when you screen record videos on posts, stories or even DMs. This will offer you a secret avenue to capture personal stories on Instagram.
You can also take screenshots of these already screen recorded videos.
It’s important to mention that you should take the sender’s privacy into consideration if the content is sensitive in nature.
On the same note, If you’re worried about strangers misusing your photos and videos, you can protect your account by switching to a private profile.
To turn your Instagram profile private, go into the Settings and switch on the Private Account option.
Your existing followers won’t be affected by this, hence it’s best to check your Followers list to ensure only the people you know have access to your gallery.
Alternatively, you can take advantage of Instagram’s Close Friends feature . That lets you share your stories with a specific set of users while keeping your profile publicly visible.
You can configure the list by tapping the Close Friends option located in your profile’s hamburger menu. In the Your List tab, add or remove your close friends.
When you’re done, you will have a new green option before publishing a new story. Enable it to share the story only with users in your Close Friends list
Related: Best Jarvee alternative Why screenshot on Instagram?
There are numerous reasons you may wish to screenshot on Instagram, they include but are not limited to:-
Avoid going back and forth between multiple recipes – screenshot and swipe! Save a picture to use as wallpaper on your phone Save gift ideas Help someone understand something Help remember something Save great ideas to remember later Share ridiculous things you see on social media with a friend (we all do it – admit it!) Remember to share something later Repost a Photo of the Day challenge Quickly save information about great products you find Save craft ideas to try later Take a photo of your calendar’s “to do” list for the day Get proof of something Remember great products you see for sale so you can attempt to make your own later Save lists you commonly refer to, like exercise challenges Showing a problem you’re having to a friend when asking for help Whichever your reason, ensure you do so with individuals’ privacy in mind. Similarly, ensure your actions does more good than harm. Good luck!
Related: Best Instagram hashtags for photographers
https://socialtipster.co/instagram-notify-when-you-screenshot-story/?utm_source=rss&utm_medium=rss&utm_campaign=instagram-notify-when-you-screenshot-story
0 notes
Photo
Why and where should you buy Instagram followers in 2020? [Non Drop!]
Why Instagram Followers Matter
Can you picture our modern lives without the presence of social media? Sites such as Instagram haven’t just impacted our lives personally and professionally, they have changed the way we interact with each other and how we view the world around us.
With that said, social media is more than just a tool for personal connection, it is a powerful marketing device that can dramatically extend one’s sphere of influence.
Instagram can be used to leverage professional and personal relationships as a business, but this often rests on one important factor: Instagram followers.
Simply having an Instagram page for your brand or business isn’t enough. You need to have an adequate amount of followers, even if you have to buy Instagram followers. At the end of the day, followers matter almost as much as the content you’re putting on your page. Let’s explore why.
When You Buy Instagram Followers Your Brand Appear Trustworthy Have you ever clicked on one of those enticing Instagram ads only to find the brand itself has very few followers?
Odds are, you clicked away pretty quickly, determining that the brand wasn’t good or lacked legitimacy. That’s how most people feel.
Research suggests that having a large number of Instagram followers makes a brand appear more trustworthy and legitimate. If you’re looking to build your brand or business on Instagram, then you need to boast an authentic and reliable appearance to those who visit. In order for this to happen, you’re going to need lots more followers.
For example, if someone on the platform only boasts a few dozen followers, you might doubt the authenticity of the account. You may even conclude that the page is run by a bot. On the other hand, when you visit an account with thousands of followers, you’re probably more likely to see that brand and account in a serious light.
This is just one reason why it is so paramount to have as many Instagram followers as possible, even if you have to buy Instagram followers to initially gain exposure. When marketing yourself or your brand, building trust is essential.
Related: How to recover disabled Instagram account
More Followers Equals Affiliate Sales As a brand, making money and marketing are two key aspects of growth overall. Without enough followers on Instagram, you won’t be able to engage well in the area of affiliate sales on the platform.
Affiliate sales are when another company asks someone on Instagram to market or sell a particular service or product. You can engage with other users to market your product or if you’re an individual, you can partner with a company to market and sell their product.
When the account sells the product, it receives a cut of the revenue. This is one of the major reasons why having more Instagram followers is key to marketing.
The more followers you have, the more potential customers the account is going to have. This opens a lot of doors to affiliate marketing, sales programs, and even swipe up revenue in Instagram stories.
Acquiring Feedback In order to build a true follower base, you may need to start by buying Instagram followers and building a foundation to keep growing upon. Once people start organically coming to your page, you’ll have the opportunity to acquire true feedback on your site.
Having lots of followers means a great opportunity to interact with others and garner feedback on your brand and its posts.
From a marketing perspective, it’s like having a virtual focus group right at your fingertips.
In real-time, you’re discovering what works, what doesn’t, and how you can build your business. If you’re selling products, you can learn what people want or what makes someone more likely to buy one product over another.
Essentially, Instagram followers allow you to cut out the middleman and go right to the consumer.
Best Website To Buy Instagram Followers From In 2020 There are plenty of websites that promise the best quality of followers but as soon as you buy Instagram followers from them, you quickly realize that the accounts don’t even look real. Most of the Instagram accounts will also have their bio written in languages other than English.
This is made worse a day or two later when you begin to notice your followers dropping so quickly, and in no time you’ll soon have the same number of followers you had before you bought Instagram followers from them.
I’ve bought Instagram followers from different providers over the years and over time I’ve weeded out many of them to the point I’m only buying from one website.
Although their prices may not be for everyone, Famoid for me seems to be the only provider of the quality of Instagram followers I’m able to resell to my clients.
We aren’t affiliated with them and are only sharing because we been asked several times by our readers to recommend a good seller.
I’ve used them since July of 2019 and will continue to as long as the quality of their followers remains high.
The Bottom Line These are just a few key reasons why buying Instagram followers matters, but the list knows no bounds. Anyone who wants to extend their influence or grow a brand will need to find ways to recruit and add more Instagram followers to their page.
As our world becomes increasingly more dependent on the digital side of life, social media is only going to play a larger role in how we interact with one another.
https://socialtipster.co/buy-instagram-followers/?utm_source=rss&utm_medium=rss&utm_campaign=buy-instagram-followers
0 notes