
Don't wanna be here? Send us removal request.
Statistics
We looked inside some of the posts by megcheese and here's what we found interesting.
Average Info
Notes Per Post
9K
Likes Per Post
6K
Reblog Per Post
3K
Reply Per Post
3
Time Between Posts
6 months
Number of Posts By Type
Text
9
Photo
6
Link
2
Last Seen Tumblr Blogs


Fun Fact
Tumblr has 16.74 million mobile monthly users in the US.
Text
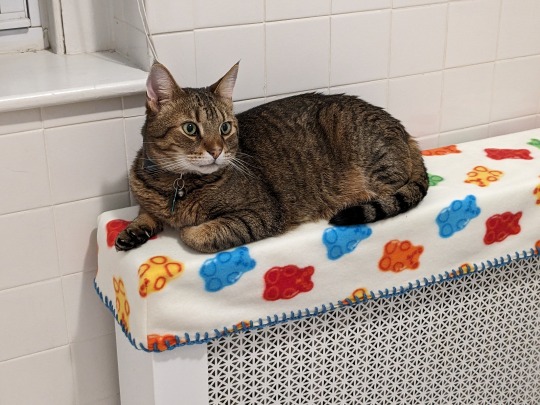
How to keep your kitty warm this winter
My latest exploit in combination domesticity and creativity is ... Radiator Cozy!
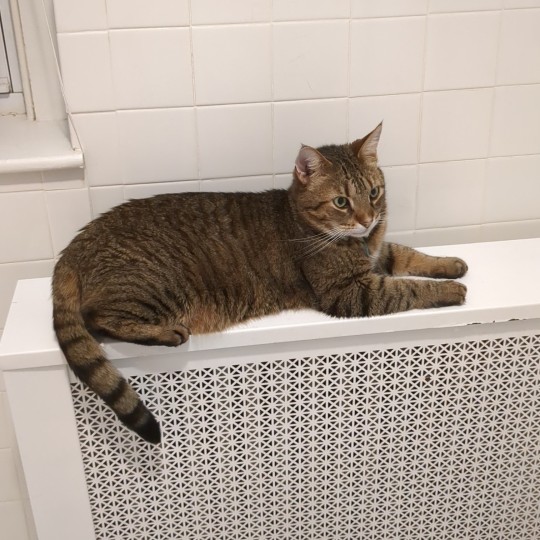
With the temperatures dropping, and our heat pump only serving the living room downstairs, it is cold enough for the boiler in our 100-year-old house to kick on. Not long after the radiators began delivering via hot steam, Charlie realized they may be a nice spot to sit.
I caught him having a nice sit as I got out of the shower one evening. He likes to be around me but does not want to get soaked in the shower. So if the water's running, he'll have to wait somewhere dry.
The very first night Charlie spent in the house was after a six-hour car ride from Syracuse. The house didn't have any furniture yet, the thermostat had been set way low to 50 while we were gone all weekend, and the upstairs was even colder because the bathroom window was open a crack at the top where it was covered by the blinds.
I wanted to ease him into the new space a little at a time, which is often recommended for bringing cats into a new space. It is also part from my recent memory of when we adopted Charlie in 2022 and he hid in an impossibly small space below the china cabinet. I basically watched him dislocate his own shoulder to get in and out of that space. So the plan was to start in 1 room and expand slowly.
The first room would be the bathroom. Back in Syracuse we kept the litterbox in the bathroom since it was a 2 bedroom apartment without a better space for it. It seemed like a good start for the litterbox, at least until we were ready to introduce Charlie to the basement. I purchased a disposable box and litter and set them up the week before so we'd be ready to go.
The plan was to get Charlie out of the car and out of his crate as soon as we made it to the house since car rides are very stressful for him. I had a "go bag" plus a more robust catkit with the automatic feeder and water fountain handy for our dismount.
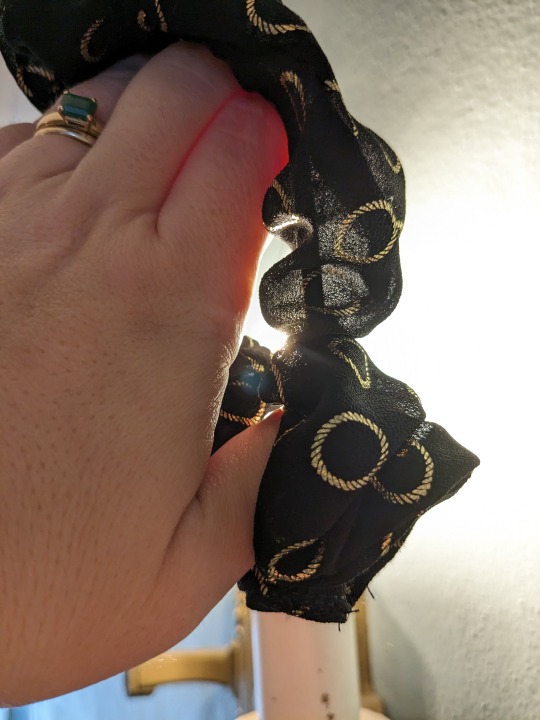
Michael packed us Ducky Blanket, which had been Circe's favorite. I folded it and placed it atop the radiator hoping it would make the cold bathroom seem a little comfier, at least until I was done unpacking the rest of the car.
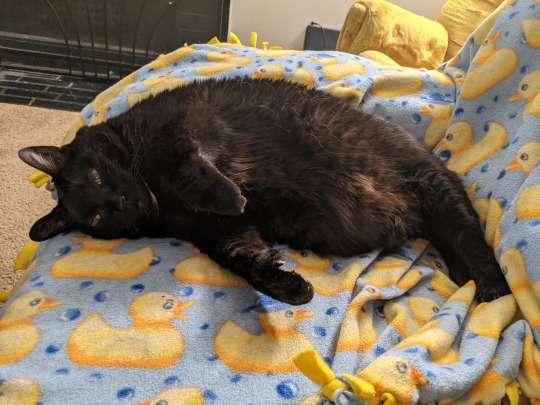
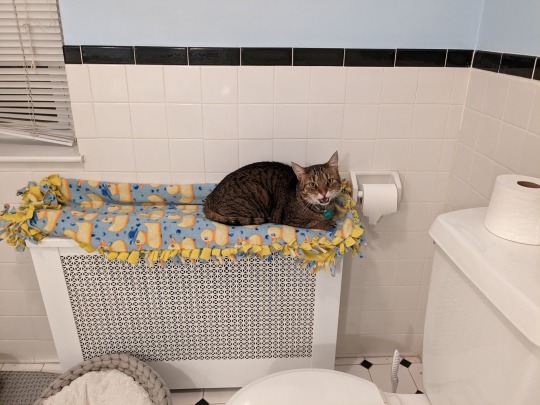
When I returned to Charlie alone in the bathroom I found him curled up on the Ducky Blanket on the radiator. He was not happy to be alone in a cold and strange place so he shouted at me as I entered.
I thought the blankie on a radiator would be a regular hangout for him, but once he was freed from the bathroom I didn't see him enjoying it ever again. Folding the blanket so many times to fit on the radiator did make it extra thick. You couldn't really feel the heat through it.
That got me thinking... what if we had a blanket made JUST for the radiator?
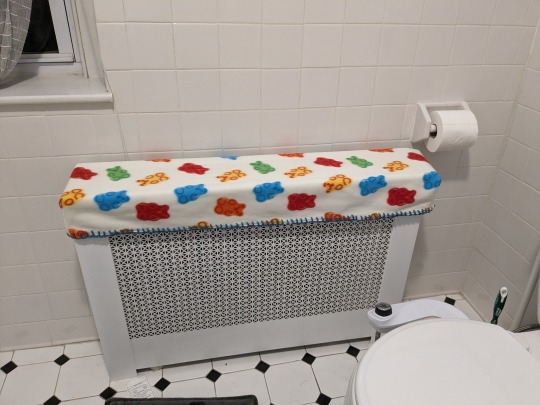
And so, the radiator cozy was born!
I lucked out when I went fabric shopping that there happened to be some pre-black Friday sales going on and Blizzard Fleece was on sale for $3.99/yd. The first patterned I selected was a print of colorful gummi bears!
To make the cozy, I measured the length and width of the radiator top and then added eight inches to each dimension. I cut a rectangle of the fleece that was (W + 8) x (L + 8) in^2.
Next, I cut into each corner at a 45 degree angle and 4*rad(2) in. That is, I cut into the diagonal of a 4 in x 4 in square at each corner.
From there, I trimmed away most of the triangle flaps leaving 1/2 inch seam allowance.
I sewed up my four corners and was left with the fitted fleece blanket that has four inches of overhang on each edge.
I can't leave those edges bare, so I selected a yarn from my stash to add a nice blanket stitch. This isn't my first time blanket stitching fleece. Last time I was working with a yarn needle that was fairly large and difficult to punch through the fleece. This time I grabbed an upholstery needle which is sharper, has an eye large enough for yarn, and is a higher gauge. Unfortunately, that didn't make stitching through the fleece easier. The yarn was thicker than the hole produced by the needle, so the last pull was tough. I used a small pair of ESD pliers on most of the cozy.
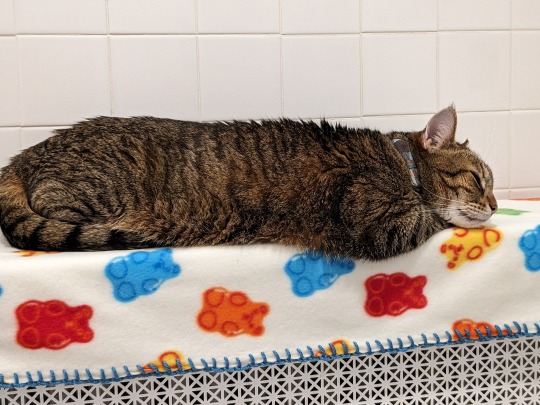
The last step of cozy creation is the sit-and-wait. Wait to catch the cozy in action! I knew exactly what conditions would get me there: when the heat kicks on while I'm in the shower. Sure enough, Tuesday evening all of my dreams came alive. Mr. Charlie Danbo was lounging on the cozy.
I'd like to make a few more. Most of the radiators in our house have these flat white covers but they're all different sizes. Where can I tempt Charlie to sit next? Living room? Kitchen? Dining room? Michael's office?
#diy#crafts#cat#cat crafts#fleece#blizzard fleece#sewing with fleece#sewing#machine sewing#hand sewing#blanket stitch#radiator#hygge#cozy#cozycore#snuggley#gummi bears#gummy bears
1 note
·
View note
Text
The next craft creation is ... scarecrow!
Now that I have a house I would like more kitschy and cutesy outdoor decor. I got a set of lawn flamingos the moment I found out they originated from a nearby town in Massachusetts. And for holidays I need more than just the indoors and window display that were good enough for apartment life.
One bit of fall yard decor I really had my heart set on was a scarecrow. But I'd see these lame little scarecrows at the grocery, hardware, and craft stores going for like $12 and somehow looking even cheaper than that. My parents have a scarecrow they've been putting out annually since I was little. That one is adult-sized and wears my dad's old jeans and flannel. He has a hand painted wooden cutout head. Where did that come from? A craft fair?
I hoped I'd run into something sufficient but no luck. The Granite State Fair had a few craft vendors but no scarecrow makers. With September ending I knew I would have to take matters in my own hands. But how?
I started with a blog post from Lowes on making your own scarecrow. That pointed me in the right direction. They recommended using landscaping stakes--like how you mark your driveway for a plow service. And a pillowcase for a head. That's very classic Oz type styling. I started thinking more about what around my house could be repurposed.
On Saturday, I started the car-ride portion of my errands run with an in-store pickup at Target for unrelated interior decor needs. I forgot that there's a Home Depot next door to the Target so I stopped in to find the garden stakes. I was very disappointed with their stock. All of the garden stakes were damp and gross. Many were warping. The driest set had evidence of a former spider egg sack. And the packs are 12. I don't need 12. I left empty handed.
I went to the Home Depot that's only a mile from my house next. I found the same packs of stakes and they were dry and nice. I had a 12-pack in my hands until I noticed oak fence posts sold as singles. Well, that's even better! They're taller than 3 ft, still have that sharpened end to drive into the ground, and I can buy just one! Sold! I grabbed a 36" baluster for the arms/shoulders and went on my way.
So what about the head? I don't have the painting skills to make a face as good as the scarecrow at my parent's house. We also don't have a jigsaw to make a good pumpkin shape. I decided to go for a foam carveable pumpkin. I can make a face with a knife okay. And I have a few spare lamp cords with nice LED bulbs lying around. I setup an in-store pickup order at a craft store for the foam pumpkin for Sunday morning.
Before leaving the house for Sunday errands, I did an inventory of things around the house I needed for the project. Self-driving wood screws that will penetrate the fencepost and baluster without coming out the opposite end? Check. Pumpkin carving knives? Check. Drill battery in the charger? Check. Lamp cord and bulbs? Check ... but ... Seeing them again up close I realize what I have is for indoor use only. I will need something sealed for use outdoors. And an outdoor extension cord.
The craft store is in the same plaza as a Lowes. Shh! Don't tell Kara and Shawn I went to Lowes! #LowesBlows I stop in for the outdoor lamp and extension cord. The lamp cords all end up being essentially the same as what I already have--rated for indoor use only. So I wander the entire lighting section slowly including their Christmas sections. In the end I choose a single garden path light that gets plugged in, runs a pre-installed LED bulb, and looks like its stake can be removed. And I grab a 40' outdoor extension cord.
Back at home I have a number of regular yard chores to take care of before I can start my scarecrow project. Michael returns home from work the moment I'm watching a YouTube video on how to loosen the drill bit chuck because it was too tight to loosen by hand. MB* uses the drill's motor to tighten/loosen the chuck. #SafetyThird It's nice having him around to help hold some pieces in place while I drive my screws. Soon I have my frame. And I have already cut a post-shaped hole in my pumpkin.

I carve the face next. I go for simple, classic, smiley jack-o'-lantern face. This is a friendly scarecrow.
What will my scarecrow wear? I have a bag of old jeans because I started making a braided rug out of them a few years ago. And used some to make my version of Britney Spears' infamous patchwork denim dress. So initially I thought I would grab an old paint-splattered pair of Michael's jeans that I know are in the bag. But I find my favorite jeans from 8th grade first. The knees tore open naturally with years of wear. The legs are flared and frayed. They are also paint-splattered. I have my jeans.

For the shirt I was less-sure. Since we just moved, we donated and trashed a lot of old clothing. I don't think we'll have a flannel to gift to the scarecrow. But as I think about my older clothing I recall a long sleeved tee from Yellow Jackets weekend. Basically every year I was at UR I missed out on the free shirts for Yellow Jackets weekend or was so late I got XXL. Only one year did I get an appropriately-sized shirt. And I still have it! AND I now live in a town called Rochester which is not the one in New York. Will my neighbors even notice?
For the the gloves, I knew what I 'd use right away. We have too many pairs of gloves from the now defunct Rat Snake race. Perfect for the scarecrow.
So now I need hay! We don't have a bunny anymore. And I threw out the old stale hat when we moved. Does tractor supply have a straw bale in stock? No. Does Home Depot? Yes. Back to Home Depot!
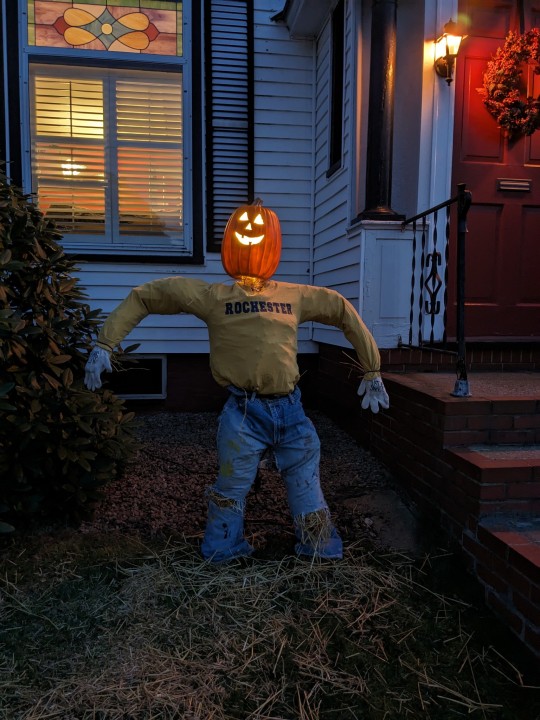
Once I'm back with my bale, I'm ready to dress, mount, and stuff my scarecrow. I'm thinking everything is set and has gone well. Until I start threading the outdoor extension cord around from the side of the house to the front. I am a few feet short. Back to Home Depot? I send Michael this time because he was headed to the grocery store anyways.
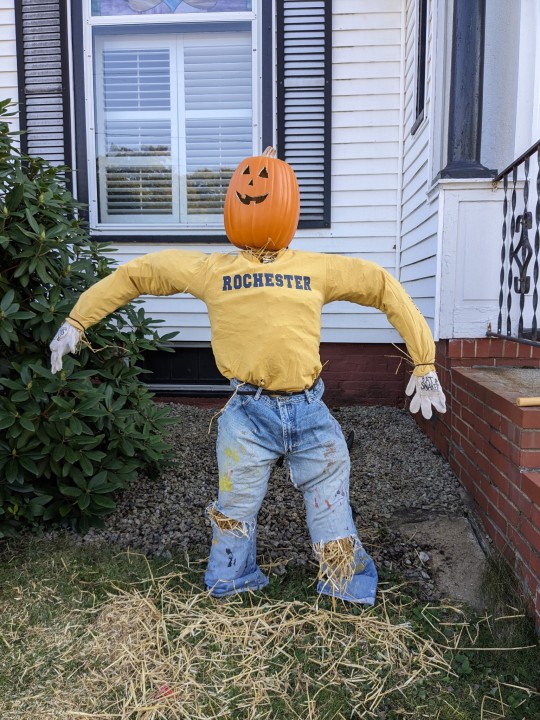
The new extension cord was long enough to run from the side door outlet to the front of the house. I was able to light the jack-o'-lantern face and plopped the remaining hay on the front stoop.
I'm very excited about my silly, homemade scarecrow. It's way better than the sad cheap ones at the store. Spooky season is in full effect! Maybe next year I will finally have the 12 ft skeleton of my dreams to join the scarecrow.
#diy#halloween#halloween decorations#halloween decor#halloween diy#scarecrow#make your own#make your own scarecrow#crafts#woodworking#power tools#upcycle#old clothes#8th grade jeans
0 notes
Text
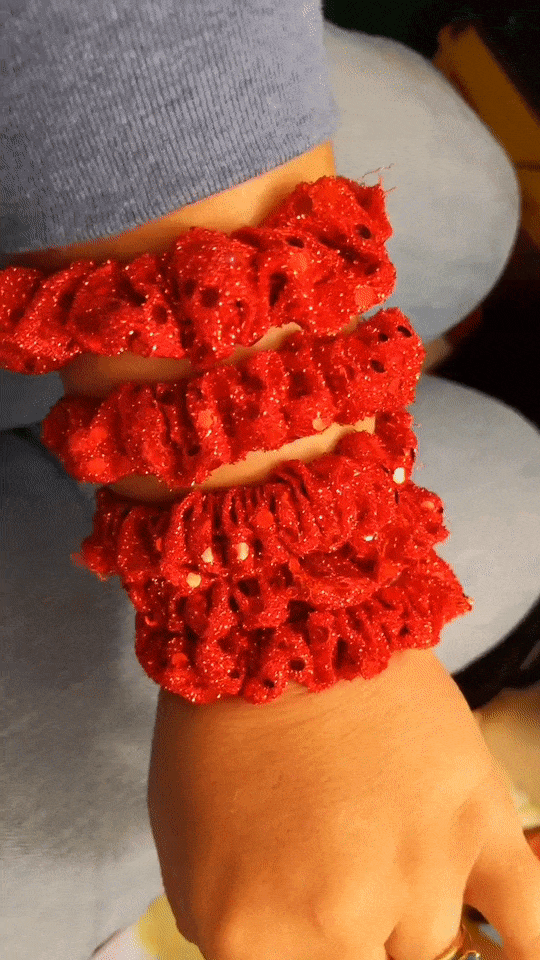
The Scrunchie Problem
Last year in August I had a brilliant idea. I will use some scrap red sequined fabric from my stash and create a couple scrunchies for the annual Red Dress Run. It will be easy! I already have everything I need: fabric, elastic, thread, sewing machine. I can knock these out in an hour or two.
So I pull out the quilting cutting mat and fabric pizza wheel and make 2” strips. And thinking about how I’d like my seams to be both clean and easy, I sew the short ends of the fabric to make a loop first. Then the long edge leaving about 1” hole for turning the fabric.
But when I go to turn the fabric after making those seams, I get stuck. At first, I think I’m just physically stuck. The pencil I’m using to turn the fabric tube inside out is starting to get gunked up from the sequin glue. And I can’t seem to get the full turn out.
My hole must be too small and my fabric tube too narrow. That’s okay. I will sew the next strip the same way but leave a larger hole. But this time when the turn out won’t seem to complete, I realize what I’ve done wrong. My wrong-side-out shape was a doughnut. But my right-side-out shape was… tube snake.
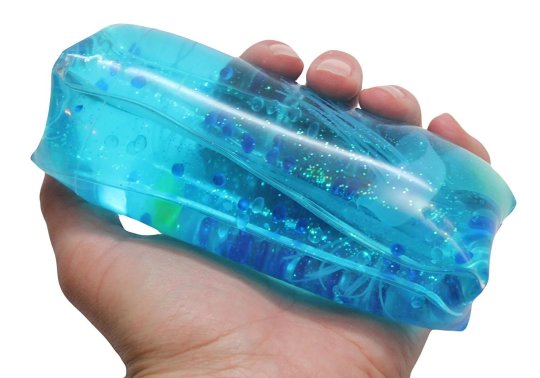
Do you remember these toys? IT’s a tube filled with water or gel and when you squeeze it, the inner part shoots to the outside and the entire thing pops out of your hand.
So how did my doughnut become a tube snake?
Both shapes are a form of a torus, or a circular toroid. The torus has two raidii, where r is the radius of a wedge of the doughnut and R is the radius of the entire doughnut ring. If we think of our donut ring as a latitude ring, once we turn it inside out, the latitude has become a meridian. So, our two radii have swapped places. Little r is now the overall radius and big R is now the wedge cross-section radius. Our shape has a large difference in scale between the two radii, so the new shape isn’t a doughnut. We get our tube snake. The tube snake is still a toroid, just a doughnut that has been stretched out to be tall.
Now that we understand the geometry, how do we sew a scrunchie correctly? I felt the internet had a lack of good instructions for this task, despite seeming so simple and like it would be a common craft idea. So I’m here to help!
Scrunchie Sewing Pattern Instructions
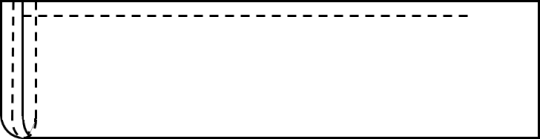
1. Cut out a strip of fabric. 2” was a bit narrow, 4” makes a good average sized scrunchie, and 6” will make a big bold scrunchie. The length should be about 24”, but exact measurements are not important.
2. Fold your fabric in half “hot dog” style and pin the long edges together. Sew the long edges together leaving a gap between 1” and 2” in the center.

Fabric Key

Step 2
3. Now we have to bring the short edges together by pulling one end inside of the fabric tube. We are making the tube snake on purpose! The shape will be turned such that the right side of the fabric is the inside surface of the tube snake and only the wrong side is exposed. Align the raw short edges of the tube. Pin and sew the complete ring. Please note that this seam is the entire circumference of little r and only through two layers of fabric.
Step 3
4. Now when we turn our shape with the right-side-out, we will have one big long doughnut.
5. Measure out a strip of elastic. I usually use ¼” width elastic and about 8” of length, but I have very thick hair and regularly destroy hair ties. Adjust based on your fit.
6. Feed the elastic strip through the tube taking care not to lose the tail end. I like to use two safety pins: one securing the tail to the opening and the second to help me feed through the tube. Sew the ends of the elastic to each other in a flat seam.
7. Last step is to close the opening. If you’re feeling fancy you can breakout the hand needle and close with an invisible (ladder) stitch. But if you’re a machine girl, tuck the raw edges in and sew a short straight seam over the opening.
And you’ve done it! You made a scrunchie!
Bonus Round!
What if I wanted to use an off-the-shelf hair elastic instead of a strip? I had black chiffon scraps from a jumpsuit that was too long for my petite height. My white ¼” elastic would be visible (and unattractive) in a scrunchie made from that fabric. How would I get an already looped black elastic in there? I under-thought my very 1st scrunchie attempt. Time to OVER-think it!
In order to get your already loop-shaped hair elastic in your scrunchie, the elastic needs to be integrated in step 1. That means when you fold your strip in half hot dog style, the hairtie is already in the hotdog bun. Fold the fabric around the loop. Part of the hair elastic will be exposed at the ends of the fabric strip. It will look like an inside-out scrunchie already. Take care when sewing your long edge seam to stretch the section of fabric under the machine. Don’t let the scrunchie folds get sewn in.
When you turn your fabric to sew the short edge seam, about half of your hair elastic will be exposed with the other half inside the tube snake. This time you need to be sure not to catch the elastic when you sew the seam.
And here comes the magic. When you turn the fabric right-sides out, the hair elastic is carried to the inner tube. Close your last opening as before.
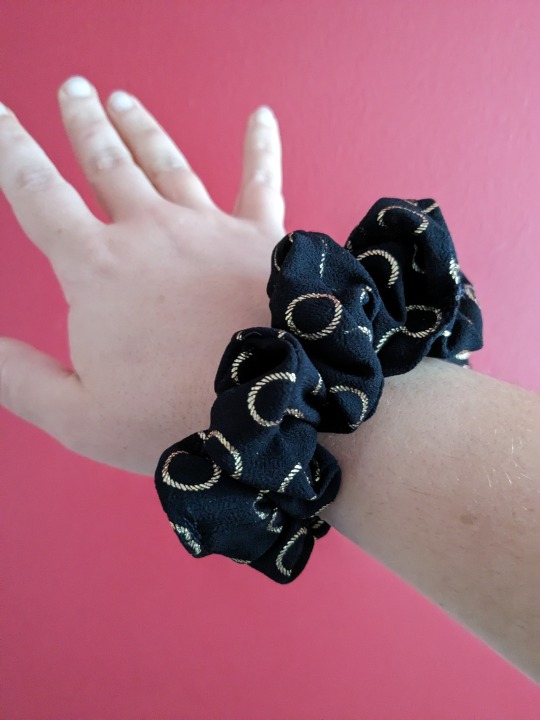
Can you even tell that I went the extra mile to use a black elastic?
Applications to other sewing projects
My most recent sewing project is a bridesmaid’s dress for me to wear at my sister’s wedding. My requirements were fairly open: black chiffon, maxi length. So I decided to make my own and selected a pattern from Simplicity, S8870 in “View A.”
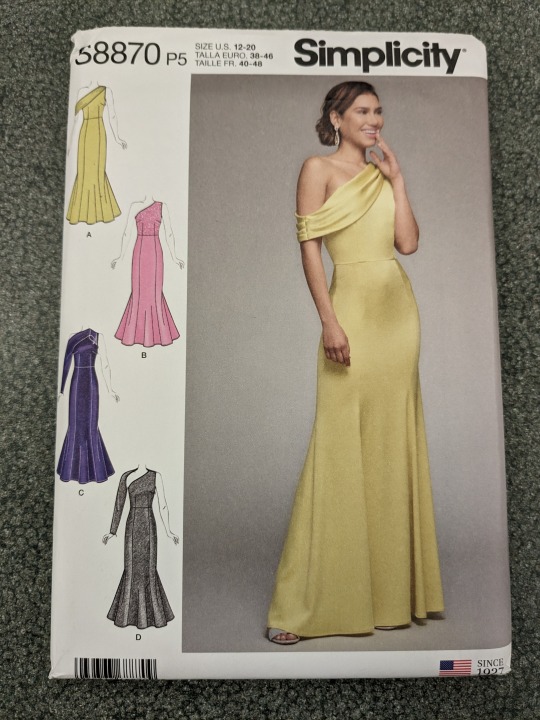
You’ll notice that the dress has a one-strap design with a loose drape that is attached at the left shoulder and then hangs over the right arm. The steps of the pattern have you sew that drape into the shoulder seam before any other steps that associate the overlay and lining or front and back of the bodice. Next, I had to understitch the neckline. Then came my secret application of The Scrunchie Problem.
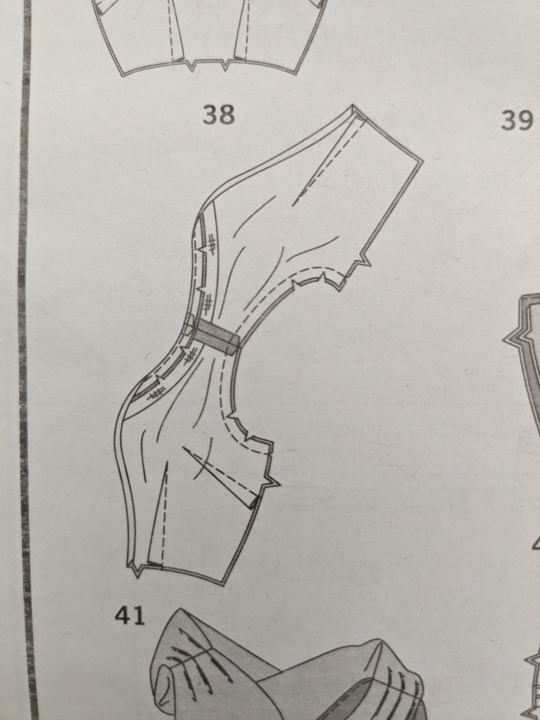
“38. Tightly roll up drape for View A or Sleeve for View D. FOR VIEWS A, B, D- Stitch lining to bodice at entire armhole edge being careful not to catch drape for View A or sleeves for View D.”
I couldn’t see the drape anywhere in the diagram for that step so I rolled my drape cinnamon roll style and pulled it out of the way of my new seam. But I made the mistake of pulling it to the outside of my new seam. I did it again! I created a new tube snake that I can never pull my drape all the way out of!
The correct interpretation of that step was to roll the drape dosa style and hide within the shoulder section. That’s why I couldn’t see it in the diagram.
Wrap up
I hope I've inspired you to make a scrunchie. It’s a great use for scrap fabric. Especially from maxi dresses that us unfortunate, short ladies had to cut several inches off of the bottom.
What should I share next? Finished bridesmaid dress? Finished wedding present quilt? Or something I haven't even decided to make yet?

#diy#sewing#machine sewing#sewing problems#sewing patterns#scrunchie#hair accessories#hair ties#hair bows#crafts#dressmaking#geometry#torus#nerd alert#sewing nerd#toroid#craft nerd#problem solving#hashing#hash house harriers#red dress run#SOH4
5 notes
·
View notes
Text
My latest creation:

I made this two-piece outfit for our Hunger Games theme party. Instead of going literal and recreating a gown or outfit from one of the movies, I decided to just create a bold and eye-catching look. The skirt and top are from a Vogue pattern I picked up a few years ago. When I brought the pattern, I bought the houndstooth as well knowing that would be a good look but wasn't sure what to do for the top. Those of you who have known me for a while might be thinking that color combo looks familiar on me.

It's not just a repeat of my wedding gown colors, the top is made with the same fabric as the sash! The sash pieces were long, leaving lots of usable leftover fabric; more than enough to make a top.
The tiny mirrors were inspired by a dress I saw in an ad from Sak's. I've worked with sequins quite a bit and often have people who think I sewed each sequin on individually rather than buying a fabric covered in sequins. Well, this time I did hand sew each individual mirror.

I'm kind of against hand sewing since a machine does most things better and will use embroidery needles for hand tasks because they're blunter and have larger eyes. But this fabric was too fine so I had to bust out the tiny and sharp hand needles.
Which brings me to the disaster portion of my story...
10:30 pm Friday night, I had put the sewing project down next to me on the couch for a minute to look at my phone. All week I'd been sewing leaned over to one side so Charlie could snuggle in my lap while I work. My obliques were sore enough that I was trying to remember which move in which workout I'd done this week that get that way. None. I was just sitting crooked all week to accommodate snuggle boi.
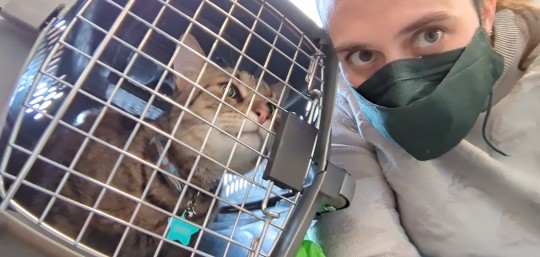
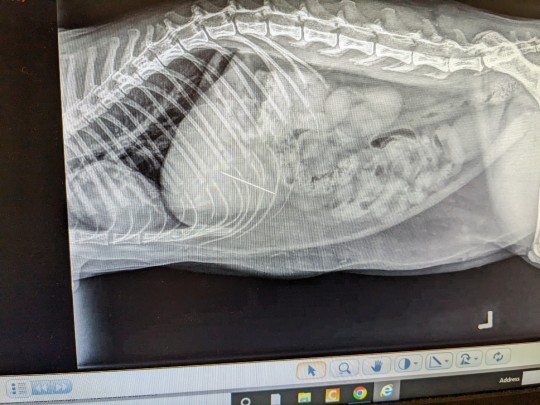
So! My sewing was on the couch right next to me, with the thread and needle dangling off the edge. I use the double thread technique so the needle is secured and can't come off without breaking the thread. And I catch Charlie chomping on that dangling thread. I scold him and grab the thread and pull. But he pulled back and the thread snapped. And he ran away. At once I'm thinking, "where's the needle?" And start checking the floor where he'd been standing. Michael heard me holler so he went to the cat and saw Charlie gagging in the hall. A little saliva or bile was coughed up but no needle! Now I'm absolutely freaking out and calling the emergency vet only to find out they're not just closed for the evening, they're closed until Sunday. And I read about what happens if your cat ingests something sharp like a needle and now neither Michael or I can go to sleep.
The cat was acting normal so we did go to bed (but not until two am) and I talked to his regular vet first thing in the morning. And we pack up and go to the emergency vet at Cornell over an hour away. And of course Charlie poops in his crate while I'm driving so I have to clean that up in a Burger King parking lot that I knew was right off the 81 in Tully.
The vets were able to see Charlie, take an x-ray, and determine that the needle could likely be removed via endoscopy. Meanwhile, I still need to finish sewing these tiny mirrors for the party the same night. So I'm the crazy lady who's like, "My cat swallowed a sewing needle!" All while continuing to sew with another needle with the same characteristics in the waiting room. I even pulled it out in the exam room with the vet to show the way the needle was attached to the thread and describe how the thread would have to have broken in two places for the cat to have swallowed thread as well.
Seeing the x-ray with the needle was kind of a relief. Up until then, part of me thought maybe the needle was lost in the carpet at home and I was overreacting. Nope, this naughty boy did in fact swallow the needle and spending the day at the vet was the correct choice.
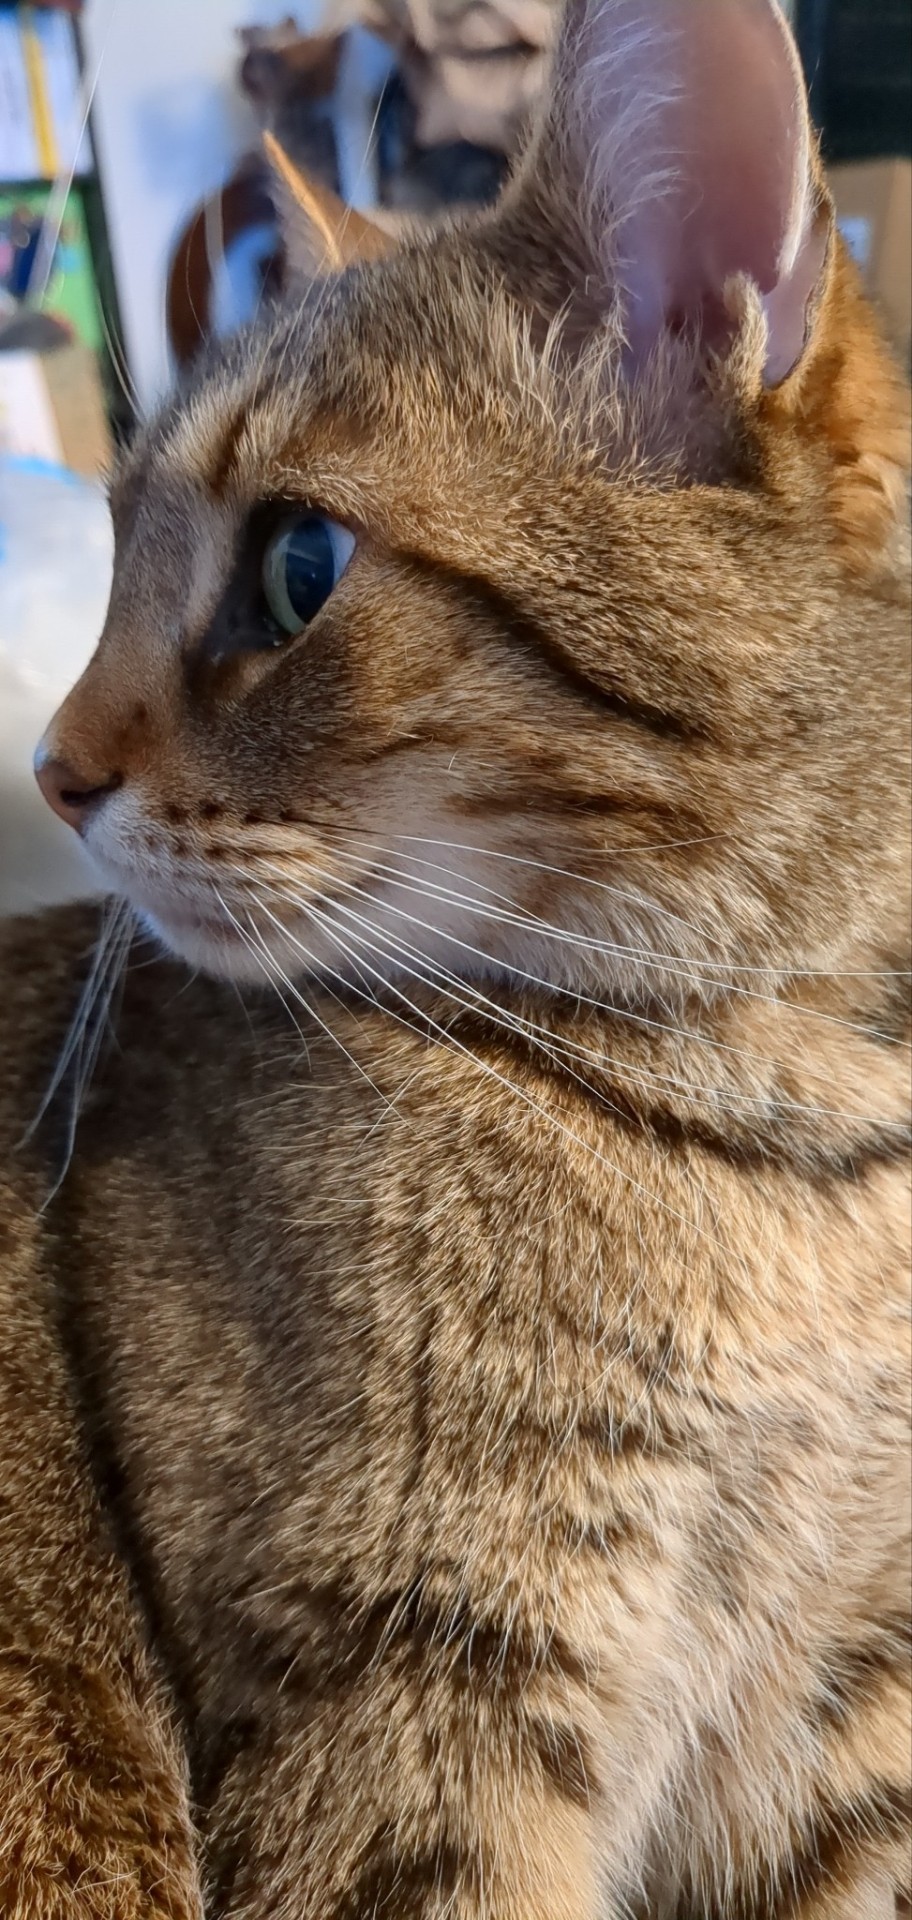
Here's my healthy boi, needle free, happy and recovering at home. We finally got to leave Cornell around four pm, after Charlie woke up from anesthesia. The endoscopy doc offered me the needle to take home but I politely declined. I was excited to see it though. They also confirmed no trauma to the esophagus or stomach, so he's going to recover well.
Moral of the story: don't let your cat swallow a sewing needle.
#sewing#dressmaking#machine sewing#hand sewing#diy#sewing detail#vogue patterns#mirror#disco ball#cat#xray#cat xray#veterinary#emergency vet#endoscopy#cornelluniversity#cornell animal hospital#the hunger games
5 notes
·
View notes
Text
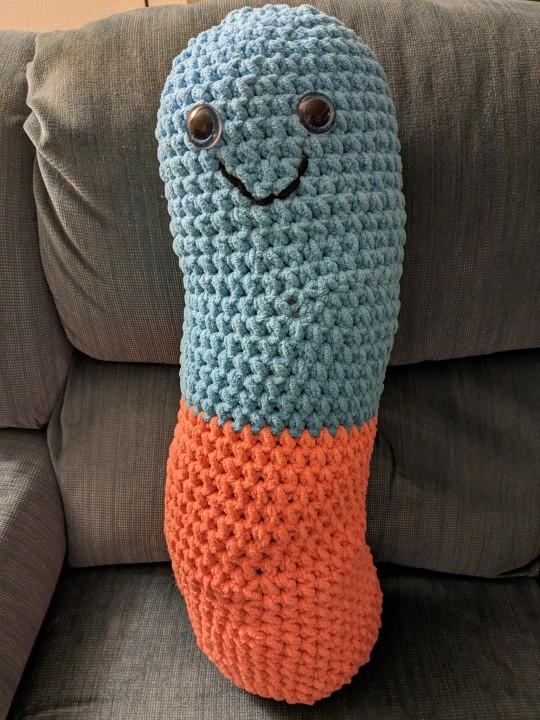
I've been waiting to post this guy. For Riah's birthday I bought her a cool Lego set for the Disney Haunted Mansion... And it turns out she got like 5 of these. So I pivoted and made a Trolli Brite Crawler! This pattern came from Tobey Time Crochet and was very quick and easy to make. Helps that I've used Bernat Baby Blanket to make an afghan for every baby I know.
3 notes
·
View notes
Text

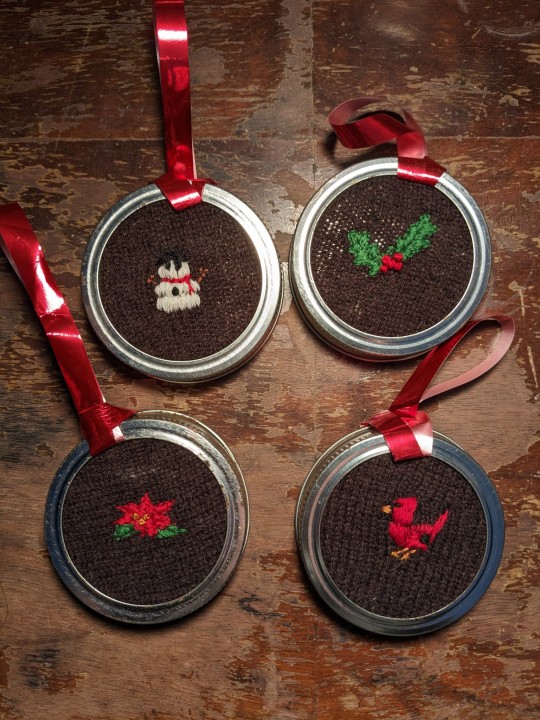
For this year's handmade ornament I continued my tradition of using "stash" materials by upcycling an old sweater and some jar lids that were starting to rust. Embroidery floss came from my collection. I freehanded these designs and stitching onto the knit fabric was different feeling from woven, so it took a minute to get my shapes the way I wanted them. I'm pretty glad with how they turned out.
#embroidery#christmas ornament#christmas#christmas gift#handmade#upcycle#merino#sweater#snowman#holly#poinsettia#cardinal#ball jar#jar lid#embroidery hoop
1 note
·
View note
Text
For this year's handmade ornament I continued my tradition of using "stash" materials by upcycling an old sweater and some jar lids that were starting to rust. Embroidery floss came from my collection. I freehanded these designs and stitching onto the knit fabric was different feeling from woven, so it took a minute to get my shapes the way I wanted them. I'm pretty glad with how they turned out.
#embroidery#christmas ornament#christmas#christmas gift#handmade#upcycle#merino#sweater#snowman#holly#poinsettia#cardinal#ball jar#jar lid#embroidery hoop
0 notes
Text

Another Christmas craft already given away! I saw ads for embroidered felt corner bookmarks and decided to make one myself as a part of my bookclub's Secret Santa. A fun little one evening project made with stuff in my craft stash. I do wish I had a better felt selection. I'm not huge on this baby pink nor is it a favorite of the recipient. But my other choices were Kermit the Frog green, glitter white, and milk chocolate brown.
1 note
·
View note
Text

Made this yesterday afternoon for my bookclub ornament exchange. Upcycled merino wool sweater that got eaten by moths and ball jar lid. Embroidery is my own design.
#upcycle#diy#upcycled#embroidery#handmade#ball jar#christmas#christmas tree#snow#snowy trees#handstitched#crafts#christmas ornament#white elephant
0 notes
Photo

Check out what I did at Museum of the Moving Image!
0 notes
Photo

Hot new look for fall. Sweater is 100% my original pattern and creation. It was my first time designing a knit garment pattern! #nyancat #nyan #shareyourknits #knitting #homemade #diy #knit #designer #patternmaker #sweater #customknit #lionbrandyarn #lionspridewoolspun #fallfashion
#nyan#designer#knitting#nyancat#customknit#sweater#lionspridewoolspun#lionbrandyarn#diy#homemade#fallfashion#knit#shareyourknits#patternmaker
132 notes
·
View notes
Link
$10,000 will be donated to special needs pets if this Kickstarter meets its goal. Lil Bub and the special needs shelter pets need your help!
0 notes
Photo

Welcome to 2015, Marty! Sorry we don't have any hoverboards. #bttf #bttf2015 #bttfday #BackToTheFuture #backtothefuturepartii #backtothefutureday #timecircuitson #fluxcapacitorfluxing
#bttf#backtothefuture#backtothefutureday#timecircuitson#bttf2015#fluxcapacitorfluxing#backtothefuturepartii#bttfday
0 notes


Photo

I just helped #FeedABee & you can too! Visit www.FeedABee.com to learn how you can help grow 50 million #flowers for #bees in 2015.
0 notes
Link
Support me as I race to raise money for the Bronx Zoo! Please donate!
0 notes