
Don't wanna be here? Send us removal request.
Statistics
We looked inside some of the posts by mi7002alicelambert and here's what we found interesting.
Average Info
Notes Per Post
0
Likes Per Post
0
Reblog Per Post
0
Reply Per Post
0
Time Between Posts
4 days
Number of Posts By Type
Photo
5
Text
12
Last Seen Tumblr Blogs


Fun Fact
Tumblr Inc. has $15.1M in annual revenue.


Text
Some Animation Tests!!! The backwards Somersault
I like doing this as a test, because it goes from being stretched to tucked and so you can see if there is any clipping of the skin etc.
youtube
youtube
Over all I am pretty happy with the way this looks, I messed around with the timings quite a couple of times, but now I am really happy with the way that this looks.
0 notes
Text
Some Animation Tests!!! The Run Cycles
youtube
youtube
This isn’t too bad, I think it could do with a little more ease in and out from the furthest reaches, but her stride length and the timing are nice to give this a more casual attitude for her run.
youtube
youtube
Again a little intense when it got to the reach, but the speed and drive forward give this a more determined look.
0 notes
Text
Some Animation Tests!! The Walk Cycles!!
youtube
youtube
This was the first test I did. There’s a little jarring in the knees, but it has quite a confident attitude towards it.
youtube
youtube
Here’s a sluggish slouched walk. I really like the timing of this one and the slightly exaggerated twist in the spine makes her look more sluggish and just trudging along.
0 notes
Photo


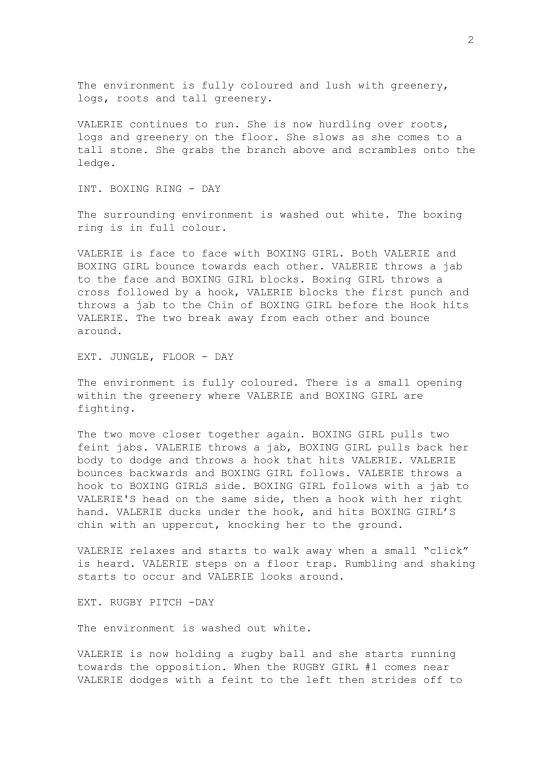
We wanted to do some render tests that we could put in our design document, so we decided to do some action shots of Valerie on in the jungle and one in the white out environment.
I posed her in her uncomfortable position for the white out and mid action of hurdling over the branches for the jungle.
Beth did all of the texturing, lighting and rendering and Ashleigh did the matte background for the jungle and is currently working on the one for the white out.
0 notes
Photo


So I redid the script which includes the insecurities part and the new ending for each of them.
I’m really happy we have gone down this route as I fee like this has a stronger message and will be better received. We are still keeping only one main character as we feel that it would make people go I know this, but last time she was doing something else. It’ll add a little something that can be discussed though the audience.
0 notes
Text
The Campaign
Now we have gone down the campaign route we have a few more things to think about. Firstly though we still needed a title. With it being a campaign we wanted it to be so that we could also make it into a hastag, so that it is easily recognisable.
With this being about their journey and the adventure of going through puberty and experiencing sport we decided on the title:
My Adventure
This meant that out # could be extended or left as it is. For example:
#MyGymnasticsAdventure #MyHurdlesAdventure #MyBoxingAdventure #MyRugbyAdventure #MyRockClimbingAdventure #MyLongJumpAdventure
We also started to discuss a tagline that would go along and expand the title. We wanted something powerful and give encouragement so we decided on:
Explore without Limits
I flows nicely and works really well with the title so we started to get really excited all over again.
0 notes
Text
Feedback from Paul and Ellie
Okay, so we had a long discussion about where this can go and Paul made a suggestion that just made sense. I think we all saw it in that light but just didn’t even think about the idea of our final piece being a campaign. So breaking it down into stings instead of it being one piece. It was also mentioned that we need to engage with the audience in the way that we want we need to have a little opening part, where it physically shows her with some insecurities.
UPDATE:
So we had a good long discussion about what we can do with this information and we are all getting a little more excited. We have our 6 sports: Gymnastics, Hurdles, Boxing, Rugby, Wall Climbing and the Long Jump. We are going to put them into clips that have a starts - showing the insecurity, followed by the sport in the white out world, into the jungle, and then come back to the real world to finish. We have some up with out ways to show the insecurities and we are now working on how we can time them. We want to try and make it so that the timing is the same across all of the stings. So that the music can be the same and it gives it a more collective feeling.
0 notes
Text
The start of rigging!
I started by building the skeleton for Valerie. To reduce any further clippings, I made the Y-axis follow to the next joint in succession. Once the skeleton was set up I made my controls. Most of them were just nurbsCircles but there were some that I needed to make a little more unique.
One of the most important things if the IK/FK switch on the arms. For the arms I had to duplicate the shoulder to wrist so there were three of them I renamed the duplicates FK or IK. I also made a switch control, so the animator can easily flick between the two. I connected all this up using the Node Editor. This was a first for me so I had to go through it a couple of times before I fully understood what I was doing.
For the fingers I wanted to create some preset movements that would be quite common during the course of our animation. I wanted a finger spread and a fist. So what I did was create a group for each individual finger control. I had to do it this way because if I used the Set Drive Key on the controller itself I would no longer be able to keyframe that. It would just revert back to the pose. I then used Set Driven Keys on the IK/FK switch, and added some attributes (Spread and Fist) Once the set driven keys were done I went into the graph editor and adjusted the timings for the fist creation a little bit to make it a more natural movement.
The feet were also something that needed some presets: Heel Twist, Toe Twist, Bank, and a roll. Most of these had to be produced in completely different ways. First of all though I had to create a reverse foot rig, though to make this all possible. I then added the attribute titles to the foot control as it will be easy to find and access at all times.
For the heel twist and toe twist I used the connection editor. I made use that I knew on which axis the heel and toe rotated to rotate left and right. In the connection editor on the left I selected the foot control and then the Heel twist and the rotation axis of the heel joint on the right. I did the same for the toe twist.
For the Bank I had to group the reverse foot joints twice naming one inner bank and the outer outer bank. I then moved them to the middle of the foot and then to either edge of the foot. To connect these to the attribute I had to use the node editor and an array of nodes to connect them up.
For the roll I used the Set Driven Key method. This was because this is a three part movement. For the attribute I chose a float and made it so it had a maximum value of 10 and a minimum value of -10. Using the set driven key I keyed all of the reverse foot joints to 0 when the Roll attribute was at 0. Then when I changed the roll attribute to -10 I made it so the heel was flexed up and keyed the joints. The next value was 5 at which I made it look like she was standing on her toes. Then at 10 I put the foot back to being flat and moved her so she was on the tips of her toes.

Next I moved onto the skinning of the character. I used a variety of ways to make sure the skinning was done properly and didn’t clip. Where major areas needed redoing I used the Weight Painting, but if it was more delicate areas or smaller areas I used the Component editor smooth skin tool to correct the individual vertices.
At this point, as well, we decided that it would probably be for the best to have the shoes and socks skinned with the characters, as they don’t need to flow in the same way as the main clothing. Since I had already skinned the character all I had to do was copy the skin weights of the character across to the socks and shoes. This actually worked surprising well and I only had to perform minor tweaks after.

Then it can to the face. I was debating on what to do here and based off my last project I decided to go more down the joint root rather than blendshape root. I find that this is a little more flexible but it also keeps the file size down as blend shapes increases that massively. So I went ahead and created the joints for that setup. And while I was at it I also created the joints for the hair set up. I used the nurbsCircle again to create the controls for the face. For each face control I grouped them and renamed the group the same as the control it was the parent of and then added _Pose to the end of it. This was so that I could create some preset facial expressions that would still allow me to move the controls as well.


I did have to add some blendshapes in like for the wink of each eye. That was because when I tried to use the joint system the mesh would cut through the eyeball. I also created a breathing blendshape so the stomach and chest would move out and in.
Then I moved onto the skinning of the face. Because I had already set up the skinning of the rest of the body I had to do it in a slightly different way so that they would not lose their weight. I had to go to Edit Influence and then the box on Add Influence where I turned the weight down to 0. This meant the joints were in the skinning system but had not weighted value. I then went used Paint Weights to add these weights on.
One of the things I did have to change after all this was the eyelashes. They had the blendshape on them to match the blinks of the eyes but they were also attached to the right via skinning. This meant that when I moved the head and then tried to use the blink blendshape the eyelashes would go back to the original translation. So I removed the skinning and parented them to the head control which solved this problem.
While I have condensed my explanation of what I have done this did in fact take me about two weeks to full do and check.
0 notes
Text
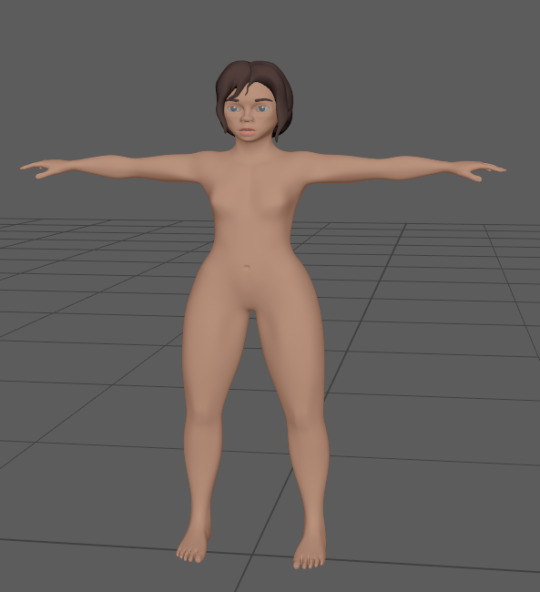
Valerie Model
James completed the Valerie model and she is looking amazing, she has an amazing tomboy look and her curves suit her very nicely.
So it’s now my job to start rigging her!

0 notes
Text
Storyboards
In the script you don’t write about the camera transitions so I made a separate sheet where I wrote down how I envisioned the transitions from scene to scene.
So then we got started on the storyboard line art and it looking pretty solid for a first draft. Ashleigh did a really great job of interpreting the script.
There were only a few things that we discussed like how the transitions would work and making sure that everything travelled from left to right, to look like she is moving forwards with her actions.
0 notes
Text
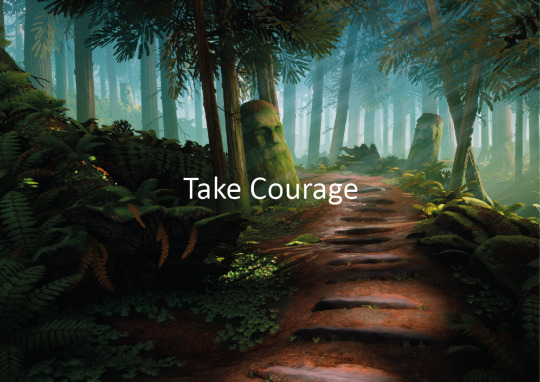
Environment Designs
Jude has started on some of our environment designs for the jungle. These are starting to look great. We wanted a fantasy style jungle as its meant to be a metaphorical release. Jude has done a lot of research and experimentation with some of the colours and assets, to match the needs that are presented within the script.
I’m feeling very positive in the direction that the jungles are going in. They really do give off a very joyous look.
UPDATE:
Beth and Jude had a fantastical idea where each jungle has a unique asset that is relevant to the sport that is going on. So we have plants with rugby ball shaped bulbs etc. I really love this idea, because it like a little easter egg within the scenes, that are truly unique for the sport.
0 notes
Text
Character Design
One of the things I was adamant about was that our character wasn’t just stick thin. I wanted her to be on the slightly large side to show that these sports are engaging no matter what shape and size you are.
Ashleigh Iceton did our Valerie character design, and she is really awesome. We wanted her to be around the age of 13 as a role model for our audience of 8-12, so her body is changing and that there is no normal. She has made her curvy and slightly on the heavy set side, which fits with my image really nicely.
Update:
We then went onto the clothing for Valerie. We want it to have a sporty look, but it needed to be relevant, with the exclusion of accessories, to all of the sports, as the story is continuous and it would be a little hard to read if she kept changing throughout.
These were the designs Ashleigh provided us with:

All of these designs gave off a nice casual sporty vibe, and really suited the shape of the character. Many of the sports we are producing use shorts as the main go to for clothing, as they allow for ventilation and are more flexible to move in. With having Teodora as our character VFX artist it has allowed us to think about what we can do with the clothing as well. She uses a software that can create a cloth like effect for the clothes.
I decided that Shorts V1 (third model) gave off a really nice active look, and when it comes to the active scenes, with the cloth simulation it’ll enhance some of the speed in the movements. I also liked the knee-high socks that were with this design, it still gives off that youthful vibe.
Especially on the athletics side a sports crop top is quite commonly found, they are also commonly used in boxing as well. With that in mind I decided to look more in that direction and the design of Vest V1 (the second model) fits well with the shorts. They have a floaty look, with the boarder that matches.
UPDATE 2:
Ashleigh has done some action shots with Valerie in her clothing designs in full colour. We also wanted to stay away from an ethnic majority as much as possible, as it wants to be all inclusive. We went for a nice burgundy colour for her outfit as it represents: ambition and power, so it matches up with her name nicely, which means: Strong and Valient.
0 notes
Photo


Okay! So this is my first draft for the script.
Update:
This wasn’t too bad when I gave ti to the group it was quite well received and allowed people to visualise what was going to happen in each scene and how the environment would look because of that.
There were some slight revisions to be made so I corrected those and made a second script.
0 notes
Text
My Group!
Okay so I now have solid interest in the comings of my team!
Myself - Director, Rigger and Animator
Ashleigh Iceton - Producer (I couldn’t ask for a better one), character designer, Storyboard artist, Sound Designer, Layout Artist, Editor
Beth Monaghan - Art Director, Texture Artist, Lighting, Rendering, Compositing
Jude Relog - Environment and Prop Designer
Alison Kow - Character Designer, Storyboard Artist, Animator
James Dunn - Character, Environment and Prop Modeller
James Hunter - Rigger and Animator
Teodora Retegan - VFX artist (character)
Ben Brown - VFX artist (Environment)
...And that makes up the team! Everything that I have proposed is now possible due to the collection of skills that the team provides. It has also made me think about how I could add or change things thanks to all these artists.
0 notes
Text
After Proposing my Idea
Okay, so the proposal went pretty well for my idea. I have already had a few people interested in working with me on this, so it looks like my project will go ahead! Ya hey :)
Update:
After presenting them to Paul as well now, I’m feeling pretty confident that my idea will be going ahead.
0 notes
Photo


My personal project proposal. Title still in progress.
0 notes