midnightsart
Midnight's Art blog
Art blog for all my work.
No reblogs on here, unless they deal with art, request idea, and other helpful tips.
24 years old. Canadian.
42 posts
Last active 60 minutes ago
Don't wanna be here? Send us removal request.
Last Seen Blogs
lordchickooon
chickooon

majach
Photos 2022 1st sem
majach
Photos 2022 1st sem
lilysmemeblog135
🌈✨ LilyC0smic🌌

helliantic-blog
sorry i hate writing titles
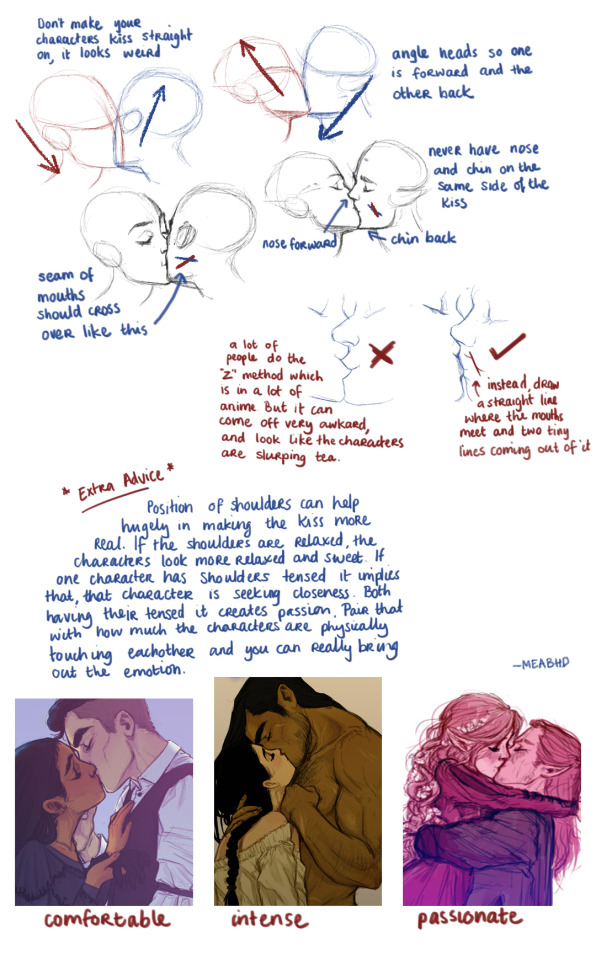
Text
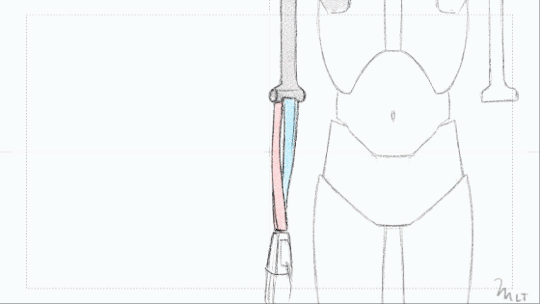
Arm studies' first animation is the forearm bones! They twist interestingly.
5K notes
·
View notes
Text
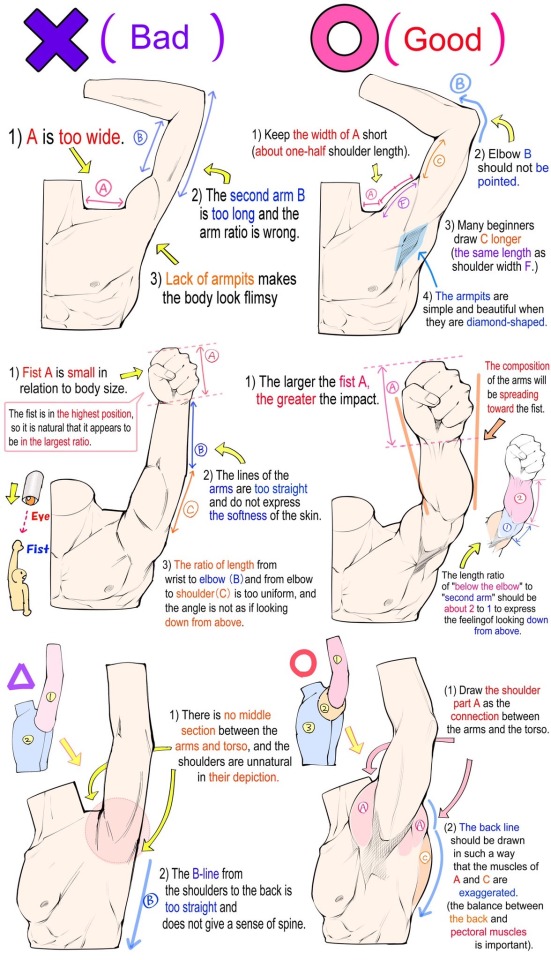
“Drawing techniques to improve the muscular structure of the arm and the perspective of the picture”
Source: Twitter
3K notes
·
View notes
Text
How to draw: The position of the Fingers in Hand Poses Correctly (FINGERS WORK TOGETHER)
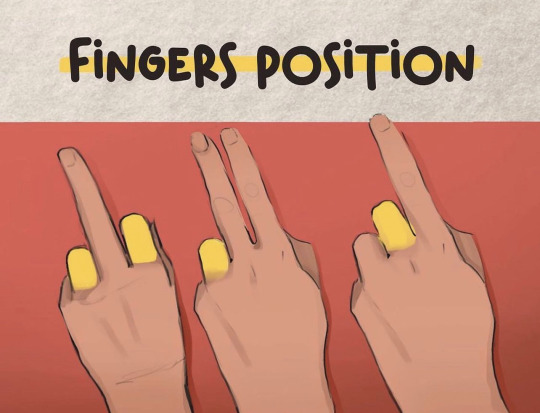

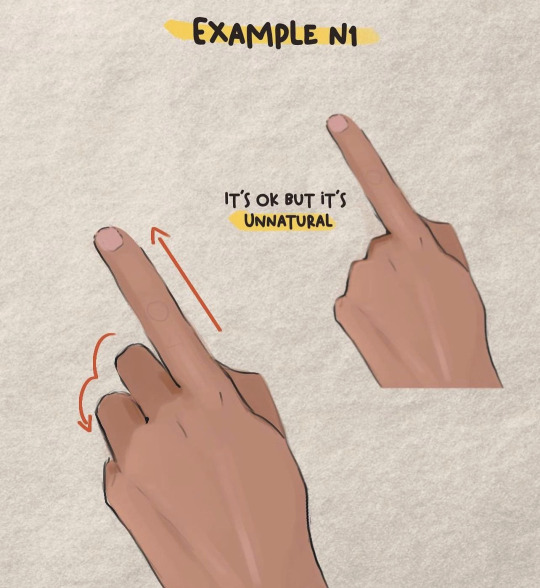
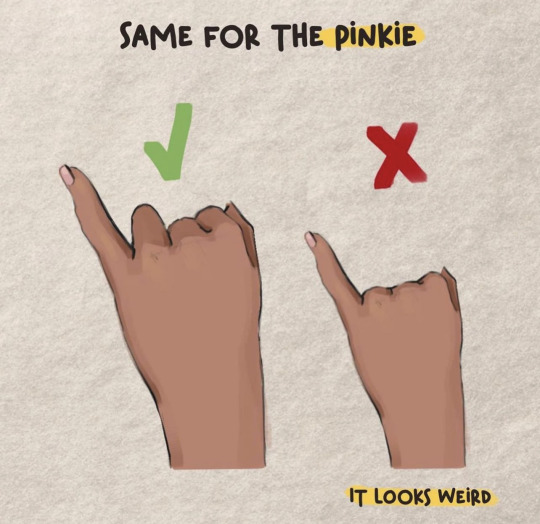

Credit: Valentart_
1K notes
·
View notes
Text
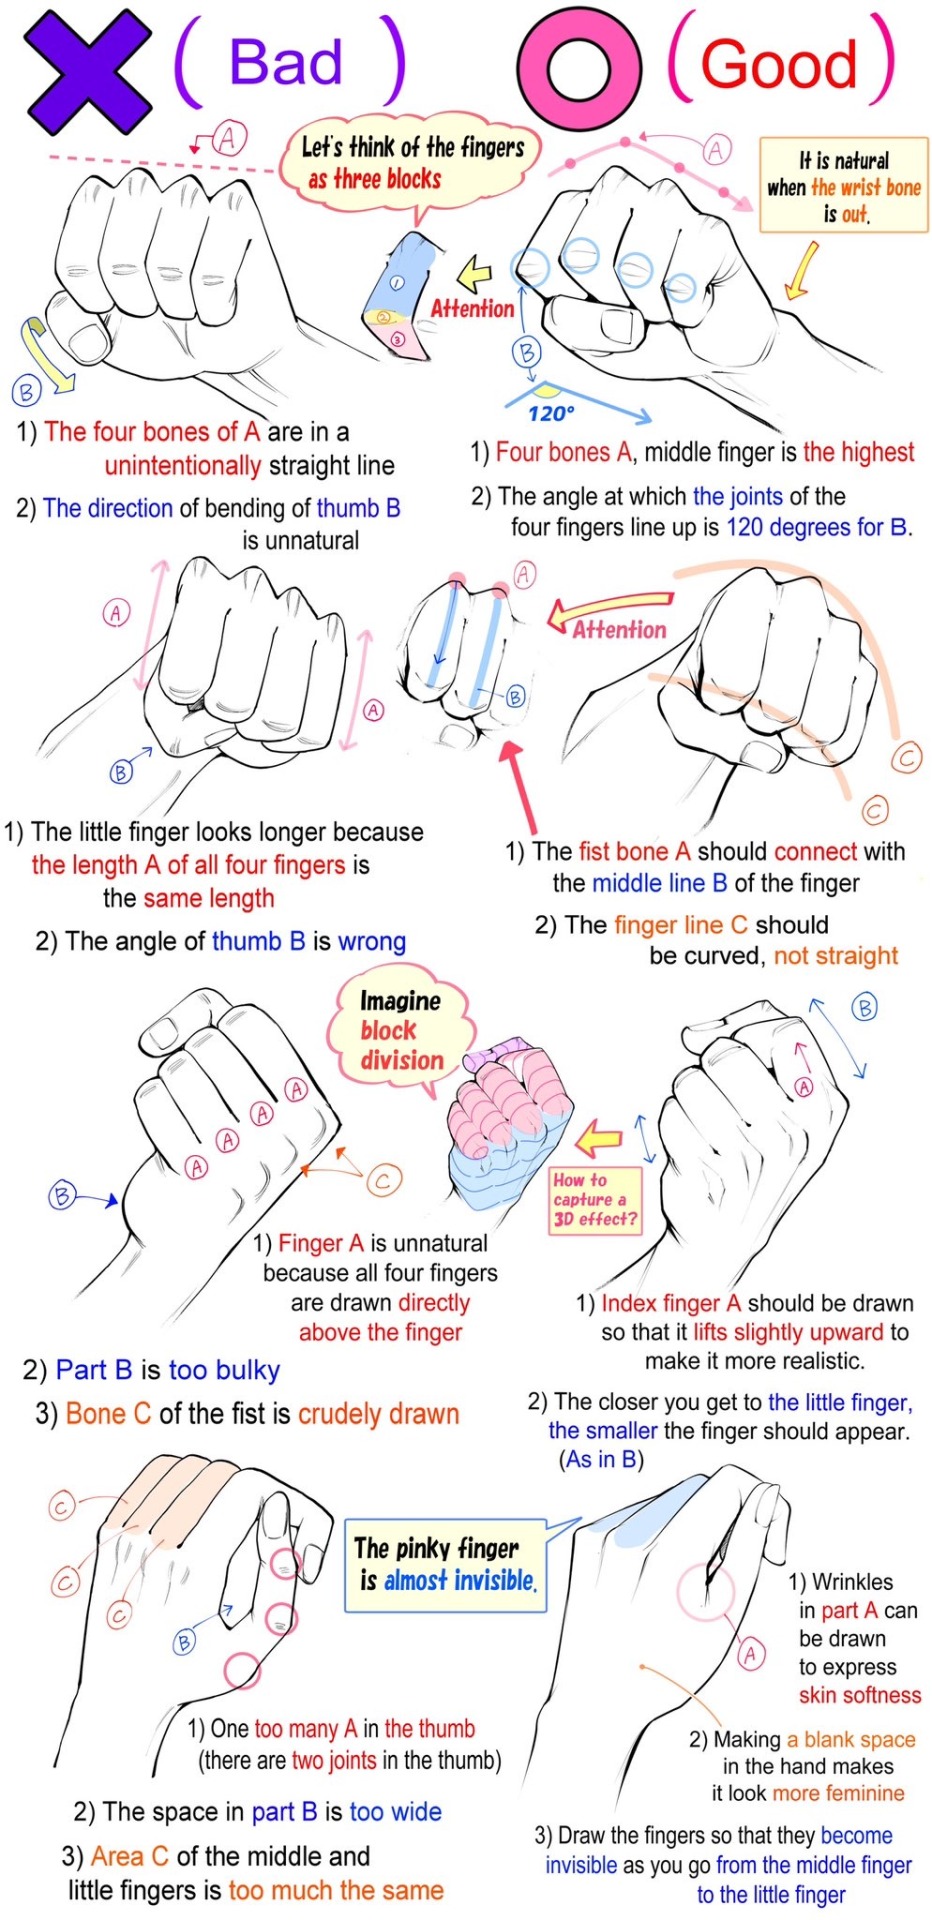
“Techniques for drawing hands with clenched fists”
Source: Twitter
4K notes
·
View notes
Text
This is my TikTok if anyone is interested in seeing my art there. I only have a few videos so far, but there will be more. ;)
3 notes
·
View notes
Text
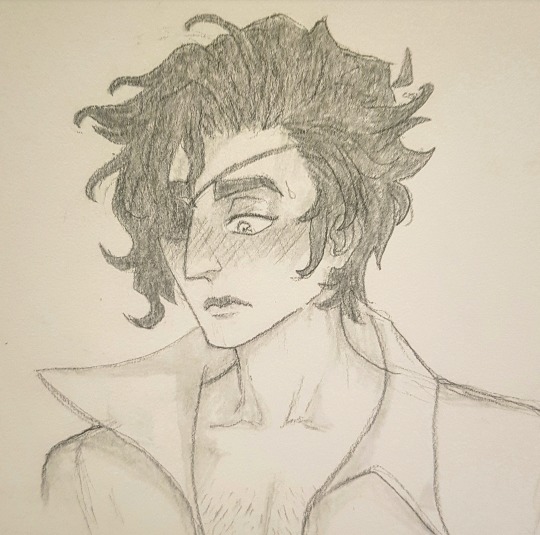
Just a quick sketch of our loveable idiot, Julian, blushing to the tips of his ears. Oh gosh, he's so adorable! I've been enjoying his story line so much ❤
14 notes
·
View notes
Text
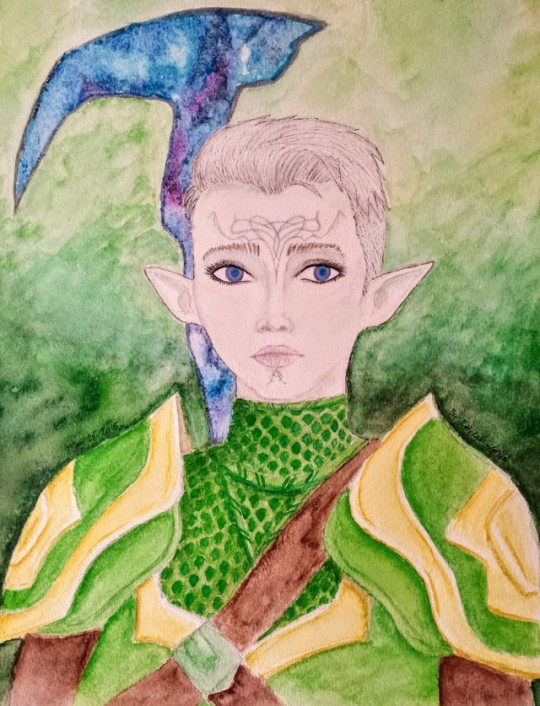
This is a Dragon Age character that I drew for an old friend, its about two years old now but I'm still proud of it ❤
#dragon age inquisition#dragon age#dragon age elf#dragon age elves#dragon age oc#dragon age inquisitor
18 notes
·
View notes
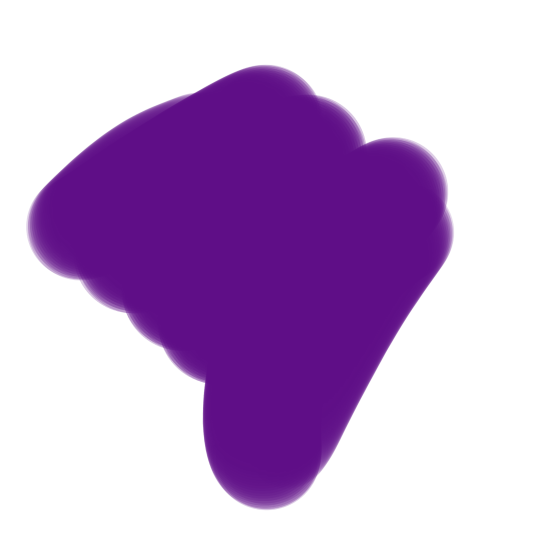
Text
lets get furry
you wanna make really nice lookin fur?? don’t know how all those furry artists do it???? allow me to educate you then
1: Lay down your base color! This is important and should be darker than the color you are aiming for.
2: Take that boss ass acrylic brush and set that thing as follows.
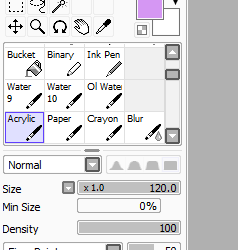
notice how we already are picking out our desired shade of lavender!
3: on the same layer as your base (if you are uncomfortable, make a duplicate so you don’t have to worry) and start making little strokes in the direction you want your fur to go. Put these strokes into rough rows and make sure you space them out enough for them to be told apart.
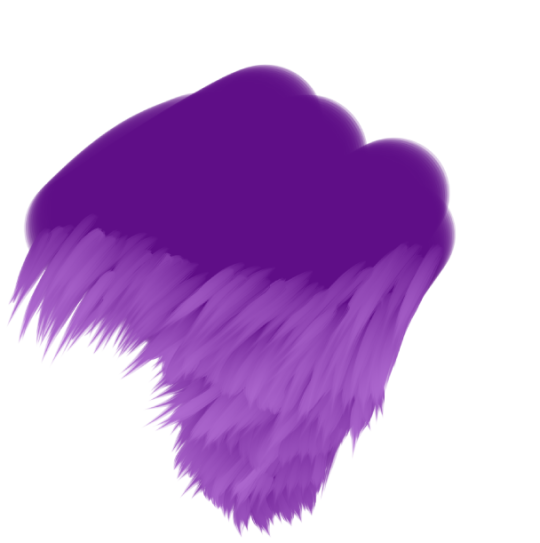
5: Keep going until you’re done! Want some cool dyed tips to your fur? Just choose a different color! Let’s start adding some cyan tips.
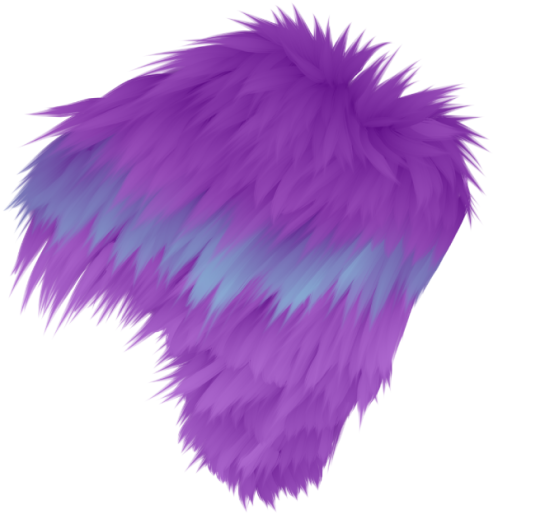
Just rinse and repeat until you’re satisfied! Don’t be afraid to play around with blending either, it can lead to some cool combos!
20K notes
·
View notes
Photo
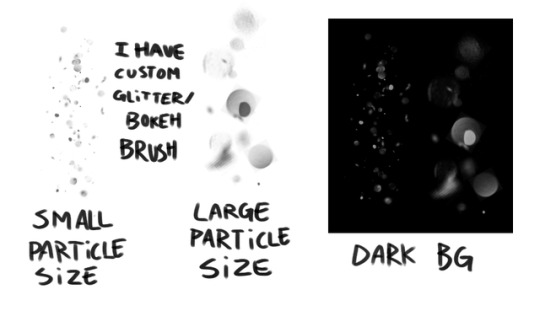
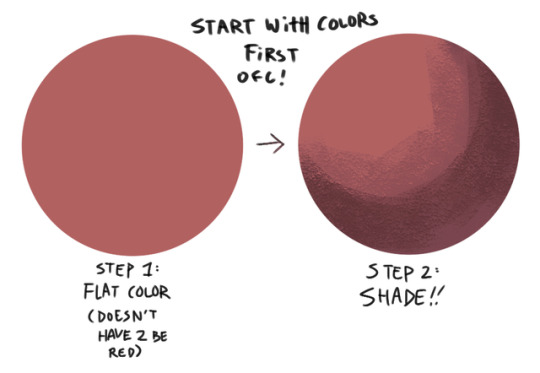
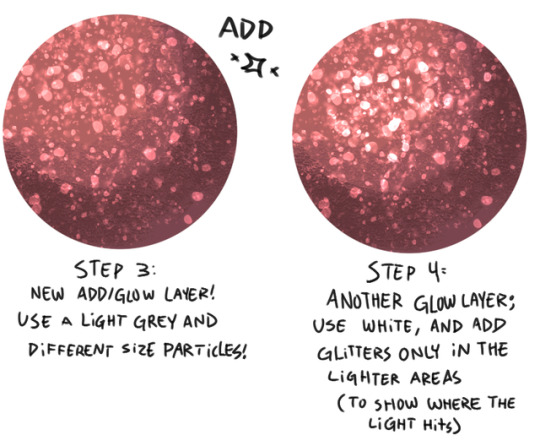
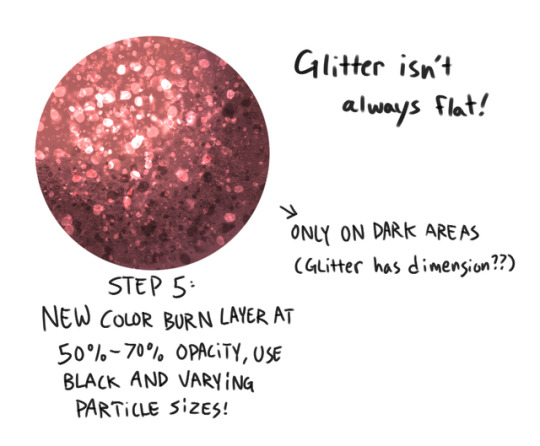
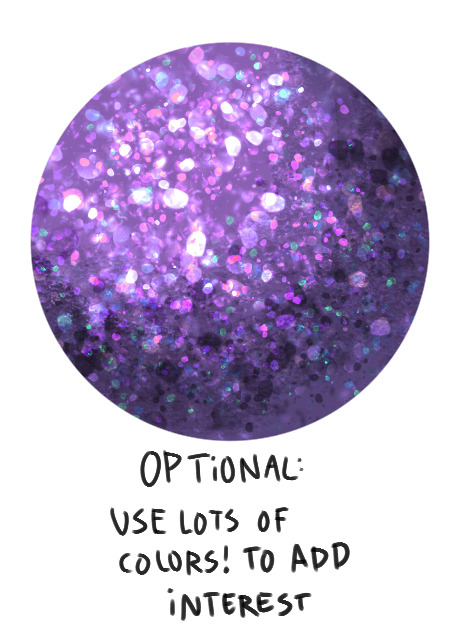
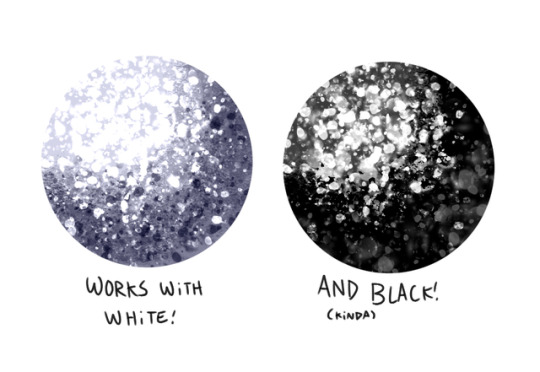
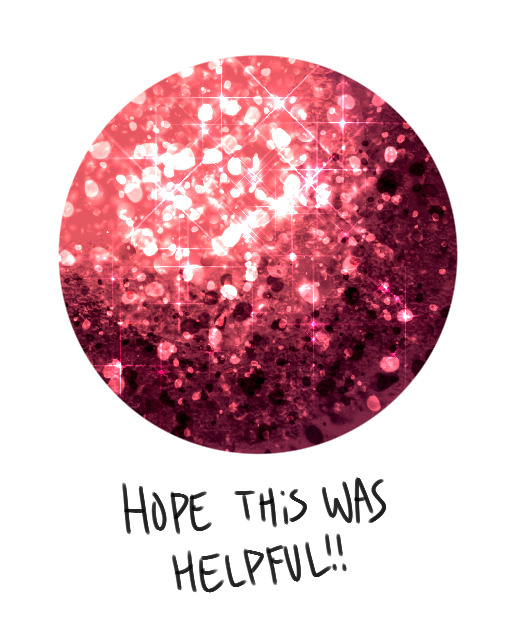
a small glitter tutorial that is badly cropped and vague i am sorry
hopefully this helps some people though!! This tutorial is for clip studio paint or photoshop mostly but im pretty sure you can do it with any program that has particle brushes!
Repost with credit is okay?? yes
26K notes
·
View notes
Photo
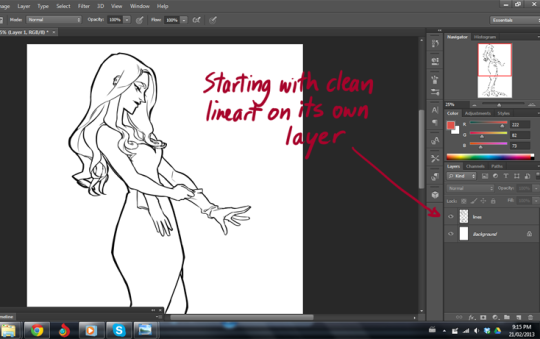
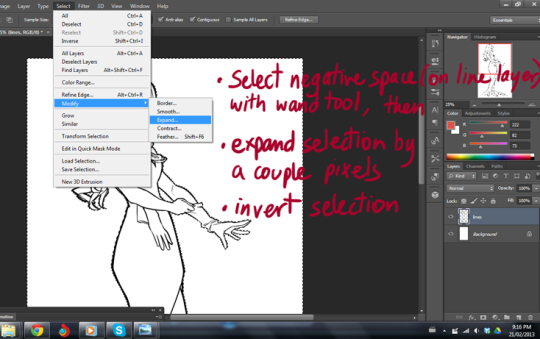
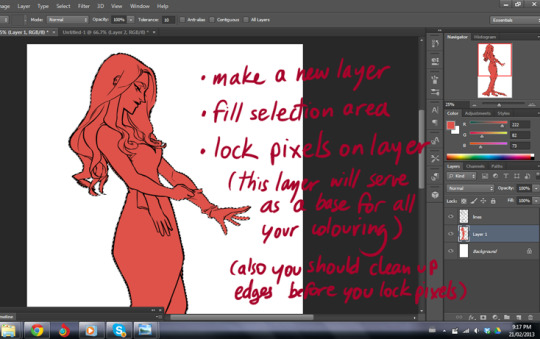
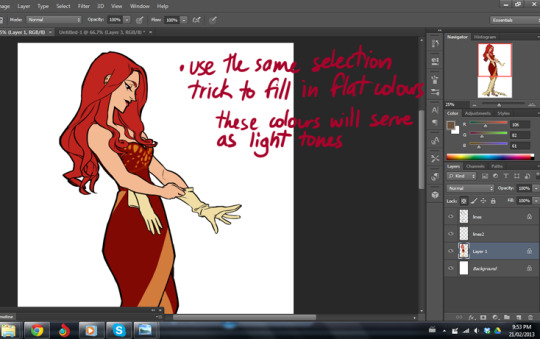
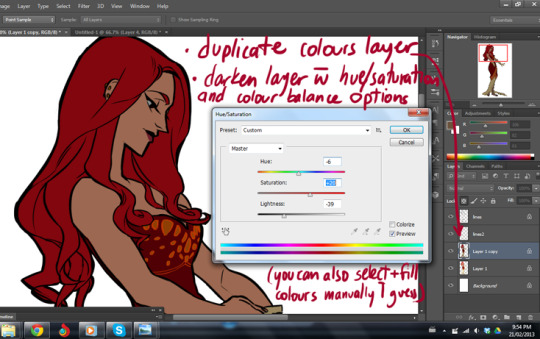

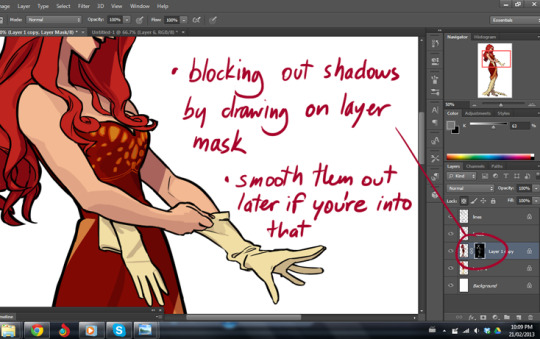
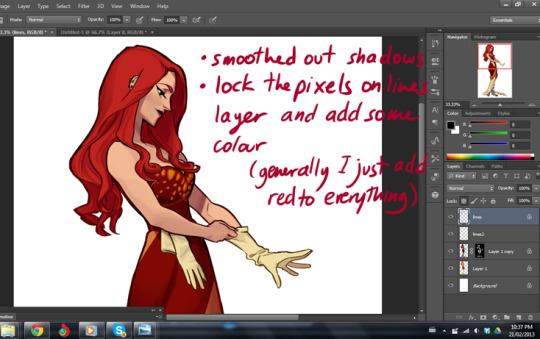
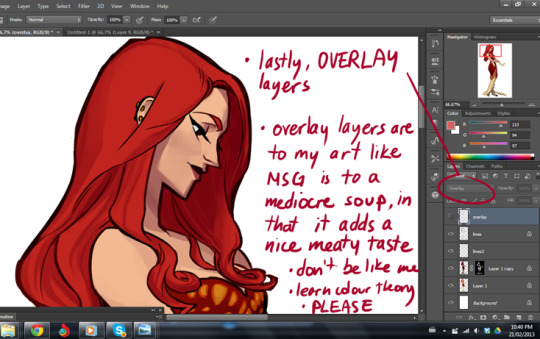
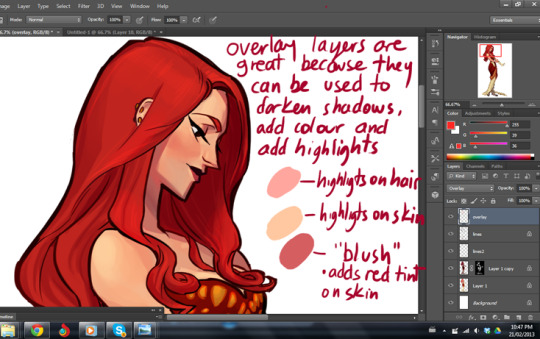
Oh no it’s a COLOURING WALKTHROUGH
The last time I did one of these I felt it was inadequate because all I did was flip through the layers of a completed piece. So this time I took screenshots as I drew!
Other notes:
This is only my method for fast colouring; if I had, say, metallic objects, or fur to colour I would likely paint it with none of the shadows layer masking business, which seems to work best on objects that aren’t particularly shiny.
If you look at the timestamps, apparently I took about an hour an a half to colour this.
Smoothing out the shadows was done with a hard round brush with flow and opacity controls turned on. (it’s a default brush.)
Your flat colours are the most important part of this process - the layer adjustments trick will save you from having to pick a second round of colours for shadows manually, but if your flats aren’t up to scratch the whole piece will suffer. Make sure your colour scheme works here before moving to shading.
Finished product can be found here. I hope this is helpful!
11K notes
·
View notes
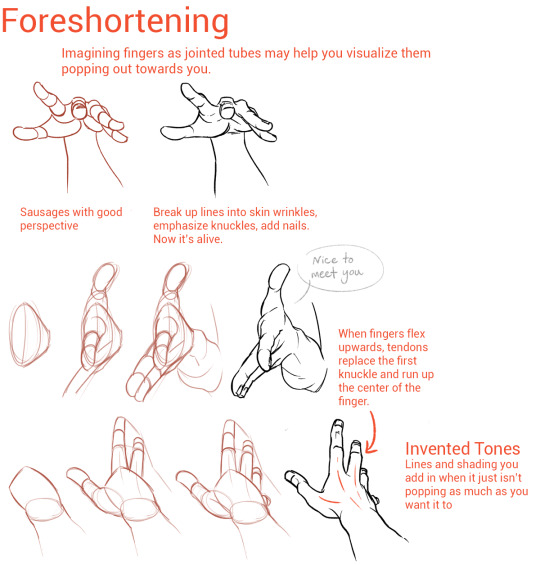
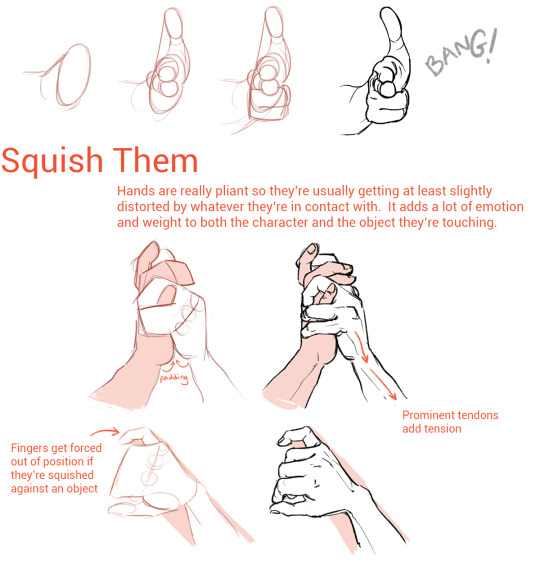
Note
I'm kinda ashamed to ask this, but could you make a tutorial on how to draw hands? ;A;
omg dont be ashamed at all!! Hands are generally tough to get used to, lots of artists struggle with it! so dont be ashamed i feel you.
and I actually have made a hand anatomy guide before in fact! If you want to get better at drawing hands I def recommend you learn the basic anatomy first. Please check out the ones I made, I try to make it simple and easy to understand:
Artistic Anatomy: Hands Part 1
Artistic Anatomy: Hands Part 2
There’s my guide to the anatomy, but here’s some more tips that I’ve noted to myself that I’d like to include

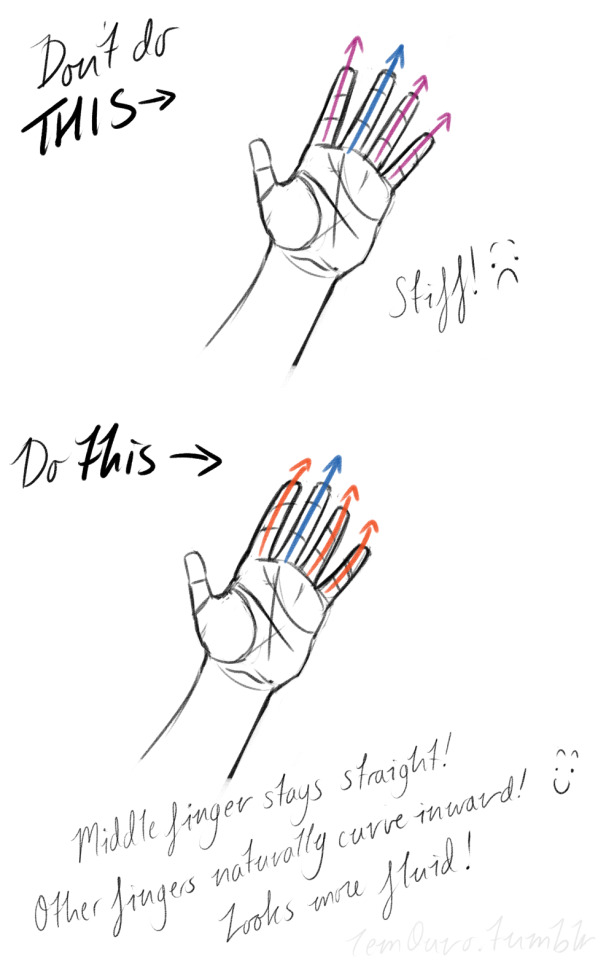
First off, I’d like to just note on the fingers: if you pay close attention to your own hand, you may notice the fingers are ever ever so slightly curved inward. It’s a very subtle detail, but I noticed that, despite how slight it is, it can make a hand look more lively, and less stiff.
Second, the “M” on the palm! Your hand moves in many ways, and because it does it creates creases in your hand. The most prominent creases appear to make an M shape; this is handy to remember for what I’m going to talk about next. (It also could be a “W” I guess, or to be more specific a “ )X( “; just think of it in whatever way helps you remember!)

SO now that you see the M, draw your hand as a basic blocked shape and add your details. As you do, you can see that the M divides the palm into four basic parts!
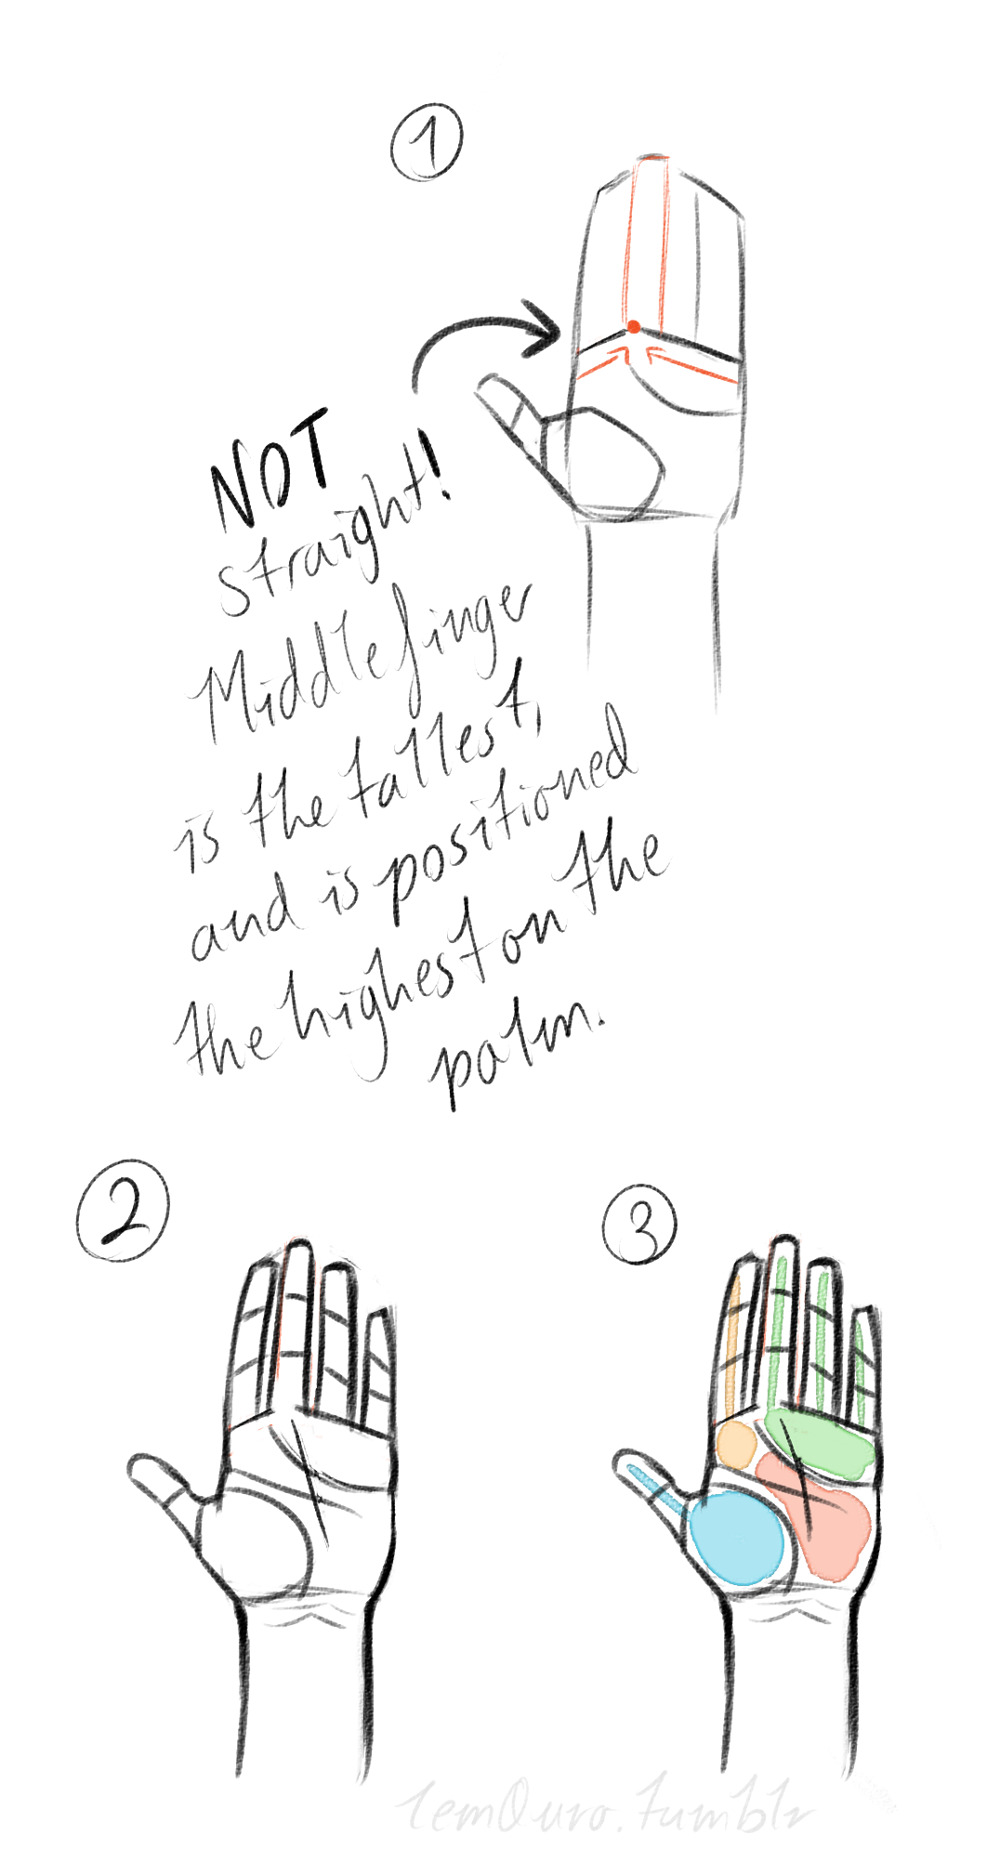

When the hand moves, parts A, B, or C of the palm, alone or in different combos, will create the general poses that the hands do normally. These parts are the parts that move, with D being stationary, no matter what!
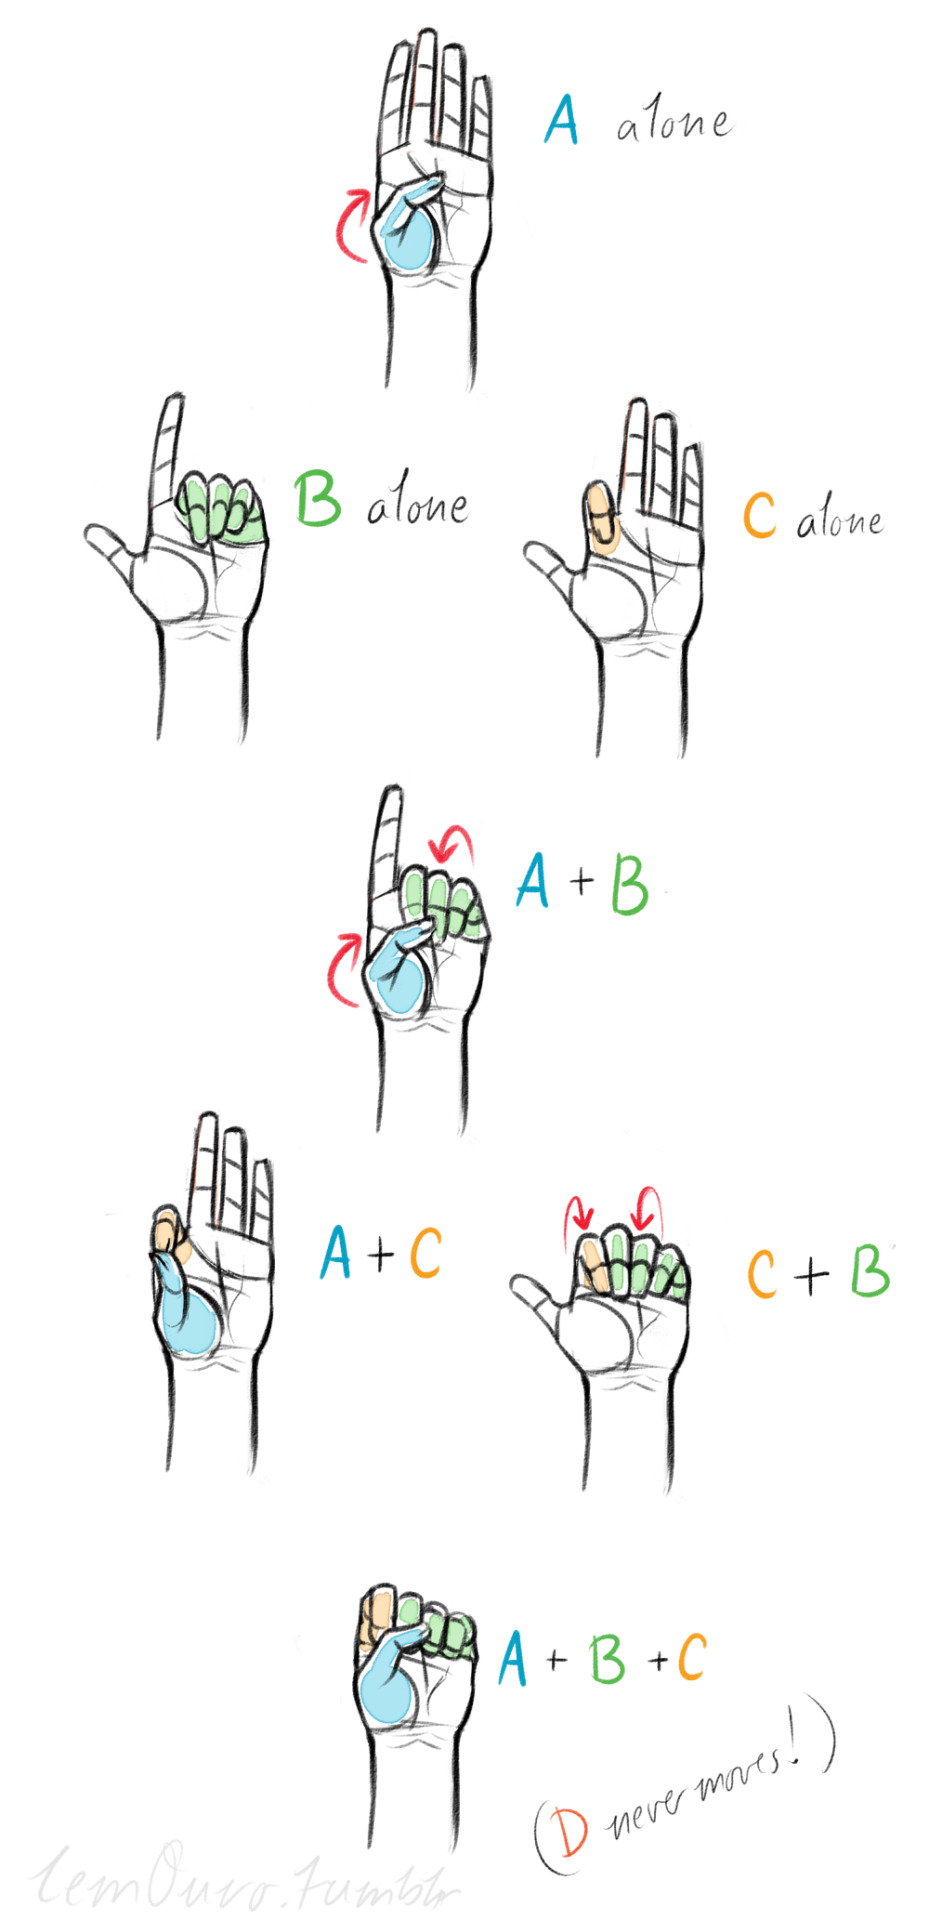
Here’s a chart of all the possible combos. Once you have down what part of the hand moves for a certain pose, you can change up the fingers and tweak it a bit to do what you need to make it more specific!
This is simply my method of drawing hands. God knows there are hundreds of tutorials out there by other artists, but personally, this way helps me the best (after learning the anatomy first).
This way I can divide the hand and combine the parts in any such way I need!
Hands take a lot of effort to grapple, and you need to practice them a lot, especially foreshortening of the hand; that’s really something you need to learn through your own studies. Look at your own hands, draw hands from life, from magazines, shows, comics; just draw hands! You’ll eventually figure out a method that works best for you. So to get better at drawing hands; draw hands!! And don’t stress over it, have fun with it!

#art ref#hands#hand reference#hand tutorial#art tips#art advice#anatomy ref#art reference#artist tips#artist ref
60K notes
·
View notes
Photo
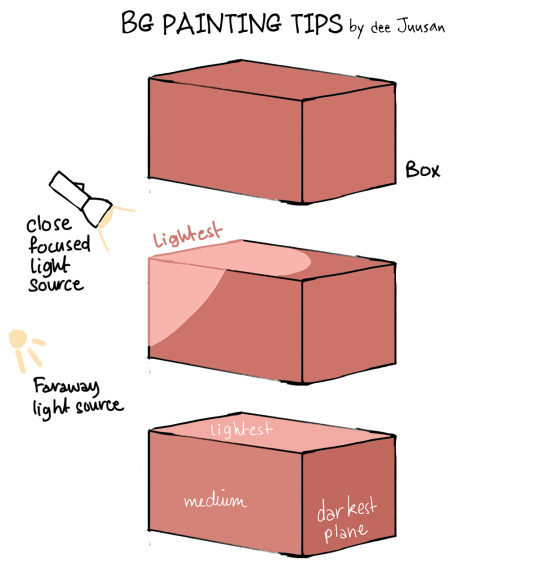
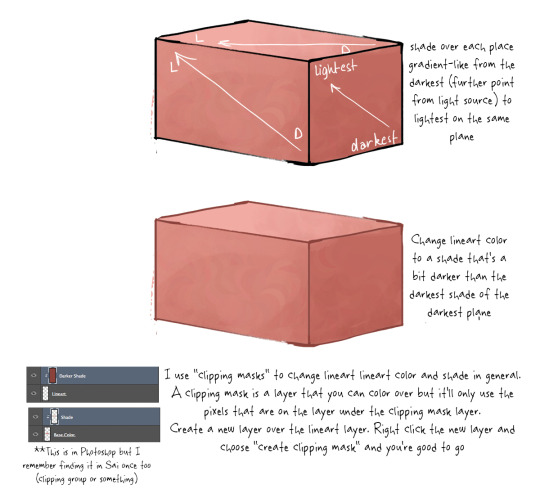
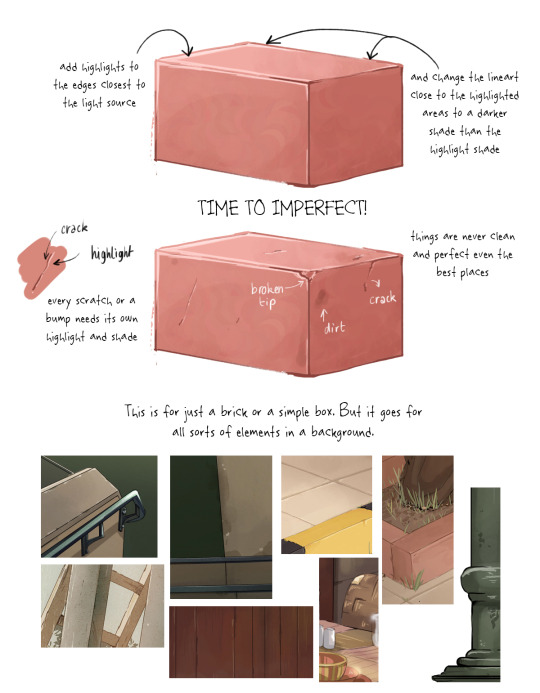
A quick tutorial on how I paint (mostly angular) shaped objects in a BG.
58K notes
·
View notes
Photo


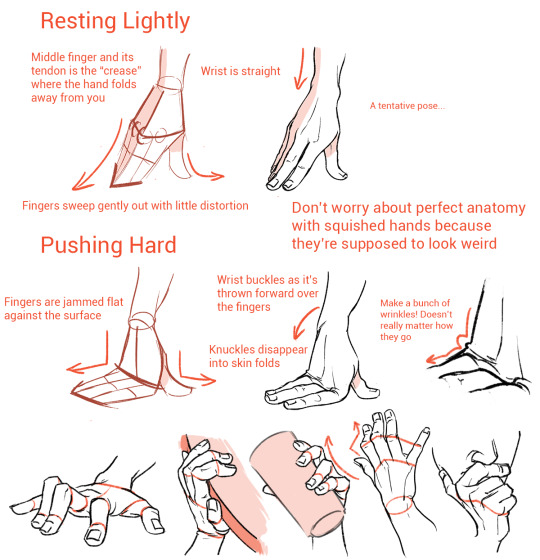
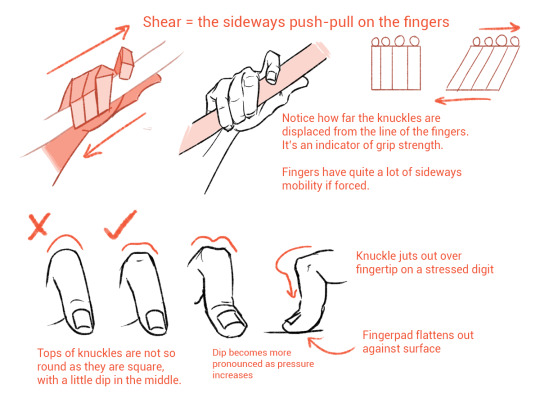
I’m not an expert but I like hands a lot so hopefully some of this was helpful!
224K notes
·
View notes
Text
Thank you anon! l made some small examples of how l do folds and I’m going to try my best to explain it as best as l could.
When drawing clothing, it’s best to use a cylinder as a guide on how the fabric would look being wrapped around it. The folds of the fabric should be following the same direction of the cylinder’s form with round strokes. The first mistake from the example below, straight lines can takes away the form and leaves a flat unnatural feeling. Remember to think 3D!

Creases and folds should be drawn on tension areas, as in when the fabric gets tighten or fold together. Think of the direction on where the tension is going or coming from. The more tension there are, the longer and straighter the crease is. When the object bends, fabric tends to make a oval-ish looking hoops with overlapping folds (Do not over do them or it will look tedious).

There are more to it for drapery, this is just the basic idea of what to look out for when drawing clothing. BUT most important of all is USE REFERENCE!! I know it’s the most used excuse, but for sure use it because it will be super super helpful!
3K notes
·
View notes
Photo

“Campers, I’d like you to meet your new camp counselor Max!”
Eighteen year old Max decides to return to Camp Campbell after being asked by David (now the owner of said camp) if he wouldn’t mind helping out since one of his employees had a family emergency and needed to go home. He agrees but only because its David whos asking him and despite what he says about the man out loud, he’s actually quite fond of him.
He wears his camp camp T-shirt under his blue hoodie because he absolutely refused to be seen wearing it in public, even though he secretly loves it.
Could be seen as Maxvid since Max is legally an adult, or simply as Dadvid. Take you pick darlings, I don’t mind. ;)
83 notes
·
View notes
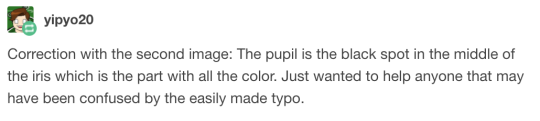
Photo
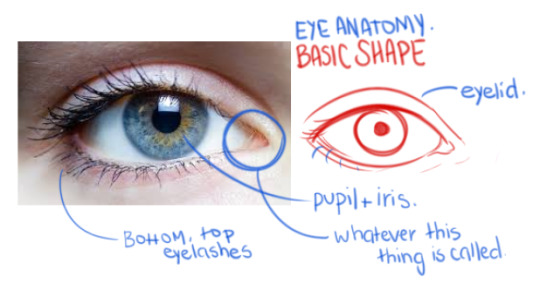
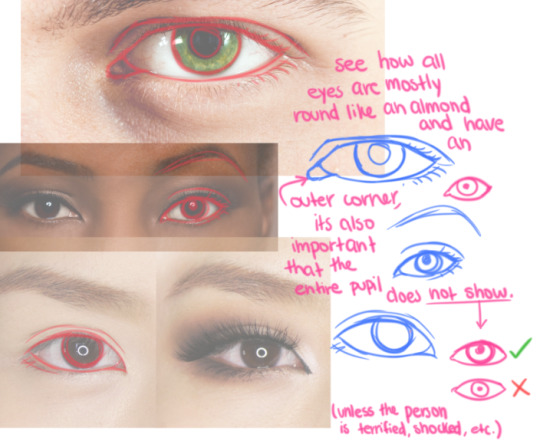
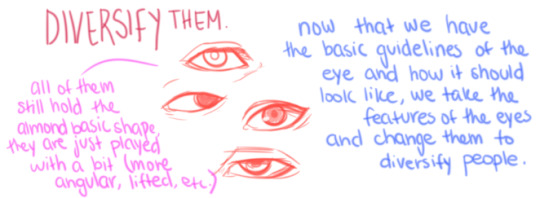
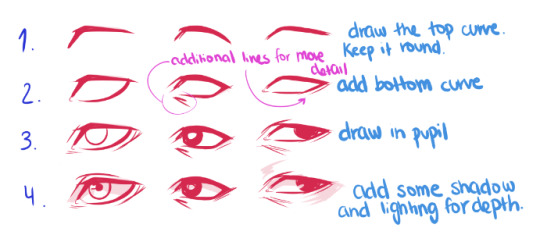
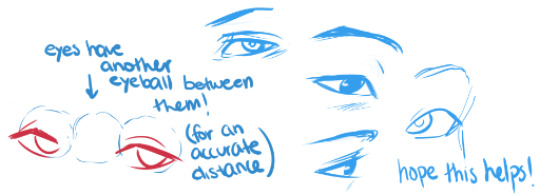
I got multiple people asking for help with eyes, so I threw something together quick
EDIT: ah yeah, my bad! thank you @yipyo20
31K notes
·
View notes