
Statistics
We looked inside some of the posts by purposecode and here's what we found interesting.
Average Info
Notes Per Post
2
Likes Per Post
2
Reblog Per Post
0
Reply Per Post
0
Time Between Posts
3 days
Number of Posts By Type
Link
12
Text
5
Last Seen Tumblr Blogs


Fun Fact
Users from the US are the majority of Tumblr visitors.
Link
How to create dates in JavaScript
0 notes
Link
How long does it take to learn Javascript?
#javascript#webdev#web developing company#web developers#webdevelopment#webdesign#html#htmlandcss#html tags#html5 css3#css for beginners#css3
0 notes
Link
20 Javascript array methods.
0 notes
Text
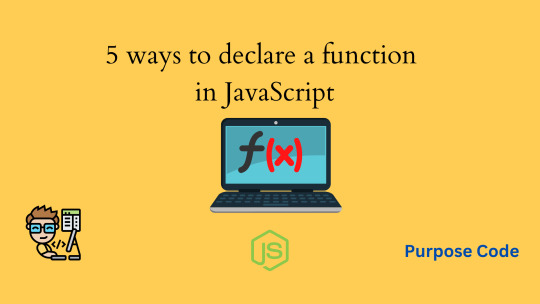
5 ways to declare a function in JavaScript
JavaScript functions are used to perform actions when certain events occur. They are also called methods.
A JavaScript function is usually a block of code that contains a group of instructions to execute.
There are many ways to declare a simple function in JavaScript. In this tutorial, we will explore them with some examples.
1)- Ways to declare functions
a)- Function declaration
Also called a function statement or a function definition, is the most common way of declaring a function in JavaScript.
The function declaration method simply means that we will declare the function using the keyword function followed by the name of the function itself like below:

So here “function” is the keyword, and “course” is the name of the function.
If we want to call the function all we have to do is write its name followed by the parenthesis like below:

A function can take arguments. If we have dynamic data, we can pass the function as many parameters as we want.
Let’s say that for function course() whenever we call it we want it to display “Welcome to this tutorial” plus the name of the student.
The name of the student can change, as we can have 10 or 20 or 30 students….
So to do that we will pass a parameter called “studentName” to the function.

So now for the function to display what we want, at the moment when we will call it we should pass it the name of the student.
Let’s say that the student’s name is Thomas.
So the code will be:

b)- Anonymous function
When a function is declared anonymously, it means that the function does not have any name.
Unlike in the general declaration function where a name is given to a function, in the anonymous function there is no name.
An anonymous function is declared using the function keyword only, like below:

As you can see, the function does not have any name. That’s why it is called anonymous.
However, as an anonymous function is not accessible after its initial creation, and as it can only be accessed via a variable, we will store it in a variable that we’ll call course, and this is what we’ll see in the next paragraph.
c)- Function expression
The function expression method allows us to create an anonymous function that doesn’t have any function name.
Below is an example of an anonymous function expression. let’s see the code:

Here the variable course stores an anonymous function.
So the anonymous function is invoked by calling out the variable with trailing parenthesis and semicolons.
The code below will call the function:

d)- Arrow function
This method is a cleaner way of creating JavaScript functions.
So instead of declaring a function like this:

To continue reading check the tutorial here:
5 ways to declare a function in JavaScript
0 notes
Text
Audio and Video HTML Tutorial – Learn how to add sound effects, videos and Youtube videos to your website

Is it possible to embed audio and video files into web pages without using Flash or other plugins?
HTML5 is a new standard for creating websites and apps. It was developed by the World Wide Web Consortium (W3C) and aims to provide developers with better tools for building cross-platform applications. The W3C has also created a specification called Web Audio API that allows developers to create interactive audio experiences within their sites.
Audio files, as well as video files, are now part of HTML5, allowing you to add audio content and videos to your site without having to rely on external plug-ins. This means that you don’t need to download additional software to play music or listen to podcasts. Just some custom controls are enough to add the media.
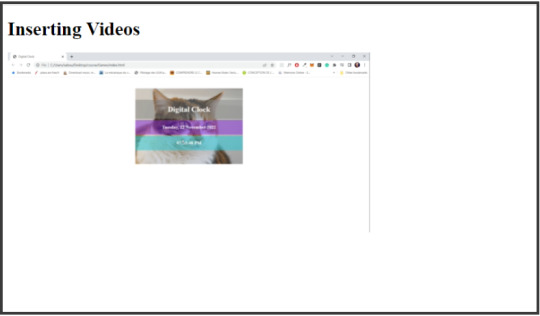
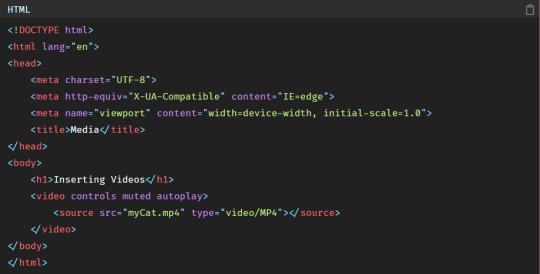
1)- Video
In HTML, to add a video to your website all you have to do is use the <video></video> tag.
Let’s take a simple HTML page with only a heading and a video.
The code is:
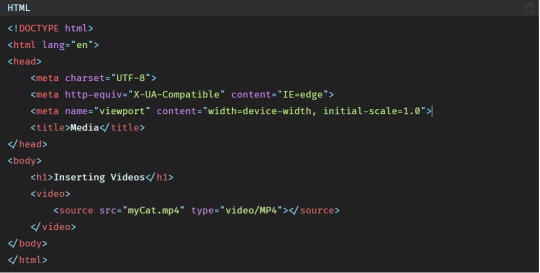
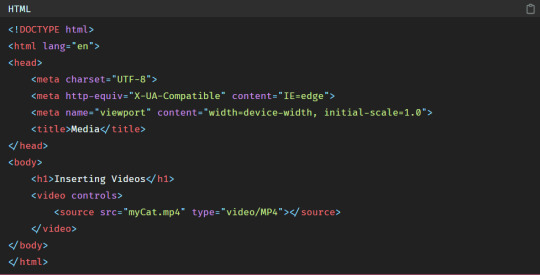
Inside the <video></video> tag we added the <source></source> tag.
The <source></source> tag is used to specify which video should be displayed, or in other words, to determine the source element of the video.
For that, the <source></source> tag accepts one essential attribute which is the src attribute. The src attribute is the one that takes in the name of the video we want to display plus the extension of the video.
Another attribute can be added to determine the type of the video, this attribute is type but it is optional.
So in the browser we have:
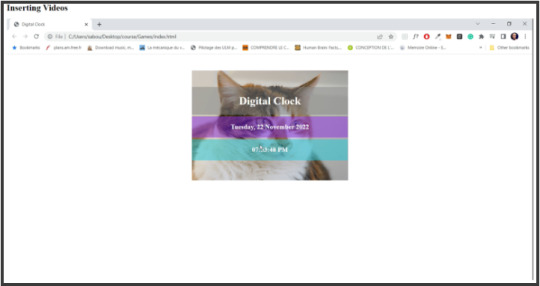
As you can see here, the video is now added to the browser. But there are 2 main problems here:
The first problem is that the video is taking up too much space, and the second problem is that there are no controls. So if we want to play the video or pause it or turn up the volume, we can’t.
Let’s see how to fix these problems.
For the first one, regarding the width of the video, we will just set a width using CSS. You can also set a height if you want , but in this example, we will add a width only:
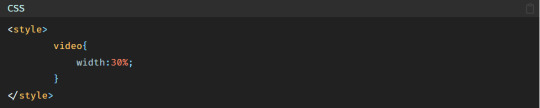
So the video now looks like this:
Now, let’s solve the second problem, which is to add the video controls.
To add video controls simply we will add the controls attribute inside the <video></video> tag like this:
So the video now becomes:
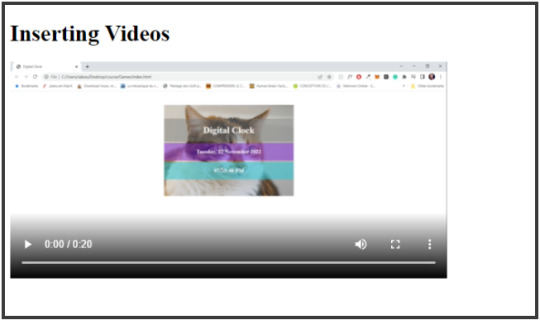
As you have noticed at the bottom of the video you have now this bar where you can play, pause the video, turn up the volume(volume controls)…
There are other attributes you can add to the <video></video> tag to have more control over the video.
a)- muted
To play the video without any sound the muted attribute should be added like this:
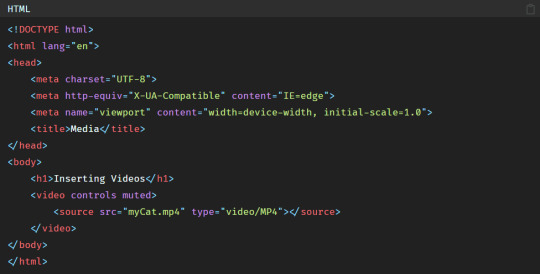
Now if you refresh the browser and play the video, you will see that the sound is muted.
b)- autoplay
autoplay attribute makes the video play automatically when the page is displayed. However, there are some “autoplay policies”: Recently, many browsers allow the video to be automatically played only if it is muted, and that is because when the user loads the page and the video is suddenly played the sound can be annoying. So to counter this problem, browsers now authorize the video to be played automatically if the sound is muted. Which is the case for Chrome autoplay policies for example.
The code is:
Now if you refresh the page you will see that the video plays on the page load.
c)- loop
To play the video again and again in a loop you can add the loop attribute.
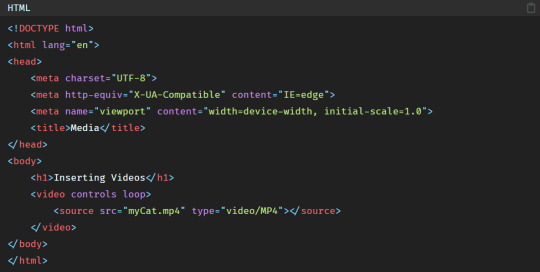
Now if you refresh the page and play the video, at the end you will see that the video will be played once again automatically, you don’t have to do anything.
That makes the video playback easy.
d)- poster
poster attribute allows us to add an image to the video that will be shown as long as the video is not played yet or while the video is downloading.
It is like a thumbnail for Youtube videos for example.
Let’s say that for this video I want an image of a dog to be shown.
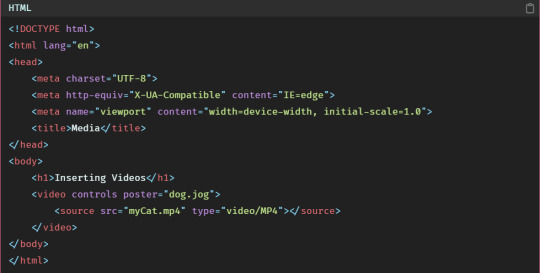
In the browser we have:

So as you can see, as long as the user does not hit the play button, the dog picture will be shown. But if the user plays the video, then the dog picture will disappear.
2)- Audio
To add an audio to the HTML page we’ll use the same code we used to add a video, except this time instead of using <video></video> tag we’ll use <audio></audio> .
So the code is:
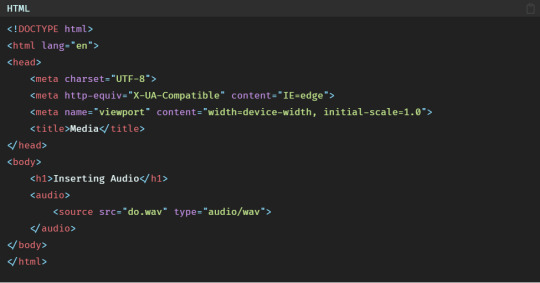
Here the src attribute takes in the audio source.
And the type attribute gives more information about the type of the audio file. So if the audio was an MP3 file for example, we would have added type=audio/mpeg.
The type attribute changes according to the type of the file formats
Now if you refresh the browser you will not see anything, and that is because to display the audio elements we need to add the controls.
So to add audio controls we’ll use the controls attribute.
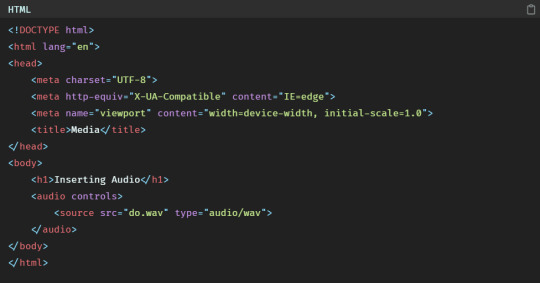
Now we can see the audio file add to the browser:

As for <video></video> tag, we can use the same attributes to have more control over the audio file.
a)- muted
To play the audio without any sound the attribute muted should be added like this:

If you refresh the browser and play the audio, you will notice that the sound is now muted.
b)- autoplay
Audio autoplay attribute makes the audio play automatically when the page is displayed. However if you use Chrome, you will not be able to get the audio displayed automatically even if it is muted, and that is because Chrome has forbidden this.
But, if you try with Firefox, you will see that the audio can be played automatically if it is muted.
So the code is:

So the muted autoplay audio works well in Firefox.
c)- loop
To play the audio again and again in a loop you can add the loop attribute.
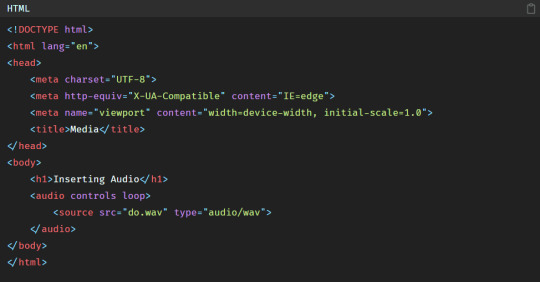
You can refresh the browser and see that the audio will be played again and again in a loop.
That makes the audio playback easy.
3)- YouTube video
To read more check my tutorial:
https://purpose-code.com/how-to-audio-and-video-in-html/
#html#htmlandcss#html5#htmldeveloper#css3#css3code#css#pure css animation#webdesign#webdev#webdevelopment#web developing company#web developers#website
0 notes
Link
Project: Digital Clock
0 notes
Link
How to Start Coding in HTML, CSS, and JS: The Ultimate Guide for Beginners
0 notes
Link
Inline vs Inline-Block vs Block CSS properties
#html tags#css#htmldeveloper#html#learn html#css3code#development css html5 php nodejs wordpress javascript react angular python vuejs django redux typescript 100daysofcode udemy javascript30 b
0 notes
Link
What are the different types of inputs in HTML forms?
#html#i love html5#htmldeveloper#html tags#convert pdf to html#css#css animation examples#development css html5 php nodejs wordpress javascript react angular python vuejs django redux typescript 100daysofcode udemy javascript30 b
0 notes
Link
Understanding JavaScript Objects: From Basic Concepts to Practical Usage
0 notes
Link
HTML tables. How to make a table in HTML?
#html#html5 development#htmldesign#html tutorial#html5games#learn html#html tables#pure css animation#html5 css3#css
0 notes
Text
How to add animations to your website?

CSS animations make an element of the web page move or change its appearance during an action by the user. Modern websites use animations to draw the user’s attention and make the navigation interactive.
Animations help make the website dynamic and offer a satisfactory user experience.
So let’s see how we can make our own animations.
How to add animation to a website?
1)- animation-name and animation duration
To apply an animation to an element we should first of all give this animation a name and a duration.
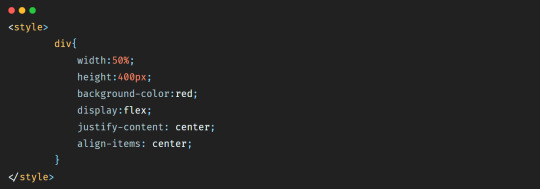
Let’s say that we have a simple <div></div> where we will add some text and we want to animate it.
We will give the <div></div> a width of 50%, a height of 400px and a red background-color. So the HTML will be:
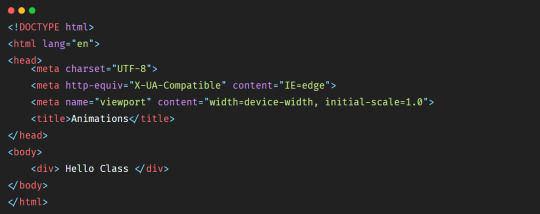
And the CSS that you can add inside the <head></head> tag will be:
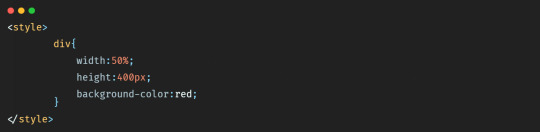
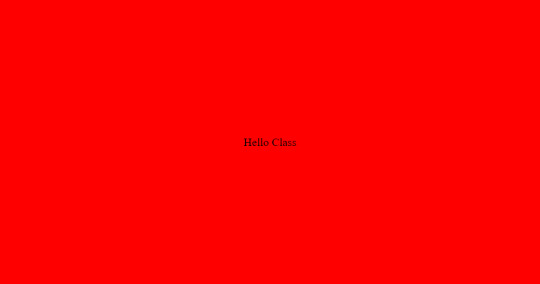
So in the browser we’ll have a simple <div></div> like this:

Let’s add a display flex style to center the text in the middle of the <div></div>.
So in the browser we have:
Now let’s animate our <div></div>. Let’s say that we want the background-color of the <div></div> to move from red to yellow.
First of all we should add a name to this animation so that we can capture it after, and then we should add a duration to say how long should it take for the <div></div> to go from red to yellow.
So the code will be:
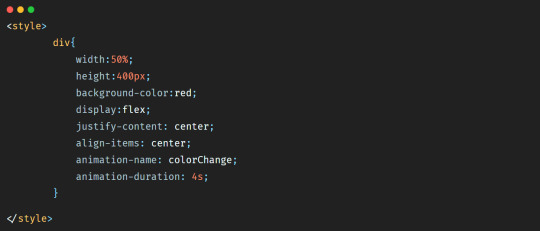
So here the animation-name property allows us to give a name to our animation. And animation-duration allows us to give a duration to the animation.
But by adding these properties only we will not see anything on the browser, nothing will happen.
To run the animation we should use the @keyframes property and add to it the name of the animation like below:
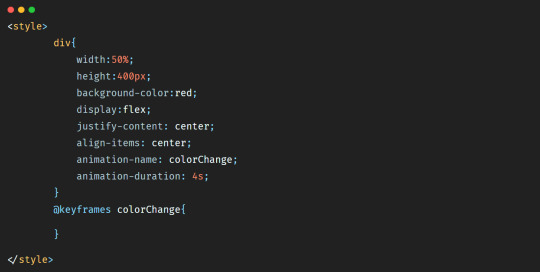
The @keyframes property defines a starting point and an ending point for the animation, which will be expressed by adding keywords from and to.
So to make our <div></div> go from red to yellow within 4s we’ll add the code below:
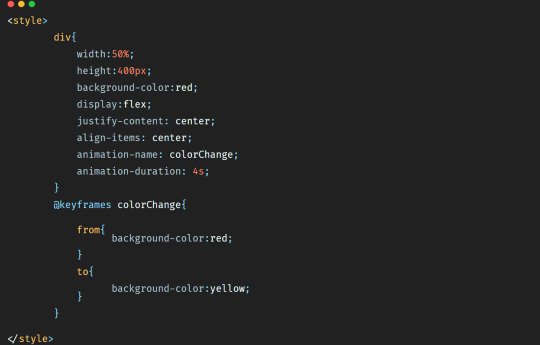
So in the browser we’ll have this animation:
youtube
As you can see, the color went from red to yellow within 4s.
We can also change the width and height properties of the <div></div>. Let’s say that we want the background-color to change, but we want also the width to become 30% and the height 200px.
The code will be then:
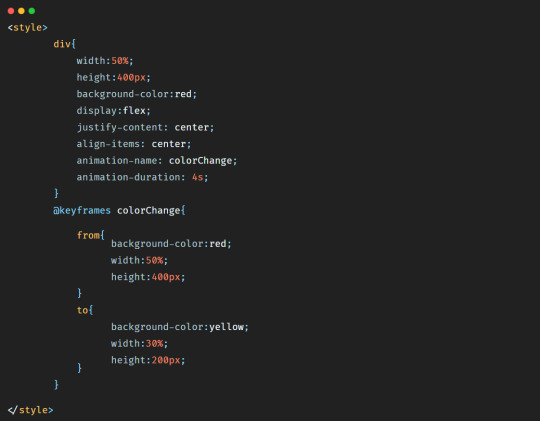
In this case the animation will be:
youtube
Now let’s say that we want to change the background-color of the <div></div>, but this time we want the background-color to be blue first, and then green, and then pink, and then at the end yellow. And let’s make the duration of the animation 8s to have time to see it.
So the code will be:
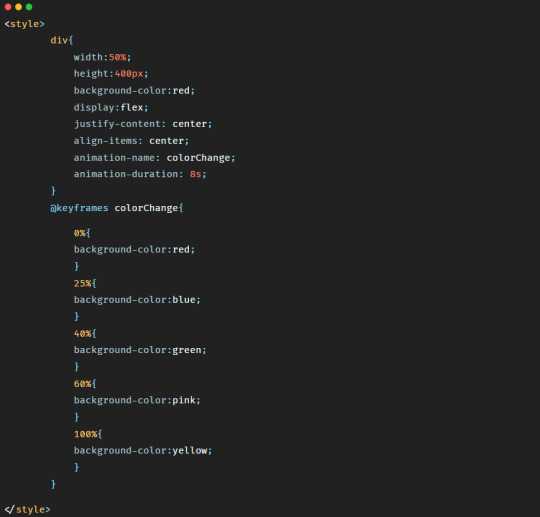
Here as you have probably noticed, we removed the keywords from and to and used percentage instead. It is because by using percentage we can define more styles that we want to see during the animation of our element.
The animation will look like:
youtube
To continue reading check my tutorial: https://purpose-code.com/how-to-add-css-animations-to-a-website/
#css#css animation tutorial#css animation examples#html css#development css html5 php nodejs wordpress javascript react angular python vuejs django redux typescript 100daysofcode udemy javascript30 b#learn css#htmlandcss#html5 css3
0 notes
Link
How to make money from your skill as a web developer?
0 notes
Link
Most used HTML tags CheatSheet
0 notes
Link
How to build a dropdown list in HTML
#html#i love html5#html website#htmldesign#html tags#javascript#html5 css3#css for beginners#css animation tutorial
0 notes
Text
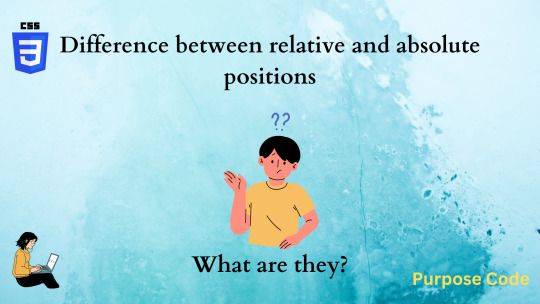
What’s the difference between absolute and relative positioning in CSS?
absolute and relative position properties are used a lot in CSS and seem to be doing the same work, which is positioning an element in the page. But in reality, they’re different.
In this tutorial we’ll see how each one of these properties work.
1)-First difference
a)- absolute position
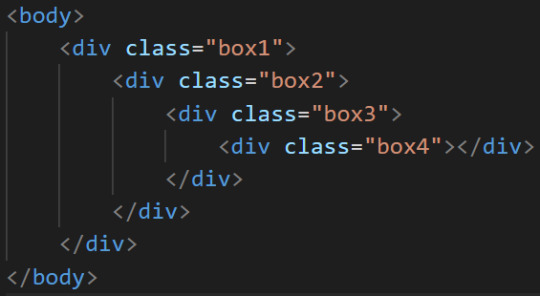
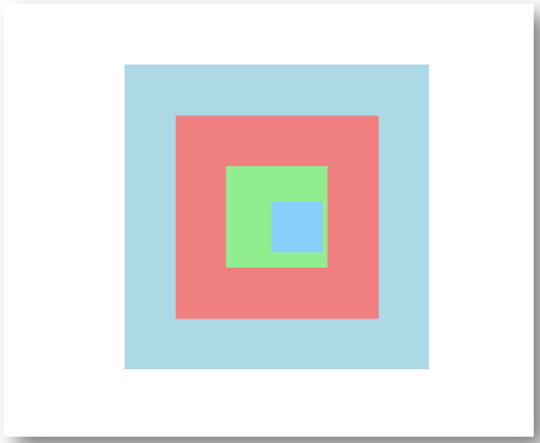
Let’s just take a simple html page that contains 4 <div></div> tags one inside another. These <div></div> tags have a width, height and a background-color.
The HTML code will be:
And the CSS code is:
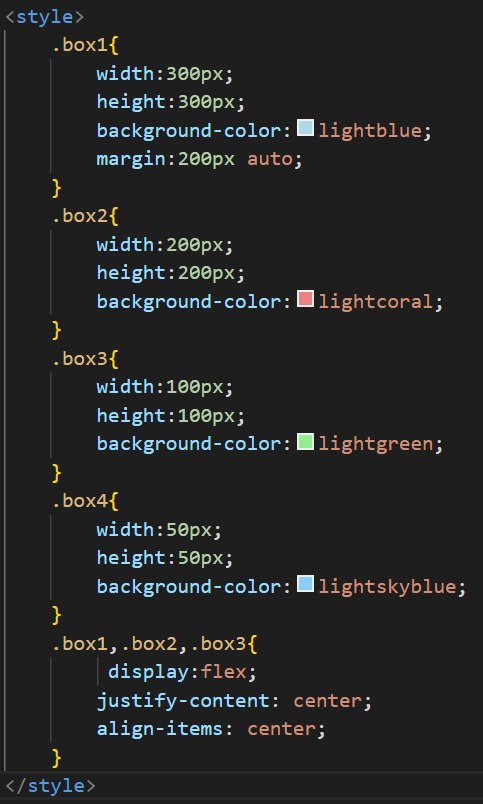
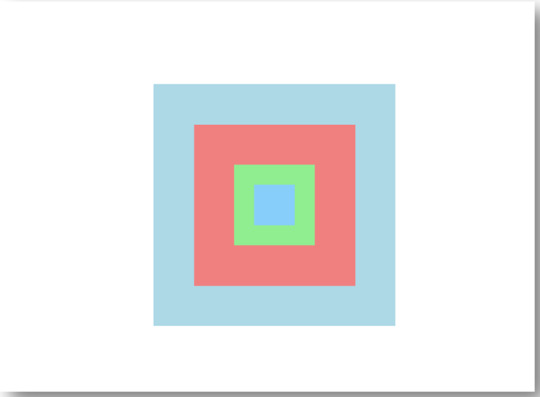
the display flex property is just to center the boxes vertically one inside another. So at the end we’ll have:
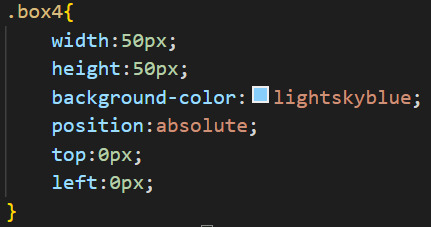
Now let’s apply the position absolute to the small blue box, which means box 4.
So the CSS code becomes:
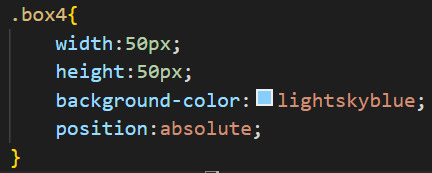
If you refresh the browser you will not see anything changed. Why? Because the absolute position needs top, bottom, left and right values.
let’s position this blue box at the top left corner of the green box. For that we’ll set the top and left to 0px and see what will happen.
The CSS code will be:
So in the browser we’ll have:
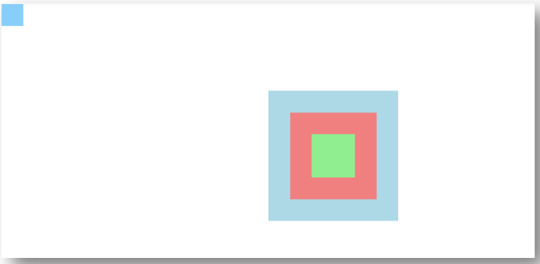
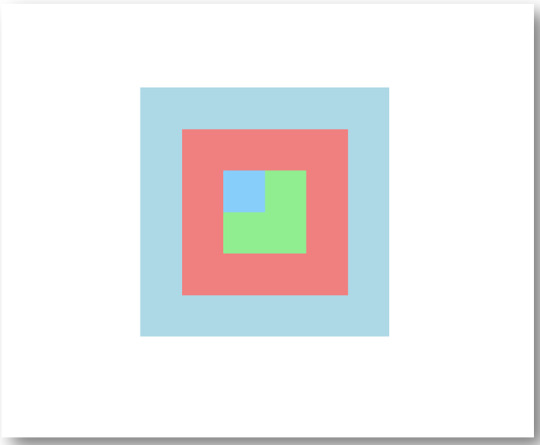
Wow, what’s this! This is not what we want at all ! Why did the blue box move to the top left corner of the page instead of the top left corner of the green box ?
Well, it is because when applying the absolute position to an element, It positions itself to the closest parent that has already its position set.
Here in this example, none of the 3 remaining boxes (light blue, red, green) have their position set. The default position that they have is unset.
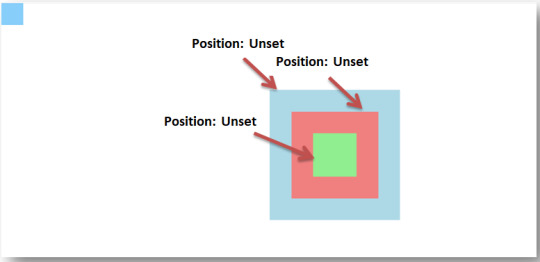
So the small blue box did not find any parent element to position itself to, so what it did it positioned itself to the body.
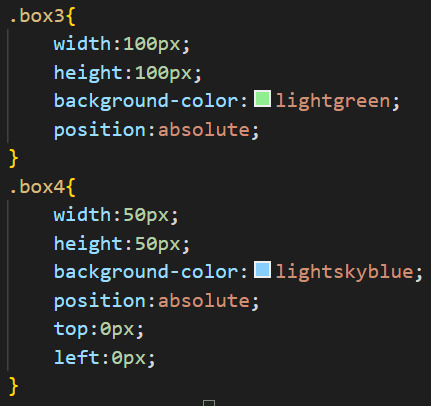
Now, if there was a parent element with a specific position already set, let’s say the position of the green box (which means box3) is set to absolute:
We would have had the results wanted:
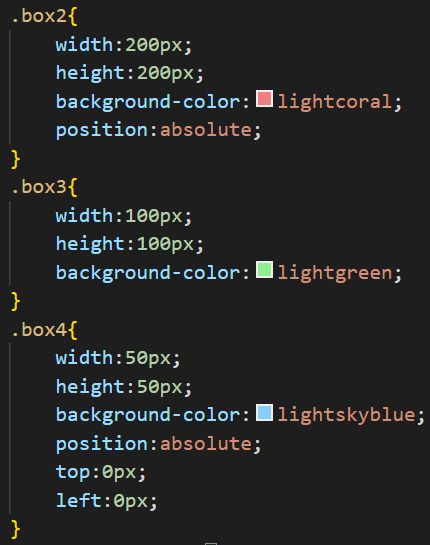
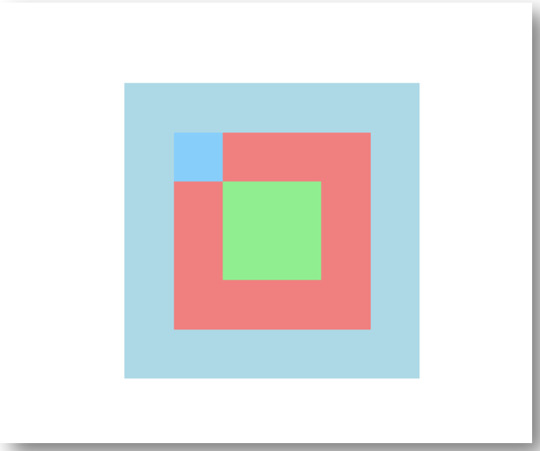
Let’s say now that we want to position the blue box to the red box, so we will add the absolute position to the red box (box 2) and remove it from the green box. Because if we keep the absolute position in the green box as well, the small blue box will position itself to the the closest parent it finds that has the absolute position.
So the code will be:
In the browser we’ll have:
b)- relative position
Now let’s change the position type of the blue box and set it this time to relative instead of absolute. Also let’s give it a top value of 10px and a left value of 20px.
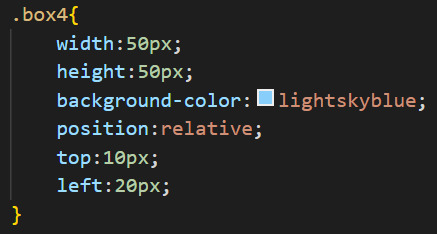
So in the browser we’ll have:
As you have probably noticed, the blue box this time positioned itself to its origin, and not to a certain parent element as with absolute position. And this is the difference between absolute and relative positioning.
You can add absolute or relative position to any parent box you want, this will not affect the positioning of the small blue box.
Because relative position cares only about the origin of the element, and not about a certain parent element position like absolute position does.
2)- Second difference
a)- absolute position
Now let’s take 3 boxes, or 3 <div></div> tags that will be aligned one next to another. Each box has a background-color:
To continue reading check my tutorial:
https://purpose-code.com/absolute-and-relative-positions-whats-the-difference/
1 note
·
View note
Text
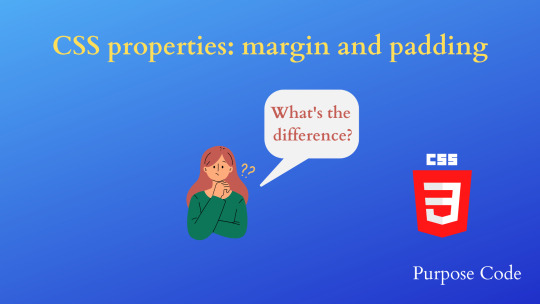
CSS margin and padding: What are they and how do we use them?
If you’re new to CSS or have used it for a little while you might have heard the words margin and padding but aren’t quite sure what they mean, or how to use them in your website.
Both properties are used to provide extra space or a gap. But what is the difference between them if they both provide space?
This tutorial will explain how these elements are used and how do they help in your website design.
1)- Margin property
margin is a CSS property that adds space between the elements.
If you have many elements on your website, and would like to add some space between them and position them differently, you use margin property to do that.
Let’s see some examples:
a)- margin-top
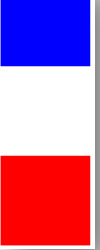
Let’s say that we have 2 <div></div> elements with the same width and the same height, one has a background-color of blue and the other a background-color of red.
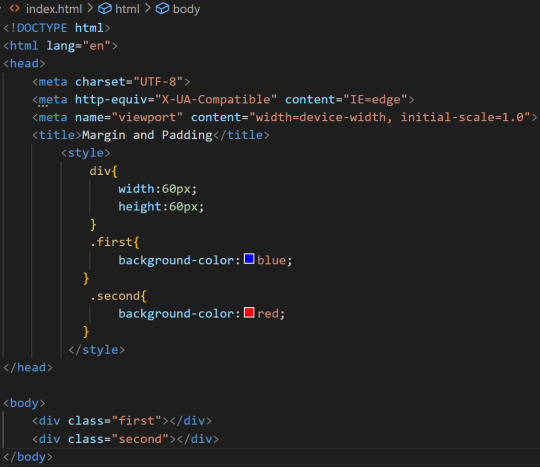
So in the browser they look like this:
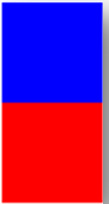
As you can see, they are on the top of each other. There is no space between them.
If we want to add some space between them one of the properties we can use is margin-top.
margin-top is a CSS property that adds some space between the top edge of the element and the bottom edge of the element before it.
in this example, if we add a margin-top to the red <div></div> then it will add space between the top edge of the red <div></div> and the bottom edge of the blue <div></div>.
In other words, it is the red <div></div> that will shift a little bit down because a space will be added to the top.
Let’s add a margin-top of 20 px.
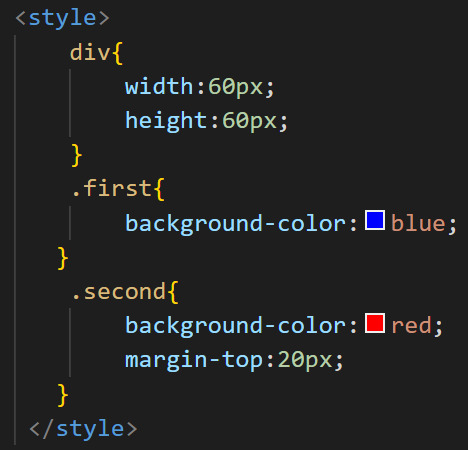
At the end we’ll have:

So now as you can see, a 20px space is added between both elements.
margin-top is a space that is always added between the element and the one before this element.
b)- margin-bottom
margin-bottom property adds some space between the bottom edge of an element and the element after it.
If we add a margin-bottom value to the blue <div></div>, then a space will be added at the bottom of the <div></div> pushing the red <div></div> to go a little bit down.
Let’s add a margin-bottom value of 60px to the blue <div></div>.
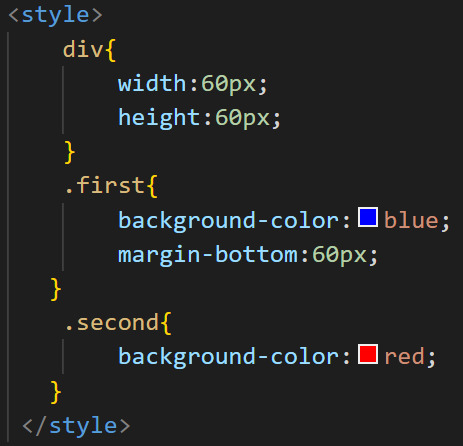
So we’ll have at the end:
Both margin-top and margin-bottom add some space between elements, but one adds space between the top edge of an element and the bottom edge of the element before it (margin-top) and the other adds space between the bottom edge of the element and the element after it(margin-bottom).
margin-top and margin-bottom add space vertically between elements.
c)- margin-left
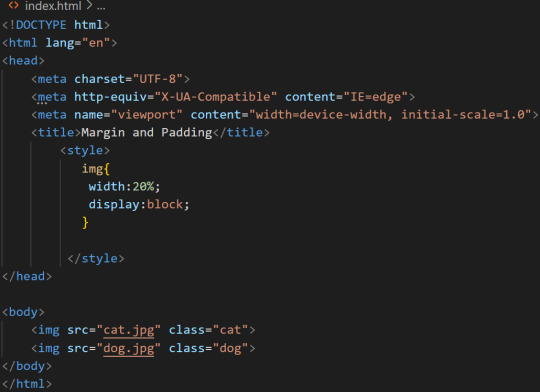
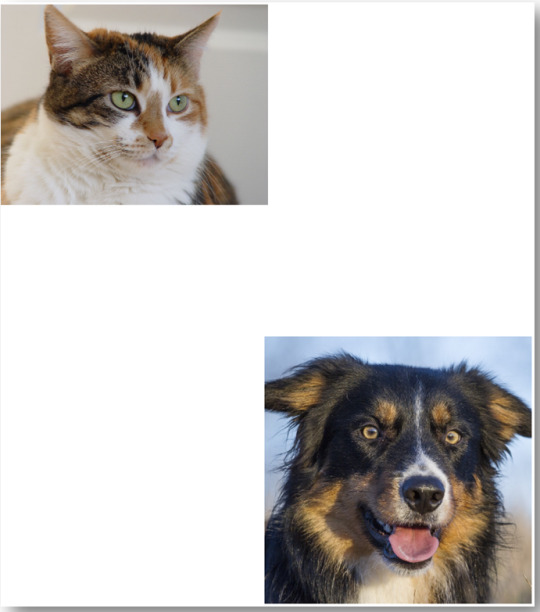
Now let’s take 2 simple pictures, one picture of a cat and one picture of a dog.
let’s display them on the browser and resize them by giving them a width of 20%.
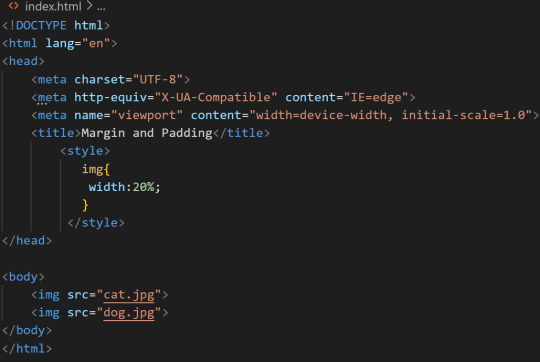
In the browser they look like this:
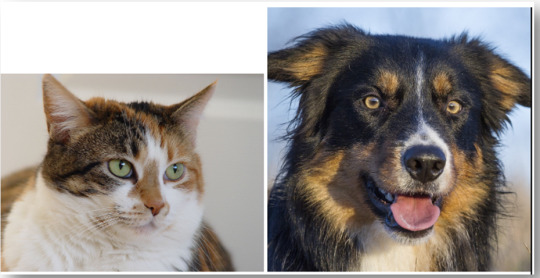
As you have probably noticed, these pictures are aligned one next to another. There is no space between them.
To add some space we can add the margin-left CSS property.
margin-left adds space on the left of an element. For example here if we add a margin-left to the dog image we will have some space on the left of the dog image, and the dog image will be shifted to the right.
Let’s add a margin-left value of 150px.
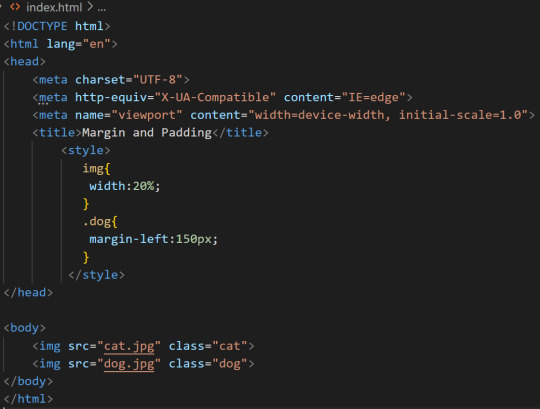
So in the browser we’ll have:
And here you are, now there is a space of 150px between both images.
d)- margin-right
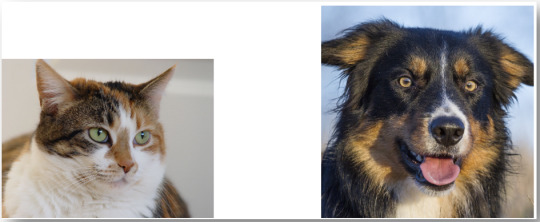
To add some space and push the dog picture to the right, we could have also used margin-right property instead of margin-left.
But this time, we would have applied margin-right property to the cat picture, because we want the dog picture to be pushed to the right. So we need space to be added between the 2 pictures for the dog picture to be pushed to the right. And margin-right adds space on the right of an element.
If we apply margin-right to the dog picture, then we will not notice anything, as the space will be added to the right of the picture and next to the dog picture there isn’t any other element to be pushed.
Let’s add a margin-right value of 200px.
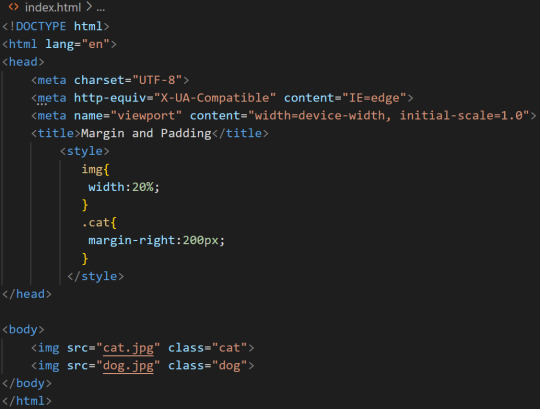
So in the browser we’ll have:

Both margin-left and margin-right add space between elements. margin-left adds space on the left of an element and margin-right on the right.
margin-left and margin-right both add space horizontally between elements.
e)- margin shorthand
For an element, if we want to add some space on the left and the right, or at the top and the bottom, or maybe on the left and the right and the top and the bottom at the same time, instead of using margin-left, margin-right, margin-top and margin-bottom individually, we can combine them in one CSS property that is margin.
For example, let’s say that we want to add some space on the left and the top of the dog picture:
First, let’s display them in block to make one picture below another:
So the pictures will be aligned vertically like this:

Now let’s add some space on the left and the top of the dog picture:
We can write the code like this:
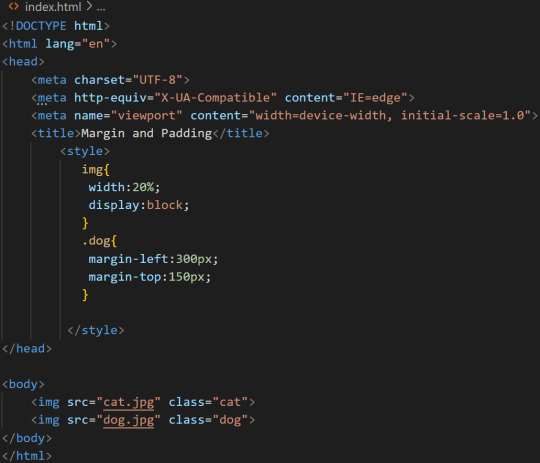
But this can be a little bit long and as we are lazy we will use margin property instead. So the code will be:
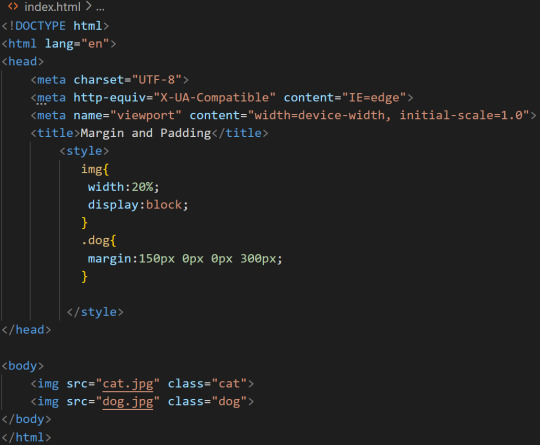
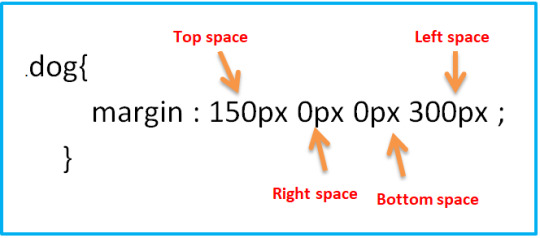
What does it mean? Simply the first value of the margin 150px represents space added at the top of an element, in other words it represents the margin-top property. The next value 0px represents the space that will be added on the right, in other words margin-right property. The next value 0px represents the space that will be added at the bottom, and by now you know that it represents margin-bottom property. And finally the last value 300px is the space that will be added on the left of an element, or should I say margin-left property.
So in the browser we’ll have:
To read more check the following tutorial:
https://purpose-code.com/css-margin-and-padding-what-are-they-and-how-do-we-use-them/
#css#css3code#html5 css3#margin#padding#html#html5#html tutorial#html tags#html tables#html website#htmldesign#javascript
1 note
·
View note