
Statistics
We looked inside some of the posts by qualitytesting and here's what we found interesting.
Average Info
Notes Per Post
5
Likes Per Post
4
Reblog Per Post
1
Reply Per Post
0
Time Between Posts
2 months
Number of Posts By Type
Text
16
Note
1
Last Seen Tumblr Blogs


Fun Fact
The most popular pages on Tumblr are about Minecraft, GIFs, and David J. Peterson.
Text
Writing Screenplay Tests in Swift (Part 3 of 3)
This is part 3 of 3 in a series about using the Screenplay pattern in Swift.
Part 1: What is the Screenplay Pattern?
Part 2: Screenplay Entities with XCTest and Swift
In part 2, we went through a basic implementation of Screenplay pattern entities for the 'bag' domain area of an e-commerce app. In this part, we will see how those entities are used together at the test level to create functional tests.
Vanilla Screenplay Tests
In this example, we'll use the Screenplay entities created in part 2, along with an additional StartedWith task I created, to implement a test for the following scenario:
Given I have six items in my bag When I remove an item from my bag Then I will have five items in my bag
First off, we create an Actor. Your test will center around an Actor. The Actor will perform Tasks and ask Questions. You can assign your actor to a constant so that you don't have to make a new Actor every time you want to get something done.
let alice = Actor(called: "Alice")
Now that you have an Actor ready to do some work, have the Actor perform the test setup. In this scenario, there's only one setup step; having six items in the bag.
alice.has(StartedWith.sixBagItems())
StartedWith.sixBagItems() is a Task which launches the app and ensures that the user's bag has six items in it.
After the test setup is complete, it's time to perform the task which is the subject of our test; removing an item from the bag.
alice.attemptsTo(RemoveBagItem.inPosition(1))
The test scenario doesn't explicitly call for a particular item to be removed, so you can request any index from 0-5 to be removed on this line to satisfy the scenario's requirement.
Finally, ask the Actor if it can see the expected result.
alice.sees(BagItems.displayedCount(is: 5))
And voilà, you have successfully built a Screenplay test!
import XCTest class BagTests: XCTestCase { func testBagItemsCanBeRemoved() { let alice = Actor(called: "Alice") alice.has(StartedWith.sixBagItems()) alice.attemptsTo(RemoveBagItem.inPosition(1)) alice.sees(Bag.Items.displayedCount(is: 5)) } }
If you wanted to use Alice as your Actor for all of the tests in your test class, you could add her to the setUp() method.
import XCTest class BagTests: XCTestCase { var alice: Actor! override func setUp() { alice = Actor(called: "Alice") } func testBagItemsCanBeRemoved() { alice.has(StartedWith.sixBagItems()) alice.attemptsTo(RemoveBagItem.inPosition(1)) alice.sees(Bag.Items.displayedCount(is: 5)) } // More tests go here... }
That's it. Unless you want a Gherkin-like interface...
Screenplay + Given, When, Then
If the 'vanilla' screenplay test style shown above isn't Gherkin-y enough for you, fear not! We can add a simple set of wrappers to enable you to write tests in the beloved Given, When, Then style.
Given I whip up a quick class which wraps around Actor...
class GherkinKeyword { let actor: Actor init(_ name: String) { self.actor = Actor(called: name) } }
When I make some GherkinKeyword subclasses...
class Given: GherkinKeyword { func has(_ task: Task) { actor.has(task) } } class When: GherkinKeyword { func attemptsTo(_ task: Task) { actor.attemptsTo(task) } } class Then: GherkinKeyword { func sees(_ question: Question) { actor.sees(question) } }
Then I can write tests using Gherkin-like syntax!
Given("Bob").has(StartedWith.sixBagItems()) When("Bob").attemptsTo(RemoveBagItem.inPosition(1)) Then("Bob").sees(Bag.Items.displayedCount(is: 5))
Notice that Given only allows you to use has(_:) (the setup task method), When only allows you to use attemptsTo(_:) (the method for performing the task under test) and Then only allows you to use sees(_:) (the questioning/assertion method). This allows your tests' structure to be more easily visible.
Unfortunately, since Given, When and Then are all separate objects, we have to create a new Actor for every step. There's more we can do, though.
We can refactor a little so that we reuse the name String:
let bob = "Bob" Given(bob).has(StartedWith.sixBagItems()) When(bob).attemptsTo(RemoveBagItem.inPosition(1)) Then(bob).sees(Bag.Items.displayedCount(is: 5))
Or we could refactor a bit more, and have GherkinKeyword (and its descendants) take an Actor in its initializer, rather than a String for the Actor's name.
class GherkinKeyword { let actor: Actor init(_ actor: Actor) { self.actor = actor } }
Now, if we create the Actor at the beginning of the test, like in the 'vanilla' example above, the Actor can be passed into each of the Given, When and Then initializers, so that each test doesn't require the creation of multiple Actors.
let bob = Actor(called: "Bob") Given(bob).has(StartedWith.sixBagItems()) When(bob).attemptsTo(RemoveBagItem.inPosition(1)) Then(bob).sees(Bag.Items.displayedCount(is: 5))
There are loads of other ways to refactor the Screenplay interface - find out what you and your team value to work out what sort of approach might be best for you!
#screenplay#screenplay pattern#ios#swift#xctest#tests#testing#ui tests#ui testing#architecture#page objects#page object model#page object pattern
0 notes
Text
Screenplay Entities with XCTest and Swift (Part 2 of 3)
This is part 2 of 3 in a series about using the Screenplay pattern in Swift.
Part 1: What is the Screenplay Pattern?
Part 3: Writing Screenplay Tests in Swift
Part 1 of this series on the Screenplay pattern explained what the Screenplay pattern is, and where its value lies. In this part, we'll go through each of the entities in the Screenplay pattern in more detail, using a Swift + XCTest implementation of Screenplay, focusing around the 'bag' domain area of an e-commerce application.
Element Location
For each domain area of your app, you will need to locate the elements which are part of that domain area. Element Locators (or 'Elements entities') will encapsulate the knowledge of how to locate the elements in each domain of the application under test.
Since this example is for tests which only ever use a single instance of the application under test, the reference to the application is created (statically) by the Elements entity. When using XCTest, any instance of XCUIApplication will be paired with your application under test by default. XCUIApplication gives you access to the elements of the application under test, which will allow you to expose elements to Actions and Questions without exposing the knowledge of how to find them. The Elements entity does not expose the app driver as part of its public or internal interface to help ensure that only Elements entities have direct access to XCUIApplication, and prevent any other types of objects from taking on the responsibility of locating elements of the application.
import XCTest enum BagElements { private static let app = XCUIApplication() static func cell(at index: Int) -> XCUIElement { return app.cells.element(boundBy: index) } static func removeButton(forCellAt index: Int) -> XCUIElement { return cell(at: index).buttons["delete"] } static var cells: XCUIElementQuery { return app.cells } }
The BagElements enum provides static functions, exposing all of the elements in the 'bag' domain of the app which are needed to execute the functional tests.
Elements entities should return XCUIElement objects whenever possible, however, in some situations, it is not possible to narrow the query down to a single object. This is often the case for groups of similar elements or repeated elements, like the list of item cells in the user's bag. In these cases, you may expose an XCUIElementQuery to allow Questions to query the group of elements as a whole, or to allow Actions to execute the same action on multiple elements at once.
Actions
Actions are static methods which encapsulate the implementation details of how to interact with elements using XCTest (or your test framework of choice) in order to perform certain actions.
Actions are grouped by domain area, so related actions may be grouped together under a single entity.
import XCTest enum BagActions { static func showRemoveItemButton(forItemAt index: Int) { let cell = BagElements.cell(at: index) cell.swipeLeft() } static func confirmRemoveItem(forItemAt index: Int) { let button = BagElements.removeButton(forCellAt: index) button.tap() } }
For each interaction which can be made by the user, there should be an action. In some cases, it may be helpful to have multiple levels of Actions (Actions which encapsulate groups of Actions), to provide a cleaner interface at the Task level.
Actions will be used by Task implementations, and will not be visible at the test level, so it's not necessary for Actions to present behavioural interfaces.
Tasks
Tasks are objects which encapsulate the actions which need to be executed in order to complete a particular task. Some tasks may only need one Action to be completed. Other tasks may need multiple Actions to be undertaken. The job of a Task is to allow the author of a test to achieve some behaviour in a single line of code; without having to explicitly direct the test on what to interact with, and how to interact with it. As such, Tasks should exhibit a behavioural interface.
Task objects must conform to the Task protocol in order to be accepted by an Actor.
public protocol Task { func perform() }
When the Task is given to an Actor, the Actor will perform() the Task. In order to ensure that the task is performed correctly, your implementation of perform() must execute some Actions.
This example implementation of a Task shows how you would construct a Task for removing an item from the user's bag, using the Actions we defined in the Actions section above.
Tasks do not need to import XCTest as all of the work with XCTest entities is done by Actions and Element Locators.
struct RemoveBagItem: Task { let index: Int /// Executes actions to remove an item from the bag. func perform() { BagActions.showRemoveItemButton(forItemAt: index) BagActions.confirmRemoveItem(forItemAt: index) } /// Creates a Task for removing a bag item at the given `index`. /// /// - Parameter index: Index of the bag item to be removed. Bag items are 0-indexed. /// - Returns: RemoveBagItem Task which, when performed, will remove the item in the user's bag at the given `index`. static func inPosition(_ index: Int) -> RemoveBagItem { return RemoveBagItem(index: index) } }
Tasks are small, focused objects. As your test suite grows, it will begin to contain many Tasks for each different domain being tested. Each different Task should have its own object definition with a unique perform() implementation and at least one factory method (like inPosition(_:)). Some tasks may have additional factory methods for convenience. If many tests are removing bag items in position 0, you may want to create a convenience factory method called inPosition0().
Remember when naming your Task and its factory methods that it will be used in the format:
Task.factoryMethodName(with: someValue)
So be sure to name your Tasks and factory methods in a way that makes sense as part of this sentence-like code structure.
RemoveBagItem.inPosition(3)
Prefer method and function names that make use sites form grammatical English phrases. - Swift API Design Guidelines
Questions
Questions must conform to the Question protocol in order to be accepted by an Actor.
public protocol Question { func ask() }
When the Question is given to an Actor, the Actor will ask() the Question. In order to ensure that the question is answered, you must make sure that your implementation of the ask() method makes an assertion, failing the test if the answer is incorrect.
This example implementation of a Question shows how you would construct a Question about the number of items in the user's bag.
import XCTest enum BagItems: Question { case count(actual: Int, expected: Int) /// Ask this question. /// /// If the answer is incorrect, the test will fail. func ask() { switch self { case .count(let actualValue, let expectedValue): XCTAssertEqual(actualValue, expectedValue) } } /// Create a question about the number of bag items being displayed. /// /// - Parameter expectedValue: The number of bag items you expect to be displayed. /// - Returns: A Question about the number of bag items being displayed. When asked, this Question will compare the number of bag items displayed with the given `expectedValue`. If they are not equal, the test will fail. static func displayedCount(is expectedValue: Int) -> BagItems { let actualValue = BagElements.cells.count return count(actual: actualValue, expected: expectedValue) } }
This implementation could be extended to ask more questions about the state of the bag, such as whether a certain item is present in the bag, or what the total price is for all the items in the bag. For each different question you want to ask about this part of the application under test, add another case with the associated values needed to make your assertion (like count(actual:expected:)), and add another static factory method (like displayedCount(is:)) to create questions using that format.
Remember when naming your Question and its factory methods that they will be used in the format:
QuestionDomainArea.factoryMethodName(is: someValue)
So be sure to name your Question entities and factory methods in a way that makes sense as part of this sentence-like code structure.
BagItems.displayedCount(is: 5)
Prefer method and function names that make use sites form grammatical English phrases. - Swift API Design Guidelines
Actors
The Actor is the point of use for Tasks and Questions. It uses the Interface Segregation and Dependency Inversion principles (the I and D in SOLID) to accept any Task or Question.
You can give your Actor a name if you'd like. This isn't strictly necessary, but may help to add context to the test when it is written. In a scenario with multiple Actors, having a name will help you to differenciate between them, which can be particularly helpful when debugging.
Actors do not need to import XCTest. Any interactions with XCTest entities should be handled by other objects.
public class Actor { let name: String public init(called name: String) { self.name = name } // MARK: Public methods /// Make this Actor perform a setup task. /// /// Interacts with the application by performing the given `task`. /// /// - Parameter task: Task to be performed. public func has(_ task: Task) { perform(task) } /// Make this Actor perform a task which should cause your expected outcome. /// /// Interacts with the application by performing the given `task`. /// /// - Parameter task: Task to be performed. public func attemptsTo(_ task: Task) { perform(task) } /// Ask a question about what this Actor sees on the screen to verify that it is what you expect. /// /// Enquires about the state of the application using the given `question`. /// /// - Parameter question: Question to be answered. public func sees(_ question: Question) { ask(question) } // MARK: Private methods /// Asks the given `question`. private func ask(_ question: Question) { question.ask() } /// Performs the given `task`. private func perform(_ task: Task) { task.perform() } }
The has(_:), attemptsTo(_:) and sees(_:) methods are available publicly to allow test writers to use them. The private ask(_:) and perform(_:) methods separate the use of the Task and Question interfaces from the implementation of the public-facing methods. This means that in the event that the Task or Question interfaces change, that change will only need to be made in the relevant private method, rather than all of the public methods which use a Task or Question.
Actors are created and used inside test methods to facilitate the actions and assertions of a test.
In part 3, you'll see how the Screenplay objects are used at the test level to write behavioural tests, and a couple of options for the interface you can have.
#screenplay#screenplay pattern#swift#ios#xctest#ui testing#ui tests#testing#tests#architecture#page objects#page object model#page object pattern
0 notes
Text
What is the Screenplay Pattern? (Part 1 of 3)
This is part 1 of 3 in a series about using the Screenplay pattern in Swift.
Part 2: Screenplay Entities with XCTest and Swift
Part 3: Writing Screenplay Tests in Swift
The Screenplay pattern for UI testing is an 'upgrade' to the Page Object pattern.
The Page Object pattern is a great UI testing pattern which provides a simple, easy-to-understand architecture for your UI testing code. It has a low barrier to entry, and is well-suited to those without much programming experience. Unfortunately, to make the Page Object pattern accessible to new programmers, it does make some sacrifices with regards to scalability.
The Screenplay pattern aims to solve the Page Object pattern's lack of scalability by adhering to SOLID principles.
It should be noted that by improving on the scalability of the Page Object pattern, the barrier to entry does become higher in terms of understanding required. Therefore, when choosing between the Page Object and Screeplay patterns, you should decide whether accessibility or scalability matter more to you.
In the Screenplay pattern, the responsibilities which would have been taken on by a page object in the Page Object pattrn are split up into multiple objects, in order to satisfy the Single Responsibility principle (the S in SOLID). These responsibilities are:
Encapsulating element location details
Encapsulating interaction implementation details
Providing a behavioural interface for user actions
Providing a state inquiry interface for the application under test
Depending on your UI testing requirements, there may be an additional responsibility; holding a reference to the instance of the application under test. This responsibility is only useful if you are testing more than one application instance at once. For now, let's assume you're just testing a single application at a time.
Screenplay Architecture

Element Locators encapsulate element location details.
Actions encapsulate interaction implementation details.
Tasks provide a behavioural interface for user actions.
Questions handle state enquiries.
Actors facilitate the execution of Actions and answering of Questions.
In part 2, you'll see how each of these entities can be implemented, and how they interact with each other.
#screenplay#screenplay pattern#ios#swift#xctest#ui tests#ui testing#page object model#page object pattern#architecture#testing#tests#page objects
0 notes
Text
SwiftLint Configuration Example
For those wondering about some of the less-obvious parts of a SwiftLint configuration file, here's an example file which hopefully spreads some light on how to configure some of the more complex rules.
excluded Rules
The excluded section of the configuration file expects a list of paths to exclude from linting. Paths are relative to the directory from which SwiftLint was called, so make sure that you include paths relative to the location of the file that invokes SwiftLint. For example:
When running from the command line, the excluded paths need to be relative to the location you run the command from.
When using Danger, the excluded paths need to be relative to the location of the Danger file which invokes SwiftLint, e.g. Danger_postclone.
For a file structure like this:
MyProject |-- .swiftlint.yml # SwiftLint configuration file |-- Danger | |-- Danger_postclone # invokes SwiftLint |-- Libraries | |-- SomeLibrary | | |-- SomeLibraryClass.swift | | |-- SomeLibraryProtocol.swift | |-- SomeOtherLibrary | | |-- SomeOtherLibraryClass.swift | | |-- SomeOtherLibraryProtocol.swift |-- MyCode |-- MyClass.swift |-- MyProtocol.swift
Use the following configuration to enable exclusion of any files under Libraries when using Danger:
# .swiftlint.yml excluded: - ../Libraries
Or this configuration when using the command line from the MyProject directory:
# .swiftlint.yml excluded: - Libraries
Adjusting Severity Levels
Run $ swiftlint rules to get a table with all of the rule identifiers you might want to use in your configuration file.
To work out how to adjust rule configurations, look under the configuration column.
Simple Rules
If the contents of the column just says "warning" or "error", the only thing that can be adjusted for that rule is the severity. The adjustment syntax for this kind of adjustment is:
{rule_identifier}: {desired_severity}
For example, to downgrade the closing_brace rule to a warning instead of an error:
# .swiftlint.yml closing_brace: warning
Or to upgrade the class_delegate_protocol to an error instead of a warning:
# .swiftlint.yml class_delegate_protocol: error
Complex Rules
Some rules have more attributes that can be configured than just the severity. The names of these attributes will be specified in the rules table.
If you are trying to configure complex rules incorrectly, you may be getting a warning when running $ swiftlint rules like:
Invalid configuration for 'statement_position'. Falling back to default.
Complex rules do not accept the same configuration syntax as simple rules.
This is what the rules table says for the colon rule:
| colon | warning, flexible_right_spacing: false, apply_to_dictionaries: true |
In this case, you can override the severity and the attributes like this:
# .swiftlint.yml colon: severity: error flexible_right_spacing: true apply_to_dictionaries: false
If you only want to override the severity on these complex rules, you still need to use the severity: syntax - you can't just do colon: error as with simple rules.
Other rules can be more complex, like nesting:
| nesting | (type_level) w: 1, (statement_level) w: 5 |
For the nesting rule, you can configure the severity levels of type-nesting and statement-nesting separately, and you can also define what level of nesting triggers a warning and what level of nesting triggers an error.
The default configuration shows that a warning will be triggered by 1 level of type-nesting and at 5 levels of statement-nesting, and there are no levels of nesting which will trigger an error.
You can change this configuration to (for example) trigger type-nesting warnings at 2 levels of nesting, errors at 3 levels, and statement-nesting warnings at 3 levels of nesting, errors at 5 levels.
# .swiftlint.yml nesting: type_level: warning: 2 error: 3 statement_level: warning: 3 error: 5
0 notes
Text
Easier Debugging with XCTActivity and XCTAttachment
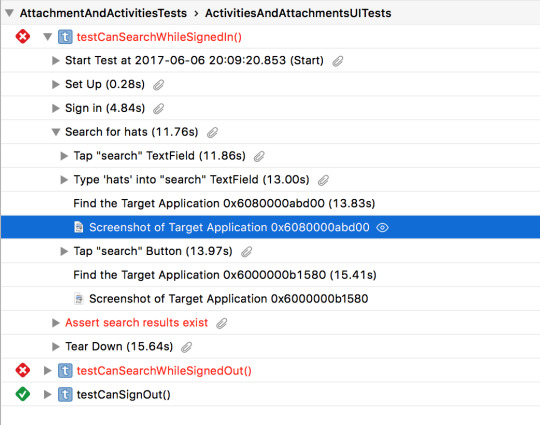
Working with XCTest for UI testing, you might be familiar with this kind of test report:

This report shows the actions that were taken to interact with the app, sometimes with screenshots, and where the test failed, if applicable. There is a nominal amount of debug information available at the point of failure. Other than that, there's not a lot of help to point you in the right direction to continue debugging.
There is a file and line number, but there is no stack trace. If you have a lot of utilities, tests can run the same line of code multiple times during execution, but it's difficult to work out from the report alone how many times it ran successfully and what the test wanted to happen at the time when it failed.
You often don't get a screenshot for the moment the test failed - the closest screenshot is often just before the action which failed the test was taken, revealing nothing except that the app was working, before it wasn't.
XCTActivity and XCTAttachment were designed to help improve this test report and the debugging information it can provide after the test has finished running. It's still not a stack trace, but it's something.
XCTActivity
XCTActivity enables you to track the activities your tests go through, with the ability to split those activities into logical sections with human-readable names.
Apple encourages you to wrap the steps your test takes into 'activities', which wrap those steps into logical groups. If you're already using utility methods, those groupings probably work well as activities.
Before
func search(for term: String) { // Enter text in the search field let searchField = self.app.textFields["search"] searchField.tap() searchField.typeText(term) // Initiate the search self.app.buttons["search"].tap() }
After
func search(for term: String) { XCTContext.runActivity(named: "Search for \(term)") { activity in // Enter text in the search field let searchField = self.app.textFields["search"] searchField.tap() searchField.typeText(term) // Initiate the search self.app.buttons["search"].tap() } }
Once you've wrapped some or all of your test(s) up in activities, your test report will group the actions that were taken during each activity, and show them as part of that activity. This makes it easier to read and navigate through the test report, giving you a better overview of what happened and where your test went wrong.

XCTAttachment
XCTAttachment enables you to store state information (such as screenshots or data) as you go through the test, and gives you the option for whether you want to discard it if the test passes.
With the addition of the XCUIElement.screenshot(), it's now* easy to take a screenshot whenever you want, without pretending to rotate the device (or whatever other hack you were using in Swift 3)! Screenshots are one of the many data types accepted by XCTAttachment, which I'll be using for this example.
After creating an attachment, you can either add it to the test case, or to the current activity, using add(_:).
func saveScreenshot(to activity: XCTActivity) { let screenshot = XCTAttachment(screenshot: XCUIApplication().screenshot()) activity.add(screenshot) }
If you want the attachment to stick around even if the test passes, you can set its lifetime to .keepAlways. XCTAttachments with a lifetime of .deleteOnSuccess will be discarded unless the test fails.
let screenshot = XCTAttachment(screenshot: XCUIApplication().screenshot()) screenshot.lifetime = .keepAlways activity.add(screenshot)
The attachment will then show up in the test report, where you'll be able to view it.
Hopefully these two additions will make it easier to debug UI tests, especially in situations where you're not running them through Xcode's debugger, e.g. on your CI machine(s).
Download my Playground here to play with the activity and attachment APIs.
*as of Swift 4
0 notes
Text
Selection: A UIKit to XCUIElement Translation
I forget or wonder how the attributes of XCUIElements in UI tests translate into the world of UIKit for app development a lot. Other people probably do at some point or another too, so here's my translation of the concept of "selection" between the two.
Note: XCUIElement conforms to the XCUIElementAttributes protocol, and so any property of XCUIElementAttributes will be present on an XCUIElement.
Selection
XCTest: XCUIElementAttributes.isSelected UIKit: UIView.accessibilityTraits.contains(UIAccessibilityTraitSelected)
Key phrases: Switch, toggle, on or off state, stable state
An XCUIElement can either be in a 'selected' state, or a 'not selected' state. This is a trait that is usually applied to UI elements like switches, which have an 'on' and 'off' state.
In XCTest, there is a simple property, isSelected, on all XCUIElements.
In UIKit, selection is denoted using Accessibility Traits. UIViews and their descendants can have one or more "accessibility traits", which help to explain their state. Traits are applied as a bitmask.
Selection does not only apply to switches. Selection states can be added to any kind of view. Some UIKit views have selection built in, like buttons, because they inherit from UIControl.
Buttons can behave in an on/off (toggle) manner, but may not. Before implementing selection as a solution, you should check that your UI element has two distinct, stable states. For example, 'being selected' should not apply to a button which submits a form, since that is not a toggle behaviour, and should also not be used in place of [enabled/disabled] behaviour.
Use Case
A shopping app has many products. Each product has an associated heart image which indicates whether the product is on the user's wishlist or not. When the product is on the user's wishlist, the image is a coloured-in heart. When the product is not on the user's wishlist, the image is an outline of a heart, with no colour fill. When the user taps the heart image, its state is toggled, and the product is added/removed from the user's wishlist as appropriate.
UIKit:
let wishlistIndicator = UIImageView! let unselectedWishlistImage = UIImage! let selectedWishlistImage = UIImage! ... func toggleWishlist() { if wishlistImage.accessibilityTraits.contains(UIAccessibilityTraitSelected) { // Switch to unselected state wishlistIndicator.accessibilityTraits = UIAccessibilityTraitButton wishlistIndicator.image = unselectedWishlistImage } else { // Switch to selected state wishlistIndicator.accessibilityTraits = (UIAccessibilityTraitButton | UIAccessibilityTraitSelected) wishlistIndicator.image = selectedWishlistImage } }
XCTest:
func testWishlistIndicatorCanBeSelected() { let app = XCUIApplication() app.launch() ... let wishlistIndicator = app.images["wishlistIndicator"] wishlistIndicator.tap() XCTAssertTrue(wishlistIndicator.selected) }
0 notes
Text
Class, Static and Instances
What's the difference between class, instance and static?
I monitor StackOverflow regularly for questions about XCTest, and I've recently been seeing an increase in the number of questions people are asking about code using static/class variables and functions. The problems often seem to stem from incorrect use of the static and/or class keywords - so here's a post about what they mean, and how they can be used.
Examples will be in Swift, but the concepts of 'class' and 'instance' variables and functions can be applied to pretty much every object-oriented language.
Let's start off with a bit of foundation work.
What are classes and objects?
The common analogy is to liken a class to a blueprint, and objects to buildings that are made from that blueprint. It's a pretty good analogy.
class Building { let squareFootage = 535 let doorCount = 1 let windowCount = 4 let storeyCount = 2 let constructionDate: NSDate var needsMaintenance: Bool var isDoorOpen: Bool init() { self.constructionDate = NSDate() self.needsMaintenance = false self.isDoorOpen = false } func openDoor() { isDoorOpen = true } func closeDoor() { isDoorOpen = false } }
The class definition above defines how to make a building with certain properties and functions. So can you open the door on this class?
Building.openDoor() // => error: use of instance member 'openDoor' on type 'Building'; did you mean to use a value of type 'Building' instead?
openDoor() is an instance method. Building is the class, or type. The line above is the equivalent of trying to open the door on the blueprint, as if the building has already been constructed. The error says that you can't open the door on the blueprint of a building. The correct way to open the door is to build a building first, and then open the door.
let myFirstBuilding = Building() // Build the building ("create an instance") myFirstBuilding.openDoor() // Open the door print(myFirstBuilding.isDoorOpen) // => true
In this example, Building is the class (also known as the type), and myFirstBuilding is the object of type Building, (also known as an instance of Building).
Instance properties and functions
In the example above, everything in the Building class was either an instance property or an instance function. This means that in order to use any of the properties or functions of a building, you must first create an instance of Builiding (a Building object).
let building = Building()
Once you have stored the instance in a constant or variable (building, in the example above), you can access all of the properties and functions defined in the Building class.
building.openDoor() print(building.isDoorOpen) // => true building.closeDoor() print(building.isDoorOpen) // => false print(building.constructionDate) // => 2016-10-27 10:55:30 +0000 print(building.needsMaintenance) // => false
You can have multiple instances of the same class, and their properties will not be tied to each other.
let dilapidatedBuilding = Building() dilapidatedBuilding.needsMaintenance = true
Here, I've set needsMaintenance to true for dilapidatedBuilding, but not on building.
print(building.needsMaintenance) // => false print(dilapidatedBuilding.needsMaintenance) // => true
Instances of a class cannot impact the instance properties of other instances. Changes made to one object do not affect other objects of that type.
print(dilapidatedBuilding.constructionDate) // => 2016-10-27 11:06:16 +0000 sleep(5) // Wait for 5 seconds before creating the next instance let anotherBuilding = Building() print(anotherBuilding.constructionDate) // => 2016-10-27 11:06:21 +0000
Class properties and functions
Let's make some additions to our Building class.
class Building {
static var buildingsBuiltCount = 0 class let creator = "Alex's Architects Inc." ... init() { ... self.idNumber = Building.buildingsBuiltCount + 1 type(of: self).buildingsBuiltCount += 1 } class func printReport() { print("Report for Buildings designed by \(creator)") print("---") print("Buildings made: \(buildingsBuiltCount)") } ...
}
Here, we've added a couple of properties and a function. These operate on the class level, rather than the instance level. This means that they are not associated with any particular Building object, but rather, they are to do with things about Buildings in general.
We can print out a report about Buildings.
Building.printReport()
Report for Buildings designed by Alex's Architects Inc.
Buildings made: 3
This method uses static properties of Building to construct the report. Notice that printReport() is called on Building (the class or type), not building, or any other instance of Building.
The type of an object can be accessed in one of two ways:
// Hardcoded Building.buildingsBuiltCount // Dynamic type(of: self).buildingsBuiltCount
The dynamic method makes it easier for subclasses to customise the behaviour, and also means that if you decide to change the name of your class, you won't have to change it in places like this where you're accessing class properties and methods from within the class definition.
During initialization, Buildings will now be assigned an ID, and the static variable buildingsBuiltCount will keep track of the last ID used.
let someBuilding = Building() let someOtherBuilding = Building() print(someBuilding.idNumber) // => 4 print(someOtherBuilding.idNumber) // => 5
Despite being made in exactly the same way, the changes made at a class level during initialization have resulted in these two objects having a different value for the same property.
Class or Static?
In Swift, there are two keywords used to associate properties and functions with a class: class and static. The difference is that properties and functions declared using class can be overridden in subclasses, but those declared using static cannot be overridden.
Static definitions:
class Building { static func printReport() { ... } } class House: Building { override static func printReport() { // => error: cannot override static method ... } }
Class definitions:
class Building { class func printReport() { ... } } class House: Building { override class func printReport() { ... } }
This allows you to control the amount of flexibility subclasses can have to some extent. This feature is not available in all languages, so be sure to check the meaning of 'static' in your language of choice before using it.
#class#static#instance#object#oop#swift#properties#variables#functions#methods#object oriented programming
0 notes
Text
What Can The User Do?
When writing UI tests, it's important to build interfaces that represent things that the user can see or do. A UI test is built to test whether the product works when a user interacts with it. So your UI test code shouldn't be able to do anything that a user can't, and your page objects shouldn't provide interfaces that wouldn't make sense to a user.
This is why I:
Keep accessibility identifiers private
Keep the element hierarchy and type private
Expose getters for element properties
Expose behavioural actions instead of directional actions
Never expose the element objects to the tests
Users don't identify elements by their accessibility identifier - not even VoiceOver users. They don't necessarily know or care that a button contains a separate text object for its title, and that the button is part of a container view, with image siblings - they just see a button in a place on the screen.
class SignInPage { private let app: XCUIApplication // Elements private let emailTextField = app.textFields["emailTextField"] private let passwordTextField = app.textFields["passwordTextField"] private let signInButton = app.buttons["signInButton"] }
If these weren't private properties, you could access and interact with these elements in your test code. It might seem reasonable to take the text field element and type some text in there, but there is a lot more you can find out about an element if you have direct access to it:
class MyUITests: XCTestCase { func testSignIn() { let signInPage = SignInPage() let email = "[email protected]" // If `SignInPage.emailTextField` wasn't private, this would work let emailTextField = signInPage.emailTextField emailTextField.typeText(email) // Seems reasonable emailTextField.identifier // Users have no business with the identifier of an element emailTextField.frame.offsetBy(dx: 0.5, dy: 0.5) // Just inappropriate } }
To prevent the tests from accessing inappropriate information (information that wouldn't be available to a user, or that a user wouldn't care about), I provide getter and action methods on my page object that represent things that a user might want to do. This might seem like extraneous code, but it makes it easier for your future self or anyone else working on the project to see what actions are available to the user, and discourages anyone writing tests from abusing the power of having direct access to elements. Not to mention the effectiveness with regards to not repeating yourself when it comes to interacting with that element.
To reinforce the "What can the user do?" mentality, I write method names behaviourally - goToSearchPage() rather than something implying implementation details like tapSearchButton(). Today, you may have to tap the search button to go to the search page, but tomorrow you might have to swipe downwards on the screen, Spotlight-style, but the user's intention will be the same either way - to go to the search page.
class SignInPage { private let app: XCUIApplication // Elements private let emailTextField = app.textFields["emailTextField"] private let passwordTextField = app.textFields["passwordTextField"] private let signInButton = app.buttons["signInButton"] func signIn(email: String, password: String) -> WelcomePage { // Enter credentials emailTextField.typeText(email) passwordTextField.typeText(password) // Submit form signInButton.tap() return WelcomePage() } func isSignInButtonEnabled() -> Bool { return signInButton.enabled } } class MyUITests: XCTestCase { func testSignIn() { let signInPage = SignInPage() let email = "[email protected]" let password = "mypassword" // Do as the user would do signInPage.signIn(email: email, password: password) ... } func testSignInButtonIsDisabledBeforeEnteringCredentials() { let signInPage = SignInPage() // What can the user see? XCTAssertFalse(signInPage.isSignInButtonEnabled) } }
UI tests are a simulation of the user, so make your page objects user simulation tools, rather than flexible providers of information. Choosing what to do is hard sometimes, so do yourself a favour and only present yourself with the options that make sense to the user.
0 notes
Text
Writing Swifty Swift
A few people in my team were quick to sing the praises of Swift API Design Guidelines, a talk from WWDC 2016. As someone who enjoys adhering to coding conventions, and has an interest in being as correct as possible, this was definitely up my street.
Migrating from Swift 2.x to Swift 3 involves changing a lot of lines of code, which this guy may have rightly assumed, might be cause for a minor panic.

Even if the prospect is daunting, as Swift is a relatively young language, it’s good to have all of these big changes happen as early as possible. Change isn’t always bad, and a lot of the guidelines for Swift API design are written specifically to make it easier for us humans to read and interact with Swift 3. Sounds good to me!
APIs are not just for servers!
“API” is an acronym commonly used to refer to a set of endpoints on a server somewhere, providing an interface between a server and one or more client applications. If you work for a tech company with a server and client(s), you’ve probably got something that you refer to as “the API”. This is fine, however…
APIs are all over all of your code. API stands for Application Programming Interface, which essentially means that the term “API” applies to any method name.
class Stereo { var currentTrack: Song // This is an API var isPaused: Bool // This is an API // These are all APIs func play(song: Song) func play(album: Album) func play(playlist: [Song]) func press(_ button: StereoButton) } let stereo = Stereo() let myFavouriteSong = Song("Music/TaylorSwift/IWishYouWould.mp3") // Use some APIs! stereo.play(song: myFavouriteSong) // Interface with the stereo to play my favourite song stereo.press(.Pause) // Interface with the stereo to pause playback
Being Swifty
There are a lot of important guidelines, so if you’re writing Swift you should read all the guidelines!) Here’s what made the biggest impact for me:
Make your APIs read like sentences for the user
To make a really slick API, it has to be easy to use. You might well be the user of an API you create, or you might be creating an API that will be used by other people in your team, around your business or anywhere in the world. Think of the user when you’re writing an API.
Think about how you would ask someone to pause a stereo.

Decisions like this may not be obvious when you’re writing your method signature…
// Which one would you write? func pressButton(button: StereoButton) func pressButton(_ button: StereoButton) func press(_ button: StereoButton)
But when you put it in the context of someone using the method, the decision is easy.
// Would you say "press button button pause"? 😒 stereo.pressButton(button: .Pause) // Would you say "press button pause"? 😕 stereo.pressButton(.Pause) // Or would you say "press pause"? 😉 stereo.press(.Pause)
To be Swifty, we choose the option that reads like a sentence to the user; press(.Pause).
This also leads to adherence to these guidelines:
Omit needless words
Name functions and methods according to their side-effects (Those with side-effects should read as imperative verb phrases, e.g., print(x), x.sort(), x.append(y).)
…if the first argument forms part of a grammatical phrase, omit its label
-Swift API Design Guidelines
Simple improvements
While there are a fair few guidelines to get your head around, there are a few I’ve picked out as really easy to do:
Do your documentation
Write a documentation comment for every declaration. Insights gained by writing documentation can have a profound impact on your design, so don’t put it off.
If you are having trouble describing your API’s functionality in simple terms, you may have designed the wrong API.
-Swift API Design Guidelines
Documentation gives you another opportunity to think about how the user of your API will see it and understand it. Context can be incredibly valuable to code, and documentation comments are a great place to make that information accessible to someone using your API.
Use Swift’s dialect of Markdown to get nice formatting in a really simple way.
Avoid abbreviations
The intended meaning for any abbreviation you use should be easily found by a web search.
-Swift API Design Guidelines
Users aren’t always familiar with the same abbreviations you are. Sometimes, they’ll have a different meaning to you for the same abbreviation. For example, what does “CDS” mean to you? Try not to have ambiguous APIs by not using abbreviations.
Use the right casing
This one needs no extra explanation.
Follow case conventions. Names of types and protocols are UpperCamelCase. Everything else is lowerCamelCase.
-Swift API Design Guidelines
Recommended Reading
The complete list of Swift API Design Guidelines is available here. (Are you noticing a recurring theme?) If you’re going to work with Swift a lot, and especially if you’re not the only person contributing to a Swift project, it’s very helpful to adhere to these guidelines which have been shaped by the Swift community.
If you’re the kind of person who takes in information better through videos, watch the WWDC session.
#swift#swift 3#api design#design guidelines#swift guidelines#swift style#swift style guidelines#style guide#style#wwdc#swifty#swifty swift#shake it off#sick beat
0 notes
Note
Hi, I've started using BDD and Cucumber few months back. Also reading , listening a lot about good practices in BDD. I would like to learn from your experience of Test Pyramid. Earlier I was advocate of doing all automation at UI level. But now I feel Test Pyramid is best way to give faster feedback to developer and product manager. Thanks & Regards, Vikram
Hi Vikram,It’s true, the test pyramid is the way to go in an ideal world. The theory being that the earlier you find bugs, the better.If you find them during the planning phase, before any code gets written, that’s great - you just change (or abort) your approach during planning - you’ve prevented the bug from ever existing. Finding them during development is not *as* great, but at least the developer can solve it before they think they’re finished - all in one go with the rest of feature development. If a bug is found during testing, after the developer thinks they’re done and has moved on to another task, more expense is added to the process of fixing the bug, because the developer will need to get their head back into ‘the zone’ around that feature, having moved to another ‘zone’ to develop the next feature. The worst stage to find a bug is after you’ve deployed whatever you’re working on to your users, as you then have to add your reputation to the list of expenses.The test pyramid helps us to find bugs as early on in the process as possible. Doing BDD is the best way that I know to find bugs during the planning stage - the bugs found during planning don’t cost any development time. Since you’re defining the behaviour of a feature before you start developing it, you and the other members of your team have time allotted to really think about the feature, whether it’s possible, and whether the behaviour you’re expecting makes sense, and because you’re keeping the discussion about *behaviour*, which is very high-level, everyone on the team can join in and ensure they’re on the same page.Please remember that ‘doing BDD’ is not the same as having Gherkin or “Given When Then” scenarios somewhere in your workflow. It is **only** **B**ehaviour-**D**riven **D**evelopment if you are defining the behaviour as a team **before development** starts.That said, BDD doesn’t really have anything to do with the test pyramid - they just compliment each other.The power of the test pyramid comes in at the unit test level. Unit tests could be a product of TDD, but they don’t have to be. What’s important for the test pyramid to work is that the code **is** unit tested. As much as possible. Unit tests form the base of the test pyramid, and if your code coverage is poor at this level, you’re going to have to do more of other kinds of testing to get the same kind of confidence in the stability of your app.Unit tests are fantastic because even with hundreds of them, they complete within seconds. Get as much unit test coverage as possible because they are **really cheap to run**. UI tests - automated or not - can take minutes, hours or days, but unit tests can be done in the time it takes you to take a sip of water or check your phone for messages.Why is this valuable? Apart from not wanting to end up with a test ice cream cone instead of a test pyramid, having a bunch of unit tests allows your developers to run a quick, mini-regression test before they say that development is “done”. If they do find any failures when they run the unit tests, they can fix them right there and then, without having to switch contexts, or waste any of their testers’ time. Faster feedback means that bugs get found and fixed earlier.Additionally, anything that is covered by a unit test doesn’t need to be covered by any other kind of test, and even if you can test something really quickly, you won’t be as fast as a unit test to do the test and report your result.The problem with unit tests is getting them written. In my experience, the developer writing the feature will be responsible for writing the unit tests. I know that there are teams out there who have processes where one developer writes the unit tests for a feature and the other developer will write the feature to get all the unit tests to pass, and others where testers will write unit tests separately from feature development, but I’ve never worked on any of these teams.The biggest challenge you will face is getting them written, **not because the developer doesn’t want to**, but because of time pressures induced by the business side of the team. Deadlines and being first-to-market and showing high productivity levels with tangible outputs are all **the enemies of unit tests**. To business stakeholders, unit tests are pretty much invisible, and while you can try to sell the process to them by insisting that increasing unit testing will improve stability and speed up output in the long run, it’s difficult for business people to allocate time to something that’s not visible feature output, especially at first, or if anyone on the team has never worked with unit tests before.If you’re not doing test-driven development, where writing unit tests is a pre-requisite to writing code for production, it’s easy and common for unit testing time to be pulled away from unit testing and onto something else that visibly provides value. Creating a unit testing culture requires buy-in from everyone on your team. Especially the person/people who will be writing them.With a strong base of unit tests, your testing pyramid may contain some integration tests and/or end-to-end tests. This is where automated UI testing sits. If your product has multiple layers (e.g. a remote API is involved) then you may want to have UI tests with and without stubbing for integration and end-to-end tests respectively.Stubbed UI tests can be relatively fast compared to end-to-end UI tests, and should be more stable. Have as many stubbed UI tests as is necessary to test the integration of your features with each other. Again, at the end-to-end level, have as many UI tests as necessary to test the product working with the full stack. If there any cases which couldn’t be covered by unit tests, you can substitute a UI test for that case at one of these levels.If you’ve done everything right up until this point, the UI tests that you have are generally covering cases around the UI implementation. It’s difficult and impractical to test UI code with unit tests, so this should be the main are of deficit covered by your UI tests. If you’re testing logic within the product you’re making, think about whether it could be tested by a unit test rather than a UI test.Anything that can’t become an automated UI test or a unit test has to become a manual test. Manual tests are necessary in pretty much every project with a UI, but they are expensive to repeat. Manual test cases may be the cheapest to write - unit tests and UI tests involve someone with programming knowledge writing code - but once unit tests and UI tests are written, they can be repeated with the push of a button. Manual tests require a human to be paid to repeat them, and that’s slow and expensive. Slow and expensive **but** necessary and valuable.A human doing manual tests will be able to give you usability feedback, and is able to notice when something looks weird or not quite right. This is a very valuable part of testing and is not one to be overlooked. Yes, automate as much as is practical, but remember that there are a lot of things that are not practical or possible to automate, and for that, you will need a human. Even though they are slow and expensive.The gist of it is that computers are incredibly fast and good at repetition. The test pyramid is a model for using this to your advantage. The test pyramid makes a lot of logical sense, but the biggest obstacle to achieving it is finding and agreeing on a balance between spending your time on achieving flawless logic and investing in your code, or spending your time making something that you can sell for money so that you still have a job tomorrow.
0 notes
Text
BDD with Zelda
10 years ago, Nintendo released The Legend of Zelda: Twilight Princess. It was a game originally planned for release on the Gamecube only, but its release was delayed for so long that its completion date coincided with the release of Nintendo's next console - the Wii (or Revolution, as we called it at the time). Nintendo decided that, rather than scrapping the Gamecube version, they would release the game on both consoles.
Imagine you're in the Legend of Zelda QA department. (A job I still dream of having!) What does this decision mean for you? Do you need to learn about the new console? Yes. Do you need to run all of your tests twice now - once on each console? Almost definitely - you hope against hope that they'll pay you overtime. Do you need to re-write all of your test scenarios? That depends on how they're written.
One of the hardest concepts to grasp in Gherkin is the line between behaviour and implementation details. You might have heard that you should do your best to avoid having implementation details in your Gherkin, but what does that mean?! I'm going to try and explain that - using this Zelda game as an example.
First, let's imagine the situation before the news that the game will be coming out on two consoles instead of one. Here's a map of the game's world:

Let's say you're in the Faron area and you want to test that you can access the Lake Hylia area from there.
Scenario: Lake Hylia is accessible from Faron Given I am in Faron When I take the East exit from Faron Then I will be at Lake Hylia
Seems reasonable, right? (Spoiler alert: Not good enough!) You've not said anything like "When I hold the control stick to the left for 92 seconds" or anything crazy like that. So you run your test, you take the East exit from Faron and you end up at Lake Hylia - great. This test works wherever you start in Faron - you could start in any place in the field and you'd still be able to locate and use the East exit to go to Lake Hylia. Fine.
BUT THEN, Nintendo decides to throw down the multiple console bombshell. Does it still work? Here's the map for the Wii version:

Wait, what? Why has it been flipped? Is this some arbitrary decision to encourage people to buy both releases because they're slightly different? Does nobody care for the time of the QA department?!
This change happened as a result of feedback from the game's director, Eiji Aonuma. Link (the character the player controls) is left-handed, and holds his sword in his left hand. On the Gamecube, this doesn't mean anything. You press a button and Link swings his sword in a direction, depending on what you're doing with the control stick. However, the controls are different on the Wii - it has a Revolutionary new method for controlling games; motion controls. The sword swings on the Wii are determined by the direction that the player slashes in while holding the controller, and, unlike Link, most people are right-handed. Aonuma indicated that it felt strange to control a left-handed sword swing with your right hand, and so the decision was made to have the game be mirrored on the Wii. A simple solution.

So, back to testing. Does your scenario still work on the Wii?
Nope. On the Wii, you take the East exit from Faron and end up in... Lower Eldin. Starts with the same letter, same number of words, but it's not Lake Hylia. The test fails.
What could you have done? Well, the test still had implementation details in it. It was high-level, but it still wasn't purely behavioural. The required behaviour was that you could get to Lake Hylia from Faron, but the detail of having to take the East exit was one of implementation.
Gherkin with implementation details is brittle. Behavioural Gherkin is strong. It's not too late though - you can fix this and learn from it. How about you re-write the scenario like this:
Scenario: Lake Hylia is accessible from Faron Given I am in Faron When I take the exit to Lake Hylia Then I will be at Lake Hylia
This captures the requirement that you can access Lake Hylia directly from Faron without implying anything about where they are geographically in relation to each other. There's no limitations about how you get there - by horse, on foot, or as a wolf (one of your powers in the game is that you can transform into a wolf) - it's important not to try and test everything at once. There's still no implications about what controls to use to get there. It's just behavioural. You've taken the exit. That's all. That's everything.
That's all you need to do to make the leap between brittle implementation detail-centric Gherkin and behavioural Gherkin. This is a key skill for behaviour-driven development (Note: We're not trying to do implementation-driven development!) and I hope that this Zelda example has helped to illustrate the difference.
2 notes
·
View notes
Text
XCTest and the Page Object Model
What's a Page Object?
The page object model is the generally accepted pattern to use when writing automated tests. The gist of it is that in order to create a maintainable test suite, you will reduce duplication in your code by creating an object for each page in your product, and storing all the information and logic around locating elements, performing actions etc. inside the respective page object. Your test code will then interact with the app through these objects.
The page object model has traditionally been applied primarily to websites, but with the introduction of mobile applications, the page object model is now being translated for use with frameworks like Appium and Calabash, which provide an interface with which to test mobile apps. When applied to mobile apps, it is sometimes referred to as the screen object model, due to the difference in terminology between websites and mobile apps.
How do I use Page Objects with XCTest?
XCTest is a framework created by Apple, which doesn't adhere to the WebDriver protocol. This means that the way you use it is a bit different. If you're familiar with Selenium WebDriver, or a relation of it (Appium's interface is an extension of WebDriver's), it can be a bit intimidating to have to learn a new structure.
Here's my translation of how to use page objects with XCTest:
Architecture Overview
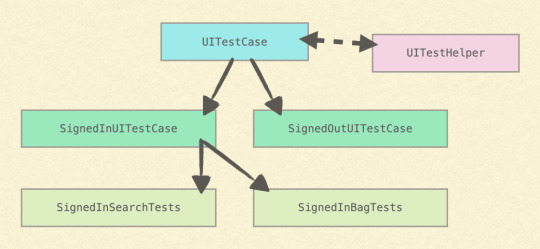
My test classes all inherit from XCTestCase. Test classes are named descriptively to quickly communicate the starting state of the tests they contain.
Each test class constructs a reference to a startPage object during setUp(), which is used as the initial state for all tests in that class. setUp() methods may handle the dismissal of any onboarding UI, and will determine that the state of the app is correct e.g. a setUp() method from a descendant of the SignedInTests class will ensure that the user is signed in.
Each test class also holds a reference to a UITestHelper object. This object contains convenience APIs which handle actions involving multiple pages, as it is not appropriate for a page object to contain a method which functions across different pages.

Page objects have been made to represent each page that the tests interact with. These objects encapsulate the implementation details of each page in the app, and are a huge part of conforming to the Don't Repeat Yourself (DRY) principle. Each page object holds a reference to the currently-running test case, where it will be able to access any stored contextual information.
Page objects are used by the tests and the UITestHelper. The page objects expose behavioural APIs to enable the author of the UI tests to write interactions in the same way that a user would think about interacting with what's on their screen.
The TabBarPage object and its descendants implement methods associated with interacting with the UITabBar in the app - which only appears on some pages. While the TabBarPage displays an API of available interactions and knows the logic required for those interactions, it is the TabBarInteractor which houses the implementation details - like a page object for the tab bar, except it's not a page object because its qualities are not unique to a page. The methods available on TabBarPage and its descendants will delegate actions to the TabBarInteractor in order to interact with the UITabBar.
Page Object Structure
Every page object inherits from Page. Page only contains properties and methods that are applicable to every page.
import XCTest class Page: NSObject { // Properties for other pages to inherit let app = XCUIApplication() let testCase: UITestCase class var awaitTimeout: Double class var uniqueElement: XCUIElement class var exists: Bool // Initializer for other pages to inherit init(testCase: UITestCase) // Called on initialization. Waits for the unique element to exist before continuing. // Initialization fails if the unique element is not found within `awaitTimeout` seconds. func await(file: String = #file, line: UInt = #line) }
All page objects will be able to:
Use app to interact with the application and discover the state of elements.
Access testCase to retrieve contextual information about the currently-running test.
Wait for up to awaitTimeout seconds for themselves to load - this will be a higher number for pages which are expected to load more slowly.
Work out whether the page they're representing exists on-screen by searching for the presence of a uniqueElement, which is unique to that page.
The awaitTimeout, uniqueElement and exists properties are variables to allow them to be overridden by descendants, and are class (static) variables because they don't need to be tied to an instance of a page to be calculated. For example, I can find out whether a page exists or not without having to initialize it. If I had to initialize the page, I would have to wait for the awaitTimeout to pass before finding out that the page does not exist, and I would then have to prevent the test from failing
On initialization, the active test case class will be injected and stored, and the page will await itself. This means that the page object will wait for its counterpart in the app to appear on-screen. After a certain amount of time has passed (defined by awaitTimeout), if the page's uniqueElement is still not found, the await method will fail the test using XCTFail().
Awaiting each page on initialization creates a "checkpoint" of sorts - every time the test facilitates a page change, a check is run to ensure that that page really does exist. This enables the test to fail faster if something's not as it expects, and prevents the initialization and attempted use of pages which aren't on-screen.
import XCTest class ProductListPage: TabPage { // Internally accessible properties override class var uniqueElement: XCUIElement override var tabBarScrollableView: XCUIElement? var isEmpty: Bool // Private properties private var productCollection: XCUIElement private var noResultsLabel: XCUIElement private var cells: XCUIElementQuery // Internally accessible methods func goToProductDetailPageForProductAtIndex(index: UInt) -> ProductDetailPage func goToProductDetailPageForProductWithName(name: String) -> ProductDetailPage func goToProductDetailPageForUnsavedItem(offset: Int = 0) -> ProductDetailPage func goToProductDetailPageForSavedItem(offset: Int = 0) -> ProductDetailPage func addItemToSaved(offset: Int = 0) -> String func getIndexForCell(saved: Bool, offset: Int) -> UInt func isSavedForProductWithName(name: String) -> Bool // Private methods private func scrollUpProductList() private func goToProductDetailPage(saved: Bool = false, offset: Int = 0) -> ProductDetailPage private func getCellForProductWithName(name: String) -> XCUIElement private func getCellAtIndex(index: UInt) -> XCUIElement private func getSavedButtonForCell(cell: XCUIElement) -> XCUIElement private func getTitleForCell(cell: XCUIElement) -> String }
The first thing to note here is the application of a page object model principle: Page object methods which change the page (or screen) that the user is viewing will initialize and return a page object representing the new page. This allows test authors to see where, if anywhere, a method will take them.
This rule of having to return a page object from navigational methods is one of the places where using a type-safe language like Swift comes in really handy (instead of a dynamic language like Ruby or Python) - your code won't compile if you're not returning the right type of page. This is not only great for catching programming errors early, but it's also a very powerful way of driving the design of your code; it prevents you from writing overly-configurable methods and forces you to create separation between different paths through the app. Combined with the await part of your page object initialization, this ensures that different paths through the app are represented discretely. This is a cleaner way of designing your classes, and also means that your method names can be more specific about what they do.
Each page descending from Page should override the uniqueElement property to ensure that the class can identify whether or not it exists. For pages with a UITabBar which may disappear from view when the user scrolls through a list, tabBarScrollableView may be overridden to specify a scrollable view which can be interacted with to bring the tab bar back onto the screen.
Not all properties should be public. In general, all properties and methods returning XCUIElement or XCUIElementQuery objects should be private, to prevent any other objects from interacting with them. Page objects should only interact with their corresponding page, and no other objects should be able to interact directly with the app.
The methods which are internally accessible (no need for these to be public, as these classes won't be used by a third party) all represent either actions that the user could perform on this page, or information from the page that the user would be able to see. Information may take the form of a get... method or a Boolean calculation.
The private methods are those which are only useful to this page. No other objects should be interested in using them - they are assistants to the internally accessible methods, but they have no place being used by other objects.
Test Structure
The tests themselves are structured in pretty much the same way as any test that uses page objects.
import XCTest class SignedInTests: UITestCase { /** Performs test setup for all signed in tests. - Signs in if the user is signed out on launch. - Returns to the home page for the test to begin. */ override func setUp() { super.setUp() // Sign in if !isSignedIn { let meUnauthenticatedPage = startPage.goToMeTabExpectingRootUnauthenticatedPage() let signInPage = meUnauthenticatedPage.goToSignInPage() let meAuthenticatedPage = signInPage.signInAsValidUserExpectingMePage(user!) startPage = meAuthenticatedPage.goToHomeTabExpectingRootPage() } } // Performs test tear down. override func tearDown() { super.tearDown() } /** Given I am signed in When I sign out Then I will be signed out */ func testSignOut() { // Sign out let meAuthenticatedPage = startPage.goToMeTabExpectingRootAuthenticatedPage() meAuthenticatedPage.signOut() // Check you are signed out XCTAssertTrue(MeUnauthenticatedPage.exists) } }
The test class is called SignedInTests so the setUp() function ensures that you are signed in before the test begins, making sure that startPage is set to the home page again before it finishes. It also calls super.setUp() before anything else - ensuring that all of the setup actions it inherited are done too.
The test begins by navigating away from startPage. It brings up the MeAuthenticatedPage (in the app I'm testing, the "Me" page (which shows information about me) is completely different depending on whether you're signed in or not, so they are separate page objects.) and signs out. The signOut() method returns a MeUnauthenticatedPage object, but as I'm not going to do anything with that page, there's no point in storing it. The last part of the test is the assertion - in this case, checking that the page I expect to be on-screen does exist.
Under the hood, there's a lot of lines of code going into making this test work, but thanks to my architecture, most of those lines are obscured. The test code becomes very readable and easy to follow, and the test suite as a whole is easy to maintain, as the implementation logic is encapsulated in page objects.
#xctest#swift#page objects#pom#page object model#testing#automated ui testing#ui testing#xcode#architecture#software architecture#software testing#test#page object
0 notes
Text
Moving Between Dynamic Picker Values with XCTest
XCTest provides an API for interacting with picker wheels - adjustToPickerWheelValue - but only when you know the value that you want to move to.
What if you don't know the values in the picker up front?
If you have dynamically-populated pickers, the provided API won't work very well for you. In order to use it without knowing the values up front, you'd have to traverse the entire picker before moving to the value you want.
However, if you can work out what value you want to get to, or how may values up or down you need to move, you can use the following two methods to interact with your pickers.
Below is an extension to XCUIElement which adds selectNextOption and selectPreviousOption, to be used on XCUIElement objects of type XCUIElementTypePickerWheel.
import XCTest extension XCUIElement { /// Scrolls a picker wheel up by one option. func selectNextOption() { let startCoord = self.coordinateWithNormalizedOffset(CGVector(dx: 0.5, dy: 0.5)) let endCoord = startCoord.coordinateWithOffset(CGVector(dx: 0.0, dy: 30.0)) endCoord.tap() } /// Scrolls a picker wheel down by one option. func selectPreviousOption() { let startCoord = self.coordinateWithNormalizedOffset(CGVector(dx: 0.5, dy: 0.5)) let endCoord = startCoord.coordinateWithOffset(CGVector(dx: 0.0, dy: -30.0)) endCoord.tap() } }
I've used +/-30.0 (points) as the Y-offset value from the centre of the picker wheel. If this doesn't work with your picker, try experimenting with different values.
You can use XCUIElement.value to extract information about the state of your picker.
/** Extracts the value of a picker from the `value` property of a picker wheel element, which shows the picker value and a description of the picker's position. - Parameter text: The value of the picker wheel element. - Returns: Tuple containing the currently-selected color, the current position of the picker wheel and the maximum position of the picker wheel. Positions are 1-indexed. */ private func getValuesForPickerText(text: String) -> (selectedValue: String, currentPosition: UInt, maximumPosition: UInt) { // Separate value let splitText = text.componentsSeparatedByString(",") let selectedValue = splitText[0] // Extract numbers var numbers = splitText[1].componentsSeparatedByCharactersInSet(NSCharacterSet.decimalDigitCharacterSet().invertedSet) numbers = numbers.filter { $0 != "" } if numbers.count != 2 { XCTFail("Expected 2 numbers in picker wheel value but found \(numbers.count)") } let currentPosition = UInt(numbers[0])! let maximumPosition = UInt(numbers[1])! return (selectedValue: selectedValue, currentPosition: currentPosition, maximumPosition: maximumPosition) }
Once you've worked out where you want to be, you can use some straight-forward logic to determine whether you need to move up or down the picker.
You could also just start moving in one direction, and if you don't find your value, go back the other way - if you're OK with that.
/** Changes the selection of the given `pickerWheel` to the given `selectionPosition`. - Parameter pickerWheel: Picker wheel to change the selection of. - Parameter selectionPosition: Position of the picker to select. 1-indexed. */ func changePickerSelection(pickerWheel: XCUIElement, selectionPosition: UInt) { // Select the new value var valueSelected = false while !valueSelected { // Unwrap the current value of the picker wheel if let pickerValue = pickerWheel.value { let currentPosition = UInt(getValuesForPickerText(String(pickerValue)).currentPosition) if currentPosition == selectionPosition { valueSelected = true } else { if currentPosition > selectionPosition { pickerWheel.selectPreviousOption() } else { pickerWheel.selectNextOption() } } } else { XCTFail("Picker wheel value was nil") } } doneButton.tap() }
3 notes
·
View notes
Text
Is faster better?
I recently had a good, hard think about what makes a team "Agile". I read a lot of articles and assessed the processes of both Waterfall and Agile-aspiring teams I've worked on. As is sometimes the case with religion, thinking harder about it left me more confused than I was when I began. I began to question whether Agile was truly better when it was so difficult to actually be Agile.
I spoke to a couple of ex-colleagues, and found echoes of my concerns in their responses. My primary question being, is it better to fail at being truly Agile than it is to execute Waterfall perfectly?
In the end, I terminated my crisis when I decided to think of Agile as lots of tiny waterfalls. Traditionally, Waterfall has one discipline complete their work in full before passing a completed body of work onto the next discipline. I began to see that the same process was applied in an Agile workflow, except the bodies of work are broken down into much smaller pieces. A feature is split up into a few parts. A designer will design each part and pass parts onto the development team as they finish the design phase. Developers will pass their part onto Test when they have made that part of the feature... Like an assembly line. That's not to say that testing can only be done once a dev says they are finished, but in most cases from reality, this is how it goes, and it makes a huge difference when it comes to zero-ing in on your shipping date.
Most of the teams I've worked with have been branded in some sort of official capacity - by the company, hiring manager, team lead etc. - as Agile. Most of those teams generally have not believed that they really are Agile. I've spoken to so many people who say things like, "We have all of these Agile-endorsed meetings, but really, we're just doing waterfall." These are teams which operate in sprints, but won't start a chunk of work items before they've been designed in full, or teams which split their development work up into small chunks, but don't create a testable build until they're all done, or teams which hold retrospectives on a regular basis, but have a chaotic backlog and overloaded sprints. They all have some Agile aspects to them, but none of the teams felt like they were really doing Agile properly.
There is no black and white answer to the question, "Is my team Agile?" Agility is not measured by your unit test coverage. Points are not docked for every piece of documentation you produce. You can still be Agile even if you don't hold backlog grooming sessions every week.
I think that the general philosophy of Agile can be combined with some practical thinking to produce a process that works well for your team. That process is going to be subjective. As well as endorsing iterative software development, your Agile process should be iterated on and assessed regularly too.
The Agile manifesto values working software over documentation, but that doesn't mean that documentation has no value, particularly for complex areas, and it doesn't mean that documentation should never be given priority over software development.
Just because a team doesn't have "kick-off" meetings, doesn't mean that they shouldn't do other meetings that fall under the heading of "Scrum". Mix and match bits of your process to find a combination that makes you faster.
Agile doesn't mean "Make software that works, quickly, even if it's a technical abomination full of hacks!" You still need to allow your team time to invest in their product, to write unit tests, to refactor old code - even if it's still working, to take the time to think about what the best solution is, instead of running with the first thing you find that works.
Above all, I think the easiest way to achieve some sort of "Agile Nirvana" is to assemble a team of people with an attitude for getting things done, with the right ratio of roles. The thing that needs to be done might not always be writing a new feature. It might be finding out if a new library is better than the ones you're using at the moment, or refactoring some existing code to make an upcoming feature easier to implement - or just less terrible to work with. But you want your team to be empowered get on with doing these things rather than trying to weave their way through a political minefield of blood-thirsty stakeholders who want five new releases in the next month. Role ratio is critical to Agile delivery because nobody likes a bottleneck. If you have seven developers and only one tester, that tester is going to have a hard time getting their job done. Similarly, having one designer working across three teams isn't going to do you any favours either.
Finding a good balance of team members, and finding a good balance between productive delivery work, allowing the team to invest in the product and process even though there is no visible business value, and allowing time and budget for people to better themselves in their field - this is the way towards creating a satisfying team to work on.
0 notes
Text
Building with Jenkins and Xcode
I set up a Jenkins job to run some automated UI tests today, using XCTest and fastlane/scan, which I wrote about here.
The unbearable intensity of waiting to see if your Jenkins build works... pic.twitter.com/5E3Y3pkE03
— Oletha Lai (@oletha) April 8, 2016
I got it working by the 13th build, which is my best record yet for builds-to-first-fully-functional-build, and made pretty good time too, at just under one working day, which included lunch, a long, unrelated meeting, and some other bits and pieces of work.
Nick Charlton has written a fantastic post on how to install Jenkins on OS X, so I won't go into it in a lot of detail, but I do have three things to note from my expedition today.
Name your job WITHOUT spaces
If there are spaces in any of the folders leading to your Xcode project files, your project will fail to build. If you've got a project with more than one word in the name, chances are that the containing folder and/or repository has a name with hyphens or underscores between the words in place of a space character, or the name is in CamelCase.
When you create a job in Jenkins, you give it a name. I called mine something like "iOS UI Automation". This creates a folder with that name; ~/.jenkins/workspace/iOS UI Automation - this is where your project should be stored. If your job involves downloading the source code from a GitHub repository or via other source control management, it will be put in this folder by default. You'll then try to build your project, and you'll get an error saying something like Could not find file at ~/.jenkins/workspace/iOS. It's stopped at the first space character it's found. Don't use spaces.
Run as a DAEMON, not an agent
The default installation of Jenkins places the configuration plist in ~/Library/LaunchAgents. This is fine if you only want to access the Jenkins instance from a single computer, as a single user, but if you want to access it from other computers - locally or remotely, youll need to be running as a Daemon process, not an agent.
Running as an agent means that the process is only accessible to the currently-logged in user. Running as a daemon means that other users can access the process, as it's owned by the system.
Simply go to your ~/Library/LaunchAgents folder and move homebrew.mxcl.jenkins.plist from there to ~/Library/LaunchDaemons. If you don't have a LaunchDaemons folder already, just make one. Remember to change the filepath in your launchctl load/unload commands to use LaunchDaemons as well, if that's how you're launching your Jenkins.
You'll also want to adjust your httpListenAddress in the plist, as explained on this StackOverflow page - just make sure to change LaunchAgents to LaunchDaemons if you've already moved your plist.
Don't forget to deal with your SUBMODULES
If you've got a submodule as part of your project, remember to look after that too. It might be second-nature to sort it out for yourself during everyday development, but Jenkins doesn't have your reflexes.
The GitHub plugin I was using had support for submodules, but insisted on updating the submodule using the --remote option. This caused the job to checkout the wrong commit from the submodule repository, and so the build would fail.
You'll know your individual method for dealing with your own submodules, but my solution was to add the correct shell command - git submodule update (without the --remote flag) - as a separate build step after the automatic checkout process had completed.
#jenkins#continuous integration#ui testing#testing#ci#hudson#xcode#build#submodule#agent#daemon#file not found#spaces#software engineering#devops
0 notes
Text
Run a Subset of XCTest Tests with fastlane/scan
fastlane/scan is a gem which provides a simplified, cleaner command line interface for running your tests, as opposed to raw xcodebuild.
It also uses xcpretty to provide you with a nice test report when the tests are done, which you can have open in your browser upon test completion if you wish.
scan provides a simple solution to:
Running all your tests
Running a pre-selected subset of your tests
Don't worry - this works for unit tests and UI tests.
It's a great solution for setting up test runs on Jenkins.
All you need to do is set up a scheme for each set of tests you want to run, and add each scheme to your Scanfile.
Installation and Setup
Install scan. You don't necessarily need fastlane.
$ sudo gem install scan
Create a template Scanfile in your project directory, inside a fastlane directory.
$ cd path/to/my/project $ mkdir fastlane $ cd fastlane $ scan init
Add a scheme for the set of tests that you want to run in Xcode:
Go to Product > Scheme > New Scheme...
Select the build target that you want your tests to run against.
Name your scheme.
Click OK.
Go to Product > Scheme and ensure your new scheme is selected.
Go to Product > Scheme > Edit Scheme...
Select Test on the left-hand side, and you should be able to see your tests in the main part of the window in a tree of disclosure arrows.
Uncheck all of the tests that you don't want to run.
Make sure that the Shared box at the bottom of the window is checked.
Close the scheme editor.
Add the scheme to your Scanfile. You may want to specify a particular device to run the tests against, particularly if you are running UI tests and have iOS 8.x or lower simulators installed, since UI testing is only supported from iOS 9 onwards.
To define a scan scheme, set scheme as the name of your scheme from Xcode, and add further parameters underneath your scheme declaration if you wish.
# For more information about this configuration visit # https://github.com/fastlane/scan#scanfile # Run all tests scheme "UITests" device "iPhone 5s (9.2)" open_report true clean true
Now, you can run your tests from the command line:
$ scan
Add as many schemes as you want.
# For more information about this configuration visit # https://github.com/fastlane/scan#scanfile # Run all tests scheme "UITests" device "iPhone 5s (9.2)" open_report true clean true # Run tests involving WebViews scheme "UITestsWebViews" device "iPhone 5s (9.2)" open_report true clean true
Specify a scheme when you run scan if you have multiple schemes.
$ scan --scheme "UITestsWebViews"
Then sit back, watch your tests run, and wait for the pretty report to appear.
#fastlane#scan#fastlane/scan#xctest#xcode#testing#ci#continuous integration#jenkins#subset#ui tests#ui testing
0 notes
Text
Test for The Worst
What's the worst that could happen? Answer that question, then test that scenario.
Depending on the way your app is built, its purpose and its audience, The Worst that could happen will vary a lot.
If you're working on a piece of in-house software for an audience of trained, internal marketing staff members (something like an internal content management system), The Worst isn't that bad - missing a corporate deadline or your site looking a bit outdated for a while.
If you're working on a piece of software that's mass-marketed as a healthcare monitor which people have come to rely on to alert them as to health dangers, which is endorsed and used by medical professionals around the world (something like a diet monitor, which can tell diabetics when they need to take insulin), The Worst could include situations like people's lives being at risk.
If your app can detect when it's not working and let the user know, that's better than the app failing silently.
Maybe your app can't auto-detect when it's broken, but you can set up an automated system to do a check for you and alert you when something's not right, and you can manually put your app into a maintenance mode.
What happens when the user sees that your app isn't working? How well does your app recover? Can it even recover at all? Does the user need to re-download the entire app? Do they need to restart it, or launch it from the background? Will it start working automatically as soon as things are fixed?
Check not only for what happens when you have a disaster, but also for what happens when you've recovered from the disaster.
Is it worth putting in all of these mechanisms to protect your users from seeing ugly errors or silent failures? You can never tell when something's going to go wrong. Obviously, things aren't supposed to go wrong, but they can. Almost every programmer has had at least one of those moments where they're looking at something that has definitely gone wrong, and thought, "That's impossible, it's impossible that this has happened." - and yet, it has.
This is why testing is a job.
Testers are hired to second-guess the developers of the product. Second-guess the developers all the way to The Worst - and back.
0 notes