1998 - Any Pronouns - I'm not really active anymore but I'll keep this blog up so people can continue to use the Furby Tutorial Masterpost!
Don't wanna be here? Send us removal request.
Statistics
We looked inside some of the posts by rancidbunny and here's what we found interesting.
Average Info
Notes Per Post
4K
Likes Per Post
3K
Reblog Per Post
1K
Reply Per Post
19
Time Between Posts
9 days
Number of Posts By Type
Text
7
Note
3
Video
1
Photo
6
Last Seen Tumblr Blogs


Fun Fact
28.6 is the average number of monthly visits per US mobile user.
Text
I have finished my pattern for the furby baby sling!
I tested this a few times on Lemondrop, and there doesn't seem to be any problems with tipping over while he's in it. I added a nice (optional) ruffle detail around the edge and the whole thing should only take around 200 yards MAX of yarn. I used a 4 weight worsted acrylic yarn and a 4.5 mm hook for my final product. This is my first time writing a crochet pattern so excuse any mistakes I may have made in the writing. I am happy to answer any questions you may have while crocheting! I hope everyone enjoys, and if you like my work you can check out my ko-fi for a free pdf version, commissions, or to leave a tip!
💜pattern below💜

💜 Written by @sweetbabyrayn on tumblr and ko-fi. Posted to @rayn--cloud on tumblr 🐸
Uses a weight 4 yarn with a 4.5 mm hook
🐸 key 🐸
dc - Double Crochet
sc - single crochet
inc - Increase (two stitches in same space)
decr - decrease (skip stitch and crochet one space over)
💜 Basket 💜
Round 1: In a magic circle, dc 8 (8) Add in a stitch marker at the beginning of the row now.
(This stitch marker will line up with the seam on the side of your furby baby)
Round 2: Inc in every stitch (16)
Round 3: (dc, inc) 8 times (24)
Round 4: (2 dc, inc) 8 times (32)
Round 5: (3dc, inc) 8, times (40)
Round 6: dc in each stitch (40)
Round 7: dc 7 chain 10 skipping over the next 8 stitches, then dc 7 (this makes the tail hole)
Round 7.5: dc 4, chain 3 skipping over the next 3 stitches, dc 4, chain 3 skipping over the next 3 stitches, dc 4 (this makes the feet holes) (42)
STOP AND CHECK THE FIT ON YOUR FURBY. IT SHOULD BE SNUG BUT NOT TOO TIGHT
Round 8: dc 3, dcr 1, dc 3, dc in each chain (10 total) dc 3, dcr 1 dc 3 (this is the tail half)
Round 8.5: dc 4, dc in each chain (3 total) dc 4, dc in each chain (3 total), dc 4 (40)
Round 9-10: dc in each stitch (40)
(on row 11 switch to secondary color if desired)
For Ruffles:
Round 11: dc 3, dc 4x in each stitch for 16 stitches (3+10+3), 5dc (place a stitch marker in the first and last dc), dc 4x in each stitch for 14 stitches (2+3+4+3+2), 2dc
For a straight edge:
Round 11: dc 3, place an additional stitch marker in the third stitch. Dc 16, dc 5 and place a stitch marker in the first and last stitch of this grouping. Dc 14, then dc 2 (40)
FOR BOTH OPTIONS:
*The stitch markers indicate where to connect the strap when at desired length.*
Round 12: Dc 3, chain one and turn. 5 sc, chain one and repeat. (5)
*We will be working in rows from here on out to make the strap. Make sure to always chain 1 before turning for each row*
Rounds 13-14: sc 5 (5)
Round 15: sc, inc, dc, inc, dc (7)
Round 16: dc in each stitch (7)
*repeat this until you get a desired length for your shoulder strap*
Ending four rounds:
Round 1: dc, dcr, dc, dcr, dc (5)
Rounds 2-4: dc 5
Attach the strap to the other side
- I do this by turning the basket inside out
- find the first stitch marker on the opposite side and make sure your strap isn't twisted
- slide the hook into the dc where the stitch marker is and pull through.
- slip stitch that loop into the one on the strap.
- repeat this for the next four stitches then tie off with a sturdy knot
- flip basket back the right way out and the seam should be out of the way and you're done!


61 notes
·
View notes
Text
The Masterpost is gettin updated again!
And also! my ask box has been... emptied?? somehow??? there was definitely an ask in there before of someone thanking me for making the masterpost and i didnt delete it buts is gone now soooo if you sent me an ask since the last time i was on here its... gone now i guess????
1 note
·
View note
Note
Hey! I noticed there isn’t much on 2023s so I wanted to offer my tear down guide
https://www.tumblr.com/l3x01d/739258333505175552/feral-teardown
The other tut you sent is already on there but this one is getting added now! Thank you!!
2 notes
·
View notes
Text
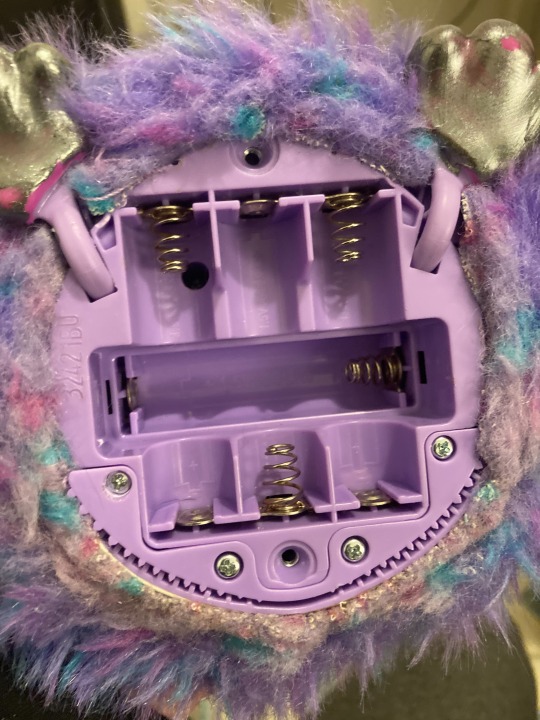
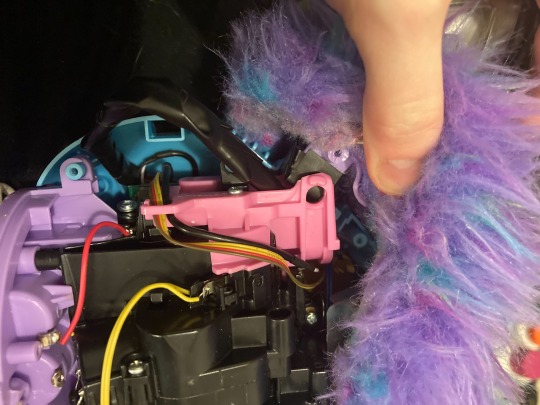
these pics are from after i already did this a couple times so yours is gonna look a bit different. Ok so first undo these^^^^ four screws. take out the little half circle with teeth. it holds in a lot of the fur thats attached to an elastic band. theoretically you could use it to hold it back inplace after putting it back together but ive never actually gotten it to go in with the fur. you dont need to undo this one:

i recommend keeping it inplace tbh. then youre gonna get to the six clips. theyre extremely hard to get out. i ended up cutting all of them along the bottom. it sucks. ive seen people say you can push them out with a screwdriver but i never got that to work. hopefully you can do it better. this is my first custom. ive also heard people say you can cut a thread or two and then theyre easier to get out but i didnt want to cut any threads so i cut the clips instead.
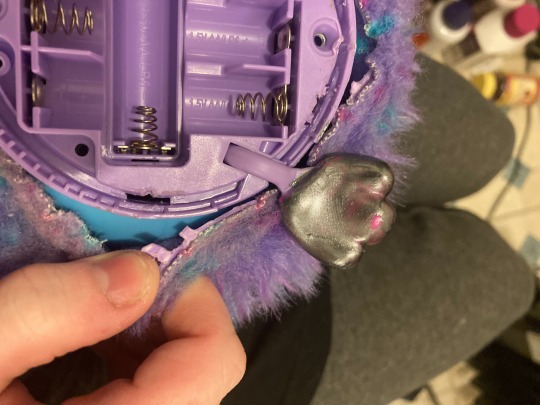
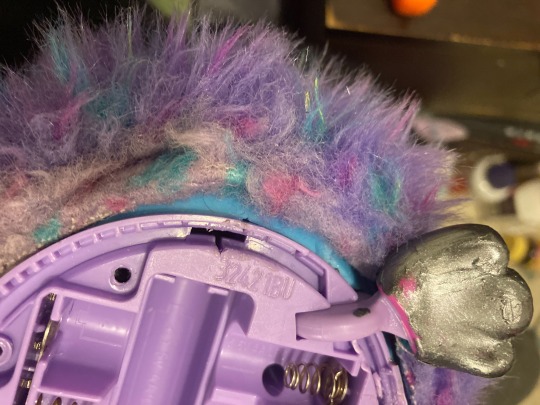

then pull the fur up as high as itll go and undo all six housing screws. the top two are really far up almost ontop of their head. then undo the two clips on the side:


then you can just lift the back housing cover completely off. this next picture already has one ear removed. ignore that sorry. unscrew the two screws with washers on the pink plastic. these are holding the ears inplace.

using a flathead screwdriver you should be able to leverage out one side of the ear posts. after that you can just pull them out fairly easily. do this on both sides.

^^^then you should be able to flip the front housing cover up just enough to push out the clips holding the front fur on. then remove the front housing and faceplate. this picture already has the faceplate removed. its held in by three screws. i took it off to paint it.then you want to unplug the ears from their little square connector dudes and remove them from the fur. try not to pull too hard on the wires. theres a small hole they go through the fur thats lined with plastic. its kinda tricky but doable. dont be afraid of this part just be careful of the wires.
if you want to paint the eyes youre gonna have to scrape or sand off the current design and the white parts. its too slick to paint directly. it helps to prop them up with something while painting because theyre on a spring for when they open/close. i used the cover for my scrapey tool. dont forget to sand the lids if you want to paint them too! most of all be careful not to get any of the dust in the internals.
this is the fun part now you can paint whatever you like!! clear spray paint makes a good sealant ive found.
Edit to add: for stuff like the faceplate that doesn’t move or get touched much spray paint is ok but for stuff that gets a lot of wear or moves (heart gems, ears) polyurethane is much better! Be sure to sand well before applying as this will be thicker than spray paint. I did 2-3 layers and it stopped the paint from coming off Feral’s heart gem.
You should be able to find polyurethane in any hardware store. It’s what goes on hardwood floors to protect them and is great for finishing clay charms too. Crystal clear is best but I used a satin finish just fine. BE SURE TO USE PPE WHENEVER FINISHING PROJECTS.

the rest of this post is gonna be things to be mindful of when putting them back together that i wish i had thought of before i learned it the hard way. if you have to really force anything its probably not right.
GO SLOW this long part in the back is gonna get in the way!! took me forever to figure it out. lay it flat in your hand as you put the housing on and make sure it lines up right.
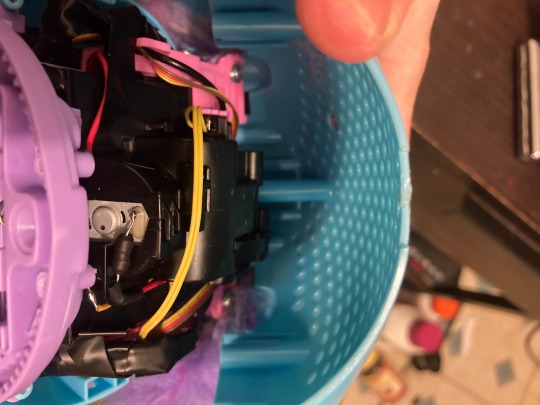
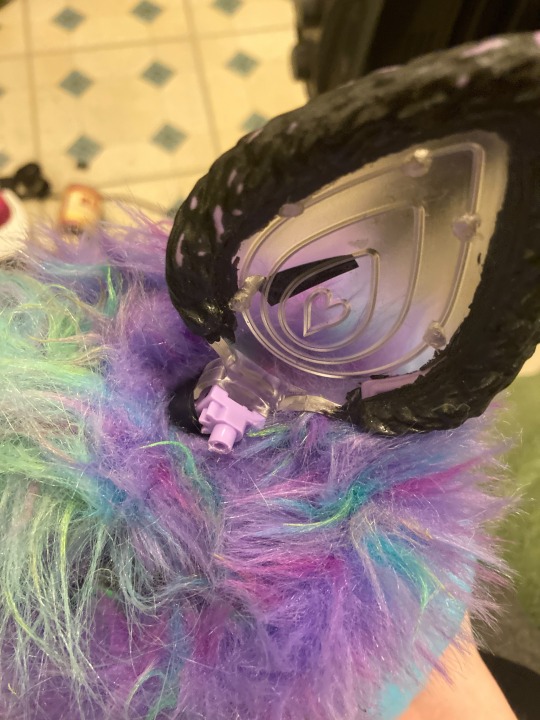
before trying to get the back housing back on make sure the silver top button is lined up correctly! it should fit in the two groves on the very top of their head. when screwing the housing toegther BE CAREFUL OF THE EAR WIRES. BE CAREFUL OF THE EAR WIRES!! i caught mine and accidentily shredded most of them the first time i put them back togeher and ended up having to resolder a bunch of it together and it was doable but a pain so just be careful when you put the holes into their notches that theres no wires in the way. the wires are right next to the pegs/holes that get screwed together. the four wires in the back are for the ears:

i think everything else has already been documented better than i could do. i also carved a bit off of the ear poles to help but i did too much on one end and now that side doesnt move so thats probably not the best idea! i also highly recommend reading furbinthewoods' post on doing this i wish i had been able to find it when i was doing mine. ive reblogged it and put it under the "furby teardown" tag.
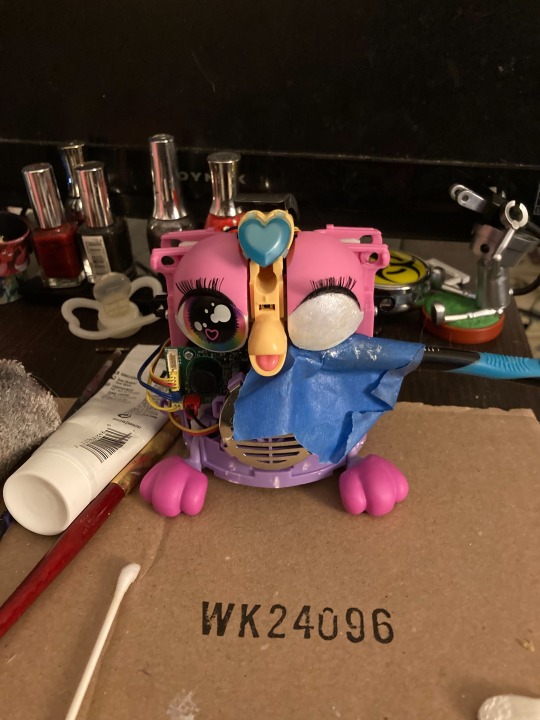
heres Feral my first custom ever and first furby since the 90s (I Love Them):

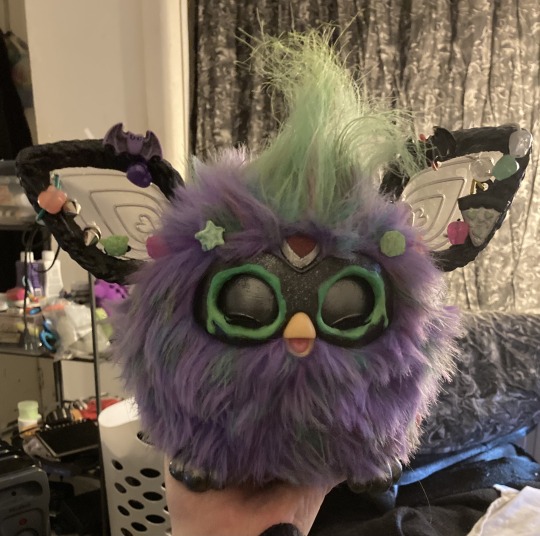
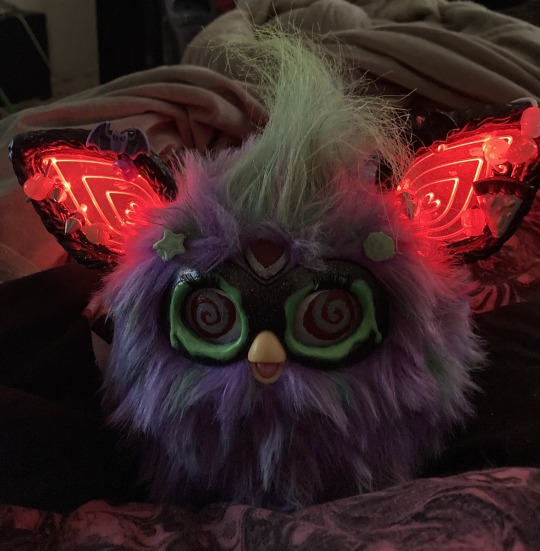
have fun and dont be afraid to fail!!
Edit:
Feral has a tail and lots of accessories now!! It won’t let me add pictures but I hope to have pics and guides up soon for some of them!
48 notes
·
View notes
Video
youtube
I made a better tutorial for the eyes, considering half my footage didn’t get eaten!
65 notes
·
View notes
Text


IVE BEEN PROCRASTINATING ON POSTING THIS LMAO.
Wonderful art trade with @long.furbys on Instagram. They made a long Furby for this trade which I will be showing soon :)
The print will be available in September
680 notes
·
View notes
Text
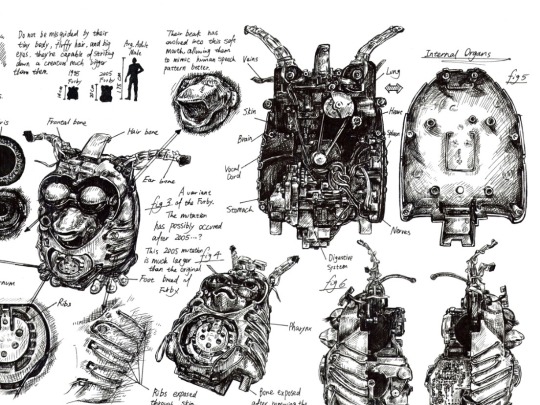
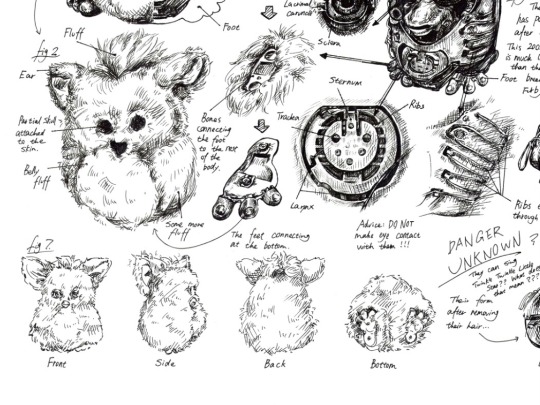
Hey guys! The Furby anatomy drawing is available as a print now!! You can find it in my Etsy shop: https://www.etsy.com/listing/1424927432/furby-anatomy-1998-furby-poster-print?ref=share_v4_lx
Please check it out. I’m saving up money for my medical transitioning, so anything would help and much appreciated 💜


191 notes
·
View notes
Photo

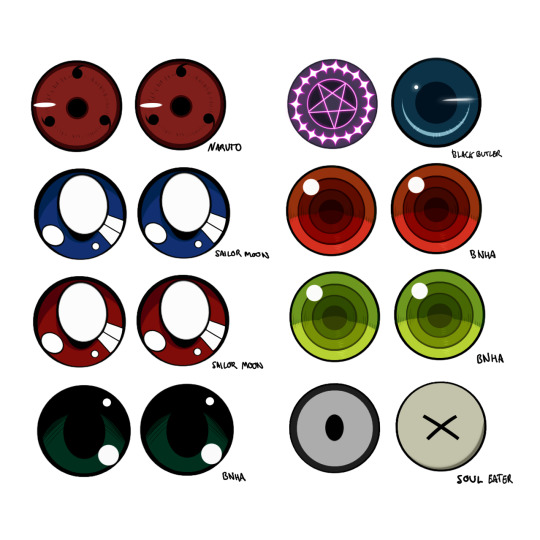
Tried my hand at designing Furby eyechips. These are free for use! Just credit me if you use them~ disclaimer: any resemble to chips others have done is coincidental
Would anyone be interested if I did custom eyechip commissions? :0c
365 notes
·
View notes
Photo

free to use furby eye pattern!
i designed these so i can test out the hot glue eye chip method soon!
and decided to make them free to use for the people who cant draw their own or just dont want to!
no catch no credit is required (although if you want to tag me for the first time when you use them i would love to see them in use!)
small instructions
1. print them out and make sure they are sized right!
2. if your using the chip method make sure all the paint is removed from the chip!
3. glue the eye chips direct onto the paper and make sure they are centered!
4. cut them out around the eyes
5. seal the back with either more glue or gloss glaze and then pop them into your furby!
have fun!
666 notes
·
View notes
Photo


some furby eye chips!!
feel free to use <3
190 notes
·
View notes
Note
would you recolor the furby regular-style eyes to have a hazel version maybe? green hazel or blue hazel would be so neat
i’ve never heard of blue hazel before, so it was pretty cool to look up! I think my sister might have blue hazel eyes, so that’s neat!!
how are these?


67 notes
·
View notes
Photo


Eleventh theme is Wide Eyes!
oops today’s an eye chip day
so basically i realized i have like..no basic eye chips aside from the ones based off the original 1998 furby eye chips. so here’s some more basic eyes!
remember, i do free recolors! just send me an ask!
Interested in custom eye chips? I also do commissions!
Keep reading
283 notes
·
View notes
Photo


BEHOLD! I have created some eyechips that are free to use! I think these are pretty nifty, especially the swirly amber-like ones. :> If you use any, let me know, I’d love to see how they look on a furb! ^^
1K notes
·
View notes
Text

i was practicing painting landscapes from stock photos a while back and just had them laying around so here enjoy highly detailed furby eyes. No iris. No focal point. Just the infinite abyss.
319 notes
·
View notes
Note
do you think you could make red 98 style eyechips? im working on an albino and i dont want to deviate from the normal eyechips to much
i’m a bit tired, but i hope one of these are what you were looking for!


40 notes
·
View notes
Photo


Just wanted to doodle some simple eye chips this time.
I do feel like something’s missing, so feel free to add to these!
Keep reading
39 notes
·
View notes