
Blog / journal entries about cinematography and filmmaking and an archive of writing, video, film and photography projects by Rachel Bardin.
Don't wanna be here? Send us removal request.
Statistics
We looked inside some of the posts by rcsbardin and here's what we found interesting.
Average Info
Notes Per Post
8
Likes Per Post
7
Reblog Per Post
1
Reply Per Post
0
Time Between Posts
6 months
Number of Posts By Type
Text
7
Video
4
Photo
4
Link
2
Last Seen Tumblr Blogs


Fun Fact
When “GIF” was named word of the year in 2012, Oxford Dictionaries U.S.A. credited Tumblr for pushing the word.
Text
Alphabet Hour - Jimmie or Jimmy
Originally published in the "Over the Rainbow" collection (for Pride June 2022) at Alphabet Hour.

Jimmie Anderson was my neighbor in the little trailer park nestled within a marina on the St. Marks river. I heard somewhere that he came to town with a carnival man named Bill Helson.
I remember his jean shorts and the stitches in his nose and how he never looked the same after.
He shucked oysters and gave me a Greek fisherman’s hat when I was in the 5th grade. I still wear it sometimes.
I took this photo when I was home from college. When he died a few years ago, people in the town said how much they loved him and they held a small gathering in front of the general store. They also said he was a little different and that we all knew his lifestyle.
I’m thinking about home and how deadly shame is. I wonder if there really is salvation in pride.
1 note
·
View note
Text
Finding and testing a super 8 camera
I am working on a project about history and tourism and decided that super 8 was a really interesting format to use because of its association with nostalgia, home movies and vacation Elizabeth Czach's thesis Home Movies Then and Now has provocative examples of how super 8 has been used and marketed. The old Wonder Years intro scene is another interesting touchstone (it looks like simulated super 8). This post is about some of the research and thought process behind using this format and then finding and testing a camera.

I filmed with super 8 many years ago but forgot to leave myself notes and had to do a lot of research to catch up. I vaguely remembered compatibility issues with certain film stocks and troubles with built in internal filters. I used a variety of resources, blogs and forums to get caught up which I'll try and link to throughout.
From a director's perspective, the automated aspects and imperfections of the super 8 format are an important part of its qualities and appeal. As a cinematographer, relinquishing control of exposure and metering and lenses is challenging after working with manual still and movie cameras.
My wish list for a Super 8 camera involved a Goldilocks-esque list of factors:
Overall reputation of camera and lens quality
Compatibility with a variety of modern film stocks
Manual exposure controls - Many super 8 cameras can't meter for higher ASA film stocks but manual control can help override that. This is helpful also in case the internal meter is inaccurate or broken. Analog Resurgence has a good video explainer of this. Or read Shoot It With Film's What You Need to Know Before Buying a Super 8 Camera.
Expense and ease of batteries - Cameras like the Beaulieus have custom batteries that either require re-celling or expensive or DIY modernized battery packs. Many other cameras require button cell batteries for the light meter which aren't too hard to find but not as easy as AAs.
Cost and condition - While I love fixing things and DIY projects, I was hoping to find something that would work pretty well off the bat because the project is coming up soon. But a camera that has a guarantee of having been tested and professionally maintained costs a lot more. What can I test for to feel comfortable with the risks?
Locally available - I'd had a tragedy of shipping a super 8 camera before another project years ago that meant I had to buy a 2nd, less desirable camera last minute. Avoiding shipping and getting to hold a camera and test it in person ranked highly for me in terms of risk assessment.
I found a great local seller of a Nizo Professional who was able to walk me through the camera and let me test things out before committing. The Nizo Pro only needs AA batteries and while it's limited to only automatically metering for film stocks up to 160T, it does have the ability to manually adjust the iris. It will meter Kodak 500T as if were 160T, overexposing the film. But I can stop down by 1 & 2/3 of a stop to compensate. It would meter 250D as 100D so stop down 1 & 1/3rd stop. (Here's a chart of ASAs in 1/3rds stops increments)
The seller helped me check the following things in person before purchasing: Initial Super 8 camera purchasing checklist Powered on and ran (no film inside but motors sounded good, only do this at low speeds!) No major battery corrosion Viewfinder and lens were clear of fungus and scratches and all barrels turned smoothly Meter activated (not testing for exposure accuracy, just that it responds to light at all). It responded both in Auto and Manual modes. That was enough for me to feel like it was worth it. He also threw in 7 cartridges of 200t, which, might be super expired and totally unusable but they also might be ok! They are useful for making sure film transports through the camera if nothing else.
I had a lot of questions still and wanted to run more tests at home.
At home Super 8 tests
Motorized zoom test - Buttons work and speed responds to varying pressure.
2. Is the iris / aperture actually moving along with the meter needle? I check this by looking through the gate while running the camera and seeing the iris expand and contract in automatic mode by pointing the camera at bright and darker spots and seeing it respond to the manual dial also. This doesn't establish accuracy of the stops indicated in the viewfinder but confirms that the iris at least works in some capacity.
3. What's going on with the internal filter, color temperature and ASA settings? TLDR; The metering and internal filter activation pins and switches are interconnected and all worked as designed.
I tested this by looking through the gate and pressing on the ASA and color temperature pins and flipping the filter switch. The filter engaged (looked orange) and disengaged appropriately with the switch and color temperature pin.
The iris opened and closed with the ASA measuring wedge being pressed in.
For accurate exposure reading, heed the manual's instructions on daylight and b&w film always being set to the sun symbol on the filter switch. Daylight film + lamp symbol will mean underexposure by 2/3rds of a stop.
Conclusion on internal filter: If I have daylight film, I'll listen to the manual and put the switch on the sun symbol mode. If I have tungsten film but I want to use a fancy glass 85 filter instead of the internal 85 filter, I'll put the switch on the light bulb symbol so that I don't double filter (the metering is done through the lens).
Final test: A roll of film!
The last test I did was putting in a 200T cartridge in and filming with it. I haven't gotten the footage back yet but I can confirm it made it to the end of the roll where it says Exposed. I know the shutter was working and the iris moved. So these are all good signs.
I tested filming with and without the internal filter engaged to see what the quality differences might be.
I filmed a color chart as well.
The test should give me an idea if the meter is exposing film at all in the ball park. Of course, 200t is more sensitive than the 160 it is being read at, so it should be overexposed by 1/3rd of a stop which I didn't bother to accommodate for manually.
I noticed a lot of flaring so I picked up a rubber hood (after the fact). I also used a variable ND because 200t is quite sensitive!
There could be other issues revealed by the test, so we shall see!
Long version of notching and internal filter testing: Super 8 cameras were designed to take a lot of guesswork out of filming. The cartridges of film have notches that correspond to mechanisms inside the camera that tells it what sensitivity and color temperature the film stock is. There is also usually a switch that you flip to tell the camera whether it is outside or inside. All of these factors impact the metering and whether or not an internal orange filter engages.
It's easy to get into the weeds on this subject so I recommend the Analog Resurgence video How Does My Camera Detect Film?, reading Pro8mm's blog about the filter and Friedemann Wachsmuth's blog post about his Super 8 notch ruler that helps measure a cartridge and camera. http://www.peaceman.de/blog/index.php/super-8-notch-ruler-new-and-improved
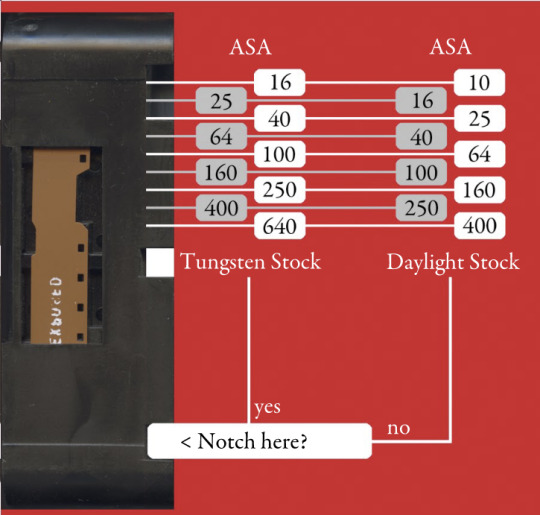
Above is a photo from Wachsmuth's ruler which shows the measurements and locations of the notches in a super 8 cartridge and below is a photo of the inside of the Nizo Pro where you can see the gate, the ASA notch reader and the tungsten / daylight reader.
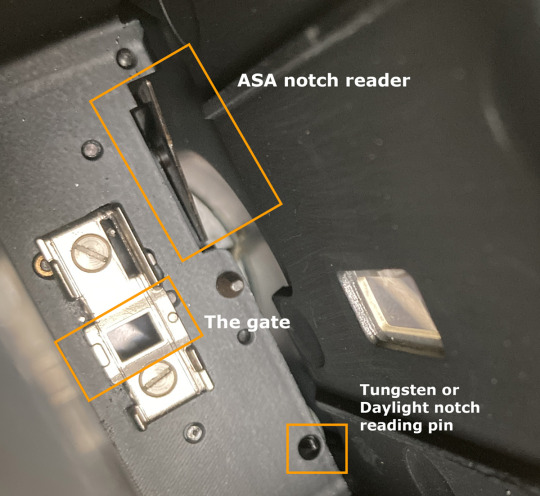
I ultimately wanted to see if the notch readers and filter switch were working as designed (and also I needed to test things out to fully comprehend the concepts and design)
Super 8 cameras mostly expected tungsten (~3200 kelvin) balanced film and have a built in 85 / orange filter to correct (~5600k) daylight to tungsten so outdoor footage didn't look blue. Many experts suggest not using these built in filters because they are probably deteriorating or dirty.
I only ever want an 85 filter if I'm using tungsten film outdoors or under 5600k balanced movie lights.
Below is a photo of the Nizo's Outdoor / Indoor setting switch. It's not a simply a filter switch, it also impacts exposure!

Observations and facts:
Setting the switch to the daylight sun symbol extends the internal pin and engages the internal 85 filter *if* it has a tungsten cartridge loaded or is totally empty.
Tungsten cartridges have a notch cut out at the bottom which gives the pin room to extend into.
A daylight cartridge has no notch so it won't allow the pin to be extended. It pushes that back pin in. Pushing back on the pin disengages the 85 filter and tells the camera this is daylight film.
*When the switch is set to the sun symbol, the meter reading does not change whether the pin is pressed in or extended out* - this is because an 85 filter on 160 cuts 2/3rds of a stop of light which the light needed equivalent to 100ASA. Setting the switch to the tungsten light bulb symbol
Turning the filter switch on the Nizo Pro to the light bulb symbol does many things: 1. retracts the pin 2. disengages the 85 filter 3. lights up a light bulb symbol in the viewfinder and 4. stops down the iris to accommodate for the extra light being let in now that there isn't a filter. I got the following readings
Sun symbol (filter engaged) f. 4 1/3 Light bulb symbol (no filter) f. 5.6
This is a good sign since 85 filters cut 2/3rds of a stop of light.
*When the switch is set to the light bulb symbol, the meter reading changes by 2/3rds of a stop (less light is let in)*
The light bulb warning light on the top right is there to remind you that you have no filter engaged in case you walk outdoors.

So what if we have daylight balanced film and put the switch to the light bulb symbol?
The manual tells us not to do this and cautions the user to always have the switch on the sun symbol when using daylight or black and white film.
What will happen if we do it anyway? We are going to underexpose our daylight or black and white film by 2/3rds of a stop. The pin that can tell the difference between daylight and tungsten film has been retracted by the switch and can't tell the difference between 100D and 160T now (which have the same top notch cutout measurement). The camera just assumes you have tungsten film that's unfiltered and stops down to compensate. But hey, the manual tried to warn us!
4 notes
·
View notes
Text

Quick update on the Nikon/Nikkor lens set project. I’d paused working on these as video lenses because I got a new still 35mm Nikon body to use them on as is and video projects got paused due to Omicron.
I worked on the 24mm Nikkor today. Main goal was to declick and take the protrusion / flange down so it doesn’t hit the mirror on my 5D or touch anything it shouldn’t on the EVA. A bit unrefined but I just used a hacksaw.

Unlike that bit of horror, the declicking of the aperture is reversible. I’ve saved the tab and screws.

The screwdriver set is Japanese Industrial Standard. Apparently using plain old Phillips Head is a recipe for stripping screws. These lenses also generally have loc tite glue, so heat is sometimes recommended to loosen them up. I had some other work done (ai lens conversion with John White) recently on the lens and asked them not to add more glue.

I’ll still need to add grease to dampen the iris but happy for now. Also rethinking the Ef lens adapter because now that I’m using these for photo, something more easily removed is preferred over the red rock adapter that involves the tiniest screws ever.
Adding a note here (June 2022) - I got this grease to dampen the iris and it seems to be working nicely - Nye Lubricants 795A (NG) Synthetic Damping Grease 50g Tube - on Ebay . A smaller quantity would have been ideal but maybe someone else will need it.
Still haven't found an ideal lens adapter, I'll probably use this fotodiox one the most because I'll be going back and forth between video (ef mount) and stills (Nikon F mount)
0 notes
Text
Archiving Immemory by Chris Marker
Formerly a CD-ROM, Immemory by Chris Marker was ported to a public Flash website on Gorgomancy.net . Due to the phasing out of Flash, the incompatibility of the CD-ROM with many modern devices with updated operating systems, it’s quite difficult to experience it in 2021 without using an old machine or emulator like SheepShaver.
I used an older machine to save the swf files and began playing them in an old version of Adobe Flash Player which also gave me readouts of errors and missing files. I pieced together the flash site and tried to find all the files and create an archive. I used Warcit to package the site and uploaded it to Conifer / Rhizome . If it were to be ported again for modern devices, I think it would be better to transpose it from the CD rom and Hyperstudio files given the compressed nature of the Flash files. This might best be done using HTML5 and Javascript. Some of the transitions and effects may simply not be translatable. But who knows how long Javascript and html5 might be around? Perhaps the WARC format by the Internet Archive is a good option, at least for now.
I also explored the Hyperstudio versions but had some difficulty...the original cursors aren’t available...I also had trouble with the Poetry page, similar to the flash site, it seems like a dead end. Yet I see the stacks and swf files...I believe the links just need to be examined. It would be nice to have a high quality, accessible version with all of the sounds and links operational.
View Immemory in English at Conifer
1 note
·
View note
Text
Building a Nikon Prime Lens Set for Cinematography. Part 1
This is about my attempt to put together a Nikon photo lens set for cinematography. I haven't posted to the blog in a few years and I'm not guaranteeing I'll post regularly or ever again. However, I thought I might use this space to document little things like lens tests.
While I've used many lovely cinema lens sets over the years, having a set of prime lenses of my own has always been a little out of reach financially. But I've been craving some variety after doing a lot of work on the same zoom lens. For a new creative challenge, I'm going to see if I can build a really affordable prime set around a lens I've owned since 2004. It might not work! The lenses might not match at all! Let's see.
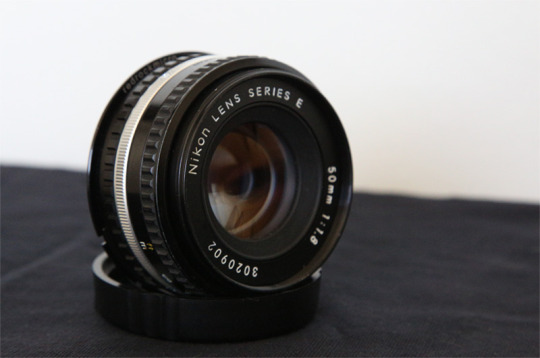
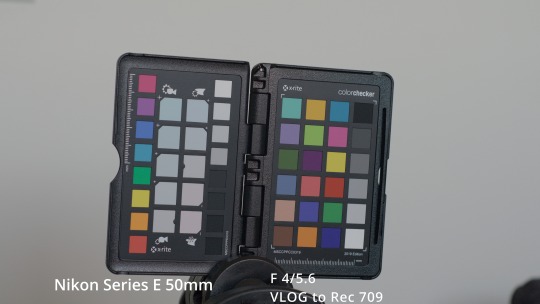
This is my Nikon Series E 50mm f1.8. The Nikon Series E lenses were designed to be more affordable and aimed at hobbyists and average consumers rather than professionals who would use the Nikkor brand lenses. They are lightweight and small due to using more plastic and fewer optical elements. When you see Nikon sets converted for cinematography, they are often AI or AI-s versions of Nikkor lenses.
I love a few things about the Nikon 50mm. After working with a somewhat clinical modern zoom lens, the visual character of the Nikon is simply refreshing. I'm not going to expand on that or give more details right now but maybe later I'll do a comparison. This lens is also very lightweight and low profile. Sometimes vintage photo lenses get rehoused into cinema housings and I totally respect the utility of that but I love having a camera build that is small, fits into tight spaces and doesn't call attention to itself. This lens also opens up to 1.8 which is quite helpful in low light or night filming.
Unlike cinema lens sets which are designed to be used together and match fairly well, photography lenses, even ones within the same brand or series can be one-off projects with different teams behind each one (Nikon has many histories of different lenses documented on their Thousand and One Nights website).
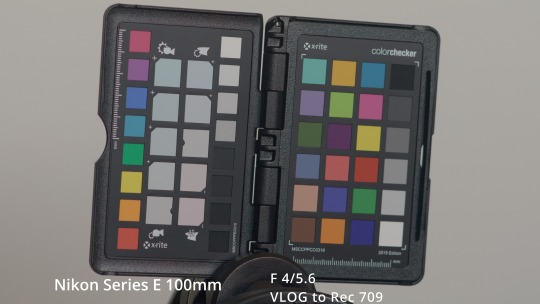
For my set, I'm going to be testing out the following Series E Nikons: the 50mm and the 100mm which are generally thought of as exceptionally good. That said, I don't even know if these two lenses will match at all. I've also thrown in a Nikkor 24mm 2.8 into the mix.
Why go Nikkor for the wide? Well the Series E only goes to 28mm and that one didn't seem to get stellar reviews. Ken Rockwell, who has generously documented countless photography lenses over the years described it as "an optically inferior 5-element 28mm f/2.8" and "crummy". Matthew Durr, who did extensive testing of Series E lenses, described the Series E 28mm as disappointing and not particularly inexpensive compared to other Series E lenses. That was enough for me to look elsewhere. I found a Nikkor 24mm 2.8 Non-AI lens for under $100 on ebay and decided to see how it looks. For reference, the 100mm series E was also just under $100 and 50mm series E lenses currently are going for $50-$80.
Test #1: What do I want to look for in these lenses? Ideally, I will set up as thorough and rigorous a lens test as Jay Holben, ASC has done and documented in American Cinematographer. For now, I want to sort out whether these lenses are even in the ballpark of each other and worth investing more time and adjustments to (like declicking the aperture ring or mounting a solid semi-permanent EF adapter and buying new rear caps). Note: I have been fond of the Red Rock micro adapters. I have one on my 50mm and for the other lenses in this test I have a Fotodiox adapter that is really sticky and makes me nervous each time I put it on a lens because it feels like it might never come off. The Red Rock adapters are around $33-35 each, and you want to buy one for each lens because mounting involves some tiny screws. Not something you'll be doing on set. Once mounted, you then need Canon EF back lens cap for each one you've adapted which are around $7 to $10 each. This semi-permanent mount change would cost about $45 for each lens but be worth it to me to speed up workflow on set and not have to bother with an anxiety-inducing removable mount.
My initial test is simple, I'm just using this color chip chart and natural, indirect window light. Confounding factors: time of day, atmospheric haze, bounce from outside of the window (foliage, buildings etc.), color of the glass in the window and screen and dust in the screen, sensor etc. A better option would be to use a full spectrum controllable light source but all I have on hand at the moment are LEDs.
First, I do a custom White balance using the 100mm lens on the Panasonic EVA1 in VLOG 150mbps / 422 UHD mode 23.98 onto the ColorChecker's whitecard.
One might expect something around 6300 for indirect light or shade.
I got 8300k -.8MG . Ok! I'm going to leave it at this setting for the all of the lenses.
I set the exposure at a 4 / 5.6 split for all of the lenses (one might also test for variations in the exposures at this point but I'm moving fast).
I'm going to bring all three clips into DaVinci Resolve and look at a few things.
1. Simple look test - I'm going to normalize the footage first by converting all of the clips from VLog to Rec 709 using tonal mapping in my project settings.
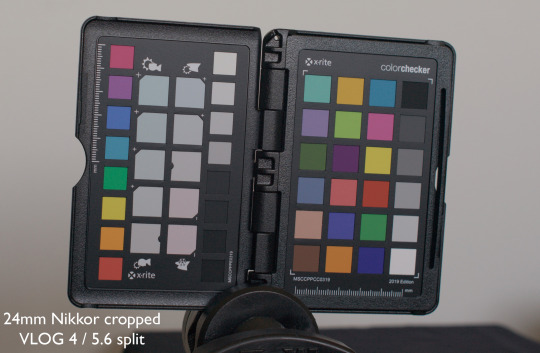
.Who knows what kinds of color transformations happened from exporting a still jpg and then uploading it here. And we also know just proximity of other colors can skew our perception which is why I cropped the 24mm for these stills.
My perception though is the 50mm looks a bit bluer just based on the wall in the background.
2. Scopes. Let's look at some scopes next using a power window to isolate the chip chart.


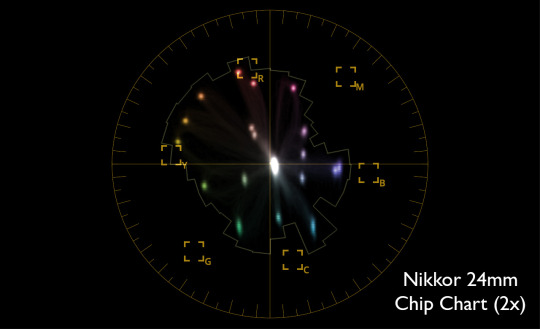
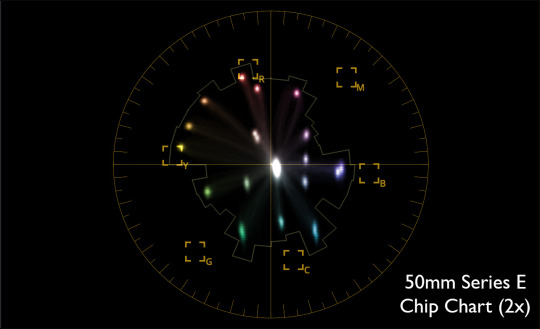
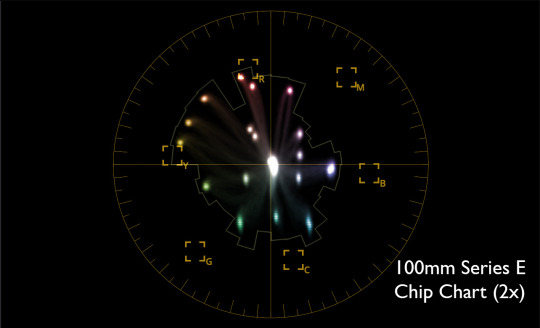
Looking at these charts and the footage, the 50mm certainly skews a bit bluer overall and none of the colors across lenses seem to exactly match up. One might have expected that the series E lenses would best match each other but the 100mm and 24mm look a bit closer to each other in my eye.
All of that said, I am encouraged to keep these lenses and continue testing for some other qualities. I don't think they are so far off from each other than modest color grading couldn't make them fairly inter-cuttable. For my next test, I'd like to keep the light source constant (even if it's an LED) and start to look at things like sharpness and contrast and the other qualities examined in Holben's test.
0 notes
Text
"I’m tired of sincerity being something we have to be afraid of doing. It’s been like that for 20 years, that the entertainment and art world has shied away from sincerity, real sincerity, because they feel they have to wink at the audience because that’s what the kids like. We have to do the real stories now. The world is in crisis." - Patty Jenkins - The Woman Behind 'Wonder Woman' - NY Times
0 notes
Photo

Lavoyger gets Special Jury Prize for Documentary Short Film at IFFBoston!
0 notes
Photo

LAVOYGER is going to Boston! Check it out at IFFBoston. School and my other films are keeping me in Austin but I wish I could be there! Thursday, April 27 9:45pm Somerville Theatre - Screen 3 Sunday, April 30 5:30pm Somerville Theatre - Screen 4
0 notes
Photo

Poster design for Lavoyger the film by Kristina Cancelmi
0 notes
Link
It is an honor to be considered for this award and it is great to see Isaiah Rendon, a UT alum on the list for his work as well.
0 notes
Text
Screening times for Lavoyger at AFF
Come out to Austin Film Festival and see Lavoyger the documentary (directed by Rachel Bardin) and other great films in Shorts Program 10: Everything's Shorter in Texas.
Screening 1 10/15/2016 4:00 PM Galaxy Highland 9 6700 Middle Fiskville Rd, Austin, TX 78752
Screening 2 10/19/2016 4:00 Pm Rollins Theatre 701 W Riverside Dr, Austin, TX 78704
Individual tickets can be purchased at the theater, passes and badges are available here https://austinfilmfestival.com/shop/badges-and-film-passes-info/
0 notes
Photo

Lavoyger, the short documentary I directed last year, will have its world premiere at the Austin Film Festival this October (13th-20th). The film is about Lavoyger Durham, the manager of El Tule ranch. During his career guiding hunts for Texas elites on the ranch, Durham has discovered over 20 bodies of people who died avoiding a nearby border patrol checkpoint. The film explores his life, background and the confluence of worlds where he lives and works. I attended AFF last year and was blown away by some of the films there, so it came as a great surprise and honor to have a film I worked on be included this year. I'm looking forward to seeing even more great films and going to many panels this year.
0 notes
Link
vimeo
Rachel Bardin Director Reel 2015 from Rachel Bardin on Vimeo.
Kissing bugs, boxes, bees and cowboys. A sample of narrative and documentary projects directed by Rachel Bardin.
1 note
·
View note
Video
youtube
Nocturne is a short documentary that I made during my first semester as a graduate student at the University of Texas. Thanks to Rachel Curtis-Robles, researcher, NSF fellow and bug hunting guide for making this possible. Kissing Bugs are present in all of the Americas and can transmit Chagas to humans, dogs and other animals.
#kissing bugs#chagas#texas#documentary#trypanosoma cruzi#rachel curtis-robles#national science foundation#video
1 note
·
View note