
Statistics
We looked inside some of the posts by rdcgomes and here's what we found interesting.
Average Info
Notes Per Post
16
Likes Per Post
12
Reblog Per Post
4
Reply Per Post
0
Time Between Posts
5 months
Number of Posts By Type
Text
3
Photo
14
Last Seen Tumblr Blogs


Fun Fact
Tumblr has a low social media market share in South America.
Text
Time to say goodbye to tumblr...
I'll stop using Thumblr and switch into my private website https://ricardo.heptasoft.com, from there you can follow me in the other social media sites or directly over RSS

0 notes
Photo


Yesterday finally got the last pieces to finalize the PC build.
The remaining 2 ram memories (for a total of 64Gb), now finally fitting below the fan, extra 1tb SSD and some Artic P12 PWM fans (to cover for the BeQuiet fan that went to the cooler).
Artic P12 PWM are very impressive fans for the price. I would say they are as quiet or quieter than the Silent Wings 3, and can go until 1800 rpm, moving some serious amount of air, very impressive. They are definitely at the level of Noctua or BeQuiet fans, for for a fraction of the price (5 fans will cost like 25 bucks).
If I didn’t own already the other BeQuiet fans, I would equip this build fully with the Artic P12 fans.
0 notes
Photo


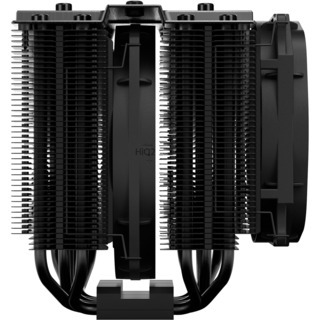


One of the reasons on my PC build that I went for a beQuiet Dark Rock 4 cooler instead of the bigger version beQuiet Dark Rock 4 Pro, since the price difference is relatively low, is that I was afraid the cooler would be too massive and that I would have issues with the ram slots. Interestingly enough, due to, in my opinion bad design and planning, is actually the opposite. Dark Rock 4, although smaller is the one that will get issues with the ram slots, being that the 140mm fan that comes with it, will cover the first ram slot and only low profile ram slots will fit (pic 1-3 are from Dark Rock 4, pic 4 is a Dark Rock 4 Pro).
Since, I want to get 2 more slots of ram, and want to stick with the same exact ram sticks, I only had 2 options, change the way the air flows on the case and invert the cooler, or install the extra brackets with an extra 120mm fan to the cooler. I went by the second option, used a 120 mm Silent Wings 3 fan and added it in the front, moving the 140mm fan to the back, together with the rubber fan stripes to hold it in place and give the required spacing, to aid extracting the air out of the cooler (since i was afraid the 120mm fan would not be enough to compensate the lack of the 140mm one).
Problem solved, I can now install the extra ram and at the same time gained a few degrees drop when the CPU is fully loaded, where in the past i would measure around 81-83, i now get 73-76 degrees.
If I was buying the cooler again, I would just choose the Dark Rock 4 Pro or a liquid AIO cooler.
0 notes
Text


Been a long time since I last wrote, so I'll be posting what I've been up to during the last months.
Starting with my much needed PC upgrade.
Needed to send the MacBook pro to fix (battery swallowing), so decided it was a good time to kill that dependency and start working with more powerful hardware on my day to day, with the idea of being quiet, no rgb nonsense, resilient and upgradable in case I required.
Some choices were also inspired a bit by Linus choices, since I hope kernel support for this components become better with time ;)
Since I use Nvidia as graphical card and didn't want to change that, hackintosh was not an option. So I decided to give a try and move to PopOS, supported by system76. Quite happy with the system, outside of the inability to suspend with this hardware, need to invest more time to look into this but its sad and annoying because I thought linux had overcome this some years ago (same behaviour on base ubuntu, so not PopOS fault)
What about iphone development, well, since ram and cpu are now abundant, I just created a VirtualBox machine for it. Works great (outside of the iPhone passthrough via usb, still didn't figure that out). But now that the MacBook is back,I have a fallback in case is needed.
Since I've been using more and more VirtualBox for complete PoC setups (kubernetes, esxi, microk8s, openshift, etc) the 32gb start to get tight, glad I got 2x16gb, so easy to add 32 more if required :)
That's all for now, more coming soon
0 notes
Photo


Finally got some free time to build the Mr.Rags Macro Keyer kit (http://wb7fhc.com/order-mr-rags-now.html) I was gifted a while back (thanks Zeev).
Was actually my first electronic kit built from scratch so it was a build, learn and improve soldering skills (still a long way to go for me) kind of situation. Followed the great assembly video https://www.youtube.com/watch?v=DqoL2q9cGMw and everything went ok, ended up working at the fist try :)
My ts100 soldering iron seem to have some defect, since its now almost impossible to read whats on the screen and it felt like the heat on it was not stable anymore, i guess I need to get another one...
5 notes
·
View notes
Text


Today I finally managed to get some free time to install the new tenis ball feet on the printer. All in all I like the result, printer is higher from the ground, less noize and vibration and no fear to scratch the floor xD
Since I was already with it, also used the opportunity to add a fan protection, security first, right xD
Also got my new esp32 devkitc delivered, so will be having some fun in the coming days ;)
0 notes
Photo


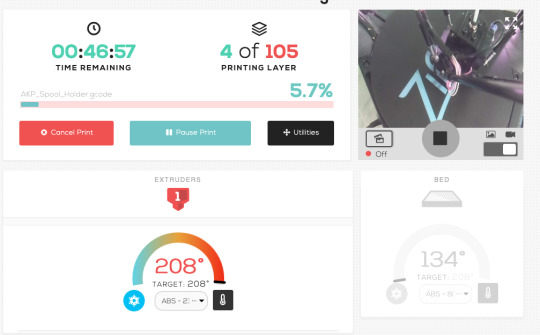
After the awesome bed leveling of last week, I decide to finally start a big print, when i realized the hotend fan was having cabling issues (would stop working in some head positions).
Time to pick my tools again and do another small fix. Gladly I had one last 12v 0.55A fan that was of the same size as the Anycubic one.
One of the things i get from this fix is that I’m loving more and more my ts100 soldering iron, its just amazing the speed and the quality it archives, highly recommended :)
0 notes
Photo


This weekend I decided to finally install my Anycubic auto bed leveling update that i bought some months ago. In the way I also updated to the latest Marlin 1.1.9.1 and finally got that first layer working nicely. I mainly followed the great video from https://www.youtube.com/watch?v=5G8GdNywsUQ&t=237s
Along the way, I had a weird issue that sometimes the probe would fail and printer would start to go up until it hits the endstops. I later realized that this was caused by the cabling that in some head positions was shorting the cables.
Another issue I had, was that the autoleveled seemed to be setting the head way to close to the bottom, making it not able to extrude the first layer. Followed the https://www.youtube.com/watch?v=GF6ZGKOuzhY&t=279s and checked for the real Delta_Height, then added it to the firmware.
Added a fork of the marlin software with my configuration here https://github.com/organom/Marlin-1.1.x :)
0 notes
Photo


3D printer fixed, re-calibrated and working better than ever. Also added the new Ziflex magnetic base, works great :)
Great video for re-calibrating the deltas: https://www.youtube.com/watch?v=Xk7remEhUx8
0 notes
Photo


Long time no write.
In the meantime I moved back to Portugal and will have now a bit more space for my “projects”.
For now, I got a new office desk and that’s how the current setup looks like.
0 notes
Photo


Another great product from Xiaomi - DF3 dafang camera
Got this one from GearBest for $27.99 - https://www.gearbest.com/ip-cameras/pp_693217.html?wid=1433363 ( search the internet for some coupons, there are always some available for GearBest ).
So, what makes this one so special? 360 horizontal degrees by 93 vertical degrees of rotation freedom, light sensor, Night Vision with 6 IR Leds, micro sd card slot and 1 usb port, wifi, full hd quality, motion detection, microphone, speaker, single power source of 5v (usb powered), 120 degrees view angle and of course, sweet design.
But wait, is that all? well... not really, 1st most important part is that it can be hacked and the 2nd most important part is that it was already done and you can now run a custom linux on it. Checkout my friend git repo for instructions on it : https://github.com/EliasKotlyar/Xiaomi-Dafang-Hacks
0 notes
Photo


Some more improvements on my Anycubic Delta Plus, this time a I just finished my Night Vision Mode.
So in order to make this happen, I managed to find in aliexpress an IR Led Strip ( https://www.aliexpress.com/item/SMD3528-IR-InfraRed-850nm-940nm-Flexible-LED-Strips-120-LEDs-per-meter-LED-Tape-with-Black/32483847826.html?spm=a2g0s.9042311.0.0.52b04c4dnWPhwQ ) from where I ordered 1 (1 meter is more than enough for this build) of the 850nm IP65 (for some protection and nicer finishing) in the time for 16,74€.
As for the camera, I’m using one that I both on Pimoroni for 16,50€ ( https://shop.pimoroni.de/products/raspberry-pi-zero-camera-module - the one with NoIR filter).
The rest was basically cut the led strips to measure, solder the wires, add some heat shrink tube to cover the solder (metal frame, needs some protection), with some pain slide the wires in the aluminium rails and pass the cables via the holes in the plastic holdings, wire everything together (via the power on/off button) and to the 12v output of the TriGorilla.
For newer models, since they came already with heat bed and a power supply, you can power everything from there, in this case (old model, no heat bed) I’m quite happy I’m able to connect everything directly to the TriGorilla board (RaspPi Zero W + camera module from the 5v, IR led strips and a fan for the steppers from the 12v) still using the original external power supply that came with the printer.
#nightvision#Anycubic#anycubicdeltaplus#Raspberrypi Zero#raspberrypizerow#IR Led#2018#3dprinter#irled
0 notes
Photo


Another weekend has passed and I decided to get rid or the ugly cables connecting the raspberry pi zero to the 3d printer. For this to go well (in one end because the tri-gorilla doesn't output power in the usb-B port and in the other because the raspberry had the connections on the opposite side that I wanted) I decided to solder the 4 wires directly to the raspberry pi zero (2nd pic) and in the other end I used a female usb-b (so that I can still disconnect the whole thing easily when needed),solder the data- and data+ to the tri-gorilla and the power I connected to the aux 5v & gnd pins.
I would say the end result got pretty neat and now I'm not afraid anymore to tune the camera direction when printing since it's not so easy to disconnect the cables anymore :P
#2017#3d printer#raspberrypi zero#raspi zero#improvements#3dprinter#Anycubic#anycubicdeltaplus#raspberrypizerow
5 notes
·
View notes
Photo


Another weekend and some more work on my 3d printer.
This time I managed to finish some foot and top coverages (both the same design), this allows a better protection of the wires, more stable structure and no dust setting on the inside of the rails. Additionally I also added some covers for the side of the print bed, for the same motives as above, unfortunately the black spool ended after the second, will eventually print the 3rd one once the new black spool arrives. Outside from that I printed a new electronics holder and simple fan support.
Next things in the list are: connecting raspberry zero without using the USB cables (direct soldered connection), auto bed leveling and some lights for the printing ( maybe infra red since I have a noir cam).
0 notes
Photo


Another post today, yeahhh ;) ... almost as awesome as Pickle Rick
Just wanted to share some improvements I’ve been doing in my Anycubic Delta Plus.
So basically I now have a raspberry pi zero with a camera in a 3d printed box & holder that controls the 3d printer, has the camera, holds the web interface and is being powered directly from the 3d printer board (5v pins). Currently I have it running AstroPrint, but before I had it with OctoPrint and works as good.
Second was the built of a spool holder inside an ikea samla 22l box (lots on this in thingyverse) and I have to say I really like the idea. It gives me an easy way to have all the spools together and usable, dust and humidity free and to transport them safely around. Next improvement on this will be connecting the box with the printer via PTFE tube, just waiting for the parts to arrive.
I did some other improvements but they are are not that worth mentioning.
Lastly but not least, I would like to share a link to one of the most awesome designs I printed lately - “Ikea Samla Clip. The best one ” https://www.thingiverse.com/thing:2110134 - believe them, they are that good, I already printed 24 during the weekend ;)
5 notes
·
View notes
Photo


Again long time no post :(
Have been mainly busy with work, but did some cool improvements in my storage room / lab related mainly with storage space and functionality.
One of them was having some jar storage compartment + light. I can fit lots of small things in the jars, see them and access them easily. Having the light over the main area of the shelve comes in hand for searching screws and gives a general nice look to it. The price of this was around 10-15€ since I mainly used materials I already had laying around, the main price was the drawer slides, light switch, wood and screws.
The other improvement was some supports for electrical wire rolls. For this I 3d printed the supports, attached them using some screws and used a round wood bar to hang the spools. Additionally I also tried some small 3d printed spools for some extra wiring storage.
0 notes
Photo
Another great hackathon, lots of fun and great projects :)

Our hackathon team hard at work at the Burda Hackathon!
1 note
·
View note