
Hobby artist and sculptor | sideblog | Main: bscully
Last active 60 minutes ago
Don't wanna be here? Send us removal request.
Statistics
We looked inside some of the posts by sculpyshop and here's what we found interesting.
Average Info
Notes Per Post
107
Likes Per Post
85
Reblog Per Post
22
Reply Per Post
0
Time Between Posts
7 days
Number of Posts By Type
Text
8
Photo
2
Last Seen Tumblr Blogs


Fun Fact
The total number of visits Tumblr.com received during January 2021 is 327 million.
Text
Use these to sculpt better
So I bought a real cheap LED Headstrap (3 bucks) to see if it’d help with sculpting:

Turns out this thing is actually extremely handy. If you wear this, it always shines onto your sculpt up front from the direction you’re looking, which makes it easier to spot asymmetry or other fine surface oddities on your sculpt. No more adjusting a goddamn lamp too!. If you want to paint sculpts with this too, make sure the light color is white. The one I got has blueish light. 10/10 definitely recommended!
14 notes
·
View notes
Text
Adding soft sculpey to hardened sculpey
Contrary to popular belief, if you got a sculpture that’s already hardened and would like to add more details, you can do so, but only if those details aren’t exposed to weight or force. If they are, they will either get cracks or even fall off. If not, you needn’t to worry at all. Backstory: Got a hardened Sculpey Firm as base, added an arm made out of Sculpey Medium, put to oven to harden. It had no cracks UNTIL I started sandpapering it. Whoops! But even so the cracks are really small and not visible if painted over it.
5 notes
·
View notes
Text
If you don’t know where to store your sculpey, you can warp it up tightly in aluminum foil. This keeps all the softener inside the sculpey and thus completely stops the process of drying out!
9 notes
·
View notes
Text
Sculptures from solid Sculpey can be problematic, even if you attempt to fix them

There are two break-through cracks on the spots I’ve marked in red. I have tried to fix these but they keep appearing. Apparently, the armature beneath still under such inner tension from its own weight (this guy must weigh around 300-400g) that these cracks reoccur despite of my best efforts. BUT I managed to prevent one crack which originally was on the right ankle, it does not exist anymore.
Lesson Learned:
to reduce weight do not make your sculpture from solid sculpey (especially if you’re going to make a bulky guy like I did)
to strengthen your armatures you can use repair putty
to prevent damage to the sculpt, tightly attach the sculpture to its pedestal using appropriate screws (ideally with flat, large heads that connect to the armature of your sculpture)
to improve armature strength on the legs it’s possible to make both feet out of the same wire (see picture). I have not tried this out yet, but it should offer a more stable base stance because the contact area to the ground is bigger.

In more detail, some fixes I have attempted, with some tips and tricks that may help you out:
Remove the legs completely and reinforce the wire beneath with repair putty (the stuff you use to fill holes in walls). Applied another layer of sculpey above it, put it to harden. Assessment of fix: the areas I patched with repair putty actually did NOT develop any cracks. Cracks were formed where I did not apply it. It may have contributed to fixing the crack on the right ankle that is now gone. Conclusion: This probably would have worked had I reinforced the entire armature like this. As such, this is something YOU can do as well. Recommended!
Fix the contact points figure <-> pedestal with new, larger screws and tightened it. Assessment of fix: This helped fixing the crack on the right ankle that is now gone.
Patched up the crack on the waist with a mixture of craft glue and powder of hardened super sculpey (sculpey patch-up putty). Assessment of fix: this helps covering up cracks, but for sculptures you put into the oven multiple times to harden (which I did here) the cracks tend to reopen. Also you may ruin your sculpt if you don’t use heat-resistant glue. Conclusion: Only do this if you finalized your sculpture and need to patch up a couple of areas. Avoid putting the sculpture to harden another time after you applied the patch-up putty.
13 notes
·
View notes
Text
PSA
Always keep the WIPs of your statues and figurines made from Super Sculpey in a dark and cool place. TIL longer exposure to sun creates small fissures on soft, unhardened sculpey and causes it to get brittle faster
5 notes
·
View notes
Photo

There isn’t much left to do until he’s completed... just many relatively small details!
22 notes
·
View notes
Photo


STOP, NOOBIE TIME!
Wanna hear about my worst sculpture fail ever?
10 years ago, I started making a full body sculpt of this little dinosaur. He went fairly well and was my first sculpture ever with super sculpey. Sadly I didn’t work on him continuously. I’d take breaks that lasted weeks and months. Then there was a point when I stopped working on him completely. Then I simply forgot about him. So 10 years later, I had to move out of my house. I found him in a box in one of my shelves and thought: “Ok, before I move I should put this guy in the oven to harden.” So I did and... the real fail just begins. 10 years ago when I started this guy, I didn’t consider that stuffing him with WAX and using HOT GLUE to keep his wiremesh together will cause him to melt away in the oven. (I hope I don’t have to mention the oven was a fucking mess after that)

What you see in the photo above is his head which I managed to salvage from his molten body. Eventually I fixed him up a bit and painted him... almost 10 years later.
Despite of this massive fuckup he turned out nice and serves as reminder to
NEVER USE FUCKING WAX WITH SUPER SCULPEY!!!!!!!!!
lmao. I don’t know what I was thinking back then.
2 notes
·
View notes
Text
Handy Tools for Sculpting
I have used each type of tool listed here a couple of times. You will not need most of the tools listed here, so I will start with the most important ones. At the end you will find tools that do not help with sculpting directly, but help creating your wiremeshes for your sculpts, for example. Here we go!
Basic Sculpting Tools:
"Surgery tools"

Price: 10-20€ per set Purpose:
handy allrounders, very flexible usage
good for wavey shapes (clothing)
reach areas you normally can’t
good for detail work
good for smoothing work
I absolutely love these, they are my fav tools!
Buying Advice:
Make sure the tools are from stainless steel
If you do not, the material may smell badly when hold in your hands
Styluses

Price: ~8-10€ per set Purpose:
maximum surface control
good for organic shapes, e.g. muscle, facial features
small styluses are good for detail and texture work
large styluses are good for smoothing out areas and getting them into shape
my second fav tools!
Other Sculpting Tools:
Artist’s Spatula/Cutting Knife

Price: 3€ per set Purpose:
cutting rolled out sculpey (works better than with a scalpel!)
evening out large areas and getting a basic shape done
Noodle machine
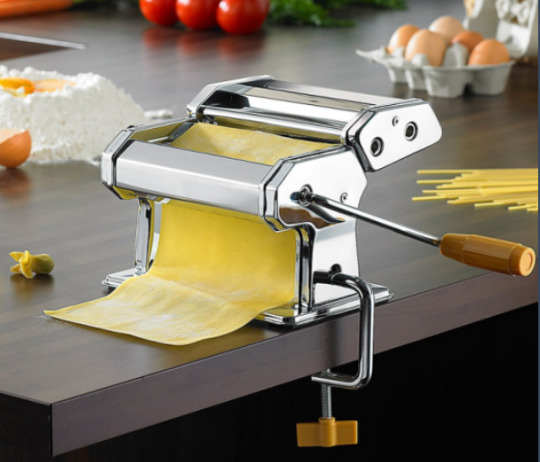
Price: 14-30€ Purpose:
fabricate even sculpey surfaces for clothing, hair, belts, and pieces meant to correct (e.g. make something thicker)
can be used to properly condition sculpey
Buying Advice:
DO NOT buy the modelling mass machine from Staedtler. It’s way too expensive (50€).
Make sure the noodle machine has an attachment for lasagna
Make sure you can adjust the thickness somehow The one pictured above is very similar to the one I got and was ~14€. It can roll out sculpey so thinnly it’s semi-transparent. It also allows a thickness of around 10mm and more.
Usage Advice:
Do not make actual noodles with the attachment you formed your sculpey. If you do, clean it thoroughly.
“Wiretools”

Price: ~15€ Purpose:
removes sculpting mass
handy for rough work and correction work, like evening out surfaces if you added too much mass
Easy texturing
The smallest one is superb for fur and hair
Buying Advice:
You can make these easily yourself using wire, some kind of container, like old pens (see above) or brass tubes, and an adhesive, e.g. superglue. My first little set of self made “wiretools” were made of wire, cotton sticks and super sculpey.
if you need a special head shape, buying them might be appropriate
Silicone or Rubber Clay Shaper

Pictured: Silicone clay shapers Price: ~5-10€ per set Purpose:
smoothing out surfaces
removing tiny clay pieces
carving subtle details
good for details on hair
Buying Advice:
Silicone is softer than rubber. Which ones you get depends on what you want to do with it. Silicone is good for shaping Super Sculpey Medium and smoothing out Super Sculpey Firm. It also allows you to carve in very subtle details. Rubber makes more distinct details on Super Sculpey Medium. With it, it’s possible to make details on Super Sculpey Firm too, but smoothing it only works decently if used with water together.
Other Tools:
Scalpel/Cutter

Price: 5-7€ Purpose:
cutting stuff
carving stuff
can be used for both sculpey and wood
Buying Advice:
Make sure you can reattach the blades so you can switch broken ones or attach other types of blades
Clamps


Price: 10-30€ and up Purpose:
bending wire
holding pieces e.g. when grinding or drilling sculpey, wood, metal
more for creating accessoires for your figurines
Buying Advice:
These go in different shapes and sizes!
small to mid-sized clamps suffice for attaching pieces to your work surface
the best is to attach a table clamp to a workbench, if you have one
if you want to use them for drilling holes, buy heavy clamps designed for this purpose (these can be attached to a work surface as well)
I have 3 clamps in my possession: A small one (a similar one pictured above in red), a mid-sized wooden clamp, and a heavy drill clamp (pictured above in blue). This setup suffices for most of DIY applications.
Pliers

Price: 3-20 € Purpose:
bending wire for your sculpture wiremesh
hold stuff when you can’t use your fingers
Buying Advice:
Make sure the pliers have a rectangular profile and are kinda pointy, this allows for more precise bending
If you only intend to bend wire, a small pair of plies for about ~5€ suffices
Try to avoid the real cheap pliers if you plan to keep it for a bit longer. Mine was ~15€ and is pictured above; it should hold out for a lifetime. I also have a tiny pair of pliers that was 3€ before that one and it’s just bad
You can use a pliers/cutter combination tool to save money, but it may have some drawbacks compared to a sole pair of pliers
Cutter/Cutting Pliers/Wire Cutter:

Price: 5-20€ Purpose:
cutting stuff, especially wire (duh)
Buying Advice:
if you’re going to use it for different purposes too, it may be advantageous to buy a more expensive tool (+10€) so it lasts longer
You can use a pliers/cutter combination tool to save money, but it may have some drawbacks compared to a sole cutter (dedicated cutters just cut better, esp. small parts)
14 notes
·
View notes
Text
For the sake of my financial stability you should NOT let me close to a DIY department or store
because I WILL buy EVERYTHING
0 notes
Text
Experiment: making Super Sculpey soft with linseed oil
Ingredients:
A brush
Linseed oil
hard and brittle sculpey
The sculpey I use here is 10 years old! It falls apart the moment you try to knead it. Completely unusable.

I got the linseed oil originally as supplement and on a discount (69 cents, original price 1,20€ ish). It went bitter after a while (as linseed happens to do) because I hardly ever used it.

Since I didn’t have any intention to eat it I might as well use it for this experiment. Let’s see what happens:

After a bit of kneading there was a noticable change in consistency.

Kneaded thoroughly for 5 more minutes - and it felt like normal sculpey. Just with a linseed oil smell.

Results:
The sculpey gets soft and is usable again!
I put a small detail piece of this to harden. All details were preserved as normal sculpey. It did not create any fissures either.
I’m under the impression it takes a bit more time to harden compared to normal sculpey. Perhaps the linseedoil takes more time to evaporate.
The hardened sculpey is still kind of brittle and easy to break. However there may be other causes for this, e.g. I didn’t put it in the oven to harden. It is also possible that it technically never really hardened... Need more data on this!
I didn’t test how well linseed oil sculpey will blend with normal sculpey.
Conclusion:
This is a much cheaper way to reactivate brittle and unusable sculpey: 250ml Linseed oil is 1,20€, while 30ml Super Sculpey Softener is 5€ (!). But using this method more extensively or professionally requires more experimenting and research.
Thus, this works, but use at your own risk!
Should you have tried this out let me know how it went!
23 notes
·
View notes