Don't wanna be here? Send us removal request.
Statistics
We looked inside some of the posts by shanz5410688 and here's what we found interesting.
Average Info
Notes Per Post
48
Likes Per Post
26
Reblog Per Post
0
Reply Per Post
22
Time Between Posts
7 days
Number of Posts By Type
Text
10
Last Seen Tumblr Blogs


Fun Fact
Tumblr posted its first advertisements in May 2012 and subsequently earned $13M in revenue.
Text
Week 10 - Completing the loop
In the last week of this semester, give a feedback on learning.
First of all, due to some reasons, I was unable to go to Sydney for class in the second semester. I have some regrets because I didn't have the opportunity to try 3D printers this semester. At the same time, there was a lack of communication during my work, which led to the finished product being not perfect. I hope that I can have more exchanges and learn more about the use of machines in Sydney next semester, so that I can have a more intuitive feeling about the products.
Next is about my homework. This semester's homework is to use tools to do industrial drawing, model making and digital modeling. This gives me a systematic concept of the process of creating a product, and I know the professional drawing tools and the main tools in the software. I know low fidelity and low fidelity, clay modeling of automobile models, etc. I have learned a lot of new knowledge, but I am not very proficient in model making and digital modeling. The results of the model are often different from those imagined. The physical model needs to be more detailed rather than rough. Digital model I need to try some bolder ideas, make some more exaggerated shapes, be familiar with each instruction of the toolbar, and be able to make models better and faster. There are still many things I need to learn and think about in this aspect.
Finally, is about the course. The course is organized and interesting. Every word the tutor said was very useful, which made me have a deeper understanding of this major. The task of this course is very clear, and it mainly focuses on practice. Practice can effectively improve my shortcomings. I have learned a lot of experience by practicing making models to express my ideas. Then, each blog requires me to write down my reflection and understanding, which effectively exercises my critical thinking and enables me to think more rationally after finishing my work. This is a good point to learn. All students will send their homework to the platform. Even if I am not on the campus in Sydney, I can learn the advantages of other students, reflect on my shortcomings and improve my works. Although they did not meet, they also exchanged their ideas.
I really hope that i can go to the campus next term. Thank for every mentors.
4 notes
·
View notes
Text
Week 9 Studio Tutorial – Preparing a 3d scan for printing
In the ninth week, I mainly learned about the digital model. About Andrew Simpson: Cup,the comparison between the physical model and the digital model shows that the physical model is more conducive to testing the state and the feeling of the material when it is used. It is more specific than the digital model.

In order to make the model more perfect, I treated the pit at the bottom and then turbo smooth the whole.In the process of doing it, it is not very difficult because it is done together with the class.

Sketch, digital modeling, physical modeling and 3D printing will be used in the prototype design. You can understand the practicality and sense of the product from multiple dimension in the design process, and constantly improve the work from multiple levels.
4 notes
·
View notes
Text
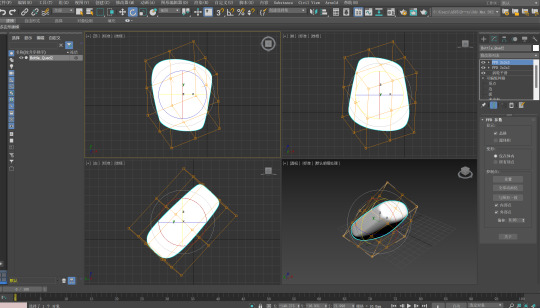
Week 8 Studio Tutorial – Digital Iteration
The task of the eighth week is digital modeling. I am not very good at software, but this is a point that needs to be broken through to challenge myself.Regarding high fidelity and low fidelity, it is to make models quickly and effectively at low cost, and select products by making a large number of models. Low fidelity is a simple sketch. The main function is to test the core function of the product. High fidelity will better fit the user's real use experience.

Because this is the first time to use the software, many tools are not very skilled, so I read some online tutorials to learn. The first part is to make a sphere, which is not very difficult. I changed it into an ellipse on the basis of the sphere, and then copied the three to form a pattern. This part is mainly to understand the main tools in the software.
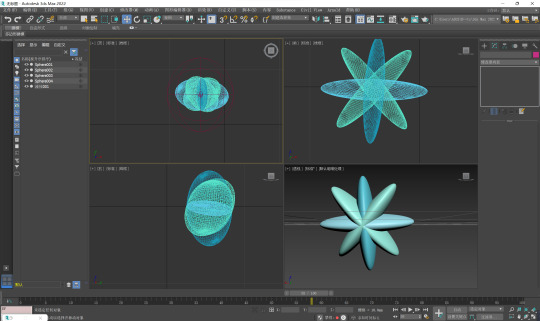

The second part is to build a furniture. I made some changes on it through a cube to make a chair. It will be difficult at the beginning because there are many tools that I don't know how to use, which leads to the complete deformation of the model at the beginning. So I tried many times to write down the role of each tool and gradually become more and more proficient. Finally, I can complete the model quickly. The problem is that the legs of the chair are a little crooked. If I do it again, I will be more careful and perfect this work.
Modeling is to establish a conceptual model through electronic equipment. The advantage is that many models can be made at low cost. The disadvantage is that it is more intuitive than the physical model.
4 notes
·
View notes
Text
Week 7 Studio Tutorial – Physical Model Making (foam)
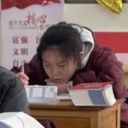
This week’s project is model making to develop hand making skills and express our ideas by physical model making. Due to the material of model is foam which will produce a lot of dust and in order to solve this problem, i wore the mask and sprinkled some water on the table to prevent too much dust.
Image 1 is my home working place

Now I have drawn the sketch of this model with a ruler on the paper, and then I use a ruler to accurately draw the size and shape of the model on the cardboard. The first part is not very difficult.


The difficulty lies in the second part. Cutting the foam board should be because there is no cutting tool at home, so I chose the foam with a thickness of 2 cm, and cut it with a knife. There is a space of 2 cm around the figure to allow fault tolerance. The cut foam will not be very flat, and then I use a carving pen to grind it. Because the head of the carving pen is small, there are many defects on the surface. Finally, I use sandpaper to rub it to make the surface smoother. In order to increase the beauty of the product, I carved two flowers with a carving pen.

To sum up, the model made of foam is more intuitive and accurate than the sketch, and it has an additional dimension to judge. At the same time, it also let me understand that foam is a good means to refresh the specific understanding of products. Making models is also a very enjoyable process, which effectively improves the ability to practice under limited conditions.
2 notes
·
View notes
Text
WEEK 6 DIGITAL PRACTICE
This week's practice is digital practice by using Adobe Photoshop which i had not used before. But i need to watch the videos carefully and try my best.

I got it from pinterest and the shape of chair likes a bloomng flower and it made of wood. This object evokes the sense of nature.

This is a sketch of machine. The brilliant ideal exress the feeling of science with the awesome skech skills.

This group design are simple but creative and convient. These furniture can reduce the wate of space.


I watched videos at first and then do it bit by bit, because I can't use many tools when I used this software for the first time, and there are many difficulties for me in the process of making it. The mouse drawing is not convenient, and the lines are not so smooth when moving. In order to solve this problem, I adjusted the settings to facilitate painting. The background is not perfect because the layers are not clearly distinguished. The color matching is not very beautiful. If I do it again, I will distinguish each layer, and then go online to find some color schemes to improve the beauty of the picture.
To sum up, I still have a lot of room to improve the use of software, and I need to think more about the design.
1 note
·
View note
Text
Week 5 Studio Tutorial – Sketching
The week 5 exercise is hand sketching. To improve hand sketching through the practice of lines.


In the practice of lines, I found that although it needs to be fast and accurate in the design, it needs to be slow at the beginning of the practice, not impetuous, and try to straighten the line and draw the circle more roundly. This requires patience and makes me more focused. I'll be more careful if I do it again.
Part 1: 2D Orthographic Thumbnails


The first part is to find inspiration by looking through the website and use these inspiration to design the appearance of the bottle and express it in my own way. I like this part very much because I can express my ideas. I use some elements such as clouds, flowers, ribbons and so on to add to the design. In order to enhance the beauty of the picture, I used a marker to paint. But the problem is that I'm not very good at using markers, which makes some shadows look unnatural. This made me notice that I should practice more and improve my hand-painted skills.
Part 2: Perspective sketch


The second part is perspective sketch I found that when painting, it should conform to the perspective principle, otherwise it will make the object look unreasonable. There is a problem with the perspective angle of the two points, because the tilt angle of the top is too large. Next time, I need to reduce the angle so that it can be more accurate.
Above of all, there is still a lot of room for progress in the skills of hand sketching. I need to practice more, think more, and improve the skills of using the marker, so as to be fast and good.
11 notes
·
View notes
Text
Week 4 Studio Tutorial – Perspective Drawing
The fourth week is learning perspective drawing by drawing three-dimensional graphics with auxiliary lines and can better understand the appearance and structure of the product.

Part 1: Construct a 2 point perspective view of your chamfered box
First draw the side and the top faces at a scale of 1:1, and then draw the station point (SP) and eye level / horizon line (EL / HL) and ground level (GL). Connect the intersections of these auxiliary lines to draw a chamfer cube. The problem is that the extension of the auxiliary line may be skewed by a millimeter, which leads to a slight deformation of the final cube. If I draw it again, I will first think about the position of HL and the angle of the top, so that it can be more accurate.

Part 2. Extending a box in perspective
When I am far away from the model, it will become smaller, which conforms to the principle of "near big far small". This part is to expand each face. I found that because the box is more inclined to the left, the expansion on the left should be larger. On the contrary, the size on the right should be smaller, and the expansion on the top should also be smaller. These faces are scaled up and down. I think it is very interesting to draw the change relationship of the three-dimensional model on a plane.

Part 3. Drawing circles in perspective
The third part is to draw a circle on the front and the side to judge the long axis and the short axis. My long axis is crooked, and the whole looks very uncoordinated. The main reason is the wrong judgment. If I draw it again, I will adjust the angle between the long axis and the short axis to conform to the perspective.
1 note
·
View note
Text
Week 3 Studio Tutorial – Section and Auxiliary Views
The third week is mainly about Section and Auxiliary Views. Hand draw through the third angle of view and use instruments to draw projection, section view and auxiliary view. I draw with pencil and ruler then trace the line with black pen. Because objects are composed of straight lines, it is not very difficult. However, there is some deviation in the size when drawing the auxiliary view. On the other hand, because the black ink is not dry, there are modifications when drawing with pencil, which makes the picture look less tidy and leaves traces of pencil modification. If I do it again, I will wait until the black ink is dry and I will use HB instead of 2B, so that the picture can look cleaner. This week's exercise has taught me that auxiliary views can more accurately express the physical structure of objects. I need to proficiently use this skill, so that I can better express the structural characteristics of objects.

4 notes
·
View notes
Text
Week 2 – Orthogonal Projection & AS1100 Standards
In the second week, I studied engineering drawing and learned how to display a design drawing by hand.
Part 1. Construct a 5 sided box to fit over a mini stapler


I used the first angle of view to draw a mini stapler. At first, I made a mistake at the beginning of the drawing, resulting in the left and right labels on the top of the box, so I redrawn one. This makes me understand that when drawing a object, I should imagine a 3D structure in my mind to judge whether there is a problem with the structure.
Part 2. Sketch a third angle orthographic drawing of mini stapler (3 views)

It is not very difficult, which makes me enjoy the process of drawing. If I do it again, I will draw it in the ratio of 1:2, because the stapler is too small, which makes the whole layout look incongruous. At the same time, zooming in can add some details. This taught me to consider the size of the object before drawing, and whether it can be zoomed in or zoomed out to achieve better drawing effect.
Part 3. Construct the orthogonal drawing accurately using using drafting equipment

I first drafted it with a pencil and then traced it with a black pen. At the beginning, I trace with a black pen directly instead of using a ruler to draw a straight line, which resulted in a less straight line and affected the overall beauty. So I added a ruler to make the picture look more professional
9 notes
·
View notes
Text
week1- Studio Tutorial – Drawing Instrument Exercises

The first practice is creating two types of shapes. One of them consists of several which is not very difficult to me and another one includes curves but it is hard to draw the connection between two curves. To make it more accuract, i draw more lines to locate its position. In the process of positioning, i drew very carefully, which made me pay more attention on it and enjoy the process. Through this exercise, i learnt that when sketching the graphics, i should have the sense of entirety and consider whether or not symmetry instead of focusing on one side meanwhile ignoring another side. Because when i first drew it, some lines are not parallel to each other and the connections are not very accurate. To alter these problems, i changed the original way and draw some lines to locate it.


In the second part, I drew an equilateral triangle on the bond paper to set the shape, but there will inevitably be angle errors in this process. In order to solve this problem, I extended the side length of the triangle and measured the length of each section with a ruler. However, the error of 0.5 mm to 1 mm appears in the process of drawing. This error will not have a great impact at the beginning. But when the third group is drew, the intersection between straight lines will be an error of 3 mm, which will lead to the overall deformation of the graphic and it is difficult to splice together. Secondly, in the process of cutting, the edges are not very straight that they cannot be perfectly spliced. So when I do it again, I will use a knife and an iron ruler to cut. The two graphics are a group, and I will cut them group by group instead of drawing three groups together, which can effectively reduce the error. From the second part, I understand that every detail should be paid attention to in the process of drawing, even if there is only a millimeter of error, because even a millimeter will lead to failure.
To sum up, the drawing instrument can improve the efficiency, but it will inevitably produce errors. Therefore, the accuracy should be improved through the cooperation between the instruments. For example, stabilize the T-shaped ruler on the table and slide one side of the triangle against the T-shaped ruler, so as to ensure that the two lines are parallel. In the future design and drawing, it is necessary to accurately know the role of each instrument and draw quickly and effectively. After drawing, compare and splice the graphics to ensure accuracy.
8 notes
·
View notes