Don't wanna be here? Send us removal request.
Statistics
We looked inside some of the posts by sims4ccyasee and here's what we found interesting.
Average Info
Notes Per Post
23K
Likes Per Post
17K
Reblog Per Post
6K
Reply Per Post
116
Time Between Posts
25 days
Number of Posts By Type
Text
11
Photo
6
Last Seen Tumblr Blogs


Fun Fact
US Tumblr user growth rate is estimated to slow down to 4.1%.
Text
Texturing Tutorial
I was asked by @liliumsims to make a tutorial on how I texture my cc. I was supposed to be texturing something else but who cares -_-
I don't know how much help this'll be cause you will need some artistic abilities and knowledge in a digital art software. There aren't any real shortcuts I can give, truth be told I do things the hard way 90% of the time, I can only show you my methods and hope they are of some use.
So to start I use the base maxis UV/texture template to see what I'm doing
I don't paint textures in blender, I usually just eyeball it in gimp and it normally turns out fine. >_>
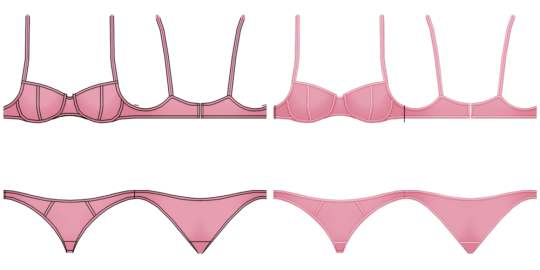
For this tutorial I'll be using the underwear from my sports set as a visual example. It's easy for me cause I just made it.
First I paint the base shape. I usually have S4S open at the same time so that I can periodically check my progress and make sure I don't mess anything up too bad... Once the shape is mapped out I then add the shadows. These are basic and meant to give a little depth to the garment.

Next is any line detail I want to add and highlights to bring the lines out a bit more. I do all my texturing with a mouse so they aren't perfect but it works for the sims so ¯\_(ツ)_/¯ (ignore the black line, i painted it on the wrong layer)
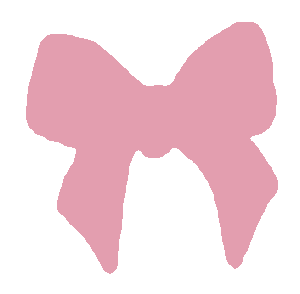
Here's a workflow gif of the bow I made for this set I had to scale it up so sorry for the crappy quality
and after everything and adding details like lace, shadows for the bow and whatnot, the garment is complete

I don't like using too many steps or layers, my aesthetic isn't realistic so thankfully I don't have to worry about that. But if you want your content to be more realistic without using actual real life textures just remember you're gonna have to put a bit more time and effort into the project.
I spend a lot of time going back and forth, checking progress and making sure it looks good in S4S only to have the quality lowered in game u.u.... But I hope this helps someone!
176 notes
·
View notes


Text


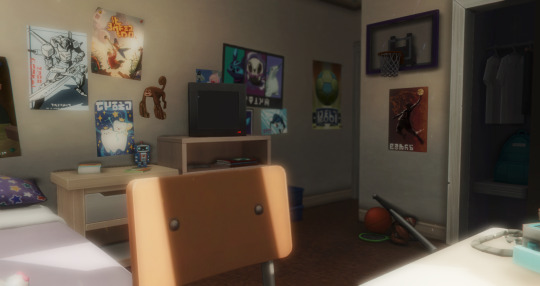

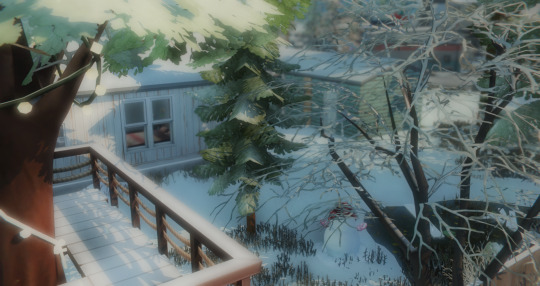
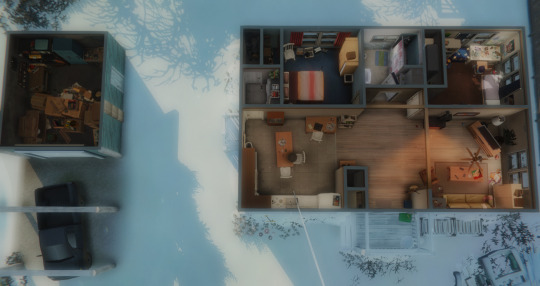
Eriksen’s house (Life is Strange 2)
The Eriksen Household is a location in The Awesome Adventures of Captain Spirit and Episode 2 of Life is Strange 2. It is the home of Charles Eriksen and Chris Eriksen. The house consists of Chris' room, Charles' room, a living room, kitchen area, bathroom and a yard. A garage is situated near to the house. *I used debug snowdrifts to make screenshots look nice, so if the season in your game is not winter you will have to remove them in b/b mode
I always would love to see your screenshots, so feel free to tag me @alerionjkeee
No CC Lot size: 30x30 Lot type: Residential 2 bedrooms, 1 bathroom Located in: Copperdale Playtested
Recommended have all packs. Make sure to enable “bb.moveobjects” before placing the lot!
Download ZIP file - (SFS)
@florwal💜
1K notes
·
View notes
Photo


Just started my game after a while today and was greeted with the new menu… and a very pixelated sim :D
I’m not sure if EA is about to fix it any time soon? However, at least a temporary solution is to change the size of the used thumbnail inside the file “ThumbnailConfig.ini” which you can find somewhere along a path like this (might be slightly different for you depending on where the game is located on your pc):
C:\Program Files (x86)\Origin Games\The Sims 4\Game\Bin\res
Make a copy of the file ThumbnailConfig.ini and save it somewhere on your pc, just in case you need to restore the original file.
Then open the original file “ThumbnailConfig.ini” with a text editor.
Navigate to the section titled [SimBust] and
change the size for Size_Small from 64,64 to 256,256 for example (this size looked good on my monitor, but a smaller size might fix it for you, too).
Delete the file localthumbcache.package (it’s located one level above your Mods folder) so that the game can generate new thumbnails, then start the game.
That’s it :-)
P.S. I’m not sure how often the small size of this thumbnail is used in-game, so don’t go overboard with the size and if you encounter game performance issues you might wanna revert the change (delete the file localthumbcache.package in this case, too, so the game can generate new thumbnails of a smaller size).
🔔Note that you will need to redo the changes to the file ThumbnailConfig.ini whenever this file is updated by the game.
401 notes
·
View notes
Photo

POSING TUTORIAL: FACIAL EXPRESSIONS
Helluu! You know the moment when you think you found the perfect pose for your story/gameplay but the faces look… uhm… a bit… off?
Yeah, I know.
When I first started making poses, the facial expressions were the hardest part for me. Because no matter what I do, I felt like they don’t look like the way I wanted them to look like. After many many many (many) hours spent in Blender, now I can achieve the emotions I want and I thought, HEY LET’S SHARE SOME TIPS&TRICKS YOU WISH SOMEONE TOLD YOU WHEN YOU FIRST STARTED!!
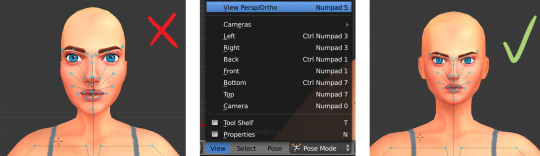
1. The View Mode
This is probably the most crucial part, at least it was for me. When you open Blender, you see your rig in Perspective mode, and it means it looks distorted. I know some pose makers prefer this view mode, but for me, it’s impossible to get the emotions I want when Blender is in this mode. So what should we do? We should switch the view mode to “Ortho”. Go to “View” menu, Click on “View Persp/Ortho” or just press 5 (Numpad).
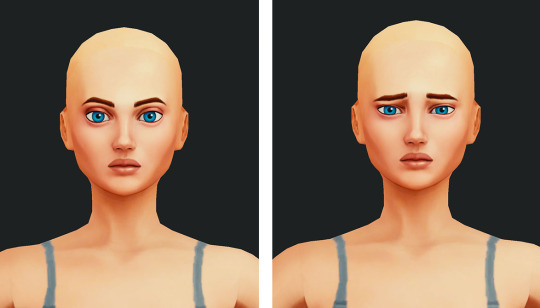
2. The Brows
Brows are where the magic happens! Just with a few minor tweaks, you can change the default face in so many different ways, even without touching the other parts of the face.

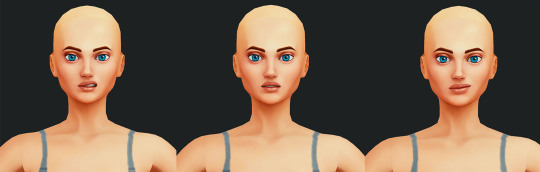
3. The Lids
Eyes wide open for a totally shoketh look, or slightly closed lids for “You bore the hell outta me” mood. If you close both the up and low lid slightly, here you go you’ll have a “I’m gonna kill you but I can’t yet decide how” look.
4. Closing The Lids
Okay, this took me long time to figure out but I’m finally happy with the results! Guess what, when you close the eyes, our beloved eyelashes CLIP! I KNOW! It’s terrible. It’s a disaster. Oh the time I’ve spent trying to fix the clipping in Photoshop… Anyway, there’s a way to avoid that. Just move the up lid forward a tiny bit with G after closing it.
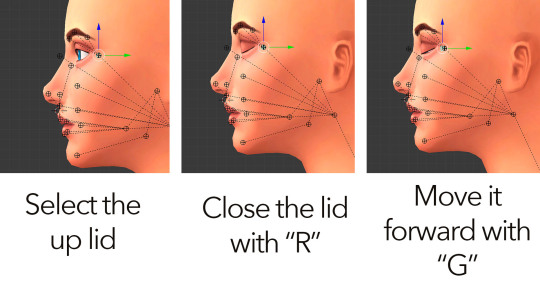
Closing the eyes are a good way to show intense emotions. Combine it with different brow and mouth movements and you’ll get a wide range of emotions.
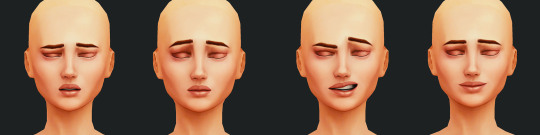
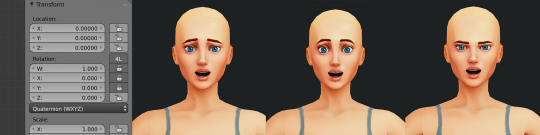
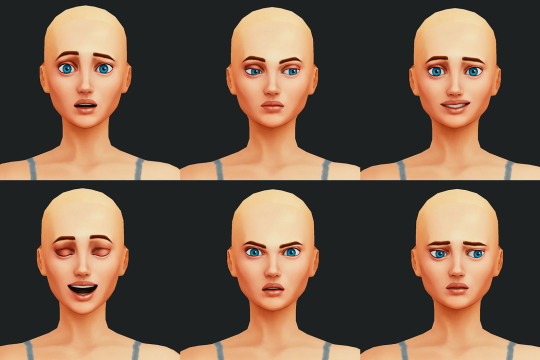
5. The Jaw
When posing the jaw, make sure you lock the W, X and Y axis before you open the rig’s mouth. In order to do that, press N and click on the little locks next to W, X and Y. That will prevent jaws to run wild.
Combine an open mouth with flying brows and open eyelids, and you have a surprised face. Change the brows a bit, you have a “oh no, not that again?!” face. Slightly close the lids and change the brows again, now you have a mad mad face in front of you.
6. The Mouth
The mouth is tricky ladies and gent… If you over-do it, it will look hideous. So try to be subtle when moving those points. There’s a fine line between a natural smirk and the whole Strangerville mood.
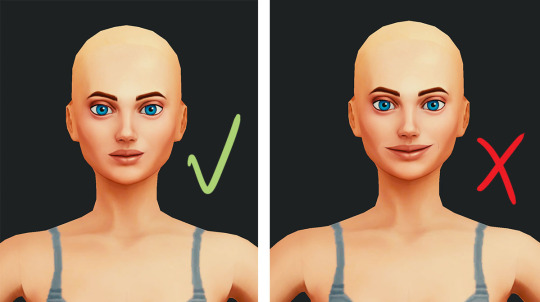
The same goes for the sad faces too. If you drag the mouth corners too much, it won’t look natural. Just a little tweak would be more than enough especially when combined with matching brows and eyelids.
7. The Lips
Okay this is the fun part! Don’t hesitate to play with the lips! They can add so much to a pose. Use the “G” key for dragging the points around.
8. The Eyes
People rarely look at something directly, so when you’re making poses, try to avoid the default eye placement. Move them around.

9. Now combine everything!
Go wild!
Hope that was helpful! Take care guys :)
4K notes
·
View notes
Text
Tutorial - World Deco Object Hiders
Since my Henford Hiders mod seems to be pretty popular, and the process for hiding world objects that way is pretty simple, here’s a quick tutorial on how to do it in Sims 4 Studio. I figured out how to do this from looking at Plasticbox’s Empty Props mod, so all credit there.
This process should work for the vast majority of debug objects, so long as they are deco and not interactive. And note that it will not replace any of the VFX from the object (like glow of lights or sounds). But if you want to completely zap a non-interactable debug/world deco object from appearing anywhere in your game, this is the easiest way to do it. If you’re familiar with the process for creating default replacements or overrides of an object, this is basically that.
Things you will need:
Sims 4 Studio (made an install video here last year)
The Sims 4, I guess
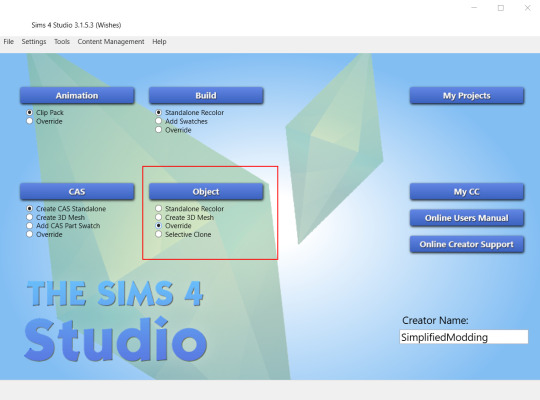
Step 1: In Sims 4 Studio, start the Object Override process
Make sure “Override” is selected, and then click the Object button. This is important; this selection retains the Type Group and Instance (TGI) information for the game object and allows you to default replace or override it with your file.
Step 2: Select a world item to hide
Use the filters to narrow down to the item you want. Make sure “Show Debug Items” is checked. Some world items have non-debug duplicates that you may not want to replace; this way those won’t show up. Once you’ve clicked on your selected object, click next.

Step 3: Name and save the package

Step 4: Delete everything but the Object Definition file
Switch to the Warehouse tab. Locate the Object Definition file (sorting by Type can help here). Delete everything except that file. This is the only file we need to change.

Step 5: Edit the Footprint
Find the footprint inside of the “Data” tab, and click “Edit Items”.
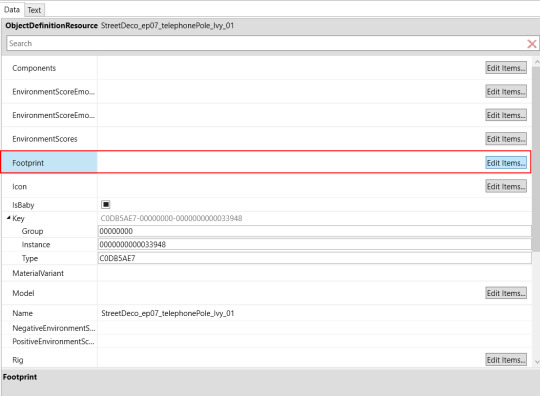
From here, change the TGI to 0 for all fields, and click save. This will close the window.

Step 6: Do the same thing for Model
Remember to save when you are done editing the model!

Step 7: Save the file and test
Click the save button in the bottom right hand corner.

Back up your Electronic Arts folder if you haven’t done that in a while.
Create a fresh save (preferably in an un-modded game), enable mods in the game settings, and test your mod file. Depending on where you saved the file initially, you may have to move it to your Mods folder.
The item you replaced should no longer be present in the world.
Note: a very similar process can be used for interactive world objects, but you have to delete the tuning information, as well. I think there is also usually slot and rig data associated with interactive objects, too, that would also need to be set to 0. I don’t want to make an additional tutorial for that, but that should be enough to get you on the right track should you want to try that.
#ts4:tutorials#ts4:modding-tutorials#ts4:hiders#hiders#overrides#default replacement#ts4cc#s4cc#ts4#sims 4
110 notes
·
View notes
Text

Override Objects Part 01 last update june 14th 2023
In this list I will share some default replacement (overrides) for those who want a realistic gameplay with more details. Credits to all the cc creators! You can find the part 02 here.
Kids.
bassinet
infant rug or blanket
watermelon swing
baby bottle 1, 2, 3 or 4
infant bath & rubber duck
Selfcare.
razor
spa nails & nail polish
towels & brush teeth
toothbrush 1, 2, 3, 4 or eletric
Random.
bridge
suitcase
fireplace
umbrellas
bills & cards
fish, rabbit & cow
ceiling 1 or 2
boxing gloves & tennis
korean magazines
cars & school buss
cleaning spray & mop
paintings, brushes, pencil & photo
Kitchen.
bread plate
lots storange
sponge 1, 2, or 3
cutlery 1, 2, 3 or 4
cutting board 1 , 2 or 3
pans, dishware & red cups
Foods.
food stalls
bubble tea
foods 1 or 2
coffee to go
ice cream shop
delivery bag & grocery bag
coffee bag 1 or 2 & milk bottle
pizza & pizza hut box or pizza delivery
Eletronics.
remote control
phone wallpaper 1, 2 or 3
phone icons
computer games & tv movies
game consoler, ps3 controller or ps5 controller
airpods, airpodspro, podsmax or airpodsmax
Phones.
iphoneX, iphone7, iphone11, iphone12, iphone12cases, flip, nokia, galaxyS20, galaxynote8 or others

pinterest | tumblr | gallery
3K notes
·
View notes
Text
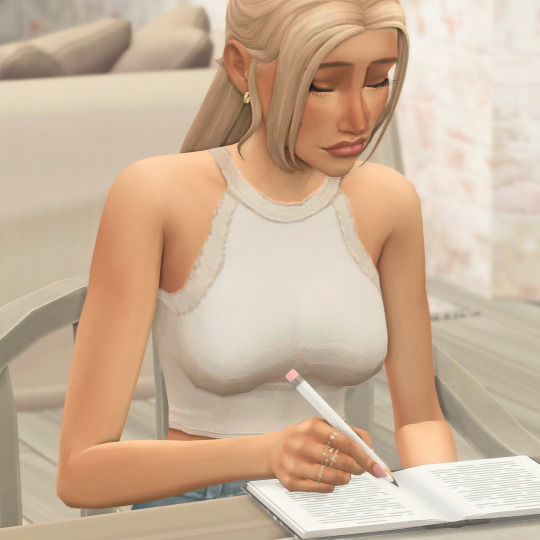

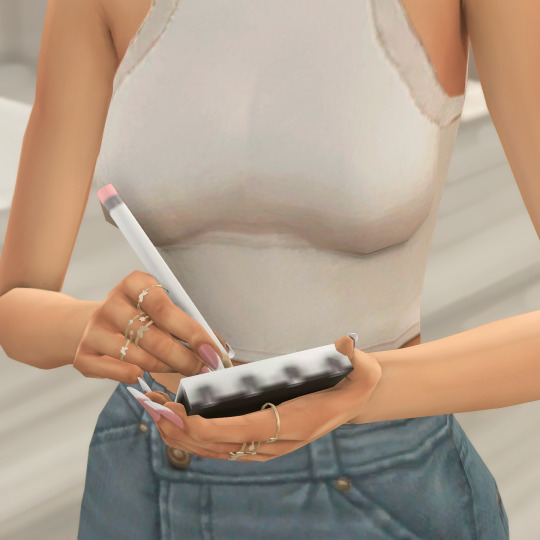

Default pencil override
Swap out that crusty old blue default pencil that we have been given by EA and replace it with my default override ✏️ , makes doing homework etc more aesthetically pleasing to the eye
My model phoebe is using the white pencil
Comes in the classic yellow, cream, white, black and of course pink
Please make sure to only download one package file (of your chosen colour) otherwise it will not work in your game
Now available on my patreon page here
607 notes
·
View notes
Text


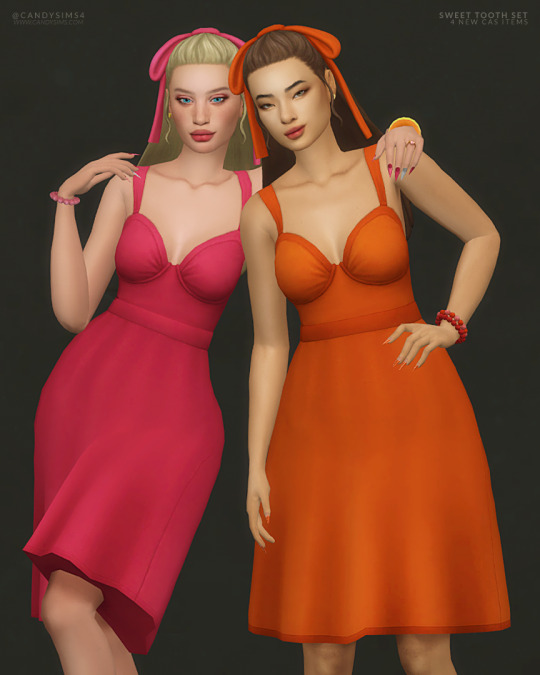
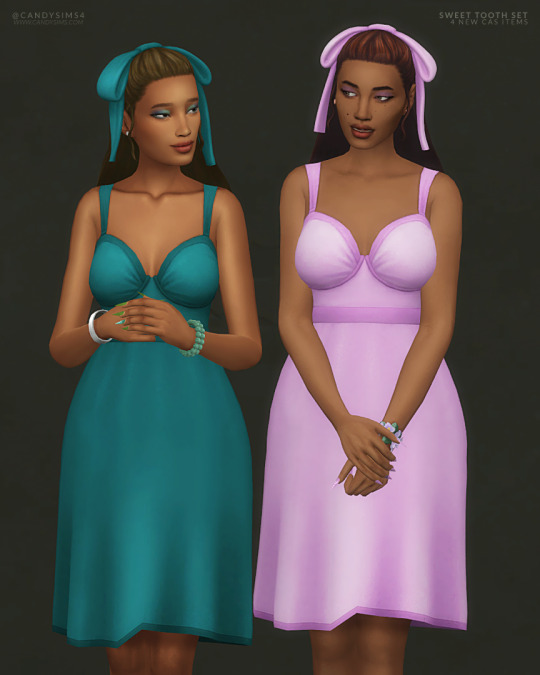
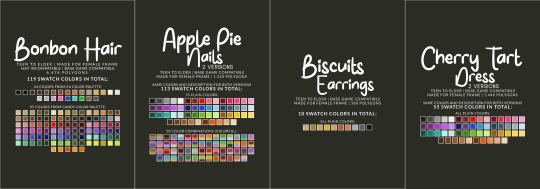
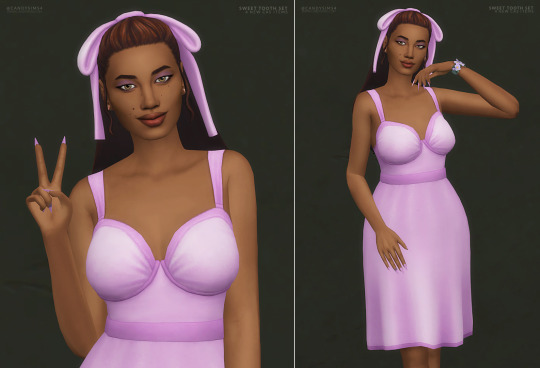
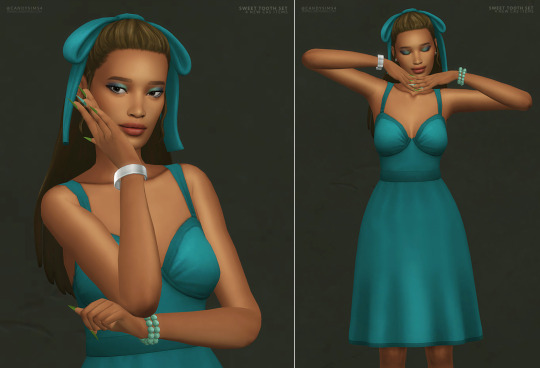

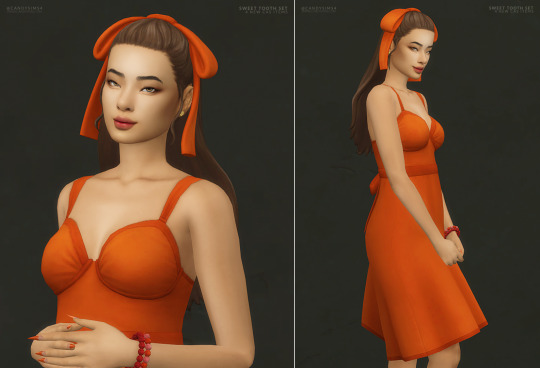


SWEET TOOTH SET
Oh my gosh, I am so excited about this new set and finally releasing it! I seriously can't get enough of these pieces - they're just so cute! Every little detail is lovely, from the bow in the hair to the hearts on the nails.
AS IT’S TOO MUCH TEXT, I’LL LEAVE THE DESCRIPTION OF EACH ITEM PLUS THE CREATOR’S NOTES BELOW THE CUT.

ALL ITEMS ARE:
TEEN TO ELDER
BASE GAME COMPATIBLE
MADE FOR FEMALE FRAME
DISALLOWED FOR RANDOM
360º GIF & THUMBNAILS (HOSTED IN IMGUR)

MY SITE (NO AD.FLY): BONBON HAIR | APPLE PIE NAILS (TWO VERSIONS) | BISCUITS EARRINGS | CHERRY TART DRESS (TWO VERSIONS) Free release on 17th October 2023
PATREON EARLY ACCESS + MERGED OPTIONS
TERMS OF USE | SEND YOUR FEEDBACK | REPORT AN ISSUE
Thanks to all the cc creators that I used in the pic. And thanks to @maxismatchccworld, @simblrcollective, @s4library, @wewantmods, and everybody who reblog this post!
If you’re a cc finds and want to be tagged when I post, please, let me know. You can send me an ask or in DM.
With your help, more people can know about my work! 💖 Love you all, XOXO 💖
DESCRIPTION OF EACH ITEM:
BONBON HAIR
HAT GAME INCOMPATIBLE
6.476 POLYGONS
119 SWATCH COLORS - 24 plain colors from EA Color Palette - 95 plain colors from my Candy Color Palette
YOU WILL FIND IN LONG HAIR OR/AND STRAIGHT OR/AND UPDO
APPLE PIE NAILS (TWO VERSIONS) Same colors description for both versions.
1.320 POLYGONS
113 SWATCH COLORS - 55 plain colors - 58 color combinations
YOU WILL FIND IN ACCESSORIES/FINGERNAILS
BISCUITS EARRINGS
360 POLYGONS
10 SWATCH COLORS - All plain colors
YOU WILL FIND IN ACCESSORIES/EARRINGS
CHERRY TART DRESS (TWO VERSIONS) Same colors description for both versions.
5.446 POLYGONS
55 SWATCH COLORS - All plain colors
YOU WILL FIND IN FULL BODY/SHORT DRESS
CREATOR’S NOTES:
Let's start with my favorite item of the set, Bonbon Hair. It's the cutest hair I've ever created, and I'm really proud of it. The bow is adorable, and I was finally able to make a great 3D model of it. I'm really happy with how the hair looks - it's exactly what I had in mind. I hope you love it too! One thing to note is that the bow on Bonbon Hair isn't removable and won't work with hats. Usually, I prefer hairstyles that can be worn with hats, but for this one, I needed more space for the bow's texture. I also drew the bow's shadow onto the hair's texture to give it more depth and a better overall look. I also made sure to keep the polycount low - around 6k polygons. I could have made it lower, but it didn't look as good in movement. So, I kept it at a higher polycount to maintain good movement without too much distortion.
I designed the dress to complement the hairstyle, adding a bow at the back for an extra touch of charm and romance. I used a new mesh from the latest kit that I couldn't wait to franken-meshing with it. My goal was to create a vintage silhouette and style, and while I'm not sure if it was successful, I'm very happy with the final result. At the end of the day, it looks cute, and that's all that really matters.
The nails are a kind of old wip that I finally decided to finish. It's one of the cutest designs I've ever come across, and I was determined to recreate it in The Sims. I love a stiletto design, and for me, one of the best nail art is this one; it matches the nail's format and is so cute. The nail includes two color options but only one spec option. However, I plan to create additional versions in the future, including a glossy and matte finish, possibly as part of a mini set that I'm working on that will have this and other versions of some of my recent clothing designs.
Next up, we have the Biscuits Earrings. These were originally a work in progress meant for a different set, but while I was styling the Sims, I realized how well they matched with the current Sweet Tooth Set. So, I quickly finished them up and included them as part of the set.
By now, it's all. Unfortunately, I've been working very slowly lately; thanks to this heat wave, I feel most of the day like I'm melting. It's scorching in here, guys. I don't understand how a person can say global warming is a lie; really, how?!
686 notes
·
View notes
Text
This is incredibly out of date and no longer functional
Does anyone know how to adjust comfort and tune scores on objects?
New Tutorial: Change an Object's Attributes and Catalog Entry
The team has posted a new tutorial that shows how to alter an object’s attributes and change the catalog entry to match. This will allow you to do things like make a recolored bed have the attributes of a different one. The example item increases the comfort, energy, and stress scores of a bed that has mediocre ones.
Currently, this requires the use of the Warehouse tab where nothing is automated so it’s a bit of a PIA. Eventually that will change of course ;)
The tutorial is here: Change Comfort & Other Scores of a Bed - Tuning & Catalog
20 notes
·
View notes
Text


SWEETENER Bubblegum Accessory
Felt like making a cute chewing gum bubble acc, and well, here it is! Hope you enjoy 🍬
Things you should know:
Only 200 polys.
Available in 3 size variations.
Comes in 15 colors, each in 4 transparency versions.
For fem+masc frames, teen-elder.
HQ compatible, pics taken without it.
BGC & to be found under bracelets category.
➔ DOWNLOAD (Patreon FREE)
If you like, please consider to support my free work, it would mean so much to me 🖤
2K notes
·
View notes
Photo

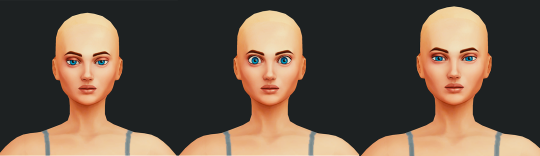
Verlaine Skinblend
Stuff;
for all ages & genders
custom thumbnail
14 swatches
7 lip options // 2 cheek options
eyelid free
2 slots: skin details — forehead, mouth crease
updated for infants patch
Download - SFS
Credits; @obscurus-sims // @pyxiidis // @miikocc // @sims3melancholic // @brooding-trait
3K notes
·
View notes
Text
Infant CC
Here is some of the infant cc that's out already! I will continue to update it until it becomes too long or pointless lol! Enjoy!
CC:
JellyPaws
Oatberrytea
chewybutterfly
littletodds
cowplant-snacks
joliebean
Kiara Zurk
gladlypants
wrixie
Maytaiii
ice-creamforbreakfast
aridridge
ravensim
sims3melancholic
BOOBOO BLUSH YAYYYYAYA!!!!
Mat color conversions:
grimmbats
Build-N-Buy CC:
awingedllama
myshunosun
2K notes
·
View notes
Text


696 notes
·
View notes
Photo
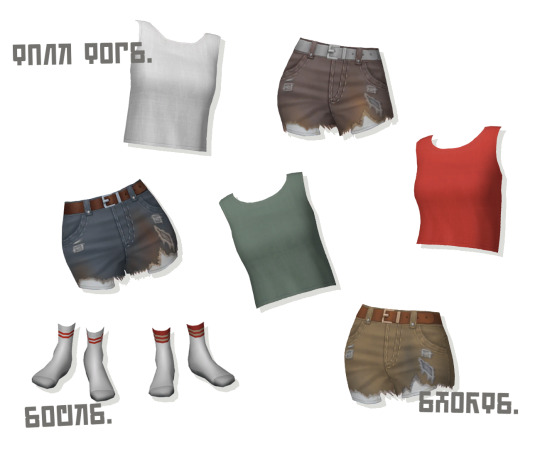
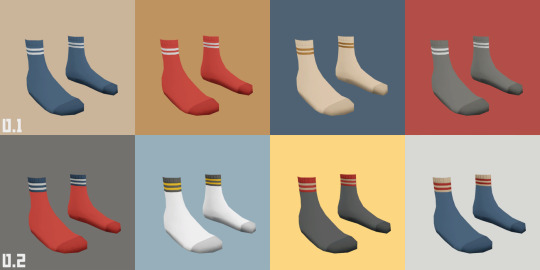
tank tops. socks. shorts. 📂 dl (everything)
Keep reading
2K notes
·
View notes
Photo

Pluto & Violet Overlays
since my defaults can’t be updated quite yet I made these into face overlay :)
Stuff;
for all ages & genders
custom thumbnails
9 swatches each // eyelid free
2 slots: skin details — forehead, mouth crease
updated for infants patch
Download - SFS
1K notes
·
View notes
Photo
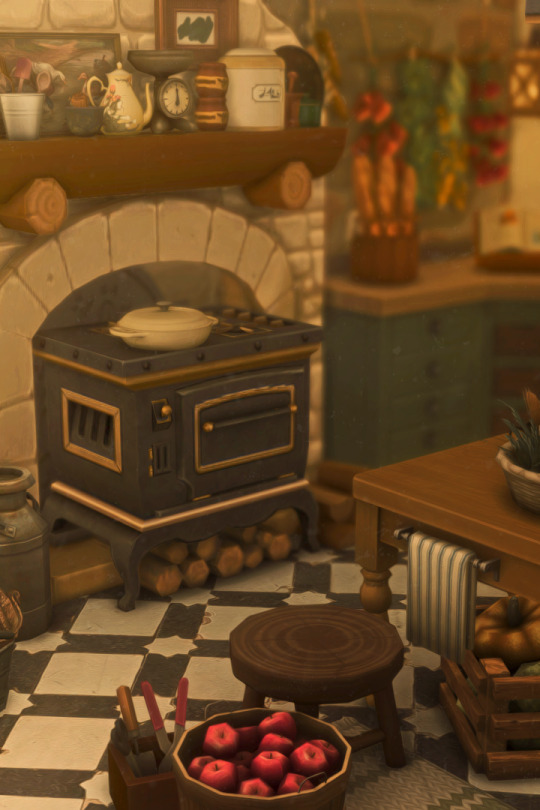


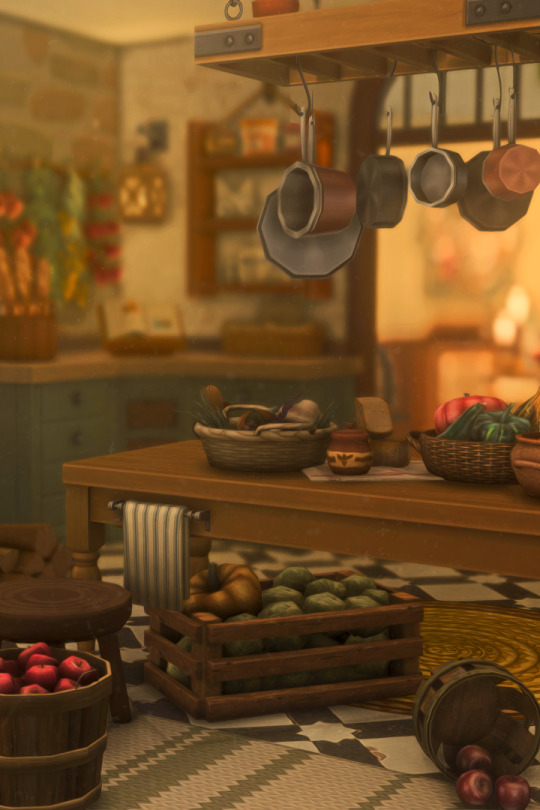
a hobbit’s kitchen 🍄
517 notes
·
View notes