#sims 4 tutorial
Explore tagged Tumblr posts
Visit Tumblr Blog
Explore Tumblr blogs with no restrictions, modern design and the best experience.
Last Seen Tumblr Blogs


Fun Fact
Hackers stole 65M passwords from Tumblr in 2013.
Text

hey guy's i made a quick and easy tutorial on youtube about how you can frame your sims screenshots with any cc frame you want, you don't need photoshop or any other of these overwhelmimg programs and you also don't need any kind of photo editing skills! you can find the video here. i hope it's helping some of you. love, jodie ♡
#tuts*#sims 4 mods#sims 4 cc#sims 4 simblr#sims 4 custom content#the sims 4#the sims#the sims community#sims 4 tutorial#the sims 4 custom content#sims 4 maxis match#sims custom content#sims 4#ts4 simblr#sims community#ts4
443 notes
·
View notes
Text
downloading a bunch of files from sfs folder a bit more comfortably (on PC)
you know this feeling when you see a sfs folder with many separate files and no full set archive, so you just sigh, click on a file, download it, go back, repeat with the next one, go back, try to recall which one you already downloaded and which you didn't... so i've come up with a little workaround that'll make it faster and a bit more comfortable! it's pretty 101, but my friend found my explanation useful, so maybe someone else needs it too.
there's this thing about SFS, that if you open the same page again in a certain period of time, i think it's a day or maybe a few hours, it won't open the page again, but instead it'll just automatically download its file. that's exactly the thing we'll be utilizing here. when you left click on a link with pressed ctrl, this link will be open in another (inactive) tab. so to "automatically" download files from this folder, just hold ctlr and click on each file you need twice.

on the first click, it'll open the inactive tab with it, on the second click, it'll just straight up download the file without you having to go away from the page you're on. when you're done downloading everything you need, just close all tabs it opened. not ideal, yes, but much faster and less annoying than having to manually open each page and click on the button. happy simming!
1K notes
·
View notes
Text
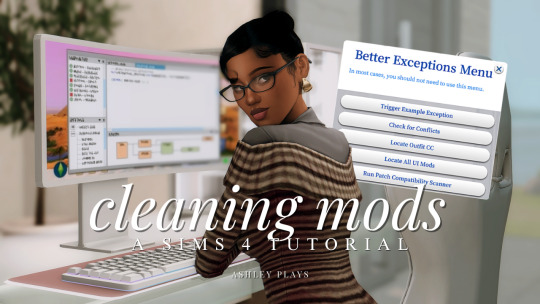
how to clean & organize your mods folder + update broken/outdated mods by ashley plays
this video goes over the following:
how to organize your mods folder
how to update your mods folder after a patch update
how to find broken/outdated mods
how to clean out custom content & find duplicate files
↓ mods, programs & helpful websites mentioned below
mods:
better exceptions
mc command center
programs:
sims 4 tray importer
sims 4 mod manager
helpful websites:
sims 4 news & updates
scarlet's realm: the mod list
bienchen's mods
littlemssam's mods
kiarasims4mods's spreadsheet
mizoreyukii's spreadsheet
2K notes
·
View notes
Text

As storytellers, realism and continuity are important to us, and they're sometimes hard to achieve within the confines of the game. I’m personally a big fan of posing Sims in open doorways, and unless you want to be limited to the CC options that exist, you’re stuck having to make some poor Sim walk in and out and pausing at just the right moment for the desired effect. But it’s actually very easy to edit a door in Blender to make your own open version!
I initially learned about "posing" objects from surelysims' Wicked Whims posing tutorial, which I highly recommend as a whole. However, it might be a little overwhelming to learn a whole new posing system for the sake of a screenshot or two, which is where this tutorial is meant to come in. Some of my explanations might seem overly simplistic, but I wanted it to be approachable even for beginners. I am far from an authority on using Blender or making CC, and I'm sure there are flaws in this process or easier ways to achieve certain things, but it works well enough for my purposes and I hope it will work for yours too. 💗
Now, onto the tutorial...
Figure out what door or gate you want to create an open version of. If it’s from the vanilla game, all you need to do is make note of its name. If it’s CC, find the package in your mods folder, make a copy, and paste it into My Documents > Sims 4 Studio > Mods. This will allow you to find it in S4S in the next step!
Open S4S. On the main screen, make sure “Standalone Recolor” is checked under the “Object” button, then click the button.

A new window should pop up (if it’s your first time doing this, it may take a while to load). At first, it will show every single object in the game. If you know the name of the object you’re looking for, you can use the search bar to find it. You can also use the filtering options to narrow the selection down by category, game pack, and whether it’s vanilla or custom content. Here, I’ve filtered the search to only base game doors. Once I find the door I want to adjust, I click on it and hit “Next.”

This will pop up a window prompting you to save a new file. Place it somewhere you know you’ll be able to find it easily later and name it accordingly. This file will ultimately contain your mesh edit, so you don’t want to lose it! I suggest placing it in a dedicated folder, on your desktop, or in your Mods folder directly.

On the next screen, you’ll be looking at the contents of the package itself. For this tutorial, you don’t need to worry about grabbing anything but the mesh. Click on the “Meshes” tab and then “Export Mesh.” You’ll again be prompted to save.

Open the mesh file you just saved in Blender. (If the view is funky to start, I recommend hitting 1 on your keyboard’s number pad to get a forward-facing view.) [It should also be noted I’m using Blender 3.6, so my screenshots and the location of certain settings may be different than in earlier or newer versions.]
You’ll see that there are actually multiple meshes involved (and the number can vary from object to object). Right now, we’re only concerned with the “rig.” If you’re familiar with posing, you’ll know that all Sims have a rig that is used to move different parts of their bodies around. Objects also have a rig, and objects that can open will have “bones” that control their moving parts. So click on “rig” and then change “Object Mode” in the bottom corner to “Pose Mode.”


Now, if you hit A on the keyboard, it will select all bones and you can see where they’re located. As far as I can tell, all doors have two bones that control their swinging movement. They both do essentially the same thing. I tend to stick with the top bone, which is called something like “bind_doorSwing.”

Pro-tip: If you’re having trouble seeing or selecting the rig's bones, you can change the view on the right side of the screen to “dope sheet.” Then when you save the position of the bones, just like when posing a Sim, by selecting all with A then clicking I and selecting “Location & Rotation,” the list of available bones will pop up there.


Rotate the door open using this bone or bones, if it’s a double door. On double doors, I recommend rotating each side individually rather than trying to rotate them together, as you may get unexpected results. You can use the R+Z combo on the keyboard to limit the direction of movement. (You can also use this in combo with numbers to swing them more precisely. For example, if you want a 45 degree swing, you can press R+Z+45.) Specifying the Z axis allows you to only swing the doors open and closed while restricting their movement in other directions.

Once you’ve got the doors swung open to where you want them, hit A to select all bones, then hit I and select “Location & Rotation” to save the position. (If you’re a poser, this maneuver is already familiar to you - and you know how important it is! If you skip it, the new position won’t save and the doors will revert back to closed.)

That’s it! You don’t have to do anything else to the mesh. Save your file in Blender. If you want to keep it separate from the original door mesh, save as instead and name it something different. (This is why you may want a dedicated folder, since the number of files does add up!)
Reopen the package you made earlier in S4S (or simply return to it if you’ve kept it open). From the same place you exported the mesh, you will now import the edited mesh. Hit “Import Mesh,” navigate to your edited Blender file, and you should now see your edited door replace the original. Since it’s the same mesh, all the swatches will still work perfectly with it.

You’ll notice that you’ve only replaced the “LOD 0 (High)” version of the mesh. When you click the drop-down menu, you’ll see that there are also medium and low detail versions, as well as shadow meshes at all levels of detail. If you’re only making an object for personal use, you don’t have to worry too much about LODs. You can probably just import the same mesh into LOD 1 and LOD 2 and be fine (so long as your computer isn't a potato). And if this is just for you, I honestly wouldn't even touch the shadow LODs.
The only other thing you might do is go back to the “Catalog” tab and alter the object name so you can find it easily in the game catalog. You can also edit the description, price, etc. if you so desire. Hit “Save.”

Test in game! If the package isn’t already in your Mods folder, move it there. As long as you didn’t mess with any of the tags, it should still be in the door section of build mode and work perfectly as a functional door. The door swinging animation will look different, and you could probably get rid of it if you wanted, but that’s above my current skill level and I don’t think it’s really necessary for our purposes. If all you need is an open version of a very specific door for storytelling purposes, it gets the job done.


(First screenshot: doors swung open as intended, second screenshot: doors swinging in the opposite direction as they’re walked through)
These steps can also potentially be used to create open versions of other in-game objects like gates, books, chests/boxes, etc. I’m only just beginning to experiment with minor mesh edits, but once you get the hang of it they can often be faster and easier than trying to line up the best circumstances to get the perfect shot in-game. I might make more tutorials for small edits like this that help with storytelling realism and continuity in the future!
#ts4#sims 4#ts4 storytelling#ts4 tutorial#sims 4 storytelling#sims 4 tutorial#this is the first tutorial i've written so do let me know if anything's confusing!!!#*tbw
277 notes
·
View notes
Text

Since folks are trying to paywall written guides, here's all of my written guides, free. (The links aren't all broken this time, yay)
Making a Pose: From Start to Finish
How to make your Pose Packs Easy to Use
How to Make a Deco Sim
Reducing CC File Size
Tips for Posing Expressions
How to make a Toy / Action Figure of your Sim
How I made the Deco Gryphons from 'Gryphon Rider' Pose Pack
How to make a Fun Wall Light using Vector Images
How to Edit Poses to fit Fat Sims
How to make a UI Emotions Pose Override
Non-CC-related
Sims Story / Challenge Planning Document
Sims Story Character Questions
Guide on How to Start and Plan a Sims Story
Guide to GShade
Custom Content Editing: Terms of Use
Side note for those of you learning posing... A lot of posemakers don't allow reuploads with edits, but I do - my Pose Terms of Use ALLOW EDITING AND RE-UPLOADING under the following conditions:
Poses based on mine MUST credit me in the pose pack's in-game description and on the post you share it on, and you must link back to the original pose pack you used as a base.
No paywalls, AdFly, SimsFinds/Simsdom or CurseForge.
206 notes
·
View notes
Text
how I edit my sims ts3/ts4 screenshots (day-time edition)
A helpful? guide for editing screenshots during the day (this is not so easy for me as i prefer taking screens at night but my sims can't always be in the dark so let us all struggle together ok? ok.) this tut is done in procreate on the iPad.

Before taking screenshots:
Help yourself as much as you can in-game, utilise in-game lighting as shadows/lighting is created for you
Understand good/bad composition and add variety by using different angles to make scenes look interesting
I take LOTS of photos just to end up with 1 or 2 good ones

step 1: i would use liquify to smooth out any sharp edges or paint over them

step 2: create new layer, blending mode "multiply" use the colour picker on the area you want to add shadows to, use the selection tool to draw the shadow. you can either colour fill or just shade into the area with the brush. If you colour fill you can then erase lines that are too harsh or use the smudge tool to soften them.


step 3: do this same step but for the clothing. remember shadows are not usually completly black so i use shades of blue to shade her clothes and then shades of green for the tree.


step 4: create new layer, blending mode: overlay. outline the left side of the sim this is to make the light source more prominant. as natural light is not usually just white, i picked a slight orange tint.

step 5: add more lighting to enhance the effect. *create new layer* blending mode: add, and do the same thing as step 4 but with this layer i'll add more lighting to the parts that will be affected most by the light

step 6: i edit the hair. you can look here for my in depth hair tutorial
step 7: add lighting effects *create new layer* blending mode: add. i used the default procreate brushes 'flare' and 'glimmer' [found in luminace] to immitate light rays

step 8: merge all layers, *duplicate layer* add bloom effect and change opacity and erase parts where bloom is too strong.

step 9: merge again, then go into photshop and colour grade using 'camera raw filter' then 'smart sharpen', use 'topaz labs' effect then done!

if you have any questions feel free to direct them to my inbox & u can check out other tutorials here
198 notes
·
View notes
Text
Small tip on how to take better resolution screenshots of the game's UI elements for your gameplay pictures (moodlets, notifications etc.)

This is probably not new, but i just wanted to share something i found out recently. Since i started sharing gameplay screenshots, I've been adding the occasional moodlet and notification boxes from the game in some of my pictures. I think it's a nice little touch, and i love when people do it, it adds a bit more context to their story. My only problem was that I wanted them to be bigger, but they looked pretty bad upscaled. So, i started looking everywhere if there was another way to take bigger screenshots of it, but i couldn't find anything apart from using SRWE, which i dont even think it works tbh. The other day while messing on the settings in game, i found completely by chance that we can make the UI bigger already in the accessibility menu, and i felt so silly lol. When i did it, there it was... some nice and big crispy boxes. I go into that menu all the time and never thought i could use that for this... but anyways, if you didn't know it like me, now you do, yay! :D
All you gotta do is press ESC > Game Options > Accessibility and make the UI as big as you want. After taking your screenshots, you can just go there again, and revert things back to what it was.


(turned off my reshade for this btw)
I'll admit, i'm a little bit lazy and will definitely forget to do this, but at least there's the option for it. Sorry if anyone's already made a guide about this and i couldn't find it btw! Hope this can be of use for someone :)
237 notes
·
View notes
Text
Enjoy the ugliest tutorial ever. Thank you so much to @baufive for taking the time to teach me this a bit ago, it has been very helpful. Just passing on the knowledge.. hopefully. (This was made for IG, why it’s formatted like this.)


55 notes
·
View notes
Text
Photoshop Tutorial #2 -
Paint Tears


This is the easiest thing in the world! You can do it in a minute. This is for anyone new to editing in Photoshop
Okay! Starting off by opening my pic in Photoshop - I'm choosing this one of a sadboy

I'll simply create 3 layers

grab a brush, set it to white,

and on the first layer, I paint some tear shaped blobs in the characters eyes - I'm just doing whatever, as long as the shapes are round and bubbly in some way, it's okay.

now, I'll set the opacity of that layer to around 25%

on the layer above, I want to draw some simple, round highlights with the same white brush

and set the opacity to around 30%
Finally, on the last (top) layer, I'm grabbing that same, white brush and making it really small - like, 2px.
Shortcut to increase & decrease brush size is [ and ]
and I'm going to paint some lines around the tears. Not all the way around, just kinda, artistically around some of the edges, and leaving other edges open.

now, I'll set the opacity to around 50%
I'm happy, so I'll flatten the image and save!
and that's it!
Here are the three layers isolated, just so that you can see.

2.

3.

and combined

Hope this was helpful!
Good luck!
#sims 4 tutorial#editing tutorial#sims editing tutorial#sims 4 edit#photoshop editing#photoshop tutorial#sims 4 community#simblr#sims 4 photoshop tutorial
144 notes
·
View notes
Text
I’ve UPDATED my Sims 4 Mods List!

y'all have been waiting forever. I apologize have released a new Sims 4 mods list featuring EVERY SINGLE MOD I have installed in my game! it is WAY too long for Tumblr to handle so it is now on Google Sheets, and available to view right now!

if you need any help learning how to mod in the Sims 4, l've released a new YouTube video covering EVERYTHING you need to know! watch here.
view my mods list for FREE here!
#solitasims#solitasims4#sims 4#the sims 4#thesims4#ts4 simblr#the sims#solitaspeaks#solita sims#sims 4 cc#sims 4 mods#Sims4mods#sims 4 modding#sims 4 mod tutorial#sims 4 modding tutorial#sims 4 mods list#sims 4 mod list#sims 4 tutorial
139 notes
·
View notes
Text
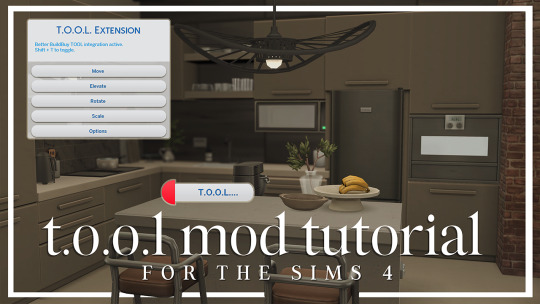
T.O.O.L Mod + Better Build/Buy Tutorial by LargeTayterTots
download links
better build/buy mod by twistedmexi
t.o.ol. mod by twistedmexi
7zip file extractor
andrew's pose player
teleport any sim mod

youtube / tiktok / twitch / patreon / gallery id: largetaytertots
286 notes
·
View notes
Text
How to unlock the event rewards from that daily login desaster:
Click in the filters on -> Special and tick 'Event Rewards' Then click on -> Colors and tick all the color boxes!
In case they patch it out, make sure to save all the objects in a room in your gallery :3


125 notes
·
View notes
Text
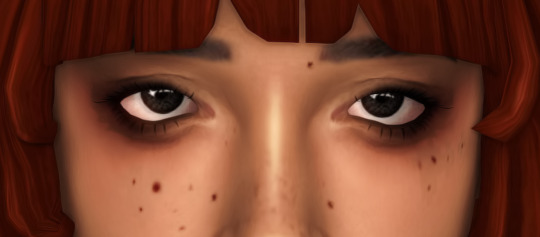
How To Fix The Placement of Eyelashes (In The Glasses Category)
We know the latest Sims 4 patch (2024-08-08) broke the placement of eyelashes found in the glasses category. Here is a method to fix them and place them in the Eyelash category.
NOTE: This is only a placement fix. If your eyelashes conflicted with glasses before and the eyelashes could not be worn at the same time as glasses, you will still have a conflict between the two items. Eyelashes in the glasses category are usually mapped in the same texture space as glasses, so now you will get texture bleeding from the eyelashes to the glasses. This is NOT a fix for that issue. To fix that issue, you'd need to use Blender to move the textures.
For this method, you do not need to know how to use Blender. You need Sims 4 Studio. If you do not have it, you can download it from here.
I've tried this method myself, and it works. Here it is, step-by-step:
In Sims 4 Studio, open the package file (eyelashes) you want to convert. These should be eyelashes in the Glasses category. The easiest way to do this is to find the file in your mods folder and move it to its own folder before you start, so it'll be less difficult to locate. You can also set the properties of package files to open automatically in S4S when you double-click on them. (That's what I've done, because I make a lot of CC)
We'll call this package the original package. Once it is opened in S4S, click on the "Meshes" tab and export the mesh. Save it somewhere you can find it easily
Next, click on the "Textures" tab and export the textures of the swatches you want to add to your package. Make sure you export the "Diffuse" texture (even if you don't export anything else). Save your exported textures somewhere you can easily find them again.
You can also export the custom thumbnail, if your original package has one. You can find it on the right side of the screen on the "Textures" tab. Again, save this in a place where you can easily find it later.
Go to the "Categories" tab and scroll all the way to the bottom. You should see three items; Allow for Random, Restrict Opposite Gender and Restrict Opposite Frame. Make note of which boxes are ticked or unticked in your original package.
Close the original package by returning to the Main Menu of Sims 4 Studio. You don't need to save the original package, as you haven't made any changes to it.
On the main menu screen of S4S, go to the CAS section (bottom left) and choose "Create 3D Mesh" and then click the large blue CAS button.
Search for the base game eyelashes. You should see a drop-down menu called "Part Type" near the top of the window, in the middle. Choose "Eyelashes" from this menu. In the main part of the window, the in-game eyelashes should appear. Click on the one you want, and it should turn blue.
Click the "Next" button.
You will be prompted to save your new package. Give it a name (preferably one that includes your creator name, so you can find it again) and save it in your Mods folder, or whichever sub-folder within your Mods folder that you like to use for CC making.
In your new package, click on the "Meshes" tab and import the mesh you exported from the original package. Look for a dropdown menu where it says "LOD 0" (you have just replaced LOD 0). Now click on "LOD 1" and then import the mesh to this LOD as well. LOD stands for "Level Of Detail" and you might see higher numbered LODs looking degraded. Don't panic. This is normal.
Save your package, but don't close it.
Go back to the "Textures" tab and import the textures you exported from your original package file. You can import the custom thumbnails during this step too.
Save your package again. Do not close it.
In the menu at the top of your Sims 4 Studio window, look for one called "Tools", click on it and scroll down until you see "Modding" and click on that. A sub-menu will appear. Scroll down the sub-menu until you find "Glass Shader (CAS)" and click on that. You should get a notification that X number of shaders have been changed to SimGlass. Click OK.
Save your package.
Go to the "Categories" tab, scroll all the way to the bottom of the window, and make sure the same boxes are ticked/unticked as in your original package. If something is ticked in your new package that was unticked in your original package, this may cause your new item to not show up for one gender or the other once you get it into CAS.
Save one final time.
Open your game and test your package. Your new lashes should appear in the eyelash category in game.
136 notes
·
View notes
Text

how to use wicked whims: installation tutorial, realistic gameplay settings & more by ashley plays
this video goes over the following:
how to install wicked whims & animations
adjusting the settings for realistic & age-appropriate gameplay
how to use custom animations & poses
my favorite wicked whims gameplay features
mods mentioned:
wicked whims (18+)
ui cheats extension
mc command center
streamer mode/censorship mode add-on
smaller mosaic
body hair v5+ redux
height slider
missing plumbob
teleport any sim
favorite animators:
error404phillips
greynaya
kiki chain
favorite pose creators (masterpost):
afrosimtric sims
katverse
sciophobis
1K notes
·
View notes
Text
mutt's guide to using dsr on ts4, with pictures!!!
ok so, dsr is a thing available for nvidia gpus that allows you to take veeery high resolution screenshots of games without much trouble, like this
it's an alternative to srwe, as it plays nicer with a lot of reshade shaders and is just, generally more nice to use! let me teach you how to use it - full tutorial with pictures for every step under the cut (im sorry its too long without the cut)
step 1: right click your desktop and open the nvidia control panel
step 2: go here (adjust desktop size and position)
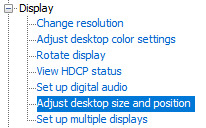
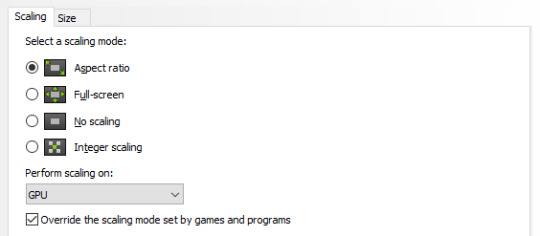
step 3: make sure your settings are set as follows! this is important
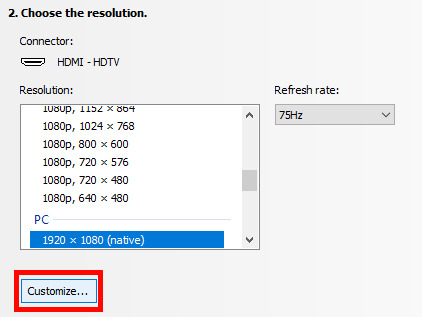
step 4: now, go here (change resolution)

step 5: under change resolution, click on this button (highlighted with a red square)
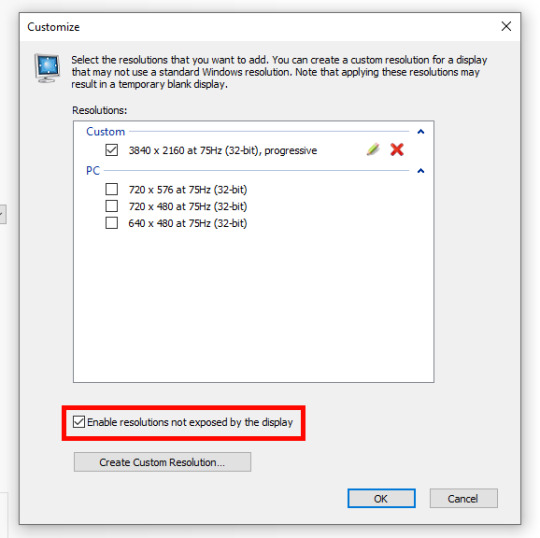
step 6: in the windows that appears, make sure that "enable resolutions not exposed by display" is ticked! this is very important! (again, highlighted in red - it should look like this)
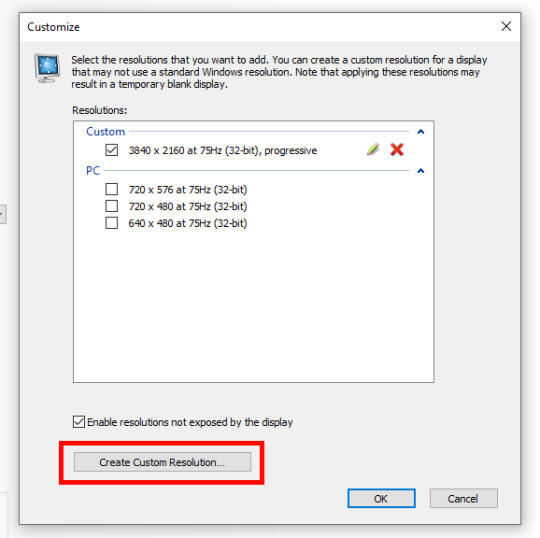
step 7: now, click on "create custom resolution"
step 8: this is where you set your desired resolution, and where i get a bit rambly; so, in my opinion, there is ZERO reason to go above normal 4K for TS4, as it's generally not a really high-poly game and it has rather simple graphics. you can fuck around a lot here, but if you don't feel like it, here are my settings - this will give you 4K screenshots. NOTE: THE REFRESH RATE DOESN'T NEED TO BE 75! SET IT TO WHATEVER THE REFRESH RATE OF YOUR MONITOR IS!
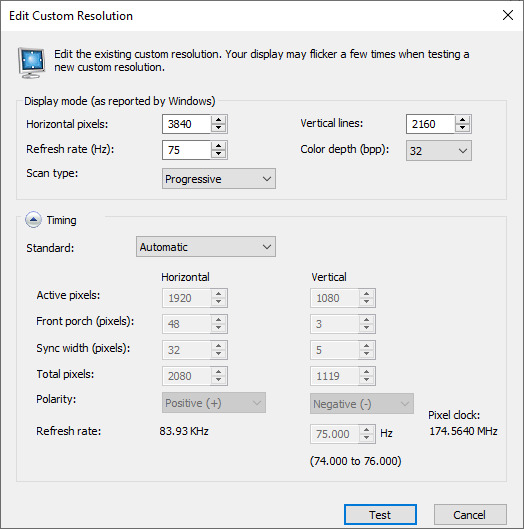
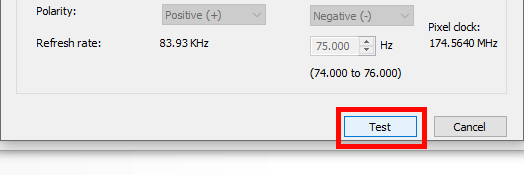
step 9: now, click on test
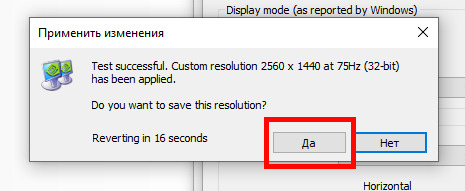
step 10: let the thing load, and after it's done, a window like this should pop up.. but yknow, in your language. click on "yes" (or accept or ok!! idk mine's in russian; basically, the button highlighted here!)
step 11: click "ok" in the window that pops up! like this! afterwards, close the nvidia panel

step 12: open the sims 4 and go into game options, then into graphics
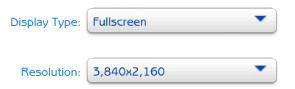
step 13: set your "display type" as "fullscreen", like this

step 14: under "resolution", select whatever resolution you setup earlier; in my case it's 4K, so if you used the same resolution, your settings should look like this
step 15: click on apply changes!
AND UR DONEE!! WAHOOIEE!! now, take your screenshot using reshade, and then go back into sims settings and set it back to what you usually play at, then apply changes!
every time you need to take an HD screenshot, simply open game settings and use your custom resolution! that's it, have fun :3
#sims 4 tutorial#ts4 tutorial#sims 4 screenshots#ts4 screenshots#sims 4 screenshot tutorial#ts4 screenshot tutorial#sims 4 hotsampling#ts4 hotsampling#srwe#nvidia#dsr#tutorials
767 notes
·
View notes
Text

📗 The Sims 4 Flawless Posters Tutorial | Beginner Friendly
READ ON PATREON (FREE)
This is basically a comprehensive tutorial on making flawless posters. I know a lot of simmers start their modding journey with custom paintings and it can feel a bit overwhelming at first.
But don't worry, I'm here to make everything crystal clear and show you just how easy it really is. With just a little guidance, anyone can create amazing CC right from the start! So, if you’ve always wanted to make posters for The Sims 4 but didn't know how, this is your chance! 😊
I would love to hear your feedback on this tutorial! And feel free to share it with other simmers to help them create perfect posters as well!
#sims 4#sims 4 mods#sims 4 cc#ts4 cc#sims 4 sexy#sims 4 wall art#sims 4 wall decor#sims 4 aesthetic#sims 4 interior decor#sims 4 custom content#sims 4 creator#sims 4 decor#the sims 4#ts4#ts4cc#sims 4 download#sims 4 cute#ts4 deco cc#ts4 decor#simblr#sims 4 tutorial#ts4 tutorial#sims 4 how to make posters#sims 4 poster tutorial#sims 4 painting tutorial#cc tutorial#making posters is easy lol (it really is!)
78 notes
·
View notes