
A self confessed geek, that due to unpreventable circumstances is going blind. You will see a mixture of really geeky posts along with some tip n tricks I have found that make my lify as a partial sighted computer user more productive. I believe knowledge is power and we should share it! - View My Blog Stats
Don't wanna be here? Send us removal request.
Statistics
We looked inside some of the posts by sip2serve and here's what we found interesting.
Average Info
Notes Per Post
5
Likes Per Post
2
Reblog Per Post
0
Reply Per Post
3
Time Between Posts
2 months
Number of Posts By Type
Text
13
Audio
1
Note
3
Last Seen Tumblr Blogs


Fun Fact
BuzzFeed published a report claiming that Tumblr was utilized as a distribution channel for Russian agents to influence American voting habits during the 2016 presidential election in Feb 2018.
Text
Sonoff 10A POW dangerous
Well I have had a busy week replacing or removing my sonoff power switch 10A modules.
Why?
Last weekend tfor the second time a sonoff switch simply melted and fizzed. In both cases the modules was attached to a device that could pull high loads, the first one was a heater and it was set to max. The second time it was a tumble dryer and it tripped the circuit breaker as it caused a short.
In New Zealand the wiring, plugs etc are rated as 10 amp which is a little lower than some other countries and our devices are also rated to the lower power. In both failure cases the same devices had been in operation for over a year with the setting untouched. I am still keeping sonoff switches in my home but they are relegated to low power devices such as lamps.
Doing some googling I am not the only one that has had this experience, it has been blamed on pcb tracks, and fuse holders and no doubt other causes will be found. The bottom line for me is that convience should not increase risk, so I have removed them from my washing machine, dishwasher, tumble dryer, clothes dryer, kettle, water urn and all my heaters throughout my home. I am replacing them with Xiaomi units as I could not find any discussions about melting smart plugs for Xiaomi, as these are compact and need no wiring then this also removes effort and an additional point of concern.
I hope this information is useful and helps others.
0 notes
Text
Sickchill & Transmission setup
I have recently rebuilt some servers as they needed a DebianOS upgrade and it was easier to rebuild than upgrade. I took the opportunity to combine two previously separate servers into one, and combined transmission with Sickchill. The change also meant it was time to sort out my pythons setup and enable python 3 to become the default. Here are my notes from doing this activity.
Preparation
As always take a backup before proceeding inless you are prepared to lose it all. This post assumes a debian or Raspberry Pi OS type build and assumes apt-get as the repository manager. Start by getting the system up-to-date, as root type the following commands
apt-get update apt-get -y upgrade
If requested perform a apt autoremove, after this its a good time to reboot.
Python Setup
We need to check the current state of our python install and ensure by the time we complete this stage that the default version is 3.x, the version can discovered using the command
python -version
no command found response. issue the command 'apt-get install python3, then repeat above version check.
If the response is 2.x then advance to step 'Check python3'.
If the result is already showing 3.x then congratulations this section is complete for you and advance to 'PIP Setup'.
Check python3
this assumes you have found python pointing to a 2.x version, this means we need to check if python3 is present and if not install it. If python3 is present just not the default then we need to make it the default.
python3 -version
two expected outcomes:
no command found response. issue the command 'apt-get install python3, then repeat two version checks above.
If the result is showing 3.x then we need to make it the default, advace to 'set python3 default'.
Set python3 default
This section provides the method to add a system profile that can be used to point to a specific installation of python as the default, this is great for those that have multiple versions installed on the same system. As root type
ls /usr/bin/python*
The response provides the versions that are installed as separate folders,
You will need to check which is set as the default if any and add the installation folders you want to switch between marking one of them as the default.
To check the current state use the command:
update-alternatives --list python
This command is used to list all the alternative locations for 'python', if none is set the response is an error: update-alternatives: error: no alternatives for python
In order to add alternatives to toggle between, use the form (change the folder names to match your own):
update-alternatives --install /usr/bin/python python /usr/bin/python2.7 1
update-alternatives: using /usr/bin/python2.7 to provide /usr/bin/python (python) in auto mode
update-alternatives --install /usr/bin/python python /usr/bin/python3.7 2
update-alternatives: using /usr/bin/python3.4 to provide /usr/bin/python (python) in auto mode
Above I have added two folders to the list; 1 for version 2.7 and 2 is for version 3.7 now we have multiples we can toggle and set which is the default using:
update-alternatives --list python
Follow the response instructions to toggle and set the default, once correct issuing the command
python -version
Should provided the desired response 3.x
PIP Setup
We need to run through a similar exercise with PIP. except in this case we want pip3 to be the default and the one that responds when pip -V command is issued.
Remote Drives
This is the point where you would update your /etc/fstab file to add remote mounts that may be wanted for the storing downloaded files and even for access stored library.
Next
The next step which will be covered in part two will go through the downloading and installation of transmission and sickchil.
Ciao
Paul
0 notes
Text
My Sonoff integration
What is a ‘Sonoff’? In the context of this article, I am talking about the cheap power switch that can be remotely Switch On and Off (S On OFF) by multiple methods.

Out of the box they are adequately supported by their native mobile app. Many like le decide to go that extra mile and flash them with tasmota firmware and enjoy increased integration afforded at the demise of the original native app support.
I have recently adjusted my Sonoff integration model as I initially used my home controller of choice OpenHab to connect using MQTT (the IoT protocol) and for Amazon echo’s Alexa to send all the commands and requests to OpenHab to enact. As OpenHab has a mobile app and a web browser GUI that meant that OpenHab was the single way to connect and operate the Sonoff devices.
That old proverb advising not to put all your eggs in one basket comes to mind.
After a few outages that left family members having to get to awkward to reach Sonoff switches to press the little manual button on the top to switch a device on or off manually occurred I had a little rethink.
I split the remote operation into three categories:
1. Manual – achieved using the button on top of the Sonoff. No change required
2. Automated – performed mainly using OpenHab, the trigger can be another event occurring or at a specific time or interval.
3. Interactive – Although there is a mobile app and a web browser through OpenHab, most of the family prefer to use Alexa for interactive commands. There is also a web GUI built into the Sonoff too that I use during troubleshooting to see why something isn’t working, and to identify the system or component at fault.
So the main change I needed to do is to allow Amazon Echo Alexa to have a direct interaction with the Sonoff, this is easily achieved as the tasmota firmware provides for hue emulation, when this is enabled a ‘Friendly name’ can be provided that is used when asking Alexa to turn something on or off. In this way I have multiple ways of getting to a device and I am not reliant on OpenHab or its server functioning.
I thought I would share my experience with these common items for others to ponder and comment on.
Ciao
Paul
0 notes
Text
Ad Blocking (even Youtube)
Hi all,
I have been messing around with Pi Hole over at https://pi-hole.net
It is an super easy to install DNS server with add blocking, the ad blocking can be rolled out across all devices on your LAN or WifI by simply pointing your internet router DNS server towards your new Pi Hole server IP address, of course it is best to make sure that the Pi Hole server has a static IP address so it doesn’t keep hopping around all over your network :)
In my case I am just trying it out with a few devices, my desktop PC and my iPad and a few other statically configured clients so that I can set them to uuse the new DNS ad blocker. My favourite thing is no more youtube ad’s. This is great.
I have now disabled my ad blocker on my browser to see the total experience. so far I AM IMPRESSED!
Ciao
Paul
0 notes
Text
PiShrink
I like many raspberry pi hobbyists often to back up their projects and later restore them. There is a fine balance between, speed to backup and restore and the capacity of the micro SD card.
The Problem(s)
Although Raspbian and the other distro’s come in minimal versions offering small disk footprints, the size of the SD card available in the shops has been growing steadily.
This leaves to a problem when your current project is consuming only 3 GB of disk space but the SD card is 16 or 32 GB in size and you use tools such as win32diskimager which clones the whole disk, empty space and all.
Your archive storage needs grows, 10 versions of your project which should only take up around 30 GB, instead needs 10 times more at a whopping 300 GB.
Anyone suffering from this dilemma?
Introducing PiShrink, our saviour
Along comes pishrink to the rescue, this script is pointed to time and time again in the raspberry pi forums, whenever people want to reduce the size of their images files to actual data not the SD capacity.
I have tried multiple times using win32imager to backup my pi’s image, by simply removing the SD card from the pi attaching it to my PC and running win32imager read and creating <somename.img> file, the file size is equal to the amount of space available on the card when formatted; which is always a touch shy of the capacity quoted on the SD label.
Also, has anyone else realised that all 16 GB SD cards are not exactly the same size once formatted? You can backup a 16 GB SD card and try and restore it to a friends 16 GB card and it will fail complaining there is insufficient space. this phenomena is not limited to 16 GB cards they all have the same issue. Frustrating!
Error!
Getting back to it, I then copy the backed up SD image to a linux machine that has PiShrink installed and run the tool and wait expectantly. AND it fails....
The error says that e2fsck cannot continue as the drive is mounted. I honestly thought there was something fundamentally wrong with the pishrink tool, and spent many hour trying to manually do what the script dis and get a successful outcome. I failed...
Light bulb Moment
I then considered the idea that the issue was not the pishrink tool but the file I was supplying, so I changed the approach, instead of using win32imager to create the back up image of the SD card I used the Linux native tool dd, this worked a breeze. Do not get me wrong it was more effort than the windows tool but it worked! And it also could compress them too so they were stored using minimum space. Awesome right?
The Details
In order to use dd you have to gracefully shutdown your RPi and then take the micro SD out, place it into a reader on your Linux machine then on the console type:
fdisk -l
This will produce an output similar to the screen shot, we are trying to identify the disk device name used by the Linus system when it mounted the drive. Scrolling through you should find an entry that matches the size of you SD card, check the screenshot. Make sure you are certain remove other drives that may be similar sizes so you do not select the wrong one. You can also try the command df -h if that is easier and look for the /dev/sd? name associated to your card.
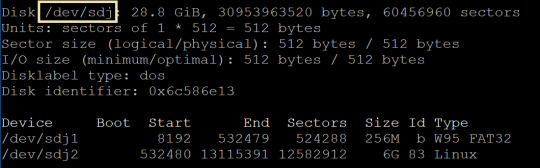
In my example the card is mounted as /dev/sdj and is 28.8 GB, it is labelled as 32 GB on the card. Armed with the identity of the card we can execute the following command. Do not forget to change the /dev/sdj in the command to match the identity of your card on your system.
dd if=/dev/sdj of=~/raspbian_backup.img
Now, a little information regarding the arguments we have provided to to dd.
if - means input file and we set this the /dev/sd? name we have discovered for our mounted card.
of - this is the output file and you can place it in any directory and call it anything, in the example the file is called ‘raspbian_backup.img‘ and it is in my home directory. I suggest you use the extension .img as it will be easier to spot later.
Let that command run, and once it complete, it will spit out a few statistics and give you the prompt back.
Next, we cd to the directory that contains our pishrink tool and execute the command
./pishrink.sh ~/raspbian_backup.img
Results
If all has gone right it will spit out some output as it goes through shrinking your image and in my case it said this ‘pishrink.sh: Shrunk /root/raspbian_backup.img from 29G to 4.5G ...’ That is an enormous saving, also not I have NOT compressed the image further which the pishrink tool is capable of doing too, if its now working for you like it does for me, I suggest you play with the different options available in the pishrink tool. and leave a comment of success here.
Ciao
Paul
0 notes
Text
Google WIFI being phased out
It seems that the new always changing strategy is that Google WIFI app on the mobile platforms is to be phased out and instead users are to migrate there existing pucks to the Google Home app instead.
Thankfully the mess that was google home app is a little better than a year ago but still confusing on how you can do many things. In fact much of Google venture into the home has been an ill thought through journey.
Home Office Integration, the ticket for tomorrows growth market
Take for example the current use of homes being utilised as the new office is also not well supported with the trend that google has of ONLY supporting integration with its own products and services. The expectation that the world must change and have all their eggs in googles basket and not use third party products seems flawed to my thoughts.
This bizarre thought process with the working from home practised by hundred of millions of people around the world now now of course extends to corporate where google really is in the minor leagues compered to say Microsoft.
While the major AI assistants battle it out for ‘there shall be only one’ supremacy instead of opting for cross integration like civilised AI’s then we can expect the take-up in the home office environment to go down a similar path as the home slowly. And with many a u-turn.
When it comes to the office workflow, calendar,email etc Microsoft rule the roost, when it come to home personal user email and calendars I would think that title and crown shifts to Google. So taking the need for a personal assistant in the home office need to look at both your personal calendar and your work one there is little chance an assistant that only does one is going to be ‘hired’ and if they are once the limitations are understand they may find themselves looking for a new position on ebay.
Back to Google WIFI
To get back on track I tried the move from Google WIFI following some very good instructions I found, only to realise part way through the google had changed their approach and now expect you to factory reset your primary puck and then set it up again on Google Home app; that internet outage presents a little problem in the modern home where all the adults and children rely of the internet for most things. perhaps the ‘network administrator’ needs to miss a meal and taker the time the rest of the family are dining as a good time to perform such destructive changes, or stay up after the family has retired to bed. These seem unattractive options and also need to be thought through a little better.
Suggestion to Google
The online’ status stated in Google WIFI is not talking about the internet service being up and working it in fact talking about the management of the primary puck is online with google cloud. So wait hold your horses, we the users have to upset our family's and perform unknown steps as they seem to change at google command when really they are trying to make us move from one cloud part to another cloud part which they control both parts. Sounds like they need to work out how to do this management control switch with a graceful hand over once the user approves, that all done no need to reboot anything as its just the control of the device needs to move over nothing to do with the internet connectivity.
Advice to Google
I say this with all sincerity, Google you need to grow up, there are other children in the playground and you need to play nicely with them. Otherwise people will stop playing with you and you will be all alone.
Ciao
Paul
#google#google wifi#google wifi system#wifi mesh#SIRI#microsoft#cortana#office 365#Amazon Echo#apple#samsung#bixby
2 notes
·
View notes
Text
Remote Wireshark captures using RPi as a probe.
This post looks briefly at using a RPi as a remote device for capturing, the RPi can be situation anywhere in the world and as long as you have good connectivity to it then it can act as a remote probe for packet capturing.
Some om RPi’s are setup to call home using OpenVPN configuration, others are setup as an in-line trace device with the idea that you place a RPi which has two Ethernet adaptors inline with a device you want to monitor.
This post though is about allowing live stream capturing remote back to your local wireshark install.
The file and the details of what to do on the remote Raspberry Pi can be found here
The setting up of remote probes is done within Wireshark follow this step guide and hopefully by following your nose and a little guidance from me you will get this working.
Disclaimer this is not a secure probe and will not provide for a fast capture rate, it is a Raspberry Pi after all, but it works even on a RPi Zero W.
Step 1 Install if needed and then open up Wireshark
Step 2 under the Capture tab select Options

Step 3 at the bottom right select manage interfaces... button

Step 4 Select the Remote Interfaces tab and then the + button at the left bottom corner of the new window.
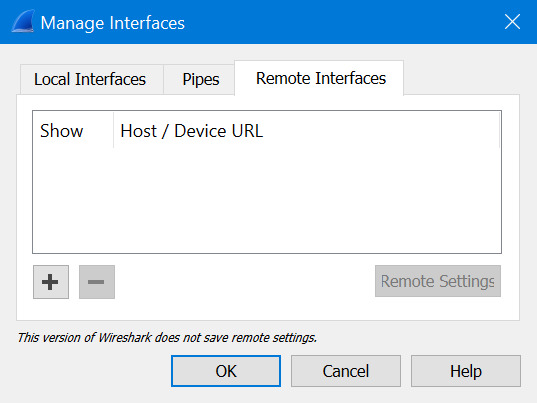
Step 5 In the new configuration window fill in the IP address of the remote probe and unless you have chosen to change the port number when running the rpcapd on the remote Pi set the port to 2002 which is the default. Make sure null is selected as Wireshark does not support authenticating a remote stream, maybe it will soon, its for you to play with and see when it works? Select OK when done.

Step 6 Now we select OK unless we want to add some more probes.
Step 7 At the interfaces window select the interface or interfaces you want to capture from and then select start at the bottom right corner of the window.
If all goes well you should see frames being captured from the remote probe in your Wireshark window.
Good Luck
Ciao
Paul
0 notes
Text
The scan-server standalone alpha build is now available!
Its finally released the alpha build of scan-server.
What is it? I hear you cry.
Well imagine you’re blind or visually impaired and want to read a recipe, or a letter has arrived in the mail and you want to know if its what you’ve been waiting for but there is no one sighted around to read it to you.
This is a raspberry pi image, by plugging in a headset and a mouse and a printer scanner into the pi you put the letter on the scanner and then can press the left button of the mouse, the scanner will start up and scan the letter and then read it through the headset jack to the user attached ear buds, headset or even a speaker.
This is the standalone version meaning it does not require an internet connection to perform its job. The speech engine is open source and well a little basic, but its the level that many blind and visually impaired users are used to hearing.
Where can you get it, well I have setup a project on GitHub and it is available here
I already have a working prototype of the advanced version that requires Internet access as it integrates with Amazon Echo, allowing users to start a scan using their voice and also to read it to them using Alexa’s superior speech engine.
This is all working the issue is getting the skills tidied up and published, but the main hurdle is to get the provisioning of the AWS infrastructure automated and a way to easily configure the details on the RPi.
0 notes
Text
RPi with USB Gigabit Ethernet dongle on Stretch
Like many I have bought a few of the USB3 Gigabit Ethernet adaptors from sites such as ali-express, and when connecting to my windows machine they work great, connected to my raspberry pi they work out of the box with buster but not at all on stretch. I know stretch is almost at the end of its support life but I still need to use it as the upgrade breaks things for me and I am not ready to make the platform from scratch right now.
I did some googling and found parts in one place and some useful tips in another and by playing got a working set of instructions, hopefully it works for you too.
The dongles are based around the RTL 8153 but as stretch has no driver or kernel module for them ithey don’t work.
Download the source tar file found here scroll down and get the linux file.
transfer this to your RPi and untar it using commands like these, modify to suit your filenames as the filenames may have changed over time.
tar xvf r8152.53.56-2.12.0.tar cd r8152_2.12.0/
So now we need to make sure the RPi is prepared with the tools needed to compile the source code driver you have just downloaded, do not get nervous.
sudo apt-get update
sudo apt-get upgrade
sudo apt-get install libelf-dev build-essential linux-headers-rpi
Answer yes to any confirm questions and when that has completed we need to actual compile with the following commands
make -j2
make install
depmod -a
next see if the kernel module is recognised with this command
modinfo ./r8152.ko
All going well that will spurt forth lots of useful information to someone who understands it.
If all that went well you should now see your Ethernet interface when you use ifconfig, go ahead and configure it as per other interfaces.
Ciao
Paul
0 notes
Text
The Alexa scan skills are working fully on Amazon AWS.
This week saw great advancement on the project.
I am still using the RPi one as I still have not received the Zero W that I have ordered.
The reach out to Amazon and the Raspberry Pi Foundation has yet to yield results, I will let you know how that goes.
I have two skills both of which I wrote in python 3.8, I could at some stage in the future combine the skills into one, vbut for now they are separate one is there to simply grab the next message off the SQS and read it aloud to the user this scan is invoked using ‘Alexa, read scan’.
The other scan which is called startscan but has has to use the invocation ‘blind scan document’ for this POC, as all the more obvious names have issue with either not being permitted or getting poor success rates when saying them. Some examples such as ‘start scan’ or ‘begin scan’ break tha Amazon invocation syntax rules so are not permitted. using phrases such ‘scan document’ or ‘scan for reading’ regularly gets Alexa to say scanning is not currently available (oh yes it is) or explain how a person would use a flatbed scanner to scan a document, all of which just frustrate the user trying to read their letter through Alexa. I am reader has an idea for the way the invocations should be set please leave a comment below.
The next area that is to receive my attention is how do I simplify the RPi configuration and get it onto the home WIFI network as well as get the IoT client configuration on it. Currently I am investigating using Bluetooth to connect and make the initial configuration.
Time to run...
ciao
Paul
0 notes
Text
Getting Alexa to scan and then read it.
Hello World!
Around three years ago in 2017 I set up a complex multi-platform solution that allowed me to ask Amazon Alexa to scan a document and then once it had been scanned and processed I could ask her to read it to me. This was awesome!
I used it for years and then considered that this could benefit my Blind and Low Vision peers and reached out to them https://blindlowvision.org.nz
They are very enthusic about this as once set up it will provide all blind and low-vision people even the less tech savvy ones a way to read letters, bills and flyers that come in the post.
As the original solution was heavily hard-coded with accounts and API keys the solution was required to be simplified for robustness and also to make sure it all worked with a Raspberry Pi Zero W as the low-cost miniture local linux platform.
Today I have an optimised Buster image the solution is broken down into three use cases and all use cases except one are based on Amazon infrastructure. It is built around IoT and serverless architecture and should scale well and cheaply.
Flow 1 which requires some development as it currently uses IFTTT and Adafruit.io for the initial invocation of the scan to begin is the next simplification I need to do see the current and target architecture diagram below.
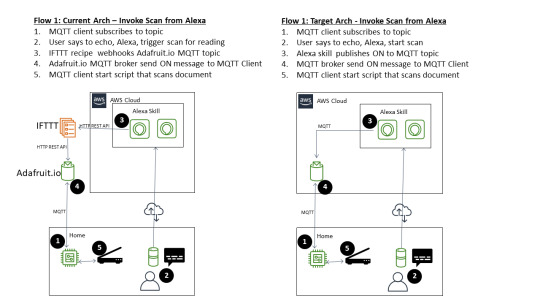
It is really important to note that removal of IFTTT and Adafruit is not because there is anything wrong with these services, on the contrary; these services were really easy to get working whereas the final piece is to use Amazon IoT service instead is proving difficut. Having Amazon services from end-to-end in the cloud allows for simplified provisioning as the Amazon Account ID can be used to stitch all the parts together, at least that is the hope
The other two flows are depicted below and are for the best part functionally complete, although I expect lots of tweaks will occur between now and its public debut.

So when is this expected to go public?
Not sure, is the short answer. I think there is around 3-6 months effort to get this all ready uasing only my free time (I have a day job). It could go much faster if others decide to pitch in and lend a hand, c’mon don’t be shy, if you have some time and would like to get involved (you do not have to be a developer) then drop me a comment and we can discuss.
Ciao
Paul
0 notes
Audio
0 notes
Text
Home Automation for cheap, warm & damp free rental property.
I live in New Zealand, where most rental properties are poorly designed and constructed, resulting in homes that are damp, and expensive to heat during the colder months.
I am not looking to have a flame war about dampness and construction practices or even about owners or property managers obligations or the poor advice that national agency’s provide such as opening your windows to reduce dampness, yeah right!
I am simply looking at what I can do as a renter to assist with the health of my family; keeping them safe, healthy and warm are fundamental to me. With this objective in mind let’s get on with this post.
Over the last two winters I have actioned what I am recommending in this post and our resident asthma sufferer is grateful for these measures as they have had zero attacks at home during this time (which is amazing). We do not see ‘crying windows’ anymore. I have also seen power savings over the winter months as a result of the changes presented here.
Getting Started
So two years ago with mounting energy costs and health issues causing costly doctor trips and medical bills I started to consider what I can do to create a warm damp free environment for my family.
I noticed a few things:
We never had these issue when we lived in Sweden, or Switzerland which are cold and damp environments.
Humans are terrible at remembering to do things regularly on their own.
I could not hope to persuade the owners to stop dampness at its source.
Electric heaters and heat-pumps were good, gas and wood burners were bad.
I came up with a plan for living areas and a different one for bedrooms. I used one particular draught to suit my needs.
Prerequisites
To set up your environment you will need the following:
Always on internet accessed through WIFI
Android or IOS mobile device
Free mobile app for setting up Sonoff modules (ewelink)
An electric heater
A simple dehumidifier
2 Sonoff TH modules with sensor
2 Extension leads (2m ones are great)
Hopefully its only the Sonoff stuff and the power extensions in the last bullet point you will need to purchase making this really cheap for you.
DRAUGHT
As a rule I used standard draught exclusion techniques to prevent doors and windows passing through gales and allowing rain to come in. As a general rule I also keep doors to rooms that open to outside areas and damp areas such as bathrooms, showers, and toilets closed; particularly when trying to reduce the humidity and get the home warm. There is one draught that I had no chance to stop as it starts in the glassed conservatory and blows down two corridors and across an office, reaching the living room. Rather than stop this draught I chose to warm the air up and use it like a warm air ventilation stream, so even though we rarely go into the games room (what we call the conservatory) it has a heater in there to make sure the draught is spreading warm air throughout the house instead of cold.
When the house becomes dryer and warmer, I open bathroom doors, etc. so that they also slowly raise their temperature so going to the bathroom is not a major undertaking.
BEDROOMS
Each occupied bedroom has its own convection heater, as we found the oil filled heaters had annoying ‘ticking’ sound when cooling down that disturbed our sleep. The heaters have three settings 1 and a 2, and with both switched on making three options, I typically use the ‘2’ setting as this allows for a good consistent rise and fall of the heat and makes the room temperature more consistent with a balanced fast warm up when needed.

Each bedroom also has a dehumidifier, these are small compact (read “cheap”) and we get them for $150 NZD from Countdown. Make sure to get a dumb/simple dehumidifier that has a simple on/off switch only. This should have no preset humidity thresholds or electronic settings. You should be able to simply plug them in switch them on at the wall socket and they start their work, fancy ones with multiple functions that need a human to set them up every time they are powered up will not work for what we are trying to achieve.
I recommend that the bedrooms of asthma sufferers get set up first, then the other bedrooms, and finally the living areas as money allows. The dehumidifiers work in tandem with the heaters to dry the air which makes the air easier to heat, meaning the heaters barely need to come on to heat the room. the temperature rises as the humidity decreases. The dehumidifier is therefore the most important part as it both raises the temperature and is 400% cheaper to run than a heater for the same period. After much research and trail & error we have settled on the bedroom humidity and temperatures for sleeping as follows:
Sleep Humidity: 72 RH
Sleep Temp: 17.4 C
Awake Humidity: 55 RH
Awake Temp: 21.0 C
The awake temperature is only increased for bedrooms that are used often during the day such as kids rooms.
Now, to measure and control the humidity and temperature I use two Sonoff devices that can controlled using an android or iOS mobile app.

These Sonoff TH 10 (or TH 16) modules can be purchased cheaply from aliexpress, wish, banggood or ebay or direct from the manufacturer (http://www.itead.com). I recommend that initially you should get the 2 TH modules one for the dehumidifier and one for the heater. also get a sensor for each that plugs in the side.

The external sensor provides the temperature & humidity measurements (that’s what the ‘TH’ stands for) and can be set to trigger the unit to turn ON and OFF. Only one sensor is needed per room, as the Sonoffs use a scene based rule set that allows multiple scenes to be defined based on the temperature and humidity measurements. So, one sensor can be used to control many devices. For example a heater, dehumidifier, fan, air conditioner, etc...
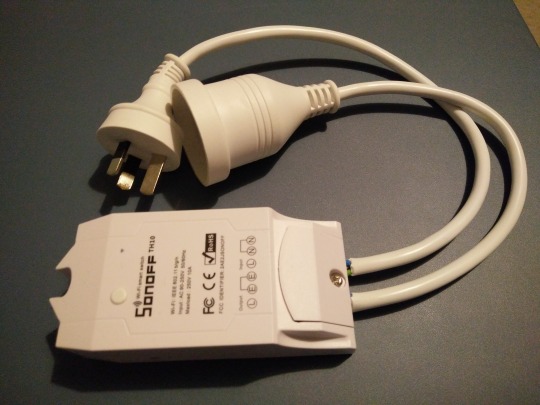
I have found it very useful to use a power extension lead cut in half as the input and output for the Sonoff module. That way you can connect anything you want and enable power remotely, if you want it be fixed install then simply cut the plug off the device about 30 centimeters or a 12 inches from the end and bare the ends of the wires to connect them to the Sonoff modules using the Live, Neutral and Ground (Earth) connects.

Make sure to check the connection labels as the order may be subject to change.

WARNING
If you are not comfortable wiring plugs then do not attempt this yourself! ask a competent friend to do this for you instead.
Make sure the heater and the dehumidifier are in the ON position and then plug in the Sonoff to the mains power, now you should be able to remotely turn the devices ON and OFF locally using the button on the module.
Using the ewelink mobile application installed on your phone or tablet, setup the devices to turn on when the temperature or humidity is lower than desired and off when the target is reached. Then plug it all together and see it function automatically. By letting measurements trigger the use of the devices you will quickly find that it actually saves you money as well improves your health. As we know, an ounce of prevention is worth a pound of cure.
As many of you will have noticed the Sonoff unit can also be controlled using Amazon, Alexa and Google home.

Next Time
In this post I focussed on the health aspects rather than pure cost savings; although I found I made savings even with this step as the consistency was key. The next post will look at the living areas and in-particular the living room where we have a heat pump and explain how we saved $150 NZD a month over winter on our power bills. Thats a whopping 25% off our bill every month!
Ciao
Paul
DISCLAIMER
I have no affinity to the maker of this Youtube video, nor Sonoff either for that matter. I gain nothing from passing on the information in this blog to you, other than the satisfaction of giving something back to the community and hopefully some others will be healthier as a result.
youtube
3 notes
·
View notes
Note
The raspberry pi access point install script is no longer on Dropbox. Would it be possible for you to get the script back up?
The links on dropbox expire after two years. The script is still there, try this link. Be warned a lot has changed in the years since I wrote this script and it may no longer work.
https://www.dropbox.com/s/5g6mdnc6n32rcpf/install-rtl8188cus.sh?dl=0
0 notes
Note
Hi, could you please reupload your script?
The post has been refreshed as the links expire after two years.
it can be downloaded from here https://www.dropbox.com/s/xj050q6t20i3pnh/genmc.zip?dl=0
0 notes
Note
Hi. Thank you very much for your article on securing a CISCO phone with encryption. However, the link to the "genmc.exe" is not available. Can you upload it again ?Thank you very much.
0 notes
Text
Google, Anti Competitive behaviour: deliberate or accident?
I have just got off the second frustrating conversation with Google support in a week. I recently purchased Google Wifi, which is a mesh WIFI router system that can be expanded to cover all your house (I have 3 units).
Google have opted to only support configuration of the Google WIFI product through a mobile application. The only platforms that have a mobile app for this purpose is Android and Apple. Nothing sinister so far, right?
In order to pair my home lighting system (Phillips Hue) so that guests can turn on and off lighting through a web browser I need first to pair the two products.
The web page that I am directed to is http://on.here and this is where the fun begins.
If I go to this site using my apple iPad it gets a screen back that says that my Safari 11 browser is not supported. Intrigued by this I tried some simple browser tests.
The supported browsers list published by Google only states Safari 8 is supported this is unfortunately no longer available and has not been for years.
As Safari is part of the iOS operating system, its version is the same as the iOS on which it run. Meaning iOS 8 and ergo Safari is depreciated and no longer supported by Apple.
I have tested Chrome and surprise, that works. and a bunch of browsers that are not on the supported browser list (Opera, Dolphin, Puffin) all of which worked. The ONLY one I found that gets rejected by the Google owned web site is Safari. This is interesting. Let’s think about the ramifications of this a little more which change the driver of this observed behaviour from resulting accidentally to deliberate.
Google restrict the operating systems that can setup the product to two: Android and iOS.
Google do not support the latest iOS Browser.
Apple do not permit the default browser to be anything other than Safari.
Seems that last bullet is what Google is using to cause the issue. and what also makes this look deliberate is that the support person said this was a ‘well known issue’ although it took him almost fifteen minutes of checking before he determined this fact. He was insistent that its an Apple issue although its a Google web site that is deliberately denying the latest Safari Browser from being processed..
So I am now wondering what to do. I will try and see if I can get an android user to setup my Google Wifi for me, but then I suspect they will hit other issues that need to be worked past with this poorly conceived and highly constrained product from Google.
Ciao
Paul
[UPDATE]
I decided to fish out my old, no longer supported iPad 3 and charge it, I then applied the DNS workaround I discovered is required, once done I tested Safari and YES! this old version was not being blocked by Google. I was then able to pair the Google Wifi with my Philips Hue using an Apple device. Interestingly all of this takes place in a web browser; so if I had been furnished with the with the correct URL I would have been able to do this particular task in a browser on my PC.
0 notes