
Side blog of siri-of-all-trades with more art-aligned stuff: fiber arts, drawing, gardening, cosplay etc. Tracking #craftsofsiri
Don't wanna be here? Send us removal request.
Statistics
We looked inside some of the posts by siriscrafts and here's what we found interesting.
Average Info
Notes Per Post
176K
Likes Per Post
100K
Reblog Per Post
76K
Reply Per Post
177
Time Between Posts
6 days
Number of Posts By Type
Text
17
Last Seen Tumblr Blogs


Fun Fact
In 2020, 44% of users from Denmark used Tumblr daily.
Text

Pentti Vainio
2021
'Garden'
Oil on canvas, 80 x 100 cm
Finnish painter
381 notes
·
View notes
Text
In case anyone is having a bad night
(The best of this post and its reblogs, but with links that work)
Here is a website where you can scroll down to all the different levels of the ocean
Here is a website where you can see the future of the universe
Here is a website where you can press a ‘make everything okay’ button, over and over, until things really are okay
Here is a website that you can read if you feel like a burden
Here is a website where you can look at strobe illusions (TW strobe/flashing)
Here is a website where you can cut stuff up (TW blood/sh)
Here and here are websites where you can play with sand
Here is a website where you can draw with macaroni and other fun foods
Here is a website where you can paint someone’s nails
Here is a website where you can grow a garden with emojis
Here is a website with hundreds of videos of people hugging you (rightfully dubbed ‘the nicest place on the internet’ because it really is, y’all, it made me cry)
Here is a website that will take you to other useless websites
Here is a website where you can make a tiny cat play bongo drums (and other instruments!)
Here is a website to help give you gentle reminders <3
Here is a website where you can grow a tiny farm
Here is a website where you can take a bunch of scientific personality tests
Here is a website of calm rain noise
Take a breath. It’s going to be okay, I promise.
25K notes
·
View notes
Text
I like to weave in as many ends as possible as I go.
This is how I do it when I join a new colour.
‼️ For a better result: Fray or break the yarn to taper the end.
Works both for knitting* and crochet.
*Does not work so well if you are knitting in the round or in intarsia or colourwork, as it will distort that first stitch. Saves you loads of time though, if you are knitting a striped scarf or shawl.
🧶🎥
342 notes
·
View notes
Text


Pörriäiskirjontaa 🐝
We are making progress 🐝 (and it doesn't look that bad even though I haven't done embroidery since highschool!)
78 notes
·
View notes
Text

Trying to find my way around colored pencils again!
🌟 2025 carrd | ☕️ Ko-fi 🌟
46 notes
·
View notes
Text
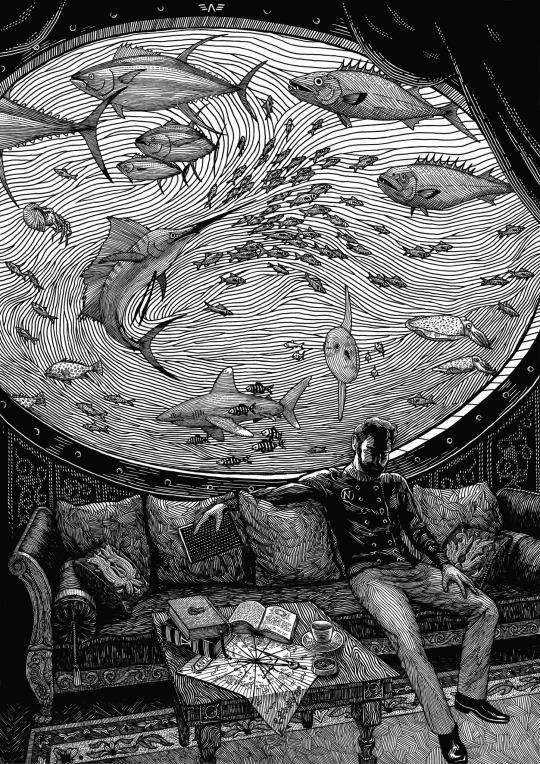
Captain Nemo
I drew this piece in 2019, and although I can see lots of mistakes and imperfections, it's still one of my favourite artworks
#woah#i love this piece and the feeling and atmosphere it evokes#makes me want to take up an ink pen again and put many hours into a piece again#inspiration#arts#drawing#reblog
15K notes
·
View notes
Text
How to join skeins
Taper the ends, either by pulling and breaking the yarn or by fraying the ends with a scissor blade. Sew one end into the other, pull both yarns lightly, so that the end settles snugly between the plies. Repeat with other end
🧶🎥🧶
50 notes
·
View notes
Text
Fellowship Cloak Weaving Draft
Hi all! I've been kind of quiet on this blog, but I have something really exciting to share today: after six years, I FINALLY figured out the weaving draft for the Fellowship cloaks from Lord of the Rings.
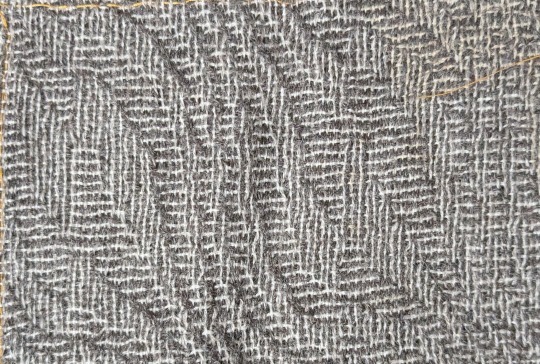
This is a problem I've been trying to figure out since shortly after I made my Legolas cosplay in 2018. The cloaks that the nine members of the Fellowship receive in Lothlórien look like a nondescript gray fabric from far away, but zoom in and you'll see a very complex pattern of horizontal and vertical bars of dark gray and white.
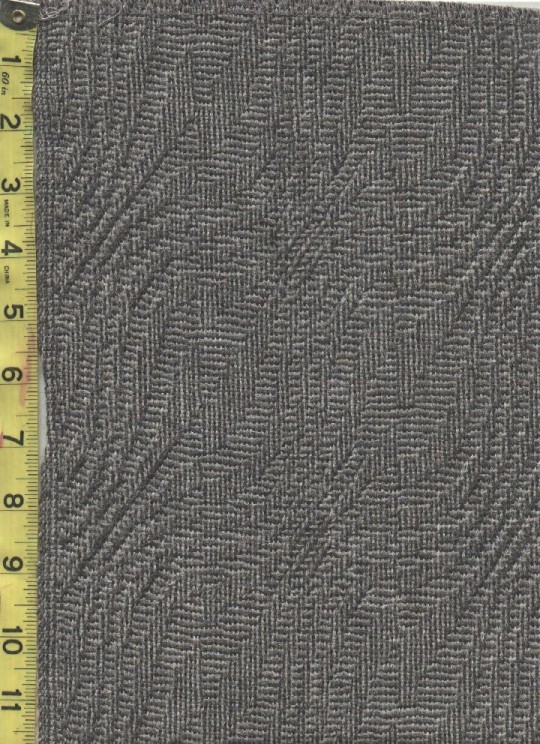
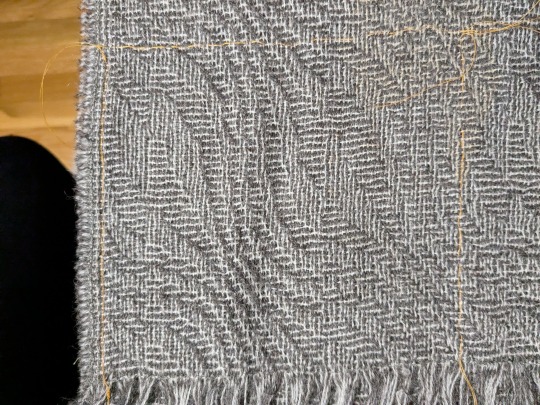
(First image from Alleycatscratch, second is a photo of the scarf of the same fabric I bought from Stansborough where I was attempting to trace the pattern repeat with orange thread)
This is going to be a long post, so I'm just going to lead with the completed draft:

Imagine me Will Smith wife posing at this for the last 24 hours.
It's got the correct size of pattern repeat! It's got the five individual ripples! It's got that dumb little pattern break in the middle that breaks up the center of the leaf motif! I am OVER THE MOON about figuring this out, especially starting out with very little knowledge about weaving drafts in general. More ramblings about this type of draft and my thought process below:
This particular pattern is known as "shadow weave," a subset of color-and-weave where the pattern is created from the interplay of different warp and weft colors plus the weaving draft itself. To get an idea of how that works, let's start by looking at plain weave in one color:

The solid purple bar at the top indicates the color of the warp threads, and the solid purple bar at the right indicates the color of the weft threads. So far we've got our basic under-over-under-over pattern in a single, solid color (purple). But what if we add an additional color (green) to the warp, and alternate those colors? Then we'd get a speckled fabric like this:

The visual effect looks pretty much identical regardless of if you start with green or purple. However, if you also alternate purple and green in the weft, it produces a very different effect depending on if you start with purple or green (note the differences in the bar on the right):


So cool, now we can make either vertical or horizontal stripes! If you double up on the colored threads in some areas, you can even flip between the two and start dividing the fabric into "blocks," like so:


Note that with all these changes, the only thing we've been doing is changing the order of the colors in the warp and weft. The actual weave structure itself is still just regular ol' plain weave. The pattern that we've created in the pictures above is called "log cabin," which you can read about here. But similar effects can be created by skipping shafts/picks in the weaving draft as well. So how do we get from log cabin into the more complicated and general category of shadow weave?
It's weird to describe how to convert a given pattern into shadow weave. There are multiple very good books with chapters on shadow weave as well as books entirely dedicated to it. Despite my best efforts, all these explanations still got so technical so fast it feels like, to me at least, asking a 6 year old to recite an entire Shakespeare play verbatim immediately after confirming that they can, in fact, sing the alphabet song. So I'm going to give my best shot at explaining it, and if it doesn't make sense, just blame it on me and check out some of the linked books above if you're really curious.
Think of shadow weave as a beauty filter for a black and white drawing. If you create a pattern out of black and white blocks/pixels/whatever, the shadow weave "filter" can be applied to it to create a similar pattern that preserves the shapes in the original, but makes them out of vertical/horizontal lines instead of solid color blocks. So in some of these books you'll find mention of converting a twill or an overshot pattern into shadow weave - that's what this is referencing. The original pattern (usually designated with light yarn) gets a secondary shadow pattern (in dark yarn) inserted into in between every other thread (also called an "end" when referencing warp yarns).
I got stuck at this point for literal years. I could find examples of weaving drafts using shadow weave, but couldn't figure out how to generate ones of my own. I imported some of the drafts I found in books into weaving software and poked around to see if I could push the patterns in the direction I wanted by changing individual elements. My experiments in changing individual warp ends and weft picks always ended up looking like stretched or compressed versions of the original pattern (when I was being careful), or incomprehensible garbage (when I was being daring). I even bought a sample of the fabric from Stansborough in the form of a scarf, thinking I could brute force it by using a magnifying glass to figure out the interlacements. I was able to figure out how large the pattern repeat was (approximately 160 x 80 ends), but otherwise I got nothing but eye strain. I ended up tabling the project and coming back to it every couple years, banging my head against it until I gave up.
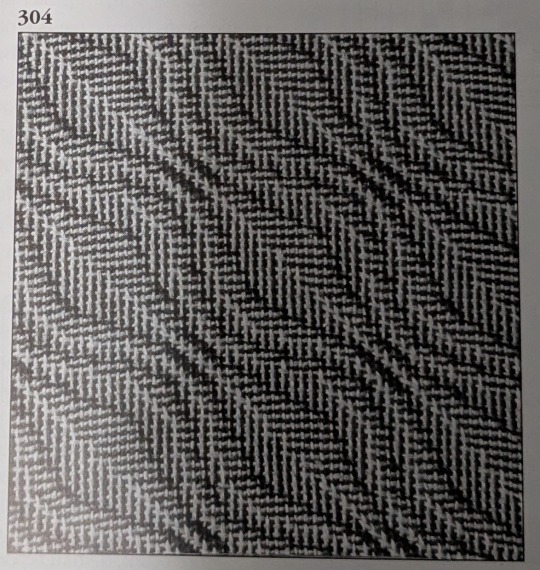
Until one day last week when I was flipping through the Strickler book and saw this page:
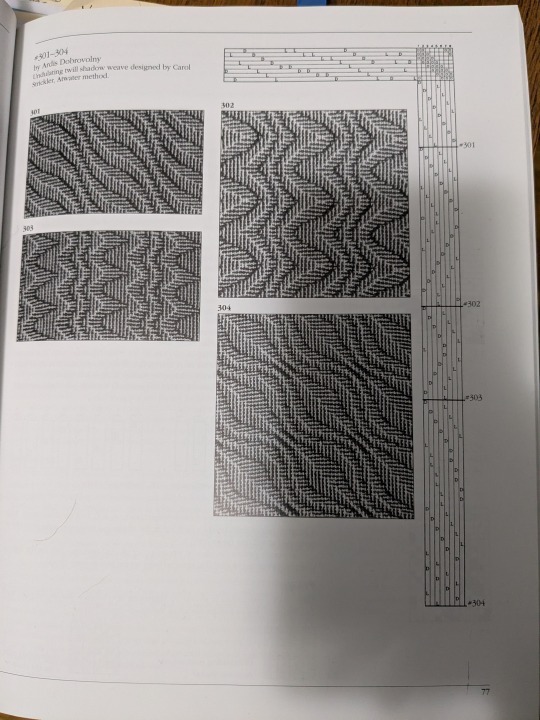
And I was like

HOLD UP
IT'S HER
...or at least a close cousin of her. BUT IT WAS A START.
So the first step was to identify what about this pattern needed to change in order to make this look like the Fellowship cloak. Overall, the main differences were:
Pattern repeat on Strickler 304 was too small - it was 42 x 42 ends and I needed it to be somewhere in the ballpark of 80 x 80 before altering the repeat.
The Fellowship pattern has a weird vertical dividing line that runs down the middle of the leaf motif, effectively doubling the width of the repeat by creating two similar looking but different leaves. This was the change I was least concerned about, as flipping between vertical and horizontal lines is pretty a straightforward process as shown above with the log cabin draft.
Strickler 304 also has a different number of waves (peaks and valleys, or whatever you want to call them) compared to the Fellowship pattern. There are 3 waves in Strickler and 5 in Fellowship. Figuring out how to add these extra waves was the biggest obstacle for me to address.
And finally, a couple of things I didn't need to care about for the weaving draft: 1) the Fellowship pattern is elongated in the warp direction, but this has more to do with a little extra spacing between weft picks as compared to the warp threads. When weaving this you'd just need to make sure you don't beat it very hard and you'll get that tall rectangle shape instead of a square repeat. 2) Both patterns have mirrored symmetry around a diagonal line drawn through the center, meaning that for treadling I could "tromp as writ" or basically just mirror the threading diagram to get the treadling instructions. For reasons I can't figure out, the Strickler pattern isn't exactly tromp as writ but looks close enough to it that the effect is still there. But I don't really care enough to figure out why - the important thing is that it gives us a threading diagram to start with!
So to start with, here's what Strickler 304 looks like in my weaving software:

(By the way, this is Fiberworks PCW Bronze. The trial version is free, and the only difference between that and the paid version is that the save/print options are disabled. I'm not sure they know about screenshots, bless their hearts.)
This is a design for 8 shafts and 8 treadles, thus the 8x8 square in the upper right corner. And you can see in the threading diagram (upper horizontal bar) and treadling diagram (right bar) that the curvature of the waves takes a similar shape to the curves of the final pattern. We just have to figure out why. And since I had already tried changing individual warp ends and treadling patterns without much success, I needed to approach in a different way.
What ended up helping me see the forest for the trees was de-shadowifying the pattern. It's relatively easy to get the black-and-white version of the pattern from the threading draft - you just need to delete the shadow, which means removing every other warp end. This is what deleting all the dark ends from the warp and light ends from the weft looks like:

We can also see with a little more detail how the threading diagram is similar to the curve in the pattern. The pattern is 21 pixels tall, but it's been chopped up to repeat over 8 shafts, like so:

OKAY COOL COOL COOL. EVERYTHING'S COMIN' UP MILHOUSE IVORIVET. From this green squiggly line we know two things:
The final number of warp ends in the shadow weave pattern is double whatever the height of the squiggle is. In the case of the Strickler pattern, we're going from 21 to 42. Since we know that we need our final height for the Fellowship pattern needs to be 80, the squiggle for that pattern needs to be around 40 pixels tall.
We needed to stitch three repeats of the Strickler threading diagram together in order to see the full squiggle. How many waves does the Strickler pattern have? Three. How many waves does the Fellowship pattern need? Five. How many shafts do we have to work on? Eight. What is 5 x 8? 40!!!

So how about we make a NEW squiggle, only 40 pixels high instead of 21? (We're gonna drop the pixels in blue, since threading diagrams won't work if you put a single end through two shafts.)


Next, we're going to chop up that squiggle and use it to create a new threading diagram in Fiberworks. I'm also using "tromp as writ" here to create the treadling pattern.

LOOK AT THAT. IT'S GOT MORE WAVES!! FIVE OF THEM!
And then we add back in the shadow by creating a space for a new end between each existing end:


And then add in the shadow. I'm using 4 as my number for the shadow offset since we're using 8 shafts. So shaft 1 shadows to shaft 5, shaft 2 shadows to shaft 6, etc.

And we're going to apply tromp as writ again to get:

AYYYYYY WE'RE GETTING CLOSE! I'm fairly certain that the reason why the Strickler treadling wasn't exactly tromp as writ had something to do with centering the pattern repeat a little more than this, but I don't really care about that so I'm going to leave this treadling the way that it is.
From here out, we need at add that weird vertical dividing line that chops up the center of the leaves. So we double the pattern repeat along the horizontal axis, and offset a 40 pixel section in the middle of the threading diagram by 1 pixel. I've also colored in the differences between the dark and light ends to help differentiate the original and shadowed curves a little bit more. (I also tried offsetting the colors of the warp ends by 1 as well like what we did in the log cabin example, but I ended up liking the way that this looked more.)
THERE SHE IS!!! MY PRECIOUS!!

From here on out, there is still a ton of work I need to do if I actually want to weave this cloak from scratch. I did buy roving in quantities that could be used to spin both the dark and light yarn (dark gray Gotland for the dark yarn, and dove gray merino + white alpaca for the light yarn), but there's still the matter of, like, handspinning a cloak's quantity of extremely fine yarn. I did start spinning the Gotland several years ago as fine as I could possibly manage, and got through maybe 20 ounces of it. However, I'm a much better spinner now and I'm not sure if the my skeins from several years ago would be suitable for weaving, or if it would be worth replicating what I did back then vs. just starting over with a new standard. There's also the possibility of just... buying weaving yarn if I want to skip that step, which would definitely save me a significant amount of time.
Anyway, thanks for reading this far and I hope it helped break down why this was so exciting for me!
836 notes
·
View notes
Text
Isobel Thorm (Baldur’s Gate 3) Cosplay Progress: Leg Armor


29 notes
·
View notes
Text


This absurd yarn is 45% cashmere, 55% silk. I have never worked with anything even remotely like it - no cashmere, no silk, and definitely nothing so thin as 92 wraps per inch. Ninety fucking two.
New, it originally cost £200/kg. A very, very kind weaver in Scotland was de-stashing and sent me 5 kilos for £50 total (plus shipping).
I have many dreams for it but right now I mostly have screams. I have no real idea how it will behave in weaving, so I've wound a small warp for some sampling and a scarf. This is 3.5km of yarn (a bit over 2 miles) and it weighs 119 grams (a bit over 4 ounces?). For those of you playing along at home, each 1kg cone is thus 30 kilometres of yarn (nearly 20 miles). It does not feel like any other yarn I have ever touched.
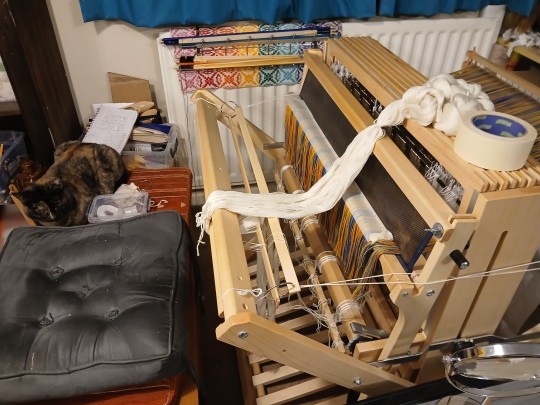


Because it's so thin (difficult to handle or even see) and so valuable, I am using it with a "dummy warp" - I have left the remains of the baby blanket warp on the loom and then I tie the new warp to it, thread by thread by single fucking thread. This means I don't have to set up the loom all over again and almost none of the fancy yarn will become "loom waste", the unweaveable section of warp at the end of a project. But it also means tying every knot, perfectly in order for each end of both the old and new warps, without the cat getting too interested.


24 knots down, a mere 1000 to go...
#i am amazed#this is such a wonderful journey of a post it made me a bit emotional#absolutely stunning work#i applaud you op!!#weaving#fiber arts#reblog
4K notes
·
View notes
Text


I'm sewing covers for a sofa and two armchairs! Just finished the first seat cover, and after taking a shopping break to get bias tape, it's going smoothly! I'm super proud how professional it looks and client (mom) is very happy. I'm also trying out sewing clips instead of pins and they're so great! Highly recommend!

#I was very intimidated by the thick fabric#ive had troubles with constant thread snapping while trying to sew thick fabric on my sewing machine before#but this time i came prepared with stronger thread and thicker needle#and while maneuvering big pieces of heavy fabric is somewhat of a workout#it went so smoothly#im very pleased#craftsofsiri#fiber arts#sewing#diy#solarpunk crafts#upcycling
3 notes
·
View notes
Text
So, I saw this image on Facebook, and it was supposedly showing what Queen Nefertiti would have looked like in real life:

Now, I thought this AI generated garbage was just truly terrible on a number of levels; first off, she looks wayyyyyy too modern - her makeup is very “Hollywood glamour”, she looks airbrushed and de-aged, and as far as I’m aware, Ancient Egyptians didn’t have mascara, glitter-based eyeshadows and lip gloss. Secondly, her features are exceptionally whitewashed in every sense - this is pretty standard for AI as racial bias is prevalent in feeding AI algorithms, but I genuinely thought a depiction of such a known individual would not exhibit such euro-centric features. Thirdly, the outfit was massively desaturated and didn’t take pigment loss into consideration, and while I *do* like the look of the neck attire, it's not at all accurate (plus, again, AI confusion on the detailing is evident).
So, this inspired me to alter the image on the left to be more accurate based off the sculpture’s features. I looked into Ancient Egyptian makeup and looked at references for kohl eyeliner and clay-based facial pigment (rouge was used on cheeks, charcoal-based powder/paste was used to darken and elongate eyebrows), and I looked at pre-existing images of Nefertiti, both her mummy and other reconstructions. While doing this, I found photos of a 3D scanned sculpture made by scientists at the University of Bristol and chose to collage the neck jewellery over the painting (and edited the lighting and shadows as best as I could).

Something I see a lot of in facial recreations of mummies is maintaining the elongated and skinny facial features as seen on preserved bodies - however, fat, muscle and cartilage shrink/disappear post mortem, regardless of preservation quality; Queen Nefertiti had art created of her in life, and these pieces are invaluable to developing an accurate portrayal of her, whether stylistic or realistic in nature.

And hey, while I don't think my adjustments are perfect (especially the neck area), I *do* believe it is a huge improvement to the original image I chose to work on top of.
I really liked working on this project for the last few days, and I think I may continue to work on it further to perfect it. But, until then, I hope you enjoy!
Remember, likes don't help artists but reblogs do!
24K notes
·
View notes
Text
I was browsing Ravelry, as ya do, and I noticed that Audrey Borrego has made all her patterns free because she's no longer designing professionally. I've only made one sweater she designed (the Atlantica originally published in PomPom), but I remember enjoying knitting it, and she's got some neat lace and color work patterns you might want to check out because, I mean, free now!
#thanks for sharing op#i found a nice top i want to make next!#save for later#resources#reblog#fiber arts#knitting
3K notes
·
View notes
Text
An incomplete list of reasons why crafting helps my mental health (and might help yours, too):
It stops me from doom scrolling: can't go on social media if my hands are full of yarn.
It gives me a sense of agency: a lot of things are messed up in a way that's beyond my control, but I can make something that didn't used to exist. It's evidence that I'm alive and I can impact the world, even if the impact is small.
It builds my tolerance for mistakes: I grew up a perfectionist , which is really bad for my wellness and my ability to complete tasks. But crafts are a great source of low-stakes mistakes to help me learn how to handle imperfection. And while there are certainly mistakes I'll always fix, I also have many opportunities to decide a mistake is acceptable and leave it in favor of getting to the finish line.
It interrupts rumination: even if I'm still chewing on some troubling news, it's not front of mind if I need to focus on getting this seam straight or whatever
It helps me meet good people: although there are obvious exceptions, I've found most craft-centered spaces (IRL and online) to be full or supportive, kind, helpful people in all walks of life
It encourages a growth mindset: I'm always learning new things in crafting, and that builds my identity as someone who can grow and improve.
And finally, making your own clothes is empowering: I know this is specific to fiber crafts, but it's important. When you make your own clothes, you flip the notion that you're supposed to "fit into" a certain size and instead remember that clothes are supposed to fit you. You get to learn how to dress the body you have with love and care, instead of allowing manufacturers decide how clothes should look.
5K notes
·
View notes
Text
Download this easy DIY clothing repair guide (only 10 pages) from Uni of Kentucky
link to PDF
82K notes
·
View notes
Text

some more camellias! I painted this one with india inks, and I love working with them! They look so nice and glossy in real life.
17K notes
·
View notes
Text
Hi fiber artists! I'm looking to challenge myself and try something new. What are some obscure or challenging knitting (or chochet!) techniques you know?
I've done knitted lace, colourwork, two-colour brioche, plushies, double helix spiral heels (picture) and socks from the toe up with magic loop and two at the same time. Figuring out new techniques is my favoutire part of knitting 🤓

7 notes
·
View notes