
hi, i’m sam! i’m a new england cosplayer and sewist ☆〜(ゝ。∂)
Don't wanna be here? Send us removal request.
Statistics
We looked inside some of the posts by spikeloid and here's what we found interesting.
Average Info
Notes Per Post
23K
Likes Per Post
13K
Reblog Per Post
9K
Reply Per Post
3
Time Between Posts
3 months
Number of Posts By Type
Photo
6
Note
2
Text
9
Last Seen Tumblr Blogs


Fun Fact
Tumblr has 4 main sources of revenue.
Photo
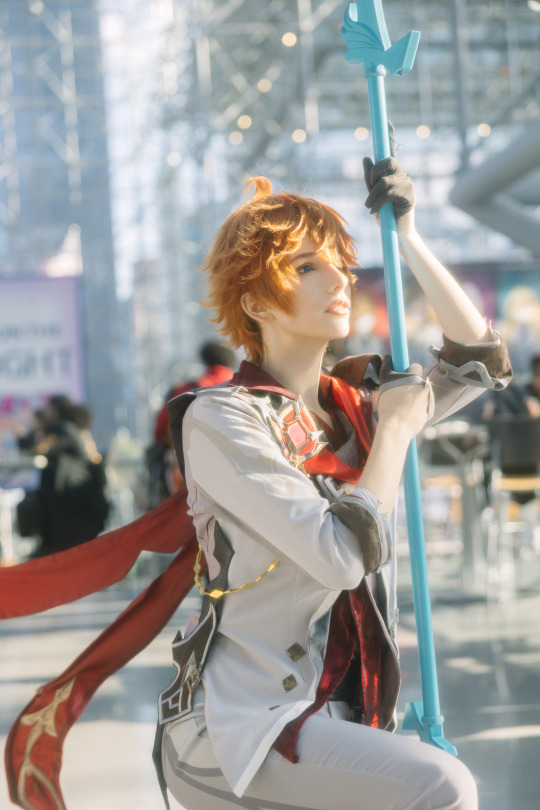
A warrior must always be ready to face any challenge with his blade. The outcome of the battle is irrelevant — what matters is that you learn from the experience.
Photo by butter_cos, wig by kabutowig
#genshin impact#tartaglia#childe#cosplay#genshin cosplay#genshin impact cosplay#childe cosplay#tartaglia cosplay#cosplay photoshoot#anime nyc#anyc#anyc22
11 notes
·
View notes
Note
did you ever make a proper madoka skirt tutorial? and what did you make the skirt out of? Just a cotton fabric? any particular type? it looks so lovely and fluffy
I never got around to making a full tutorial, just explained how to stack layers to give it the donut look. I tried, but couldn’t figure out how to explain it in text/images without it getting truly convoluted and then I lost steam and got busy with school. Being a university student is suffering.
(It’s also bullshit that I have trouble explaining it in text because if Christine can teach me how to do this over the phone, there is no reason why I shouldn’t be able to write it. Let’s give this another shot.)
Anyway, so.
The skirt is made of cotton sateen. It’s this amazingly beautiful fabric that is crisp, lovely to iron, and has this lovely shine to it without being satin-levels of obnoxious. It is what dreams are made of. I wish I had more costumes that used this. We also used it on Sayaka’s shirt, Mami’s shirt/arm warmers and Kyoko’s ruffles. If it were considered at the time, I would have insisted Christine use it for Homura’s shirt, too, but alas. (BRB, making Maya use it for her Satsuki costume.)
So anyway, you want to make this.

Once you break it down it becomes significantly less complicated than it looks.

Basically the entire skirt is rectangles. Also note that the skirt still has to be worn with a petticoat. This just gives you the necessary “donut” poof look.
A. You have a rectangle that becomes the waistband. Generally [your waist + seam allowance + room for elasticizing]” x 4”. This will be elasticized, not difficult.
B. You have a rectangle that will be the upper layer that domes over the tulle. This gets gathered down a lot, so you probably do something like [[your waist x 5]+ seam allowance] x 20” or something. It depends on how long you want the skirt to be, and keep in mind that this layer includes the bottom ruffle. You can do this in panels (as we did five panels of [waist]) or you can find one big massive long strip. Up to you and how you can most effectively use fabric; any seams will be lost in the ruffles anyway.
C. Then you have a rectangle that is the bottom layer, which can be much smaller, like [[your waist x 3]+ seam allowance] x 14”.
D. As many rectangles as you want in tulle for the stuffing inside. This is basically like a petticoat but sealed inside the skirt; any petticoat tutorial should give you an idea of how to do this.
You’ll notice that B is longer than C by about 6”. This is to include hem and ruffle. You can alter these numbers (20 and 14, in this case) to be whatever you want, as it will depend on your height and how long you want the skirt to be. Katherine’s skirt barely covers her bum (hooray, ruffles and matching bloomers!) but she is also 5’6” or something with long legs, if she were 5’0” and had short legs, that same measurement might fall to mid-thigh. You have to alter these numbers to scale to you, but you still want to keep the 6” (or whatever) difference to account for ruffle and hem.
So first you take B and you make it into the “skirt” by joining both ends and then hemming. Cool. Now you have a “skirt”.
Then you go five inches (or whatever you’ve decided to make your ruffle length) from the bottom of the skirt/hem and sew a gathering line all the way around. Gather this down to the width of C. Attach the bottom of the C-skirt to this ruffle line so you’ve essentially got one two-layered skirt, the top layer (B) having much more fabric.
Gather the top of C down to match the waistband (A). Sew (or tack, as you will still be adding D and B.)
Create your petticoat (D) layer to gather down to match waistband (A). Sew (or tack, as you still need to add B.) There are a handful of pictures of this process here but I’ve included some below too.

Now gather down B to match the waistband (A). Again, sew or tack in place. (It’s a shit ton of fun, I tell you. That many layers gets crazy.)

Attach waistband, install elastic.
Become cupcake.

Hope that helped!
- Jenn
1K notes
·
View notes
Note
Hey, do you have any advice for making Madoka's bow? Thank you so much!
Prop making is not my forte so I will direct you to some tutorials and writeups.
One, two, threeBonus: arrows

(source)
One tip I do have is if you can make it so the bow can hold its shape without a string, do it. Not only will it be a lot sturdier, some cons’ weapons policy doesn’t allow bows with a taut string. It’d suck to make a beautiful bow and not be able to get it through the door, or to have the string snap during the weekend.
(This is actually a major weakness of mine that I’ve somehow managed to skirt by while writing this blog? I’m going to be posting a call for more mods soon for people with expertise in some of the areas I’m lacking.)
6 notes
·
View notes
Text
madoka kaname rose bow tutorial!
super easy and super cheap! efurrykindofkat and i made this in under 24 hours, but granted it was rushed a bit. even if given proper time to dry, it shouldnt take more than a few days to make. everything under the cut!
heres what you’ll need (you can get all this at michales for like <$20):
model magic
brown paint
pink paint
white string
a pack of wooden dowels
foam board
fake flowers
part 1: the arrow
there are a lot of different ways you could make this, and the way we did ours is not specific to the bow. if you find another method for the arrow that you like better, im sure it would work with this bow too! anyway, heres how we did ours. this is the shape reference we used:

we traced out the shape onto the foam board like so (it can be any size you want):

and then used an exacto knife to cut it out! be very careful cutting it out, you want it to be nice and smooth and there are a lot of sharp curves. make sure to clean it up and shave down any rough edges after its cut out

we decided to put a layer of modge podge on to seal it more, and then we painted it! this was a super simple paint job, you could probably make it fancier but we just did a simple pink

we added another coat of modge podge, and thats all for the arrow! nice job!
part 2: the bow
for the bow, we made the basic structure out of small wooden dowels. the ones we used were pretty thin, id advise using thicker ones so the bow is sturdier. anyway, we just got like a small pack of 10, each were about a foot long, got them at michaels for like $3.
this is the shape reference we used for the bow:

as you can see, its split into about 7 parts. so you’ll need 7 dowels for it. the bottom two are slightly smaller, so cut those down a bit. what we did next was cut the ends of each dowel at a slight angle, so that they would fit together nicer! after they were cut to fit, we hot glued each one together. very advanced stuff. we know.

to make them a bit stronger, each joint was wrapped in string a bunch of times. it doesn’t matter how it looks at this point, bc each joint is going to be covered in model magic. so yeah! thats the basic frame of it. next you’ll want to break out the model magic. cover each joint as pictured, two of them should be large diamond shapes, and the others should just smooth things out. make sure you really blend them. after you’ve done that, you’ll want to use the model magic on the upper 3 dowels to shape the thorns! really blend those in.

now you’ll want to take the fake flowers and pick out the one that looks the nicest to you. also pick out a branch with some leaves that look right; cut off the leaves and flower head, etc. this was how our bouquet looked before we cut it apart:

at the very top of the center dowel and very bottom of the whole thing, you’ll want to use a bit of model magic to build up where the flower and leaves will sit. once you’ve made the shape, the flower head should have a small remnant of the stem you pulled it off, so press that piece into the model magic so you’ll be able to glue in the leaves and flower later on. in the end, the basic structure should look like this!

while all the clay on the bow is drying, use more clay to make the small diamond gems. they should all be about the same size; they’re going to go on the diamond shaped parts of the bow so make sure they fit! you’ll need 4 total. once those are dry, paint them pink and seal them with modge podge or something similar. once all the clay on the bow is dry, start painting! paint the whole thing brown.

then, take the gems you made and hot glue them on in the right spots. also take the flower and leaves, fill the little hole you pressed in earlier with hot glue, and stick the flower and leaves in each one! sorry the bottom of the bow is white, this was taken before the leaves were put in the bottom and that part was painted.

finally, take your string, cut it to whatever length you want, and tie it to the top and bottom of the bow. use hot glue so that the knots don’t move around.
that should be everything! enjoy your new bow!!!

208 notes
·
View notes
Text
Painting Clear Glass Gems | Cosplay Tutorials

To view this tutorial on my blog, click here ♥
Heyah! I’m writing a new tutorial, this time it’s a simple way to acquire gems for your cosplay needs. Not all gems come in every colour, shape and size, so if you can find a clear gem that is the right shape and size, you can easily colour it any way you want. For patterns or designs, visit my Amira pendant tutorial and work with that example, but if you want to paint your gem a single colour…keep reading! ♥
Materials: Clear Glass Gem | Nail Varnish in your desired colour


Step 1: ♥ Turn your gem curved side down, so you can paint the straight, back surface of it. This will create a coloured backing that will appear as though the whole gem is one solid, translucent colour ~ With your Nail Varnish in the colour you want the gem to be, paint several coats and avoid paint overflow onto the curved section. Add however many layers needed (I use between 4 and 6) waiting for each one to dry on its own. After all layers are dry and set, add a silver, metallic backing with either self-adhesive sticker paper or tinfoil (use any glue that dries clear) so if there were any spots that were missing a bit of colour, this will fill them in. This paper or metallic backing also helps when gluing or attaching the gem to other surfaces, should you get it wrong this way you won’t mess up the varnish colour. Important!!! When painting avoid bumpy or uneven streaks, aim for a smooth paint coat so the gem will be very perfect and natural ♥


Varnish Tips! ♥ For added shimmer and allure, try out shimmery varnish colours, or even metallic ones. The small glitter and shimmer in these will create beautiful reflections on your gems ♥
♥ Thank you lovelies ♥
49 notes
·
View notes
Text
Cosplay Wings (tutorial)
After much time finally got this done! I made this tutorial for those who want to cosplay w/ feathered wings but don’t have the money to buy professionally made ones. I’ve seen a few pairs online go for more than 100 dollars, so I’m here to show you how to make your own wings!

Ok so we’ll need some supplies before we start.

I bought all of the material (not including hot glue, scissors, and wire cutters) at my local craft store for under 30 dollars.
Be sure to get foam sheets, feathers, and ribbon in the same color. The size of you foam sheet should be big enough to fit one wing.
Also, don’t underestimate the amount of feathers you need!!! I’ve made this mistake and it’s not fun!

Also make sure you have a pattern of what you want your wing shape to be. I’ve sketched out some references, but you can find my printable templates here: http://tumblr-is-better.blogspot.com/2015/05/printable-wing-template.html

After figuring out what I would like, I drew the bigger pattern onto my foam. Trace and cut.

Pretty flimsy, right? Here’s how to add more stability:

I placed the wire on the edge of the foam sheet for one wing. Then I added hot glue over the top of the wire and cover it with the ribbon. This helps by covering up the wire so it doesn’t poke while being worn, and so that the wire stays put. It also makes for a nice place to glue feathers over.
It doesn’t have to be neat, since there will be feathers over it.

Save your scraps of foam.
From the scraps, I cut out two identical ovals. The length of each should be the same as the base of each wing.

I attached them to the wing, and added wire and ribbon around the edge. This base for the wings works better than making the wings as one piece. The base should sit right on your shoulder blades, making the wings look a lot more realistic.
Make sure they are attached at a slant, ribbon facing the inside. The side with the ribbon will be the inside or the “front” of the wing.

If the area where the wing attaches to the oval is flimsy and doesn’t stay in place (which is totally normal) bend a piece of wire into an “L” shape and glue it onto the part of the wing that slants downwards. Don’t forget to cover it in ribbon as well! (Sorry for bad lighting)

Now the time consuming part.. Feathers! I used an assortment of different sized feathers. Always start from the bottom layers and work your way up to the top.
Don’t cover the base with feathers. That will be done later.


Bend the wire in the wings to shape them how ever you like!
As for attaching the wings together, you will need elastic. I used clear elastic so the bands in between the wings were not visible. It turned out pretty well, but you might want to find fabric elastic that fits the color of your costume (if you’re wearing one) because clear elastic tends to break easily and it never lays flat.
I measured the distance between my shoulder blades. The wings do not have to rest on your shoulder blades, if they need be elsewhere, it will still work.

I cut two holes through the base using scissors and an exacto knife in the places that best fit my liking. Be sure that both holes on the first wing match up with the other wing. The holes should be directly through the ribbon, and behind the wire.
I did the same for the arm bands, but I made the holes farther apart.

When stringing the elastic through, don’t underestimate how much it can stretch. It’s better to have it shorter in the place between wings, so don’t be afraid.

Once through, I secured the elastic like so. If you’re using clear elastic put a layer of glue over the top of it. Clear elastic doesn’t stick to hot glue by itself. :/

Before attaching the arm bands, I measure the distance from my shoulder blade, around my arm, and back to the shoulder blade.
After the elastic is in and attached, I continued to cover the base with feathers.

Largest wings that I’ve made with this technique had a six foot wingspan. You can make these as big as you’d like.
I also didn’t give exact measurements since everyone’s will be different!
And done!

17K notes
·
View notes
Photo
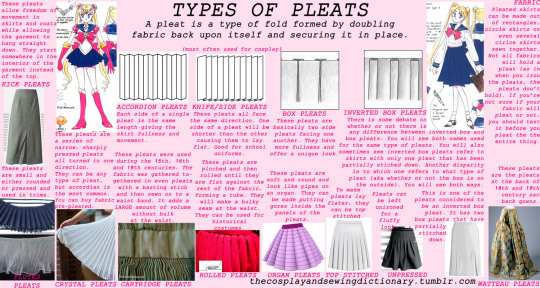
Here’s your one stop spot for everything pleats. General pleat source, rolled pleat source and crystal pleat source
1K notes
·
View notes
Photo


COLORFUL COSPLAY GEMS IN A SUPER HURRY!
I didn’t want to mess around with casting red gems for one of my costumes; I’m in a crunch and casting colored gems that look perfectly alike is a massive pain, and I actually LIKE resin casting! Enter a hunch of mine.
iDye Poly is a type of fabric dye easily available in the United States meant for dying synthetic fabric. I had a bunch of clear acrylic cabochons. Was it possible to dye them?
You’re looking at the results of five minutes of boiling clear acrylic cabochons from TAP Plastics in rather concentrated iDye Poly. They look nice and shiny just sitting on some white paper! Bonus: this is after they have been fully washed. With dish soap.
I just HAD to share this technique because I’m pretty sure someone else can get some use from it!
3K notes
·
View notes
Photo

Number Eleven of the Fatui Harbingers. Code name: Childe.
Photo by butter_cos (ig), wig by kabutowig (ig)
#genshin impact#childe#tartaglia#hoyoverse#cosplay#genshin impact cosplay#genshin cosplay#childe cosplay#tartaglia cosplay#ajax
1 note
·
View note
Text


I do not fear death. I only fear that my rage will fade over time. ⛓🩸
13 notes
·
View notes
Text


Allow me to be a stepping stone for hope.
#danganronpa#super danganronpa 2#nagito komaeda#dr#sdr2#komaeda#nagito#danganronpa cosplay#super danganronpa goodbye despair#cosplay#komaeda tag#komaeda cosplay
16 notes
·
View notes
Text


This world is rotten. 🍎💀
13 notes
·
View notes
Text


Blue hair, blue tie, hiding in your Wi-Fi 💙🎶
Pc: @kimchiii.p on insta
2 notes
·
View notes
Text


« God, why are you so dumb?? »
#dangan ronpa#drv3#kokichi ouma#cosplay#dangan ronpa cosplay#drv3 cosplay#kokichi ouma cosplay#ouma#crossplay
10 notes
·
View notes
Text


A beautiful rose has thorns! 🌹✨
#persona 5#ann takamaki#cosplay#p5#panther#persona 5 cosplay#ann takamaki cosplay#p5 cosplay#panther cosplay#anime#manga#persona#atlus#kawaii#otaku
16 notes
·
View notes
Photo


Beasty gimmie gimmie! 💜✨ Ph: @dan_seiter on insta
#vocaloid#cosplay#kagamine rin#luvoratorrrrry#vocaloid cosplay#rin#rin kagamine#giga p#gumi#gumi megpoid#kawaii#anime girl#anime
17 notes
·
View notes
Photo


Miku Miku ni shite ageru~ ✨💕
15 notes
·
View notes