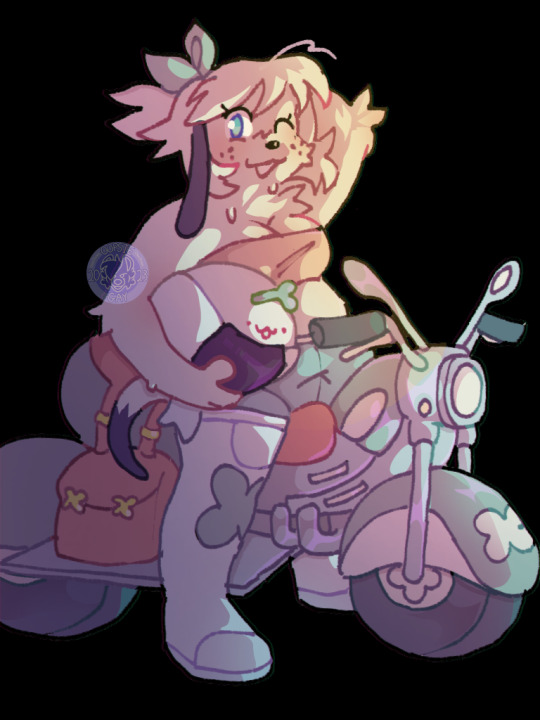
#// edited some details and added the watermark <3
Text
Commissions Open!
Thank you for your interest! Heres what you need to know:
I Will do:
Humans/Humanoids (object heads/elves/mermaids/etc)
Anthros
Ferals
Ponies
cannon x oc or self ship
fanart
complex/detailed designs
and more!
I will not do:
nsfw
rude/offensive gestures
hateful or bigoted art
Maybe:
• Gore (depends)
I maintain the right to turn down any commission for any reason
Pricing
I currently accept PayPal and Cashapp only. All prices are in USD
Full bodies:
Flat color: $50
Shaded: $65
Colored lineart: +$10
Half bodies:
Flat color: $35
Shaded: $45
Colored lineart: +$8
Busts:
Flat color: $20
Shaded: $25
Colored lineart: +$5
Each additional character is +50% of the base price*
*(except for busts, which are +75%)
If you have an idea for something not listed here, please ask!
Backgrounds
I have recently changed my tune about backgrounds. If you would like a background, let me know and i will tell you if i think im up to it. Complex backgrounds are a fee of +%50 as they take a lot of time. If you have multiple characters, the background price is calculated AFTER the price of the additional characters. It is up to me to decide what a complex background is.
Simple/abstract backgrounds remain free of charge. If i think a work would benefit from it, i will put a solid or swirly colored shape behind it and send you a version with and without the background so you can decide which you like better. You may request a basic background on your own.
TOS:
I retain the right to post your completed piece to any of my social medias to use as an example of my work and a testament to my reliability. I will credit you when I do.
All payments are non-refundable unless for some reason i am unable to finish your piece, or we get part way through the process and i feel that i am unable to do your character(s) justice.
You MAY:
Post your completed piece wherever you please WITH appropriate credit by either linking my page or simply stating my name and platform.
edit my art in regards to cropping for profile pictures, adding an overlay to fit a theme, and resizing to fit a platform better
You may NOT:
feed my hard work to ai
use it for anything NFT related
claim it as your own
remove my watermarks
use it commercially
What is the process?
It's pretty simple! Send me a dm with a photo of your character(s) and tell me what you'd like. Let me know if you need a few days to get the money, or if there's a time constraint (like if the piece is a birthday or holiday gift). If you don't have an idea for a pose, please include a brief description of their personality. If there's characters interacting, let me know their relationship to one another and their dynamic.
I will respond with a price and if you're ok with proceeding I will mock up a vague sketch so you can get an idea of what it would look like. This will be watermarked and it will not even be very recognizable as your character. That's because I have been scammed and ghosted in the past, even with a very rough and watermarked sketch.
After that you will send 100% of the payment in order for me to proceed. Do not send payment via friends and family. I don't want to be banned from paypal lol
I work on a first come first serve basis, but i may work on a piece while waiting for approval on another. I will let you know if there is someone ahead of you. Once payment is received i will message you frequently with updates and for approval. Once lineart is finalized, i will update less often in order to creater a better final reveal. Your final piece will already be glazed to fight against ai stealing my style.
Depending on my life circumstances, this whole process could take from 1-3 days up to a month. The later is very unlikely, and i will message you with updates if i feel i am taking too long.
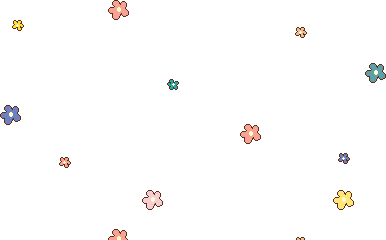
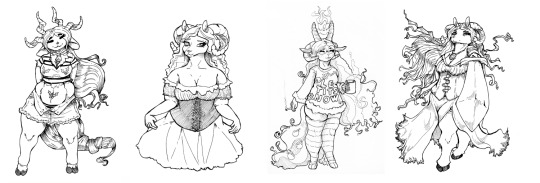
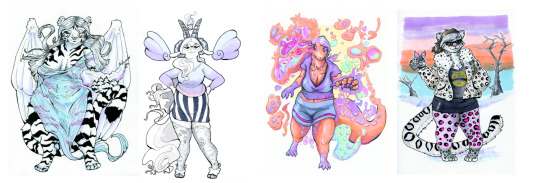
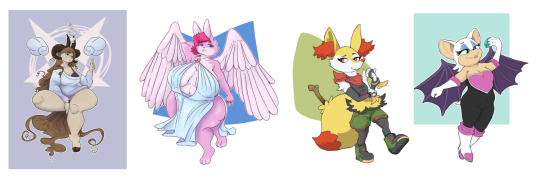
Examples of my work:
These are simply commissions that ive done in the past! I have many more examples of personal art on my blog


top to bottom: Bunyo and Sasha who belong to @/ilikecorndogs, Honey who belongs to to @/mei, and Solace who belongs to @/sundryd
61 notes
·
View notes
Text
Commision Info! [updated 1/12/2024]
See bottom of post for additional refrences!
○Commisions are ALWAYS open and I almost always have same day (24hr) delivery! I post my sfw art on tumblr and my nsfw art in an 18+ furry art site called e621. You can reach out to me through tumblr messages, discord, e6 messages, and telegram. Please read terms of use at bottom.
Tumblr: moth---4
Discord: oopsie-gay
Telegram: @oopsiethatsgay
E621: oopsie-gay
Prices are generally SET but there may be slight increases for very complex designs or scenes though this is rare.
I offer quite a large variety of things but if its not on the list please do not ask. The list is made for both your and my convenience.
○Fullbody- 65 (+30 for additional character #1, + 65 for ever character after)
○Halfbody-45 (+20 for additional characters)
○Icon-15 (no additional characters, intended for profile picture)
These are fully rendered (shaded) and have additional details to polish them.
These include a simple pattern or solid color background (like a pride flag or sunset)
Backgrounds can be added but they can vary wildly in price depending on what youd like. Example 1, a character at a cafe, with full veiw of desert display case and tables, +40-50. Example 2, a character on a couch, nothing but the back wall and a sliver of a coffee table, +20
Reference sheets are another can of worms! These can take much longer than regular commisions given the time and attention to detail needed sometimes.
○Furry Ref 80 Includes 2 veiws, front and back, along with a small pelt display generally used if clothes or pose is obstructing design, and both hand and feet paws, mouth, and eyes, and wings shown seperately if needed . Aside from that colors and name will be displayed.
○Big Pony Ref ((mare BASE only)) 65 (Includes 4 veiws of the pony and some additional boxes to showcase expressions. The cutie mark and colors will be displayed)
○Small Pony Ref 20 Any screenshot from the mlp show edited to fit your pony! Will NOT include background just your guy!
Telegram stickers are a new addition to my commision list! They come in PACKS and can not be bought individually. To clarify, these are emoji like stickers used in the messaging app Telegram and are NOT physically printed or intended to be printed.
○3 pack 20
○5 pack 25
○10 pack 35
Customs are CURRENTLY CLOSED but Ill keep the info up. They have one (1!) veiw with colors and are not as polished as my regular art. They are NOT shaded so that the design can have accurate colors showcased. Just because they are not polished does not mean low effort.
○Pony- 25
○Pony-(ON BASE) 25
○Furry- 70
(Sexual content warning ahead, purely to list what Im okay with drawing NO VISUALS) Scroll to the "🌟" to skip to Terms of use
YEAH OKAYS!
Sexual art (I have an e6 for a reason lol)
Nudity in any capacity
Blood
MILD gore
Marijuana usage
(For full list of spicy content thats allowed just dm!)
NO THANK YOUS!
Mecha
Human (including humanoids like anime cat girls)
Foot fetish
Pregnancy
Scat, pee, or barf
Vore
Age play
Fat fetish (normal overweight characters welcome! Just no fetish art)
🌟🌟🌟
Thank you for reading!! The TOS is next Id appreciate if you looked at that as well before messaging me
☆Terms of Service☆
My art can and will be posted wherever I please though I will not take credit for your character. You may use my art for profile pictures, backgrounds or PERSONAL use with credit. My art may NOT be used for anything commercial including youtube videos in any capacity, twitch stream layouts, subscriber, donation or sub alerts. You may not print, sell, or produce any merchandise with my art regardless of if its intended for personal use.
You can post the artwork anywhere or use it on your profile as long as there is CLEAR and OBVIOUS credit to me with a link of some kind. You canot use the art for profit, that includes prints, merchandise or use in videos or games in any capacity. You may not edit the work or remove the watermark.
No refunds! Due to my fast work pace and 24 hour turnaround, refunds are not an option as I would lose money and time on my work. If you are unsure of my limits, being fetishes or anything else please just ask. It will save alot of trouble to just be open and communicate. If clear communication is not recived, and the art is not up to your standards because of it, that is on you. I will always sends work in progress things and you must request changes when I give opportunities.
A small fee will be put in place for changes.
And one final word, I can and WILL take legal action if you attemt to profit from my work. Please understand this is my livelyhood and primary source of income.
Thank you for considering me for commisions! I really appreciate all of you that make my dream job possible


#digital art#art#mlp#oc#mlp art#mlp oc#pony oc#character design#furry art#furry oc#commisions open#commision#art commisions#reference sheet
45 notes
·
View notes
Text
RECOGNISING AI GENERATED IMAGES
(Disclaimer: This is not a foolproof guide as these softwares are constantly changing, but it is intended to help you learn things to possibly look out for.)
We've all heard "count the fingers, count the teeth" for AI generated images of people, but more and more frequently I see people sharing images of objects and scenery that are AI generated without realising it. These people are often vocally anti-AI but still get caught out. This post is not intended to shame or make anyone feel bad for not recognising AI imagery. Usually, AI images posted on platforms like tumblr are not tagged as AI; the OP is often fully intending to trick you just to gain some quick numbers, so it's not your fault that their tactics work. They're designed to be pretty at a glance and betting on you not looking any closer.
So, that out of the way: How can I spot and avoid AI Generated images?
Here's some things I've learned to pick up on, and now I can spot them pretty much on sight.
Full guide under the cut. Contains AI images as examples.
1. Source
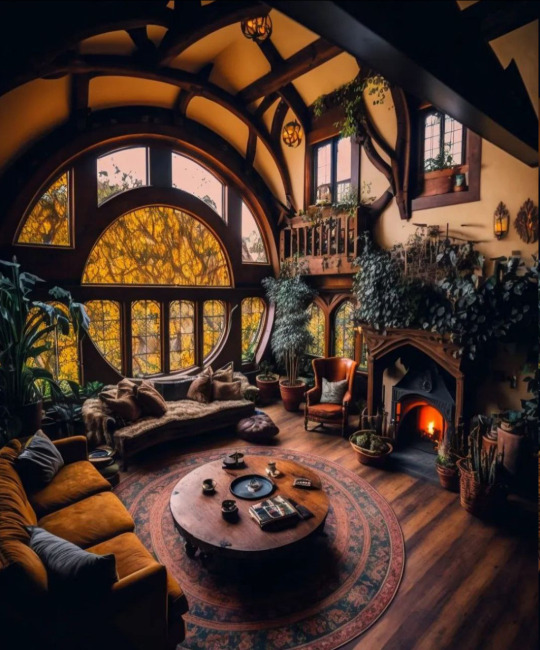
Your first easy step is to check if there's a source. Remember when everything on tumblr was just credited to weheartit?? This is the new worse version of that. If the image has no source in the description describing an artist, photographer, brand, location etc... check the original post.
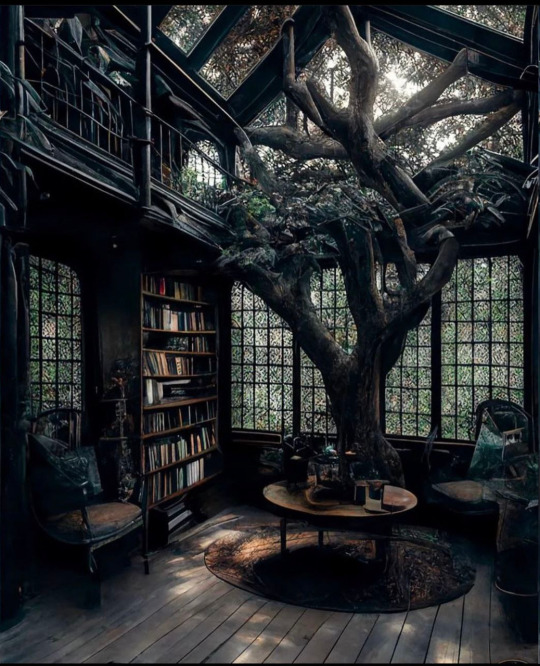
If there's nothing in the tags to indicate that it is art or a piece of photography or an advertisement, it could be AI. Sometimes the caption is just something generic or aesthetic like ~witchy cottage life~ etc. The tags above for the image below of the room with the tree are largely nonsense.
Important note: A watermark does not always indicate a photographer or artist: if you think it might be AI but it has a watermark, that will most likely lead you to the socials for the person who created the image using AI.
2. Visual Soup

Zoom. In. It sucks to feel like you have to get into the habit of pausing and closely checking the details of images on platforms designed for infinite scroll and quick engagement, but if you get into the habit of this, soon you'll be learning to spot AI at a quick scroll glance.
Generally, when you zoom in on a photograph, the details and divisions of where one object ends and another begins still stays the same, just out of focus. Zooming in on an AI image, the details become... soup. Why is that plant morphing into the countertops? Why is the tap floating? Why are there five thousand burner dials???

The same applies to art. Zooming in on art reveals things like brush strokes, pencil lines, pixels, imperfections and intentional small details. If zooming in reveals soupy details that don't look like intentional stylistic choices it could be AI.
3. Interior Design Disasters

One thing AI doesn't seem to be good at is separating the depth and layers of rooms full of furniture, and making things sit properly in their 3D space. Window frames are wonky. Chairs and tables are fused to each other, or to walls. Bookcases get narrower at one end when they really shouldn't. A little wonkiness is fine and expected in artwork, but when the whole thing isn't sitting right, it could be AI.
(Compare the white image on the right to these real photographs of a similar house, and notice how messy and nonsensical the AI image seems).
(Edit 03/06/2023: See also this abstract furniture that still has a proper sense of depth and doesn't merge into the background)
4. Toothpaste

I don't know what else to call this but midjourney effing loves it. I most commonly see this on things like AI generated objects, outfits and garments rather than scenery. It looks like the software has applied all the details with a piping bag. Weird, greebly swirls like it's hoping you won't notice if it adds enough visual noise. Notice it. It's AI. And it looks super fucking weird.
Midjourney also loves adding weird concentric circles to everything, which can be seen in the image example for Lighting below.
5. Giblets
What is that bowl of stuff?? What is on that shelf?? What's that pile of...things?? They're giblets. This is another prominent midjourney feature and another example of visual noise. Stuff it with details, and maybe the viewer won't notice that what they're actually looking at is a lumpy pile of nonsense that definitely shouldn't exist. Spot the giblets!
6. Lighting

This one is hardest to describe and to spot, but I often find that the lighting in AI images of scenery and objects has a flat, dream-like quality. Once you study it, it begins to feel distinctly unreal.
7. Names
Lastly, some people do state that an image is AI in their descriptions or tags, but might not do so in those exact words. If you aren't already familiar, here's the names of the most prominant AI generators as of May 2023:
Midjourney
Dall-E or Dall-E 2
Stable Diffusion
Deep Dream
Artbreeder
WOMBO
NightCafe
Lensa
Stablecog
BigSleep
Brands such as Bing, Google, Shutterstock and Canva are also bringing out generators
8. Multiple Angles (added 03/06/2023)
I forgot to add this earlier, but it's another very simple tell! If the images are objects, garments or rooms... are there multiple images in the post of the same object or location from different angles? No? Then it could be AI. The shoes used as Toothpaste examples above were part of a set of lots of different shoes, but of each design there was only one image. AI is Not Good at creating the same thing twice consistently.
(See these photographs of hair pins. The post contains a source link to the photographer's flikr account, where there are multiple images of each pin in different angles and lighting, confirming that they're real.)
If I think of anything else or some new tell starts to appear, I will come back and update this post, but for now, thank you for reading. My hope for this is that people will either share AI generated images less, or if they do, at least learn to spot and tag them so that those who don't want to see them (aka me!) can filter and avoid.
#AI#AI image#AI generated#AI art#anti AI#AI generatred images#how to avoid AI#how to recognise AI#i had to look at so many ai images to make this post and i hated every second i am so brave#I hope this is educational and helpful I really do!!
89 notes
·
View notes
Text
hi!! i'm [hesitantly] opening up 5 sketch commission slots for the rest of october! due to unforeseen expenses involving computer repair, i'm out of $200 and may not be able to pay all of my bills in full this month.
here's some examples of what to expect! pricing and my tos are under the cut, if these are something you're interested in please message me either on this blog [ @archnemossis ] or via my discord [ dirt#7356 ] <3


headshot: 5USD [ +2USD for colors ]
bust: 10USD [ +5USD for colors / additional characters ]
fullbody [feral]: 10USD [ +5USD for colors; additional characters are an extra 10USD ]
fullbody [anthro/human]: 15USD [ +5USD for colors; additional characters are an extra 10USD ]
payment will be required before the final commission is finished. i accept any form of payment through Paypal, Cashapp, or Venmo.
any minor changes requested will be done free of charge, even after the final product is provided. major changes will require a minor fee, which will be discussed when necessary. major changes include fully changing a pose, adding an extra character, altering all of the colors, etc.
receiving your finished piece may take up to a week, due to my current job and health constraints. you will be contacted if your estimated time for completion will be longer than a week!
full refunds are not available for these commissions, but partial refunds prior to receiving your finalized piece are available. any requests for a refund after obtaining your finished commission will be denied- but i am more than happy to figure out an alternative with you.
before any commission is finalized, i will send a watermarked image to you in the event you would like to make any edits or ask for any extra details. as started before, any major edits will cost an extra fee. if i do not receive a response requesting changes or input within three days i will continue working on the commission.
in order to provide the best work possible, i do require having clear and concise reference images for your commission. i am, however, willing to use multiple partial reference images in the event you do not have one to two succinct references available.
you may use your commission however you please, as long as you are not using it for commercial usage and properly credit me. unless discussed prior, i do not consent nor allow my art to be used for financial gain.
I WILL DRAW:
humans, anthros, ferals, ocs [fandom-based included], monsters, blood, mild gore, non-sexual nudity, nsfw [with age conformation], simple and complex designs
I WILL NOT DRAW:
any works promoting bigotry [racism, ableism, homophobia, etc.], hate speech, excessive gore, fetish art, incest, babyfur / pedophilia, real life people
#commisions open#commision info#comm tag#this post will be updated as slots get filled / as i update my tos#also this is going to be revlogged quite a bit. sorry#the formatting is a bit weird so!! i recommend checking out my carrd [on my pinned]
25 notes
·
View notes
Text
Comms: Open!
Hello! This post will just basically be the nitty gritty of all my commission information!
If you happen to be interested in my commissions feel free to continue on below! You’ll find my terms of service as well as pricing! -^^-
Comm examples post:
Commission ToS:
Payment and refunds:
* Payment is expected within 24 hours after verification of commission sketch
* ALL payments USD
* Payment will be taken through PayPal and Cash-app ONLY
* Non-payment within 24 hours will result in the commission being cancelled. Progress up to this point, if any, will be deleted.
* Refunds are available but vary depending on how much work is done
* Sketch: 90%
* Line: 50%
* Line and Flat Color: 15%
* Shading/More : 0%
General terms:
* When commissioning me please do so in a kind and professional manner.
* Please provide clear reference images, I do not accept text messages as reference no matter how detailed your texts may be.
* Please follow any and all rules or directions within my TOS policy.
* If I have accepted payment for a commission but find I cannot finish it for some reason i will either ask if you want me to draw another character of yours, or give you full refund.
* I have the right to increase the price if your character has a highly detailed design or if you want a very detailed illustration.
* My art is constantly evolving and improving which means there will be some small changes from time to time in my work (anatomy, coloring, lineart etc) please keep that in mind!
* By commissioning me, you automatically agree to my Terms of Service and is expected and obligated to follow them. You are also automatically promising that you wont request any paypal chargebacks.
Copyright / Usage terms:
As the Artist, I am allowed to:
* Promote myself with the artwork on any other places or websites.
* Post/display the artwork anywhere i want (on my Commissions page or Discord for example) but i will always give you proper credit as the owner of the character.
* Publish works with it.
As the commissioner, you’re allowed to:
* Re-upload the image with proper credits given to myself in the form of a link, user, or discord.
* Claim the right of your characters depicted in the commission[s] but NOT the art work
As the commissioner, you are NOT allowed to:
* Reproduce/using the artwork commercially (meaning making money of it in any way)
* Remove my watermark/signature.
* Edit/change the artwork without my permission.
Finally: BY ORDERING ANY SUGGESTIVE/18+ ART YOU ARE AGREEING THAT YOU ARE 18 OR OLDER.
[Now that that has all been addressed be can finally get into the good stuff!!]
Illustrations:
Headshot/ icon:
- Sketches: $2-5
- Lines: $5-8
- Color: 8-10
- Color with Shading: $10
- Matching icons: 25 [Fully rendered always]
Half body:
- Sketches: $7-10
- Lines: $15
- Color: $20
- Color with Shading: $30
- Additional Character: $10
Full body:
- Sketches: $15-20
- Lines: $30
- Color: $40
- Color with Shading: $60
- Additional Character: $10
Backgrounds:
- Included with commissions just up to you if you’d like it or not
- Please refrain from asking for complicated backgrounds
Turnaround time: 1-3 weeks
Emotes/Badges:
- $5 per emote
- $35 for 10 pack
- 50 for 20 pack
- Color with Shading: $60
- Please have the emotes you want picked out before you contact me
Turnaround time: 2-6 weeks
Reference sheets:
- Front view: $60
- +Detail Shot: $15
- +1 Prop/Pet: $15-20
- +Back view: $20
- +Alt Costume: $30
- Backgrounds are Included with commissions just up to you if you’d like it or not
- Please refrain from asking for complicated backgrounds
Turnaround time: 2-6 weeks
Tattoos:
In the case that any of the work i provided is wanted to be used for a tattoo a $15 fee will be added to the final total.
To place an order, please fill free to send me a message through discord or use my commission email [email protected] with a clear description of what you're looking for. If you have any reference images or specific requests, please include those as well.
I'm happy to work with you to create a piece that you'll love. I also offer discounts for customers who order multiple pieces. This discount can be anywhere between 10-20% depending on the commission.
Thank you for considering me for your art needs! Looking forward to working with you!
Best for:
* Undertale/skeletons
* Reference sheets/character sheets (see for price)
* Character design (bring your Oc or other characters to life!)
Will draw:
* OCs
* FCs
* Cannon Characters
* Ships
* SelfShips
* Light NSFW/suggestive themes
* Mild violence
* Angst
* LGBT+
* Icons
Not great but will try:
* Banners
* Furries
* Scalie
* Chibi icons
*semi realism
Absolutely not:
* Realism (for now)
* Overly complicated characters/designs
* Overly complicated backgrounds
* Heavy NSFW
* Heavy gore
* Mechas or Gundams
* Lolis or other child like characters in sexual or suggestive themes
Comm examples post:
If there is anything that I haven’t listed here feel free to shoot me a message about if I’ll be able to draw it or not
#comms open#commissions open#commission#commission info#comms info#digital artist#digital art#undertale au#au sans#sans oc#sans undertale#underverse#undertale alternate universe
2 notes
·
View notes
Text
TOKI GA KITA
I've decided I need to finally create some kind of order in the way I use social media!
And also use each platform differently so that I can motivate myself to actually use more than one!
1. Ko-fi // mythee - Project-focused vibe + mini shop
=================
Finished project/comms art: Medium resolution + you can donate any amount asking for a parody art of it
W.I.P.s with written details about the process, visible to everyone
Announce when I start a new project
MONTHLY: One or more of: A) Add something to a littol store for people to buy original art if they feel like it B) progress post on any of my longer running art projects C) Upload an old project that hasn’t been uploaded yet.
A folder for every "project" rather than a folder for every art type. This won’t be a portfolio website.

2. Tumblr // mytheetarecold - Personal vibe
=================
Finished project/comms art: Medium Resolution, Watermarked, write a funny littol poem to go with it, mention non-watermarked version on Ko-fi + you can donate any amount and I'll make a parody of it
Gift and doodle art: Posted normally
Announce whenever new stuff is added to Ko-fi
Interact with and promote mutuals content!
Reblog funny stuff, cool science stuff, scenery, animals, serious stuff and important matter discussions sometimes
Might also make posts like that (scenery/discussions etc)
3. Twitter // @mytheeee - Less words, snapshot view vibe
=================
Finished project/comms art: Low Resolution, Watermarked, link to other social medias.
Gift and doodle art: posted normally
MONTHLY: SUMMARY OF KO-FI POSTS WITH THUMBNAILS OF THEM
Interact with and promote mutuals content!
Retweet funny stuff, cool science stuff, scenery, animals, shitposts
Can shitpost too
Do those trending self-promotion things like Portfolio Day
4. Artstation // evergeneforest - "portfolio"
=================
Finished art: Medium resolution, short description, no fluff
5. Twitch.tv // mythee_stream_sediment
=================
How mythteriouth!
So here's my to-do list toward making all of these changes!
□ Remove WIPs and fluff from Artstation, cull the art shown there
Make proper square thumbnails and folders for these on Artstation
□ -> Neko at the Asase Shrine (comic)
□ -> Place to Unwind (comic)
□ -> Part 1 of Clash (comic)
□ Reorganize Ko-fi gallery into “projects” (unlike Artstation)
□ Unlock WIPs from Ko-fi
□ Make the Ko-fi donation system for parody art
□ Make a watermark thing that isn't too annoying (mossy?)
□ Schedule monthly calendar reminders to prepare monthly content
Wish me luck and please kick my ass if you don't see me editing this post with more stuff crossed off every week!
6 notes
·
View notes
Text
How to Remove Logo from Photo? 【Easy & Effective Methods】

Watermark is a way of protecting copyright. Sometimes you may want to use the original image for a different purpose, but you have added a watermark to it. Then it is necessary to remove watermarks in the photos. At present, the methods and complexity of removing photo watermarks are also different due to watermarks.
Have you ever taken a perfect picture, only to find that an unnecessary logo or watermark ruined the beauty of the picture? Whether it is the company logo, a copyright symbol or any other unnecessary logo, removing it can significantly enhance the visual appeal and usability of the image. We will show you some common tools and online AI photo editors, application scenarios, and some suggestions on how to remove watermarks from photos.

There are several ways to cleanup picture and remove logos from photos, from manual retouching technology to using professional software and online tools.
Using Photoshop to Remove Logo from Image Step by Step
1. Open the Image
• Launch Adobe Photoshop.
• Open the image with the logo you wish to remove by going to File > Open and selecting the image.

2. Select the Logo
• Use the Lasso Tool to draw a rough outline around the logo.
• For a more precise selection, you can use the Pen Tool to create a path around the logo, then convert the path to a selection.
3. Remove the Logo
• Once the logo is selected, you can remove it using several methods:
• Content-Aware Fill: Go to Edit > Fill, choose Content-Aware in the Contents dropdown, and click OK. Photoshop will automatically fill in the selected area with surrounding content.
Clone Stamp Tool
• Select the Clone Stamp Tool (shortcut S), hold the Alt key to sample a nearby area of the image, and then paint over the logo to clone the sampled area.
• Spot Healing Brush: Select the Spot Healing Brush Tool, make sure Content-Aware is selected in the options bar, and paint over the logo to remove it.
5. Refine the Edits
• If there are any imperfections after removing the logo, you can use the Healing Brush Tool for touch-ups.
• To blend the edited area seamlessly, you may need to adjust the color, brightness, or texture using Adjustment Layers.
6. Save the Image
• Once you are satisfied with the result, save the edited image by going to File > Save As.
• Choose the desired format and location to save your image without the logo.
Other Free Logo Removal Tools Online (Support Image & Video)
Online logo removal tools provides a convenient and user-friendly solution for removing logos from photos. These tools automatically detect and delete logos from images by using AI, and usually provide fast and satisfactory results.
Here are more details for each of the watermark removal tools you deserved to own.
iFoto Watermark Remover
iFoto Watermark Remover is an intuitive online tool that efficiently removes watermarks from photos using advanced AI technology.
It supports various image formats, and provides customizable settings to achieve accurate deletion. With its user-friendly interface and no need to download, iFoto can be accessed from any device.

Wondershare Filmora
Wondershare Filmora watermark remover aims at removing watermarks and logos from videos. With its intuitive interface, users can select and delete watermarks easily and seamlessly. This tool provides customizable settings for precise deletion, and allows users to preview the edited contents before saving.
Wondershare Filmora watermark remover is ideal choice for content creators and video lovers, which can ensure the professional appearance of video without distracting watermarks.

VideoProc Converter AI
VideoProc Converter AI logo remover uses AI to remove logos from videos. It provides advanced algorithms to accurately detect and eliminate logos, thus ensuring professional results.
Users can easily upload videos and start removing logo with minimal effort. With its intuitive interface and powerful AI capabilities, VideoProc Converter AI logo remover efficiently removes unwanted logos while preserving video quality.

EasePaint Watermark Remover
Easepaint Watermark Remover uses advanced algorithms to detect and remove watermarks seamlessly, ensuring high-quality results. Users can easily upload images or videos and apply the deletion tools with only a few clicks.
Easepaint Watermark Remover offers customizable settings for precise removal and gives users the option to preview their edits before saving. With its user-friendly interface and efficient watermark removal function, Easepaint Watermark Remover is ideal choice for anyone who wants to enhance images or videos by removing unnecessary watermarks.

inPixio Photo Studio Pro 12
inPixio Photo Studio Pro 12 is a multifunctional photo editing software, which is equipped with various tools and functions to enhance images. It provides comprehensive editing functions, from basic adjustments such as clipping to advanced functions such as noise reduction and object deletion.
inPixio Photo Studio Pro 12 was chosen for its powerful features and intuitive design, making it suitable for both beginners and experienced photographers. inPixio Photo Studio Pro 12 can produce amazing effects and simplify the editing process, making it an excellent choice for anyone who wants to enhance photos easily and accurately.

SoftOrbis Watermark Remover
What sets SoftOrbis apart is its intelligent algorithm, which not only detects and removes watermarks with precision but also minimizes any loss of image quality in the process. This is crucial for professionals and enthusiasts alike who demand pristine results without compromising on visual integrity. Furthermore, SoftOrbis offers a range of customization options, allowing users to fine-tune the watermark removal process to suit their specific needs.
In addition to its technical prowess, SoftOrbis excels in terms of usability. Its intuitive interface makes it accessible to users of all skill levels, from beginners to seasoned professionals. This accessibility, combined with its powerful features, makes SoftOrbis Watermark Remover the go-to choice for anyone seeking to elevate their images or videos by removing unwanted watermarks.

HitPaw Watermark Remover
HitPaw Watermark Remover emphasizes customization, allowing users to tailor the watermark removal process according to their own specific preferences and requirements.
In addition, its intuitive interface is suitable for users of all proficiency levels, which is helpful for seamless navigation and maximum work efficiency. This combination of versatility, accuracy and user-friendliness makes paw watermark remover the first choice for those individuals seeking to enhance their creative projects through effective and seamless watermark removal.

Notes:
These tools provide a series of functions ranging from basic watermark removal to advanced editing functions. It is very important to choose the tool that meet your specific needs and skill level. Please always make sure that you have the legal right to delete the watermarks from any content you process.
Step-by-step Guide: Removing Logos from Photos in iFoto (PC & iOS & Android)
Follow the step-by-step instructions of iFoto to effectively perform the logo removal process.
1. Upload Your Photo:
Please visit the website of iFoto Watermark Remover. Look for the upload option, which may be a button or a drag-and-drop area. And then select a photo file from the device. The recognized formats usually include JPEG and PNG.

Once you are selected, your photo will be uploaded to the platform for editing.
2. Mark the Logo
After uploading, the tool will show your photo. Highlight the logo with the provided marking tool. This may include simply clicking on the logo or drawing on it with your cursor.
Then, the AI will use this marking to understand which part of the image to analyze and remove.

3. Remove the Logo
With the logo marked, click the 'Remove 'button to start the process. iFoto will process the image, removing the marked logo and filling in the space with matching background details. This process is usually fast, but the time may vary according to the complexity of the logo and the background.

4. Download the Edited Photo without Logo
You will be able to preview the results once the logo is removed. If you are satisfied with the edited photo, please find the download options. Click to download the photo, which will be saved to your device without logo.
These steps are simple and clear, so that users without professional editing skills can easily delete the logos from photos. For the best results, make sure the logo is clear and use high-quality images where the logo is in sharp contrast with the background.
Conclusion
Removing logos from photos is not only for beauty, but also to enhance the universality and practicality of photos on different platforms. Whether it's social media marketing, product promotion, or personalization, logo-free images convey professionalism and authenticity. However, achieving seamless results requires appropriate tools and technology. Tools like iFoto provide users with the ability to remove logos seamlessly, ensuring that the final image maintains its integrity and is more suitable for various applications. This process is not just about removing an element; It's about turning an image into a multifunctional asset that effectively conveys its information and makes it stand out in a crowded digital environment.
People Also Ask
Can I remove logos from photos without compromising image quality?
Yes, by using iFoto Watermark Remover, you can remove logos while preserving image quality.
Is it legal to remove logos from photos?
The legality of logo removal depends on the context and the rights associated with the logo. It's essential to consider copyright laws and permissions before removing logos from photos.
Can I remove logos from photos on my smartphone?
Yes, iFoto App available for both iOS and Android devices that allow users to remove logos from photos directly on their smartphones.
Read the full article
0 notes
Text
How to Send Photo to Amazon Seller
In the dynamic world of e-commerce, where visuals play a pivotal role in attracting customers, sending high-quality photos to Amazon sellers is crucial for effective product listings. Whether you're a supplier, manufacturer, or a freelancer hired for product photography, understanding the process of sending photos to Amazon sellers ensures smooth collaboration and enhances the overall shopping experience for customers. In this guide, we'll delve into the step-by-step process of sending photos to Amazon sellers, along with best practices to ensure your images meet Amazon's standards.
Read More
Why High-Quality Photos Matter
Before we dive into the 'how,' let's briefly touch on the 'why.' High-quality product images are essential for several reasons:
Enhanced Visibility: Crisp, clear images grab attention and entice potential buyers to click on your product listing.
Improved Conversion Rates: Detailed and aesthetically pleasing images instill trust in buyers and increase the likelihood of making a purchase.
Reduced Returns: When customers have a clear understanding of the product's appearance, they are less likely to return it due to mismatched expectations.
Brand Reputation: Consistent, professional imagery reflects positively on your brand, signaling credibility and professionalism to customers.
Step-by-Step Guide to Sending Photos to Amazon Sellers
Step 1: Capture High-Quality Images
Before sending photos to Amazon sellers, ensure that your product images meet Amazon's image requirements. Here are some key guidelines to follow:
Use a high-resolution camera to capture sharp images.
Opt for a neutral background that doesn't distract from the product.
Include multiple angles and close-up shots to showcase product details.
Avoid adding watermarks, logos, or promotional text to the images.
Step 2: Organize Your Files
Properly organizing your image files makes it easier for Amazon sellers to navigate and use them for product listings. Consider the following tips:
Create separate folders for each product or product category.
Use descriptive file names that include the product name, variant (if applicable), and angle (e.g., product_name_color_angle.jpg).
Compress large image files to reduce upload/download times without compromising quality.
Step 3: Communicate with the Seller
Before sending the photos, establish clear communication with the Amazon seller regarding their specific requirements and preferences. Discuss aspects such as:
Preferred file formats (JPEG, PNG, etc.).
Any specific dimensions or aspect ratios required.
Additional shots or angles they may need for the product listing.
Deadlines for submitting the images.
Step 4: Choose a Secure Transfer Method
When sending photos to Amazon sellers, prioritize security to protect sensitive data and intellectual property rights. Consider the following secure transfer methods:
Secure File Sharing Platforms: Utilize reputable file-sharing services like Dropbox, Google Drive, or WeTransfer, which offer encryption and password protection features.
Encrypted Email Attachments: If sending files via email, encrypt them using password-protected ZIP files to prevent unauthorized access.
Step 5: Double-Check for Quality and Accuracy
Before finalizing the image transfer, conduct a thorough review to ensure that the photos meet the seller's requirements and adhere to Amazon's guidelines. Pay attention to the following aspects:
Image resolution and clarity.
Consistency in lighting and color accuracy across all photos.
Correct product variants and angles.
Absence of any visual imperfections or distortions.
Step 6: Follow Up and Provide Support
After sending the photos, follow up with the Amazon seller to confirm receipt and address any additional requests or concerns they may have. Offer ongoing support to ensure a smooth collaboration and resolve any issues promptly.
Learn More: Product Photo Editing Service
Best Practices for Sending Photos to Amazon Sellers
Be Responsive: Promptly respond to seller inquiries and requests to maintain a positive working relationship.
Respect Intellectual Property: Obtain necessary permissions for using trademarks, logos, or copyrighted materials in the product images.
Stay Organized: Maintain a systematic approach to file organization and communication to streamline the process.
Stay Updated: Keep abreast of any changes to Amazon's image guidelines and adapt your practices accordingly.
Seek Feedback: Request feedback from sellers to continually improve the quality and effectiveness of your product images.
The Importance of Amazon's Image Requirements
Amazon has specific image requirements that sellers must adhere to for their product listings to ensure consistency, professionalism, and a seamless shopping experience for customers. These requirements serve several purposes:
Uniformity: Standardizing image specifications across product listings ensures a cohesive browsing experience for customers, making it easier for them to compare products.
Clarity and Detail: By mandating high-resolution images with clear visibility of product features, Amazon ensures that customers have a comprehensive understanding of the products they're interested in.
Mobile Compatibility: With a significant portion of online shopping occurring on mobile devices, Amazon's image requirements prioritize mobile responsiveness, ensuring that images display properly across various screen sizes and resolutions.
Brand Integrity: Adhering to image guidelines helps maintain the integrity of brands and prevents misleading or low-quality visuals from detracting from a seller's reputation.
Tips for Meeting Amazon's Image Requirements
To ensure that your photos meet Amazon's standards, consider the following tips:
Image Size and Resolution: Amazon recommends images with dimensions of at least 1000 pixels or larger in either height or width to enable zoom functionality and maintain clarity. Aim for a resolution of at least 72 pixels per inch (PPI) to ensure crispness.
Background: Use a clean, white background for product images to minimize distractions and focus attention on the product itself. Avoid using borders, watermarks, or additional graphics in the image.
Product Placement: Center the product in the frame and fill the majority of the image area with the product to maximize visibility. Include multiple angles and close-up shots to showcase different features.
File Format: Save images in JPEG (.jpg) format with minimal compression to preserve image quality while keeping file sizes manageable. PNG (.png) format is also acceptable for images with transparent backgrounds.
Color Accuracy: Ensure that the colors in your images are true to life and accurately represent the product. Avoid oversaturation or alterations that may mislead customers about the product's appearance.
No Additional Text or Graphics: Amazon prohibits the inclusion of text, logos, watermarks, or promotional overlays in product images. The focus should be solely on the product itself without any distractions.
Primary and Secondary Images: Designate one image as the main product photo, which will appear in search results and product listings. Include additional images to showcase different angles, features, or variations of the product.
Image Cropping and Editing: Use image editing software to crop, resize, and adjust images as needed to meet Amazon's specifications. However, avoid excessive editing or manipulation that may misrepresent the product.
Conclusion
Sending photos to Amazon sellers is a collaborative process that requires attention to detail, clear communication, and a commitment to quality. By following the step-by-step guide outlined in this article and adhering to best practices, you can ensure that your product images meet Amazon's standards and contribute to the success of your online listings. Remember, compelling visuals are often the difference between a browser and a buyer in the competitive landscape of e-commerce.
1 note
·
View note
Text
"What's your drawing process? Care to show a tutorial of how you colour, shade and render?"
I don't really have the energy to go into detail (visually at least) but I'm happy to show my general process and explain what I do for each step.

1) I draw the rough page with "prelim" sketches, using a 10px ink tool in red. These are usually just stickfigures with ears, eyes and a few features that differentiate them, in the rough poses I need them to be in. The simplicity means I can move things around easily. I also add prelim text-boxes to get an idea of how much space I need for dialogue.

2) I draw over the prelims with the actual sketch, using a 1px sketch tool in black. When drawing over sketches of any kind, I put the sketch at 9-11% opacity so it's just visible. It's harder to make mistakes that way and forces me to be more careful with my lines. Here I also add the other panel lines and keep the prelim text boxes.
3) I line over the final sketch using the same sketch opacity rule, for the character illustrations. The lines start out rough initially as I use a mouse and thus can't draw with pen pressure, so once the lining is done I erase and add to the lines to simulate line weight and make it look cleaner.
4) I begin colouring by first using the selection tool on the areas outside of the character lineart, then inverting it so it contains all of the character. This is easier than directly selecting each section of the character.

5) The selected section is filled out with the character's base/main colour. I usually do this with accessories turned off, as they are on a different layer (ie Miltei's blade and Ash's necklace). Then I make a hair layer, eye/mouth/scars layer, and 1-2 marking layers, in that order of dominance. These are set as clipping layers to the base colour layer so I don't have to worry too much about going beyond the lineart. I just use the pencil tool at whatever size needed for colouring, and at 5 px for lineart.

6) I finish the accessory layers and colour the inner lineart to simulate depth and connection between certain body parts. Eyes receive "eye lights" (white dots of varying sizes at a low opacity) to simulate eye reflectiveness.

7) I then line the background using the same lineart rules/process established earlier. (Ignore that it's been coloured already idc)
8) The base colours are added for the background. Some sections get rendering before others.

9) Final colouring and extra details added. I usually add some shading or details to suggest depth and texture.

10) Final tweaks; ambience! Skyrays like the ones shown are done by drawing a large beam of yellow light and blurring it a ton. Then I do it again. On the second layer I add thin yellow lines using the spread tool. Then on luminous layers I add little dust particles like in the sunbeams you'd see in real life (though usually you can only see the dust up close).

11) I import the page into CSP and rewrite the dialogue using the prelim text boxes as a guide. I get them in the shape I want, then draw the speech bubbles using CSP's bubble tool. It's set to a sketchy outline to make the bubbles look a bit rough. These are coloured to match the character speaking, as are the text. The text and bubble layers are then reimported to SAI and the watermark is added. And we're done!

extra notes:
1) Eyes are generally drawn on a separate layer to the rest of the lineart, and pupil lines on yet another layer. This makes it easier to edit them and colour them without accidentally interfering with the other lineart.
2) There are rules I follow with how I do eyes and eye lights, but it's hard to explain. If I make an eye tutorial I'll make sure to go into plenty of detail about it.
3) I don't usually merge layers unless I know there's no reason to keep them separate. Those eye lineart layers always stay separate from other lineart.
4) The panel/page outlines are never on the lineart layer. When selecting the lineart so I can colour, I just draw small lines to connect the lineart that goes into the panel outlines. This is in case I need to edit the lineart position or something like that.
5) How I actually approach lineart changes on a case-to-case basis. Sometimes I'll do hair first, or body first, or ears first, sometimes I draw them all on different layers because of a complex pose, etc. I almost always draw eyes and accessories last though.
6) Preferred font is comic sans (thought I use both upper and lowercase as purely uppercase is irritating to me as a writer) for readability. I use a mix of other fonts for varying purposes.
0 notes
Text
Blog Week 5
Reflection
This week we focused on a lot of experiencing immersive experiences ourselves and discovering what we valued in performances.
In Tuesday's class, I got feedback about my original music choice, exhilaration by Solee. Through exploration, it was shown that the music chosen was not fast-paced enough and did not have a clear enough climax. I was steered toward looking into the sub genre of dubstep music within the electronic music genre. I was fixated on picking electronic music as I felt like it would most effectively pair with creating exhilaration within the viewer. I was directed into looking at Nero and delta heavy. After listening to Guilt by Nero I really liked the crescendo of the music and thought I could strongly edit a series of videos to the music. The only downfall was the song included lyrics and although they were effective I thought the added layer of detail in the music might take away from my video work. Due to this I look into a lyric-free version of the song and found Guilt ( in the style of Nero) karaoke version by all hits gold.
In Thursday’s class, we went to the Capitol Theatre and watched all the Pharos works within the class. Although I am not using the Pharos lighting software it was still helpful to look at my peer's work and see their creative outlook on how they created an immersive experience.
Research
Academic
In a lot of my previous academic research prior to this week, I have looked into the boundary between exhilaration and fear. In Steve W Parry's research article, How should we manage fear of falling in older adults living in the community? The article goes into the helpful ways adults have been seen to overcome their fear of falling. They go to how cognitive behavioural therapy is seen to be highly effective. CBT ( cognitive behavioural therapy) aims to make patients recognise their worries, challenge them and learn strategies to cope. CBT is learning to look at stressful stimuli in a different light. With knowledge from this article, I plan to think of how I can incorporate stressful stimuli in my performance but make them seem more friendly as the video piece goes on to allude to the viewer they are not actually a treat, similar to what CBT does.
Creative Practice
How I have been approaching my work this week has included a lot of brainstorming and storyboarding. I have been listening to my chosen music Guilt ( in the style of Nero) karaoke version every time I have had the chance and visually how I want my project to look. After this, I will jot down some brief concept sketches and words of what concepts and visuals I have been thinking to include. This week has included a lot of troubleshooting and being realistic in terms of my project. I can tend to be too ambitious in creative projects and stray from a sense of was can be effective but reasonable.
Technical
Unfortunately I had to change my software from Resolume to touch designer. Without the full licensed version of Resolume, it exports with a watermark. Touch Designer can be used for non-commercial purposes if the image resolution is 1280x1280. I have fixed my compositions in after effects to be 1280 x 720 to match. I have been using this week to further progress in animating some of my visuals within after effects. I had some issues importing music and hearing it within after effects originally but after some troubleshooting within the audio hardware I was able to fix the output so I could line up my animations to the music effectively. The song I have chosen goes for 4 minutes and 4 seconds although around the 2:40 mark, there is potential for the song to be cut and with assistance in sound editing be made not abrupt and appear as an organic ending to the song. Although I aim to see if I can edit the video to finish at 4 minutes and 4 seconds as the song includes a nice secondary climax at the 3:40 mark that I would like to utilise to create further exhilaration within the audience. I have been watching a lot of tutorials from creators in terms of after-effects. The videos I have watched this week are included in the bibliography.
Progress
This week was focused on narrowing in on the concepts for my project. I was able to start physically mapping out my project within after effects and constructing a projection mapping export within touch designer. I picked my chosen music to go along with my constructed video piece Guilt ( in the style of Nero) karaoke version by all hits gold.
Bibliography
Layered logo motion design animation in After effects tutorial (2022) YouTube. Available at: https://www.youtube.com/watch?v=a1W-fIaQR-s&ab_channel=MoveShapes (Accessed: 19 August 2023).
How to create the silhouette music video effect in premiere pro (2022) YouTube. Available at: https://www.youtube.com/watch?v=Umz9T7yVP7Y&ab_channel=FelixTheCreator (Accessed: 19 August 2023).
Create line path animations in After effects | tutorial shorts (2022) YouTube. Available at: https://www.youtube.com/watch?v=rYBq709OnwQ&ab_channel=SonduckFilm (Accessed: 19 August 2023).
Simple motion visualisation – Touchdesigner tutorial 55 (2022) YouTube. Available at: https://www.youtube.com/watch?v=QGuquFiInqY&ab_channel=bileamtschepe(elekktronaut) (Accessed: 19 August 2023).
Make liquid lines in after effects - after effects tutorial - no plugins - liquid animation tutorial (2022) YouTube. Available at: https://www.youtube.com/watch?v=WrZO-iV0LwI&ab_channel=AvnishParker (Accessed: 19 August 2023).
Guilt (in the style of nero) [karaoke instrumental version] (2013) Spotify. Available at: https://open.spotify.com/track/551SLzLemY8nNoemNlywTG (Accessed: 19 August 2023).
Parry, S.W., Finch, T. and Deary, V. (2013) How should we manage fear of falling in older adults living in the community?, The BMJ. Available at: https://www.bmj.com/content/346/bmj.f2933.short (Accessed: 19 August 2023).
0 notes
Text
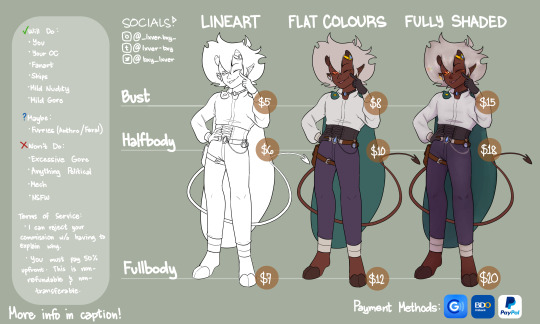
(Emergency) COMMISSIONS OPEN!!!!
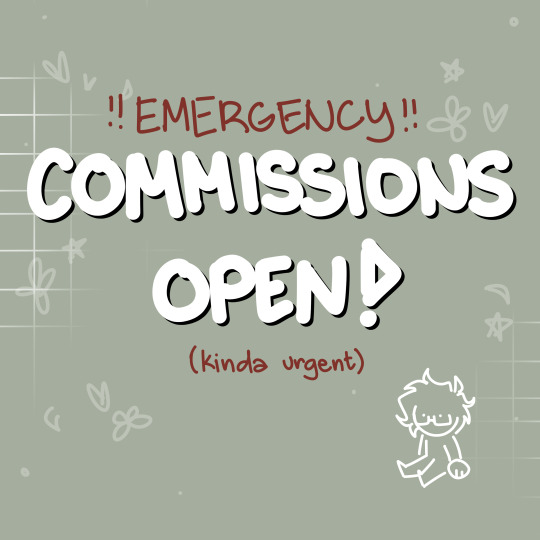
Hi!!! I was actually planning to open commissions at a better time but unfortunately we're going through a rough patch rn and any extra help would be very appreciated!
Even if you can't commission me, just interacting with this post by liking, commenting, and sharing would help me so much!
Again, sorry for not posting very much! Like I said above, we're going through some health+academic/financial issues so I haven't had much time or energy to draw, but I'm back now and I'll be doing my absolute best to give you (almost) anythinf you want >:)
Thank you all so much for the support, I love every single one of you that are still here <333
Now, to the post itself.
For the people who can't read my handwriting on the last slide, here's what I wrote:
~~~
✅ Will Do:
- You
- Your OC
- Fanart
- Ships
- Mild Nudity
- Mild Gore
❓Maybe:
- Furries (Anthro/Feral)
^ This will depend on the design </3
❌ Won't Do:
- Excessive Gore
- Anything Political
- Mech
- NSFW
Terms of Service:
- I can reject your commission without needing to explain myself
- You must pay 50% upfront. This is non-refundable and non-transferable.
Payment will be done through Gcash, BDO, or PayPal.
~~~
And here are some extra notes I didn't mention in the post:
- I accept (detailed) OC descriptions, but a photo is preferable. Even a picrew, a pinterest board, or collage helps!
- You won't be added to the waiting list until you pay the 50% downpayment.
- Don't be afraid to point something I got wrong out! I am still here to give me something you will like!!
- I'll most likely be posting your commission on my accounts at some point (with a very big watermark over it, of course). If you don't want me to, please inform me before hand :D
- THESE ARE FOR PERSONAL USE ONLY!! No commercial or NFT use!!!!!
- That said, please don't try and repost these as your own! I will be very sad
- For more examples, please check my instagram (@_lxver.bxy_)! I'll be posting some of my art from there on my tumblr as well to make it easier for yall :)
That's all! If I have anything to add I'll be editing the caption later
If you have any questions, feel free to DM me or comment :)
#fanart#digital art#commissions#taking commisions#commission sheet#open commissions#emergency commissions#commission info#art commissions#commission prices#medibang paint#OC#original character art#original character
1 note
·
View note
Text
Download acdsee photo studio ultimate 2019

#Download acdsee photo studio ultimate 2019 manual#
#Download acdsee photo studio ultimate 2019 archive#
#Download acdsee photo studio ultimate 2019 full#
#Download acdsee photo studio ultimate 2019 software#
#Download acdsee photo studio ultimate 2019 Pc#
ACDSee Ultimate is a popular photo editing app that is compatible with. With a noteworthy cluster of programmed capacities intended to keep your work process streaming, a large group of new channels to keep the imagination coming, and brisk access to the cloud, ACDSee gives you phenomenal productivity. Download Mask Photo Editor Face Camera 2020, make beautiful neon mask photography. The product is pressed with devices to enable you to sort out your photos, immaculate your best, and move your loved ones. Dealing with your developing photo accumulation has never been this easy. You can even access the ACD Systems‘ Community and video instructional exercise asset focus to take advantage of the product.ĪCDSee Photo Studio Standard enables photographers to complete the majority of the fundamental components of the imaginative photography procedure and appropriation in one spot. It gives various noteworthy highlights including face location and facial acknowledgment, customisable console alternate ways, and that’s just the beginning. ACDSee Photo Studio Ultimate 2020 Crack freeload combines GPU-accelerated layers, RAW editing, and world-class digital asset management with enough agility.
#Download acdsee photo studio ultimate 2019 Pc#
It gives you an amazing arrangement of editing and photo the board instruments for your Windows PC to help open your innovative potential.ĪCDSee Photo Studio Ultimate 2019 gives you the devices to build efficiency, push inventive limits, and work innovatively.
#Download acdsee photo studio ultimate 2019 manual#
Features edit quickly help easily remove various distortions - available with a manual in detail and the training program.Comprehensive Digital Asset Manager and RAW Image EditorĪCDSee Photo Studio Ultimate 2019 is a complete computerized resource director and RAW picture editor with layers.
They can be customized by adding contact information, company logo, as well as other information relevant to the business activity of the user. ACDSee Photo Studio Ultimate 2019s Face Detection & Facial Recognition tool will.
The album template HTML created to meet the needs of professional users. Downloads 2002 Last checked 2 hours ago Date uploaded 3 years ago.
Tool Shadow / Highlight allows you to only lighten the dark areas of photos, shade too bright or do both at the same time.
Watermarks on photos with graphics or text to reflect copyright and ownership, as well as the ability to impose up some images on certain business information.
ACDSee supports IPTC integrated to interact with PhotoShop.
Edit a series with thousands of photos in when using many functions.
Integrated support DNG (Specification digital negative) RAW format.
The ability to mark visual allows you to quickly sort and select the desired image.
#Download acdsee photo studio ultimate 2019 full#
ACDSee Photo Studio Ultimate support color management full color configuration ICC and ICM.
#Download acdsee photo studio ultimate 2019 software#
Powerful tools to handle the RAW format gives the user full control over images with precision tools for adjusting white balance, various defects, sharpness and noise different. ACDSee now offers its software as a one-time download for 229.98 or as a subscription, starting at 89 per year (or 8.90 per month).Support RAW format for advanced digital cameras of Nikon, Canon, Konica-Minolta, Olympus, Fuji and Pentax.The main features of ACDSee Photo Studio Ultimate Products help significantly simplify the process of handling digital images from beginning to end. In addition, support and processing RAW files is provided, you have the tools to systematize strong, as the directory and the category custom function, quick edit, visual bookmarks, and supports color management for configuration ICC and ICM to meet all the needs of professional users.
#Download acdsee photo studio ultimate 2019 archive#
Products ACDSee Photo Studio Ultimate lets you view, edit, sort, publish, and archive the catalog photo. The program also provides batch processing quickly a large number of files with visual methods effective to assign meta tags for images. ACDSee lets you work with digital photos, RAW images, and supports more than 100 image file formats. ACDSee is a program function is designed for both professional photographers and amateurs. ACDSee Photo Studio Ultimate:ĪCDSee Photo Studio Ultimate 2019 is the perfect combination between support layers, supports image processing is GPU accelerated, supports transparency with all the function adjust the picture from edit mode. Download ACDSee Photo Studio Ultimate 2022 v15 - Design software working with digital photos, RAW images, and supports more than 100 image file formats.
0 notes
Photo
I’m looking to take some commissions! I have a bit of spare time coming up soon, and I could use a little extra money
For commission inquiries, email me at [email protected] or PM on my social media.
tl;dnr: Row 1 / 2 / 3 = $35/$60/$50
More details below ᏊºัꈊºัᏊ
Examples given above are approximate starting examples for the prices listed below, and shown as an example of skill level and quality.
Traditional Inked Lines* (First Row): $35+
Traditional Coloured Markers/Mixed Medium*,** (Second Row): $60+
Digital Art (Lines, Flats & Light Shading) (Third Row): $50+
Sequential Art (sequential edits, small panel comics, full pages, etc...): By request (minimum of twice the listed price above of the equivalent medium, but likely more as these are often time consuming projects).
I don’t change charges for half bodies/full bodies, etc... The art is what it is, if you want to specify one or the other, you must do so at the start.
* For traditional art, I can mail you the finished product, at your expense. I would scan it before sending it to ensure there is a copy immediately available (and in case it is lost in the mail). I typically do not digitally touch up a piece, so the original and the posted version will usually be the same (but I can also digitally touch up pieces to ensure quality standards). However sometimes there are small imperfections in traditional art. If this is a concern for you, do not ask for traditional art.
** For coloured/mixed medium, I am limited to colours I have, or can blend. If you require a specific colour matched for your design, I can hunt it down but this will have to be at an additional expense of supplies.
Prices are the starting point for a single character or other equivalent subjects (like backgrounds, or large objects like a motorcycle). More complex designs or additional characters/subjects will be at additional cost.
Conditions
Payment up front before work starts. I use paypal.
All prices listed are for personal use. If looking for commercial use in any capacity, prices will be negotiated at that time.
I only plan to take 1 commission at a time, and unless something happens I should be able to turn it around in a week or so (usually less). I reserve the right to take longer, but if it will be longer than a week I will give you some warning (unless I am incapacitated or something). I will only charge once I am ready to start your art
References are extremely encouraged! It doesn’t have to be a professional ref sheet, a scribble by you with some colours added in mspaint makes a world of difference over nothing.
Art can be posted anonymously.
Art can be unposted, but if so, let me know immediately: this will be at an extra fee (posting art draws interest to artists, so working on a piece that is not shared is at a premium).
NSFW is permitted, but see below for additional conditions.
Digital Art
I will share with you, watermarked, once I get to the lines and allow a chance for minor edits. I will only do major edits if an error was made on my part.
Traditional Art
What you see is what you get - if there is an error on my part then alterations can be made. I can do some touch-ups digitally to correct mistakes (but that would not be reflected in the physical piece).
NSFW Art
I will do artistic or explicit nudity. All at additional cost: I have a child, and will need to use my very rare & limited spare time when she is not around to work on this.
Soft kinks are fine to ask about. Hard kinks are a hard no.
Requests for underaged characters, aged up or otherwise will result in a hard no & a hard block.
Posted July 7th/22
35 notes
·
View notes
Text
ps tutorial: how to make a custom shape for watermarks and other stuff.

So I've seen way too many people not use watermarks on their gifs because they feel the need to type it out manually each time (which, let's admit, can be a bit of a headache, considering how small watermarks tend to be). This of course, risks their work being stolen and reposted (sucks that we have to do this but reposters are ugly </3) and their content stolen from them, so today I will be showing you how to make a custom shape for your watermark! What this essentially means is that you can simply save your watermark as a shape and use the custom shape tool to simply add it in a jiffy! This also lets you make your watermark a bit stylish if you want to and not have to assemble all that shit each time.
Requirements; basic knowledge of photoshop tools and editing language.
Tutorial below. This is long and pretty image heavy, and make sure to zoom into the pics to see what exactly I'm doing!
STEP I.

↠ Okay so start off with a blank canvas. I use a 1280 px x 1280 px to ensure that my watermark never looks grainy even if i'm using it on bigger sizes of photos. a 500px x 500px will also do for this, but make sure the canvas isn't too small. These are my settings:
STEP II.

↠ So this tool (custom shape tool) is what we're gonna be working with for this credit.
↠ Okay, so assemble your credit the way you want it to look. For me, I simply used some simple text and symbols — you can make it as simple or complex as you'd like, this area is completely based on your creative freedom. As you can see in the layers panel below, I have two separate layers.

↠ now convert all the layers it took you to make your watermark into a smart object.

STEP III.

↠ Now use the quick selection tool to select your watermark, the right click on the selection and select make work path. This is essentially the equivalent of tracing out something with the pen tool, but easier :]

↠ Now set the tolerance to 0.5 pixels, and do not use any higher number than this, because 0.5 px ensures that the shape will be well defined and have all the details properly shown.

↠ As you can see in the image, a blue outline will wrap around your watermark, after which you have to go to edit → define custom shape.

↠ So as you can see, you simply name your shape and then click on OK. Then go to the custom shape tool and click on the little settings icon on the top menu bar (as you can see in the image above) and select "definite proportions". This will ensure that your watermark will have the correct dimensions every time you use the shape and won't look well,,, wonky.
STEP IV.

↠ Now there's nothing else to do! :) Simply select the custom shape tool and drag over the canvas and set it to as large or small as you'd like! Make sure that there's no stroke and choose your fill color as whatever color you want your credit to be. (you can check the settings I used in the above image).
and you're done! adding a watermark has never been easier, and this method works for basically any shape you want to make, not just watermarks! have fun trying it out and if you have any queries, feel free to send me an ask! :D
#ps help#photoshop resources#watermarks#quirkyresources#yeahps#itsphotoshop#resources#skz#kpop#this was to pass time hehe :D#*.& tutorial
251 notes
·
View notes
Text
#showyourprocess
From planning to posting, share your process for making creative content!
To continue supporting content makers, this tag game is meant to show the entire process of making creative content: this can be for any creation.
RULES - When your work is tagged, show the process of its creation from planning to posting, then tag up to 5 people with a specific link to one of their creative works you’d like to see the process of. Use the tag #showyourprocess so we can find yours.
sabrina @lanwangiji tagged me to show how i made my zayn’s birthday edit! check out her explanation on this mesmerizing zayn’s edit
1. PLANNING
It’s Zayn’s birthday, I ought to make something because so far I have made birthday posts for Louis, Niall and Liam. I didn’t participate in his birthday challenge so I had more time to create something for his birthday. I saw this post by @spaceniall and instantly fell in love with it. It's so clean, so neat, an amazing edit. I had that post tagged for inspo and because my Louis’s birthday edit was a bit “grand”, I thought I should make something simple.
I went to look for some photos of Zayn everywhere. Literally e v e r y w h e r e. I saved every photo I found beautiful and there were a LOT. I asked my friends for adjectives that describe Louis best and added them on my Louis’s birthday post, and I followed that approach for this edit. I asked several friends what they think of Zayn and collected the adjectives.
This was a time where I haven’t used trello board, so I put all the adjectives in a google doc. Seriously I swear by trello board, they make my life easier.
After I had all the photos and the adjectives, I went to pinterest to look for the color palette. I forgot how and why I came up with this color scheme, but I believed I wanted something pastel and muted color.
I had this idea to make an evergreen birthday post. I didn’t want to state any “happy birthday zayn” or his age on the graphic. I didn’t want to make all the edits to have his face because I wanted to showcase my graphics and typography style lmao. So I came up with 2 pictures with Zayn’s face and one central picture with his name. And I’m obsessed with space stuffs so this birthday edit is space themed.
2. PROCESSING
This is one of my earliest edits that I made in Illustrator, though I used Photoshop as well.
2.1 REMOVING PICTURES BACKGROUND
Remember I saved a LOT of Zayn’s photos? Yeah? Well I had a hard time choosing the right one. I asked Sabrina to help lmao. After I agreed with myself which photos I would use, I opened Photoshop and prayed it won’t crash after 5 min.
I uploaded the 2 photos and then I used selection on Zayn and then clicked inverse and deleted the background. Recently I found this website who can delete your background in 1 min, tbh that’s a life saver. I recommend using them, if you hate removing backgrounds with Photoshop.
I saved the backgroundless Zayn’s photos as png. And we’re moving on to the next step
2.2 THE TYPOGRAPHY
I only used Photoshop to remove the backgrounds. Now onto Illustrator. Always pray it won’t close by itself every 5 min.
I don’t really remember which dimension I used, but I suspect it’s 600x700 px. I made 3 artboards and loaded the color palette I found from Pinterest. I made 3 rectangles as the backgrounds for each picture and filled them with my desired colors, 2 pink and 1 green. Green being the standalone was put in the middle.
A bit of excursion based on my experience
When you open an artboard in Illustrator, you’ll see a white background. When you save the file you’ve worked on, it’ll actually be transparent. That’s why I always draw a rectangle as a background so it has a solid color.
I focused on ZAYN (middle pic) first because I wanted that to be the main focus. I don’t remember the font I used and I already deleted all files. I followed this tutorial to make the text. Basically you write your text first and choose effect > 3d > extrude and bevel > isometric top. Changed the colors according to my color palette.
I moved on to the first picture, Zayn and the adjectives. I uploaded his photo to the artboard and put it in the middle. I wanted the adjectives to encircle him. I just followed this tutorial on how to make the effect. I made that text effect because that reminded me of the saturn ring lmao.
2.3 THE GRAPHIC DETAILS
Once I got the typography done, I made stars and moon to make the edits merrier and more space themed.
For the stars you can follow this tutorials. For the moon I made 2 circles, one of them was bigger. I put the smaller one in front and click minus front (I think). For the saturn planet, I made a circle with filling and an oval with stroke only, putting the oval infront of the circle and delete the back part of the ring (I hope this makes sense).
I have these lines around Zayn, my intention was to make Zayn pop and kind of crown him or give him a glowy effect sort-of.

All I did was follow this tutorial and delete the lines at the top, because I didn’t want it to be too crowded. Then I put some stars and planets at the top to balance it.
2.4 FINISHING TOUCHES & EXPORTING
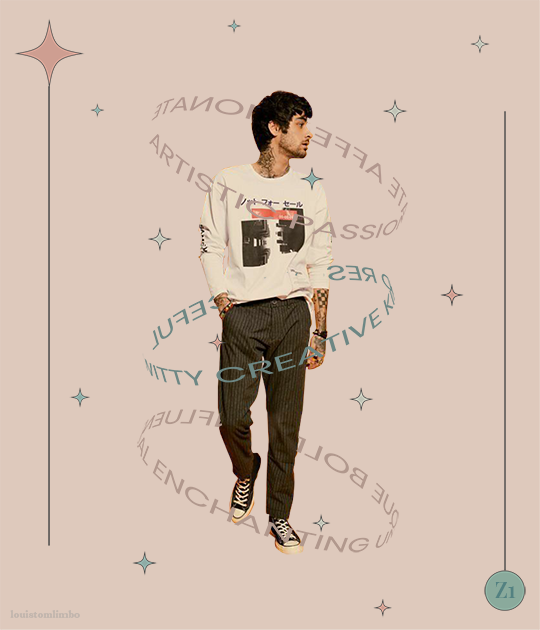
I rearranged some things, zoomed out the artboard so I could see everything as one post and picked and deleted some unwanted things. After I was satisfied, I added my watermark and it was my old url, I just typed louistomlinboo. (Now I made a logo-ish and use that as my watermark and the logo is not dependent on my url)
Ok I lied I used Photoshop again… so I had these adjectives in 2.1 that encircled him right but some parts of the texts are above him. I exported my Illustrator file as a psd, uploaded it on Photoshop and used layer mask magic to delete the texts that were above him to create an illusion that the texts went around and under him you know. See the picture below, some texts are beneath him.
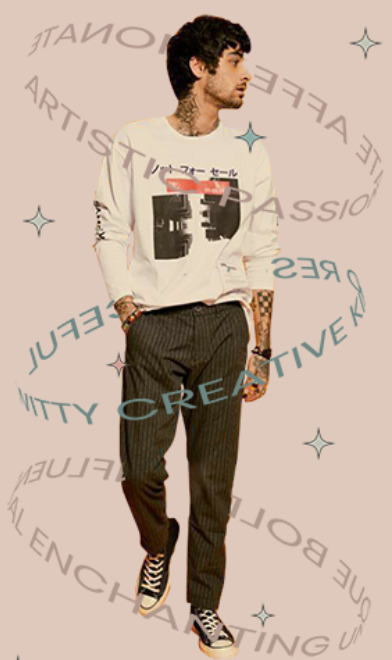
For this picture I exported the png file from Photoshop, the rest directly from Illustrator.
This was when I learned I needed to scale up, because on Illustrator they all look good in terms of quality. But when I posted it, the quality was reduced. That time I just exported as big as the dimensions and I was disappointed with the quality when it’s on tumblr.
3. POSTING
I uploaded the 3 pictures I have on tumblr and chose “happy birthday zayn” with star symbols/emojis to keep up with the space theme.
So I always write out what my caption will be with the “rich text” option.

Then I go to this color html website to add the gradient color in the caption and remove the “;” with “ “ in here. Once I have everything, I change rich text to html so I can put the text with color in html mode.
Put some tags related to Zayn. (self promotion time lol. i have compiled tags for 1d creators check them out here)
I finished I think a week earlier before Zayn's birthday so I saved it on draft. I posted around midnight (my timezone is CET), because oh boy it is a competition with birthday post lmao. That’s what I feel like at least. You know, everyone wants to make a birthday post, I feel I have a better chance If I post something first. Whenever I have something done earlier before a certain due date, I either save it on draft or schedule it so it’ll be posted automatically.
Yeah that’s it! It’s not as detailed as before I think because the files are deleted sorry!
i’m tagging:
@spaceniall for this wonderful niall’s birthday edit
@she-fearlesss for this magnificent louis’s birthday gifset
@finewalls for this mesmerizing animation
@louitomlinson (i know you’re not that active but if you want and can!) for this amazing edit
and @tomlinsun for this cool edit
21 notes
·
View notes
Text
Hakuoki Yuugiroku 3 - Short Episode #8 “The Troubles of the Head of the Kazama Family” Eng Translation
This is my first post of the month, so I’ll start by asking you to please support me if you can through my ko-fi, and paypal or patreon which provides access to my hakuoki blog translations and early access to my postings. Also, please let me know if you have any hakuoki drama cds that you’d be willing to share that are on my Lookout List since i either do not have audio for those cds or do not have audio that I can share.... and if you are able to remove watermarks from a video, please contact me.
no translation posts next week since my bday is next week and i use that as a break... hopefully i’ll finally be able to watch the a certain CxM stage play that i may have downloaded a while ago. tad surprised about how much music from the game i heard while i was skipping through the honpen file to check that it was working...

anyway, enjoy~ also the punctuation in the tl i used doesn’t match that of the game so that will be fixed later.
also im probably going to drop all yuugiroku 3 stuff aside from the short episodes given the amount of editing work i need to do (the translations im relying on seem to be missing some details).
The Troubles of the Kazama Family Head
Translation by KumoriYami

Kazama: Damn it, those Shogunate dogs!

Shiranui: Hey, I've come to play, it's been a while since I've seen you.

Amagiri: You've come, Shiranui, though this may not be a good time.

Shiranui: [Since this is] Not a good time, did something happen?

Kazama: What could possibly have happened?
The number of people who want to separate me from my wife has doubled/There are almost twice as many people trying to separate me from my wife now.

They're not just within the Shinsengumi, there are actually outsiders too!
Shiranui: Oh, so you're complaining that the number of enemies/rivals for love has increased?
Really, come on/forget it, you should give up/give up.
Kazama: Impossible!
Oni should be linked with other oni! And this would be the marriage of two leaders! What is there to hesitate about!
Amagiri: Was she not raised as a human? You asking her to accept the opinions/circumstances of an oni may be impossible.

Shiranui: Hey Amagiri, if you say something that provokes him, you won't be able to say anything

Amagiri: Indeed.
Shiranui: What kind of guys were added.
I know Sakamoto. Who are the others!

Kazama: Nagakura, Sanan, Yamazaki are from the Shinsengumi.
There's another of the Shogunate's dogs, a hanamoto named Iba.
Additionally, there's some useless youngster named Souma.
Then there's Sakamoto, that frivolous man you know of.

Amagiri:......I feel that your introductions are too malicious/impolite/rude/weren't very polite.
Shiranui: I don't think he's aware of his biases.
Those people are protecting that female oni.

At least they're better than Kazama......

Kazama: What did you say! Shiranui, you need to pay attention to what you say to me.
Do you know who you are talking to?

Shiranui: I only stated my honest opinion.
Kazama: I am strong, rich, I have unlimited prospects/a limitless future, and am also from an oni clan. Why can't I compare with them/How am I unable to match them!
Shiranui: It's a different matter if that female oni wants that or not [might change to interested based on jp mtl].

Amagiri: Not all women pursue power and wealth.
Shiranui: There are many women who would rather avoid men with those things.

Kazama: !
Are you saying that Yukimura and I are not suitable for each other?
Shiranui: In any case, if that's what that female oni decides, I won't intrude.

Amagiri: Myself as well, were I not in this position, I would recommend that she choose another man to live out her life with.

Kazama:......

Shiranui: What's wrong?
Can't we say this? You need to think about everything you've done.

Kazama: How should I change [then].


Shiranui: !?
Kazama: How can I make it so that my wife does not look at those shady people, and marry into my family.
Shiranui: Wha!!!
Amagiri: !!!!?
Kazama: What's with that astonished expression, is what I said that surprising?
Shiranui: No, although this is for a pure-blooded female oni, I really didn't expect it to this degree.
I didn't think it was possible for him/you to actually say that he’d/you would change for someone else.
Amagiri: Did you eat something you shouldn't have? Or do you have a fever?
Kazama: What do you mean?
Are you saying that I am a man who is completely unrepentant [might change to remorseless... or some other synonym] and arrogant?
Shiranui: Mm, no! It would be great if that was true though.
But you've had the same temperament since you were a kid, can you change it?
Amagiri: And not just because / this cannot be because you're being reprimanded, but rather for the sake of the daughter of the Yukimura family!

Kazama: I am a man who does what he says, and I am saying that I will change.
Shiranui: If you're really serious, we'll help you.
But even if Kazama is humble/modest, that female oni might view that as a trap.
Amagiri: That cannot be said!
This however is a good opportunity to correct his daily bad habits.
Shiranui: That's also right, we should take advantage of this opportunity.
Kazama: What are you secretly whispering about?
You still haven't told me what I should correct.
Shiranui: Okay, I got it, do you have the courage to listen?
Kazama: Come then, I will see this to the very end, so don't hold back!

End
#hakuoki#hakuouki#Hakuoki Game Translation#hakuoki yuugiroku 3#Kazama Chikage#Amagiri Kyuuju#Shiranui Kyo
30 notes
·
View notes
Last Seen Blogs


