#<- a program that doesnt exactly do transparency
Explore tagged Tumblr posts
Visit Tumblr Blog
Explore Tumblr blogs with no restrictions, modern design and the best experience.
Last Seen Tumblr Blogs


Fun Fact
Tumblr has a 66 index score for customer satisfaction in the US.
Note

Egg
- @farmer-juice

Egg
#been drawing in sai as of late#<- a program that doesnt exactly do transparency#so i dragged that egg out of the void as well as i damn could lmaoooo#mash art#farmer mash#ask farmer mash#sdv ask#sdv ask blog#sdv farmer
4 notes
·
View notes
Note
If you don't mind, could you give us a tutorial or brief explanation on how you render hair? /nf
YES!! unfortunately i got. very tired after making this so this is only one hair type :( was gonna go into all the different types of hair textures but. i will just have to do that later. also keep in mind i drew this in like. 7 minutes its just a simple guide to get out the basic steps
^i didn't put music in this so. listen to whatever u want while ur watching this (its 6 minutes 40 seconds). also its slightly sped up this isn't real speed
elaboration of each step under read more:
step 0: look at other hair tutorials/pictures of real hair to figure out how light reflects off of them. then completely disregard that and just make things up (this is the best artistic process trust me i do it every day)
step 1: just get out that basic shape. it doesnt have to be anything fancy,
step 2: just fill it in and adjust the shape as needed
step 3: figure out how the hair moves and flows, which parts go out more (highlights), which parts are closer to the head (shadows/base), etc. i highly recommend just looking at pictures of hair online, or taking pictures of your own hair. for coily/curly hair, you just kind of have to do this for each curl/coil. one thing to keep in mind the highlight is in the middle of the curl/coil and the shadows are on the edges (usually). i'll elaborate more on that once i have an actual video for it
step 4: just make it so the edges of the highlights transition a bit more smoothly into the base color. it just helps for later steps tbh. try not to over do it, don't want to completely get rid of the highlight, just soften it
step 5: add more highlights with thinner brush. this should be where the light would bounce off the hair the MOST. i think i forgot to say in the video uhhh add in some base value too. maybe a few shadows. mostly this step is for highlights tho.
step 6: idk what else to put here sorry. ngl just get silly with it
step 7: it is very important to do one stroke per area in this one. do not lift your pen off the screen/tablet/whatever until the little area youre working on is one smooth transparent shade, then move on to the next. idk if i'm explaining this right hopefully this makes sense.
step 8: complete opposite as step seven. make as many strokes as you feel it needs. not TOO many, just enough to get some texture and then some yk? i recommend making a copy of the layer youre working on before doing this so that if you mess something up you can always go back to square one.
also a lot of these steps apply to pretty much any hair type just. in a completely different shape with completely different rules. which is to say its exactly like this but it actually isn't like this at all. which is why i plan on making other videos some day (hopefully) also look up "hair texture chart" it will help you find the words you need to look up good refs
remember: always get silly with it. the only rule to to make things up and change your mind 400 times. bring a 'fuck it, we ball' mentality to your art program that the haters (your brain) really won't like. practice makes perfect and all that, do NOT expect to get something good first try, sometimes i still struggle with drawing hair in a way that i like and just scrap the whole thing. also i'm not kidding about those real hair reference pictures it helps so so much
hope this helped at least a little bit bc i am not good at explaining things 👍
#foster's art tag#asks#someday i will make refs for how i draw long/med length and straight/curly/coily hair but. todays not that day rip#edit: just realized a bit of text pops up in the middle of step 3 that is. not supposed to be there so i editted it out👍
21 notes
·
View notes
Text
detailed giffing + basic coloring tutorial for beginners
so a lot of gif/coloring tutorials are pretty outdated or not that detailed & i wanted to put my own out there! in this:
how to get the screencaps for your gifs
how to make a general gif
basic coloring (no psds here, it just gives you a basic idea for making colors pop and look nice. you can look up how to use psds, but i prefer making my own for every gif as it’s much more personal, gratifying, and creative. there’s nothing wrong with using psds as long as you don’t claim them as your own, it’s just not my personal thing)
how to save a gif
we’ll be going from this:

to this

what you need:
photoshop (cc 2019 is what i’m using, but this works with any version of photoshop really as long as you download a version with the timeline feature) i won’t add download links here since i don’t want this deleted, but you can look some up on tumblr or use the pirate bay (current url is pirateproxy.blue as of 4/29/2020) & follow the instructions there.
for windows: potplayer/kmplayer (both use literally the exact same instructions) this tutorial uses potplayer but kmplayer uses like literally the same instructions, it just doesnt work right on my computer
for mac: mplayer. this tutorial does NOT cover this so find a tutorial on tumblr on how to take screencaps with mplayer & then skip to the “how to make a general gif” section. though, again, i’m on a pc so i have no idea if this is entirely accurate for mac.
if you’re downloading from youtube: clipconverter
if you’re Definitely Legaly torrenting: utorrent + the pirate bay (again, current url is pirateproxy.blue as of 4/29/2020) or another torrent site + you should really consider getting a VPN when torrenting (i use privateinternetaccess but you can find one that suits you)
note: download an adblock of some kind, disable automatic downloads on your computer, & download an antivirus program if you want because some sites are sketchier than others! this is ESPECIALLY crucial on sites like piratebay. keep your computer safe babes.
1. screencapping
there’s several ways to get screencaps on photoshop, but this is the easiest imo and i’ve never done the whole convert video frames to layers thing. like i said, you’ll need potplayer or kmplayer. i’m using potplayer. important note: don’t accidentally download viruses here! read each screen carefully & make sure you’re not hitting accept to download any secondary programs.
1. download your .mp4/.mkv. you can go to youtube & find a clip/scene/whatever and use clipconverter to download it. just make sure you download it at 720 (or higher) as anything lower than that will give you a poor quality gif. you can also download using somewhere like the pirate bay, but for this you need utorrent & i would HIGHLY recommend using a vpn if you live in a country where torrenting copyrighted content is illegal, as your internet provider may flag your ip address if you don’t & you torrent too often.
2. download potplayer/kmplayer & get it set up
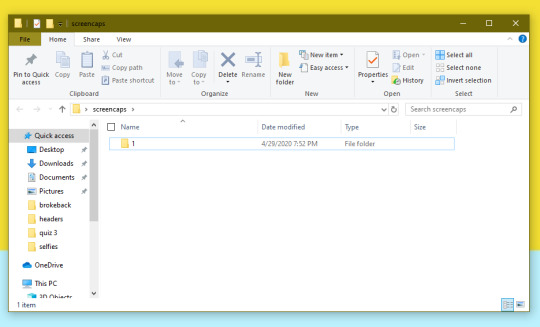
3. create a screencaps folder. i always put mine on my desktop. in your screencaps folder, make a folder for however many gifs you want in your set. i just have one for mine so:
4. open up your .mp4/.mkv

5. hit ctrl + g to bring up the screen capture pop-up & set your settings to these. click the button w/the three dots next to the storage option & select the folder you created for your first gif
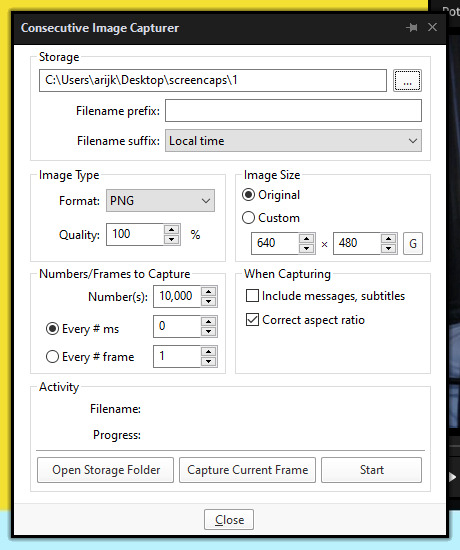
6. navigate to the scene you want to gif. when you’re there, pause it and hit the start button on the consecutive image capture screen, then play the video. how many screencaps you need depends on the size of your gif. for larger gifs (so like 540px wide gifs), you’re probably going to want to keep it below 30 frames. for smaller gifs (268px wide or less) you can maybe stretch it to 60, depending on how much coloring you add. you can always delete screencaps later though in photoshop, so don’t worry about it too much. for this gif, i only had 17 frames because the scene was really short lmao
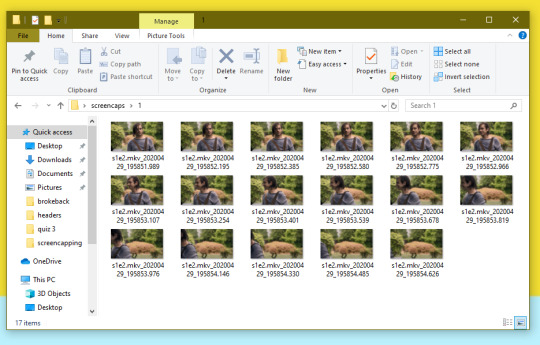
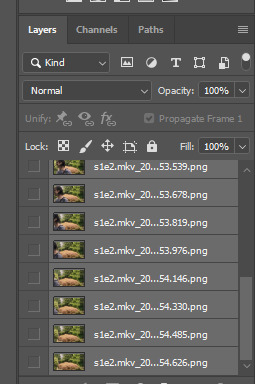
7. go to your screencap folder you made & delete any unnecessary frames. it’ll look like this:
8. repeat the process for any other gifs, making new folders in your “screencaps” folder, numbered for however many gifs you’re making. make sure to change the folder you’re loading the images into on the image capture pop up though so they don’t all go into folder 1.
2. making a simple gif (+sharpening)
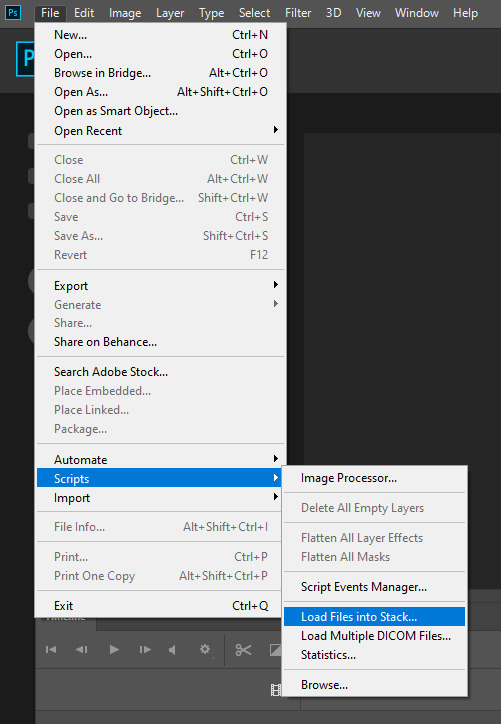
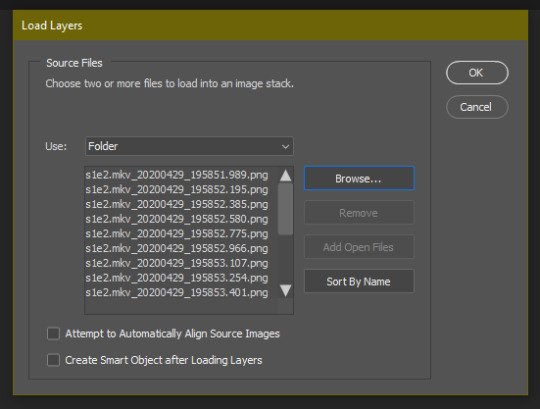
1. first, you need to load your screencaps. when you open up photoshop, go to file > scripts > load files into stack
2. when the window pops up, switch the “file” option to “folder”

3. click browse and find your screencap folder for your first gif (in my case, desktop > screencaps > 1) once it’s all loaded, click “OK”
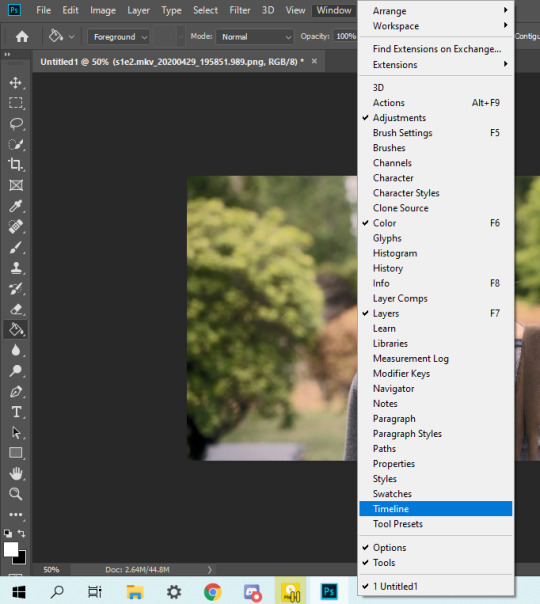
4. it’ll take a minute to load all your screencaps into photoshop. when they do, go to the upper bar on photoshop > windows > timeline
5. when the timeline bar shows up, click “create frame animation”

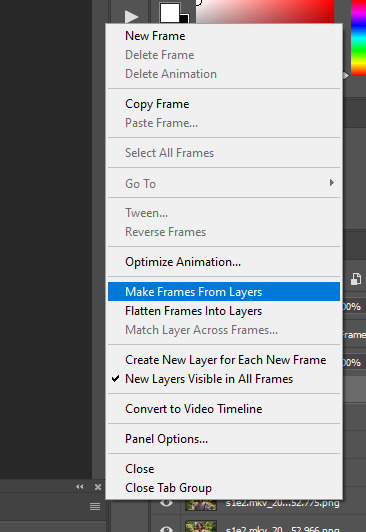
6. hit this button and click “make frames from layers”

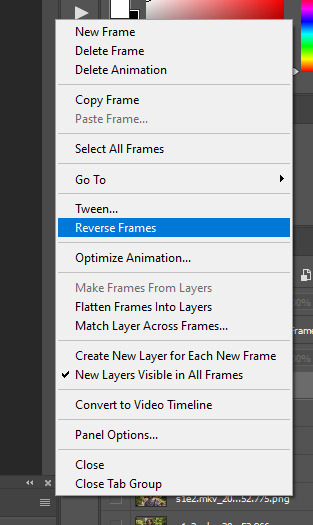
7. hit the button again and click “reverse frames”
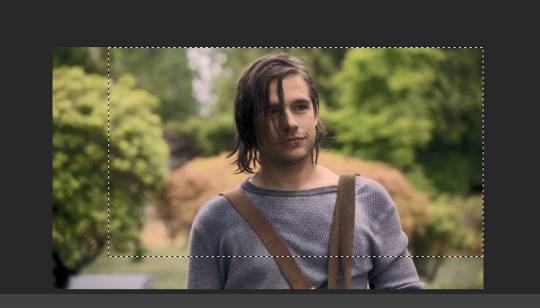
8. click back onto your first gif. then select the rectangular marquee tool and set it to whatever gif size you want. the width for 2 small gifs next to each other is 268px, the width for full size gifs is 540px. most people use 268x150 px for gifsets of 4+


9. use the marquee tool to select what area you want for your gif, like this. it’s up to you how to crop it! get creative!
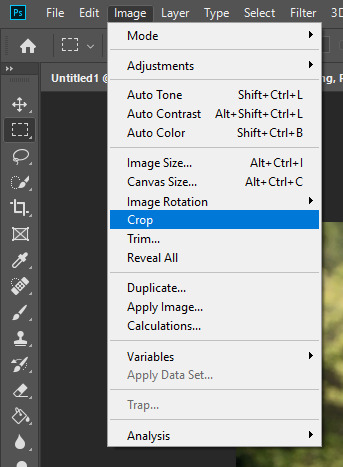
10. go to image > crop
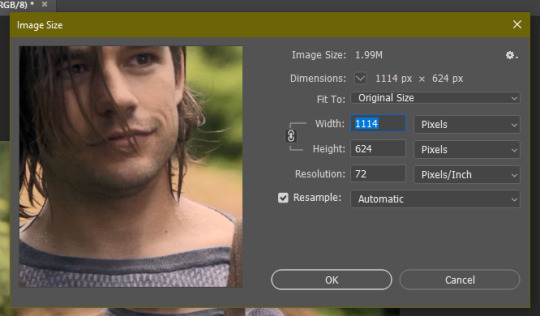
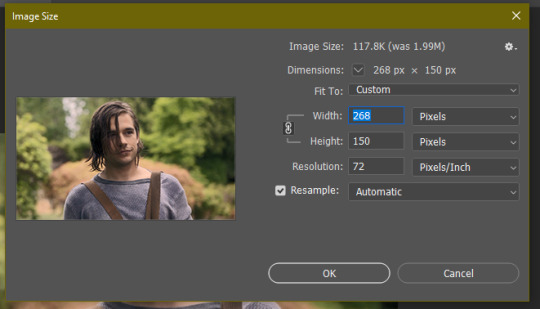
11. now that your image is cropped, go to image > image size. change the size to your desired gif size (in this case 268x150). hit “OK”. then make sure it’s zoomed in to 100%

12. now, you COULD just save this gif, but they look way better sharpened. so you need to convert this to a smart object. to do so, first select all your layers in the righthand layer window. to select all the layers, click on your top layer, hold shift, and scroll down to your bottom layer & click on it as well while still holding shift
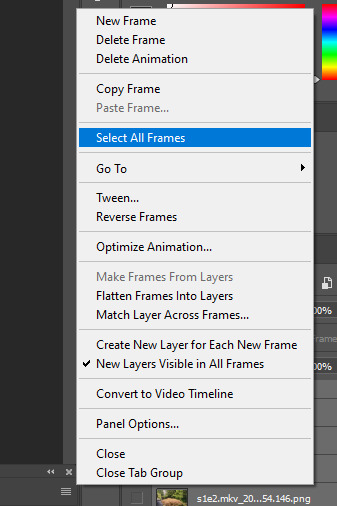
13. next, you need to select all your frames. go back to the options button from part 6 > select all frames
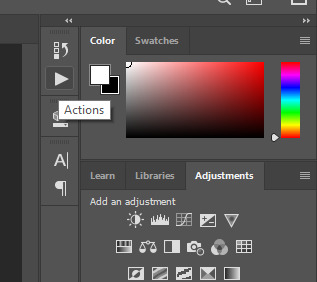
14. next, we’re going to create an action to make your life 100x easier when it comes to sharpening gifs in the future. to do so, go to the actions icon (may look different on different versions of photoshop, but basically just find the actions window)
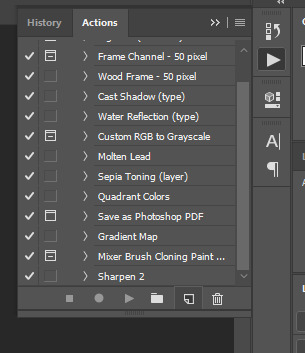
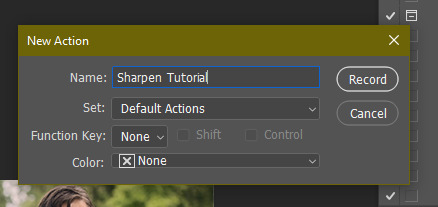
15. create a new action with this button. name it something. i named this one “sharpen tutorial” and hit “record”
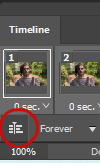
16. click this button to convert to video timeline
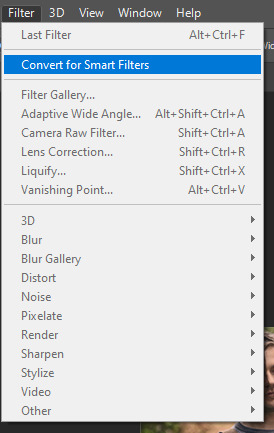
17. go to filter > convert for smart objects
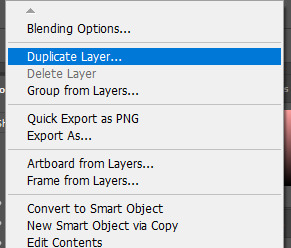
18. go to your single created layer and right click and click duplicate layer. this helps get rid of the transparent border around the gif.
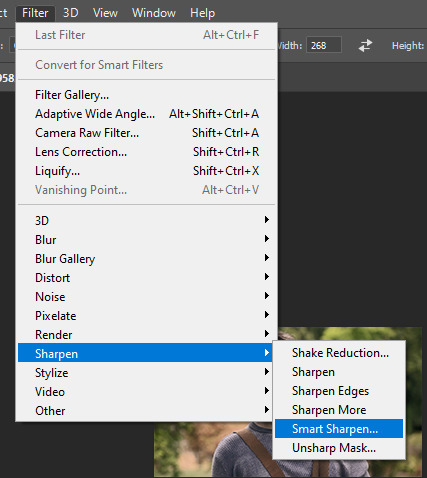
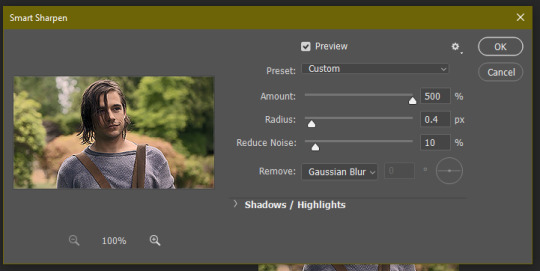
19. go to filter > sharpen > smart sharpen & use these settings
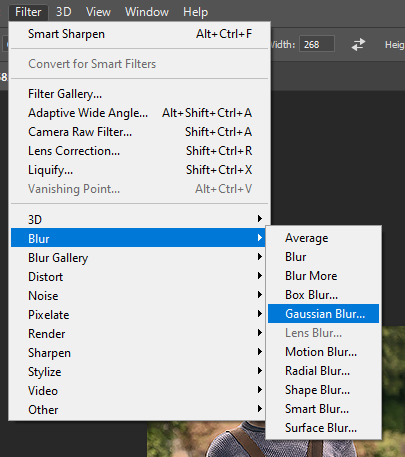
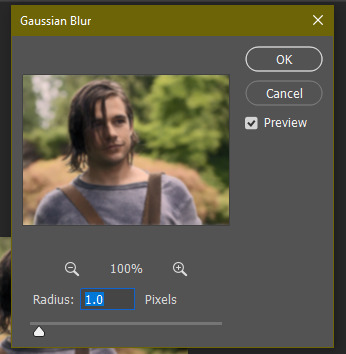
20. go to filter > blur > gaussian blur. set it to these settings.
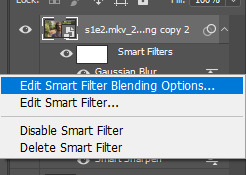
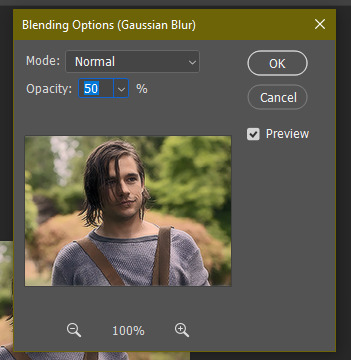
21. go to your second layer with the filters on it & right click on the gaussian blur filter to select “edit smart filter blending options” and set the opacity to 50%. you can mess around with this for different levels of sharpness. the closer to 0%, the sharper your gif will be.
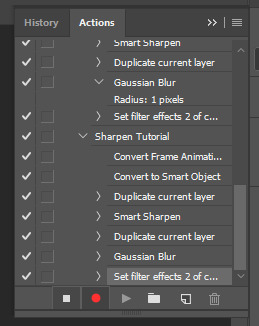
22. hit the stop recording button on your sharpen action. now you’ll have an action to use next time you make a gif! after you’ve followed all the steps 1-13 you simply go to actions, click on your saved sharpening action, and hit play instead & it’ll do steps 14-21 in a few seconds. here’s a pic of the stop button on the actions window
23. our gif is now sharpened! you can end with this & skip to the saving a gif section, or you can continue to coloring. here’s what we have so far.
3. coloring
now on to coloring. this is pretty basic coloring and it probably won’t work if you follow my numbers exactly, as every single scene is different color + lighting wise. but this is just an example of the kind of thing you could do. basically, if you’re making vibrant gifs, you want to up the brightness + contrast + vibrance and make the colors already present pop. if you want anything more complicated (pale gifs, changing the colors to make, say, quentin’s shirt in these gifs red instead of blue), you’ll have to find other tutorials or experiment on your own. learning how to color & finding your style takes time! you can download psds if you want, but imo those kinda take the fun out of making gifs? that’s just me though.
after each step, i’ll show you what the gif looks like.
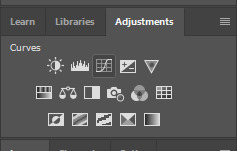
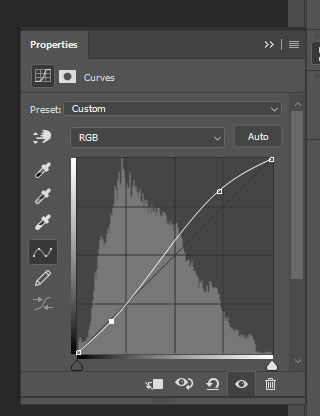
1. i usually start with a curves layer. i usually don’t mess with the color curve options, just this one:

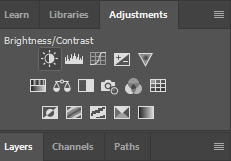
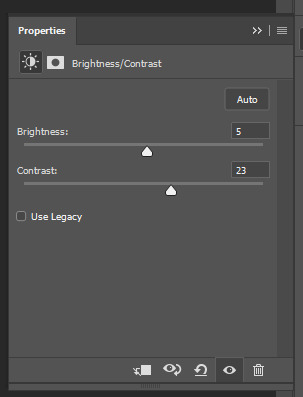
2. next, i do a brightness/contrast layer

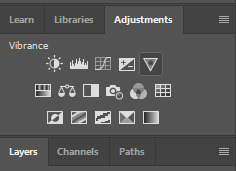
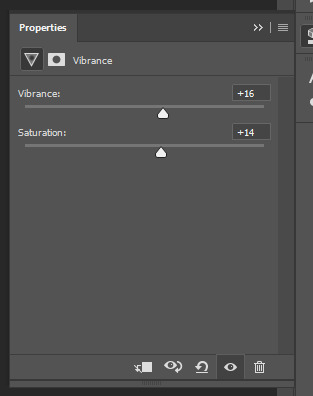
3. next, i do a vibrance layer. make sure not to make it TOO saturated or it’ll look bad.

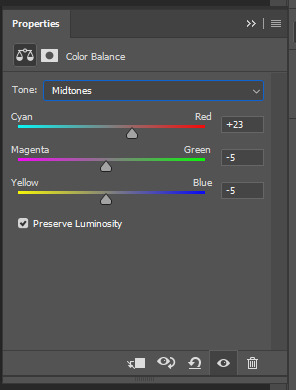
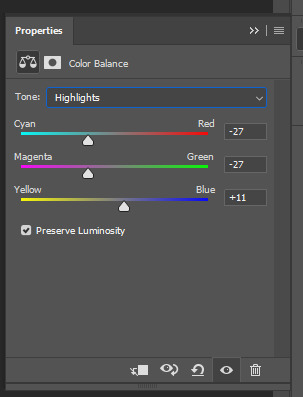
4. next i do a color balance layer. this is where it really starts differing depending on what color you want your gif to be.


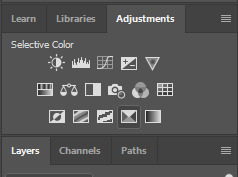
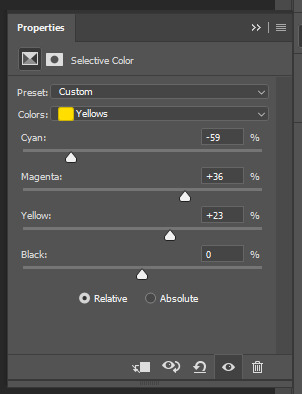
5. next we move to the selective color layers, which are arguably the most powerful. here you can make colors pop, change colors, etc. it’ll take lots of practice & messing around with, but here’s what i did with this gif. this one is making yellow + blue pop
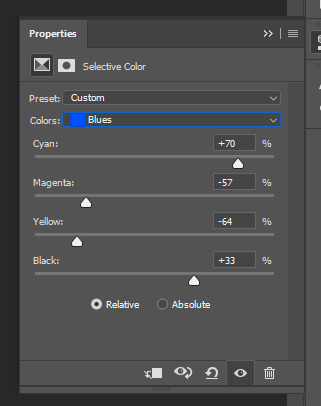

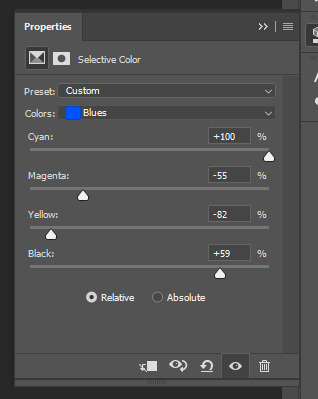
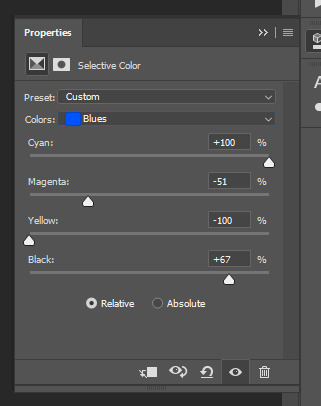
6. next, i did two more selective color layers editing the blue tab to make the blue pop even more


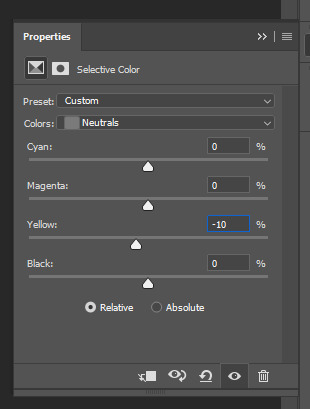
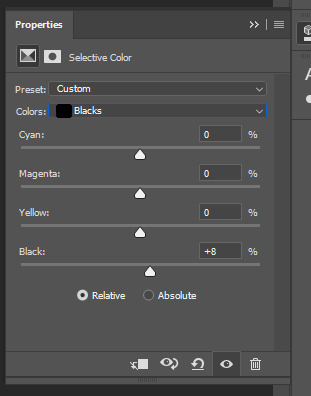
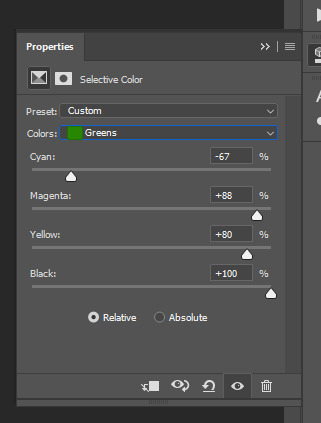
7. i still wasn’t quite happy with it, so i added another selective color layer to edit the blacks + neutrals + greens

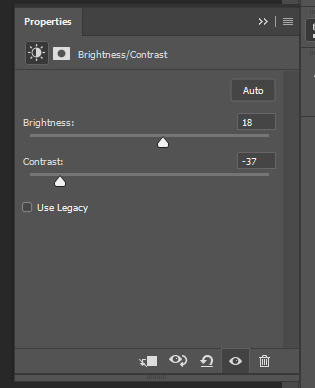
8. for good measure, i added one more brightness/contrast layer

9. and the gif is done! however, you can play around with various adjustment layers until you’re happy. again, this is just an example of how to do basic coloring. it’s a skill like any other & takes practice. to keep consistent coloring in a gifset,
9b. you may want to make a psd of this coloring. to do so, you need to put all your adjustment layers in a folder, delete your frame layers, and click file > save as. save it as a .psd. then you can open it and drag it onto any other gifs you make, adjusting the coloring accordingly but still with the same vibes. you don’t have to do this, but it makes life easier. here’s how to use your saved psd, though obviously you’re using your own in this case and not a downloaded one.
4. saving your gif
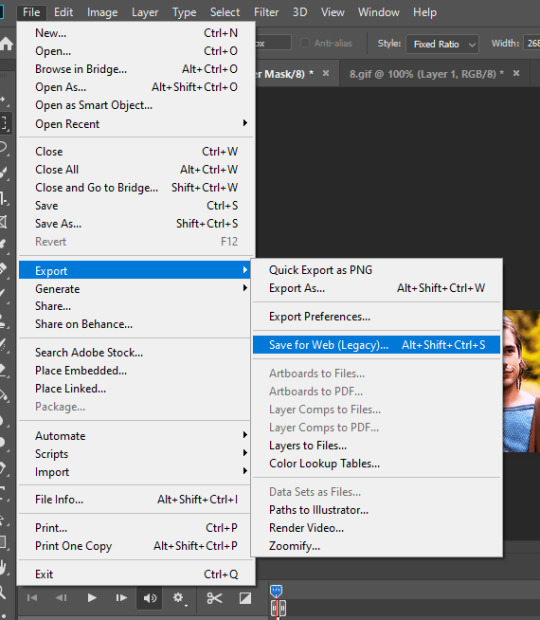
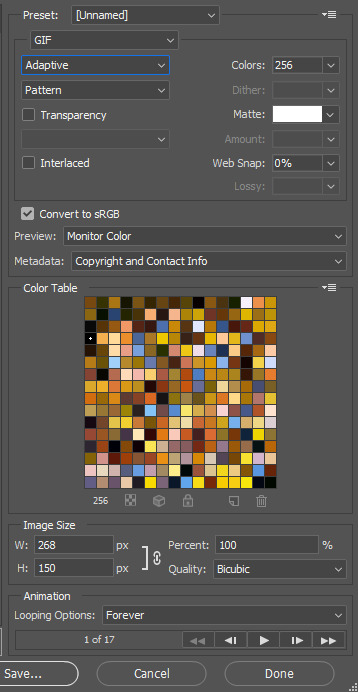
1. on photoshop cc 2019, you go to file > export > save for web (legacy). for other versions, you can just go to file > save for web. use these settings. the gif size limit is 3mb per gif, so make sure your file size is under that. if it’s not, you’ll need to delete some frames or some adjustment layers.
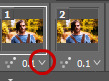
2. now, photoshop is a bit of a pain & this gif timing will not be right. so you need to open your newly saved gif. then you hit this button + select all frames
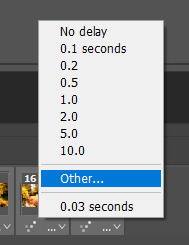
3. click this button & select “other”. tumblr gifs are typically .05-.08. my photoshop is glitchy and i have to set mine to .1-.15 or they’re WAY too fast. but usually, go with .05-.08 unless yours ends up glitching too.
4. save it like you did the first time and ta-da! you’ve made a gif!
#gif tutorial#photoshop tutorial#edit tutorial#coloring tutorial#yes im using the magicians its my hyperfixation and i get to choose the gifs
164 notes
·
View notes
Note
I was wondering if you knew where to get high quality artwork? I wanted to edit the gen 6 black belt but the bulbapedia file is tiny
For 2d images, this program here (disregard the name, it's a legit site) resizes images while smoothing them out. It doesnt work well with transparents, you will have to make it transparent after you resize it.
Sprite squad is going to add on how they do sprites.
- Decima
----
Pokemon sprites, I get from Smogon’s Gen 5-style sprite designs or, for everyone from Gen 1-5, pokemondb.com. For trainer sprites, I just copy and paste them from Bulbapedia and remake the outline myself.
As for actually resizing the sprites and such, I personally use MS Paint, so here’s my step-by-step tutorial. :)
So you select something, right?
Next to "Select" is “Resize”
To achieve this another way, right click what you've selected and click on “Resize”
Now, on "resize", you want to maintain the aspect ratio. There is a checkbox that says exactly this, so make sure it's checked.
On neutral, the selected thing will be at 100/100
Since you're maintaining the aspect ratio, any change you will do to one number will occur to the other
So changing it to 67 will make the other 67
et cetera
To resize my sprites, I change the numbers to 200/200 for double its size, and 400/400 for quadruple its size
It's good for some detail work - for example, the latticework in that one Arbok I did, or the gradients in that gay pride Misdreavus.
- Vice
----
Dragonis here. I use Paint.net. I use the Resize option, and resize it by either 200% or 400%, depending on my needs.
- Dragonis
----
I already said it in my edit tutorial but for 2d artwork I get my images off Pokepedia since they’re the highest quality, and if I ever find them too tiny or with jpg artifacts I use this version of waifu2x
It supports transparency and has more options than the link Deci posted
- Shay
6 notes
·
View notes
Text
personal sensory processing stuff
(you’re welcome to look, reblog, whatever, it’s just long)
my visual processing is weird
like on one hand when i picture abstract stuff it's usually kinda vision-y and it's from a point of view like a camera that can move relative to what im picturing and very 3d in a very vision-y way
but on the other hand i sometimes realize that oh i havent been using my vision at all for this latest thing i did i was picturing it in my normal way but i actually wasnt using my eyes like rummaging in my bag or finding something in the dark
and like it feels absolutely the same? im being aware of space and picturing things' locations relative to one another. i can actually get distracted so i Don't Realize im not using my eyes until later. colors dont matter, shapes are abstract. its just objects/symbols and their locations in space relative to one another, and that's kinda how my brain works with everything. math, time, you name it
i guess it's a synesthesia thing? far as i understand, synesthesia is about blending senses together in a weird hodgepodge and thats exactly what happens when i dont notice if im using sight or touch to create a mental map of something, and also when im mathing visually
i tend to say my primary perception is not vision, but it often feels wrong when all my abstract thinking seems to be tied with vision, and when im reading im picturing things too
except its not vision, not exactly... its this weird half-symbolic Awareness Of Space. when im imagining characters of a book im reading i dont give them specific faces unless i focus on that
actually prosopagnosia is a separate thing that ties into all that huh. i just dont parse faces the way im probably supposed to. i dont give fictional characters in my head faces because thats not how i recognize irl people either
still, my imagination runs on this half-visual perception that i have heard described as digital? its not a precise word but its the best i have. abstract concepts, existing spatially. scales, coordinates, overlapping sets. when i add large numbers i imagine them overlapping like half-transparent photoshop layers - that's how i keep the entirety of them in my operational memory at the same time
it makes my artistic abilities weird, too. all the advice on how to learn how to art that i've ever heard was focused on visual perception. look and memorize. but i cant do that it doesnt work like that for me. the way ive been able to learn how to anatomy was with abstract shapes and then curves of surface over them. ive started being able to process lighting after reading a book and doing exercises on programming physics of lighting. i couldnt wrap my head around it while looking at stuff but give me an abstract explanation and oh - there it is, all clear. movement is easy, anatomy is understandable, but looking at someone and grasping proportions of their face and simplifying them for a drawing? how does that work?
i say my main channel of perception is touch bc i do notice when im touched while i can easily space out and not hear or see anything at all no matter what happens. if you want to guaranteed get my attention you have to touch me. that always works (might earn you a smack if you dont do it the right way - lightly, on the shoulder)
my relationship with vision is just weird
#sensory processing disorder#visual perception#theres a lot about auditory perception on tumblr but i havent seen a lot on visual perception#actuallyautistic#prosopagnosia#brought to you by the latest 'wait i think the room is dark what was i just doing was that not my eyes' realization#synesthesia
2 notes
·
View notes
Text
Trump administration takes down public-facing directory of Energy Department employees
check it out @ https://tuthillscopes.com/trump-administration-takes-down-public-facing-directory-of-energy-department-employees/
Trump administration takes down public-facing directory of Energy Department employees
Image: Shutterstock / Concept Photo
The United states doe has had lower its public-facing employee directory, which makes it much more hard for journalists and people from the public to discover emails and make contact with figures for agency personnel.
The move, that was announced to agency contractors on Wednesday and implemented Thursday morning, was confirmed within an internal email distributed to Mashable.
Making federal scientists and policy makers harder to make contact with isnt an insignificant matter. These types of moves toward opacity wall off employees in the outdoors world making it much more likely they wont experience public pressure associated with their citizen-funded work.
SEE ALSO: Rick Perry regrets calling for abolishment of Energy Department
Additionally, it causes it to be simpler for pr officials to visualize additional control over use of interview subjects, since journalists not really acquainted with agency sources will have to contact the central press office to create headway on the story.
The phonebook was functioning early Thursday morning but went lower around 10:15 a.m. ET.
This is the way the page reads now:
United states doe public-facing phonebook.
Image: energy.gov
Rather to find the power Department phonebook online on Thursday, people to the department website now are forwarded to a main telephone number (that is 202-586-5000) and therefore are told to make contact with a particular office using a web directory.
Your directory permitted any user to look for department employees by name and retrieve their fundamental contact details and office division, that was an aid for journalists, civil society watchdog groups and many more trying to penetrate the frequently opaque federal paperwork.
Until today, you can lookup United states doe (DOE) employees by name to locate their office telephone number and emails. Thinking about the truth that the department is really a maze in excess of 10,000 employees and contractors located all over the world, that phonebook is much more than convenient its essential.
Other federal agencies, such as the National Oceanic and Atmospheric Administration and NASA, have intact public phonebooks, because they did through the Federal government.
The Power Department states it required lower the phonebook due to internal complaints from agency personnel who did not want their information shared any longer.
“Work of Public Matters had received complaints in the workforce concerning the discharge of their direct contact details and also the disruption for their operations because of outdoors personnel trying directly vice dealing with the right channels,” stated Shelley Laver, a company spokeswoman, within an email.
“The general public continues to be able to talk with the department through various channels,” she stated. The agency’s database didn’t give a achievable method to allow individual employees to opt from being listed whilst maintaining the general public directory, she stated.
The interior email delivered to a company contractor didn’t give a reason the general public phonebook was removed. Since phonebook continues to be online for a long time, it’s removal now strikes some as suspicious.
Energy Department employees, contractors and watchdog groups have been receiving alert for changes in the department that will limit transparency and would infringe upon the agency’s broad portfolio of climate science research. Maintaining the scientific integrity and independence from the agency’s scientific work is a particular concern considering the Trump administration’s denial of mainstream climate science findings.
“Taking lower the phonebook doesnt seem sensible,Inch stated Michael Halpern, the deputy director from the center for democracy in the Union of Concerned Scientists, an ecological advocacy group. “This centralizes communication and causes it to be harder to make contact with individual DOE employees without dealing with an agreement process first,” he stated, while using acronym for that agency.
Halpern stated removing the phonebook, if it’s permanent, “could limit immediate access to DOE scientists.” By routing callers through primary offices, he stated, “It can give a political filter to how DOE communicates science.”
Just before walking lower in the finish of former president Barack Obama’s second term, then-secretary Ernest Moniz signed a company-wide scientific integrity policy that will evidently safeguard the organization’s research from political interference.
“The DOE scientific integrity policy claims that employees do not need to inquire about permission before openly discussing scientific information with individuals who ask,” Halpern stated. “DOE ought to be doing all it may to create scientific experts readily available towards the public, which gets into the alternative direction.”
Environmental protection agency scientists happen to be forced to violate their integrity policy once they were advised not to speak with the press or share research results using the public throughout the presidential transition.
Wind generators us dot the landscape near Steele City, Neb.
Image: Nati Harnik/AP/REX/Shutterstock
Under Obama, the power Department grew to become a number one supply of investment capital for clean energy firms, additionally to funding leading edge climate science and research at its network of national labs.
The Trump administration made waves throughout the transition if this asked the department for that names of employees who’d labored on climate programs and took part in worldwide climate negotiations, suggesting a coming purge of staff involve in climate programs.
The Trump transition team then backed removed from that questionnaire, attributing it to some “rogue” employee. The transition team also hinted the department is destined to have an overall 10 % budget cut underneath the new administration.
President Jesse Trump’s nominee for Energy Secretary, former Texas governor Ron Perry, has stated he’d try to safeguard scientists in the department and it is still waiting for Senate confirmation. Previously, Perry has denied the presence of human-caused global warming and recommended for that removal of the company entirely, though he softened that stance in the opening of his confirmation hearing.
“I’ve learned a good deal concerning the important work being carried out every single day through the outstanding women and men from the United states doe,Inch Perry stated.
“My past statements remodeled 5 years ago about abolishing the United states doe don’t reflect my current thinking,” he stated.
The disabling from the public Energy Department phonebook is comparable to exactly what the Trump administration did towards the White-colored House public phone number, if this rather requested for comments via social networking or perhaps a web form.
In the two cases, the simplicity of public use of key areas of the us government continues to be limited. The White-colored Home is now basically walled removed from comment by anybody without a web connection.
If you’re a federal worker, researcher or citizen researcher who sees climate science and policy shifts at federal agencies and desires to alert the press, you want to know what you think. Please send an e-mail out of your personal email account to [email protected].
You may also contact science editor Andrew Freedman through the secure messaging application Signal, with more information in his Twitter bio.
BONUS: 2016 was Earth’s warmest year on record, continuing a three-year streak
Find out more: http://mashable.com/2017/02/16/trump-admin-removes-energy-department-phonebook/
#climate#department-of-energy#energy-department#global-warming#rick-perry#Science#scientific-integrity#scientific-transparency#trump#us-world
0 notes