#“beginner” tutorial my ass
Explore tagged Tumblr posts
Visit Tumblr Blog
Explore Tumblr blogs with no restrictions, modern design and the best experience.
Last Seen Tumblr Blogs


Fun Fact
Tumblr has 4 main sources of revenue.
Text
I wish I could wrap my brain around how to use 3D sculpting programs or I could make more parts from scratch myself, but I really just don't understand how to use them no matter how many tutorials I watch.
#I need someone to teach me like I'm a grandma who's never used a computer probably#and doesn't assume I already have any basic knowledge what so ever#like please hold my hand through this process bc Idk what the fuck you're talking about#“beginner” tutorial my ass
38 notes
·
View notes
Text
downloaded daggerfall unity to see how different it is from regular daggerfall and pro's: i can easily use mouse-look and it has some nice modernization/beginner settings, however the cons is that its running worse than heavily modded skyrim consistently
#also the default pixel smoothing filter looks like ASS#i did not have enough of my adhd meds in my system to even try to take a crack at it past the character creation screen#(i followed a beginners tutorial vid with the same caution and apprehension as a kid trying to learn a bike)#should probably just go back to morrowind tbh. still haven't beat the dlc after like FOUR fucking years
2 notes
·
View notes
Text

Take a load of this guy recommending hairy sketching to beginners artists
#If it works it works. But doing the second one is just dumb#There are ways to do dynamic lines that doesn't involve the sketch looking like that#If it works it works but I'm giving the author such a fat side eye for recommending that to clearly young artists#And just because the end result looks pretty it gets shared around a lot#Hopefully it's gonna help like 3 people who already have good anatomy and this will help them make their drawings less stiff#The rest? Eh a few more years of unreadable even to the author sketches#I mean you could teach people how to draw confident lines from the elbow/shoulder and it'll help everyone mentioned above and more#But that's boring amirite#The author is a grown ass man too omg#My issue isn't that he made a tutorial while doing something wrong btw#I love it when beginners share tips and tricks with each other#The issue is that he has a good enough level in a separate skill that people will look at this and this#'oh! This is one of the good artists that know what he's talking about. & it's so easy to follow unlike the boring art lectures. Gotta rb!'
0 notes
Text

#AUGHHSHH HELP#this one small ice cream was kicking my ass lmao#im not even done with it yet#it still needs the stick and i have to mess with the lighting#and idk how lighting works outside of the tutorial i did so im gonna be messing around with that for who knows how long#the ice cream is also in the void#idk what the do for the bg yet.....#im gonna finish this im too far in#and then i have to do it again sometime in the future when im better at blender cause it could be better#but u know beginner things!#asmo ice cream...ur gonna be my progress piece#u know when ppl redraw their old art over time#that but with this#im gonna go exercise my whole body feels scrunched up
1 note
·
View note
Text

𝐂𝐎𝐎𝐋 𝐊𝐈𝐃 𝐆𝐎𝐍𝐄 𝐋𝐎𝐒𝐄𝐑! ★
content: prodigy!abby x nerdy!reader, childhood friends, university-based, fluff (for now), romance + tension (little bit angsty), drabble length but switching up the small caps (experimenting. heh), mainly jotting an idea, not a certified abby expert.


It was an absolute murder to discover that she could not fufill this one off her bucket list.
Fucking video gaming?
Exactamundo! Abby can outstand everybody in nearly anything, being everything from a virtuoso violinist, to a glorified part-time fisherman, and a damn gourmet chef as well. She paraded around the entire campus pursuing a name in every elective and Olympic hobby you could ever think of. Name it, chances are she's done it. Actually, more than done it, all things considered.
But video games? Guess the esteemed Abby Anderson had finally tumbled downhill and suffered defeat; looking you up out of all computer-smart people felt treasonous to her, but seemed high-priority to the eye of the beholder, the eyes in question even rolling. You don't need an in-person class course on fucking Skyrim. Look at the tutorials!
“So, how the hell do I shorten my speedrun times?”
None of it made a lick of sense. Well, the wanting to do speedruns part, you see the appeal in a medieval-inspired game. Speedrunning sucks the fun and the atmosphere out of a truly gorgeous game such as the forenamed. Yet, it's not like you haven't experimented in closed-world speedruns after immersing yourself in collecting all the achievements; Firewatch takes the cake.
But, still, coming to you—a forgotten, childhood friend whom she ghosted—makes no logical sense. Games are easy-peasy. Literal pieces of cake!
You scrunch your nose at the reclined blondie on your bed, confused. “Um, by watching a tutorial?” Almost laying back into a condescending tone, maybe even a little. “Did you even think to do that before knocking in the dead of night?” Her mordant, stick-up-the-ass kind does the same thing to you, so, you can gripe at that game all you desire.
“Hey,” she pouts, sounding out mock-offense. She scoots up from her prone position on the bed to face you—so proper. “Everything has more to it than what you see.” Sure, philosopher. “And there definitely is with video games. I keep losing. Besides, if I can't stomach skydiving or rock-climbing, then this is next on my list.”
“Pft—”
“What? You know I don't do heights.”
Oh, my god. “'You keep losing?'” Is she a prodigy at radical honesty?
Pond-blue eyes toss in a perfect, resentful circle. She scoffs, “Why do you think I came over here?” Complaining right hand flicking with attitude.
“I don't teach beginners.”
Your sarcasm flies not even an inch under her radar; it was always a retreat tactic back in highschool—when this imitative facade first hardened. “Oh, okay.” She bites you back with it too. But it never even occured to her that you might just be serving a tablespoon of teasery. Being old friends, having lonesome yearns, even stubborn prodigies can be painted in a rosy picture.
Still can see those young, faded freckles. Lovely ones.
“This was a mistake, wasn't it?” An unpleasant question. Drops from her lips almost wantonly.
It strains your chest cavity.
Is seeing her a mistake?
Not really. You hope not really. Once, there was a time where she was suddenly rude, dismissive and up every aspiring valedictorian's ass, but all paths lead back, you believe. Somewhere underneath that porcelain facade—and hot, rocking bod—is a clean crack in her over-achiever matrix; softness is bleeding out. You can see the beginning brooks of it like a kingly ichor. Possible smiles that aren't contemptuous.
What next, an apology?
“Can I at least.. say sorry, before going?”
Sorry—going? Fuck, you majorly zoned out. “What?” You loom in closer, throwing the one-brow raise. The proximity barely even occurs to you.
“For being a jerk, for blowing you off, ..” The list implies endlessness as her voice fades out. In a way, you expect her to pick up and continue. But, after the gestures and head-tilts, she pauses. Reinstates eye contact, pauses, and works her lips again. An awkward, prefacing breath skims. “And I guess, 'm also sorry for.. this?”
Before comprehension hits, it is too late. Darkly, a warmth brushes your cheek and a silence catches your lips, blocking your eyes out. It makes you feel blindsided, this short-lived kiss, one you suspend wide eyes for, tilt your neck for, accept without question. A strange deja vu rushes to your nape.
You shiver.
It even ends before you understand it, Abby pulling away with light-glossed eyes you swear are stones of aquamarine in disguise. She cracks; dints a smile in her cheek. Proud, anticipating. Having her this close made your inhales excessive; you needed all the air in the world to function right now. Deep breathing.
She smells like the outdoors.
Naturally.
“Good?” She has to reassure herself.
“Yeah,” you quickly spout, croak even. Wherever in the world your head is, it's not here. “Not really a prodigy at kissing, so..” And while it is somewhere, the remnants of her kiss are phantom. They have not stopped yet.
An amused chuckle greets in gusts across your lips, from your radical honesty, the moment itself, whatever. Crowns you the jokester anyways. “Guess we both have something to learn then.”
Wonder what future that comment entails.
#✮─── . aestra's bibliotheca#abby anderson#abby anderson x reader#tlou abby#abbyanderson#prodigy!abby#abby tlou#abby anderson fluff#abby anderson angst#abby anderson imagine#abby anderson drabble#abby anderson tlou2#abby the last of us#tlou 2#tlou x reader
421 notes
·
View notes
Text
Ok! I've finally decided to put together a (somewhat) comprehensive tutorial on my latest art~
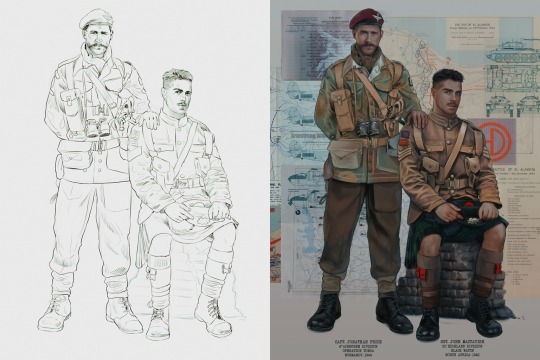
Please enjoy this little step-by-step 💁♀️
First things first--references!
Now I'm not saying you have to go overboard, but I always find that this is a crucial starting point in any art piece I intend on making. Especially if you're a detail freak like me and want to make it as realistic as possible 🙃
As such, your web browser should look like this at any given point:

Since this is a historical piece, it means hours upon hours of meaningless research just to see what color the socks are, but...again. that isn't, strictly, necessary 😅
Once I've compiled all my lovely ref pics, I usually dump them into a big-ass collage ⬇️
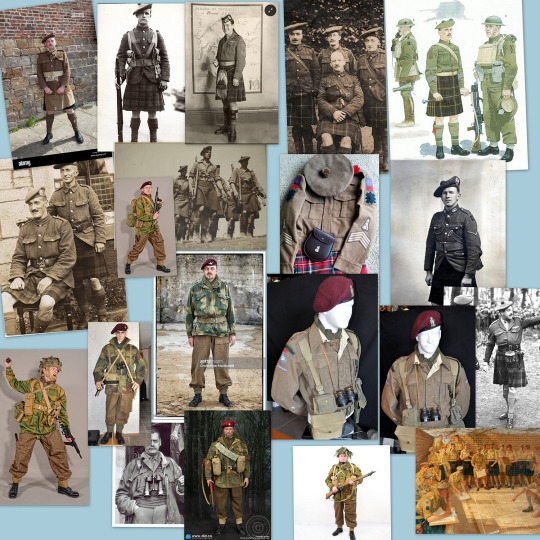
(I will end up not using half of these, alas :'D)
Another reference search for background material, and getting to showcase our models of choice for this occasion~
When picking a reference for an actor or model, the main thing I keep in mind (besides prettiness 🤭) is lighting and orientation. Because I already kinda know what pose I'm gonna go with for this piece, I can look for specific angles that might fit the criteria. I should mention that I am a reference hound, and my current COD actor ref folder looks like this:

Also keep in mind, if you're using a ref that you need to flip, make sure you adjust accordingly. This especially applies to clothing, as certain things like pants zippers and belt buckles can be quite specific ☝️
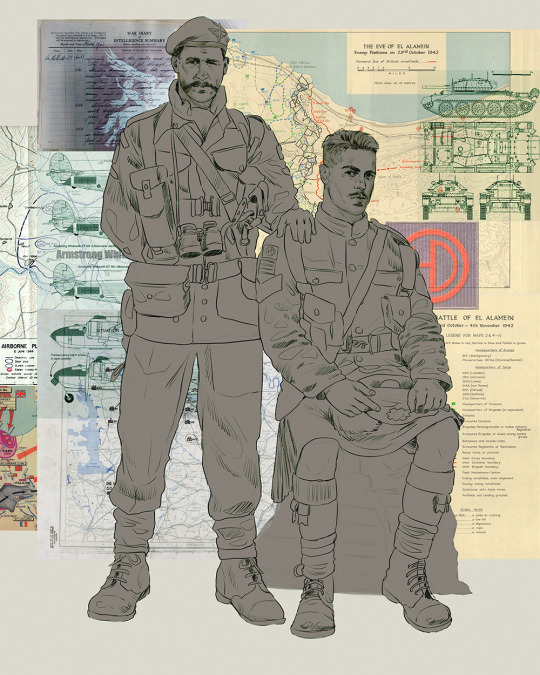
Now that we've spent countless hours googling, it's time to start with a rough sketch:
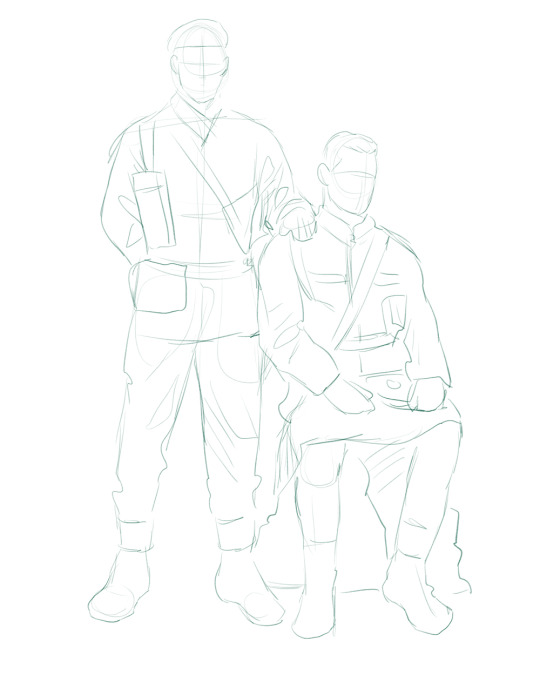
It doesn't have to be pretty, folks, just a basic guideline of where you want the figures to be.
The next step is to define it more, and I know this looks like that 'how to draw an owl' meme, but I promise--getting from the loose sketch above to below is not that difficult.
Things to keep in mind are--don't go too in-depth with the details, because things are still subject to change at this point. In terms of making a suitable anatomically-correct sketch, I would suggest lots of studying. This doesn't even have to be things like figure drawing, I genuinely look at people around me for inspiration all the time. Familiarize yourself with the human form, and things like weight, proportions, posing will seem a little more feasible.
It's also important at this stage to consider your composition. Remember to flip the canvas frequently to make sure you're not leaning to one side too often. I'm sure something can be said for the spiral fibonacci stuff, which I don't really try to do on purpose, but I think keeping things like symmetry and balance in mind is a good start ✌️

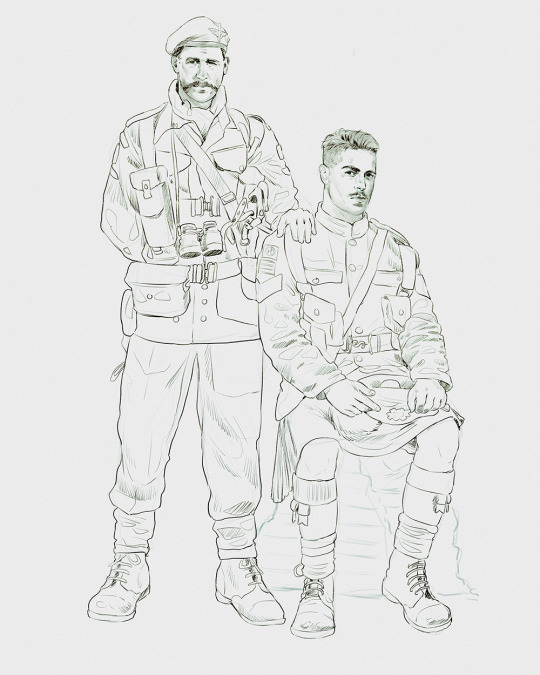
Next step is just blocking in the figures. Standard. No fuss 👍
Now onto the background!
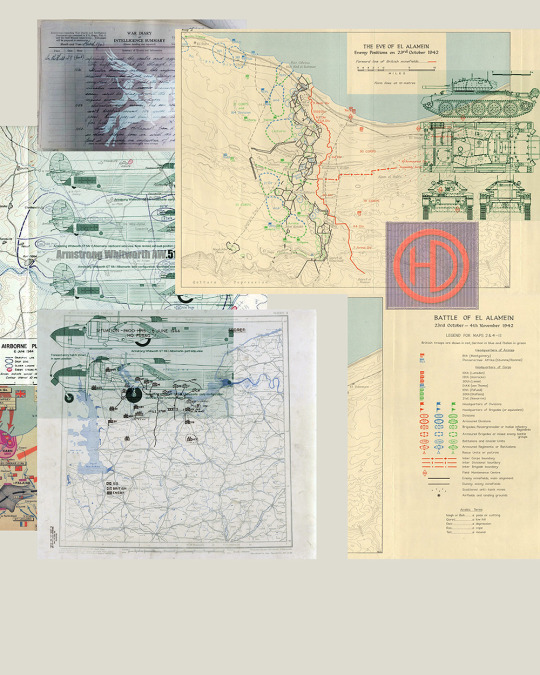
It's frankly hilarious how many people thought I was *hand-drawing* these maps and stuff 😂😂 I cannot even begin to comprehend how insanely difficult that would be. So yeah, we're just taking the lazy copy and paste way out 🤙
I almost always prepare my backgrounds first, and this is mostly to get a general color scheme off the bat. For collage work, it's really just a matter of trial and error, sticking this here, slapping this there, etc. I like to futz around with different overlay options until I've found a nice arrangement. Advice for this is just--go nuts 🤷♀️
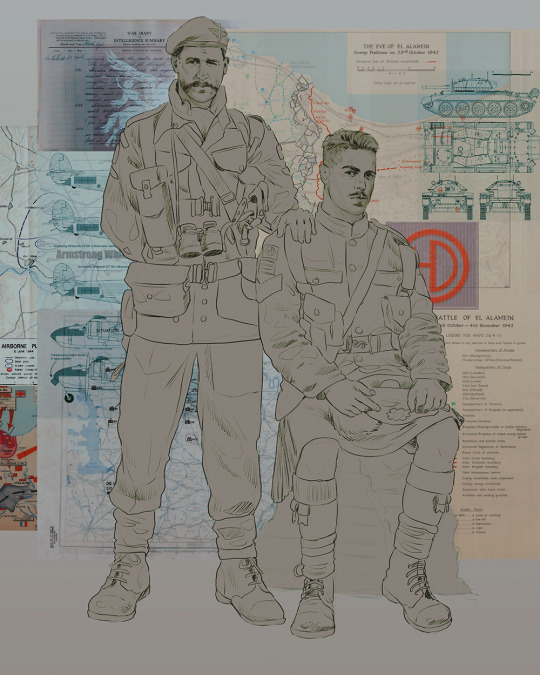
Next, I add a few color adjustments. I tend to make at least 2 colors pop in an art piece, and low and behold, they usually tend to be red and blue ❤️💙There's something about warm/cool vibes, idk man..
Now we move on to coloring the figures. This is just a basic block and fill, not really defining any of the details yet.
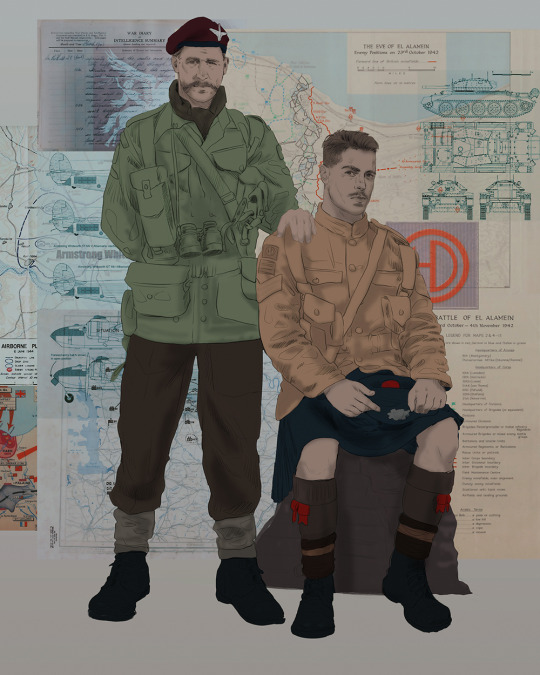
Next, we add some cursory values. Sloppy airbrush works fine, it'll look better soon I promise 🙏
And now--rendering!
I know a lot of beginner artists are intimidated by rendering, and I can totally understand why. It's just one of those things you have to commit to 💪
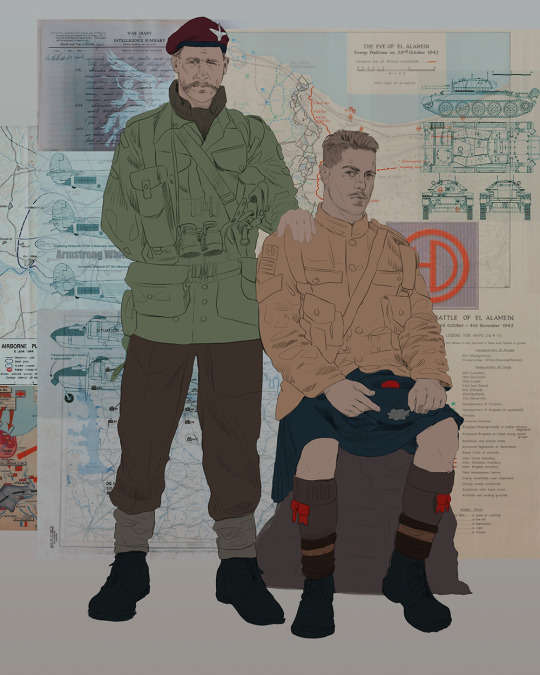
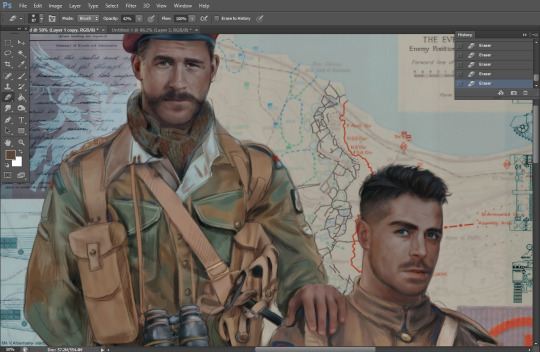
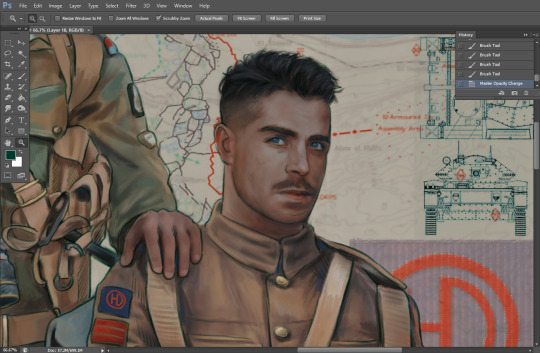
I've decided to show a brief process of rendering our dear Johnny's face here:
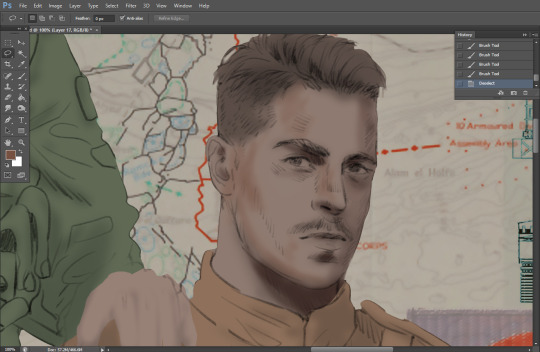
Starting off, I usually rely on the trusty airbrush just to get some color values going. Note--I've kept my sketch layer on top, but feel free to turn it on and off as you work, so as to not be too bound to the sketch. For now, it's just a guideline.
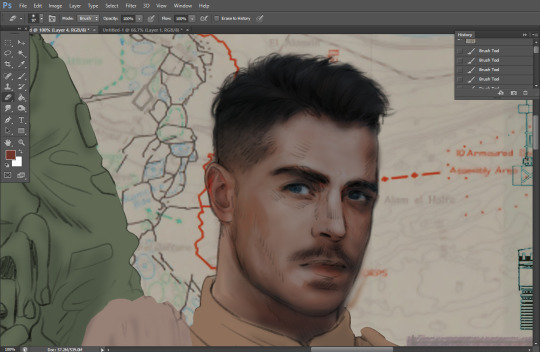
This next stage may look like a huge jump, but it's really just adding more to the foundation. I try to think of it like putting on make-up in a way~ Adding contours, accentuating highlights. This is also where I start adding in more saturation, especially around areas such as ears, nose and lips. Still a bit fuzzy at this point, but that's why we keep adding to it 💪
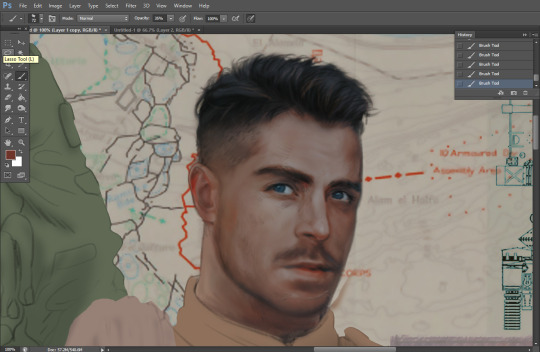
A boy has appeared! See--now I've removed most of the line layer, and it holds up on its own. I'll admit that in order to achieve this realistic style, you'll need lots and lots of practice and skill, which shouldn't be discouraging! Just motivate yourself with the prospect of getting to look at pretty men for countless hours 🙆♀️
I'll probably do a more in-depth explanation about rendering at some point, but let's keep this rolling~

Moving forward is just a process of adding to the figures bit by bit. I do lean towards filling in each section from top to bottom, but you can feel free to pop around to certain parts that appeal to you more. I almost always do the faces first though, because if they end up sucking, I feel less guilty about scrapping it 😂 But no--I think he's pretty enough to proceed 😚
They're coming together now 🙆♀️ Another helpful tip--make sure you reuse color. By that, I mean--try to incorporate various colors throughout your piece, using the eyedropper tool to keep a consistent palette. I try to put in bits of red and blue where I can
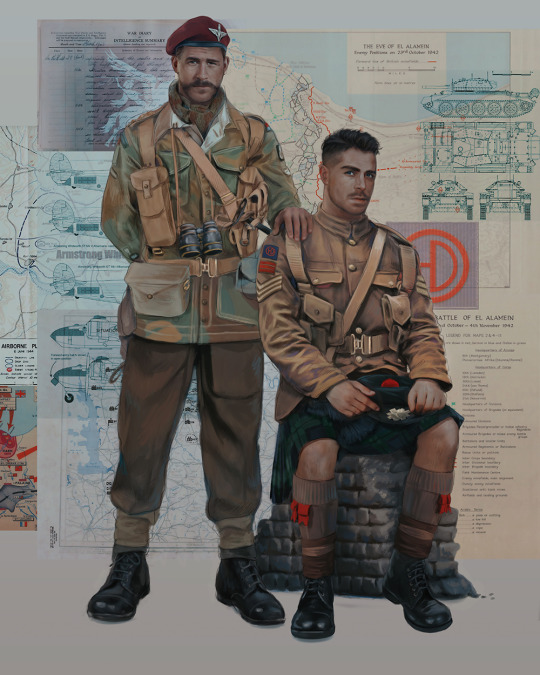
Here they are fully rendered! Notice I've made a few subtle changes from the sketch, like adjusting the belt buckles because I made a mistake 😬 Hence why you shouldn't put too much stock in your initial sketch~
The next step is more of a stylistic choice, but I usually go over everything with an outline, typically in a bright color like green. Occasionally, I can just use my initial line layer, but for this, I've made a brand new, cleaner line 👍
And the final step is adjusting the color and adding some text:
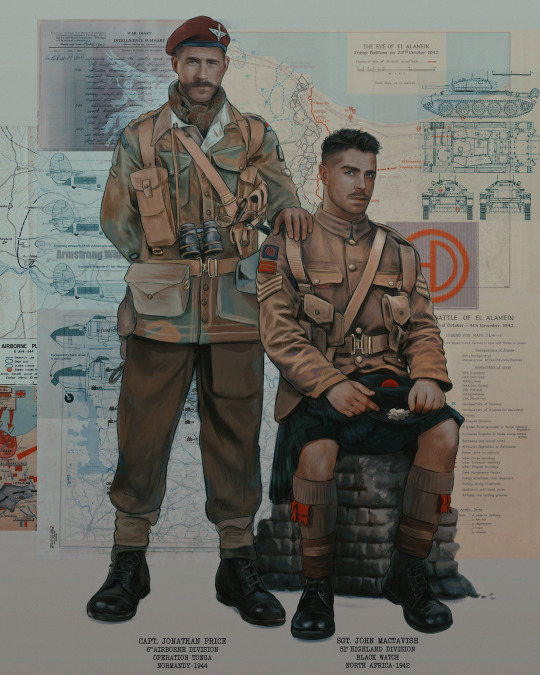
Tada!! It's done!
All in all, this took me the better part of a week, but I have a lot of free time, so yeah ✌️
I hope you appreciated that little walkthrough~ I know people have been asking me how I do my art, but the truth is--I usually have no clue how to explain myself 😅 So have this half-assed tutorial~
As a bonus, here is a cute (cursed) image of Johnny without his mustache:
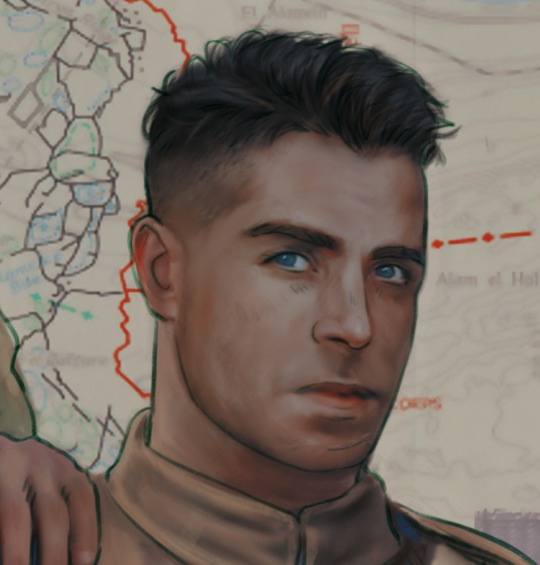
A baby, a literal infant child !!! who put this wee bairn on the front lines ??! 😭
Anyway! peace out ✌️
#tutorial#my art#art tutorial#since people have been asking#I remembered to save my process from this latest work~#enjoy 🙆♀️
1K notes
·
View notes
Note
What were you even trying to make in blender 😭
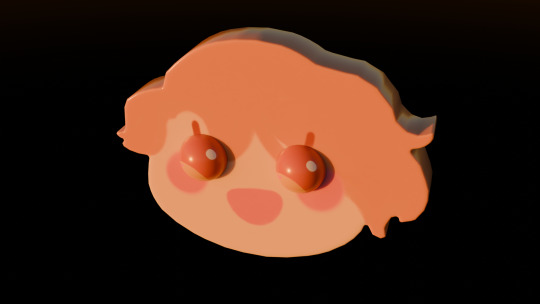
well at first i tried to make a simple circle, hopefully build my way up to making a 3d model of peter's head so i can have a better reference on hand. well that can't happen because trying to make a simple circle gave me FIVE DIFFERENT LUMPY SQUARES. I DIDN'T ADD ANYTHING, I DIDN'T DO ANYTHING OUTSIDE OF THE TUTORIAL. so i start getting stressed because the squares won't go away. they end up leaving of their own accord when im not even touching anything. that's fine. try again. this time, the square instead becomes a massive rectangle. again: ALL I CLICKED was "subdivide, 5 cuts, 1 smooth" like the tutorial said to. the tutorial is a lie. a sham. a facade. "for beginners" my ass. beginning to get on my fucking nerves more like it. beginning to make me murderous. beginning my mental breakdown
84 notes
·
View notes
Text
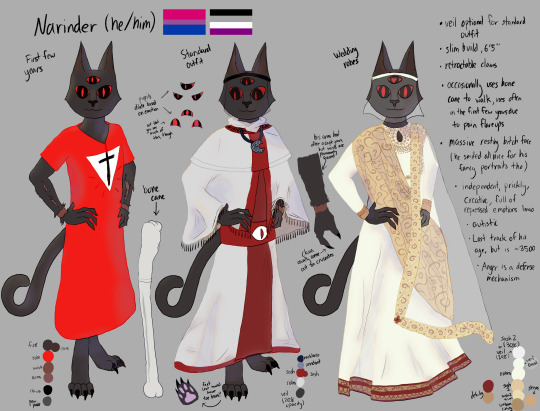
hi hey holy fuck i'm done with this. I tried to render for the first time following a "15 minute" tutorial and my noob ass turned it into a 3 hour learning experience. But now I have Narinder's reference for The Risen Lamb and the Fallen God! Rambles under readmore
SO I BARELY DRAW because I started learning how to draw like... May of last year, and then went bonkers over the summer making lots of progress and once the school year started in august I dropped it to focus on writing... and have drawn basically 1 thing in between then and now. Anyway. Last week I remembered, oh yeah, I used to draw sometimes. And suddenly had an all consuming urge to practice again.
And you know what? I forgot how fucking FUN drawing is. I take it much less seriously than I do my writing so my technique for now is pretty much "go ham and try a bunch of shit because you're getting practice and having fun with it anyway". and it IS fun until I try to do a specific thing and can't figure out how so thanks to those who tuned in to my stream tonight to see me push through the frustrating part of finishing this LMAO. uh according to the krita file this took me 13 and a half hours
If you didn't catch it a while back, the one thing I drew during my kinda-art-hiatus was my Lambert reference! Normal outfit, casual outfit (that they sometimes wear while off-duty, usually when visiting Ratau or just hanging out alone), and wedding outfit ^^
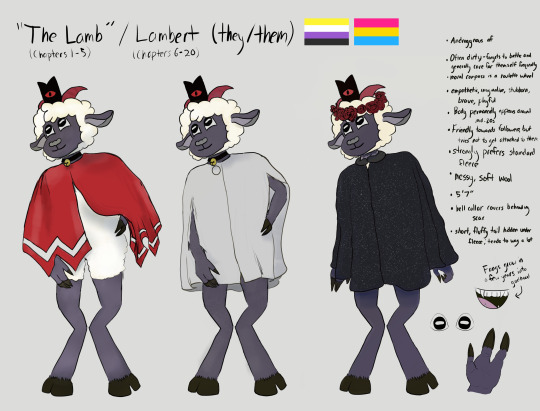
...Which means now that I have my narilamb references I can commission my friends. i have a few people who i already plan to open my wallet for.
"Ive already drawn you fanart for ur fic and now the outfits are very slightly wrong :<" ITS FINE I AM CHERISHING IT FOREVER PLS DONT CHANGE IT ITS PERFECT
"is it okay if i draw your designs" Why do yall think i would be mad about this i will eat that shit UP i would fucking LOVE that and I'm already foaming at the mouth because i'd been asked that a couple times while i was drawing narinder's reference lol
I'm still a beginner and constructive criticism is welcome! Will probably make less intensive references for the OCs in Risen/Fallen or at least draw them, Thenana and Juno for sure
#hannah's rambles#cult of the lamb#narilamb#narinder#cotl#Hannah draws#digital art#idk how else to tag this
174 notes
·
View notes
Note
I hope this isn’t super unsolicited but I’ve been following you for a LOONG time and I always thought u were just anither artist that has been non-stop dedicated to their craft since they were a kid but reading ur pinned shocked me to my core 😭😭 You’re so good what!! Do you have any tips for a beginner artist that starts later in life (i’m 22) like what kind of tutorials to watch or how to study? you’re my #1 inspo when it comes to artstyle
OMG this is soooo touching really! The best feeling is to inspire others and honestly, you are making me tearing up😭😭 Yea, I'm on the beginning of my journey only, and I'm trying to observe everything I see to grow as fast as possible, since I lost pretty damn much years aswell. But to cheer you up a little, I believe that the older you get, the easier it is to learn, since you understand many things better. So what would I suggest so far and what I'm doing myself: 1. Rule numba one - observing. Literally. Become a sponge and soak up information as if your life depended on it. The thing is that in drawing, as in almost all crafts, OBSERVATION is very important. Your brain needs to get information from somewhere on how and what to do, it cannot generate from 0. And this means that your task is to fill it with information. What I advise is to collect drawings of everyone you like, no matter how cool they are. Watch speedpaintings, surround yourself with creativity, so that you slowly remember all sorts of little things. Speedpaintings are a treasure trove, you will unconsciously remember other people's ready-made solutions and make them in the future. 2. The second piece of advice is to try to repeat other people's work for learning purposes. This technique is also used in graphic design. You see the finished result - try to come to it. It doesn't matter that it won't turn out the same, but try to look at every detail and figure out how to achieve it, this will help in your own future works. 3. The third piece of advice is anatomy and fundementals. Yea-yea, it's boring, I always want to get to the fun part faster too. But literally in my last work I laughed at myself, like: "Wow, I literally draw simple shapes in the body and just smooth out the corners to make it more natural. You need to learn shapes." 4. It will probably take me a million points, so I will make this the last one as the main advice - references. Remember, your head cannot generate solutions from nowhere, so use references!! The more you draw, the more will be stored in your head and in the future you will be able to come up with everything yourself, but now, it is important to repeat what already exists. Photos are a must have! Other people's drawings - only in general, details and not a complete work. For example, I have not yet figured out how I want to draw noses - I go to see how my favorite artists do it and learn from them. And here I do not know how to paint clothes, I go and collect a collage of clothes that others do and try to understand how they came to this. 5. Last advice will be practical. Anatomy book that saving my ass - https://anatomy4sculptors.com/ Youtubers - NIRO, Pikat, Proko, Angel Ganev. Main advice - References are the most important part. Preparing for an art is important. Practicing all the time - is important. And HAVE FUN! Drawing should be FUN, it's not routine, there are lots of ways to make the process fun. :) Hope it helps! Sorry for the mistakes, English isn't my first language!
24 notes
·
View notes
Text
Today I unearthed a folder in which I saved some good memories from school, mostly drawings and doodles I made together with friends or by myself, and it's making me emotional.
I... found that I made fanart for a game I loved at that time and... the art wasn't bad. Especially for a teenager and beginner artist (yes, I am a beginner artist to this day, it's embarrassing, I know). The art was cute, even has some attempts at shading and converting colors to black and white. I like it. A lot actually.
And now I just sit on my bed, holding these old sketches, and wonder why I never pursued art. I loved it so much. I had fun. My younger self wouldn't have kept these drawings if not, and my older self can see it on the paper, in every line, every stroke, every tiny grain of pencil dust.
What made me think that this wasn't worth pursuing, not worth trying again until many years later? What discouraged me? I don't remember an exact moment or anything; the only thing I know for sure is that I knew and believed - and know and believe to this day, to be honest - that there's a lack of innate ability on my part and that others my age are so far ahead and were back then as well. Hell, I've been behind since I failed to color within the lines in kindergarten.
It feels and felt like a fool's errand to deal with my clumsy hands and messed up back for hours just to end up with something that is... maybe charming in my eyes, but so, so subpar in the grand scheme of things.
I stuck to writing in the end because it was the only thing people said I was good at. And I'm glad I - just this once - had the courage to do so and to keep going and, eventually, push myself into sharing it on the internet too. Through sheer delusion and determination and lots, oh, lots of writing I clawed myself up to a place where I feel just confident enough in my skills to not constantly question myself and happily create.
And therein lies the answer for art as well, doesn't it? "Just keep trying, just put in all those hours and days and months and years of work for it as well, until your hands bleed and your back gives out, eventually you'll get there! Talent is not required either!"
But it's not that simple. I'm not sure I can do this again, muster enough courage and delusion to be terrible for years until I finally start making things that go from subpar to mediocre. And maybe never from mediocre to decent or even good.
When I learned to write, I had other people's claims that I was talented to fall back on and wasn't as hopelessly behind other people. Now motivation is lower and frustration is higher. Learning curves and empty canvases paralyze me; the last time I made art it took me 2 full hours until I could push past it. Not to mention that I'd picked out all references and tutorials and everything a week before.
Where does this leave us? What will I do, you ask? Well. Even if I never beat these demons I can assure you that, every once in a while, the urge will overcome me and I will attempt something. Maybe I'll learn and improve just a little by accident. Maybe I'll even get my ass up and actually learn sometime.
I am technically currently doing an art event somewhere else, so at the very least I will be forced to make a few pieces.
And I know myself a bit better these days. That also helps.
I know that, if anything will get me past the demons, it's obsession, the need to illustrate my own fics and, most importantly, porn.
#if you've read this far thank you for hearing me out#i did want to end this on a lighthearted note#cílil's random rambles#thoughts and feelings#on art#artist woes#being a beginner artist#please know that i'm just very strict with myself but would never ever have the same standards for anyone else
25 notes
·
View notes
Text
Nighty beginner art tips
- never start with full body drawings. Not even half body. Maybe not even face. I’ve been drawing my whole life and I rarely can put together a full body drawing. I started to learn drawing with an eye. Do it step by step, you can’t concentrate on too many things at once. Also! I once heard that if you draw someone the eyes determine if you can recognise the person, so they have to be spot on and that stuck with me ever since.
- don’t start with full body -colour- drawings. Actually don’t start with colour. fck colour. learn that later.
- greyscale is easier to develop a sense for shading and rendering. At least for me. Because you only need to think in black- white and midtones and not hue, saturation and brightness. It’s much more difficult to use colours to create an interesting composition than just black white and midtones imo.
- Develop an eye for what looks right. Just look at people. Look at stuff you want to draw. You don’t know how much time I’ve spent to just literally look at Sukuna and just -study- him and how he works. Do it with faces, fingers, arms, feet. Just -look-. Perspective is an evil btch and I still struggle with it too, but it will get easier! The next step is to learn how to translate it onto your canvas.
- tracing references (photos) is completely fine to get a feeling for anatomy and poses! Next step is to alternate your drawing from the reference. True Form Sukuna works perfectly for that cause you have two extra arms to draw and an unusual cute ass face.
- Tutorials are fine and the internet is full of it but you learn more if you fail a thousand times. Draw and compare. Draw and compare. It also helps with the eye I talked about earlier.
- If you draw traditionally use different pencils for a single drawing (HB, 2B, 6B etc) If you draw digitally, use different brushes.
- If you think you’re stuck and you don’t develop: use. different. pencils/brushes.
- Almost the most important thing: have INTENTION and THOUGHT behind your art. You can’t ppl expect to be amazed by your art, if you didn’t put intention and thought behind it. It IS visible if you did or didn’t.
- Take.Your.Time.
- Please don’t ask people for advise, who clearly don’t have the artstyle you are pursuing. They probably don’t know how to help you. At least I don’t. (don’t ask me about anime style please.)
122 notes
·
View notes
Text
Most of my photos were from 2012 to 2016. I have learned a lot since then. My photo restoration hobby has improved my image editing skills in general. And I was curious if I tried editing one of my photos from scratch if I could improve upon my original edit from years ago.
This is my friend Nicole.

( @nicolebelongs I hope you don't mind being my guinea pig for this.)
This is just a direct output of the original RAW file. RAW files are typically flat by nature so you have more latitude when processing and editing.
This is my original finished edit from 2016.

I actually made a pretty big lighting mistake when shooting this photo. A beauty dish can cause harsh reflections on makeup and so Nicole's forehead bounced all that light directly into my camera. I was still learning back then and didn't know anything about makeup. All that was required was angling the dish a few degrees up or down, which feels like a pretty silly mistake all these years later.
And here is my 2023 edit. I did not reference the 2016 image until after I finished.

The main priority was the glare on the forehead, but I think this is much more balanced overall as well. I also tried to fix the weird neck shadow and the lack of light in the eyes. I probably should have used a reflector originally, but thankfully Photoshop has a solution to almost any photography blunder. I removed some vellus hairs on the edge of the face, as that is not something you would notice in real life, but the camera and lights can exaggerate them. I'd also like to say I love the new remove tool. Getting rid of flyaway hairs was such a monotonous pain in the ass before and that thing just zaps them with a click.
I am also trying to learn new editing techniques I was never good at. There is a retouching technique called "dodging & burning" that I had trouble with back in the day. Mostly because finding advanced tutorials can be difficult. Much of the content on YouTube focuses on beginner techniques.
Dodging & burning was originally innovated by Ansel Adams back in the days of film. He would block portions of his negatives for a second or two so those areas would develop darker. Or he would let sections expose longer so they would be brighter. It was basically analog Photoshop. You can see a neat video of his darkroom here.
While Ansel mostly did landscapes, portrait photographers of the digital age utilize dodging & burning to help bring out dimension in the face. It's quite similar to makeup contouring, actually. It is very hard to perfectly light every nook and cranny on a face and many portrait lenses are slightly telephoto. Longer lenses compress faces to remove distortion, but you end up losing three-dimensionality as a tradeoff.
My first attempt dodging and burning did not go well but I played with this photo for a few hours trying many different approaches and I think I landed on something I like. But I have been staring at it for way too long, so it is hard for me to look at it objectively.

I do wish we could all look at this on the same display. Green is notoriously difficult to keep consistent from screen to screen.
In any case, there are a dozen subtle things I did with my upgraded knowledge that may not be noticeable individually, but I'm hoping it all adds up to a better finished result.
And I guess we'll see if there is a consensus regarding the dodging & burning. Either good, bad, or just... different.
89 notes
·
View notes
Text
thank you to the amazing artists on youtube who make detailed tutorials and hacks for anime drawing on intimidating art softwares and programs for beginner artists FOR FREE . and encouraging in every video like your art doesn’t need to be good starting out you will do great keep practicing and you can be just as good of an artist your art is yours and no one else’s etc etc . my word ya’ll need your ass ate yesterday
#‧₊˚ 🌸 ‧₊˚ 𐙚 sora speaks#so helpful dude like sooo helpful#THIS SHIT IS PEAKKK LIKE I USED TO DRAW AT SOME POINT so i’m not 100% a beginner but like still very much so when it comes to digital +#navigating these intimidating programs lol#makes the hobby less scary to start out lol
10 notes
·
View notes
Text
Tylie Boo 💋🚬
x 25 • 08 • 24 x

• Please ignore my half-assed attempt at shading clothes / hair / smoke etc. and the fact that I didn't clean out the edges, I got way too excited about the new skin rendering tutorial I found and unconsciously decided to fixate on that element. Also I cooked this up in less than 2 hours. I think the messy style really fits in with the Fight Club aesthetic.
• Don't worry everyone, I'll probably do a cleaner, more-balanced version with better features and shading ahahah. This was mostly an experiment and I had way too much fun with it. Do expect more of this in the future from me 💖.
• My art style will probably stay like this from now on.
• If feasible, please share some constructive criticism! I'm no beginner but I'm certainly no professional!
• FOR YOU, @dweebsfilingcabinet !!! 💖💖💖
𖤐 - ProjectMush46 💫
#Art Account#Art#Drawing#Digital#Digital Art#Skin#Rendering#Silly#Fight Club#Tyler Durden#Tyler Durden Fight Club#Fanart#Film#Movies#1999#ProjectMush46
20 notes
·
View notes
Note
What do you say is the easiest app / thing to use to code for interactive fictions for beginnigers? Damn, fuck my dyslexic ass. Sorry for grammar mistakes
I am absolutely no expert on this thing, but I use Twine SugarCube and I think it’s easy enough for beginners to pick up. There are a few great tutorials and templates that will help you get a start!
I hope that answers your question, feel free to come back if you have more!
8 notes
·
View notes
Text

This was my first artwork of my OC for Diabolik Lovers. The first one was when I was sooo beginner when it comes to digital art, as you can see 👉👈
I watched a lot of art tutorials, then a year passed, I tried remaking my OC. Which was the second pic 🫣
Akagi Nagato is a girl boss vampire hunter with a mysterious history how the vampires doesn't notice she's human. I'm really fond of girls who can kick someone's ass ♡ AAANDDD guess who were her love interests??
*drum rolllssss*
It's Laito, Yuma and Shu!
I wrote a fanfiction story about them in wattpad, I SWEAR my oc and Yuma had a lot of steamyyy scenes🔥 but I went through a huge writer's block and decided to quit writing it in the end.
#diabolik lovers#oc art#oc#diabolik oc#shu sakamaki#yuma mukami#laito sakamaki#diaboys#diabolik boys#diabolik lovers fanart#diabolik lovers fandom
24 notes
·
View notes