#* NPM (Node Package Manager)
Explore tagged Tumblr posts
Visit Tumblr Blog
Explore Tumblr blogs with no restrictions, modern design and the best experience.
Last Seen Tumblr Blogs


Fun Fact
Mobile US users spent an average of 115.8 minutes on Tumblr app monthly.
Text
Mini React.js Tips #2 | Resources ✨

Continuing the #mini react tips series, it's time to understand what is going on with the folders and files in the default React project - they can be a bit confusing as to what folder/file does what~!
What you'll need:
know how to create a React project >> click
already taken a look around the files and folders themselves

What does the file structure look like?
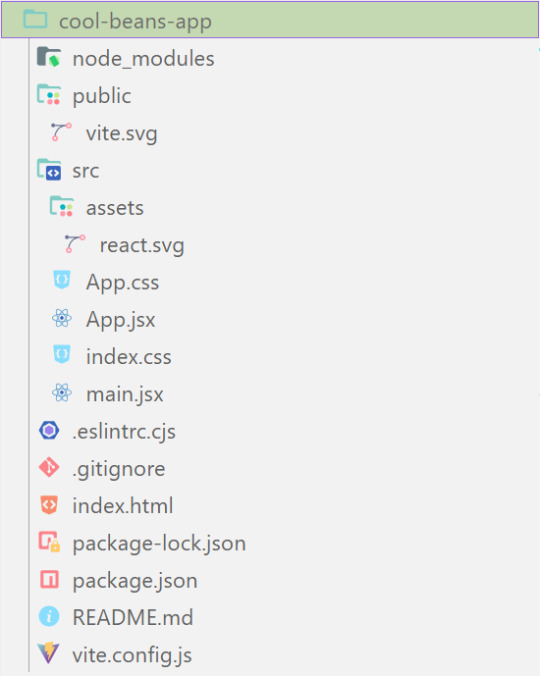
✤ node_modules folder: contains all the dependencies and packages (tools, resources, code, or software libraries created by others) needed for your project to run properly! These dependencies are usually managed by a package manager, such as npm (Node Package Manager)!
✤ public folder: Holds static assets (files that don't change dynamically and remain fixed) that don't require any special processing before using them! These assets are things like images, icons, or files that can be used directly without going through any additional steps.
✤ src folder: This is where your main source code resides. 'src' is short for source.
✤ assets folder: This folder stores static assets such as images, logos, and similar files. This folder is handy for organizing and accessing these non-changing elements in your project.
✤ App.css: This file contains styles specific to the App component (we will learn what 'components' are in React in the next tips post~!).
✤ App.jsx: This is the main component of your React application. It's where you define the structure and behavior of your app. The .jsx extension means the file uses a mixture of both HTML and JavaScript - open the file and see for yourself~!
✤ index.css: This file contains global styles that apply to the entire project. Any styles defined in this file will be applied universally across different parts of your project, providing a consistent look and feel.
✤ main.jsx: This is the entry point of your application! In this file, the React app is rendered, meaning it's the starting point where the React components are translated into the actual HTML elements displayed in the browser. Would recommend not to delete as a beginner!!
✤ .eslintrc.cjs: This file is the ESLint configuration. ESLint (one of the dependencies installed) is a tool that helps maintain coding standards and identifies common errors in your code. This configuration file contains rules and settings that define how ESLint should analyze and check your code.
✤ .gitignore: This file specifies which files and folders should be ignored by Git when version-controlling your project. It helps to avoid committing unnecessary files. The node_modules folder is typically ignored.
✤ index.html: This is the main HTML file that serves as the entry point for your React application. It includes the necessary scripts and links to load your app.
✤ package.json: A metadata file for your project. It includes essential information about the project, such as its name, version, description, and configuration details. Also, it holds a list of dependencies needed for the project to run - when someone else has the project on their local machine and wants to set it up, they can use the information in the file to install all the listed dependencies via npm install.
✤ package-lock.json: This file's purpose is to lock down and record the exact versions of each installed dependency/package in your project. This ensures consistency across different environments when other developers or systems install the dependencies.
✤ README.md: This file typically contains information about your project, including how to set it up, use it, and any other relevant details.
✤ vite.config.js: This file contains the configuration settings for Vite, the build tool used for this React project. It may include options for development and production builds, plugins, and other build-related configurations.
Congratulations! You know what the default folders and files do! Have a play around and familiarise yourself with them~!
BroCode’s 'React Full Course for Free’ 2024 >> click
React Official Website >> click
React's JSX >> click
The basics of Package.json >> click
Previous Tip: Tip #1 Creating The Default React Project >> click
Stay tuned for the other posts I will make on this series #mini react tips~!
#mini react tips#my resources#resources#codeblr#coding#progblr#programming#studyblr#studying#javascript#react.js#reactjs#coding tips#coding resources
25 notes
·
View notes
Text
i want to keep tumblr because i like aesthetics
aesthetic aggregation is important because it allows for intimate relationships to develop outside of life-long domesticated-servile contracts
you transfer
love energy,
actually, when you share your aesthetic, and merge, like that
however
i don't think its possible to make organic relationships the same way it was a decade ago, no, entirely too sanitized
i highly doubt, since the algorithm that i'll ever oganically run into; actually its absurd to even finish that sentence
luckily, i became a sysadmin / programmer, in the interem period, and can actually build the tools this time around
i have an idea for an aesthetic aggregator portal place that combines dump.fm & tumblr with cellular automata, like a living pool you gaze into and everything's a ripple on a wave, man, that's like connected, woah
and i'm schemeing on it, i love lisp, when i go looking everything i want to do is available to me like channeling a spell... somebody already wrote scheme to wasm, that really shouldn't be too hard... still looking for alternate ways to chat :D hmu on xmpp it's exactly like AIM
i've tried node/npm, python, package managers... the best most satisfying one if you're going to go and install a big library, blob thing like that, is probably some flavor of emacs... for me, this is a personal preference, the fact that you 'can' do anything that rust/python/go/js can do in LISP... is enough for me, because, it is elegant, it is more pleasant to look at and easier to read, idk. loving my time with it recently and have been knocking it out of the park most days recently... the past 7 years i've been working on a top secret project, which will have a working alpha demo of the basic features by the end of next week :D
the best os rn is a freeBSD jail with guixSD GNU/linux-libre there's also hyperbola/BSD in the works you want to try to phase out the linux kernel because of all the google/microsoft shenanigans creeping in, you don't need unix/linux any more you can do all your daily driver stuff on an embedded, low power risc soc that costs under a hundo you need less overhead for embedded systems, there's microkernels like genome, and platforms like zephyr, its ok to move away idk one thing i learned its good to take a step back and look at the scope of what you're trying to achieve, try to strip away all the unneccessary parts... a mhz is 1,000,000 calculations a microsecond or whatever, when you sit down and write a piece of code how many calculations exactly do you need to do to do your business, honestly.
^these are the 3 am ramblings of a minimalist
i'm trying to find peers here on my site that's connected to the internet that's why i'm sending messages to it about my interests, pardon me, sir please send $1 to this address
3 notes
·
View notes
Text
React JS
Component-Based Architecture:
React applications are built using components, which are reusable, self-contained pieces of the UI. Components can be nested, managed, and handled independently, leading to better maintainability and scalability.
JSX (JavaScript XML):
React uses JSX, a syntax extension that allows HTML to be written within JavaScript. This makes the code more readable and easier to write.
Virtual DOM:
React maintains a virtual DOM, an in-memory representation of the actual DOM. When the state of an object changes, React updates the virtual DOM and efficiently determines the minimal set of changes needed to update the real DOM, leading to performance improvements.
One-Way Data Binding:
Data flows in one direction, from parent to child components, which makes the data flow and logic easier to understand and debug.
State Management:
React components can maintain internal state, making it easy to build dynamic and interactive UIs. For more complex state management, libraries like Redux or Context API can be used.
Advantages of Using React
Performance:
Due to the virtual DOM, React minimizes direct manipulation of the DOM, resulting in better performance for dynamic applications.
Reusable Components:
Components can be reused across different parts of an application, reducing the amount of code and enhancing consistency.
Strong Community and Ecosystem:
A large community and a rich ecosystem of tools and libraries support React, making it easier to find solutions, get support, and integrate with other technologies.
SEO Friendly:
React can be rendered on the server using Node.js, making web pages more SEO-friendly compared to traditional client-side rendering.
Getting Started with React
To start building applications with React, you need to have Node.js and npm (Node Package Manager) installed. Here’s a basic setup to create a new React application:
Install Node.js and npm:
Download and install from Node.js website.
Create a New React Application:
You can use Create React App, an officially supported way to create single-page React applications with no configuration required:
npx create-react-app my-app cd my-app npm start
import React from 'react';
function Welcome(props) { return
Hello, {props.name}
; }
export default Welcome;
#React JS#Front end Developer#Advanced JavaScript#coding#html css#htmlcoding#html#css#php#website#html5 css3#software#React Training
5 notes
·
View notes
Text
The Debate of the Decade: What to choose as the backend framework Node.Js or Ruby on Rails?
New, cutting-edge web development frameworks and tools have been made available in recent years. While this variety is great for developers and company owners alike, it does come with certain drawbacks. This not only creates a lot of confusion but also slows down development at a time when quick and effective answers are essential. This is why discussions about whether Ruby on Rails or Noe.js is superior continue to rage. What framework is best for what kind of project is a hotly contested question. Nivida Web Solutions is a top-tier web development company in Vadodara. Nivida Web Solutions is the place to go if you want to make a beautiful website that gets people talking.

Identifying the optimal option for your work is challenging. This piece breaks things down for you. Two widely used web development frameworks, RoR and Node.js, are compared and contrasted in this article. We'll also get deep into contrasting RoR and Node.js. Let's get started with a quick overview of Ruby on Rails and Node.js.
NodeJS:
This method makes it possible to convert client-side software to server-side ones. At the node, JavaScript is usually converted into machine code that the hardware can process with a single click. Node.js is a very efficient server-side web framework built on the Chrome V8 Engine. It makes a sizable contribution to the maximum conversion rate achievable under normal operating conditions.
There are several open-source libraries available through the Node Package Manager that make the Node.js ecosystem special. Node.js's built-in modules make it suitable for managing everything from computer resources to security information. Are you prepared to make your mark in the online world? If you want to improve your online reputation, team up with Nivida Web Solutions, the best web development company in Gujarat.
Key Features:
· Cross-Platforms Interoperability
· V8 Engine
· Microservice Development and Swift Deployment
· Easy to Scale
· Dependable Technology
Ruby on Rails:
The back-end framework Ruby on Rails (RoR) is commonly used for both web and desktop applications. Developers appreciate the Ruby framework because it provides a solid foundation upon which other website elements may be built. A custom-made website can greatly enhance your visibility on the web. If you're looking for a trustworthy web development company in India, go no further than Nivida Web Solutions.
Ruby on Rails' cutting-edge features, such as automatic table generation, database migrations, and view scaffolding, are a big reason for the framework's widespread adoption.
Key Features:
· MVC Structure
· Current Record
· Convention Over Configuration (CoC)
· Automatic Deployment
· The Boom of Mobile Apps
· Sharing Data in Databases
Node.js v/s RoR:
· Libraries:
The Rails package library is called the Ruby Gems. However, the Node.Js Node Package Manager (NPM) provides libraries and packages to help programmers avoid duplicating their work. Ruby Gems and NPM work together to make it easy to generate NPM packages with strict version control and straightforward installation.
· Performance:
Node.js' performance has been lauded for its speed. Node.js is the go-to framework for resource-intensive projects because of its ability to run asynchronous code and the fact that it is powered by Google's V8 engine. Ruby on Rails is 20 times less efficient than Node.js.
· Scalability:
Ruby's scalability is constrained by comparison to Node.js due to the latter's cluster module. In an abstraction-based cluster, the number of CPUs a process uses is based on the demands of the application.
· Architecture:
The Node.js ecosystem has a wealth of useful components, but JavaScript was never designed to handle backend activities and has significant constraints when it comes to cutting-edge construction strategies. Ruby on Rails, in contrast to Node.js, is a framework that aims to streamline the process of building out a website's infrastructure by eliminating frequent installation problems.
· The learning curve:
Ruby has a low barrier to entry since it is an easy language to learn. The learning curve with Node.js is considerably lower. JavaScript veterans will have the easiest time learning the language, but developers acquainted with various languages should have no trouble.
Final Thoughts:
Both Node.JS and RoR have been tried and tested in real-world scenarios. Ruby on Rails is great for fast-paced development teams, whereas Node.js excels at building real-time web apps and single-page applications.
If you are in need of a back-end developer, Nivida Web Solutions, a unique web development agency in Gujarat, can assist you in creating a product that will both meet and exceed the needs of your target audience.
#web development company in vadodara#web development company in India#web development company in Gujarat#Web development Companies in Vadodara#Web development Companies in India#Web development Companies in Gujarat#Web development agency in Gujarat#Web development agency in India#Web development agency in Vadodara
8 notes
·
View notes
Text
Importance of MERN Stack
What is MERN Stack?
Four essential technologies make up the full-stack JavaScript framework MERN Stack:
MongoDB: A NoSQL database system known for its flexibility and scalability, MongoDB stores data in a JSON-like format, making it ideal for handling large volumes of data.
Express.js: A minimalist web application framework for Node.js, Express.js simplifies the process of building robust and scalable web applications by providing a set of features for web and mobile applications.
React.js: Developed by Facebook, React.js is a powerful JavaScript library for building interactive user interfaces. Its component-based architecture allows developers to create reusable UI components, resulting in a more modular and maintainable codebase.
Node.js: A server-side JavaScript runtime environment, Node.js enables developers to build fast and scalable network applications. With its event-driven, non-blocking I/O model, Node.js is well-suited for building real-time web applications.
Why Choose MERN Stack?
Streamlined Development: With MERN Stack, developers can leverage the power of JavaScript across the entire development stack, from frontend to backend. This unified approach reduces development time and eliminates the need to switch between different programming languages and frameworks.
SEO-Friendly Architecture: MERN Stack's server-side rendering capabilities, coupled with its support for modern JavaScript frameworks like React.js, make it highly SEO-friendly. This ensures that web applications built with MERN Stack are easily discoverable by search engines, leading to improved search engine rankings and increased organic traffic.
Optimized Performance: MERN Stack's asynchronous, non-blocking architecture allows for seamless communication between frontend, backend, and database components, resulting in faster response times and improved performance. This translates to a smoother user experience and higher customer satisfaction.
Improved Security: In today's digital environment, security is of the highest priority. MERN Stack provides built-in security features, such as authentication and authorization mechanisms, as well as support for encryption and data validation, to ensure that web applications are protected against common security threats.
Scalability and Flexibility: Whether you're building a small-scale application or a large-scale enterprise solution, MERN Stack offers the scalability and flexibility you need to grow and adapt to changing business requirements. With its modular architecture and support for microservices, MERN Stack allows for easy scaling and maintenance of complex applications.
Getting Started with MERN Stack
Are you prepared to explore the MERN Stack world? Here is a detailed how-to for getting started:
Install Node.js: Begin by installing Node.js, which includes npm (Node Package Manager), on your local machine. Node.js will serve as the runtime environment for your server-side code.
Set Up MongoDB: Install MongoDB, a NoSQL database system, and set up a local or remote MongoDB instance to store your application data.
Create an Express.js Server: Use Express.js to create a server-side application that will handle HTTP requests and serve as the backend for your web application.
Build Your React.js Frontend: Use React.js to create a client-side application that will handle user interface interactions and communicate with the backend server.
Integrate MongoDB with Express.js: Connect your Express.js server to your MongoDB database using Mongoose, a MongoDB object modeling tool for Node.js.
Deploy Your Application: Once your application is complete, deploy it to a hosting provider of your choice to make it accessible to users worldwide.
Conclusion
MERN Stack offers a powerful and versatile framework for building modern web applications that are fast, scalable, and secure. Whether you're a seasoned developer or just getting started, MERN Stack provides the tools and resources you need to bring your ideas to life. So why wait? Start exploring the endless possibilities of MERN Stack today and unlock the potential of your web development projects with Meander Training, Meander training is a platform where you can start your web development journey, it provides industrial training with certification.
1 note
·
View note
Text
You can learn NodeJS easily, Here's all you need:
1.Introduction to Node.js
• JavaScript Runtime for Server-Side Development
• Non-Blocking I/0
2.Setting Up Node.js
• Installing Node.js and NPM
• Package.json Configuration
• Node Version Manager (NVM)
3.Node.js Modules
• CommonJS Modules (require, module.exports)
• ES6 Modules (import, export)
• Built-in Modules (e.g., fs, http, events)
4.Core Concepts
• Event Loop
• Callbacks and Asynchronous Programming
• Streams and Buffers
5.Core Modules
• fs (File Svstem)
• http and https (HTTP Modules)
• events (Event Emitter)
• util (Utilities)
• os (Operating System)
• path (Path Module)
6.NPM (Node Package Manager)
• Installing Packages
• Creating and Managing package.json
• Semantic Versioning
• NPM Scripts
7.Asynchronous Programming in Node.js
• Callbacks
• Promises
• Async/Await
• Error-First Callbacks
8.Express.js Framework
• Routing
• Middleware
• Templating Engines (Pug, EJS)
• RESTful APIs
• Error Handling Middleware
9.Working with Databases
• Connecting to Databases (MongoDB, MySQL)
• Mongoose (for MongoDB)
• Sequelize (for MySQL)
• Database Migrations and Seeders
10.Authentication and Authorization
• JSON Web Tokens (JWT)
• Passport.js Middleware
• OAuth and OAuth2
11.Security
• Helmet.js (Security Middleware)
• Input Validation and Sanitization
• Secure Headers
• Cross-Origin Resource Sharing (CORS)
12.Testing and Debugging
• Unit Testing (Mocha, Chai)
• Debugging Tools (Node Inspector)
• Load Testing (Artillery, Apache Bench)
13.API Documentation
• Swagger
• API Blueprint
• Postman Documentation
14.Real-Time Applications
• WebSockets (Socket.io)
• Server-Sent Events (SSE)
• WebRTC for Video Calls
15.Performance Optimization
• Caching Strategies (in-memory, Redis)
• Load Balancing (Nginx, HAProxy)
• Profiling and Optimization Tools (Node Clinic, New Relic)
16.Deployment and Hosting
• Deploying Node.js Apps (PM2, Forever)
• Hosting Platforms (AWS, Heroku, DigitalOcean)
• Continuous Integration and Deployment-(Jenkins, Travis CI)
17.RESTful API Design
• Best Practices
• API Versioning
• HATEOAS (Hypermedia as the Engine-of Application State)
18.Middleware and Custom Modules
• Creating Custom Middleware
• Organizing Code into Modules
• Publish and Use Private NPM Packages
19.Logging
• Winston Logger
• Morgan Middleware
• Log Rotation Strategies
20.Streaming and Buffers
• Readable and Writable Streams
• Buffers
• Transform Streams
21.Error Handling and Monitoring
• Sentry and Error Tracking
• Health Checks and Monitoring Endpoints
22.Microservices Architecture
• Principles of Microservices
• Communication Patterns (REST, gRPC)
• Service Discovery and Load Balancing in Microservices
2 notes
·
View notes
Text
Node.js Development Services: Build Fast, Scalable, and High-Performance Applications
In the ever-evolving digital landscape, businesses need applications that are fast, scalable, and reliable to stay ahead of market demands. Node.js development services have rapidly become a preferred solution for companies seeking to build real-time, data-intensive, and feature-rich applications.
Built on Google Chrome’s V8 JavaScript engine, Node.js offers a lightweight, event-driven, non-blocking I/O model that makes it highly efficient and scalable for server-side and network applications. From startups to global enterprises, businesses leverage Node.js to power their most demanding applications.
In this article, we’ll explore the advantages of Node.js, its most common use cases, key service offerings, and why partnering with a professional Node.js development company can elevate your business operations.
What is Node.js?
Node.js is an open-source, cross-platform JavaScript runtime environment designed for developing fast and scalable network applications. It uses an event-driven, non-blocking I/O model, allowing developers to build applications capable of handling thousands of simultaneous connections without performance issues.
Unlike traditional server-side platforms, Node.js enables developers to use JavaScript for both server-side and client-side development, promoting consistency and efficiency across the entire application stack.
Why Choose Node.js Development Services?
Modern businesses prioritize speed, scalability, and user experience. Here’s why Node.js development services are widely preferred:
High-Speed Execution: Powered by the V8 engine, Node.js compiles JavaScript directly into native machine code, ensuring faster execution.
Scalable Architecture: Ideal for applications that need to handle numerous concurrent requests without delays.
Single Language Stack: Enables full-stack development with JavaScript, improving code maintainability and developer productivity.
Extensive Package Ecosystem: Access to over a million open-source packages via NPM enhances functionality and accelerates development.
Asynchronous and Event-Driven: Handles multiple requests concurrently, which is ideal for real-time applications.
Advantages of Node.js Development Services
Partnering with an experienced Node.js development company offers numerous technical and operational benefits:
1. Exceptional Performance
Node.js’s non-blocking architecture ensures that applications can process multiple requests simultaneously without performance bottlenecks. This makes it suitable for real-time platforms and high-traffic web applications.
2. Cost-Efficient Development
Using a single language for frontend and backend development reduces operational costs and simplifies project management, allowing for faster, more efficient development cycles.
3. Rapid Development with Rich Libraries
The Node Package Manager (NPM) provides a vast repository of open-source libraries and modules, enabling developers to implement advanced features quickly without building from scratch.
4. Highly Scalable Applications
Node.js is designed for building scalable applications that can easily handle growing user bases and increased traffic loads without compromising performance.
5. Improved Data Handling
With its ability to process data streams efficiently, Node.js is ideal for applications requiring continuous data updates like streaming platforms or IoT dashboards.
Common Use Cases for Node.js Development
Node.js development services are widely applied across various industries and business models:
Real-Time Applications: Chat apps, live streaming, gaming platforms
Streaming Platforms: Video and audio streaming services
Ecommerce Websites: Scalable online stores, payment gateways, product management systems
Enterprise Solutions: CRM systems, ERP platforms, HR management tools
APIs and Microservices: Lightweight, secure, and scalable backend services
Internet of Things (IoT): Real-time data processing and device management solutions
Core Node.js Development Services
Professional Node.js development companies offer a broad range of services tailored to diverse business needs:
Custom Application Development
Designing and developing tailored, scalable, and high-performance applications to meet unique business objectives.
API Development and Integration
Creating secure and scalable RESTful and GraphQL APIs to integrate with internal systems or third-party services.
Real-Time Application Development
Building interactive real-time applications such as chat platforms, video conferencing tools, and collaborative software.
Node.js Plugin and Module Development
Developing custom plugins and modules to extend application functionality as per business requirements.
Microservices Architecture Development
Implementing microservices-based architecture to ensure modularity, scalability, and ease of maintenance.
Migration to Node.js
Re-engineering and migrating legacy systems to Node.js for enhanced performance, scalability, and maintainability.
Support and Maintenance
Providing ongoing monitoring, optimization, and troubleshooting services to maintain application health and performance.
Why Hire a Professional Node.js Development Company?
Collaborating with a skilled Node.js development service provider ensures that your project is executed efficiently and delivers lasting business value:
Expert Development Teams: Access to experienced, certified Node.js developers with expertise in advanced frameworks and libraries.
Time and Cost Savings: Optimized development workflows and reusable components reduce project timelines and budgets.
Quality Assurance: Rigorous testing processes and security audits guarantee application reliability and security.
Future-Proof Solutions: Applications built for long-term scalability and seamless integration with modern tools and systems.
Dedicated Support: Comprehensive post-launch support and maintenance services to ensure consistent performance and security.
Brands That Trust Node.js
Leading global organizations trust Node.js for its speed and scalability:
Netflix: Enhanced streaming performance by adopting Node.js for server-side operations.
LinkedIn: Migrated its mobile backend to Node.js for faster load times and scalability.
PayPal: Improved application response times and reduced code complexity with Node.js.
Uber: Chose Node.js for its asynchronous processing and real-time data handling capabilities.
The Future of Node.js Development
With continuous enhancements, robust community support, and increasing adoption for enterprise applications, Node.js development services are positioned for sustained growth. As businesses shift towards cloud-native solutions, microservices, and real-time platforms, the demand for Node.js expertise will only increase.
Conclusion
Node.js development services offer businesses a powerful and reliable solution for creating fast, scalable, and efficient applications. Its performance-driven architecture, unified language stack, and rich ecosystem make it ideal for a wide range of modern web and mobile applications.
Whether you’re launching a new application, modernizing an existing platform, or integrating real-time features, partnering with a dedicated Node.js development company can help you turn your vision into a robust, scalable, and high-performing digital solution.
Frequently Asked Questions
Q1. What types of applications can be built using Node.js? Node.js is suitable for real-time applications, streaming services, APIs, microservices, ecommerce platforms, and enterprise solutions.
Q2. Is Node.js good for enterprise applications? Yes. Its scalable architecture and efficient performance make it an excellent choice for large-scale enterprise applications.
Q3. How much does Node.js application development cost? Development costs vary based on the project’s complexity, features, and timeline. A professional Node.js development company can offer a tailored estimate.
Q4. Can legacy applications be migrated to Node.js? Yes. Experienced developers can migrate legacy applications to Node.js, enhancing performance, scalability, and maintainability.
Q5. How long does it take to develop a Node.js application? Development timelines depend on the project’s size and complexity. Simple applications may take a few weeks, while enterprise-level solutions can require several months.
0 notes
Text
Laravel vs Node.js: Which One is Good?
Choosing between Laravel and Node.js for your next web project? Find out which backend framework best fits your development goals.
Introduction

Startups tend to aim for rapid market entry while large enterprises look to build a scalable system. Irrespective of which you are, the main dilemma before starting developing state-of-the-art solutions will be the selection of technology.
There are several options, but which is the best backend framework for startups and enterprises? In most cases, it tends to come down to the two most influential frameworks — Laravel and Node.js.
This isn’t an article to compare programming languages however, it is important to understand how PHP vs JavaScript backend fair. 74.2% of the websites use PHP for server-side programming and Laravel happens to be one of the most popular PHP frameworks.
Laravel is a PHP-based framework that has built a reputation for rapid development and simplicity. On the other hand, Node.js, powered by JavaScript, is hailed for its performance, scalability, and event-driven architecture.
Deciding between Laravel and Node.js isn’t merely a technical preference; it’s a strategic business decision. The goodness of each platform lies in its ability to meet your project’s unique demands, budget constraints, and scalability aspirations, directly influencing your real-world ROI.
While both technologies are powerful in their own right, they serve different purposes and cater to different use cases. This is an article about Laravel vs Node.js — a side-by-side comparison to evaluate them across several critical factors.
Quick Overview of Laravel

Laravel is more than just a PHP framework; it represents the modern face of PHP development. Laravel is a robust, open-source PHP framework built around the Model-View-Controller (MVC) architecture. It provides built-in tools such as Eloquent ORM, Blade templating, authentication scaffolding, and Artisan CLI to simplify development workflows.
Hence the obvious question: Is Laravel better than Node.js for web development?. The following sections will make this more evident.
There are many Laravel pros and cons, but here are it’s core philosophy and strengths:
Developer Experience (DX) First
Model-View-Controller (MVC) Architecture
Feature-rich out-of-the-box
Eloquent ORM
Blade Templating Engine
Artisan CLI
Built-in Authentication & Authorization
Caching & Queues
Testing Utilities
Maturity and Stability
Vibrant and Supportive Ecosystem
Laravel applications scale effectively
There are many benefits of using Laravel since it is a feature-rich platform with built-in security. It is ideal to build high-performing applications.
Understanding What is Node.js

Developers use Node.js not as a framework, but as a runtime environment for JavaScript powered by Chrome’s V8 engine. Its breakthrough came when it allowed JavaScript to move beyond the browser, letting teams build both frontend and backend with one language.
By operating on an event-driven, non-blocking I/O model, Node.js handles real-time data and high volumes of simultaneous connections with impressive efficiency.
There are many benefits of using Node.js, however here are its core strengths:
Asynchronous, Non-Blocking I/O
NPM (Node Package Manager) Ecosystem
Ideal for APIs and Microservices
Real-Time Capabilities
Serverless Potential
Node.js performance advantages in several use cases can work in your favor.
Popular Node.js Frameworks That Bring Structure to the Chaos
Although Node.js itself isn’t a framework, it uses the JavaScript programming language. There are several JavaScript frameworks that allow one to build a full-fledged application. Here are a few standout choices that have become favorites in the community:
Express.js: Think of Express as the lean, no-frills framework that gets out of your way. It doesn’t tell you how to build — just hands you the tools and lets you run with them. Loved for its simplicity and flexibility, Express powers everything from small side projects to large-scale applications.
NestJS: If you’re building something complex and want structure from day one, NestJS steps in like an architect with a blueprint. Inspired by Angular and built with TypeScript at its core, it brings dependency injection, modular design, and enterprise-ready features that help teams stay organized as projects grow.
Koa.js: Created by the same team behind Express, Koa is the modern minimalist. It uses ES6’s async/await to give developers finer control over asynchronous flows, cutting down on callback clutter and improving code readability. It’s perfect for those who want the power of Node with a cleaner, more elegant approach.
Use Case Comparisons
Choosing backend technology is a task for someone with sufficient technical knowledge. It is an important decision that can dictate the outcome of your project.
This Laravel vs Node.js overview of the user cases will make this decision easier. Laravel is a full-stack PHP framework that is ideal for the rapid development of secure, high-performing, and scalable applications. This makes it ideal for developing enterprise applications, content-driven platforms, eCommerce applications, SaaS solutions, and much more.
NodeJS is a JavaScript runtime library with immense potential. It is well suited for developing real-time, event-driven, and high-concurrency applications. This means it is one of the best options when it comes to developing a chat application, messaging app, single page application, and IoT application. Hence it is vital to consider Node.JS when doing a backend technology comparison with use cases.
Laravel vs Node.js — compassion of the use cases:
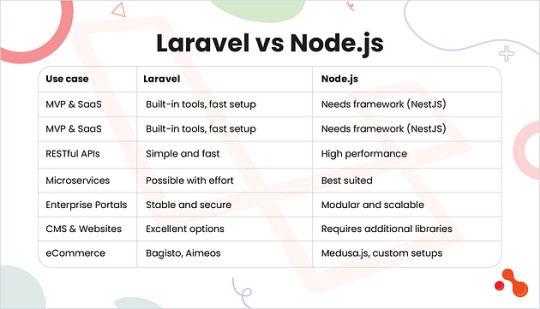
Here are some of the best use cases for Laravel:
On-demand apps
eLearning apps
Stock trading solutions
Multilingual CMS system
Banking & Fintech apps
Gaming apps
Music & Video streaming apps
Chat, Messaging, and Email apps
Here are some of the best use cases for Node.js:
Real-time chat apps
Complex SPAs
Embedded systems
Data streaming apps
Transportation and logistic apps
Browser games
Head-to-Head Comparison
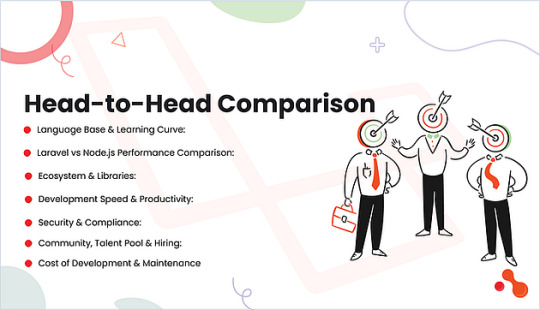
Head-to-Head Comparison
The previous sections give a good overview of both Laravel and Node.js. Hence it is time for a detailed comparison of Laravel vs Node.js:
Language Base & Learning Curve:
Laravel: Laravel’s opinionated structure and extensive documentation make it beginner-friendly and ideal for teams needing quick onboarding. However, it does require one to have intermediate experience with programming in PHP. Laravel’s gentle learning curve is a major plus for fast-moving teams.
Node.js: Node.js enables full-stack development with a single language — JavaScript However, developers must grasp asynchronous patterns, which can steepen the learning curve. Good knowledge of JavaScript, and a good understanding of the Node’s architecture and NPM package modules can help reduce the learning curve. Node.js offers flexibility but demands discipline and experienced developers to maintain structure.
Laravel vs Node.js Performance Comparison:
Laravel: Laravel, built on a synchronous PHP runtime, may lag in high-concurrency use cases. However, performance bottlenecks can be addressed with Laravel Octane, Swoole, or RoadRunner for asynchronous handling. Laravel works well for high-logic business applications that aren’t real-time intensive.
Node.js: Node.js’s non-blocking architecture supports concurrency, making it perfect for I/O-heavy tasks like chat apps, live data feeds, and APIs. It scales horizontally with ease and performs exceptionally in high-traffic conditions. Node.js handles real-time, scalable applications efficiently. Hence Node.js scalability is an advantage.
Ecosystem & Libraries:
Laravel: Laravel boasts an integrated ecosystem. Tools like Horizon (queues), Echo (broadcasting), and Scout (search) provide robust features without relying on third-party libraries. Thus, Laravel reduces time-to-market with integrated tools.
Node.js: npm offers a vast number of packages for almost every functionality. However, it’s more unstructured and can lead to fragmented architecture if not managed properly. Node.js offers extensive flexibility for large-scale, microservice-driven systems.
Development Speed & Productivity:
Laravel: Laravel is designed for rapid application development. Features like built-in auth, migrations and elegant routing simplify repetitive tasks. It’s great for building SaaS products, internal tools, and CMS platforms. Laravel is better suited for MVPs and fast iteration cycles.
Node.js: While Node.js offers flexibility, setting up projects can take more time. Frameworks like NestJS or Express can streamline development but still require configuration and boilerplate. Node.js allows for customizable architecture suited for complex business needs.
Security & Compliance:
Laravel: Laravel comes equipped with built-in protection against common web threats like CSRF, XSS, and SQL injection. It also provides password hashing, authentication, and user session handling out of the box. Laravel offers stronger defaults. Node.js requires thorough DevSecOps policies. Laravel security practices work in your favor.
Node.js: Node.js security measures depend heavily on chosen libraries. Tools like Helmet and CSURF offer protection, but developers must be proactive in applying security best practices.
Community, Talent Pool & Hiring:
Laravel: Laravel has a strong presence in South Asia, Eastern Europe, and Latin America. Developers are widely available and often more cost-effective. Laravel-focused agencies and marketplaces also exist. Laravel is budget-friendly and widely supported.
Node.js: JavaScript’s popularity makes Node.js developers easy to find. Full-stack JavaScript developers are in high demand, especially in North America and Europe. Node.js has a larger, more versatile talent pool.
Cost of Development & Maintenance
Laravel: Development with Laravel is cost-effective due to faster development cycles and a large pool of affordable developers. Its structured nature also ensures lower maintenance overhead. The cost to develop Laravel apps makes it ideal for short-time-to-market goals.
Node.js: Initial development may cost more due to complex setups. However, the cost to develop Node.js app can be lower for large-scale deployments if maintained well. Node.js offers better long-term scalability for high-performance apps.
Startups & Enterprises
Laravel: Laravel is the ideal choice for startups seeking to build and ship fast. The Laravel ecosystem and built-in tools help reduce development time and costs. Laravel remains a strong contender for enterprise-grade CRUD applications, compliance platforms, and ERP systems.
Node.js: Node.js should be considered when real-time or data-heavy applications are involved. Node.js is excellent for scalable microservices and real-time systems but demands robust DevOps and architecture oversight.
Communication:
Laravel: Laravel is designed with a well-defined structure that promotes good coding practices. At the same time, it also equips the developers with high-level control and lets them experiment. This makes Laravel highly customizable however, it requires one to have extensive knowledge of PHP in order to do so.
Node.js: Node.js is also open-source thus allowing one to customize the package modules. It allows the developers to customize as per their requirements.
Laravel vs Node.js Feature Comparison
When choosing between Laravel and Node.js, it’s not just about the language — it’s about philosophy, structure, and how each tool helps you deliver better software faster. Let’s explore how these two powerhouses stack up, feature by feature.
The Laravel vs Node.js feature-by-feature breakdown:
Laravel: Elegance Meets Efficiency
Laravel isn’t just another PHP framework — it’s a carefully crafted ecosystem designed to make your life easier as a developer. It emphasizes clarity, structure, and developer happiness, and it comes packed with features that reduce the need for boilerplate code and repetitive tasks.
MVC Architecture That Keeps You Organized
Laravel’s Model-View-Controller (MVC) structure brings a clean separation of logic, data, and presentation. This design pattern keeps your application maintainable and scalable — even as your codebase grows.
Eloquent ORM: Talk to Your Database Like a Pro
Working with databases in Laravel feels almost natural. Eloquent lets you treat tables as objects and simplifies complex relationships with expressive syntax, making CRUD operations feel intuitive.
Queue System: Offload the Heavy Lifting
Whether you’re sending thousands of emails or processing massive image files, Laravel’s built-in queue system lets you push those time-consuming tasks to the background — speeding up the user experience without sacrificing performance.
Security, Baked In
From CSRF protection to hashed passwords and built-in sanitization, Laravel ships with robust security already wired into its core — saving you hours of research and implementation.
Routing That Makes Sense
Laravel’s elegant routing syntax helps define clear URL paths and lets you attach middleware (like authentication or logging) right at the entry point — so you control traffic before it hits your controllers.
First-Class Testing Support
Laravel promotes test-driven development (TDD) by offering built-in tools for unit, feature, and browser testing. If stability and continuous delivery matter to you, Laravel has your back.
Broadcasting & Real-Time Updates, Simplified
With Laravel Broadcasting and Echo, integrating real-time features like notifications or collaborative tools becomes seamless. No more complex WebSocket setups — just elegant APIs that work.
Laravel Octane: Performance on Steroids
Looking to push PHP beyond its limits? Octane uses high-performance servers like Swoole to dramatically boost Laravel’s speed. It brings concurrency, coroutines, and async behavior — something PHP wasn’t traditionally known for — right into your app stack.
Node.js: Powering Full-Stack JavaScript
Node.js isn’t a framework — it’s a runtime environment that redefined backend development by letting JavaScript run server-side. Lightweight, non-blocking, and asynchronous by design, Node.js is the engine behind many of today’s most demanding, real-time applications.
Asynchronous, Non-Blocking I/O for the Win
Node handles thousands of simultaneous connections with ease. Its event-driven nature makes it ideal for chat apps, live feeds, and APIs that demand real-time responsiveness.
Blazing Speed with V8 Engine
Powered by Google’s V8 engine, Node compiles JavaScript to machine code on the fly — giving your backend an impressive performance boost, especially for compute-light workloads.
Single-Threaded, Yet Super Scalable
Although it runs on a single thread, Node can handle massive traffic. For heavier, CPU-bound tasks, you can offload processing to worker threads or scale horizontally with ease.
NPM: The World’s Largest Developer Toolbox
With access to over a million open-source packages, NPM (Node Package Manager) makes it easy to plug in pre-built modules — whether you’re spinning up a REST API or adding OAuth support.
JavaScript All the Way Down
Using the same language across frontend and backend simplifies collaboration, reduces context switching, and makes it easier to hire or upskill developers in full-stack roles.
Perfect for Microservices and APIs
Node’s modular design and lightweight footprint make it a natural fit for building microservices architectures, allowing teams to scale and deploy independently without stepping on each other’s toes.
Real-Time Application Ready
Need WebSockets, live updates, or streaming capabilities? Node.js shines in building fast, two-way communication systems — whether it’s multiplayer gaming, collaborative tools, or financial dashboards.
Handles Streams Like a Native
From processing large video files to piping data through analytics engines, Node’s stream API allows you to work with big data efficiently, minimizing memory usage and boosting performance.
Runs Anywhere, Deploys Everywhere
With cross-platform support baked in, Node applications can be developed on macOS and deployed on Linux or Windows with minimal friction — an essential advantage for today’s cloud-native workflows.
Real-World Examples

Real-World Examples
In the fast-paced startup world, the ‘good’ technology choice — be it Laravel or Node.js — isn’t about absolute speed, but about strategic alignment. Your ability to scale effectively hinges on understanding when each platform truly serves your evolving needs, ensuring sustainable growth over time. Here are a few real-world examples of Laravel and Node.js to help with the decision process.
Laravel: Laravel is the choice of many different companies around the world. This includes firms like BBC, Pfizer, 9GAG, TourRadar, Novell, Inc. and many more. Here are a few case studies:
Invoice Ninja:
Industry: SaaS / Invoicing
Use Case: Online invoice creation, time tracking, payment integration
Why Laravel: Secure multi-tenant system, powerful API backend, seamless integration with payment gateways.
Tech Highlights: Laravel’s elegant syntax, queues, and mail support power a scalable solution.
Link: https://www.invoiceninja.com
MyRank:
Industry: EdTech
Use Case: Competitive exam preparation platform with quizzes, reports, and performance analytics.
Why Laravel: Easy routing, performance optimizations with caching, and support for complex backend logic.
Link: https://www.myrank.in
Laracasts:
Industry: Online education (Developer training)
Use Case: Streaming video platform for Laravel and general PHP training.
Why Laravel: Built by Jeffrey Way (a Laravel contributor), it uses Laravel’s routing, authentication, and custom services extensively.
Link: https://laracasts.com
Cachet:
Industry: DevOps / Infrastructure
Use Case: Open-source status page system.
Why Laravel: Quick development cycles, elegant RESTful structure, user-friendly admin dashboards.
Link: https://cachethq.io
OctoberCMS
Industry: CMS / Web Development
Use Case: Content management platform used by developers and agencies.
Why Laravel: Leverages Laravel’s MVC architecture, ORM, and plugin ecosystem.
Link: https://octobercms.com
Great Colorado Homes
Industry: Real Estate / Web Development
Use Case: Real estate portal for both property buyers and sellers with several additional features.
Why Laravel: Acquaint Softtech developed with Laravel to leverage the built-in features for a dynamic real estate listing, property tour, robust property listing & search, and high performing third-party integration.
Link: https://greatcoloradohomes.com/
Node.js: This is a popular framework trusted by many large firms worldwide. Some of the industry’s leading companies that implement Node.js include Twitter, Spotify, eBay, Airbnb, Walmart and many more. Here are a few strategically selected case studies:
LinkedIn (Mobile Backend):
Industry: Professional Networking
Use Case: Backend API for mobile apps
Why Node.js: Switched from Ruby on Rails to Node.js for 2–10x performance improvements and better mobile scaling.
Link: LinkedIn
Netflix:
Industry: Streaming / Entertainment
Use Case: Server-side rendering, UI customization layer
Why Node.js: Non-blocking I/O for real-time data, fast iteration cycles, and unified JS stack for frontend + backend.
Link: Netflix
PayPal:
Industry: FinTech / Payments
Use Case: Web application backend
Why Node.js: Switched from Java to Node.js, resulting in 2x faster response times and a unified dev team for browser/server logic.
Link: PayPal
Uber:
Industry: Ride-sharing
Use Case: Real-time data processing, dispatch system
Why Node.js: Asynchronous processing, event-driven architecture suited for high I/O throughput and fast iteration.
Link: Uber Engineering Blog
Trello:
Industry: Productivity / Project Management
Use Case: Real-time collaboration platform
Why Node.js: WebSockets and event-based architecture for updating project boards in real-time.
Link: Trello
SuperFi
Industry: Fintech / Web & Mobile App
Use Case: A debt solution platform for users to clear their bills and gain rewards.
Why Node.js: Acquaint Softtech chose Node.js to streamline banking access, integrate payments and financial data, and offer users highly robust real-time chat support.
Link: https://www.joinsuperfi.com/
The Verdict
Contacting the professionals for expert Laravel or Node.js consultation can help businesses decide which one is best for them. NodeJS was created in 2009, uses the Google V8 JavaScript engine and has an event-driven non-blocking i/o. Laravel was created in 2011 and uses the Blade template engine and has multithreaded blocking i/o.
Choosing the right backend technology is not as straightforward as one would imagine. Here are a few facts on the latest versions of both Laravel and Node.js.
Laravel 12:
Introduces starter kits for React, Vue, and Livewire.
Provides variants of each starter kit powered by WorkOS AuthKit.
Refined and organized directory structure.
Upgraded security with stricter password policies and validation.
Implements asynchronous caching, smarter database queries, and rapid job processing.
Enhanced WebSocket support and improved real-time capabilities.
Advanced query creation, GraphQL support, and API versioning.
Strong community support.
Node 24.1.0:
V8 engine upgrade that unlocks several new JavaScript features providing performance improvements.
Adds the ability to pause threads in Atomics, aiding low-level concurrency tasks in Workers.
Ensures that AsyncLocalStore instances operate in isolation, enhancing the reliability of asynchronous operations.
Strong support via libraries like Socket.io and native WebSocket APIs
Flexible API development with support for REST, GraphQL, and various middleware options
Both Laravel 12 and Node.js 24.1.0 offer robust solutions for modern web development, and the choice between them should be guided by your project’s specific requirements, team expertise, and long-term maintenance considerations.
That said it is hard to ignore the following statistics:
Over 74.2% of the websites use PHP as the server-side programming language.
62.3% of developers worldwide use JavaScript while only 18.2% use PHP programming language. (2024).
Laravel is one of the most popular PHP frameworks with a 43.7% share.
40.8% of developers worldwide use Node.js as of 2024 and 7.9% use Laravel
2.32% of the top 1 Million websites use Laravel (23215)
4.84% of the top 1 million websites use Express.js (48423)
4.5% of all websites where the server-side language is known use Node.js.
Choose Laravel development services if you’re looking for a full-featured PHP framework with built-in tools for rapid development, enhanced security features, and a structured approach to building web applications. It is the ideal technology for startups with the need for rapid MVP development, standard web application, predictable development & talent acquisition.
Enterprises can hire Laravel developers like Acquaint Softtech for better options for robust monoliths & large enterprise applications, integration with existing PHP infrastructure, predictable development & onboarding for large teams, and professional support & ecosystem.
It is ideal for startups looking for real-time as a core feature, microservices architecture from day one, full-stack JavaScript team, and heavy API-driven products.
Node.js is for Enterprises that require high-performance APIs & microservices architecture, real-time & high concurrency demands, unified language strategy, cloud-native & serverless initiatives, and event-driven architectures. Acquaint Softtech offers backend development servicesfor NodeJS as well.
Hire backend developers depending on how the requirements of your startup or enterprise match with what Laravel and Node.js have to offer. Laravel provides a defined structure, guiding your project with convention. The truly good choice hinges on the level of architectural autonomy and complexity the development team you hire is best equipped to handle.
0 notes
Text
Unlock the Power of Real-Time Web Apps with Professional Node JS Development Services
In the rapidly evolving digital ecosystem, building high-performance, scalable, and secure applications is no longer optional—it's essential. Businesses need robust backend architectures that can handle concurrent connections, process large data streams, and deliver fast user experiences. This is where Node JS development services come into play.

Whether you're a startup looking to launch your MVP or an enterprise aiming to modernize your web infrastructure, leveraging Node JS can be a game-changer. At Orbit Edge Tech, we specialize in offering tailored Node JS development services that align with your business objectives and deliver tangible results.
What is Node.js and Why is It Popular? Node.js is an open-source, cross-platform JavaScript runtime environment that executes JavaScript code outside a web browser. Built on Google Chrome's V8 engine, Node.js enables developers to use JavaScript to write server-side code, creating dynamic and scalable applications. Its non-blocking I/O and event-driven architecture make Node.js perfect for real-time applications like chat apps, collaborative tools, streaming platforms, and e-commerce systems. Key Benefits of Using Node.js: High Performance: Executes code faster due to the V8 engine.
Scalability: Ideal for microservices and APIs.
Unified Language Stack: JavaScript on both front-end and back-end.
Real-Time Capabilities: WebSocket and event-based communication make it suitable for real-time apps.
Large Ecosystem: Over 1 million packages on NPM (Node Package Manager).
Why Choose Orbit Edge Tech for Your Node JS Development Services? At Orbit Edge Tech, we bring over a decade of experience in building secure, high-performance Node.js applications for clients across the globe. Our team of certified developers understands the intricacies of Node.js and has hands-on experience in various industry verticals like eCommerce, healthcare, logistics, education, fintech, and more. We don’t believe in one-size-fits-all. Every business is unique, and so are its challenges. That’s why our Node JS development services are highly customized to meet your specific needs. Our Node.js Expertise Includes: Custom Node.js Application Development Get end-to-end Node.js solutions tailored to your requirements—be it a microservice backend or a full-stack application.
API & Web Services Development We build secure and scalable RESTful and GraphQL APIs to power your mobile and web apps.
Real-Time Application Development From messaging apps to live streaming and IoT dashboards, we create apps that demand instant data communication.
Node.js Migration Services Migrate your existing applications to Node.js seamlessly, with minimal downtime and maximum compatibility.
Support & Maintenance Ensure the smooth running of your applications with our comprehensive support and ongoing performance monitoring.
Use Cases: What Can You Build with Node.js?
Real-Time Chat Applications Build chat apps with real-time communication and synchronization capabilities using WebSockets and Node.js’ event-driven model.
Streaming Services Stream audio, video, and other media in real-time with a robust and efficient back-end powered by Node.js.
E-commerce Platforms Power your online store with fast-loading APIs, secure payment gateways, and scalable microservices.
Single Page Applications (SPAs) Develop dynamic, user-friendly single-page apps using Node.js with React or Angular for seamless performance.
Data-Intensive Dashboards Handle large volumes of data efficiently with fast backend processing and real-time updates.
Our Development Process At Orbit Edge Tech, we follow a proven 6-phase development approach: Planning & Strategy: We understand your goals and define a roadmap.
UI/UX Design: Our designers create intuitive and engaging interfaces.
Development: Node.js experts write clean, efficient, and modular code.
Testing & QA: Every line of code is rigorously tested for bugs and performance.
Deployment: Seamless release across environments.
Support & Optimization: Continuous monitoring and improvements.
Tech Stack We Use with Node.js Node.js works exceptionally well with a variety of modern tools and frameworks. At Orbit Edge Tech, we combine Node.js with: Front-end: React.js, Angular, Vue.js
Databases: MongoDB, PostgreSQL, MySQL, Redis
DevOps: Docker, Kubernetes, Jenkins, GitHub Actions
Cloud Platforms: AWS, Google Cloud, Microsoft Azure
Testing Tools: Mocha, Chai, Jest, Supertest
This allows us to build highly scalable, secure, and future-proof applications for our clients.
Why Node.js is Ideal for Modern Businesses In today’s competitive digital landscape, speed and scalability are everything. Node.js allows businesses to develop apps faster without compromising on performance or user experience. Here are some compelling reasons why more companies are choosing Node JS development services: Faster Time to Market With reusable components and ready-made modules, development time is significantly reduced.
Cost Efficiency Full-stack JavaScript developers can handle both front-end and back-end, reducing hiring needs.
SEO-Friendly Fast load times and server-side rendering improve search engine rankings.
Community Support A large community of developers and contributors ensures constant innovation and problem-solving.
Client Success Story One of our global retail clients approached us to overhaul their legacy PHP-based backend. We migrated them to a modern Node.js + React stack. The results? 65% faster page loads
99.9% uptime with real-time stock sync
30% increase in online conversions
Seamless integration with 3rd party tools (Stripe, Firebase, etc.)
Conclusion Investing in professional Node JS development services is a smart move for businesses looking to build scalable, high-performance, and real-time applications. At Orbit Edge Tech, our mission is to empower businesses with cutting-edge technology, and Node.js is at the heart of that mission. Whether you're looking to build an app from scratch, revamp an existing product, or simply need backend support, our experts are ready to deliver. Get in touch with Orbit Edge Tech today and discuss how our Node JS development services can drive your business forward.
Frequently Asked Questions (FAQs) Q1. What is Node.js used for? Node.js is commonly used for building scalable server-side applications, including web apps, APIs, real-time applications like chat or streaming apps, and more. Its event-driven model is perfect for high-traffic environments.
Q2. Is Node.js better than PHP or Python? Node.js is better suited for real-time applications and handling concurrent connections. While PHP and Python have their advantages, Node.js excels in speed, scalability, and using JavaScript across the entire stack.
Q3. How much do Node JS development services cost? The cost depends on project complexity, required features, and the team’s experience. At Orbit Edge Tech, we offer flexible pricing models tailored to your budget and goals.
Q4. Do you offer support after deployment? Yes, we provide comprehensive post-deployment support, including monitoring, performance optimization, bug fixes, and feature updates to ensure your application runs smoothly.
Q5. Can you integrate Node.js with my existing front-end? Absolutely. Node.js works well with popular front-end frameworks like React, Angular, and Vue.js. Our team can help seamlessly integrate the backend with your current or new front-end stack.
0 notes
Text
Top 10 Tools Every Web Developer Should Know

Web development in 2025 is fast, collaborative, and constantly evolving. Whether you're a beginner or a professional, using the right tools can make or break your development workflow. From writing clean code to deploying powerful applications, having a smart toolkit helps you stay productive, efficient, and competitive.
At Web Era Solutions, we believe that staying ahead in the web development game starts with mastering the essentials. In this blog, we’ll share the top 10 tools every web developer should know — and why they matter.
1. Visual Studio Code (VS Code)
One of the most widely used code editors for web developers is Visual Studio Code. It's lightweight, fast, and highly customizable with thousands of extensions. It supports HTML, CSS, JavaScript, PHP, Python, and more.
Why It’s Great:
IntelliSense for smart code suggestions
Git integration
Extensions for everything from React to Tailwind CSS
Perfect for front-end and full-stack development projects.
2. Git & GitHub
Version control is a must for any developer. Git helps you track changes in your code, while GitHub allows collaboration, storage, and deployment.
Why It’s Great:
Manage code history easily
Work with teams on the same codebase
Deploy projects using GitHub Pages
Essential for modern collaborative web development.
3. Chrome DevTools
Built right into Google Chrome, Chrome DevTools helps you inspect code, debug JavaScript, analyze page load speed, and test responsive design.
Why It’s Great:
Real-time DOM editing
CSS debugging
Network activity analysis
Crucial for performance optimization and debugging.
4. Node.js & NPM
Node.js allows developers to run JavaScript on the server-side, while NPM (Node Package Manager) provides access to thousands of libraries and tools.
Why It’s Great:
Build full-stack web apps using JavaScript
Access to powerful development packages
Efficient and scalable
Ideal for back-end development and building fast APIs.
5. Figma
While not a coding tool, Figma is widely used for UI/UX design and prototyping. It allows developers and designers to collaborate in real-time.
Why It’s Great:
Cloud-based interface
Easy developer handoff
Responsive design previews
smoothly connects the design and development phases.
6. Bootstrap
Bootstrap is a front-end framework that helps you build responsive, mobile-first websites quickly using pre-designed components and a 12-column grid system.
Why It’s Great:
Saves time with ready-to-use elements
Built-in responsiveness
Well-documented and easy to learn
Perfect for developers who want to speed up the front-end process.
7. Postman
Postman is a tool for testing and developing APIs (Application Programming Interfaces). It’s especially useful for back-end developers and full-stack devs.
Why It’s Great:
Easy API testing interface
Supports REST, GraphQL, and SOAP
Automation and collaboration features
Critical for building and testing web services.
8. Webpack
Webpack is a powerful module bundler that compiles JavaScript modules into a single file and optimizes assets like images, CSS, and HTML.
Why It’s Great:
Speeds up page load time
Optimizes resource management
Integrates with most modern frameworks
Essential for large-scale projects with complex codebases.
9. Tailwind CSS
Tailwind CSS is a utility-first CSS framework that lets you style directly in your markup. It's becoming increasingly popular for its flexibility and speed.
Why It’s Great:
Eliminates custom CSS files
Makes design consistent and scalable
Works great with React, Vue, and other JS frameworks
Favored by developers for clean and fast front-end styling.
10. Netlify
A cutting-edge platform for front-end apps and static websites is Netlify. It facilitates continuous integration and streamlines the deployment procedure.
Why It’s Great:
One-click deployments
Free hosting for small projects
Built-in CI/CD and custom domain setup
Great for deploying portfolio websites and client projects.
Final Thoughts
Mastering these tools gives you a strong foundation as a web developer in 2025. Whether you're coding solo, working in a team, or launching your startup, these tools can dramatically improve your development process and help deliver better results faster.
At Web Era Solutions, we use these tools daily to build high-performance websites, scalable web applications, and full-stack solutions for businesses of all sizes. If you're looking to build a powerful digital presence, we’re here to help.
Ready to Build Something Amazing?
Whether you're a business owner, entrepreneur, or aspiring developer, Web Era Solutions offers professional web development services in Delhi and across India.
Contact us today to discuss your project or learn more about the tools we use to build modern, high-performance websites.
For a free consultation, give us a call right now or send us a mail!
0 notes
Text
How to Design and Build Scalable Microservices in Node.js
Microservices are becoming the go-to architecture for modern applications, and if you're just starting out with backend development, Node.js is a great place to begin. Known for its speed and lightweight nature, Node.js is an ideal choice for building services that need to grow and scale over time. If you're exploring Node.js web development, understanding how to create scalable microservices is a vital skill.
In this article, we’ll walk you through what microservices are, why they’re useful, and how you can design and build them using Node.js- even if you're new to backend programming.
What Are Microservices?
A microservices architecture breaks down a large application into smaller, independent services that each perform a specific task. These services communicate with each other through APIs, usually over HTTP or messaging queues.
For example, in an e-commerce platform:
One microservice might handle user authentication
Another handles orders
A third manages product listings
This approach is more flexible and maintainable than a traditional monolithic application, where everything is packed into one large codebase.
Why Choose Node.js for Microservices?
There are several reasons developers choose Node.js for microservices:
Fast and non-blocking I/O: Node.js handles multiple requests efficiently without waiting for previous ones to finish.
Lightweight and modular: Node’s package manager (npm) offers thousands of ready-to-use modules.
Easy to scale: Built-in tools like clustering and horizontal scaling make it easier to grow your services.
JavaScript everywhere: You can use the same language on both the frontend and backend.
Whether you're building your first API or planning a bigger system, many startups and enterprises rely on professional Node.js Development Services to set up clean and efficient architectures from the start.
Step-by-Step: Building Scalable Microservices in Node.js
Let’s break it down into manageable steps.
1. Define Your Services Clearly
Start by identifying the business functions of your app. Each microservice should be responsible for one feature or domain.
For example:
User Service for authentication
Order Service for handling transactions
Inventory Service for managing products
Keep each service focused. This improves performance and makes your app easier to maintain or scale.
2. Set Up a Basic Node.js Service
Here’s a very simple example using Express.js:
mkdir user-service cd user-service npm init -y npm install express
Create a server.js file:
jsCopy
const express = require('express'); const app = express(); app.get('/users', (req, res) => { res.json([{ id: 1, name: 'Alice' }]); }); app.listen(3000, () => { console.log('User service is running on port 3000'); });
This is your first microservice.
3. Use a Gateway or API Layer
In a microservices setup, each service has its own endpoint. But to avoid confusing your users with multiple URLs, you can use an API Gateway like Express Gateway, Kong, or Nginx to route traffic to the correct service.
The gateway can also handle:
Authentication
Rate limiting
Logging
Version control
If you want to save time and ensure best practices, it’s often a good idea to hire Node.js developers who already understand how to configure gateways and secure your APIs effectively.
4. Implement Inter-Service Communication
Microservices often need to talk to each other. This is done through APIs (HTTP) or message brokers (like RabbitMQ or Kafka).
In a simple HTTP example:
jsCopy
// order-service calls user-service const axios = require('axios'); axios.get('http://localhost:3000/users') .then(res => console.log(res.data));
As your system grows, switching to messaging queues improves performance and decouples services even further.
5. Use Docker to Containerize Your Services
To make your services easy to deploy, run, and scale, containerize them using Docker.
Here’s a simple Dockerfile for a Node.js service:
dockerfileCopy
FROM node:18 WORKDIR /app COPY . . RUN npm install CMD ["node", "server.js"]
This makes your service portable and predictable—key traits for scaling.
Most Node.js development companies containerize microservices and use orchestration tools like Docker Compose or Kubernetes to manage multiple services efficiently.
6. Add Monitoring and Logging
Don’t wait until something breaks. Add monitoring early.
Use tools like:
Winston or Morgan for logging
Prometheus and Grafana for monitoring performance
Logstash or Elasticsearch for log storage and search
This visibility helps you debug faster and scale more reliably.
7. Plan for Scaling
Node.js can scale vertically (more CPU/threads) and horizontally (more instances). Use built-in clustering or cloud platforms (like AWS ECS, Azure App Service, or Google Cloud Run) to scale your services based on demand.
Scalability is where many teams turn to expert Node.js Development Services to architect fault-tolerant and load-balanced systems that handle high traffic smoothly.
Tips for Beginners
Here are a few tips to make your microservices journey easier:
Start with two services and expand gradually
Keep services stateless (no shared memory or sessions)
Use environment variables for configuration
Maintain separate codebases for each service
Write clear API documentation for each microservice
Building scalable microservices doesn’t mean building everything at once. Take it step by step.
When to Seek Help
When your app grows in complexity or you need to handle production-level traffic, it might be time to bring in professional help.
A reputable Node.js development company can support you with:
System design and architecture
API security and versioning
Testing and CI/CD pipelines
Cloud deployment and scaling strategies
Or, if you’re looking for temporary expertise, you can hire Node.js developers to join your team on a freelance or contract basis. They’ll help speed up development, review your code for best practices, and guide your technical decisions.
Final Thoughts
Designing scalable microservices in Node.js is not as hard as it sounds—especially if you take a modular, step-by-step approach. With the right structure and tools, you can build systems that are easier to manage, faster to deploy, and ready to grow.
Whether you're building your first microservice or planning to scale a business application, Node.js has the flexibility and performance to help you succeed.
And when you're ready to move faster and scale smarter, don’t hesitate to reach out to a reliable Node.js development company or hire Node.js developers who can bring your vision to life with confidence.
#NodeJS#Microservices#BackendDevelopment#ScalableArchitecture#DistributedSystems#JavaScriptDevelopment#CloudNative#DevOps#Docker#Kubernetes#SystemDesign#WebDevelopment#TechArchitecture#HighAvailability#Serverless#APIDevelopment#SoftwareEngineering#CodeQuality#FullStackDevelopment
0 notes
Text
Researchers discover new wave of malicious npm (Node Package Manager) packages planted by North Korean state-sponsored actors.
Cybersecurity researchers have recently identified a new wave of malicious npm (Node Package Manager) packages tied to the ongoing “Contagious Interview” operation, which is attributed to North Korean state-sponsored threat actors. This campaign specifically targets software developers who are actively seeking employment, leveraging the trust and routine practices of the tech hiring process. npm…
0 notes
Text
Node.js Tutorial for Web Developers
In today’s fast-paced development world, having the ability to build fast, scalable, and efficient web applications is a must for every web developer. Node.js has emerged as one of the most powerful tools for building server-side applications using JavaScript. If you're a web developer ready to expand your skills beyond front-end development, this Node.js Tutorial for Web Developers is the perfect place to start.
This blog will guide you through the core concepts of Node.js, from setting up your environment to building your first server, working with modules, handling requests, and connecting to databases. Whether you're transitioning from front-end development or just starting out with full-stack JavaScript, this tutorial will help you understand and apply Node.js effectively.
What is Node.js?
Node.js is an open-source, cross-platform runtime environment that allows you to run JavaScript on the server side. It is built on Chrome’s V8 JavaScript engine and is known for its non-blocking, event-driven architecture. Unlike traditional server-side languages like PHP or Python, Node.js enables full-stack development using a single language: JavaScript.
With Node.js, developers can build fast, scalable, and high-performance network applications, RESTful APIs, real-time chat apps, and much more.
Key features of Node.js include:
Asynchronous and event-driven
Highly scalable
Built-in package manager (npm)
Single programming language for full-stack development
Large and active community
Why Web Developers Should Learn Node.js
As a web developer, learning Node.js can greatly enhance your ability to build modern web applications. Here’s why:
JavaScript Everywhere: Use the same language on both the client and server sides.
Real-Time Capabilities: Ideal for building chat apps, streaming services, and real-time dashboards.
Performance: Node.js can handle thousands of simultaneous connections with high throughput.
Massive Ecosystem: Thousands of reusable libraries available through npm.
Career Opportunities: High demand for full-stack JavaScript developers in the job market.
Node.js Tutorial for Web Developers
Let’s get started with building a basic application using Node.js. Follow this step-by-step tutorial to understand the core concepts.
Step 1: Installing Node.js and npm
First, download and install Node.js from the official website: https://nodejs.org
Once installed, verify the installation:node -v npm -v
node is the runtime, and npm is the Node package manager used to install libraries and tools.
Step 2: Initialize Your Project
Create a new directory for your project:mkdir node-tutorial cd node-tutorial
Initialize a new Node.js project:npm init -y
This creates a package.json file to manage project dependencies.
Step 3: Create a Simple Web Server
Create a file named server.js and add the following code:const http = require('http'); const server = http.createServer((req, res) => { res.statusCode = 200; res.setHeader('Content-Type', 'text/plain'); res.end('Hello, Node.js!'); }); server.listen(3000, () => { console.log('Server running at http://localhost:3000/'); });
Run the server:node server.js
Visit http://localhost:3000 in your browser. You should see "Hello, Node.js!"
Step 4: Working with Modules
Node.js uses a modular system. You can create reusable code in separate files.
Create a file called greet.js:module.exports = function(name) { return `Hello, ${name}!`; };
Then use it in your server.js:const greet = require('./greet'); console.log(greet('Web Developer'));
This makes your code cleaner and easier to manage.
Step 5: Using Express.js
While you can use Node’s built-in modules, most developers use frameworks like Express.js to build APIs quickly.
Install Express:npm install express
Update server.js:const express = require('express'); const app = express(); app.get('/', (req, res) => { res.send('Welcome to the Node.js Tutorial!'); }); app.listen(3000, () => { console.log('Server running on http://localhost:3000'); });
Express simplifies route handling and improves readability.
Step 6: Handling POST Requests and JSON
Add support for POST requests and JSON:app.use(express.json()); app.post('/greet', (req, res) => { const name = req.body.name; res.send(`Hello, ${name}`); });
Use Postman or a frontend form to test sending data to the server.
Step 7: Connecting to a Database (MongoDB)
You can connect your Node.js app to MongoDB using Mongoose:npm install mongoose
Then connect to a database:const mongoose = require('mongoose'); mongoose.connect('mongodb://localhost:27017/nodetutorial', { useNewUrlParser: true, useUnifiedTopology: true, }) .then(() => console.log('MongoDB connected')) .catch(err => console.error(err));
You can now create schemas and interact with your database.
What You’ll Learn from This Node.js Tutorial
This Node.js Tutorial for Web Developers helps you:
Understand the Node.js runtime and architecture
Build your first web server
Use modules for modular code
Create APIs using Express.js
Handle HTTP requests and responses
Parse JSON data and work with forms
Connect to MongoDB and handle data persistence
Final Thoughts
Node.js is a must-learn tool for web developers aiming to become proficient in full-stack development. Its event-driven architecture, speed, and scalability make it a favorite for building real-time and data-intensive applications.
This Node.js tutorial for web developers provides a clear path to mastering back-end development using JavaScript. By learning and applying these concepts, you’ll gain the ability to build complete, dynamic, and modern web applications.
Ready to take your web development skills to the next level? Start coding with Node.js today!
0 notes
Text
Deno 2.3 Introduces Support for Local NPM Packages: A Game-Changer for JavaScript Developers
Deno 2.3 introduces support for local NPM packages, marking a significant milestone for developers working with JavaScript and TypeScript. This latest update to the modern runtime brings a host of enhancements that streamline workflows, boost performance, and deepen integration with the NPM ecosystem. For developers seeking a secure, efficient, and flexible environment, this release opens new doors for local package management and beyond. Let’s explore what makes this update a must-know for the JavaScript community.
Why Deno 2.3 Matters for Developers
The release of Deno 2.3 is more than just a version bump. It addresses key pain points for developers, particularly those working in complex projects that rely on NPM dependencies. By introducing support for local NPM packages, Deno empowers developers to test and iterate on modules without needing to publish them to a registry. This feature alone saves time and enhances the development experience, especially for those managing private or experimental packages.
Beyond local package support, the update includes improvements to compilation, code formatting, and observability. These additions make Deno an even stronger alternative to traditional runtimes like Node.js, offering a zero-config, secure-by-default environment that aligns with modern web standards.
The Power of Local NPM Package Support
One of the standout features of Deno 2.3 is its ability to handle local NPM packages seamlessly. Previously, developers had to publish packages to a registry or rely on workarounds to test locally. Now, Deno allows you to reference a local folder directly, making it easier to develop and debug NPM modules without external dependencies.
This feature is particularly valuable for teams working on monorepos or private libraries. By configuring a local node_modules directory, developers can ensure that their projects remain self-contained and reproducible. Whether you’re prototyping a new feature or refining an existing package, this capability reduces friction and accelerates iteration.
How Local NPM Support Enhances Workflows
Local NPM package support in Deno 2.3 introduces support for local NPM packages by allowing developers to specify a local path in their configuration files. This eliminates the need for constant publishing and republishing during development. For example, teams can now link a local package to multiple projects, test changes in real-time, and maintain control over their dependencies.
Additionally, Deno’s secure-by-default model ensures that local packages adhere to the same permission-based access controls as remote ones. This means you can experiment with local modules without compromising the integrity of your project. The result is a smoother, safer, and more efficient development process.
Enhanced Compilation Capabilities
Deno 2.3 doesn’t stop at package management. The update significantly improves the deno compile command, enabling developers to create standalone binaries with greater flexibility. These binaries now support Foreign Function Interface (FFI) and Node native add-ons, allowing for deeper integration with native libraries and plugins.
Building Leaner Binaries
A key enhancement to compilation is the ability to exclude specific files from the final binary. This feature lets developers reduce the size of their executables, making them more efficient for distribution. For instance, you can exclude development or test files, ensuring that only production-ready code is packaged.
The introduction of the Deno.build.standalone boolean flag further enhances compilation. This flag allows your code to detect whether it’s running in a compiled binary, enabling dynamic behavior based on the execution context. Whether you’re toggling features or customizing error messages, this introspective capability adds a layer of sophistication to your applications.
Cross-Platform Compatibility
With Deno 2.3, compiled binaries are more versatile than ever. The support for FFI and Node add-ons means you can leverage platform-specific libraries without sacrificing portability. This makes Deno an attractive choice for building cross-platform tools, from command-line utilities to desktop applications.
Improved Code Formatting with deno fmt
Code consistency is critical for collaborative projects, and Deno 2.3 delivers with an upgraded deno fmt command. This formatter now supports embedded CSS, HTML, and SQL within tagged templates, ensuring that your mixed-content codebases remain tidy and readable.
New Formatting Options
The update introduces 14 new formatting options, giving developers fine-grained control over their code’s appearance. Whether you’re working with JavaScript, TypeScript, or embedded languages, these options let you tailor formatting to your team’s preferences. This is a boon for projects with diverse file types, as it reduces the need for external formatters.
Streamlined CI Pipelines
Deno 2.3 also extends the --permit-no-files flag to deno fmt and deno lint. This prevents errors when no files are found, making it easier to integrate formatting and linting into continuous integration (CI) pipelines. By reducing false positives, this enhancement saves time and ensures smoother automation.
Boosted Observability with OpenTelemetry
Observability is a cornerstone of modern application development, and Deno 2.3 strengthens its OpenTelemetry support. This update adds event recording, span context propagation, and V8 engine metrics, giving developers deeper insights into their applications’ performance.
Monitoring Made Simple
With expanded OpenTelemetry features, you can capture detailed telemetry data and export it to tools like Grafana or Honeycomb. This makes it easier to diagnose bottlenecks, track user interactions, and optimize resource usage. For teams running production workloads, these capabilities are invaluable for maintaining reliability.
Seamless Integration
Deno’s OpenTelemetry support integrates seamlessly with existing observability stacks. Whether you’re monitoring a serverless function or a full-fledged API, the added metrics and tracing options provide a comprehensive view of your application’s behavior. This aligns with Deno’s goal of simplifying complex workflows without sacrificing power.
Performance and Ecosystem Improvements
Deno 2.3 brings a slew of performance optimizations, particularly for projects with NPM dependencies. Package installation via deno install and deno add is now up to twice as fast when dependencies are cached. This speed boost is especially noticeable in large monorepos, where redundant dependency resolution has been minimized.
Upgraded Engines
The update includes upgrades to TypeScript 5.8 and V8 13.5, bringing new language features and performance improvements. These enhancements ensure that Deno remains at the cutting edge of JavaScript and TypeScript development, offering developers the latest tools to build robust applications.
Better Jupyter Integration
For data scientists and researchers, Deno 2.3 improves the Jupyter notebook experience. Variables, modules, and type definitions are now shared across cells, making it easier to explore datasets and prototype scripts. This enhancement positions Deno as a compelling choice for interactive JavaScript and TypeScript development.
Why Choose Deno 2.3?
Deno 2.3 introduces support for local NPM packages, but its impact goes far beyond this single feature. With improved compilation, formatting, observability, and performance, this release solidifies Deno’s position as a modern, developer-friendly runtime. Its seamless integration with the NPM ecosystem, combined with a secure and zero-config approach, makes it an ideal choice for both new and existing projects.
Whether you’re building a startup’s backend, a personal CLI tool, or a data visualization dashboard, Deno 2.3 offers the tools you need to succeed. Its focus on simplicity, security, and performance ensures that you can focus on writing code rather than wrestling with configuration.
Getting Started with Deno 2.3
Ready to dive into Deno 2.3? Getting started is straightforward. If you haven’t installed Deno yet, you can do so with a single command from the official website. Once installed, explore the new features by creating a project and experimenting with local NPM packages or compilation.
The Deno documentation provides detailed guides on leveraging local package support, formatting options, and observability features. For community support, check out the Deno subreddit or GitHub repository, where developers share tips and discuss the latest updates.
Deno 2.3 introduces support for local NPM packages, delivering a feature that developers have long awaited. Combined with enhanced compilation, improved formatting, and robust observability, this release makes Deno a powerhouse for JavaScript and TypeScript development. By addressing real-world needs with practical solutions, Deno 2.3 empowers developers to build faster, safer, and more maintainable applications.
#Deno#Deno2_3#JavaScript#NPM#LocalNPMPackages#WebDevelopment#JavaScriptDevelopment#NodeJS#Programming#TechNews#DeveloperTools#SoftwareDevelopment
0 notes
Text
يختفي كوريا الشمالية dev مستودعات الأمواج النائمة ، وينزلق رمز سرقة بيانات الاعتماد في تحديثات المحفظة
اكتسب مطور كوري شمالي امتيازات مرتفعة داخل قاعدة كود المحفظة على بروتوكول بروتوكول ، وفقا ل 18 يونيو تقرير بقلم كيتمان.سلط التقرير الضوء على عمليات المسح الروتينية لنشاط جمهورية كوريا الديمقراطية (DPRK) على GitHub ، والذي كشف عن حساب "Ahegaoxxx" الذي يدفع التحديثات إلى المحفظة. لم تُظهر مستودعات المحفظة أي ارتباط شرعي بعد أغسطس 2023 ، ومع ذلك تلقوا عدة نتوءات تبعية تبدأ في مايو 2025. أشارت تحليلات المستودع إلى أنه يمكن للمستخدم فتح الفروع ، وإنشاء الإصدارات ، والنشر إلى سجل Manager Node Package (NPM) ، مما يمنح المشغل التحكم الكامل على المؤسسة.ثم ربط التقرير "Ahegaoxxx" بالتعاقد مع حلقات عمال تكنولوجيا المعلومات في DPRK ، والتي كانت قد استخدمت سابقًا قنوات مستقلة للتسلل إلى مشاريع البرمجيات.امتدت وصول الحساب إلى ما وراء الصيانة البسيطة. تشير القواعد إعادة توجيه القواعد داخل مساحة اسم بروتوكول الأمواج الرئيسية إلى حزم متطابقة داخل مساحة اسم المحفظة النشطة حديثًا ، مما يشير إلى رمز نقل من الداخل من المؤسسة الأساسية إلى مشروع المحفظة.تغييرات رمز مشبوهذكر التقرير أيضًا التزامًا واحدًا داخل "Keeper-Wallet/Keeper-Wallet-Extension" يضيف سجلات محفظة تصدير دالة وأخطاء وقت التشغيل إلى قاعدة بيانات خارجية. يلتقط الروتين المعدل عبارات ذاكري ومفاتيح خاصة قبل الإرسال ، مما يزيد من احتمال ترشيح الاعتماد. يظل الفرع غير مرغوب فيه ، لكن وجوده يشير إلى نية تضمين الكود في إصدار الإنتاج.تعكس سجلات سجل NPM النشاط ذي الصلة. إصدارات "@Waves/Provider-keeper" ، "@Waves/Waves-Transactions" ، وأربع حزم أخرى تقدمت فجأة بعد عامين من السكون. يسرد كل منشورات "Msmolyakov-Waves" كصيانة. يوضح تاريخ Github أن الحساب ينتمي إلى مهندس Waves السابق Maxim Smolyakov ولم يعرض أي نشاط منذ عام 2023 حتى وافق على طلب سحب من "Ahegaoxxx" وأثار إصدار NPM جديد في ��قل من أربع دقائق. قام التقرير بتقييم أن بيانات اعتماد المهندس تندرج الآن تحت سيطرة DPRK ، مما يوفر للمهاجم مسارًا موثوقًا به ثانٍ لتوزيع التصميمات الضارة.التعرض لسلسلة التوريد والتدابير المضادةيمثل التحول من العمل الحر المعزول إلى مراقبة المستودع المباشر ما يطلق عليه التقرير "المتقاطع غير العادي" بين عمل العقد العادي DPRK وحملة اختراق علنية.لا تزال تعدادات التنزيل للحزم المتأثرة منخفضة ، ولكن أي مستخدم Waves يقوم بتثبيت أو يقوم بتحديث المحفوظات المحفوظة على استعداد الرمز الذي يقوم بإعادة توجيه العبارات السرية إلى خادم معادي.نصح المنشور فرق التطوير بتشديد دفاعات سلسلة التوريد ، بما في ذلك امتيازات المساهمين في التدقيق ، وإزالة الأعضاء غير النشطين من منظمات GitHub ، وتتبع من يمكنه تشغيل الإصدارات ، ومراقبة إعادة توجيه المستودعات عبر النظم الإيكولوجية مثل NPM و Docker. أخيرًا ، شجعت الشركة المراجعات المنتظمة لمجالات البريد الإلكتروني الناشر على اكتشاف حسابات نائمة يمكن أن توافق على التحديثات المارقة.أحدث ألفا تقرير السوق
0 notes
Text
Node JS Development Services: Delivering High-Performance, Scalable Web Solutions
In the digital age, businesses require web applications that are fast, scalable, and capable of managing extensive real-time interactions. Node JS development services have quickly become a preferred choice for companies aiming to develop modern, efficient, and data-intensive applications. With its event-driven, non-blocking I/O model and lightweight runtime environment, Node.js is widely used to build high-performance applications for various industries.
This article explores what Node.js is, its core advantages, why it stands out among other technologies, and how professional Node JS development services can add value to your business.
What Is Node.js?
Node.js is an open-source, server-side runtime environment built on Google Chrome’s V8 JavaScript engine. It allows developers to run JavaScript code outside a web browser, making it suitable for backend development. Its non-blocking, event-driven architecture makes it highly efficient for applications that handle multiple simultaneous connections, such as chat apps, streaming services, and APIs.
Node.js leverages JavaScript for both client and server sides, promoting faster development cycles and simplifying full-stack development.
Key Features of Node JS Development Services
Asynchronous and Non-Blocking
Node.js operates asynchronously, processing multiple requests simultaneously without blocking other operations. This ensures faster application performance, especially for real-time and high-traffic applications.
High Performance with V8 Engine
Powered by Chrome’s V8 engine, Node.js compiles JavaScript directly into machine code, resulting in rapid code execution and reduced server response time.
Single Language for Entire Development
Node.js allows developers to use JavaScript for both front-end and back-end, streamlining the development process, reducing costs, and improving team collaboration.
Rich Package Ecosystem
With access to the Node Package Manager (NPM), developers can utilize thousands of open-source libraries and tools, accelerating development and reducing time-to-market.
Scalable Architecture
Its event-driven model enables efficient management of concurrent connections, making it ideal for businesses expecting rapid growth and high user traffic.
Business Benefits of Node JS Development Services
1. Accelerated Development Process
By using a single programming language and reusable code components, Node.js reduces development time, ensuring faster project delivery without compromising quality.
2. Real-Time Data Handling
Node.js excels in applications that require real-time data processing, such as messaging platforms, collaborative tools, and live streaming services, delivering seamless user experiences.
3. Scalability for High-Traffic Applications
Its lightweight architecture and asynchronous processing allow businesses to build scalable applications capable of managing thousands of concurrent connections effortlessly.
4. Cost-Effective Full-Stack Development
Node.js allows companies to streamline resources by utilizing JavaScript across both client and server sides, reducing the need for separate technology stacks and large teams.
5. Large Developer Community and Support
With a vast, active community and continuous contributions, Node.js offers reliable support, frequent updates, and access to an ever-expanding library of modules and extensions.
Applications Built with Node.js
Node.js is versatile and widely used across industries for various application types, including:
Real-Time Applications (chat apps, notifications, collaborative platforms)
Streaming Services
Single-Page Applications (SPAs)
RESTful APIs and Backend Services
IoT-Based Applications
Ecommerce Platforms
Enterprise Web Portals
Microservices-Based Systems
Why Choose Node JS Development Services for Your Business?
Many leading enterprises and fast-growing startups leverage Node.js for its performance, scalability, and developer-friendly environment. Major brands like Netflix, LinkedIn, PayPal, and Uber have successfully adopted Node.js to deliver robust and high-performing applications.
By opting for professional Node JS development services, businesses can:
Enhance application speed and responsiveness
Handle high concurrent traffic with minimal latency
Reduce infrastructure and maintenance costs
Integrate advanced real-time functionalities
Simplify project management with a single tech stack
How to Select the Right Node JS Development Company
Choosing the right development partner is crucial for the success of your project. When selecting a Node JS development services provider, consider the following:
Proven track record in delivering successful Node.js projects
Expertise in integrating Node.js with databases, APIs, and cloud platforms
Proficiency in JavaScript frameworks and microservices architecture
Transparent project management processes and regular progress reporting
Strong client portfolio and positive client testimonials
Conclusion
As businesses prioritize digital transformation, the demand for efficient, scalable, and real-time applications continues to rise. Node JS development services offer a reliable solution for companies looking to build fast, scalable, and feature-rich applications for web and mobile platforms.
Whether you are developing a real-time communication app, an ecommerce platform, or a data-driven enterprise solution, Node.js provides the performance, scalability, and flexibility needed to succeed in a competitive market.
Frequently Asked Questions (FAQs)
Q1. What makes Node.js suitable for real-time applications? Node.js uses an event-driven, non-blocking I/O model, making it highly efficient in managing multiple simultaneous connections with minimal latency — essential for real-time applications.
Q2. Is Node.js appropriate for large-scale enterprise applications? Yes. Its ability to handle concurrent processes, scalability features, and compatibility with microservices architecture make Node.js an ideal choice for enterprise-level applications.
Q3. How does Node.js improve development efficiency? By using JavaScript for both server and client sides, Node.js streamlines development workflows, reduces project complexity, and speeds up delivery times.
Q4. Can Node.js be integrated with cloud services and databases? Absolutely. Node.js is highly compatible with major cloud platforms and supports seamless integration with relational and NoSQL databases like MySQL, MongoDB, and PostgreSQL.
Q5. Why should I hire a professional Node.js development company? A professional Node.js development company brings technical expertise, industry experience, and project management capabilities, ensuring your application is secure, scalable, and aligned with your business objectives.
1 note
·
View note