#18th century pockets
Text
History bounding for the toolbox!
I had surgery 11 days ago, and as a result I’ve got surgical drains at my hips. I’m glad to have them, since they do the job bandages used to, so everything is much cleaner than I expected. But these little bulbs on the end of tubes are a bit awkward to corral. The clips built into them aren’t that strong, and a need to fasten them to something to keep them up and out of the way so they don’t lemming away.
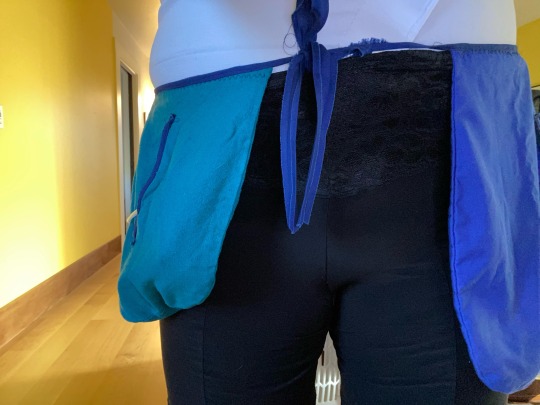
Enter the 18th century pockets! I sewed a pair a few years ago for a costume, and they’ve been tucked in the back of my closet. This morning I’ve tied them on and tucked the drains away in their own secure little pouches where I won’t get bonked with plastic every time I walk and the line of my shirt won’t bulge with them. I’m very excited!
4 notes
·
View notes
Text

2 notes
·
View notes
Text
A Pair of Pieced Pockets
February 11, 2021
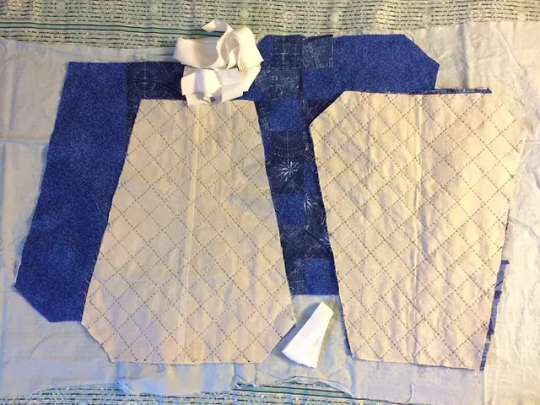
[Image ID: a photo of the pieces of the prepared pieces of the pockets. There are two quilted muslin shapes on top of two similar blue shapes, plus two bundles of white ribbon.]
One of my sewing goals for 2020 was stash-busting (yeah, I started this a few months ago). Making a pair of pieced 18th century pockets was a chance to use up some smaller scraps!
I started, of course, by raiding my fabric stash. I pulled out scraps of two different printed cottons for the pieced outer layers. For the lining I pulled out my first attempt at a Regency shift, which was made out of unbleached cotton muslin.
I drafted a simple pattern from the gridded pattern in "Put On Thy Beautiful Garments: Rural New England Clothing, 1783-1800," but there are also plenty of patterns and tutorials online.
I cut out four of that pattern from the muslin. Two pieces were cut along the side seams of the old shift, one of which required a bit of extra piecing in the corner, and two were cut from the front and back. For the piecing, I used a spool of brown thread and I used a combination of light blue cotton and navy polyester thread for the quilting and construction. The little machine sewing I did used white poly thread because it was already on my machine and wasn't going to show.
Part 1: Piecing
I didn't have large enough pieces of the blue cottons to cut full pocket pieces, but I was able to get a few halves - I got two halves from the darker blue atlas-print cotton and three from the lighter blue floral cotton. I paired up one half from each fabric to get one full piece, then repeated that for a second full piece. (That was a confusing sentence to write, and I'm sure even worse to read, so check out the photo below to see what that looked like in the end.) Those two half-and-half pieces became the backs of the pockets.
I pieced together a third half of the dark blue fabric using two wider strips. That and the remaining half piece of the light blue fabric each became half of the front of one of the pockets.
Then the piecing encroached onto quilting territory.
I had decided on using 2" squares, and I grided it out on my pattern and realized I would need at least 42 squares. I cut two templates from a cereal box - a 2" square to mark sewing lines and a 2.5" square to give each piece a quarter inch seam allowance.
I got 38 squares from my scraps, with roughly twice as many dark blue squares as light blue. Which meant I was four squares short.
I decided to try triangles, which could be pieced into squares. I cut out two templates again, this time a 2" right triangle and a 3" right triangle (because seam allowance math is weird with triangles I guess). I managed to get four triangles out of each fabric, which meant four squares total, so I was set!
With everything cut out, I got to sewing. The triangles went first, pairing one triangle of each fabric into a square. Once all four of those were done, I backstitched four 'columns' of eight squares each (because that's what fit my pocket pattern height) and two 'columns' of five squares each.
Those columns, in turn, were seamed together, doing my best to match up the seam lines between squares. As I was making two separate halves, I made two pieces each consisting of two eight-square columns and one five-square column.
Once those were done, I switched my attention back to the un-pieced front halves. I used a pen to draw a seam line along the straight center edge and made a mark roughly halfway from the top to indicate where the opening will start/stop. Then I brought the heavily pieced and less pieced halves together and lined them up along the center front seam. The seams were backstitched below the marker for the opening and basted above to hold everything in place for ironing.
I ironed all the seams, paying special attention to the seam allowances of all those squares. There were empty spots on my heavily pieced halves, as I expected, but I filled those in using pieces I trimmed away from other places.
With that last bit of piecing done and ironed, I could turn my mind to other prep work.
Part 2: Preparation
I was a bit worried about how all that piecing would hold up, so I decided to 'quilt' the inner and outer layers together for strength and stability (and to use up some blue thread). I decided to use a running stitch like I did on my housewife, except the pattern was more square this time.
It was at this point that I started thinking about what I would need to actually construct the pockets. I had some 1" cotton twill tape from Burnley & Trowbridge for the waist ties, but I didn't have enough to bind the opening or edges of the pockets. So back to the stash I went. I didn't have enough bias tape either, so I decided to cut strips (not on the bias) from scraps of the white cotton fabric I had used for my Regency petticoat and to line my white Regency dress bodice. Those strips were ironed to resemble double-fold bias tape, and then I could finally put everything together!
Part 3: Construction
I carefully pinned some of my cotton strips around the pocket slits (right sides together) and machine stitched them into place. Then I stacked the front and back of each pocket wrong sides together and pinned the binding into place with the right side of the binding facing the right side of the front piece. Once those were machine sewn, I was able to fold the biding around the pocket and slit edges and whip the back side of the binding into place.
(As a side note, I had originally intended to hand sew the pockets completely. I started them in September after finishing my white Regency dress and wanted a simple little hand sewing project to work on. Piecing was a lot more work than I thought it would be and I put the project down for long periods of time. I didn't get to the actual construction until January and was just ready for the project to be done, so I gave myself permission to machine sew the binding and speed up the process a little.)
With the binding done, all I had left to do was to attach the pockets to a waist tape! I pinned the pockets to the twill tape and checked the position by tying it around my waist. One edge of the twill tape was back stitched to the back of the pocket (though the stitching went through all the layers) and the other edge was whipped to the front. As a final touch, I folded and stitched the ends of the twill tape to keep it from unraveling.
And then they were finally done!
I'm pretty happy with how they turned out, but frustrated with how long they took me to make. I'm also baffled about why I started the project in the first place - I don't do 18th century! I've only done Regency so far and I'm getting into the 1890s, and while I'd like to do some 1700s stuff, it's all pretty far down the line. They're done though, and I did some stash busting, and that's all that I really care about right now.
Stay warm. Stay safe. Stay healthy.
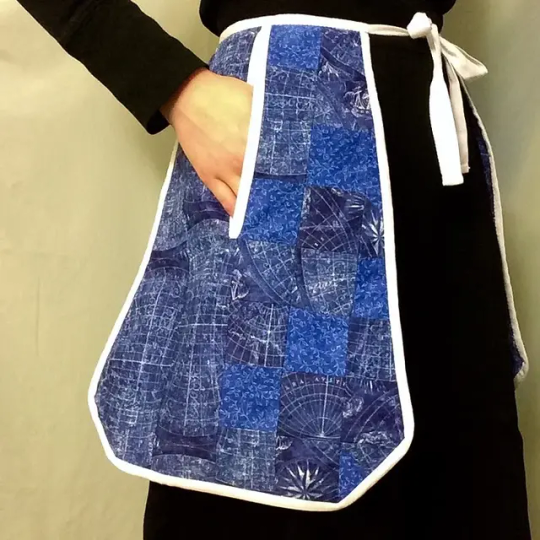
[Image ID: a waist-to-knees photo of a person dressed in black with blue 18th century pockets tied around their waist.]
0 notes
Photo
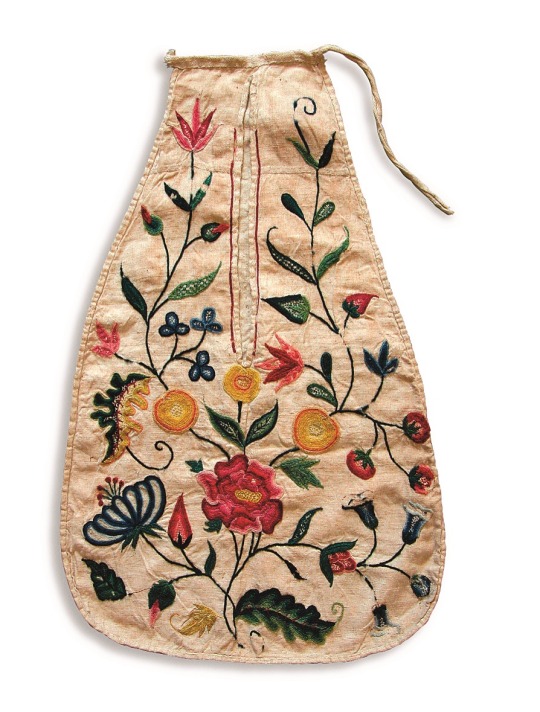
Pocket
1710s
Fashion Museum Bath via Twitter
#pocket#fashion history#historical fashion#1710s#18th century#stuart era#georgian era#accessories#embroidery#floral#united kingdom#fashion museum bath#popular
2K notes
·
View notes
Text
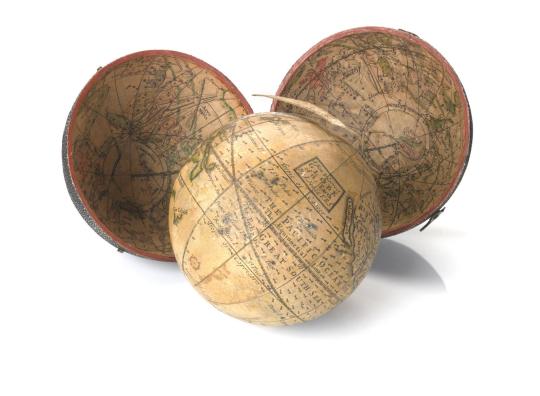
Pocket Globe, c. 1754, twelve printed gores laid down on a plaster and wooden sphere, illustrating the northwest portion of America as Unknown Parts, cartouche reading A New Terrestrial Globe by Nath Hill 1754, fish-skin-covered wood case lined with twelve hand-colored printed gores of the celestial maps.
220 notes
·
View notes
Text
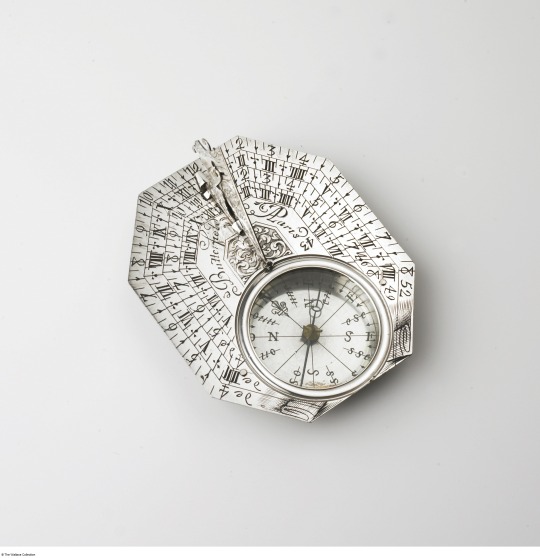

▪︎ Pocket compass and sundial.
Artist/Maker: Michael Butterfield (1635-1724)
Place of origin: Paris, France and England
Date: early 18th century
Medium: Engraved silver, engraved brass
#18th century#18th century art#18th century science#science#history of science#pocket compass#sundial#Michael Butterfield
323 notes
·
View notes
Text
#historical fashion#fashion#historical#history#historical clothing#historical dress#pockets#sewing#historical pattern#patterns#18th century fashion#18th century#fashion dress#textile#textiles#art#1700s
157 notes
·
View notes
Text
If anyone, like me, sews or likes to think they can sew and also has a healthy appreciation for 18th century women's pockets, I've come across an adjustable skirt design with built in pockets inspired by 18th century pockets!
It's got two designs in one and look at this!!
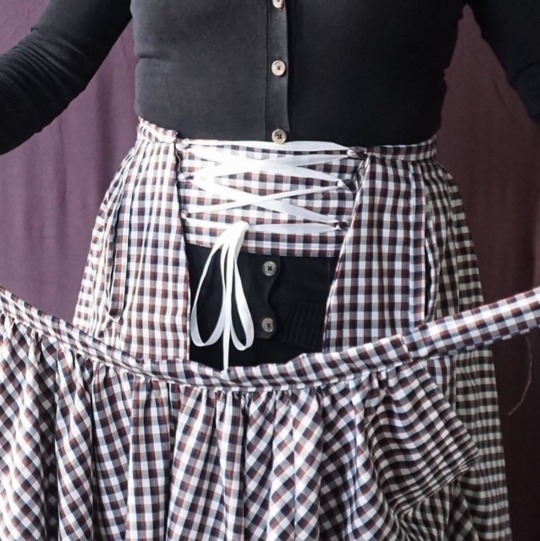
Disclaimer of course that I haven't tried the pattern myself yet, but I'm excited to!
#my post#sewing#i fit so much shit in my 18th century pockets and i miss them sometimes#also this is on sale but it ends today#i might try and increase the length bc i like design b but also like a little longer of a skirt sometimes#the other version still adjusts but doesn't use lacing to do so
635 notes
·
View notes
Text
Pocket watch, Jean Baptiste Baillon, c. 1755

Rijks Museum
132 notes
·
View notes
Text


18th-century tie-on pockets I made for @jellosaladseance! I based them off the pattern and instructions on Burnley and Trowbridge's YouTube channel.
21 notes
·
View notes
Text

Pocket with Latch
Wool embroidery on waulked black wool. Made between 1730 and 1770 in Hallingdal, Norway.
Photo by Nasjonalmuseet/Larsen, Frode
58 notes
·
View notes
Text
18th century pocket
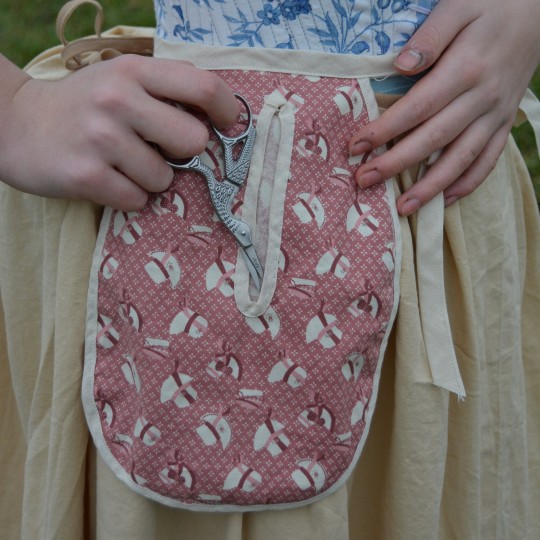
ᵀʰᵉʰᶦˢᵗᵒʳᶦᶜᵃˡᶠʳᵒᵍ
#i love the fabric but there was only enough for pockets#18th centary fashion#historical fashion#handmade#textiles#cottagecore#sewing#18th century#history#rococco#thehistoricalfrog
103 notes
·
View notes
Text
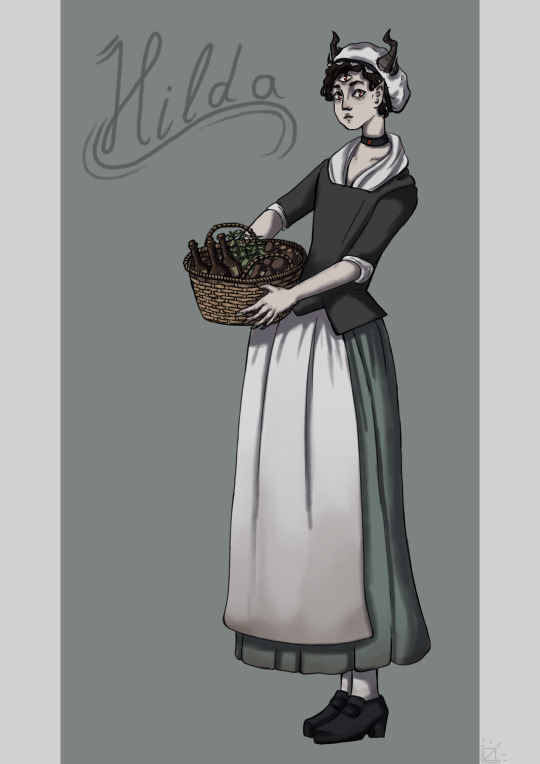
Got bored, drew my Treebury Upon Avon character. She may be a witch living in the woods, but she still goes to the market for her groceries when the weather is too bad for foraging.
The outfit is inspired by 1770s working class fashion.
#i wish i would've drawn her with pockets#pockets back then were ridiculously big#treebury upon avon#treebury upon avon hilda#art#digital art#character art#18th century#18th century fashion#1770s#1770s fashion#original character#oc
18 notes
·
View notes
Text
I am the hottest medieval peasant in the grocery store.
3 notes
·
View notes
Text
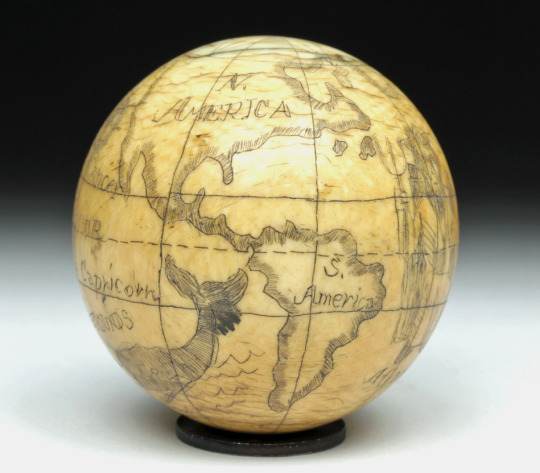
Scrimshawed pocket globe, late 18th century - early 19th century
162 notes
·
View notes
Text
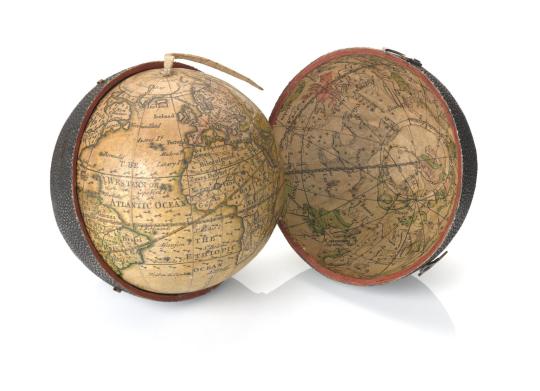

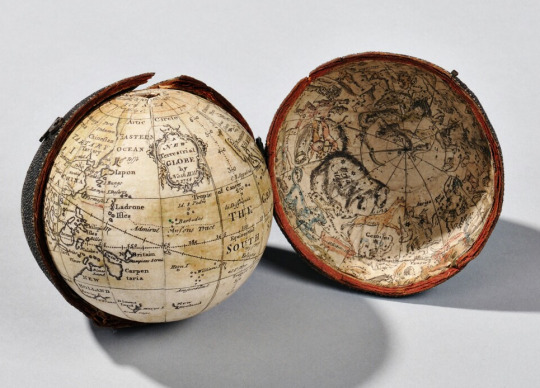
▪︎ Small pocket globe.
Artisst/Maker: John Senex (London, England, 1702-1740)
Medium: Fish-skin case
#18th century#history#art#history of art#science#history of science#small pocket globe#globe#john senex
362 notes
·
View notes
Last Seen Blogs

dangerouscolors
DANGEROUSCOLORS

resource-who-admit93
Untitled

vvolken
MONS⸸ER!

lolitaonfire-blog
omnia sol temperat

gloriabunn0546-blog
3 review Scams And Ways To Get Around