#3DMark
Explore tagged Tumblr posts
Visit Tumblr Blog
Explore Tumblr blogs with no restrictions, modern design and the best experience.
Last Seen Tumblr Blogs


Fun Fact
There are dozens of funny blogs to kill time on Tumblr.
Text
3DMark Benchmarking Tool Now Available on macOS
The popular, previously PC-centric graphics benchmarking suite 3DMark has been launched natively on macOS, offering Mac users a dedicated tool to test their system’s gaming performance. The new macOS version includes four benchmark tests: Wild Life Extreme, Solar Bay, Steel Nomad Light, and the demanding Steel Nomad benchmark previously exclusive to Windows. All tests run natively using Apple’s…
0 notes
Video
youtube
(via 3DMark เปิดตัวเวอร์ชันสำหรับ macOS อย่างเป็นทางการ พร้อมรองรับเบนช์มาร์คระดับสูง)
0 notes
Text
Currently 4th place worldwide on 3dmark timespy!
Very happy with my computer right now, I just finished tightening the timings on my ram and ocing it as hard as it would go. I still gotta figure out how to per core undervolt to get the max out of my cpu but so far the performance is spectacular, im maintaining just about 5ghz clocks on a 5950x with just PBO no manual overclock needed!
Heres a shot of my 9900k oced to 5ghz with the same ram (just not as well tuned) vs my 5950x mostly untuned then my well tuned 5950x.
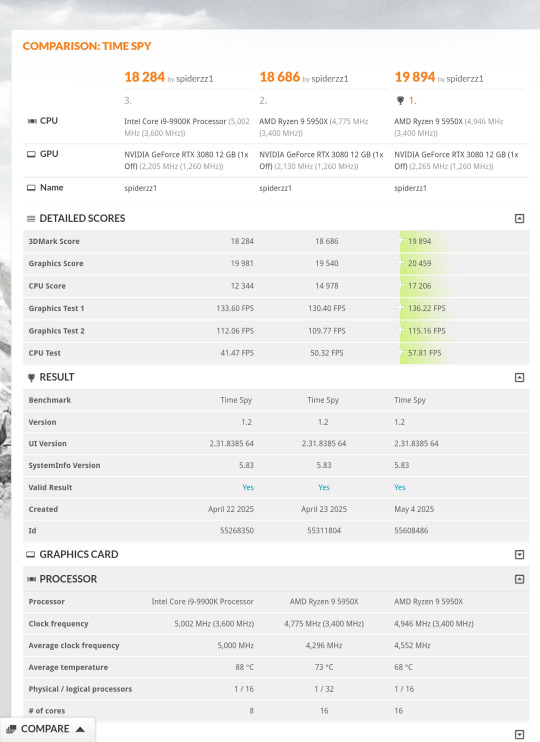
Of course keep in mind im 4th place with this exact hardware, im unsure if having a better GPU gets you better CPU scores in timespy but I did see some people with 4090's getting stupidly high CPU scores if somebody knows please tell me.
Overall not bad for a 5950x I got broken at half price off ebay that was shipped to me in a plastic baggie and then cooled on air!
#amd#amd ryzen#ryzen#5950x#oc#overclock#overclocking#3dmark#timespy#pc#computer#scoreboard chasing#ram#ram oc#ram timing
0 notes
Text
0 notes
Note
Do you know of a decent place to see which phones still work well after years? I'm noticing pretty damning performance issues with my Xperia meanwhile my razer phone 2 is still chugging along!
Longevity is kind of double edged, there's update support and there's raw performance. For update support, there's EndOfLife which has details for a few brands, and you can otherwise usually find a recent list pumped out by an aggregator site if you search "Update Support <Brand> Phones". Just because support is long doesn't mean it'll necessarily run well, (Samsung has long support on even their slowest phones) but it's a start.
For performance, the flagship phones with high end processors and tons of RAM do a lot to future proof a phone against the increasing resource demands, so your best bet is often just benchmark results relative to those.
GSMArena will usually have GFXbench or 3DMark and GeekBench results for phones. Versions change often but, you can usually look at like, the contemporary Samsung S or S Ultra whatever which is pretty reliably one of the fastest fast phones of its generation and see how what you're looking at stacks up. e.g. here's a Nothing 3a pro vs the Samsung S25.

Huge performance gap! GeekBench and AnTuTu are sort of holistic usability benchmarks, while 3DMark is mostly gaming focussed. Here's my phone (Pixel 8) vs its contemporary S24. Now that I mention it, contemporary pixel is also a good "middle of the road" benchmark for recent generations.

No good graphics comparison, but you can see, ~65% performance give or take in general use. This also shows you how big the inter-generation gap was this time, pretty big!
Another thing that matters more than you might think is storage. Modern phones use eUFS 2.x or eUFS 3.x, both of which are high performance flash standards and which are a huge step up over older eMMC storage. Slow flash like eMMC dramatically affects app performance and only makes it worse if you run out of memory and have to hit swap. Snappy app transitions under Android involve a lot of careful memory management and swap usage so slow storage can really highlight that. GSMArena will usually list the flash standard a phone is using.
Memory has a much narrower spread these days, even the cheapest new budget phone will usually have 6GB of RAM, but getting 8 or 12GB will help reduce swapping and improve caching for application launching and multitasking.
21 notes
·
View notes
Text
Antutu Benchmark Comprehensive Guide to Understanding and Using It
Introduction
Antutu Benchmark is one of the most popular and widely used performance testing tools for smartphones and other devices. It provides a detailed score based on multiple tests that measure CPU, GPU, memory, and user experience performance. Whether you’re a tech enthusiast, a buyer comparing devices, or a developer optimizing apps, Antutu Benchmark offers valuable insights into device capabilities.
What is Antutu Benchmark?
Definition and Purpose Antutu Benchmark is an app that runs a series of tests on your device to evaluate its overall performance. It assesses different components like the processor, graphics, memory speed, and user interface fluidity to generate a comprehensive score. This score helps users compare devices and understand their strengths and weaknesses.

Why Use Antutu Benchmark? Using Antutu Benchmark is important because it provides an objective, standardized way to measure device performance. It helps consumers make informed decisions when purchasing smartphones, tablets, or other gadgets and helps manufacturers optimize hardware and software.
How Does Antutu Benchmark Work?
Key Testing Areas Antutu performs tests in several categories including CPU performance (calculations and multitasking), GPU performance (graphics rendering and gaming), memory speed (RAM and storage performance), and user experience (smoothness of operation).
Score Calculation After running all tests, Antutu combines results into a single score. Higher scores mean better overall performance. This score is often used to rank devices in performance charts and reviews.
Benefits of Using Antutu Benchmark
Device Comparison Made Easy With Antutu Benchmark, you can compare scores of different devices to find which performs better in real-world scenarios.
Helps Identify Bottlenecks By breaking down scores into CPU, GPU, and memory, Antutu helps identify which component might be slowing your device.
How to Use Antutu Benchmark?
Installation Process You can download Antutu Benchmark from official app stores or trusted sources. After installation, simply open the app and start the benchmark test.
Running the Test Make sure your device is charged and close background apps for accurate results. The test takes several minutes and runs through all performance checks automatically.
Common Questions About Antutu Benchmark
Is Antutu Benchmark reliable? Antutu is widely accepted but, like any benchmark, it has limitations. Scores can vary based on device conditions and software versions.
Does running Antutu affect my device? The test is safe but can cause the device to heat up temporarily due to intensive processing.
Tips to Get Accurate Results on Antutu Benchmark
Close All Apps Before testing, close any apps running in the background to avoid interference.
Use the Latest Version Always update Antutu Benchmark to the latest version to get the most accurate and relevant tests.
Antutu Benchmark Scores: What Do They Mean?
youtube
Understanding Scores Scores above 500,000 indicate high-end performance, suitable for gaming and heavy multitasking. Mid-range devices typically score between 200,000 to 400,000.
Comparing Scores Over Time Newer devices usually score higher, reflecting advancements in hardware technology.
Alternatives to Antutu Benchmark
Other Popular Benchmark Apps Besides Antutu, apps like Geekbench, 3DMark, and PCMark offer alternative performance tests focusing on specific aspects like CPU or graphics.
When to Use Alternatives Using multiple benchmarks gives a more rounded view of your device’s capabilities.
Conclusion Antutu Benchmark remains a powerful tool to measure and compare smartphone and device performance. By understanding how it works and interpreting the scores correctly, users can make smarter purchasing decisions and optimize their tech experience.
FAQs
Q1: Can Antutu Benchmark be used on all smartphones? Yes, Antutu supports most Android devices and has a version for iOS with limited features.
Q2: Does Antutu Benchmark require internet? No, you can run the benchmark offline, but internet is needed to check online rankings.
Q3: Why are my Antutu scores different on the same device? Scores can vary due to temperature, battery level, and background processes.
Q4: Can Antutu detect fake or modified devices? Antutu includes security checks that can flag devices with counterfeit or tampered hardware.
Q5: Is a higher Antutu score always better? Generally yes, but real-world performance depends on software optimization and usage scenarios too.
2 notes
·
View notes
Text
3DMark Benchmarking Tool Now Available on macOS
Unlock the Secrets of Ethical Hacking! Ready to dive into the world of offensive security? This course gives you the Black Hat hacker’s perspective, teaching you attack techniques to defend against malicious activity. Learn to hack Android and Windows systems, create undetectable malware and ransomware, and even master spoofing techniques. Start your first hack in just one hour! Enroll now and…
0 notes
Photo

Did Samsung GDDR6 modules make the Radeon RX 9070 XT slightly slower than SK Hynix versions? A Chinese hardware reviewer discovered that RX 9070 XTs with Samsung GDDR6 memory perform 1-2% worse than those with SK Hynix modules. Despite higher clock speeds and power consumption, Samsung-based GPUs showed higher latency and lower speeds in tests like 3DMark Speedway. This difference is mainly due to Samsung's "loose" timings, resulting in increased memory latency — around 370-380ns compared to 350-360ns for SK Hynix. AMD confirmed Samsung modules are the culprits, highlighting how memory choice impacts GPU performance even among high-end models. Are you considering a Radeon RX 9070 XT? Knowing the memory type could be key to getting the best performance. Explore custom computer builds with us at GroovyComputers.ca for the perfect gaming or professional setup! #GPUPerformance #GamingHardware #TechNews #AMD #Radeon #SkHynix #Samsung #GraphicsCards #HighEndGPU #GamingSetup #CustomPCs #TechInsights #HardwareNews Ready to build the ultimate gaming PC? Visit GroovyComputers.ca to customize your dream machine today!
0 notes
Text
Price: [price_with_discount] (as of [price_update_date] - Details) [ad_1] Are you ready to feel the rush of extreme performance? The Crucial T700 PCIe 5.0 NVMe SSD offers speeds of up to 12,400MB/s sequential reads and up to 11,800MB/s sequential writes** (up to 1,500K IOPS random reads/writes**) for faster gaming, video editing, 3D rendering and heavy workload applications. Built with Micron 232-layer TLC NAND3 and ready for use with your motherboard’s heatsink*, the Crucial T700 Gen5 SSD is optimized for performance, takes full advantage of Microsoft DirectStorage, and is backward compatible with Gen3 and Gen4 motherboards. With SSD speeds nearly 2x faster than Gen4**** in your PC, you’ll never look back from the Crucial T700! * Non-heatsink versions of the Crucial T700 must be installed with a motherboard or alternate heatsink to achieve optimal performance. ** Typical I/O performance as measured using CrystalDiskMark with a queue depth of 512 and write cache enabled. Windows 11 Core isolation disabled for performance measurement. Fresh out-of-box (FOB) state is assumed. For performance measurement purposes, the SSD may be restored to FOB state using the secure erase command. System variations will affect measured results. *** See Micron.com/products/nand-flash for more information. **** Compared to Crucial P5 Plus Gen4 NVMe SSD listed speed of 6,600MB/s. Actual speed may vary. ***** Some storage capacity is used for formatting and other purposes and is not available for data storage. 1GB equals 1 billion bytes. ****** Compared to Gen5 SSD performance without DirectStorage, based on internal test results with supported GPU that uses GPU decompression. ******* Compared to Crucial MX500 SATA SSD listed speed of 560MB/s. Actual speed may vary. ******** Warranty valid for 5 years from the original date of purchase or before writing the maximum total bytes written (TBW) as published in the product datasheet and as measured in the product’s SMART data, whichever comes first. ********* Under typical conditions for airflow and ambient temperature, our pre-installed premium heatsink allows the T700 Gen5 SSD to run at max workload without the need to thermal throttle. Please ensure your drive has proper airflow for maximum performance. ********** Based on internal gaming performance results measured with 3DMark Storage Benchmark SSD performance test for gamers. Actual results may vary. *********** Compared to SSD temperatures without a cooling apparatus, based on internal testing. The Crucial T700 SSD must be installed with a heatsink for optimal performance. BLISTERING SPEEDS: Get sequential reads/writes of up to 12,400/11,800MB/s2 and random read/writes of up to 1,500K IOPS2 for blazing performance ULTIMATE GAMING & CREATIVITY: With Microsoft DirectStorage, elevate gaming with up to 60% faster texture renders8 and reduced load times, render photos or UHD/8K+ videos and run heavy workloads with up to 99% less CPU utilization8 COMPATIBLE: Ready for performance with your motherboard heatsink1, the T700 installs easily in your M.2 slot. (T700 must be installed with a heatsink.) INNOVATION: Produced in house with the Micron 232-layer TLC NAND3 for Intel 13th Gen and AMD Ryzen 7000 CPUs SPACIOUS: Store more games, UHD/8K+ media, apps, files and more with up to 4TB5 of capacity [ad_2]
0 notes
Text
DIY愛好者爆改顯卡 接上CPU塔扇
不知道大家有沒有想過GPU用上CPU的散熱器會有怎樣的效果,DIY愛好者 TrashBench 就動手完成了這樣的改造。他用的顯示卡是 GTX 960,在3DMark Fire Strike 測試中,使用預設散熱器和散熱罩時溫度達到了40°C。 起初他嘗試用紮帶將 Cooler Master 散熱器和風扇固定到 GPU,但這看起來很笨重,而且在3DMark Fire Strike 測試中,這樣的臨時加裝反而令溫度飆升至 50°C,結果並不理想。 於是,這位科技YouTuber用3D列印機製作了一個合適的小支架,能與PCB板上已有的螺絲孔相匹配,最終溫度達到了28°C,堪稱完美。
0 notes
Photo

AMD Ryzen 5 7500F Upgrade Kit (A620M 16GB DDR4) QUICK SPEC: CPU – AMD Ryzen 5 7500F 6-Core 3.7GHz AM5 (Up to 5.0GHz) Motherboard – MSI A620M Chipset AM5 Micro-ATX Motherboard Memory – 16GB DDR5 5600MHz Gaming Memory Breathe new life into your desktop PC with the PCBuilder AMD Ryzen 5 7500F LEVEL UP Core Upgrade Kit. This upgrade kit is designed for desktop PCs and is powered by a 7th Generation AMD Ryzen 5 7500F CPU. It also comes with an MSI A620 chipset motherboard and 16GB of high-speed DDR5 memory. This Ryzen 5 Upgrade Kit has everything you need to stay ahead of the pack and is a great way to begin your gaming journey. The LEVEL UP Core features a reliable Ryzen 7000 Series CPU and DDR5 memory, which will ensure that every task gets completed quickly and efficiently. With 6 cores and 16GB of DDR5 memory, no task is too much for it to handle. All the components are held together with a high-performance MSI AM5 Motherboard with Lightning Gen 4.0 support. MSI motherboards deliver an efficient and productive experience with stable functionality and high-quality assembly. FEATURES: 3-in-1 CPU, Memory, and Motherboard Kit Six-Core AMD Ryzen 5 7500F CPU with a boost clock of up to 5.0GHz Visualize, synchronize, and mesmerize with DDR5 Gaming Memory Durable and versatile MSI AM5 Micro-ATX Motherboard Ideal for gaming or the office SPECIFICATIONS: AMD Ryzen 5 7500F 6-Core 3.7GHz AM5 CPU Cores: 6 Cores Base Clock Speed: 3.7GHz Boost Clock Speed: 5.0GHz Socket: AM5 MSI A620 Chipset AM5 Micro-ATX Motherboard Socket: AM5 Form Factor: Micro-ATX 16GB DDR5 5600MHz Gaming Memory Capacity: 16GB x 1 Data Transfer Rate: 5600MHz Generation: DDR5 WHAT’S IN THE BOX: AMD Ryzen 5 7500F Upgrade Kit x1 Please note that the images displayed are for illustrative purposes only. Components will be supplied as per the technical specifications in this listing. 3DMark FPS & Time Spy benchmark scores are estimates only.
#DESKTOP_COMPONENTS#UPGRADE_COMBO#16GB_RAM#5600MHZ#7500F#A620#AM5#AMD#DDR5#DESKTOP#DESKTOP_UPGRADE_KIT#GAMING#MOTHERBOARD#MSI#RYZEN_5#UPGRADE_KIT
1 note
·
View note
Text
GPU undervolting around stupid limitations
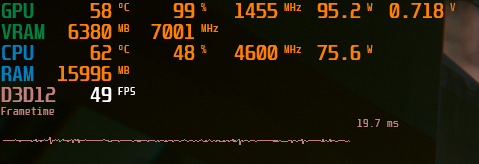
I've spent the past few days playing with undervolting settings for my RTX 2060 Super.
TL;DR of the results: Around 15-20% performance loss vs stock, double that vs my usual overclocked profile. Power draw has gone down anywhere between 35-55%, depending on the benchmark. Synthetic benchmarks tend to have smaller power draw savings while games show bigger improvements. This is NOT a stable setting, more tweaking is needed. More details (and how to do this!) under the cut.
Just to be clear, this was an attempt to push voltage as low as possible with absolutely no regard for performance. I just wanted to see how low I could go while still technically running above stock clocks. I tried Steel Nomad and Time Spy for synthetic benchmarks, and a couple of games I frequently play for game tests. DLSS/FSR/XeSS were always OFF, all these tests are at native resolution.
-- IMPORTANT CAVEATS --
This is NOT a well controlled environment, this is me firing up games off my library, letting the temperature and framerate stabilise in a location that performs worse than average, then taking screenshots.
I do NOT have a good performance logging solution configured, nor do I have preset benchmark runs for these tests. They are quick and dirty and should be taken with more than one grain of salt.
The only thing that changed in between test runs was applying my custom profile on MSI Afterburner and returning to stock settings.
I expect the margin of error to be large, well above the 1-2% we usually see in professional benchmarks and reviews. I cannot verify exactly how much it is, so assume the worst.
Whenever "my overclocked profile", "overclocked" or anything with the same meaning is mentioned, it means the following settings in MSI Afterburner:
-- SYNTHETIC BENCHMARKS --
All tests run at default settings.
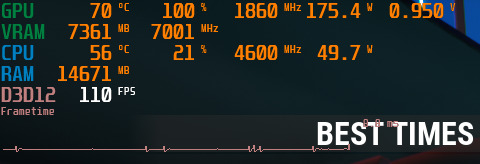
In 3DMark Steel Nomad, the card peaks at around 110 W for a decrease of 37% from stock, while performance drops by 13%. Compared to my overclocked profile, power draw went down by 41%, and performance went down by 18%. Results links: Undervolted (110 W), Stock (175 W), Overclocked (185 W). Note that the Undervolted run still has the VRAM overclocked for this test.
3DMark Time Spy had similar results. Performance loss was 14% vs stock and 17% vs overclocked, with power draw reduced by 43% and 46% respectively. Results links: Undervolted (100 W), Stock (175 W), Overclocked (185 W). Note that the Undervolted run still has the VRAM overclocked for this test.
-- GAME BENCHMARKS --
All settings and spots where screenshots were taken can be found here.
Assassin's Creed Mirage, custom Medium settings. The undervolted profile consistently draws 85 W or less even in more crowded areas. At stock settings the card draws between 175-180 W. That being said, this does come at the cost of significantly less stable frametimes, meaning this undervolt is probably on the absolute edge of stability and a bit more voltage would be necessary for a long-term setting. Note the over 20% performance loss alongside the nearly 500 MHz frequency drop.

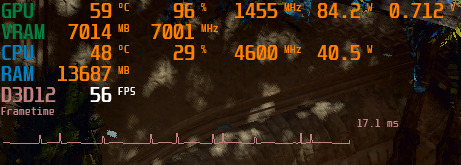
Redout 2, max settings. Stock does incredibly well here, delivering over 100 FPS in most occasions. Tested at Neo-Tokyo, which tends to be one of the more performance-heavy tracks in my experience. Undervolting here dropped performance by up to 20%, and reduced power draw by 42%. Note that the overall frametime consistency has worsened here too, but it's fast enough that it doesn't detract from the experience.
Cyberpunk 2077, custom Medium settings. Stock settles in at around 60 FPS with my settings, while undervolting drags down to 50. Power draw drops below 100 W as a result.

-- HOW IT'S DONE --
Since Nvidia doesn't let you directly control the voltage of your GPU, you have to find a different way around it, and there is one:
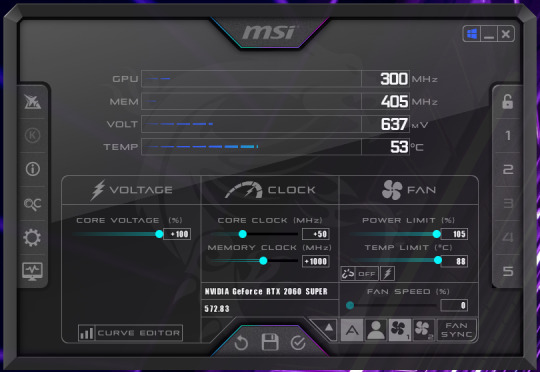
Setting a maximum clock speed using MSI Afterburner's Curve Editor means your GPU will aim for that clock speed at the lowest voltage that matches it.
What this means is, if you make your V/F curve completely flat from one voltage onwards, your GPU will never try to go above that voltage. Thus, you effectively cap your card's voltage and select a target frequency for it.
For a visual example, here's my card's stock V/F curve:

And here's the undervolt setting:

There's a quick way to do this, so you don't have to set each little point manually. Select the leftmost point (lowest voltage) you want to try, set it to the frequency you want. Then, hold Shift, and drag across all the other points to select them together. Finally, hit Shift+Enter twice, and Afterburner will flatten the rest of the curve for you. Hit Apply and hope you don't crash.
-- THOUGHTS OVERALL --
Averaging out my results, power draw went down by 44% vs stock settings and 47% versus my overclocked profile. At the same time, the performance change was -18% versus stock. I didn't keep record of my overclocked gaming results, but the performance bump seemed to be around the same as that in synthetic benchmarks, if not a little less.
This makes for an efficiency improvement of 24% overall versus stock, accounting for performance loss versus power draw reduction. Not fucking bad, though again this DID really mess with frametime stability, so be mindful of that when trying this yourself. Frametime stability is just as (if not more) important than average framerates - A game running at 100 FPS with frequent stutters will usually not feel as good as a game running a rock-solid 75 or even 60, depending on the severity of said stutters.
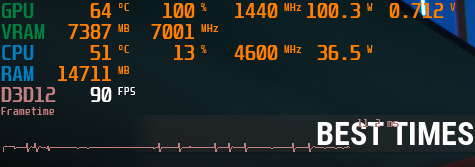
My next attempt will be running stock clocks undervolted, though of course that's probably not going to be anywhere near as big an efficiency improvement. I wanted to go as hard as I could for the start, and 0.712 volts was what it settled down in.
0 notes
Text
RTX 5060 Ti de 16GB supera a la 4060 Ti en un 20% en 3DMark
La NVIDIA GeForce RTX 5060 Ti de 16GB vuelve a ser el centro de atención tras nuevas filtraciones que revelan su rendimiento en 3DMark. Según los datos, esta GPU ofrece un rendimiento 20% superior al de la RTX 4060 Ti, lo cual representa una mejora moderada dentro de su misma gama, especialmente si consideramos su precio y consumo. Las pruebas abarcaron varios tests de 3DMark, incluyendo Fire…
0 notes
Text
Ekran Kartı ve İşlemci Uyumu Darboğaz Sorunu ve Çözümü
New Post has been published on https://www.teknolojicozum.com/ekran-karti-ve-islemci-uyumu-darbogaz-sorunu-ve-cozumu/
Ekran Kartı ve İşlemci Uyumu Darboğaz Sorunu ve Çözümü

Bilgisayar sisteminin genel performansı, içindeki bileşenlerin birbirleriyle uyumuna bağlıdır. Özellikle ekran kartı (GPU) ve işlemci (CPU) arasındaki denge, oyunlardaki kare hızlarını (FPS) ve uygulamalardaki verimliliği yakından etkiler. Bu denge bozulduğunda ortaya çıkan en yaygın sorun ise darboğaz problemidir. Darboğaz, sistemin bir bileşeninin (genellikle işlemci veya ekran kartı) diğerini tam kapasite kullanmasını engellemesi durumudur. Bu makalede, GPU ve CPU uyumunu nasıl sağlayabileceğiniz, darboğazın teknik analizi ve bu sorunu gidermeye yönelik yöntemler profesyonel bir bakış açısıyla ele alınmıştır.
Darboğaz Nedir ve Nasıl Oluşur?
Darboğaz, basit bir ifadeyle, bir sistemdeki en yavaş bırakılan halkanın tüm sistem performansını sınırlamasıdır. Bilgisayar dünyasında bu terim, özellikle işlemci ve ekran kartı arasındaki uyumsuzluğa referansla kullanılır. Örneğin, çok güçlü bir ekran kartını eski nesil veya düşük kapasiteli bir işlemciyle kullanırsanız, işlemci yeterince hızlı veri besleyemediği için ekran kartı tam performansını gösteremez; bu durumda işlemci darboğazı ortaya çıkar. Tersi durumda, çok güçlü bir işlemciye karşı görece zayıf bir ekran kartı kullanırsanız bu kez GPU, CPU’yu sınırlayan faktör olur; ancak pratikte bunun etkisi daha az gözle görülür çünkü genelde oyunlarda FPS’i belirleyen ana unsur GPU gücüdür. Darboğazı anlamak için gerçek zamanlı izleme yapmak yararlı olur. Örneğin, bir oyunda GPU kullanımı %60 civarında kalırken CPU kullanımı %100’e vuruyorsa, işlemci yetişemiyor ve darboğaz yaşanıyor demektir. Bu durumda, ekran kartı daha fazlasını sunabilecek olsa da işlemci onu besleyemediği için FPS artmaz, hatta düşebilir. Genellikle düşük çözünürlükte (1080p ve altı) işlemci sınırına daha çabuk ulaşılır, çünkü GPU’ya göre iş daha hafiftir ve kare sayıları çok yükselir, bu da CPU’ya ekstra yük bindirir.
Darboğazı Tespit Etme
Darboğaz problemini netleştirmek için aşağıdaki yöntemleri kullanabilirsiniz: Gerçek Zamanlı İzleme Araçları: MSI Afterburner + RivaTuner Statistics Server gibi yazılımlarla oyun sırasında CPU ve GPU kullanım oranlarını, sıcaklıklarını, saat hızlarını ve FPS değerini aynı anda izleyebilirsiniz. Bu gözlem, darboğaza neyin sebep olduğunu anlamanızı sağlar. Örneğin GPU kullanımı sık sık %90-100 bandına çıkarken CPU hep %50’lerde kalıyorsa, burada GPU sınırda çalışıyor (yani GPU darboğazı veya çok iyi bir denge) anlamına gelir. Ancak CPU %100 ve GPU daha düşük ise, CPU darboğazı kesin gibidir. Farklı Çözünürlük ve Ayarları Deneme: Eğer bir oyunda çözünürlüğü veya grafik ayarlarını düşürdüğünüz halde FPS’nizde belirgin bir artış olmuyorsa, bu da işlemci darboğazının habercisidir. Normalde grafik ayarlarını kısmak GPU’yu rahatlatır ve FPS’i yükseltir; eğer bu yolla artış göremiyorsanız, demek ki tıkanma noktası GPU değil CPU tarafındadır. Benzer şekilde, çözünürlük artırdığınızda FPS çok değişmiyor ama sonra bir eşikten (mesela 1440p) sonra düşüyorsa, düşük çözünürlükte CPU, yüksek çözünürlükte GPU sınır olduğunun işareti olabilir. Karşılaştırmalı Testler (Benchmark): Sentetik test programları (3DMark gibi) veya oyun içi benchmark araçları ile, sisteminizi benzer konfigürasyonlarla karşılaştırın. Eğer benzer ekran kartı + daha iyi bir işlemci kombinasyonuna göre çok daha düşük skorlar alıyorsanız, işlemci sınırına takıldığınızı anlayabilirsiniz. Bu karşılaştırmalar için online veritabanları ve forumlar çok faydalı olabilir; insanlar benzer sistemlerini paylaşır ve referans noktaları sunar.
Darboğaz Sorunu Çözüm Önerileri
Darboğaz sorunuyla başa çıkmak için izleyebileceğiniz adımlar ve yöntemler: Çözünürlük Yükseltme (Geçici Çözüm): Bu, sorunu kökünden çözmez ama işlemci darboğazı yaşanıyorsa, çözünürlüğü veya grafik kalite ayarını yükseltmek GPU’ya daha fazla iş yükü bindirerek CPU’nun nispeten rahatlamasını sağlar. Bu şekilde, hem görüntü kalitesi artar hem de belki biraz daha stabil (ancak yine sınırlı) bir FPS elde edilebilir. Örneğin, 1080p’de 90 FPS alan bir sistem, CPU sınırında iken 1440p’ye çıktığında 70 FPS’de kalıp GPU kullanımını artırabilir; bu durumda CPU daha az kare işlediği için %100’den biraz düşecek, daha akıcı bir deneyim sağlanabilecektir.
CPU Overclock veya Güncelleme:
Eğer işlemciniz müsaitse, hafif bir overclock ile %5-10 civarı ekstra performans elde edebilirsiniz. Modern Intel ve AMD işlemcilerde bu, uygun soğutma koşullarında mümkündür. CPU frekansının artması, tek çekirdek ve çok çekirdek performansını arttıracağı için, işlemci darboğazını hafifletebilir. Ancak her işlemcinin overclock edilemeyeceğini (“K” serisi Intel, ya da belirli anakart chipsetleri gerektiğini) unutmayın. Alternatif olarak, işlemcinizi daha büyük bir modelle güncellemek en kesin çözümdür. Örneğin 4 çekirdekli bir işlemciden 6 veya 8 çekirdeğe geçiş yapmak, yeni nesil mimarilere yükseltmek ciddi fark yaratabilir.
Arka Plan Uygulamaları ve Oyun Optimizasyonu:
İşlemciniz sınırda çalışıyorsa, oyun sırasında arka planda çalışan gereksiz programları kapatın. Bu, işlemci üzerindeki ek yükü azaltır. Aynı zamanda, özellikle CPU’ya yük bindiren oyunlarda (örneğin büyük çaplı savaşlar veya açık dünya ortamları gibi) kalabalık sahneler, yapay zeka hesaplamaları gibi unsurlar işlemciyi zorlar. Oyun içi ayarlardan “population density” (nüfus yoğunluğu), “view distance” (görüş mesafesi) gibi seçenekleri düşürmek işlemcinin iş yükünü azaltarak darboğazı azaltabilir. Ekran Kartı Sınırlama (Frame Limiting): Kulağa ters gelebilir ancak işlemci darboğazının göze battığı durumlarda, eğer FPS çok yüksek ve aşırı dalgalanıyorsa, bir FPS sınırlayıcı (limiter) veya V-Sync ile maksimum kare oranını sınırlandırmak, işlemcinin her saniye daha az iş yapmasını sağlayarak sahne gecikmelerini azaltabilir. Örneğin, 120 FPS dalgalı bir deneyim yerine 90 FPS kilitli ama daha stabil bir deneyim, daha az stutter (takılma) hissettirir ve CPU biraz nefes alır. Bu seçenek, sadece geçici bir konfor artışı içindir; temelde sorunu çözmez ama oyuncuyu rahatlatarak anın tadını çıkarmasını sağlar.
Sistem Belleği ve Diğer Etkenler:
Darboğaz denince akla ilk CPU-GPU ikilisi gelir, fakat yetersiz RAM de FPS düşüşlerine neden olabilir. Eğer oyunlar sistem belleğinizin sınırlarını zorluyorsa (8GB RAM ile yeni oyunlar gibi), RAM yüklemesi CPU üzerine bindirilir ve bu da dolaylı darboğaz sebebi olur. Özellikle çoklu oyunculu veya açık dünya oyunlarında 16GB veya daha fazla RAM, 8GB’a göre çok daha akıcılık sağlar. Aynı şekilde, depolama biriminizin hızı (SSD vs HDD) yüklenme sıraları ve akıcılık için fark yaratabilir ama bu genellikle FPS’e doğrudan etki etmez, sadece takılma (stutter) durumlarını etkiler.
Uyumlu Sistem Tasarımı
En başta, sistem toplarken veya güncelleme yaparken dengeyi gözetmek en önemli faktördür. Ortalama bir oyuncu veya kullanıcı için, işlemci ve ekran kartını benzer segmentlerde tutmak genellikle yeterli uyumu sağlar. Örneğin, üst düzey bir ekran kartı (RTX 3080 gibi) için en az üst düzey bir işlemci (Core i7 veya Ryzen 7 gibi) tercih edilmeli. Orta düzey bir kart (GTX 1660 Super gibi) için orta sınıf bir CPU (Core i5 veya Ryzen 5 gibi) yeterli olur. Bu şekilde, iki bileşen de birbirini sınırlamadan yakın performans seviyelerinde çalışabilir. Ayrıca, sistemin amacına göre de uyum önem taşır. Sadece e-spor oyunları oynayan biri çok güçlü bir GPU yerine daha güçlü bir CPU’yu tercih edebilir, çünkü bu tür oyunlar (CS:GO, Valorant vb.) yüksek FPS için işlemciye daha fazla yük biner. Tam tersi, tek kişilik hikaye odaklı oyunları seven biri, grafik şöleni için güçlü bir GPU’yu önceliklendirebilir. Dolayısıyla denge, sadece teknik değil, aynı zamanda kullanım senaryosuna göre değişkenlik gösterir. Sonuç olarak, ekran kartı ve işlemci uyumunu sağlamak, darboğaz sorununu önlemek ve sistem performansından en iyi şekilde yararlanmak için kritik bir unsurdur. Teknik analizlerle sistemdeki dar noktaları belirleyip, yukarıda bahsedilen çözüm yollarını uygulayarak daha dengeli ve verimli bir bilgisayar deneyimine ulaşabilirsiniz. Ekran Kartı Tamiri
#bilgisayar ekran kartı tamiri#ekran kartı bakımı#ekran kartı chipset tamiri#ekran kartı onarım hizmetleri#ekran kartı sorunları#ekran kartı tamir fiyatı#ekran kartı tamiri#ekran kartı tamiri fiyatları#ekran kartı tamiri hizmeti#ekran kartı tamiri istanbul
0 notes