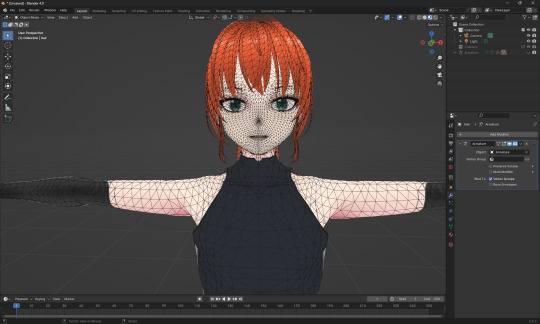
#3d clothing design software free
Text
youtube
#Clo#CLO 3D#CLO 3D Software#Fashion design software#3D Dress design#Clothing Design Software#3D Cloth#Cloth 3D Model#3D Designer#3d clothing design software free#3d clo#competitive exam#digital marketing course#fashion designing course#NIFT#NID#Uceed#NATA#Youtube
2 notes
·
View notes
Text
LETS STOP GATEKEEPING
I didn't use all those, it's just all the info i could gather
My patreon (free)|Discord
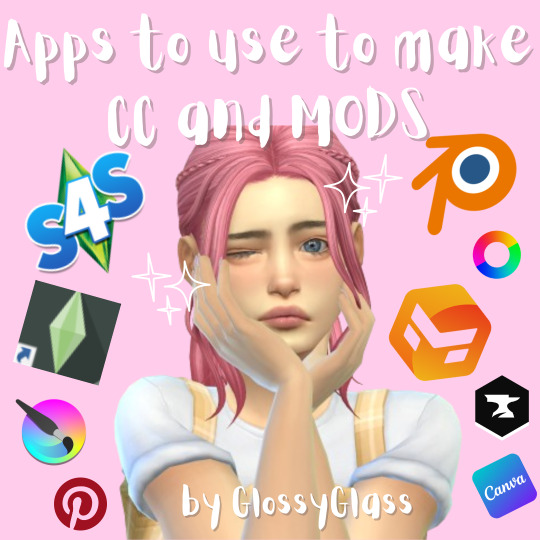
Apps to use to make CC's:
sims 4 studio (must)
canva (to make thumbnails and stuff, can be also any other program but it works best for me)
Krita/ibispaint or other drawing/photo editing software (that's where most of the work happens in making tattoo's/recoloring and stuff)
sims 4 manager (to make loading screens, here again canva comes handy, and pinterest of course)
Pinterest (to look for inspo/patterns)
Blender (to make 3d objects)
Marvelous Designer (to make clothes, not free unfortunately>:( )
Gshade/ReShade (to make reshades for the game)
Apps to use to make MODS:
Mod Constructor V5 (AN ABSOLUTE MUST IF YOU DON'T KNOW PROGRAMMING LIKE ME)
Sims 4 Studio (again, a must especially if you want to translate it or smt)
PyCharm (To my knowledge python is a really handy language that can enable you to make mods!)
Good to have:
mods that show you corrupted mods and CC's in the game(and if yours is not one of them)
CurseForge (for the same reason, it shows you which files are corrupted)
reddit (handy to ask for help there)
If i'll remember/see something else I'll let you know!!!
#the sims 4#ts4#sims 4#the sims custom content#ts4 custom content#ts4 simblr#ts4cc#ts4 cc#ts4 cc download
62 notes
·
View notes
Photo

Decided to post the whole thing on Tumblr, since Tumblr is just perfect for longreads.
Here is a small background tutorial I did a few days ago! Hope you guys enjoy it!
I decided to make this tutorial free, but if you wish to leave a small tip you can do it at my BMC page. But basically all I wish for is to share this thing with others, so I would really appreciate some reblogs here!
This tutorial is not for the beginners, it requires some basic knowledge on perspective drawing (but don’t worry, I got you covered: here’s my easy guide to perspective drawing). 3D-modelling skills aren’t necessary though, there are plenty of free models out there that can be used in personal or even commercial projects.
All the architecture and interior element designs/3D models are my own (I use SketchUp for modeling), the pillows and cloth are some random 3D-models used as a base with a bit of overpainting. The background is photobashing (I always use the assets published under Creative Commons license or similar licenses, especially now when I can't buy stock images and packs for photobashing) with some paintover. The nice brushes I used to draw leaves are from LoranDeSore pack (you can find it on her DeviantArt page) and the watercolor texture I used on top of the image are made by Hibbary (check out their DA for texture packs).
There are plenty of nice free assets out there, both for Photoshop and CSP, and I think it is important to share this stuff with others, especially knowing that not everyone can afford paying for brushes, textures and stocks. And if you can't afford PS or CSP either there are a lot of software developers who offer their stuff for free, everyone can download Krita and Gimp or other amazing stuff online.
I find it funny when Ai-bros say that artists are gatekeeping (all while fighting with each other over prompts). Like, it literally have never been easier to find tutorials, assets and instruments for your creations.
298 notes
·
View notes
Text
「viRtua canm0m」 Project :: 002 - driving a vtuber
That about wraps up my series on the technical details on uploading my brain. Get a good clean scan and you won't need to do much work. As for the rest, well, you know, everyone's been talking about uploads since the MMAcevedo experiment, but honestly so much is still a black box right now it's hard to say anything definitive. Nobody wants to hear more upload qualia discourse, do they?
On the other hand, vtubing is a lot easier to get to grips with! And more importantly, actually real. So let's talk details!
Vtubing is, at the most abstract level, a kind of puppetry using video tracking software and livestreaming. Alternatively, you could compare it to realtime mocap animation. Someone at Polygon did a surprisingly decent overview of the scene if you're unfamiliar.
Generally speaking: you need a model, and you need tracking of some sort, and a program that takes the tracking data and applies it to a skeleton to render a skinned mesh in real time.
Remarkably, there are a lot of quite high-quality vtubing tools available as open source. And I'm lucky enough to know a vtuber who is very generous in pointing me in the right direction (shoutout to Yuri Heart, she's about to embark on something very special for her end of year streams so I highly encourage you to tune in tonight!).
For anime-style vtubing, there are two main types, termed '2D' and 3D'. 2D vtubing involves taking a static illustration and cutting it up to pieces which can be animated through warping and replacement - the results can look pretty '3D', but they're not using 3D graphics techniques, it's closer to the kind of cutout animation used in gacha games. The main tool used is Live2D, which is proprietary with a limited free version. Other alternatives with free/paid models include PrPrLive and VTube studio. FaceRig (no longer available) and Animaze (proprietary) also support Live2D models. I have a very cute 2D vtuber avatar created by @xrafstar for use in PrPrLive, and I definitely want to include some aspects of her design in the new 3D character I'm working on.

For 3D anime-style vtubing, the most commonly used software is probably VSeeFace, which is built on Unity and renders the VRM format. VRM is an open standard that extends the GLTF file format for 3D models, adding support for a cel shading material and defining a specific skeleton format.
It's incredibly easy to get a pretty decent looking VRM model using the software VRoid Studio, essentially a videogame character creator whose anime-styled models can be customised using lots of sliders, hair pieces, etc., which appears to be owned by Pixiv. The program includes basic texture-painting tools, and the facility to load in new models, but ultimately the way to go for a more custom model is to use the VRM import/export plugin in Blender.
But first, let's have a look at the software which will display our model.
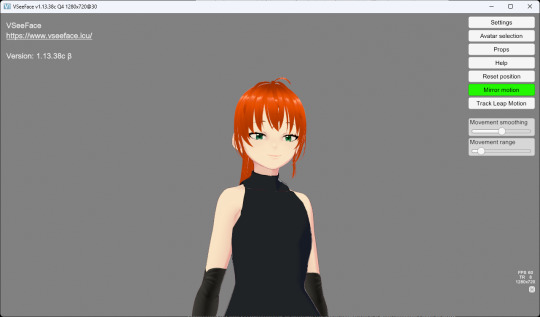
meet viRtua canm0m v0.0.5, a very basic design. her clothes don't match very well at all.
VSeeFace offers a decent set of parameters and honestly got quite nice tracking out of the box. You can also receive face tracking data from the ARKit protocol from a connected iPhone, get hand tracking data from a Leap Motion, or disable its internal tracking and pipe in another application using the VMC protocol.
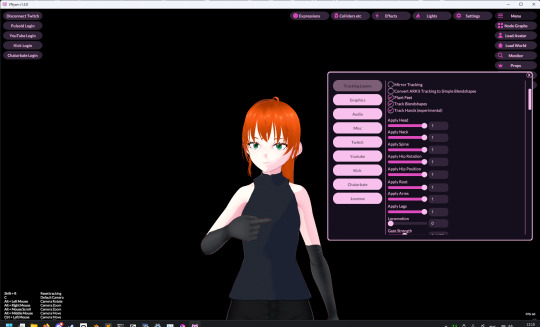
If you want more control, another Unity-based program called VNyan offers more fine-grained adjustment, as well as a kind of node-graph based programming system for doing things like spawning physics objects or modifying the model when triggered by Twitch etc. They've also implemented experimental hand tracking for webcams, although it doesn't work very well so far. This pointing shot took forever to get:
<kayfabe>Obviously I'll be hooking it up to use the output of the simulated brain upload rather than a webcam.</kayfabe>
To get good hand tracking you basically need some kit - most likely a Leap Motion (1 or 2), which costs about £120 new. It's essentially a small pair of IR cameras designed to measure depth, which can be placed on a necklace, on your desk or on your monitor. I assume from there they use some kind of neural network to estimate your hand positions. I got to have a go on one of these recently and the tracking was generally very clean - better than what the Quest 2/3 can do. So I'm planning to get one of those, more on that when I have one.
Essentially, the tracker feeds a bunch of floating point numbers in to the display software at every tick, and the display software is responsible for blending all these different influences and applying it to the skinned mesh. For example, a parameter might be something like eyeLookInLeft. VNyan uses the Apple ARKit parameters internally, and you can see the full list of ARKit blendshapes here.
To apply tracking data, the software needs a model whose rig it can understand. This is defined in the VRM spec, which tells you exactly which bones must be present in the rig and how they should be oriented in a T-pose. The skeleton is generally speaking pretty simple: you have shoulder bones but no roll bones in the arm; individual finger joint bones; 2-3 chest bones; no separate toes; 5 head bones (including neck). Except for the hands, it's on the low end of game rig complexity.
Expressions are handled using GLTF morph targets, also known as blend shapes or (in Blender) shape keys. Each one essentially a set of displacement values for the mesh vertices. The spec defines five default expressions (happy, angry, sad, relaxed, surprised), five vowel mouth shapes for lip sync, blinks, and shapes for pointing the eyes in different directions (if you wanna do it this way rather than with bones). You can also define custom expressions.
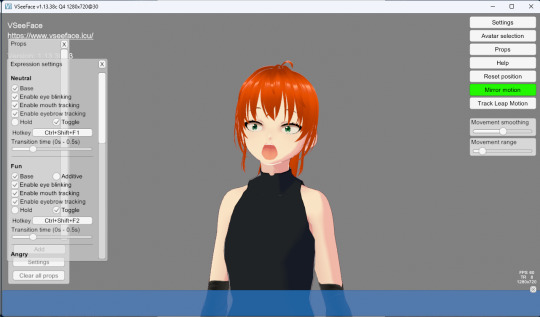
This viRtua canm0m's teeth are clipping through her jaw...
By default, the face-tracking generally tries to estimate whether you qualify as meeting one of these expressions. For example, if I open my mouth wide it triggers the 'surprised' expression where the character opens her mouth super wide and her pupils get tiny.
You can calibrate the expressions that trigger this effect in VSeeFace by pulling funny faces at the computer to demonstrate each expression (it's kinda black-box); in VNyan, you can set it to trigger the expressions based on certain combinations of ARKit inputs.
For more complex expressions in VNyan, you need to sculpt blendshapes for the various ARKit blendshapes. These are not generated by default in VRoid Studio so that will be a bit of work.
You can apply various kinds of post-processing to the tracking data, e.g. adjusting blending weights based on input values or applying moving-average smoothing (though this noticeably increases the lag between your movements and the model), restricting the model's range of movement in various ways, applying IK to plant the feet, and similar.
On top of the skeleton bones, you can add any number of 'spring bones' which are given a physics simulation. These are used to, for example, have hair swing naturally when you move, or, yes, make your boobs jiggle. Spring bones give you a natural overshoot and settle, and they're going to be quite important to creating a model that feels alive, I think.
Next up we are gonna crack open the VRoid Studio model in Blender and look into its topology, weight painting, and shaders. GLTF defines standard PBR metallicity-roughness-normals shaders in its spec, but leaves the actual shader up to the application. VRM adds a custom toon shader, which blends between two colour maps based on the Lambertian shading, and this is going to be quite interesting to take apart.
The MToon shader is pretty solid, but ultimately I think I want to create custom shaders for my character. Shaders are something I specialise in at work, and I think it would be a great way to give her more of a unique identity. This will mean going beyond the VRM format, and I'll be looking into using the VNyan SDK to build on top of that.
More soon, watch this space!
9 notes
·
View notes
Note
Hello! I am amazed by your work, and I am very curious as to what software you use to make new clothes? Blender ? Marvelous Designer? Are you stripping the 3D characters first and then adding new clothing?
Thank you :)
hello !
I use blender exlusively, i did try Marvelous designer but couldn't get into it before the end of the free trial lmao
if you want to make new clothes for the characters the easiest way to do it is to use clothes from the game as base and edit them ( saves you a lot time since the heavy work is already done , i have a tutorial showing how i do an outfit edit for Yennefer using only game assets ->
youtube
then once you feel more comfortable adding bits and pieces made from scratch never hurts ;)
not sure what you mean but to add new clothes i just replaced the vanilla outfit meshes with the new modded ones, simple as that
8 notes
·
View notes
Text
Apple Vision Pro: Revolutionizing Augmented Reality
Apple, a trailblazer in technology innovation, has unveiled its latest breakthrough in augmented reality (AR) with the Apple Vision Pro. This cutting-edge device promises to redefine the way we interact with digital content, bridging the gap between the virtual and real worlds. In this article, we'll explore the features and potential impact of the Apple Vision Pro on the AR landscape.
The Birth of Apple Vision Pro
Apple's vision for AR technology has been taking shape over the years, with the release of ARKit, ARCore, and the AR-focused LIDAR scanners in their devices. The Apple Vision Pro represents the culmination of these efforts, combining hardware and software to create a powerful AR experience.
Hardware Innovation
At the heart of the Apple Vision Pro is its impressive hardware lineup. The device boasts a sleek, lightweight headset with a wide field of view, ensuring an immersive AR experience. The headset is equipped with advanced sensors and cameras for precise tracking, gesture recognition, and spatial mapping, allowing users to interact seamlessly with virtual objects in their real environment.
Display Technology
The Apple Vision Pro features state-of-the-art display technology that provides stunning visuals. The high-resolution OLED displays offer vibrant colors and deep blacks, ensuring that virtual objects blend seamlessly with the real world. Apple's commitment to display quality ensures a comfortable and immersive AR experience for users.
Spatial Audio
To enhance immersion, Apple Vision Pro includes spatial audio technology. This allows users to hear virtual sounds as if they were coming from their physical surroundings, creating a more convincing and engaging AR experience. Whether it's directional cues or ambient sounds, the audio adapts to the user's perspective, further blurring the lines between the real and virtual worlds.
Performance
Under the hood, the Apple Vision Pro is powered by a custom-designed Apple Silicon chip, specifically optimized for AR applications. This ensures smooth performance, low latency, and efficient power consumption. Users can expect high-quality AR experiences without compromising on battery life.
Software Ecosystem
Apple has a robust software ecosystem that integrates seamlessly with the Apple Vision Pro. The device is fully compatible with the App Store, meaning users can access a wide range of AR apps and experiences. Developers are also given the tools and resources to create innovative AR applications, opening up new possibilities for entertainment, education, and productivity.
Applications and Use Cases
The Apple Vision Pro has the potential to revolutionize numerous industries and domains:
Gaming: Immersive AR gaming experiences will take center stage, with users physically interacting with virtual environments and characters.
Education: Augmented reality can enhance learning by providing interactive and immersive educational content, making complex subjects more engaging.
Medical: Surgeons can use AR for real-time guidance during complex surgeries, and medical students can practice procedures in a risk-free virtual environment.
Architecture and Design: Architects and designers can visualize and manipulate 3D models of buildings and products in real-world settings.
Entertainment: AR concerts, theater performances, and art installations will become more interactive and engaging.
Retail: Customers can try on virtual clothing and accessories, enhancing the online shopping experience.
Conclusion
The Apple Vision Pro represents a significant leap forward in the world of augmented reality. With its cutting-edge hardware, immersive display technology, spatial audio, and powerful software ecosystem, it has the potential to transform how we interact with digital content in our everyday lives. As Apple continues to refine and expand the capabilities of the Apple Vision Pro, we can anticipate a future where augmented reality seamlessly integrates into our reality, opening up new horizons for innovation and creativity.
2 notes
·
View notes
Text
Review & Evaluation: Individual Learning Processes
Review Blog Post #2
This major study project has been a vast learning experience for me in terms of technical skill, new software to explore as well as challenging old techniques or practices which might hold me back.
The most difficult concept art I created was the mech companion as it challenged my technical drawing skills. In the end I resorted to using 3D to help me as a perspective aid once I had the general design down. The basic model proved to still be a little challenging to create, however, the speed at which I was able to render by hand the final concept made it all worth it. While I'll still develop my technical drawing skills, it's a relief to know that 3D tools can help me out of a rut.
I pushed myself to learn new approaches to prop design on characters, in particular my focus for the Frontier Engineer was detail centric props, as tools are a vital part of an engineer’s kit. Artist Jude Smith was a massive inspiration for me for his detailed, well thought-out characters as he expertly blends sci-fi and traditional components. The main thing I learnt from analysing Jude’s work was the 3D volume he was able to capture in his designs. I particularly noticed the way he designed the armoured pieces to functionally form together, the gravity and weight given to attached props, like gloves and cables, and the volumetric flare of clothing to add movement and interest. I tried to really think about the way my accessories were made and worn, and how the pieces fitted together, and I was successful to some degree. I want to continue developing my working knowledge of costume elements like these to improve my work as a concept artist.
Smith, J. (2022).
My 3D skills have evolved tremendously learning the Unreal Engine 5 pipeline, learning better modelling techniques for cleaner geometry. I encountered a couple of errors in exporting it into unreal, but I was able to trouble shoot the model to have it import successfully.
Unreal Engine 5 was an entirely new experience for me, but I loved every minute of the creative power terraforming and set dressing gave me. I was able to carefully create the world I had been working so very hard to visualise the last few months, and seeing my models in the beautiful level by MYTHRA TECH was extremely satisfying and addicting. I found myself in a frenzy modelling props, unavailable to download for free, to achieve the look and feel I envisioned. The creative joy I felt in Unreal has left me with a thirst for level design which I would love to develop my skills in further. This creative zone is something I will definitely also be tapping into when I feel the resurgence of art block.
I think my practice has developed tremendously over the course of the module as well as the year. It has given me a thirst for experiencing new tools and exploration and helped me over-come my fears of new design territory and software.
References:
MYTHRA TECH. (2022). Mediterranean Coast. [Online]. Unreal Engine Marketplace. Available at: https://www.unrealengine.com/marketplace/en-US/product/3a23dac323e646f38e2c7a744236478e?sessionInval [Accessed 29 July 2024].
Smith, J. (2022). Meriwa. [Online]. ArtStation. Available at: https://www.artstation.com/artwork/aGmg60 [Accessed 22 June 2024].
Smith, J. (2022). Nero. [Online]. ArtStation. Available at: https://www.artstation.com/artwork/Penggy [Accessed 22 June 2024].
0 notes
Text
Sharper Cuts: A Guide to Clipping Path Service Providers

Introduction: The Power of Clean Cuts
Imagine a world where product photos on online stores magically have pristine white backgrounds. Or envision magazine covers where models seamlessly blend into breathtaking landscapes. This visual magic isn't a trick; it's the power of clipping paths.
A clipping path is a precise digital outline created around an object in a photo. Think of it as a meticulous cut made with invisible scissors, isolating the subject from its background. These clean cuts are essential for various visual applications:
E-commerce: Showcase products on online stores with crisp, distraction-free backgrounds, enhancing product clarity and user experience.
Marketing Materials: Create stunning brochures, presentations, and social media graphics featuring isolated product images or graphics.
Publishing: Seamlessly integrate models or objects into different backgrounds for creative magazine covers or layouts.
Achieving clean cuts traditionally involves software and manual editing skills. However, the process can be time-consuming and require specific expertise. This is where clipping path service providers come in, offering a professional and efficient solution.
Advanced Techniques in Clipping Path Services
To fully appreciate the value of clipping path services, it’s helpful to understand some advanced techniques employed by professionals:
Layer Masking: This technique involves using layers to mask parts of the image, allowing for non-destructive editing. It’s particularly useful for images with complex backgrounds.
Channel Masking: By isolating the different color channels in an image, professionals can create more precise paths for objects with intricate details.
Vector Path Creation: Using vector paths ensures that the clipping path is scalable without losing quality, which is crucial for high-resolution prints and large-format graphics.
3D Clipping Paths: For objects that need to be placed in a three-dimensional space, 3D clipping paths can be used to create realistic perspectives and shadows.
Industry Applications of Clipping Path Services
Clipping path services find applications in various industries, each with specific needs and standards:
Fashion and Apparel: Clothing brands use clipping paths to showcase products without distractions, often employing the ghost mannequin effect to highlight the fit and design.
Electronics: High-tech gadgets and electronics are often displayed against clean backgrounds to emphasize their design and features.
Automotive: Car manufacturers and dealerships use clipping paths to isolate vehicles, making them stand out in promotional materials.
Food and Beverage: Restaurants and food brands utilize clipping paths to present dishes and products in an appealing manner, enhancing visual appeal and repetitiveness.
Real Estate: Real estate listings benefit from clipping paths by presenting properties in a clean, uncluttered way, focusing on key features and details.
Trends in Clipping Path Services
The clipping path industry is constantly evolving, with new trends emerging to meet the demands of modern visual content:
Automation and AI: Advances in artificial intelligence are making automated clipping paths more accurate, reducing the need for manual adjustments and speeding up the process.
Integration with 3D Modeling: Combining clipping paths with 3D modelling techniques allows for more dynamic and interactive product displays.
Enhanced Collaboration Tools: Improved communication platforms enable better collaboration between clients and service providers, ensuring clarity and efficiency throughout the project.
Sustainability Focus: As sustainability becomes a priority, some clipping path providers are adopting eco-friendly practices, such as using energy-efficient software and promoting digital solutions over physical prints.
How to Maximize the Benefits of Clipping Path Services
To get the most out of your clipping path service provider, consider the following tips:
Provide Clear Instructions: Be specific about your requirements and expectations. The more detailed your instructions, the better the results will be.
Establish a Review Process: Set up a review and feedback process to ensure that the final images meet your standards. Regular communication with the service provider can help address any issues promptly.
Utilize File Formats Wisely: Use the appropriate file formats for your needs. For instance, vector formats are ideal for scalable graphics, while raster formats are better for detailed images.
Leverage Bulk Discounts: If you have a large volume of images, inquire about bulk discounts or subscription plans to save on costs.
Conclusion
In the world of visual content, the importance of clean, precise images cannot be overstated. Clipping path service providers offer a valuable solution, enabling businesses and creatives to achieve professional results without the steep learning curve and time investment of doing it themselves. By understanding the services available, benefits, and how to choose the right provider, you can make informed decisions that enhance your visual projects.
Read full article here: https://www.newportpaperhouse.com/2024/08/sharper-cuts-guide-to-clipping-path.html
0 notes
Text
Polygons Effect - Projection Mapping Loops Pack Vol.12

Download for Projection 3D Mapping Performances.
Download exclusive visuals for projection 3D Video Mapping Show! Exclusive 30 monochromatic video mapping loops produced with polygonal effect style. Low-poly 3D displace motion backgrounds for projection mapping show. Video Mapping Loops Pack is an original video art digital content produced in resolution and frame rate. Video Mapping 3D Effects Visuals is compatible with different Vj software products and Video Projection Media Servers. Original Video Mapping Loops Pack produced in higher resolution and frame rate. was developed especially for VJ’s, Digital Visual Artists and Motion Designers. You can use for Architectural or interior Video Mapping performances and for Fulldome Video Projection Show. Video Mapping Loops was encoded in video format. Create Video Mapping 90% faster without plugins or scripts - Use 3D Effect Video Footage for Your Video Projection Show. Compatible with all VJ and Video Mapping Software
Royalty Free resolution video mapping content. Looped videos & Motion Backgrounds for Video Projection Show
After purchase You will get a confirmation Email with PDF invoice and links for digital instant download. If You will have any questions regarding your order You could reach us via Email or Mobile, WhatsApp, Telegram or Viber by +43 676 391 10 49. Also by online chat webform our Support Manager could help You!
100% temptation. Immediate and pleasurable urge to make any surface made of fabric induces to purchase Cloth Facade. 3D Simulation of Cloth Animation special for Facade Architectural video projection mapping. Loose the ties of self-control. Positive consequences guaranteed. 1920X1080 Full HD Video Resolution / 29 fps (29 frames per second) / Quicktime Photojpeg video encoding / All Clips are looped.
Read the full article
0 notes
Text
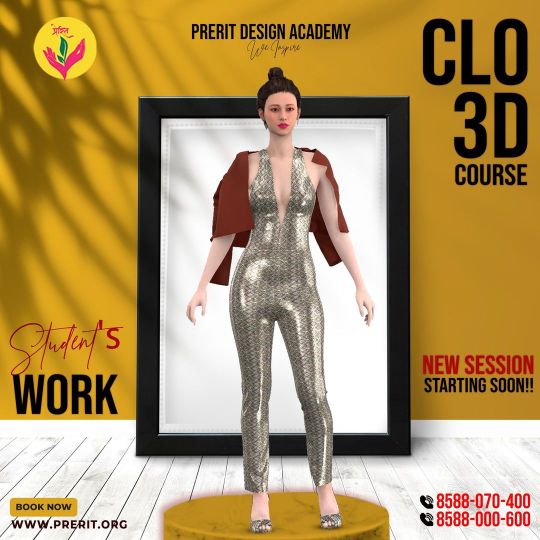
Clo 3D design has developed into a highly sought-after skill due to the expanding demand for more efficiency and a reduced environmental impact within the fashion sector.
#Clo#CLO 3D#CLO 3D Software#Fashion design software#3D Dress design#Clothing Design Software#3D Cloth#Cloth 3D Model#3D Designer#3d clothing design software free
2 notes
·
View notes
Text
ForeFront 8. Manual and Automatic cloth folds.
Since I was working on delicate clothes, I decided to dedicate some free time towards learning how essential cloth design works.
Sculpting cloths is quite a process - There are many ways to do it: You can do it completely manually by using only sculpting tools, use a simulation feature that will generate all the folds for you, or create the mesh in such a way that would automatically simulate folds during the render, or mix every workflow in various ways, provided the artist knows what they are doing.
In addition to the workflow, we also need to consider what software we will use in order to do the seams: Using universal 3D software may be enough for some projects, but by using dedicated software you could get way better results since you could unlock useful tools that could improve your work.
I have found a very interesting YouTube channel titled
Outgang, where they post various guides on how to create better 3D characters in terms of sculpting, shading and texturing. They provide the viewers with professional material, which does not stop with simple quick tutorials and guides.
I decided to watch their video titled "Cloth and Fold Anatomy for 3d Artists" (2021) since I wanted to know more about it, and I really enjoyed the tutorial!
youtube
I really enjoy studies that go above the essentials: When you don't only learn what folds and seams do usually consist of, but also how they form and why. This study was very useful for me because it helped me to understand that folds do not form randomly - that each different material in different conditions will leave its own unique clues.
With this study, I will be forming seams less randomly and much more better due to happened intuition on how they must look like. While I still need plenty of experience in order to get better with quick brush works, and more. I started to understand how the essentials work and how to place them. (for example, that X,Y,Z and Diamond-like shapes are fairly common in clothes).

A simple diagram that shows the common cloth shapes and how they are formed.
I still did wanted to know efficient ways on how to do cloth folds in Blender, so I watched one more tutorial by Noggi (2022) about foams and seams.
youtube
With this tutorial, I have learned how to create cloth details while using Blender cloth simulation brushes. By using Face Sets, control sculpts and a selection of brush simulators - I managed to create some impressive results!
While the simulations did the heavy lifting for me - I noticed that without the Outgang's tutorial, I would have struggled to create proper folds in the first place, as I still needed to apply some control sculpts.


In the end, I understood a little more about cloth physics work. While I still need some practice in order to fortify the knowledge that I have learned with these tutorials - I can already see how I can apply these skills in Blender and even outside of it.
References:
Outgang. (2021). Cloth and Fold Anatomy for 3d Artists. [online] Available at: https://www.youtube.com/watch?v=imp3j7l6V1U [Accessed 27 Jul. 2024].
80.lv. (2019). Manual Sculpting of Anatomy and Clothing Details. [online] Available at: https://80.lv/articles/manual-sculpting-of-anatomy-and-clothing-details-007gai/ [Accessed 30 Jul. 2024].
Noggi (2022). The Hidden Cloth Simulation Brushes You Don’t Use. [online] YouTube. Available at: https://www.youtube.com/watch?v=SU6XE6WKTBk&t=1s [Accessed 27 Jul. 2024].
0 notes
Text
Some notes regarding pro 3D, accumulated by yours truly:
For the love of god, learn basic things like topology, edge flow, polygonal modelling and subdiv, because jesus christ, that's like the basicest of basic stuff, and if you can't understand it - it's high time to learn it. Learn modifiers too, they are usually almost 1 to 1 identical in function from software to software.
Cloth sim and sculpting are cool and all, but the old ass modelling methods are still alive and kicking and they are the most required things ever.
I mean yeah, you can sculpt yourself smth and be like "here i made this hard surface armor", but bruv, you have to retopo it now like a dumbass and you have to spend even more time torturing yourself, esp if you don't know the basics and if you get feedbacked from the higher ups.
Better spend time to learn topology now to just speedrun things later. And it's not as destructive. Easy. Fast. No bullshit.
GOOD GEOMETRY IS KING.
If you want to go gamedev or vfx, it's not enough to be good at sculpting and design (unless you have a dedicated person for the technical stuff), it's important to have a solid base.
Learn where to cut corners. Do not half ass where you shouldn't half ass, half ass where it's not necessary for things to be perfect. Learn how to spot these opportunities. Half assing saves time and effort, but only when you're capable of it and only if you are experienced in it.
It's not always that you'll be asked to do immaculate perfect things - more often than not you'll be asked specifically for half assing, to save on time and costs.
Learn how to do uvs, seriously. Learn how to make straight grid islands for optimization. Learn about the texel density and how to make use of most space available. Learn about overlapping.
For the love of everything that is holy, BE INDEPENDENT. Learn to see, like legit, learn it, it's a skill of its own: spot the shapes, spot the volumes, the sizes, distances, angles, curves, everything. Learn how to see errors yourself, learn how to apply feedback. Learn to read and listen! If you don't understand something, don't be afraid to ask again to clarify. As a lead, I can only suggest you to change certain things to look better and review your stuff to allow you to go to the next stage; if you can't see issues yourself, and I have to guide you and give you feedback every iteration - it's easier for me to take over and do things myself. Well, fair enough, there are cases where guiding and feedbacking every iteration is valid, but these cases a extremely rare.
I had to give so much feedback in the past few weeks, I'm legit nearly fucking dying: feedback this, explain that, overpaint everything, chew out the concept and spit it out for modelers... And it takes hours, and I've a ton of shit to model and texture myself, and there are SEVERAL PROJECTS I HAVE TO DEAL WITH.
And in the end, when I had to take over, I just completely remade the assets from scratch, cuz no way in hell I'm shipping the jank.
Take time to get to know your software. Do bullshit. Press buttons. Make it crash. Just know where's where and what does what. Don't make your seniors give you step by step explanation of how to work in any given software.
Learn how to bake properly. This is like the easiest shit, but I swear people be just not seeing errors in their bakes, and I have to pixelfuck, pinpointing issues.
If one baker sucks, go to the other, and then other, or try to adjust your model, try cage, anything.
Last time i had an issue with bakes, I tried it both in SP and Blender. And I had my lead try bakes in the new SP. Guess what? In desperation I went to xNormal, and fuck me it blew me away, baking things exactly as I wanted them. Old as hell and reliable as well.
Pay attention to the normal map format, pay attention to the coordinates! Pay attention to a good looking ambient occlusion. If something doesn't bake right away, feel free to make a composite map of several bakes.
Learn to hear and to read feedback. Learn to apply it. Do not disregard anything. If you're a scatterbrain, use lists to keep track of everything. If you don't understand something - it's fine to clarify information.
It's okay to have questions and doubts, and do not hesitate to voice anything. It's even better if you have a shitton of questions. The more questions you ask, the more confident we are in you. Please, don't present yourself as a super-duper-hella-pro-9000 with 1mil years of experience and complete understanding of how the universe works and why - this guarantees you are seen as ignorant and instantly sets off red flags.
Language is important, google translate can only help you so much. You should be able to comprehend the common lango, at the very least have some writing and reading skills. At best you should be able to listen to people talk and you should be able to understand the spoken words.
0 notes
Text
Fashion World by Reliance Providing Franchise Opportunity For East India
If You are from Kolkata or East India, So keep in mind that Reliance has taken their leverage Franchise Opportunity to East India.
Introduction of Fashion World by Reliance.
Reliance Retail, which is a division of Reliance Industries, is India’s largest and most valued enterprise and has an extensive network across various sectors. As it is known by everyone how it has business of retail and digital services to oil and chemicals, and Reliance has established itself as a market leader. With an enterprise value of $235 billion and revenues of $105 billion, Reliance Industries stands as a symbol of innovation, scale, and success.

Fashion World by Reliance, a part of Reliance Retail, has a mission to significantly impact the fashion retail landscape in East India. Here are some key points about their mission:
Expanding Accessibility: Fashion World aims to bring a diverse range of high-quality, affordable fashion products to the residents of East India. By opening new stores in urban and rural areas, they seek to make fashionable clothing and accessories accessible to a wider audience.
Promoting Local Employment: The company is dedicated to creating job opportunities in the region. By establishing stores and distribution centers, they generate employment for local communities, contributing to economic development.
Supporting Local Designers and Artisans: Fashion World by Reliance endeavors to collaborate with local designers and artisans, promoting traditional crafts and integrating them into contemporary fashion. This not only supports the local economy but also preserves and modernizes cultural heritage.
Enhancing Customer Experience: They focus on providing an excellent shopping experience through well-designed stores, customer-friendly policies, and an extensive product range. Their mission includes offering personalized services and maintaining high standards of customer satisfaction.
Sustainability Initiatives: Incorporating sustainable practices is a part of their mission. This includes using eco-friendly materials, promoting sustainable fashion, and reducing the carbon footprint of their operations.
Technological Integration: Leveraging technology to enhance retail operations and customer experience is a priority. This includes the use of digital tools for inventory management, customer feedback systems, and online shopping platforms to complement their physical stores.
Community Engagement: Fashion World by Reliance aims to engage with the local communities through various initiatives such as fashion shows, workshops, and other events that promote fashion awareness and education.
By focusing on these areas, Fashion World by Reliance seeks to become a leading fashion retailer in East India, driving growth, innovation, and positive social impact in the region.
Focus on Targeted Areas:
Chattisgarh, Orissa, Bihar, West Bengal, Assam, Meghalaya, Tripura, Mizoram, Manipur
Benefits of Partnering with Fashion World
1st time opportunity to become a franchise partner with RRL F&L
2.5 lakh Franchisee Fees payable to the company waived off (early bird)
Store Interior Layout Design & 3D Diagram support
Visual merchandising, branding, and marketing support
Billing & CRM software at free of cost
Retail training for support staff and store employees
Requirements
Family store requirements
Total area 2500 to 4000 sq ft carpet area
Investment 25-50 Lacs.
Stock on Bank Guarantee.
Reliance giving free: staff dress, billing software, visual merchandise free for the store, board free, carry bags, and lots more.
Gross margin 39% to 42%
Business model FOFO Franchise Owned Franchise Operated
Contact Information:
If you are interested in dealing with the Fashion World by Trends for franchising, you can contact Franchise AVS through their official website www.franchiseavs.com, or email [email protected]. You can also reach them by phone at 9205434226.
Conclusion:
Partnering with Fashion World by Trends is a lucrative opportunity for investors looking to be a part of a well-established brand in India. With a secure deal, attractive profit margins, and the support of the Reliance group, the Fashion World by Trends offers a promising future in the Indian retail market.
0 notes
Text
How Technology is Shaping the Future of Fashion Design
In the dynamic world of fashion, technology has emerged as a formidable force, completely transforming the way designers conceive, fabricate, and exhibit their collections. From groundbreaking materials to state-of-the-art production techniques, technology is revolutionizing every facet of the fashion realm. One of the most notable impacts of technology on fashion design lies in the realm of sustainability. As environmental concerns continue to escalate, designers are harnessing technology to develop eco-friendly alternatives to conventional materials and processes. For instance, advancements in biotechnology have paved the way for the creation of lab-grown fabrics like lab-made leather and silk, offering a sustainable and cruelty-free substitute to their animal-derived counterparts.
Likewise, 3D printing technology empowers designers to craft intricate garments with minimal waste, effectively reducing the industry's carbon footprint. Furthermore, technology is democratizing the design process, making it more accessible to aspiring designers and enthusiasts alike. With the advent of Computer-Aided Design (CAD) software, individuals armed with a computer and an internet connection can now experiment with digital design tools to bring their imaginative visions to fruition. Online platforms and marketplaces further facilitate independent designers in showcasing and selling their creations to a global audience, circumventing the traditional gatekeepers of the industry.
The democratization of design not only encourages creativity and innovation but also fosters diversity and inclusivity within the fashion community. Another area where fashion design is being revolutionized by technology is in the realm of personalization and customization. With the emergence of AI (Artificial Intelligence) and machine learning algorithms, brands can analyze vast amounts of data to gain insights into consumer preferences and tailor their offerings accordingly. This data-driven approach empowers designers to create personalized shopping experiences, where customers have the ability to customize everything from the fit and style of their garments to the fabric and color choices.
The ability to customize not only enhances customer satisfaction but also reduces waste by producing garments on demand, thereby minimizing excess inventory. Moreover, technology is blurring the boundaries between the physical and digital worlds, giving rise to new forms of expression and interaction. Fashion brands are utilizing Augmented Reality (AR) and Virtual Reality (VR) technologies to create immersive experiences, enabling customers to virtually try on garments and visualize how they would look in real life. Virtual fashion shows and digital fashion collections are also gaining popularity, providing designers with an innovative and engaging platform to showcase their work. These digital advancements not only expand the possibilities for creative expression but also have the potential to redefine the traditional fashion calendar and transform the way we consume fashion media.
Technology is certainly revolutionizing the future of fashion design in significant and thrilling ways. With the use of sustainable materials and digital design tools, along with personalized shopping experiences and immersive virtual realities, technology is leading the charge in innovation and revolutionizing all facets of the fashion sector. As designers increasingly adopt and utilize the capabilities of technology, we anticipate witnessing further pioneering advancements that will influence our clothing choices and self-expression for the foreseeable future. Embracing technology goes beyond mere relevance; it involves redefining the core of fashion in the era of digitalization. The future of fashion design goes beyond creating beautiful garments; it involves crafting a compelling narrative that resonates with the global community and has a positive impact on individuals and the environment. Dream Zone is a distinguished institution that offers one of the top fashion design courses in the industry. Known for its unwavering commitment to excellence, Dream Zone provides a comprehensive curriculum that equips aspiring designers with the necessary skills and knowledge for a successful career in the ever-changing world of fashion. The course is specifically designed to nurture creativity, foster innovation, and develop a profound understanding of the evolving trends in the fashion industry.
0 notes
Text
3D Animation Course in Delhi.
https://picklesanimation.in/3d-animation-courses/
Here's a structured course content outline for a 3D animation course offered by Pickles Animation:
Title: 3D Animation Course by Pickles Animation
Course Overview: This comprehensive course is designed to provide participants with the knowledge and skills required to create professional-quality 3D animations. From understanding 3D animation principles and character rigging to mastering animation software and rendering techniques, students will gain practical experience through hands-on projects and real-world case studies.
Course Content:
Introduction to 3D Animation
Understanding the basics of 3D animation
Overview of animation principles in the context of 3D
Introduction to 3D animation software and tools (e.g., Autodesk Maya, Blender)
Modeling
Basics of 3D modeling techniques (polygonal, NURBS, sculpting)
Creating and manipulating 3D objects and shapes
Understanding topology and edge flow for efficient modeling
Texturing and Shading
Basics of texturing and shading in 3D animation
Applying materials and textures to 3D models
Understanding UV mapping and texture painting
Rigging and Character Animation
Basics of character rigging for animation
Creating skeletons and rig controls
Animating characters using rigging tools and techniques
Animation Principles in 3D
Applying animation principles (squash and stretch, timing, anticipation) in 3D animation
Understanding keyframe animation and interpolation
Creating believable character movements and performances
Lighting and Rendering
Basics of lighting techniques in 3D animation
Setting up lights and shadows for scenes
Rendering animations using software renderers and third-party render engines (e.g., Arnold, V-Ray)
Particle and Dynamics
Introduction to particle effects and dynamics simulations
Creating realistic physics-based animations (e.g., cloth, hair, fluids)
Integrating dynamics simulations into 3D scenes
Camera and Cinematography
Basics of camera setup and composition in 3D animation
Creating dynamic camera movements and shots
Understanding cinematography principles for storytelling in 3D animation
Special Effects and Compositing
Adding visual effects and post-processing to animations
Compositing 3D elements with live-action footage
Enhancing animations with effects such as explosions, fire, and smoke
Project Development and Portfolio Building
Applying learned concepts to real-world animation projects
Building a professional animation portfolio showcasing diverse 3D animation styles and techniques
Presenting and showcasing animation projects effectively
Prerequisites: No formal prerequisites required, but a basic understanding of animation concepts and software usage is beneficial.
Requirements: Computer with 3D animation software (Autodesk Maya, Blender), graphics tablet (recommended).
Course Duration: [X] weeks/months, [X] hours of instruction per week.
Assessment: Quizzes, assignments, 3D animation projects.
Certification: Certificate of completion.
Enrollment: Visit our website or contact us for enrollment details.
Feel free to customize the content based on the specific features, curriculum, and goals of the 3D animation course offered by Pickles Animation!
0 notes
Text
Who are the Best Residential and Home Interior Designers in Pune?
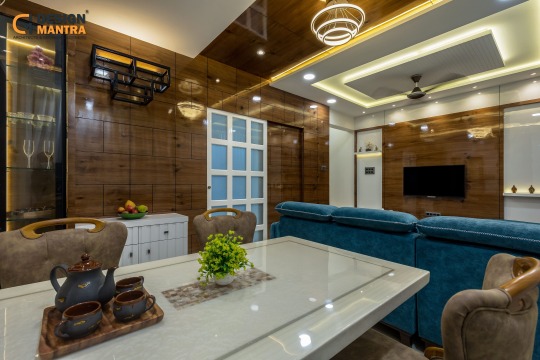
https://designmantrastudio.com/who-are-the-best-residential-and-home-interior-designers-in-pune.html
Design Mantra is one of the Best Residential interiors designing company in Pune for the past 13 years. Design Mantra Interiors provide the services in Pune. Design Mantra having the best modular kitchen designing experience with preview 3D kitchen interior design that fulfils all your needs. 100% Customized Home Interiors in Pune from best Interior designers in Pune.
Get Free Estimate from Interior Designers in Pune for Homes, Apartments and Flats
Transform your kitchen to the heart of your home with the help of Home Lane. From coffee dates to dinner parties, our end-to-end design and installation services will turn your kitchen into a stylish and functional space. Design Mantra is one of the Best Home interiors designing company in Pune and they having best designing experience. A Kitchen should be a peaceful and restful retreat. The color scheme should be calming and soothing, with soft, neutral tones that create a sense of tranquility. The furniture should be comfortable and functional, with a bed as the focal point of the room.
Wardrobes are furniture pieces that help store and organize clothing and other personal belongings which makes them an essential part of any bedroom design. Wardrobe designs can range from simple, single-door units to large, multi-door armoires and can be made of a variety of materials like wood, metal or plastic and they can be crafted in a range of decor styles. Let’s make your bedrooms as functional as they’re aesthetic, shall we? Space-saving furniture is designed to be compact and take up as little space as possible. It is well suited for small apartments, homes and offices where space is at a premium. This kind of furniture which includes Murphy beds, fold-down tables and convertible sofas can be easily stowed away when not in use and can help maximize the use of the available space in a room.
What is Design mantra? What services do you offer? Why should I choose Design mantra?
Design mantra is a full-service professional interior design firm, Pune led by dynamic architects and interior designers focused on making designer homes personalized to your tastes and needs available within your budget. We aim to bring premium design and quality to each and every home buyer.
Our services include interior designing Pune, custom furniture, false ceiling, flooring, wall accents, and so much more. We deliver high-quality interiors because we have a 100% in-house team, whose work we strictly monitor based on the quality checklist. And that’s why we can even give you a full home warranty!
Do you charge a design fee?
No, Design services are free of cost for Rooms that are part of the order.
How is the pricing calculated?
Each home has its own needs and requirements based on its size, its design, material finish and hardware used as well storage options. The prices are generated dynamically from our software based on your custom design, giving you full flexibility to create designer homes.
#Interior Designer in Magarpatta#Interior Designer in Pimple Saudagar#Interior Designer in Bavdhan#Interior Designers in Aundh#Interior Designer in Wakad#Interior Designers in Hinjewadi#Interior Designer in Ravet#Interior Designer in Baner#Interior Designer in Viman Nagar#Interior Designer in Pimpri Chinchwad
0 notes
Last Seen Blogs

miinah92
3anqod

alspaulding
Al Spaulding's Quips, Poems, Quotes, & Pics

mahbubzeeshan-blog
Zeeshan

xiiitredecim
TREDECIM

lumberjackbearded
Lumberjack Style