#3ds max modifier stack
Explore tagged Tumblr posts
Visit Tumblr Blog
Explore Tumblr blogs with no restrictions, modern design and the best experience.
Last Seen Tumblr Blogs


Fun Fact
There were a total of 171.5 billion posts on Tumblr in 2019.
Text
youtube
This tutorial will give you a basic understanding of the under-the-hood relation between the modifier stack and the transform engine inside 3DS Max. This will help you understand some of the issues that may occur, that look weird. One of the issues that many of the users bumped into, is when scaling a shape, then applying an extrude modifier, to find out that the extrusion height doesn't match the extrusion value in the stack.
#3dsmax#3ds max tutorials#autodesk#learn 3ds max#3ds max expert#autodesk 3ds max#3d#3dsmax tutorials#3ds max modifier stack#3ds max transforms#Youtube
3 notes
·
View notes
Text
Quick Mata Nui Height Map Tutorial
I've had some requests I explain how I made the Mata Nui model from this video, and that I 3d printed here, so here it is.
So step one, you need a height map and a coloured version of the Mata Nui image, like so:


Import them both in to blender as planes.

I'm using 2.79, deal with it.
On the coloured one use a subdivision modifier. These can be quite dangerous, its very easy to overload your computer. A good rule of thumb is find the closest power of two to the resolution of the image and go with that, the resolution of this image is 4249, so the closest power of two is 4096, which is 2^12. Again, for safety's sake, I'd lower that down a bit for the view port render, unless you're sure your computer can handle it.

Seems the max is 11 anyway. You can stack modifiers though, but again: its very dangerous.

Now add a displacement modifier, add a new texture, and set coordinates to UV.

Open up the texture tab and select the displacement modifier, and set the image to the bump map you loaded in earlier.

Now you should get something that looks like this.


Strength of .1 is a lot more reasonable.
And there you have it, a nice little model of Mata Nui.

70 notes
·
View notes
Text
46. Radirgy De Gojaru! (3DS, 2014)

Well well... this is a wierd one
Radirgy De Gojaru is a pretty good example of not judging a book by its cover.
It all takes place in one screen, not the scrolling backgrounds from previous entries, you have infinite HP, the framerate fucking dies often.
It sounds like a bit of a lame schmup doesnt it... it kind of is honestly... and that what makes it good imo...
RDG doesnt try to surpass its previous entries, instead trying something new and simple for the handheld, this simple aproach makes it in my opinion the best handheld RS34 schmup on the 3DS
Beating that of Karous The Beast of Re:Eden and Illmatic Envelope Dillinjah, as those two shot for something more complicated that didnt really work because of the 3DS's power.
Ooookay so this video game.
Radirgy de Gojaru is a schmup tower defence game... yup
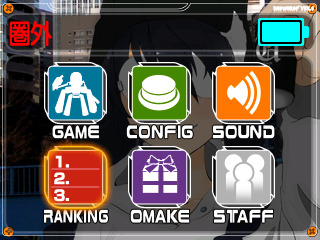

This are all the options you have in the title screen, nothin more, nothin less.
Alright, let's get straight to it!

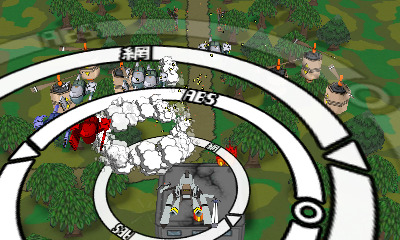
As described previously, RDG takes place in one area, above Tadayo Aita's garage.
You protect the garage using a modified machine with endless HP and a super big bomb.
Your main objetive in game is to not let any bullets or ships travel to the bottom of the top screen.
For every ship and bullet that passes, 1% of the total HP of the garage is lowered (your HP is shown by the block thats over the X shot icon)
and thats the basic gist of it, its quite simple but eh it works well enough.
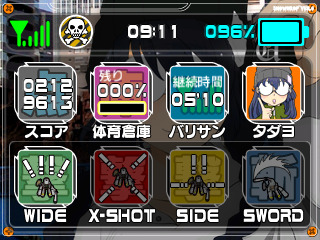
So you have four weapons and a bomb (that big circle thing in the second screenshot)
So you have a wide shot, a X shot, a side shot and a upgraded sword.
You can use the sword while using any other shot but its particularly strong when using the sword option.
When you deal damage to enemies you regain Battery which lets you use the bomb more often.
You can stack the bomb up to 3-4 times, at max level it covers most of the screen and takes every bullet on its range. Keeping the shield up is the most important part of the game.

On the bottom screen you have a few things,
From top row to bottom row left to right:
Total signal, Instant Death (Quit button), Timer of the current run and battery %
Total score, the HP % of the garage, Time at full signal (you reach full signal by propperly using the shield at max power), a button to talk to Tadayo as shown bellow.

sadly I dont understand japanese so im missing out on the flavor text...
and on the last row: manual weapon switching if you dont want to use the weapon change button (the weapon switch just uses the next weapon to the right, no way to pick the last selected weapon, so that kinda justifies the use of the touch screen... in a way)
Its neat. Having all the important hud info on the bottom screen makes the top screen less cluttered (Kinda like how Resident Evil Revelations handles it... odd comparison I know lmao)
You shoot things, you gain meter, you use meter to get meter.
The gameplay is simple but it works.
So what about that presentation... I mean for a one screen game it actually it has quite the decent presentation
Models are nice, prolly ripped straight from the original radirgy
It does suffer from alot of jaged edges and the cel shaded style doesnt really look the best which does hurt it a bit but despite all that it captures the essence of the series.
Even if the game does look quite alright... It doesnt help that the game never runs at full speed at later parts of runs, the slowdown is SUPER heavy but thats kind of a good thing.
Theres alot of stuff to keep track off so the slowdown helps catch some enemies going to the bottom screen.
One area where I have no complains, where they absolutely nailed it was the 2D elements.
The menus are super nice!
There is alot of selectable bottom screen art that is really nice!

Not a good screenshot, I was trying to just take a screenshot of the bottom screen art alone (and failed) but there is alot of stuff to select and unlock!
The game hits the series style on the 3D visuals and 2D visuals.
also in the topic of presentation, the audio.
The sound effects can be a bit much at times. you will hear the shot sound... often, same with the sword SFX and its a bit annoying. You grow used to it and you can turn off sound effects but its not the best... but what saves all this... is the music.
The music is so good! Daisuke Nagata and Ko Hayashi, composers of the original Radirgy, came back to create a great 13 track long soundtrack!
It even got a CD soundtrack release! (RSCD-001)
Take a listen!
Fantastic stuff for a 800 yen game.
Radirgy de Gojaru is not the greatest schmup out there, its not even the best one on the 3DS. Games like Kokuga and even Metal Torrent on the DSi have it beat easly.
But that doesnt stop it from being a fun time at a cheap price.
Keeping the spirit of the series in a simple format.
I am not sure if I should give this a score at all. giving it a high score is giving it too much credit but giving it a low score is discrediting everything it does right...
Eh I guess its a 4.5/10 game that I like so much I give a 6.5/10
To cap everything off. heres the trailer from RS34's official YT channel.
My apologies for the more scattershot review this time arround.
4 notes
·
View notes
Text
Major Study
Production Post #27
Player's Base: Creating More 3D Assets


Texturing simple crates I made for set dressing the level.


I used soft select to gently twist the bend into the blades of the turbine.


I used a hexagon mesh png as an alpha for a normal map in substance, I used it to make the solar cells on the equipment.


A cute access panel detail.
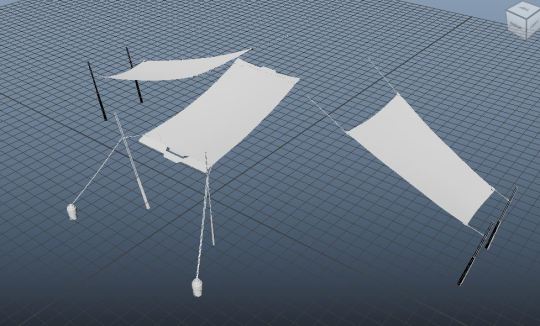


I created two canopies and duplicated the one on the right after UV mapping it so that the UV's would stack and the player wouldn't notice. I had some trouble with the auto folds generation of the smart material, but I was able to eventually modify the smart material generator.


I added the same solar cell technique used on the windmill to the panels of the house, I think it looks really cool!


The first attempt at modelling the main solar array ended up too grid like and rigid. I instead opted for a flared wing design where the panels overlap like feathers which was inspired by the design on the map.


The supports and lower utility, heatsink and battery section were all taken from the lower greebling of the house to save time. This is kitbashing and indeed saved a lot of time and created a design that I feel stands well on its own.


The uv mapping again used stacked uvs from the right side to the left side. This doubled the available resolution of the 4k max image size in substance painter. The central section was not mirrored to hide any mirroring of the textures on the sides.
0 notes
Text
3ds Max vs Maya: Detailed Comparison of Features and Capabilities
When it comes to 3D modeling, animation, and rendering, two names often come up: Autodesk's 3ds Max and Maya. Both are industry-standard tools used by professionals worldwide, from game developers and filmmakers to architects and designers. However, each software has its unique strengths and nuances that make it better suited for certain tasks and workflows. In this detailed comparison of 3ds Max vs Maya, we'll explore the features and capabilities of 3ds Max and Maya to help you decide which one might be the best fit for your needs.
User Interface and Ease of Use
3ds Max
3ds Max is known for its user-friendly interface, which makes it particularly popular among beginners and intermediate users. The software features a customizable and intuitive UI with a wide array of toolsets that are easily accessible. Its modifier stack system allows for non-destructive editing, making it easier to experiment and iterate on designs.
Maya
Maya, on the other hand, has a steeper learning curve but offers immense flexibility and power once mastered. The interface is highly customizable, allowing users to tailor the workspace to their specific needs. Maya’s node-based architecture provides a deeper level of control, which is highly beneficial for complex animations and simulations. However, this can be daunting for new users.
Modeling Capabilities
3ds Max
3ds Max excels in polygon modeling and is often the go-to choice for architectural visualization, game development, and industrial design. Its precision and control in handling vertices, edges, and faces make it ideal for creating detailed and complex models. The software also includes robust spline-based modeling tools, which are useful for creating smooth and flowing surfaces.
Maya
Maya is highly regarded for its organic modeling capabilities, making it a favorite among character artists and animators. Its advanced sculpting tools and ability to handle high-resolution meshes allow for the creation of intricate and lifelike models. Maya’s NURBS modeling tools are also powerful, enabling the creation of smooth, mathematically-defined surfaces, which are crucial for character rigging and animation.
Animation and Rigging
3ds Max
3ds Max offers solid animation tools and is particularly strong in keyframe animation. Its Character Studio feature provides an efficient rigging and animation system, especially for bipedal characters. The software also includes CAT (Character Animation Toolkit), which simplifies the process of rigging and animating characters.
Maya
Maya is renowned for its superior animation and rigging capabilities. It is the industry standard for character animation in film and television, thanks to its advanced rigging tools and flexibility. Maya’s HumanIK system and powerful skeleton rigging tools enable precise control over character movements. Additionally, its animation layers and nonlinear animation capabilities offer animators extensive creative freedom.
Dynamics and Simulation
3ds Max
3ds Max provides a range of dynamics and simulation tools, including particle systems, cloth simulation, and rigid body dynamics. The MassFX toolset integrates these features, allowing for complex physical simulations. While capable, 3ds Max’s dynamics tools are generally considered less advanced than Maya’s.
Maya
Maya stands out in the realm of dynamics and simulation. Its nDynamics system, including nCloth, nHair, and nParticles, allows for highly detailed and realistic simulations. Maya’s Bifrost procedural effects platform enables the creation of complex simulations like fluids and smoke. These capabilities make Maya a preferred choice for visual effects artists.
Rendering
3ds Max
3ds Max offers robust rendering capabilities with its native Arnold renderer and the legacy Scanline Renderer. The integration with third-party renderers like V-Ray and Corona enhances its rendering power, making it a strong contender for architectural visualization and product design. The ActiveShade interactive rendering feature allows users to see real-time updates as they adjust lighting and materials.
Maya
Maya also features the Arnold renderer, providing high-quality rendering outputs. Its integration with other render engines, such as RenderMan and Redshift, makes it versatile for different production needs. Maya’s Hypershade material editor and extensive shader networks give artists fine control over textures and materials, essential for achieving photorealistic results.
Scripting and Customization
3ds Max
3ds Max supports MAXScript, a scripting language that allows users to automate repetitive tasks and create custom tools. While powerful, MAXScript is generally considered less flexible than Maya’s scripting options.
Maya
Maya excels in scripting and customization, supporting both MEL (Maya Embedded Language) and Python. This dual-language support provides unparalleled flexibility for creating complex scripts and custom tools, making it a favorite among technical directors and pipeline developers.
Industry Use and Integration
3ds Max
3ds Max is widely used in architecture, product design, and game development. Its integration with other Autodesk products, such as AutoCAD and Revit, makes it a preferred choice for architectural visualization and engineering workflows.
Maya
Maya is the tool of choice for the film and television industry, especially for character animation and visual effects. Its extensive toolset and flexibility make it ideal for high-end productions and large studio environments.
Conclusion
Choosing between 3ds Max and Maya ultimately depends on your specific needs and industry. If you are focused on architectural visualization, product design, or game development, 3ds Max’s user-friendly interface and robust modeling tools may be more suitable. On the other hand, if you are working in film, television, or character animation, Maya’s advanced animation and simulation capabilities provide the depth and flexibility required for these demanding fields.
Both software packages offer powerful tools and features that can cater to a wide range of 3D design and animation tasks. Understanding their strengths and how they align with your workflow will help you make the best choice for your projects.
0 notes
Text
Week 9 Studio Tutorial – Preparing a 3d scan for printing
Part 1: Obtaining a 3D scan from the MCIC
This class was really useful in opening my eyes to the amazing world of 3D scanning. With our studio class work coinciding with the work we were doing in this class, the practicality and applications of these technologies were amplified.
I was amazed at how well my blue foam model for my perfume bottle translated as a scan and will definitely be returning to this technique for projects dealing with similar-sized objects.


Part 2: Using rhino to quadify the model

Rob's tutorial introducing us to the Quad Remesh tool in Rhino was really useful in translating a 3D scan into something which could be inserted into a program and altered using CAD. These steps will be something I know I'll use in the future when it comes to 3D scanning any model.
Part 3: Import into 3ds Max and correct orientation

Again, I found that a video tutorial was extremely helpful in helping me correctly orientate my model in 3Dsmax. Rob's step-by-step tutorial gave me a lot of clarity that may not have been if I was simply reading a written set of instructions. I know in future, if video tutorials are not provided, to conduct my own research on Youtube or on websites such as Autodesk in order to seek clarity.
Part 4: Modifications to enhance original model
Luckily, my scan came out quite well as I had really worked to refine my foam model to a smooth finish. Therefore, there weren't too many noticeable dents but I did play around with some of the tools such as the relax tools just to experiment and gain experience in refining.
Part 5: Design Iterations
This part was really exciting as I was able to play around with my own design and utilise the tools I had been using on simple spheres and boxes on an object I was familiar with and that was close to my heart. I really had fun playing around with design iterations and see how this could be a step in my design process in future projects!


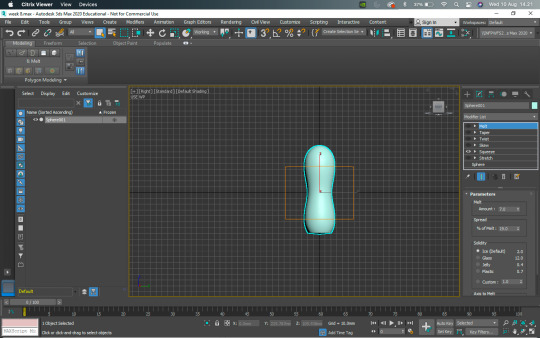
Here is an example of a subtle iteration: on the left is the original bottle and on the right I changed the form slightly using taper, bending and melting tools stacked on top of one another. This method opened my eyes to a great way of creating slight readjustments to an already existing model design.


These were some more subtle iterations where the predominant modifier used was the squeeze tool. This created more petite and taller looking designs. I can see how these iterations could be used in presenting different moods and feelings to a client, as these create a more feminine, yet tall and proud effect.


These were slightly more radical, experimental changes which were more to test how much I could do using 3Dsmax rather than to show slight changes in my bottle design. Using the bend tool as my main tool, I was able to change the form of the bottle to more of a triangular prism than a rectangular prism. Having separate scans for my bottle and lid also meant I could play around with the scale of the lid in comparison to the bottle.
I really enjoyed this process and can realistically see it becoming a regular part of my design process where suitable!
Part 6: Uploading to Cura


The orientation of my model was yet again an issue when preparing my Cura file, however, the ability to rotate your model on the plate was a really helpful tool. I found the rotation to be really frustrating and laggy, however, fixed this problem by turning off the snap rotation, which allowed me to make incremental changes to the rotation so that it sat well in the printer.
Again, I found this week really rewarding, as I could see how comfortable I had gotten with some of the digital programs compared to when I first encountered them. As mentioned throughout my blogs, I know I'll be utilsiing some of these techniques in future projects for sure! In terms of what to improve on, I think time management and starting things earlier would definitely minimise the frustration of tackling unfamiliar digital softwares.
2 notes
·
View notes
Text
WEEK 8: DIGITAL MODELLING
This week's activities consisted of getting familiar with CAD, specifically 3DS Max in model making. The use of Digital model making as compared to Physical model making allows us to make adjustments and iterations of our models easier and to experiment with different textures and materials which could then be translated into physical models.
Using CAD would especially aid in observing different materials or finishes which would either wise be time consuming to make actual physical models with different materials.
Beginning this activity I was quite nervous since I had barely any prior experience in 3D modelling softwares and since I was using a Macbook this might have served as another issue in controls as the majority of tutorials used a window interface with different controls.
PART 1: BEGINNER STEPS
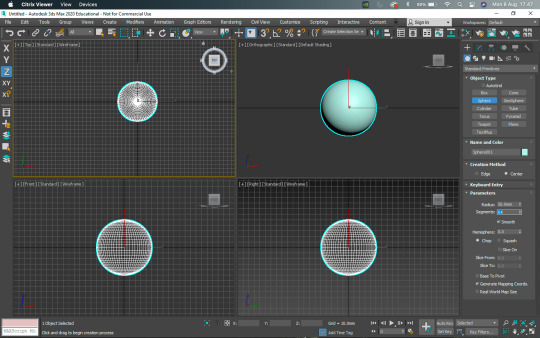
The activity began with making sure our user settings such as units and interface were as needed and to simplify it for tools we were going to be exploring. First thing we were asked to do was creating a sphere and adjusting it's dimensions to the desired size, this step was easily straight forward using the primitives tab and modifying it.
PART 2: EXPERIMENTATION
After creating the Sphere the next step was to explore the modifiers such as squeeze, stretch, bend, melt, twist, taper and skew. This portion was particularly fun as I got to discover what each modifiers did by experimenting visually and to create unique forms. i found that the option to stack and toggle the modifiers to be interesting as we can put a combination of modifier in different manners.


PART 3 : POLYGON MODELLING TOOLS
In this section we explored some other functions of Polygon Modelling such as Extruding, Bevelling, Chamfering, Cloning, Bridging and NURMS. These functions allowed us to create forms that can be cloned then connected via two poly surfaces then create extensions of the forms via Extruding or Bevelling then to smoothen the form via NURMS. This part of the activity was very informational on how to simplify the modelling by understanding the use of each tools, one problem I had while following the tutorial was due to the difference in some commands and interface since i was using a Macbook. Overall, enjoyed this process and found the modelling tools to open a whole new area of possibilities to attempt and explore.


PART 4: APPLICATION
After watching the week 8 tutorial videos, I attempted to create a form which implements some of the things the tutorials showed, in on of the tutorial videos, the lathe function was also demonstrated and from this I experimented by making a mug. this function is especially helpful in creating objects that are identical all around.

Finishing these week's activities I gained more confidence in using 3DSMax and inspired me to further explore 3D modelling since this would aid in making prototypes and models for future projects.
2 notes
·
View notes
Text
Week 8 - Digital Iteration
The first pre-class activity was to watch a video on the development of a razor. Andrew Simpson discussed the use low-fidelity and hi-fidelity models when prototyping the razor. A low-fidelity model is usually a very early prototype that doesn’t accurately represent what the final product will look like and rarely allows for user interaction. However, a hi-fidelity model is a prototype close to what the final product will look like and will perform its intended functions almost exactly.
In this week’s tutorial we were introduced to a new modelling software; Autodesk 3ds Max. I have previously worked with Autodesk Fusion360, Rhino and SketchUp, so this software was new to me. However, there are tools that can be found across all platforms such as offset, chamfer, bevel etc. After getting past the MyAccess drama, I was finally able to have a working version of 3ds Max and began with Part 1 of the tutorial. This was mainly getting used to the interface and learning to set up the viewports and units correctly.
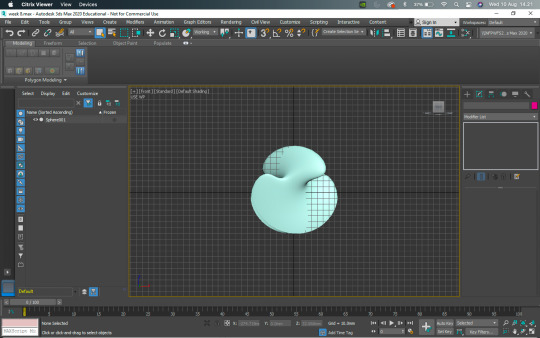
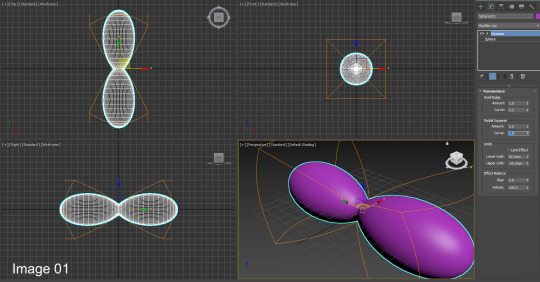
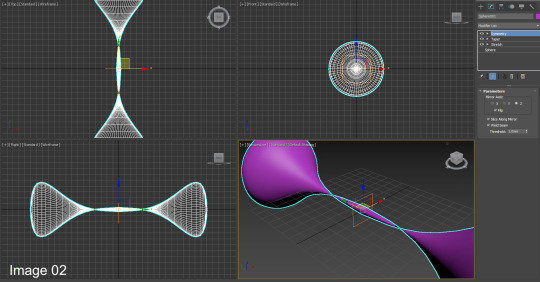
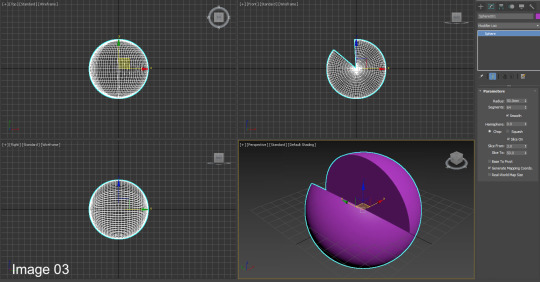
We then started playing around with the different tools such as gizmo, primitives, and modifiers. When experimenting with these different functions, it was interesting to see how changing the values of different elements could drastically change the shape and flow of an object(Images 01-03). For example, I used the melt function on my sphere and played around with the different values and eventually ended up with a donut shape. I also tried stacking the modifiers to see what effect that would have on the sphere. Overall, this section of the tutorial was quite straightforward and easy to follow (apart from 3ds crashing halfway through and not having saved my work).
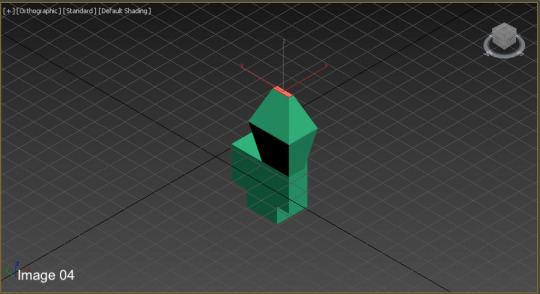
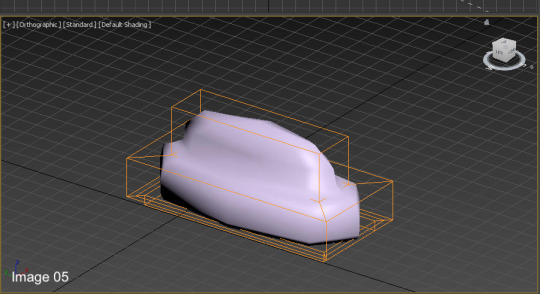
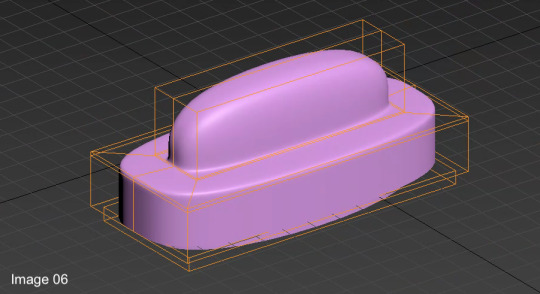
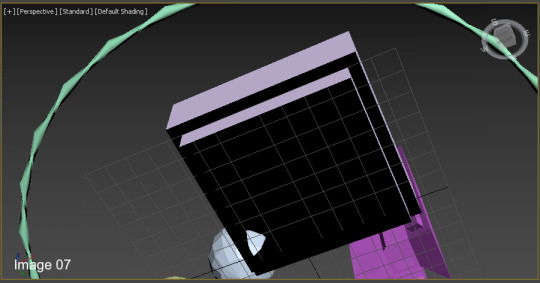
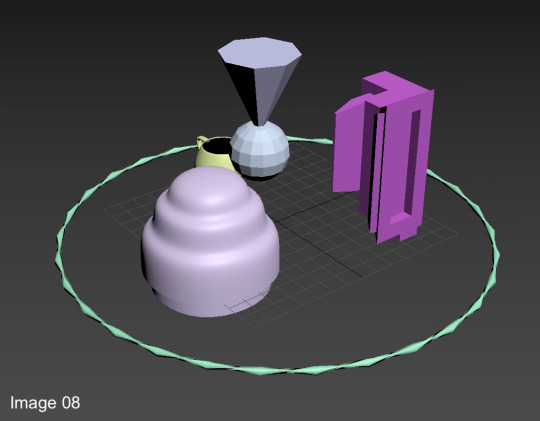
The second part of the tutorial was for creating our own abstract shapes (Image 08) using the new skills we had learnt in Part 1 and in the extra tutorial videos on Autodesk. I found this very enjoyable as I learnt neat shortcuts/tips to make a more aesthetic model. For example, by deleting and/or adding faces onto a polygon, you can create a smoother surface when using the NURMS function (Image 06).
However, next week’s task may be more difficult when we have to create the shape of our Olay moisturizer bottles. This week we were just playing around and creating things on the spot but now that we have a designated shape/design we need to produce, it may be more difficult to create the precise/accurate edges and curves.
11 notes
·
View notes
Text
Autodesk has released 3ds Max 2024

Autodesk has released 3ds Max 2024. New features include:
OCIO colour management is now available as a technology preview, bringing modern colour management solutions throughout Max.
A new boolean modifier is available that allows users to incorporate boolean operations into the modifier stack.
An OpenVDB meshing method is included in the new boolean modifier, providing an alternate wat to calculate operations. OpenVDb booleans are topologically independent of the source geometry and they will often yield good results even when mesh errors are present that would cause standard boolean techniques to fail.
The array modifier is updated with a new Phyllotaxis distribution technique. This type of pattern is frequently seen in nature, particularly in plants and trees.
The array modifier includes a new Material ID rollout that can control the materials IDs on a per-face or per-element basis. Several modes are available including random, sequenced, and the ability to change the ID of the first and last clone in an array and randomise the remainder.
The array modifier can now use a progressive transform mode that increments the transform value for each element.
A new controller allows the user to add multiple Transform controllers to an object as layers of blended animation data. This lets animators add unique animation data to each layer, as well as allows them to control how the layers blend together.
A new material node allows the user to switch between multiple materials using a numeric index.
The motion paths feature that allows users to visualise animation paths has been updated so that it can now be used for all controller types and it works with the new list controllers.
The slate material editor has been overhauled to use QT. As a result, it’s much more customisable and dockable, as well as promising significant speed improvements.
The material editor now includes a new Compound node that allows you to create sub-graphs. These can be used to organise large graphs to aid legibility. Creating a compound is as simple as right-clicking on a selection of nodes and selecting Package Nodes in Compound,
The Modifier list has been improved to use QT and now includes a list search feature so that users can start typing to find the modifier they need.
The Symmetry Modifier‘s default Mirror Axis is now X to better align with artist’s workflows.
STL import is now an impressive 10,000 times faster, and the STL Check modifier is 5000% times faster.
Auto Smooth is now at least 10% faster
The Material Modifier can now be used on splines without them being converted to a mesh. It can now also retain explicit normals when applied to a mesh.
Spline Welding is improved
Retriangulation for Edit Poly and Editable poly is improved as follows: The edit poly modifier now uses the new retriangulation algorithm introduced in Max 2023.2; Editable Poly objects and the Edit Poly modifier now automatically retriangulate faces when a vertex, edge, or face is adjusted in a way that causes edges or hidden faces to cross; New faces that are generated when performing capping are no longer left unsmoothed. Instead, faces are assigned to a new smoothing group; The new traingulation algorithm is now used for face splitting by insertion of edges, Slice, Cut, Bridge, Vertex extrusion, and edge extrusion.
3ds Max 2024 ships with Substance 2.4.10 and Arnold 5.6.0.1
Source: https://blog.superrendersfarm.com/news/autodesk-has-released-3ds-max-2024/
0 notes
Video
vimeo
Leopard 3D Model Animated | PROmax3D from PROmax3D on Vimeo.
Leopard 3d Model Animated - promax3d.com/leopard-3d-model-animated Leopard animated is a high-quality photorealistic 3d model to add more details and realism to your rendering projects. Fully detailed and textured leopard animal 3d model. Detailed enough for close-up renders. Final images rendered with mental ray.
Features: High-quality polygonal model - correctly scaled accurate representation of the original objects. Objects are contained in a layer structure, with the layer having the same name as the product. Model resolutions are optimized for polygon efficiency (in 3ds Max the Mesh Smooth function can be used to increase mesh resolution if necessary). All colors can be easily modified. The model is fully textured with all materials applied. All textures and materials are included and mapped in every format. Max models are grouped for easy selection & objects are logically named for ease of scene management. No part-name confusion when importing several models into a scene. No cleaning up is necessary, just drop the model into your scene and start rendering. No special plug-in is needed to open the scene. Textures formats and resolution: The model is provided with high-resolution texture (color maps are .JPG, and PNG formats):
Leopard_Diffuse_UVs (4096x4096) Lioness-mouth-UVW (4096x4096) Lioness-mouth-Bump (4096x4096) Lioness-mouth-Normal-Map (4096x4096) Nails_UVs (4096x4096) Mesh Totals Body - Polys:4126; Vertices:4179, Whiskers - Polys:84; Vertices:124, Mouth - Polys:3890; Vertices:3974, Nails - Polys:384; Vertices:464, Subtotal: Leopard (Group); - Polys:8484; Vertices:8741.
Total: Leopard (Group) + riggings; - Polys:9927; Vertices:9681.
Rigging and Animation: Rigging was done via the CAT object. Animation done via CAT Motion and Animation Layers...
Frame Rate is NTSC (FPS:30)
WalkAndRun (In CatMotion Editor (the paw icon) you will find the main two layers) Walk (01-48) Run (01-48) +W Walk Run (Adjustment World - Adjustment for a walk and run cycle) +L Walk Run(Local Adjustment Layer - Adjustment for a walk and run cycle) +W Run (Adjustment World - Adjustment for run cycle only. Should be enabled only if you are using Run cycle.) +W Ear Motion (Adjustment World - Ear motion) +W Mouth Closed (Adjustment World - Mouth Closed) +W Eyes Closed (Adjustment World - Eyes Closed) Abs Standing Pose (Absolute layer) Abs Signature Image (Absolute layer) Notes: To activate the animation you have to select any bone first, then select 'Motion' -> 'Layer Manager', after you can select WalkAndRun appropriate ('CATMotion' walk/run-cycle) animation layer... Walk and run have their own separate adjustment layers that should be activated depending on the animals running or walking. Simply turn on or off the animation layers.
Attention: By default, an Absolute layer overwrites the previous layer's animation with a new animation. This means that, with two Absolute layers on the stack, only the second layer has any effect. So, if you wish to use 'CATMotion' walk-cycle animation, you should disable all Abs (Absolute) layers...
0 notes
Text
Week 8 - Digital Iteration
This week we operated on a program called 3d Max. The focus of this task is to develop our CAD skills and be comfortable using and experimenting with the basics of 3ds Max. Getting started with 3ds Max was a little hard to follow since I've never used it before. It took some time but the tutorial files provided definitely helped me in addition with also some research and tutorials online that I found useful.
Pre-class
Andrew Simpson's video on the development of razor illustrates the importance of design process from sketching to model making and how each process is meaningful in their own way. For example, sketches are not able to do certain types of layering while you definitely can with models and models have high tendencies of making mistakes that can't be redone easily while you definitely can with sketches just by starting over on a new page.
Andrew Simpson explains "low fidelity" and "high fidelity". "Low fidelity" can be defined as the models that are created first as low quality such as what we have done with our moisturiser bottles using foam to give uncomplicated information but a good representation of how it could then be refined to create something that is "high fidelity" for the final product with the right materials and ergonomics.
Part 1
Since it is my first time working with 3d Max it took me some time to find the different tabs/panels as usual when working on something for the first time. The only programs I've worked on are SketchUp and Rhino. I would say the layout and viewports are similar to Rhino and also how it functions but quite different from SketchUp when it comes to the layout and setup. However, I think the navigation tools in 3d Max, Rhino and SketchUp are all very similar with minor differences which I found very easy to follow.
For the first part of experimenting, we were asked to create a simple sphere. Trying to find the command panel took an embarrassing lot of time but eventually managed to find it. From there, I really enjoyed experimenting with the different modifiers and messing up the sphere although it was a whole lot of trial and error. Over the course of experimenting, I managed to create something.

It's a drop of water! It looks very simple but I very much enjoyed the process of making it unintentionally. It made me feel that I've just tackled a whole new challenge and another step forward to progression.
Part 2
The second part of the task was to use the modifiers and create random objects. There seems to be no end to making various shapes and forms in 3d Max so I took this advantage to play around with the modifiers and the mesh tools.

I used everything I learnt by using the different modifiers and stacking up modifiers on top of one another during the first experimentation part of the task. In the end, I made something of what looks like a lampshade or could also be a flower pot. Working with 3d Max opens up new design ideas and inspirations that I can apply to industrial Design. Overall, I'm fairly please with the result of my work.
For my next creation I wanted to create something that was more literal and less of an abstract one and had more of a structure in it. I looked up several tutorials on how to make simple objects on YouTube. I recommend watching tutorials on YouTube as part of the process as a visual learner myself because it can help familiarise how to use tools that are often used and overall provides good guidance. I found a tutorial which included majority of the basics I've already learnt but also with tools I hadn't already used yet and also their other functions. This way it was easier for me to follow unlike the other tutorials I watched which included a lot of commands and tools I didn't know how to use yet and took me an insane amount of time with only four minutes into the video.


Although the video was easy to follow, online tutorials still has its limitations. A problem I encountered with my object and the tutorial was the making of the cylindrical spheres of the lego block as I had to do them one by one whereas in the tutorial they only did one and used a tool to multiply them evenly across the surface of the block.
Overall, I think this task was very engaging into putting our CAD skills into test and I totally enjoyed it.
0 notes
Text
Week 8 - Digital Modelling
3ds Max
The exercise this week took the class through the process of modelling with 3ds Max. In the past I have strictly modelled architectural forms with programs such as Revit, ArchiCAD, SketchUp, etc. In completing the task this week I found the modelling process in 3ds Max to be quite different from these other programs I have experience in.
Part 1:
I first started by learning how to create some basic shapes along with how to accurately change their dimensions by altering the parameters.

The next step was to start playing around with the modifiers and discovering what each one of them does and how they behave once stacked on top of one another. The screenshot below shows what happens to a sphere when the twist, squeeze, and Ripple modifiers have been applied.

I continued to play around with the modifiers and materials applying them to different shapes to determine how they interact with different forms.

1 note
·
View note
Text
Week 8 – Digital Iteration
This week we familiarized ourselves with the program 3DS Max. I already have experience with the 3d software Blender, however, due to the different control systems, placement of buttons and differing workflows, the transitions was still some what difficult.
Below: After getting the document set-up as outlined in the tutorial, I added a sphere and rectangular prism primitives. The sphere was dimension to have a 50mm radius while the cube had equal side lengths of 50mm.

Below: After this i started experimenting with the various deformation modifiers. The squeeze, skew, and twist were stacked to create a spiral effect, then the melt modifier was used to simulate the object being melted into its bounding box. My process for finding the modifiers were to look through the modifier drop-down list and experiment with the modifiers that sounded like they would produced interesting results.

Below: After I saw that I still had the cube in the scene, and wanted to see if it was possible to perform a boolean operation between the modified sphere and cube. Using the "compound objects" menu, I was able to perform a simple boolean operation which would subtract the cube from the modified sphere. creating this abstract jagged mountain looking object.

Below: I wanted to render the object out in a product rendering setting. I created a background using a plane with the "EditPoly" modifier to extrude and bevel the plane change. A primary "quad" light was added next to the abstract object and a HDRI environment map was utilized as a fill light.

Below: Finally, I added a chrome preset material to the abstract object, and edited the colour to be blue. The background utilized a diffused pink shader instead. This process used for this project is similar to that which I would use in blender, and through this process I learnt to a greater extent the workflow and quirks of 3DS Max. That being said, Overall, I am not too pleased with my final rendered results. The image is still quite grainy, the materials are very basic and contrast in lighting is stark to the point where the whites are clipped. However, through more practice I will get better at utilizing this program.

0 notes
Photo


This #3dprintable model is available for download here:
https://www.cgtrader.com/3d-print-models/jewelry/pendants/math-object-0066
-- Solid, manifold topology in compliance with 3d Printing rules and standards. -- Welded solid object and bail hoop -- Compatible with 3dsMax 2017 or higher. MAX scene file included. -- MAX scene file contains the LOW POLY version with OpenSubDiv modifier in the stack. -- Dimensions: X =30.76, Y=9.956mm, Z= 37.57mm -- Minimum Thickness: 1.2mm -- Maximum Thickness: 3.5mm
#3d#3d model#3dprinting#3d artist#3ds#3d print#3d printing#3d modeling#3d print model#3d object#3d printable#3d download#cg trader#cg modeling#cg model#cg object#cg jewelry#3d jewelry#printable jewelry#pendant#cg pendant#printable pendant#necklace pendant#math art#math model#Scherk
17 notes
·
View notes
Photo


GENERIC CREW CAB PICKUP TRUCK 19 3D Model
3D model of a crew cab pickup truck. The truck's high detail exterior is great for close up renders, the cabin, chassis and drivetrain have been extensively detailed for close range shots. Handlers have been added to the truck, tailgate, doors, front wheels and fuel door so you can manipulate them for poses. The model was created with 3DS Max 2016 using the open subdivision modifier which has been left in the stack to adjust the level of detail. There are also included HI and LO poly versions in Blender 2.9 format with textures. Exchange files included: FBX, OBJ and 3DS, all with HI and LO subdivision versions. SPECIFICATIONS: The model has 178.000 polygons with subdivision level at 0 and 712.000 at level 1. Elements are logically named and grouped so they can be separated to adjust to your needs. The model contains quads and tris (no N-gons). Scale/transform is set to 100%, units are set to centimeters, texture paths are stripped and and it is made to real world scale. PRESENTATION: Renders were made in 3DSMax with V Ray and Blender with Cycles and have no post processing. Product is ready to render out of the box only in 3DSMax and Blender. Lights and cameras are not included. MATERIALS AND TEXTURES: The model is fully textured and UV mapped with diffuse, bump, roughness and specular maps. All materials and textures are included and mapped in all files but they will render like the preview images only in 3DSMax and Blender versions with V-Ray and Cycles respectively, in the rest of the files they might have to be adjusted depending on the software you are using. Textures are in JPG format with 4096x4096, 2048x2048, 1024x1024 and 512x512 resolution. USAGE: This model is suitable for design visualization, broadcast, forensic presentation, technical demonstrations, etc.
- #3D_Model #Pickup
0 notes
Text
Autodesk 3ds Max 2021 Max Script-Part-3
Autodesk 3ds Max 2021 Max Script-Part-3
Modifier : MAXWrapper and SpacewarpModifier : MAXWrapper The Modifier and SpacewarpModifier families of classes can be created and added to an object’s modifier stack using the addModifier() or modPanel.addModToSelection() methods. Unless otherwise noted, the term modifier will be used to mean members of either class. By making a single modifier and adding it to several objects, you are sharing…

View On WordPress
0 notes