#3mm Wargaming
Text


Litko restocks are up & ready to go!
4.5-inch Elevation Kit (3)
Area of Effect Template Set, Fluorescent Orange (2)
Core Breach Marker
Hazard Stripe Objective Tokens, Gold (5)
Miniature Bases, Hexagonal, 32mm, 3mm Plywood
Missile Salvo Stand, Grey & Translucent White
Overheat Dial Kit Compatible with BT: Alpha, Translucent Red & Gold (2)
Premium Printed Mecha Electronic Countermeasures Token Set (10)
Premium Printed Mecha Electronic Warfare Token Set (20)
Premium Printed Mecha Pilot Skill Check Tokens (10)
Strafe Template Compatible with Battletech, Fluorescent Orange
battletech #alphastrike #ironwindmetals #battletechalphastrike #miniatures #catalystgamelabs #battlemech #battletechminiatures #battletechpaintingandcustoms #mecha #tabletop #tabletopgames #tabletopgaming #wargaming #wargames #hobby #scifi #sciencefiction #miniaturepainting #mech #hovertank #6mmminis #6mmscifi #feldherr #dougram #gundam #robotech #armypainter #thearmypainter #chessex
0 notes
Text
Miniature Medieval Town Diorama (3mm Scale)
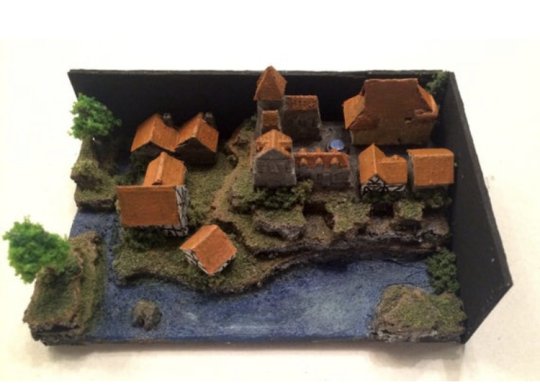
Miniature Medieval Town Diorama (3mm Scale)
Era: Medieval Era
Description: Medieval town diorama with eight buildings. The diorama is made from wood, plastic, poster board, cork, canvas, paper, and foliage. Measures 3 inches by 5 inches, and approximately 2 inches high.
This medieval town diorama takes you back to an idyllic setting. Makes a wonderful gift for medieval history or fantasy enthusiasts. This beautiful diorama took hours to make, and now you can enjoy this one of a kind work of art, for either your home or office.
Scale: 3mm figure height (1/600 Scale)
Type: Diorama - Wargame Scenery or Terrain Tile
Inventory: One of a kind custom made diorama. SOLD
Request a similar diorama: Medieval Wargame Scenery Tile Commission (3mm 1:600 scale)
Read the full article
0 notes
Photo


3mm Cybershadows Stalkers, painted by Thaddeus Gregory Blanchette
Jaeger Stalkers available here
Jackal Stalkers available here
2 notes
·
View notes
Text
Tutorial! Post-apocalyptic Roads, part 2:
Hey there, I'm back with part two of my tutorial on how to make cheap and easy roads for post apocalyptic wargaming! Part 2 is about painting - here we go!
Last time we got to the point of undercoating the roads with matt black spray. Now time to grab the stuff you need:
* acrylic paint - light grey, black, brown, white
* masking tape (the thinner one about 1" wide)
* big old DIY-styke paintbrush, I used a 1" wide brush
* sponge - I used a bit of a kitchen sponge with the scourer bit torn off
* steel ruler & pencil
So! Step one is to mix up a nice dark grey with a hint of brown in it - not too much. I used black and light grey acrylic mixed and added brown until I was happy with the colour. Then just do a nice drybrush over the whole surface. It's tough and ready, but any major mistakes can be covered up, and besides road surfaces are rarely uniform anyways.

Then I do another lighter drybrush with just the light grey acrylic, concentrating on the edges of the damaged bits especially.

If you're doing a lot of roads I would do them all at the same time if you have the space, because it ensures that they roads match up colour-wise.
After this step, I left the roads 24 hours to thoroughly dry, as I didn't want the masking tape used in the next step to pull any paint off.
After 24 hours, time to do road markings. Now, a note here: mine are really basic road markings and probably don't really match any from any country. You can obviously adapt this system for yourself.
I used a couple of off-cuts of cork the same width as the roads to make some markers for the lines. Mine are 6mm wide so I marked the middle of the 4" road off-cuts and then marked 3mm on each side.

You can just about see the pencil lines on there. With an off-cut at each end of the road, I put my steel ruler between the markings to act as a guide for laying out two long pieces of masking tape.

There's the centre line for the road markings. I decided to make my white lines 1 inch long, and in order to keep the lines uniformly spaced that means having a 1/2 inch bit of bare asphalt at each end, then dividing the remaining space into inches.

Here's the spacing I've marked on the masking tape (gently so as not to sent the cork underneath). Then put more tape on to cover the areas that are bare asphalt between the white lines - as you can see, there's a half-inch on each end and then it's staggered along. Unfortunately my masking tape isn't exactly 1" wide so I had to do two pieces overlapped slightly.

Now that's done, time to paint! With the sponge I dabbed light grey acrylic into the gaps. It's important to only use a little paint (wipe most of it off the sponge with a paper towel - this is like drybrushing. Drysponging?) If you use too much paint it can sleep under the masking tape.

Then use white acrylic and the sponge for the next step.

If you're careful you can peel the masking tape off while the paint's still wet. Here's the result!

If you're *really* careful and managed to peel off the tape in one piece you can even re-use the masking tape 'ladder' to stick onto the next road section.
Hope you liked the tutorial! You can add extra details too, like tyre skid-marks and cracks etc, which i will detail next time, but you can use them like this and they look pretty good all together!
#wargames#wargaming#wargame#miniatures#painting#28mm#minis#painting minis#painting miniatures#28mm miniatures#28mm minis#tabletop#scenery#terrain#tabletop gaming#wargames terrain#hobby#wargames scenery#making terrain
3 notes
·
View notes
Photo

Almost three hours to magnetise a few torso and arms, what a nightmare, 3mm drill bit is about as sharp as a spoon! - - #spacehulk #40ktermimator #wh40k #wargames #tabletopgames (at Prudhoe) https://www.instagram.com/p/CPeC-Iin3Cl/?utm_medium=tumblr
0 notes

Text
Choosing a Wargame’s Period and Scale?

(This article is credited to Jason Weiser. Jason is a long-time wargamer with published works in the Journal of the Society of Twentieth Century Wargamers; Miniature Wargames Magazine; and Wargames, Strategy, and Soldier.)
Choosing a period of which to wargame is ultimately a personal decision that should not be taken too lightly. In the end, it’s going to be something that you’re going to sink some money into, either into hex and counter wargames on the topic or miniatures and assorted terrain. I would say the most important factor to consider is: What periods in history do you enjoy?
Of course, there are other considerations, as well. As you read one, we’ll take a look at some of the aspects of wargaming you’ll need to keep in mind when choosing a period and scale.
How well-known is your conflict?
There are more resources, games, books, and figures out there to game out the Napoleonic Wars than, say, the War of the Spanish Succession. That’s not to say there aren’t resources out there, but they will be harder to find and will be somewhat more expensive in the case of books. But, all wargamers have what we call “gonzo projects,” mine being the Russian Civil War, inspired by way too many viewings of Dr. Zhivago!
How patient of a painter are you?
Do you like to spend a lot of time on the smaller details? For certain periods, like the Renaissance or the 18th and early 19th centuries, there are a ton of small details and uniforms. Especially in the Renaissance era, there are ample details to challenge even the best painters. Then you have the Napoleonic era armies, which are riots of color and detail. Uniforms reached their ornate heights in this period, and in the larger scales (20mm and larger), you will be painting a ton of details. However, the 20th century and subsequent generations are a lot easier to paint, with drab and less decorative uniforms. That said, I’ve seen some 20mm World War II efforts that make me despair about my own efforts to paint miniatures.
How is your eyesight?
If it’s not great, you’re best to stick to the larger scales as they’re easier to paint in some respects. But then again, you have more details to paint, so any mistakes are going to be a lot more obvious.
What’s your budget?
Naturally, with smaller scales, you get a lot more for your money, and you can put together larger armies faster.
How much space do you have to play?
If you’re gaming on a card table in your studio apartment, where space is a premium, you’ll need to consider the amount of pliable space you actually have. In this case, I’d go with a smaller scale. Unfortunately, space is a hard limit on the games you can play.
I’d love to run larger games, but my townhouse is only so big!
A Matter of Scale
With considerations out of the way, let’s quickly discuss the various miniatures scales. I won’t be getting into air or naval wargaming scales as I just got into air wargaming (yes, there is such a thing, and there are multiple boardgames and miniatures rules on the topic), and naval wargaming, especially for WWII, can become quite expensive (The US Navy at its height in WWII was ginormous, with 20 carriers in the Pacific alone in 1945!). For infantry miniatures, the measurement of 6 or 15mm is a measurement from the toes of the miniature to eye level. It’s an odd standard, I know, but it’s tradition!
3mm

Also known as 1/600, this scale is quite small. With manufacturers like Oddizal Osmy, you get quite a lot for very little cost. For rules where one model vehicle represents five actual vehicles, you could actually put the real number of vehicles on a small wooden or metal base and run the rules as-is. Now, I will say doing more than a monochrome pattern on these is probably a recipe for eye strain and frustration. The good news? You could probably paint these in an afternoon with a primer coat and a pass with an airbrush or spray paint can.
6mm

They’re a little bigger and have been the smaller option for gamers for a long time. The infantry is still small and fragile, and I’d really not recommend doing too much detail here, but the tanks here lend themselves to painting some detail. Again, less is more at this scale. That said, I’ve seen some really beautiful work completed on 6mm models.
10mm

This is a scale that’s somewhat new to the U.S. British gamers have been playing with it for a while, and it’s a nice compromise between 6mm and 15mm for size versus detail and cost. That said, I have not seen it in the flesh myself, but I have seen a lot of images on the internet, and some of the new Cold War-era sculpts coming out of Plastic Soldier Company have me rather intrigued. (Then again, I do that period in two scales already, I’d be a bit daft to do it in a third scale!)
15mm

This is a go-to scale for a lot of gamers. Flames of War and Team Yankee have their official miniatures in this scale, and a lot of traditional wargamers run this scale in just about every period under the sun.
Many wargamers cut their teeth on this scale. It’s a very good balance between cost, detail, and bang for the buck. That said, like most wargaming scales, “15mm” is relative. The truth is, there’s a concept called “scale creep” in wargaming. One manufacturer’s 15mm is not always going to play well with another manufacturer’s 15mm! There are ways around this, but it pays to ask around before you buy, or just stick to one manufacturer.
20mm

This is my chosen scale for a lot of projects. Why? Well, when you’re a kid just starting out in wargaming and you only have so much money, you can get a lot of terrain and soft plastic figures to fill out your armies fast for very little money. And there are model kits galore to build to fill out vehicle parks for WWII and beyond!
That said, you’re going to spend a bit more than you would for 15mm, and metal 20mm manufacturers are all based in England. I have a friend who gives me quite a hard time about this (jokingly of course!)
25/28mm

Ok, now the opinions on this scale are very much mine. This scale has a lot going for it. It’s big, it makes for a nice spectacle if you have space, and there’s a lot of periods for it. Not to mention, it’s another traditional wargaming scale. That said, it’s also one of those scales where one guy’s 25 or 28mm may not match another fellow. And worse, the creep in scale has created a whole new scale, called 28mm or “heroic” scale.
I don’t game in this scale, as personally, for what you shell out per figure, I can get four in 20mm. That said? There’s a lot out there for it these days, and if you fancy yourself a good painter, you can make figures in this scale shine. I have loved seeing 25 or 28mm Napoleonic or Civil War figures on a table. They’re a sight to see.
54mm

This is the traditional “toy soldier” or collector scale. But don’t scoff at wargaming in this scale. The truth is, there are people who do, and I have gamed with them. I must say, the spectacle is there in this scale. And it’s not as expensive as you might think, especially if you go the plastic figure route. That said, the advice on soft plastic and painting is a must.
Well, that’s it for now. I’ll muse more on this sort of thing as time goes on. And we’ll also get into the practical advice as well. Trust me, there’s plenty to cover when it comes to wargaming.
At SJR Research, we specialize in creating compelling narratives and provide research to give your game the kind of details that engage your players and create a resonant world they want to spend time in. If you are interested in learning more about our gaming research services, you can browse SJR Research’s service on our site at SJR Research.
0 notes
Text
MDF URBAN RUINS SCENERY! PWORK MDF TERRAINS!
MDF URBAN RUINS SCENERY! PWORK MDF TERRAINS!
https://www.pworkwargames.com/en/22-city-ruins-scenery-terrain


MDF Scenery - Urban Ruins is a new line of 3D scenery terrain sets consisting in some different scenic elements made in MDF material, ideal for fantasy, historical or science-fiction settings; three Urban Ruins kits are available, each one including ruined buildings and remains of a collapsed walls. Each kit is composed by a different number of 3D scenic elements, from 4 to 12 terrain elements.
Check also the kits bundles, to have more kits with a little discount!
With MDF Scenery - Urban Ruins you can make your battles more realistic and more engaging! You can set on your mat awesome fights among a city in ruins!
Never stop playing!


#Pwork Wargames#Pwork#wargames#wargaming#terrain#tabletop#scenery#scenic elements#terrain scenery#boardgame#boardgames#battle terrain#mat#mats#battle mats#MDF#3mm MDF#city ruins#ruins#urban ruins#urban#cityfight#skirmish#SciFi#Sci-Fi#science fiction#historical#gothic#Warhammer 40000#Warhammer 40k
0 notes
Last Seen Blogs

klmkreations
KLMKreations

iusedtohaveatopic
Brain cells? Not quite.

kichessarjilian
...

proactivehealthcarerecruiters
Healthcare Recruitment Agency

barbandrich
Photographic journey of a couple